caffe编译遇到的问题(持续更新)
问题:opencv2/highgui/highgui_c.h: No such file or directory
解决办法:
需要安装opencv
sudo apt-get install libopencv-dev
问题:“libgdal.so.20: symbol TIFFReadRGBATileExt version LIBTIFF_4.0 not defined in file libtiff.so.5 with link time reference”
度娘搜一下发现没有相关问题的解决方法,换谷哥搜,找了个排在前面的链接,找到的原因是libtiff.so.5这个库加载错了,matlab自带的libtiff.so.5里没有LIBTIFF_4.0,而系统库里有,按照他说的搜了一下两个地方的libtiff.so.5,用strings查找了一下还真是这样子。解决方法同libstdc++.so.6一样,export LD_PRELOAD那一行后面加上正确的libtiff.so.5。make mattest成功!
问题:fatal error: pyconfig.h: 没有那个文件或目录
解决:
如果使用Anaconda ,那么导入
make clean
export CPLUS_INCLUDE_PATH=/home/你的/anaconda3/include/python3.7m
make all
原因
python路径都改为了anaconda的路径,但是CPLUS的path没有设置,系统中我也没把aneconda设置成默认的python导致的。
问题:
Makefile:563: recipe for target '.build_release/src/caffe/test/test_smooth_L1_loss_layer.o' failed
打开这个文件删掉第11行报错的头文件
#include “caffe/vision_layers.hpp”
问题:
Invalid MEX-file '/home/abc/caffe/matlab/+caffe/private/caffe_.mexa64': /usr/lib/libgdal.so.20:
symbol TIFFReadRGBATileExt version LIBTIFF_4.0 not defined in file libtiff.so.5 with link time
reference
回答 :
export LD_PRELOAD=/usr/lib/x86_64-linux-gnu/libtiff.so.5:/usr/lib/x86_64-linux-gnu/libstdc++.so.6
问题:
make runtest
undefined symbol: _ZN5caffe3NetIfE21CopyTrainedLayersFromERKNSt7__cxx1112basic_stringIcSt11char_traitsIcESaIcEEE
回答 :
I add a line NVCCFLAGS += -G to Makefile and it changes from
...
# Debugging
ifeq ($(DEBUG), 1)
        COMMON_FLAGS += -DDEBUG -g -O0
        NVCCFLAGS += -G
else
        COMMON_FLAGS += -DNDEBUG -O2
endif
...
to
...
# Debugging
ifeq ($(DEBUG), 1)
        COMMON_FLAGS += -DDEBUG -g -O0
        NVCCFLAGS += -G
else
        COMMON_FLAGS += -DNDEBUG -O2
        NVCCFLAGS += -G
endif
...
Then, compiling caffe again... and make runtest passes without failure!
问题:
convert_imageset.cpp:(.text._ZN6google17MakeCheckOpStringImiEEPSsRKT_RKT0_PKc[_ZN6google17MakeCheckOpStringImiEEPSsRKT_RKT0_PKc]+0x50):对‘google::base::CheckOpMessageBuilder::NewString()’未定义的引用
.build_release/tools/convert_imageset.o:在函数‘_GLOBAL__sub_I_convert_imageset.cpp’中:
convert_imageset.cpp:(.text.startup+0x121):对‘google::FlagRegisterer::FlagRegisterer<std::string>(char const*, char const*, char const*, std::string*, std::string*)’未定义的引用
convert_imageset.cpp:(.text.startup+0x289):对‘google::FlagRegisterer::FlagRegisterer<std::string>(char const*, char const*, char const*, std::string*, std::string*)’未定义的引用
.build_release/tools/convert_imageset.o:在函数‘main’中:
convert_imageset.cpp:(.text.startup+0x367):对‘google::SetUsageMessage(std::string const&)’未定义的引用
convert_imageset.cpp:(.text.startup+0xd81):对‘google::protobuf::MessageLite::SerializeToString(std::string*) const’未定义的引用
.build_release/lib/libcaffe.so:对‘google::protobuf::Message::InitializationErrorString() const’未定义的引用
.build_release/lib/libcaffe.so:对‘google::protobuf::internal::WireFormatLite::WriteStringMaybeAliased(int, std::string const&, google::protobuf::io::CodedOutputStream*)’未定义的引用
.build_release/lib/libcaffe.so:对‘google::protobuf::io::CodedInputStream::SetTotalBytesLimit(int, int)’未定义的引用
.build_release/lib/libcaffe.so:对‘google::protobuf::io::CodedOutputStream::WriteStringWithSizeToArray(std::string const&, unsigned char*)’未定义的引用
回答 :
我的版本是
protobuf=3.4.1 与 gcc/g++=4.9
将gcc与g++升级为5,
使用如下命令安装gcc、g++
sudo apt install g++-5
sudo apt install gcc-5
链接gcc、g++:
cd /usr/bin
sudo rm gcc
sudo ln -s gcc-5 gcc
sudo rm g++
sudo ln -s g++-5g++
查看现有的gcc和g++版本
gcc --version
g++ --version
sudo ldconfig
make clean
make all
问题:
Invalid MEX-file '/home/abc/caffe/matlab/+caffe/private/caffe_.mexa64': libcudnn.so.7: 无法打开共享对象文件: 没有
那个文件或目录
回答 :
使用sudo ldconfig /usr/local/cuda-9.0/lib64/命令的时候提示如下的错误
/sbin/ldconfig.real: /usr/local/cuda-9.0/lib64/libcudnn.so.7 不是符号连接。
采用如下的命令进行解决:
sudo ln -sf /usr/local/cuda-9.0/lib64/libcudnn.so.7.x.x(这个地方要查阅以下自己的安装版本
)/usr/local/cuda-9.0/lib64/libcudnn.so.7
再次执行sudo ldconfig /usr/local/cuda-9.0/lib64/的时候没有提示即成功.
make runtest.
pass!
问题:
安装 libstdc++ 时,得到错误:下列软件包有未满足的依赖关系: libstdc++-4.8-doc : 冲突: libstdc++6-4.7-doc.
回答 :
首先运行这些命令
sudo apt-get update && sudo apt-get upgrade


sudo apt-get install build-essential


sudo apt-get install aptitude
然后尝试
sudo apt-get install libstdc++6问题:
Invalid MEX-file '/home/abc/caffe/matlab/+caffe/private/caffe_.mexa64': /usr/local/MATLAB/R2015b/bin/glnxa64/../../sys/os/glnxa64/libstdc++.so.6: version
`CXXABI_1.3.8' not found (required by /home/abc/caffe/matlab/+caffe/private/caffe_.mexa64)
解决:
export LD_PRELOAD=/usr/lib/x86_64-linux-gnu/libtiff.so.5:/usr/lib/x86_64-linux-gnu/libstdc++.so.6
如果还不可以,再:
在Matlab目录下,建立关于libstdc++.so.6的超链接文件。
# ln -sf /usr/lib/x86_64-linux-gnu/libstdc++.so.6 /usr/local/MATLAB/R2014a/bin/glnxa64/libstdc++.so.6 1 错误:
protoc: error while loading shared libraries: libprotoc.so.10: cannot open shared object file: No such file or directory
解决:
解决办法:export LD_LIBRARY_PATH=/usr/local/lib
2. 错误:
/sbin/ldconfig.real: /usr/local/cuda-8.0/lib64/libcudnn.so.5 不是符号连接
解决:
在sudo ldconfig时遇到
usr/local/cuda-8.0/lib64/libcudnn.so.5 不是符号连接的问题,解决办法也很简单,重新建立链接并删除原链接
首先找到usr/local/cuda-8.0/lib64/目录,搜索 libcudnn 然后发现
两个文件
libcudnn.so.5 和libcudnn.so.5.0.5 理论上只有一个libcudnn.so.5.0.5
终端执行
ln -sf /usr/local/cuda-8.0/lib64/libcudnn.so.5.0.5 /usr/local/cuda-8.0/lib64/libcudnn.so.5
ln -sf /usr/local/cuda-8.0/lib64/libcudnn.so.5.0.5 /usr/local/cuda-8.0/lib64/libcudnn.so.5
再sudo ldconfig时就可以了,这时候会发现usr/local/cuda-8.0/lib64/目录下只有
libcudnn.so.5.0.5 文件了,libcudnn.so.5消失了。
1:错误:
.build_release/tools/caffe: error while loading shared libraries: libhdf5.so.10: cannot open shared object file: No such file or directory
解决:
echo "export LD_LIBRARY_PATH=/home/abc/anaconda2/lib:$LD_LIBRARY_PATH" >>~/.bashrc
2.错误:
/usr/lib/x86_64-linux-gnu/libopencv_highgui.so:对‘TIFFOpen@LIBTIFF_4.0’未定义的引用
/usr/lib/x86_64-linux-gnu/libopencv_highgui.so:对‘TIFFReadEncodedStrip@LIBTIFF_4.0’未定义的引用
/usr/lib/x86_64-linux-gnu/libopencv_highgui.so:对‘TIFFSetField@LIBTIFF_4.0’未定义的引用
/usr/lib/x86_64-linux-gnu/libopencv_highgui.so:对‘TIFFSetWarningHandler@LIBTIFF_4.0’未定义的引用
/usr/lib/x86_64-linux-gnu/libopencv_highgui.so:对‘TIFFSetErrorHandler@LIBTIFF_4.0’未定义的引用
collect2:错误:ld返回1
make:*** [.build_release/tools/extract_features.bin]错误1
解决:
这个可能是权限问题,采用以下指令:
sudo su;
make all ;
make test ;
make runtest ;
make pycaffe;
一切都能顺利解决
4.错误:
python/caffe/_caffe.cpp:1:52:致命错误:Python.h:没有那个文件或目录
编译中断。
make:*** [python/caffe/_caffe.so]错误1
解决:
执行:sudofind / -name 'Python.h'找到他的路径,
在Makefile.config的PYTHON_INCLUDE加上/home/abc/anaconda2/include/python2.7\(路径是自己的)
5.错误:
import caffe时:
ImportError:No module named skimage.io
解决办法:
可能是我们没有安装所谓的skimage.io模块,所以可以用以下的命令来安装:
pip install scikit-image
关掉终端,重新进入再编译
或者:sudo pip install scikit-image
另一种方法:
sudo apt-get install python-skimage
6.错误:
importcaffe
Traceback(most recent call last):
File"<stdin>", line 1, in <module>
ImportError:No module named caffe
解决:
echo'export PATH="/home/abc/caffe-master/python:$PATH"' >>~/.bashrc
source~/.bashrc
关掉终端,重新进入再编译
7.错误:
InvalidMEX-file'/home/abc/caffe-master/matlab/+caffe/private/caffe_.mexa64':libhdf5.so.10: cannot open
sharedobject file: No such file or directory
解决:
在linux下输入:
ldd /home/abc/caffe-master/matlab/+caffe/private/caffe_.mexa64
在matlab的命令窗口输入:
!ldd /home/abc/caffe-master/matlab/+caffe/private/caffe_.mexa64 /home/abc/caffe-master/matlab/+caffe/private/caffe_.mexa64
看看哪个文件没有找到依赖项。我的是libhdf5.so.10他no found然后再看看在linux下他的默认链接是哪一个:
libhdf5.so.10=> /home/abc/anaconda2/lib/libhdf5.so.10
然后:
sudo cp /home/abc/anaconda2/lib/libhdf5.so.10 /usr/lib/x86_64-linux-gnu
再在matlab窗口下看他又没有找到,一般就可以了。
這個命令
strings /usr/lib/x86_64-linux-gnu/libstdc++.so.6 | grep GLIBCXX的結果是:
GLIBCXX_3.4.19
GLIBCXX_3.4.20
GLIBCXX_3.4.21
GLIBCXX_DEBUG_MESSAGE_LENGTH
8.错误
Checkfailed: error == cudaSuccess (2 vs. 0) out of memory
***Check failure stack trace: ***
@ 0x7fcd92132daa (unknown)
解决:
一次性读入的图片太多了,所以就超出了显存。因此需要将train.prototxt中的文件train和test的batch_size调小一点。
9.错误:
在生成lmdb时:
E0502 00:10:19.496055 5957 io.cpp:80] Could not open or find file /home/abc/caffe-master/data/mushroom/test1/2__09.png 0
解决方案:
1.检查数据图像存放的路径是否填写正确
2.在txt文件里面,图像路径与图像标签是否用空格” “分隔,“\t”分隔会出现此类错误(caffe版本更新,改变了分隔符号)
10.错误:
安装ubuntu14.04之后做的第一件事就是更新源,于是从网上找到来网易的源,结果更新后出现如下错误:W: 无法下载 http://mirrors.163.com/ubuntu/dists/trusty-security/main/binary-i386/Packages Hash 校验和不符
W: 无法下载 http://mirrors.163.com/ubuntu/dists/trusty-security/universe/binary-i386/Packages Hash 校验和不符。。。。。。。。。。。。。。。。。。。。。
解决:
更新软件源
11.为了防止报错“E:软件包gcc还没有可供安装的候选者”
使用如下命令修改资源
sudo gedit /etc/apt/sources.list
在打开的文件中添加如下几行
deb http://mirrors.ustc.edu.cn/ubuntu xenial main
deb http://mirrors.ustc.edu.cn/ubuntu xenial universe
deb http://dk.archive.ubuntu.com/ubuntu/ xenial main
deb http://dk.archive.ubuntu.com/ubuntu/ xenial universe
使用如下命令更新源
sudo apt update
2、 使用如下命令安装gcc、g++
sudo apt install g++-4.9
sudo apt install gcc-4.9
链接gcc、g++实现降级
cd /usr/bin
sudo rm gcc
这里版本号根据你安装的来定,实际情况中可以通过查看/usr/bin目录下gcc的包名字来定
sudo ln -s gcc-4.9 gcc
sudo rm g++
sudo ln -s g++-4.9 g++
查看现有的gcc和g++版本
gcc --version
g++ --version
12。问题:
Makefile:588: recipe for target ‘.build_release/cuda/src/caffe/layers/embed_layer.o’ failed
make: * [.build_release/cuda/src/caffe/layers/embed_layer.o] Error 1
/usr/include/string.h: In function ‘void* __mempcpy_inline(void*, const void*, size_t)’:
/usr/include/string.h:652:42: error: ‘memcpy’ was not declared in this scope
return (char *) memcpy (__dest, __src, __n) + __n;
这个问题疑似跟Ubuntu16.04的版本有关系,google到一个方法:在caffe的Makefile里面第409行(我的)
NVCCFLAGS += -ccbin=$(CXX) -Xcompiler -fPIC $(COMMON_FLAGS)更改为
NVCCFLAGS += -D_FORCE_INLINES -ccbin=$(CXX) -Xcompiler -fPIC $(COMMON_FLAGS)13. 错误
ubuntu16.04配置MATLAB2016amatest问题:
在修改makefile里面的CXXFLAGS(大约410行),添加CXXFLAGS += -std=C++11后,直接 make matcaffe 。最后编译成功。
14.问题:
刚开始我是直接在终端输入:
[plain] view plain copy
- export LD_LIBRARY_PATH=/usr/lib/x86_64-linux-gnu/:/usr/local/cuda-8.0/lib64
- export LD_PRELOAD=/usr/lib/x86_64-linux-gnu/libopencv_highgui.so.2.4:/usr/lib/x86_64-linux-gnu/libopencv_imgproc.so.2.4:/usr/lib/x86_64-linux-gnu/libopencv_core.so.2.4:/usr/lib/x86_64-linux-gnu/libstdc++.so.6:/usr/lib/x86_64-linux-gnu/libfreetype.so.6
然后再 make mattest 成功,但是关掉终端后再打开测试还是会有同样的错误,于是我就直接在系统文件里面加入路径。
首先终端输入:
[plain] view plain copy
- sudo gedit ~/.bashrc
然后把如下两个路径加到文件最下面。
[plain] view plain copy
- export LD_LIBRARY_PATH=/usr/lib/x86_64-linux-gnu/:/usr/local/cuda-8.0/lib64
- export LD_PRELOAD=/usr/lib/x86_64-linux-gnu/libopencv_highgui.so.2.4:/usr/lib/x86_64-linux-gnu/libopencv_imgproc.so.2.4:/usr/lib/x86_64-linux-gnu/libopencv_core.so.2.4:/usr/lib/x86_64-linux-gnu/libstdc++.so.6:/usr/lib/x86_64-linux-gnu/libfreetype.so.6
保存 退出,重启电脑。make mattest成功了。
15.错误
import caffe时错误提示
ImportError: No module named google.protobuf.internal
解决方式:
sudo pip install easydict
sudo pip install protobuf
16.错误
MATLAB_DIR must be specified in Makefile.config to build matcaffe.
make: *** [matlab/+caffe/private/caffe_.] 错误 1
解决方法:打开caffe-master 文件夹下的Makefile.config文件,找到有MATLAB_DIR:所在行:# MATLAB_DIR := /usr/local/MATLAB/R2014a,将该行的注释去掉。完美解决!
17.问题
symbol lookup error: /home/caffe/anaconda/lib/libreadline.so.6: undefined symbol: PC – caffe安装错误解决办法:
先执行命令locate libreadline.so.6 然后会发现比如系统目录下:/lib/x86_64-Linux-gnu/libreadline.so.6会有这个文件
然后cp /lib/x86_64-linux-gnu/libreadline.so.6 ~/anaconda/lib
完美解决!
18 问题:
/home/abc/anaconda2/lib/libstdc++.so.6: version `GLIBCXX_3.4.20' not found (required by /home/abc/caffe-1/.build_release/tools/../lib/libcaffe.so.1.0.0)。执行:$ strings /home/abc/anaconda3/bin/../lib/libstdc++.so.6 | grep GLIBCXX 会发现:GLIBCXX_3.4.。。。GLIBCXX_3.4.19GLIBCXX_FORCE_NEWGLIBCXX_DEBUG_MESSAGE_LENGTH没有3.4.20
解决办法:
$ conda install libgcc
安装后:
$ strings /home/abc/anaconda3/bin/../lib/libstdc++.so.6 | grep GLIBCXX
结果:GLIBCXX_3.4.19GLIBCXX_3.4.20GLIBCXX_3.4.21
解决!
19.问题:
在caffe的make run test时error while loading shared libraries: libcudnn.so.5: cannot open shared object file: No such file ordirectory
解决:
1. export LD_LIBRARY_PATH=/usr/local/cuda-8.0/lib64:$LD_LIBRARY_PATH
2. $ sudo echo "/usr/local/cuda-8.0/lib64" > /etc/ld.so.conf.d/cuda.conf
3. $ sudo ldconfig
20.问题:
>>> import caffe
Traceback (most recent call last):
File "<stdin>", line 1, in <module>
ImportError: No module named 'caffe'
解决:export PYTHONPATH=/home/abc/caffe-master/python:$PYTHONPATH
21.错误
“fatal error: hdf5.h: 没有那个文件或目录”解决方法
Step 1
在Makefile.config文件的第95行,添加/usr/include/hdf5/serial/ 到INCLUDE_DIRS。版本不同可能代码有差别。
INCLUDE_DIRS := $(PYTHON_INCLUDE) /usr/local/include  /usr/include/hdf5/serial
LIBRARY_DIRS := $(PYTHON_LIB) /usr/local/lib /usr/lib /usr/lib/x86_64-linux-gnu/hdf5/serial
Step 2
在Makefile文件的第173行,把 hdf5_hl 和hdf5修改为hdf5_serial_hl 和hdf5_serial,也就是把下面第一行代码改为第二行代码。
LIBRARIES += glog gflags protobuf boost_system boost_filesystem m hdf5_hl hdf5
LIBRARIES += glog gflags protobuf boost_system boost_filesystem m hdf5_serial_hl hdf5_serial
22.错误
blob size exceeds INT_MAX:
hdf5过大问题
23.错误
Makefile:572:recipe for target ‘.build_release/lib/libcaffe.so.1.0.0’ failed
collect2: error: ld returned 1 exit status
Makefile:572:recipe for target ‘.build_release/lib/libcaffe.so.1.0.0’ failed
make: * [.build_release/lib/libcaffe.so.1.0.0] Error 1
解决:参照错误21.
24.错误
编译MATLAB的make mattest出错:
Error in caffe.set_mode_cpu (line 5)
caffe_('set_mode_cpu');

Error in caffe.run_tests (line 6)
caffe.set_mode_cpu();

>> Exception in thread "AWT-EventQueue-0" java.lang.RuntimeException: com.mathworks.services.settings.SettingValidationException: IMsgIDException for "matlab.workingfolder.LastFolderPath": Internal Error: No write permission on directory /home/ubuntu/.matlab/R2017a/temp0x9290x2244. Details: fl:filesystem:AccessDenied.
	at com.mathworks.mlwidgets.prefs.InitialWorkingFolder.setStringSettingValue(InitialWorkingFolder.java:52)
	at com.mathworks.mlwidgets.prefs.InitialWorkingFolder.access$000(InitialWorkingFolder.java:15)
	at com.mathworks.mlwidgets.prefs.InitialWorkingFolder$1.actionPerformed(InitialWorkingFolder.java:34)
Caused by: com.mathworks.services.settings.SettingValidationException: IMsgIDException for "matlab.workingfolder.LastFolderPath": Internal Error: No write permission on directory /home/ubuntu/.matlab/R2017a/temp0x9290x2244. Details: fl:filesystem:AccessDenied.
	at com.mathworks.services.settings.Setting.nativeSet(Native Method)
	at com.mathworks.services.settings.Setting.set(Setting.java:913)
	at com.mathworks.services.settings.Setting.set(Setting.java:769)
	at com.mathworks.services.settings.Setting.set(Setting.java:709)
	at com.mathworks.mlwidgets.prefs.InitialWorkingFolder.setStringSettingValue(InitialWorkingFolder.java:50)
	... 24 more
解决:切换到root用户再试一下。再有错参考问题14
25.问题描述:
error while loading shared libraries: libcudart.so.8.0: cannot open shared object file: No such file or directory
解决:
将相应的库文件复制到/usr/lib
sudo cp /usr/local/cuda-8.0/lib64/libcudart.so.8.0 /usr/local/lib/libcudart.so.8.0 && sudo ldconfig
sudo cp /usr/local/cuda-8.0/lib64/libcublas.so.8.0 /usr/local/lib/libcublas.so.8.0 && sudo ldconfig
sudo cp /usr/local/cuda-8.0/lib64/libcurand.so.8.0 /usr/local/lib/libcurand.so.8.0 && sudo ldconfig
ps. ldconfig命令是一个动态链接库管理命令,是为了让动态链接库为系统共享
26.问题:
MEX-file '/home/zhangjiqing/caffe/matlab/+caffe/private/caffe_.mexa64' 无效:
/home/zhangjiqing/caffe/matlab/+caffe/private/caffe_.mexa64: undefined symbol:
_ZN2cv8imencodeERKNSt7__cxx1112basic_stringIcSt11char_traitsIcESaIcEEERKNS_11_InputArrayERSt6vectorIhSaIhEER
解决:
make mattest 报出以上错误。
简单粗暴的解决方法就是将 usr/local/MATLAB/R2016b/bin/glnxa64 中 以下三个文件删除。(建议删除前进行备份)
libopencv_core.so.2.4
libopencv_highgui.so.2.4
libopencv_imgproc.so.2.4
27.遇到的错误:
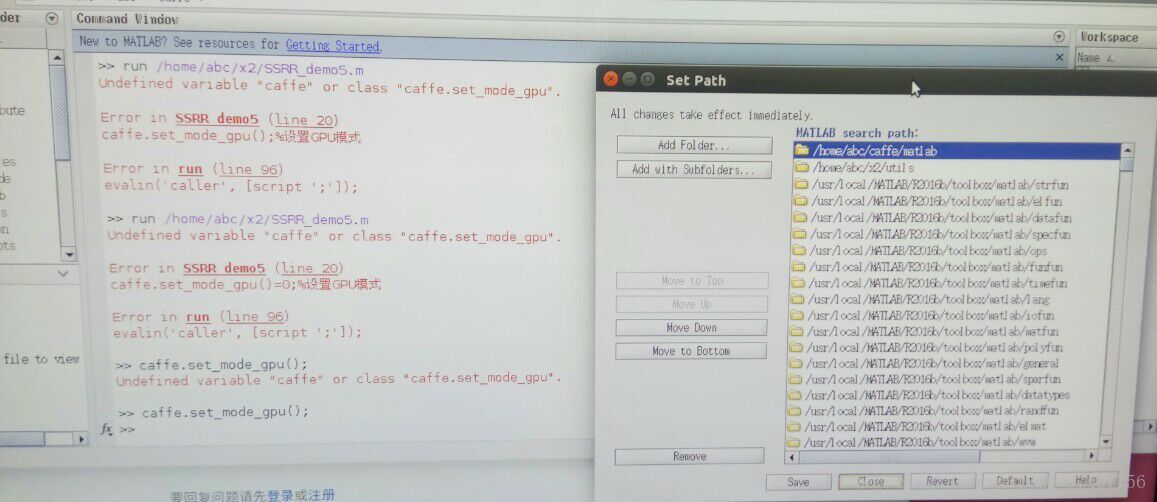
未定义变量 "caffe" 或类 "caffe.set_mode_cpu"。
28.错误
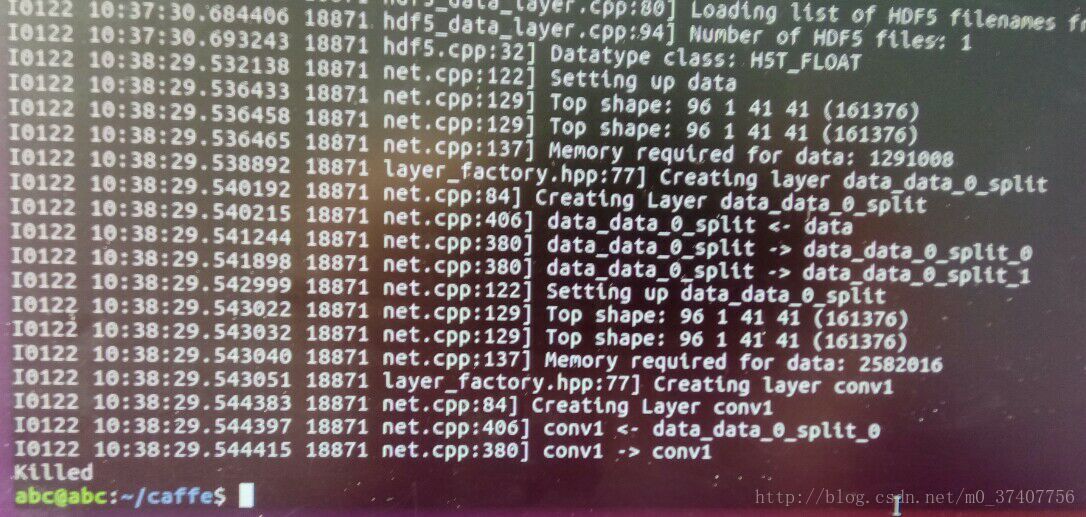
服务器的内存不够。
29.错误
ImportError: libcublas.so.9.0: cannot open shared object file: No such file or directory
这是因为我装了tensorflow-gpu 1.5版本,而我用的是cuda 8.0和cudnn6.0,1.5版本要求cuda 9.0,我的做法就是滚回:
[plain] view plain copy
- pip install tensorflow-gpu==1.4
然后运行就没有报错了。(如果报错:
libcudnn.so.6:cannot open sharedobjectfile: No such file or directory
你可以试一下1.2)
30.错误:
Makefile:600: recipe for target 'cmake_check_build_system' failed
make: *** [cmake_check_build_system] Error 1
换用sudo
31.错误
dsg@DSG:~/caffe$ sudo make pycaffe
NVCC src/caffe/util/math_functions.cu
nvcc fatal : Unsupported gpu architecture 'compute_20'
Makefile:588: recipe for target '.build_release/cuda/src/caffe/util/math_functions.o' failed
make: *** [.build_release/cuda/src/caffe/util/math_functions.o] Error 1
解决:
看了一下 Makefile.config 中 CUDA_ARCH 设置未按规定设置:
原来:CUDA_ARCH := -gencode arch=compute_20,code=sm_20 \
-gencode arch=compute_20,code=sm_21 \
-gencode arch=compute_30,code=sm_30 \
-gencode arch=compute_35,code=sm_35 \
-gencode arch=compute_50,code=sm_50 \
-gencode arch=compute_52,code=sm_52 \
-gencode arch=compute_60,code=sm_60 \
-gencode arch=compute_61,code=sm_61 \
-gencode arch=compute_61,code=compute_61
这两行删除就可以了
-
gencode arch=compute_20,code=sm_20 \ -
-gencode arch=compute_20,code=sm_21 \
变为:
CUDA_ARCH := -gencode arch=compute_30,code=sm_30 \
        -gencode arch=compute_35,code=sm_35 \
        -gencode arch=compute_50,code=sm_50 \
        -gencode arch=compute_52,code=sm_52 \
        -gencode arch=compute_60,code=sm_60 \
        -gencode arch=compute_61,code=sm_61 \
        -gencode arch=compute_61,code=compute_61
32.错误
fatal error: numpy/arrayobject.h: 没有那个文件或目录
解决方法: sudo apt-get install python-numpy
33。/usr/lib/x86_64-linux-gnu/libopencv_highgui.so.2.4.9:对‘TIFFReadRGBAStrip@LIBTIFF_4.0’未定义的引用
sudo apt-get remove libtiff5-devconda install -c menpo opencv3
34.error: #error This file requires compiler and library support for the ISO C++ 2011 standard. This support is currently experimental, and must be enabled with the -std=c++11 or -std=gnu++11 compiler op
caffe c++11编译问题
问题:error: #error This file requires compiler and library support for the ISO C++ 2011 standard. This support is currently experimental, and must be enabled with the -std=c++11 or -std=gnu++11 compiler options.
解决:修改Makefile文件
CXXFLAGS += -pthread -fPIC $(COMMON_FLAGS) $(WARNINGS) -std=c++11
NVCCFLAGS += -D_FORCE_INLINES -ccbin=$(CXX) -Xcompiler -fPIC $(COMMON_FLAGS) -std=c++11
LINKFLAGS += -pthread -fPIC $(COMMON_FLAGS) $(WARNINGS) -std=c++11
35./usr/local/MATLAB/R2016b/bin/glnxa64/../../sys/os/glnxa64/libstdc++.so.6: version `GLIBCXX_3.4.21' not found.
解决:
Firstly, install:
sudo apt-get install libstdc++6
This should already be installed by default, but try it anyway. If it doesn't solve it, just do the following:
sudo add-apt-repository ppa:ubuntu-toolchain-r/test
sudo apt-get update
sudo apt-get upgrade
sudo apt-get dist-upgrade
I didn't perform the "dist-upgrade" command, but the ones before solved it for me。
later :
export LD_PRELOAD=/usr/lib/x86_64-linux-gnu/libtiff.so.5:/usr/lib/x86_64-linux-gnu/libstdc++.so.6
问题:
在anaconda虚拟环境中配置caffe的python路径:
export CPLUS_INCLUDE_PATH=/home/dsg/anaconda3/envs/caffe/include/python2.7


