第6章:控件
本章目标
-
掌握内容控件的应用
-
掌握文本控件的应用
-
掌握列表控件的应用
-
掌握范围控件的应用
-
掌握日期控件的应用
控件类
所有控件都继承自System.Windows.Control 类,该类添加了一小部分的基础结构:
-
设置控件内容对齐方式的能力
-
设置Tab 键顺序的能力
-
支持绘制背景、前景和边框
-
支持格式化文本内容的尺寸和字体
WPF控件的完整类别,包括以下控件:
内容控件:这些控件可包含嵌套的元素,为他们提供近乎无限的显示能力。内容控件包括Label、Button、ToolTip和ScrollViewer 类。
带有标题的内容控件:这些控件是允许添加主要内容部分以及单独标题部分的内容控件。它们通常用于分装更大的用户界面块。此类控件包括 TabItem、GroupBox 以及Expander 类。
文本控件:文本控件较少,它们允许用户输入文本。文本控件支持普通文本(Textbox)、密码(PasswordBox)以及格式化文本(RichTextBox)。
列表控件:这些控件在列表中显示项的集合。列表控件包括 ListBox 和 ComboBox 类。
范围控件:这些控件通常只有共同的属性 Value,可使用预先规定范围内的任何数字设置改属性。这类控件包括Silder 以及ProgressBar 类。
日期控件:此类控件包含两个允许用户选择日期的控件:Calendar 和 DatePicker.
画刷
所有的控件都包含背景和前景概念。通常,背景是控件的表面,而前景是文本。在WPF中,分别使用Background 和 Foreground 属性设置这两个区域的颜色。
Background 和Foreground 属性使用颜色对象,然后这些属性实际上使用的是更强大的对象:Brush 对象。该对象为填充背景和前景内容提供了灵活性,可使用单一颜色(使用 SolidColorBrush 画刷)或更特殊的颜色(如使用 LinearGradientBrush 或 TileBrush 画刷)填充背景和前景。
用代码设置颜色
//使用Color类的静态属性预定义颜色
btn.Background=new SolidColorBrush(Colors.AliceBlue);

//使用SystemColors 枚举中的系统颜色
btn.Background=new SolidColorBrush(SystemColors.ControlColor);
btn.Background=new SystemColors.ControlBrush;

//使用R/G/B 创建Color 对象
btn.Foreground=new SolidColorBrush(Color.FromRgb(0,255,0));
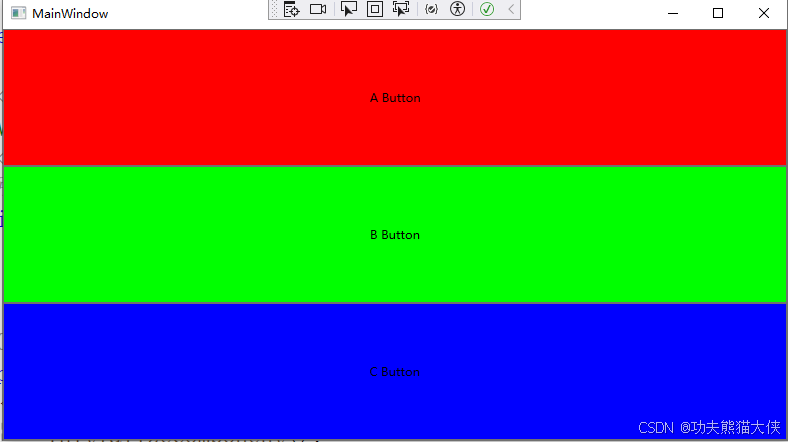
在XAML中设置颜色
<Window x:Class="WpfApp1.MainWindow"
        xmlns="http://schemas.microsoft.com/winfx/2006/xaml/presentation"
        xmlns:x="http://schemas.microsoft.com/winfx/2006/xaml"
        xmlns:d="http://schemas.microsoft.com/expression/blend/2008"
        xmlns:mc="http://schemas.openxmlformats.org/markup-compatibility/2006"
        xmlns:local="clr-namespace:WpfApp1"
        mc:Ignorable="d"
        Title="MainWindow" Height="450" Width="800">
    <Grid>

        <Grid.RowDefinitions>
            <RowDefinition/>
            <RowDefinition/>
            <RowDefinition/>
        </Grid.RowDefinitions>

        <Button Grid.Row="0" Background="Red">A Button</Button>

        <Button Grid.Row="1" Background="#00ff00">B Button</Button>

        <Button Grid.Row="2">

            <Button.Content>C Button</Button.Content>
            <Button.Background>
                <SolidColorBrush Color="Blue" />
            </Button.Background>

        </Button>

    </Grid>
</Window>
字体
Control 类定义了一小部分与字体相关的属性,这些属性确定文本在控件中的显示方式。
| 名称 | 说明 |
|---|---|
| FontFamily | 字体名称 |
| FontSize | 字体的设备无关单位尺寸 |
| FontStyle | 字体样式 |
| FontWeight | 字体粗细 |
| FontStretch | 字体的拉伸或压缩程度 |
鼠标光标
可以通过 System.Windows.Input.Cursor 对象来表示每个光标。获取 Cursor 对象的最简方法是用Cursors 类(位于 System.Windows.Input 命名空间)的静态属性,它们包含了所有标准的 Windows 鼠标光标,如沙漏光标、手状光标、调整尺寸的箭头光标等。
this.Cursor=Cursors.Wait;
如果使用 XAML 设置鼠标光标,就不需要直接使用 Cursors 类。这是因为 Cursor 属性的类型转换器能识别属性名称,并从 Cursors 类中检索对应的鼠标光标。这意味着当鼠标位于某个按钮上时,为了显示“帮助”光标(箭头和问号的组合),可按如下方式编写标记:
<Button Cursor="Hlp"> Help </Button>
内容控件
内容控件(content control)是更特殊的控件类型,它们可包含并显示一块内容。从技术角度看,内容控件是可以包含单个嵌套元素的控件。与布局容器不同的是,内容控件只能包含一个子元素,而布局容器只要愿意可以包含任意多个嵌套元素。
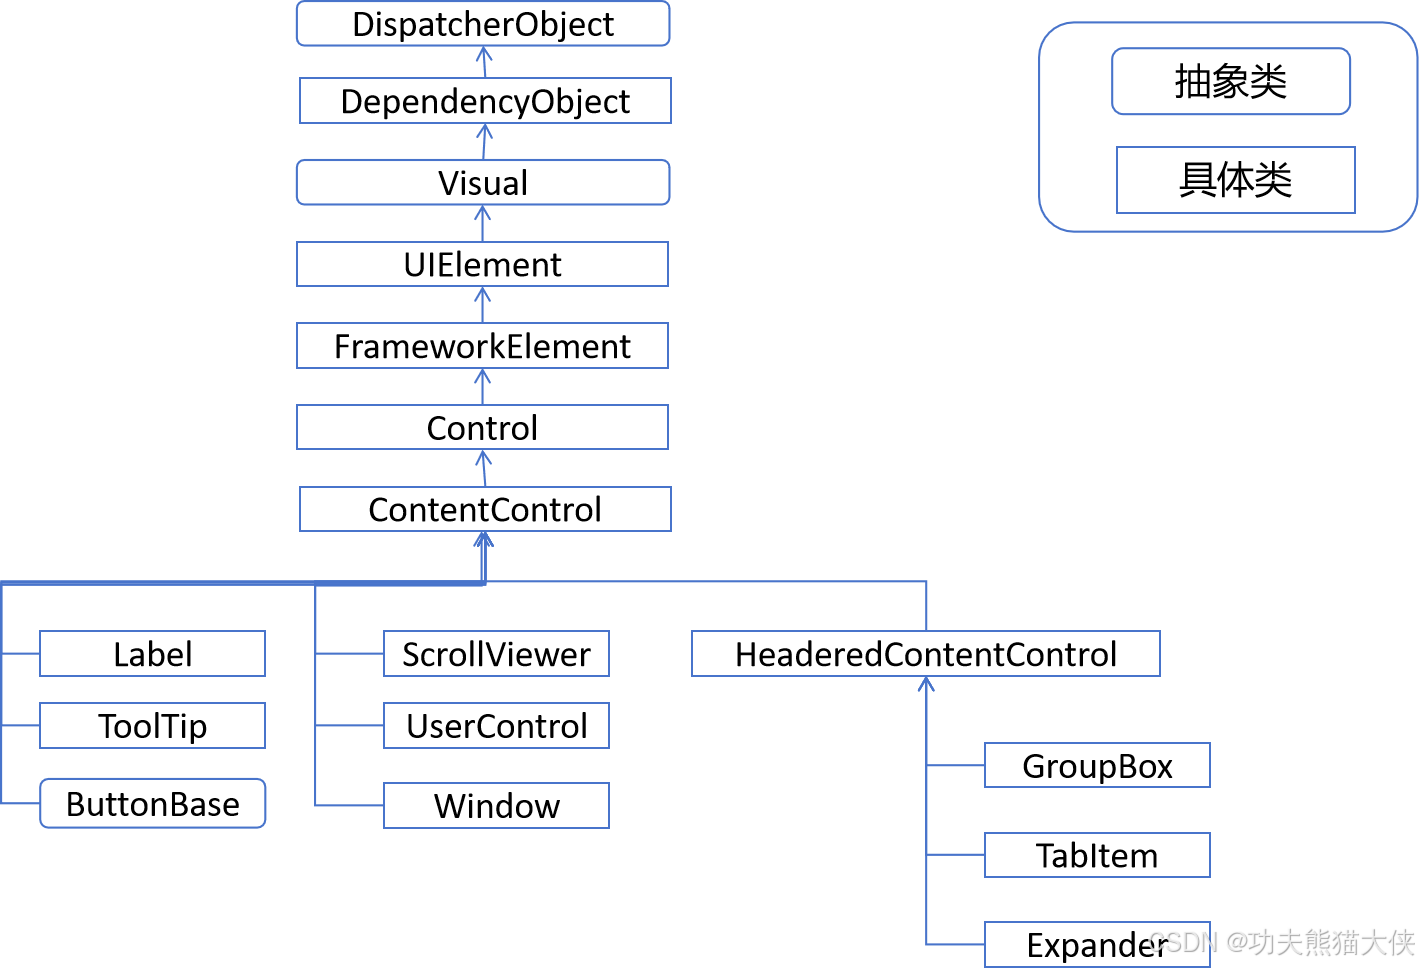
所有内容控件都继承自抽象类 ContentControl, 如下图所示:
Content属性
与Panel 类提供 Children 集合来保存嵌套的元素不同,Control 类添加了 Content 属性,该属性只接受单一对象。Content 属性支持任何类型的对象,但可将该属性支持的对象分为两大类,针对每一类进行不同的处理。
- 未继承自 UIElement 类的对象:内容控件调用这些控件的 ToString() 方法获取文本,然后显示该文本。
- 继承自 UIElement 类的对象:这些对象(包括所有可视化元素,它们是 WPF 的组成部分)使用 UIElement.OnRender() 方法在内容控件的内部进行展示。
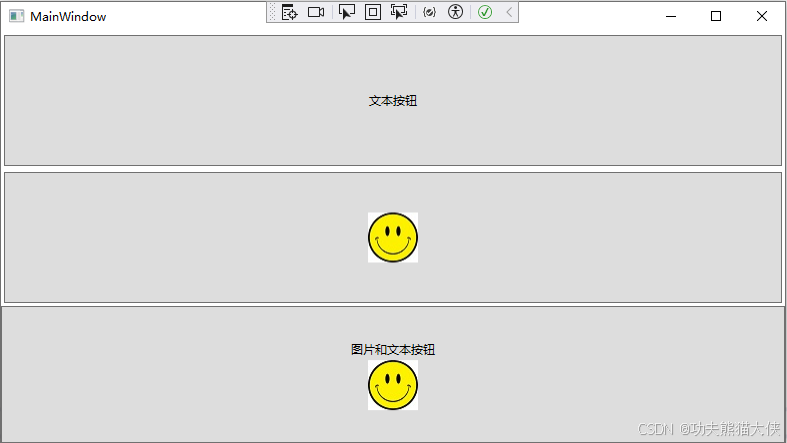
为理解 Content 属性的工作原理,以下采用按钮来演示效果。
<Button Margin="3"> 文本内容</Button>
该字符串被设置为按钮的内容,并在按钮上显示该内容。然而,还可通过在按钮上放置任何其他元素。例如,可使用Image 类在按钮上放置一幅图像:
<Button Margin="3">
	<Image Source="happyface.jpg" Streach="None" />
</Button>
还可在布局容器(如 StackPanel 面板)中组合文本和图像:
<Button Margin="3">
	<StackPanel>
		<TextBlock Margin="3"> 图像和文本</TextBlock>
		<Image Source="happyface.jpg" Stretch="None" />
		<TextBlock Margin="3"></TextBlock>
	</StackPanel>
</Button>
完整代码:
<Window x:Class="WpfApp1.MainWindow"
        xmlns="http://schemas.microsoft.com/winfx/2006/xaml/presentation"
        xmlns:x="http://schemas.microsoft.com/winfx/2006/xaml"
        xmlns:d="http://schemas.microsoft.com/expression/blend/2008"
        xmlns:mc="http://schemas.openxmlformats.org/markup-compatibility/2006"
        xmlns:local="clr-namespace:WpfApp1"
        mc:Ignorable="d"
        Title="MainWindow" Height="450" Width="800">
    <Grid>
        <Grid.RowDefinitions>
            <RowDefinition/>
            <RowDefinition/>
            <RowDefinition/>
        </Grid.RowDefinitions>

        <Button Grid.Row="0" Margin="3">文本按钮</Button>
        <Button Grid.Row="1" Margin="3">
            <Image Source="11.jpg" Stretch="None"/>
        </Button>
        <Button Grid.Row="2">
            <StackPanel>
                <TextBlock Margin="3" TextAlignment="Center">图片和文本按钮</TextBlock>
                <Image Source="11.jpg" Stretch="None"/>
            </StackPanel>
        </Button>

    </Grid>
</Window>
对齐内容
在 FrameworkElement 基类中定义的 HorizontalAlignment 和 VerticalAligment 属性,在容器中对齐不同的控件。然而,一旦控件包含了内容,就需要考虑另一个组织级别。需要决定内容控件的内容如何和边框对齐,这是通过使用 HorizontalContentAlignment 和 VerticalContentAlignment 属性实现的。
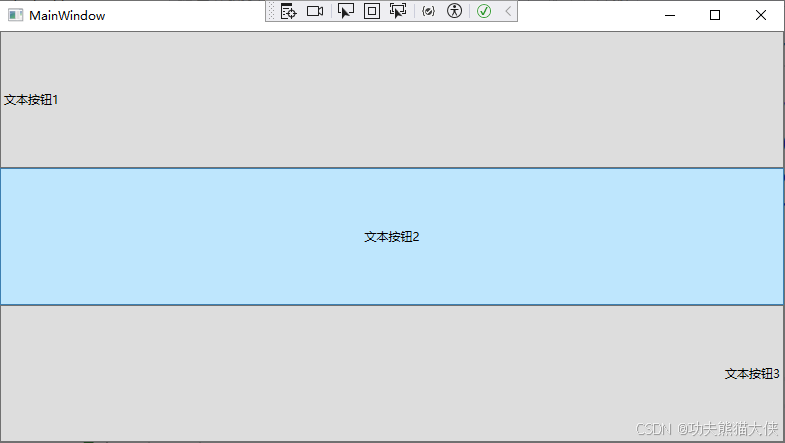
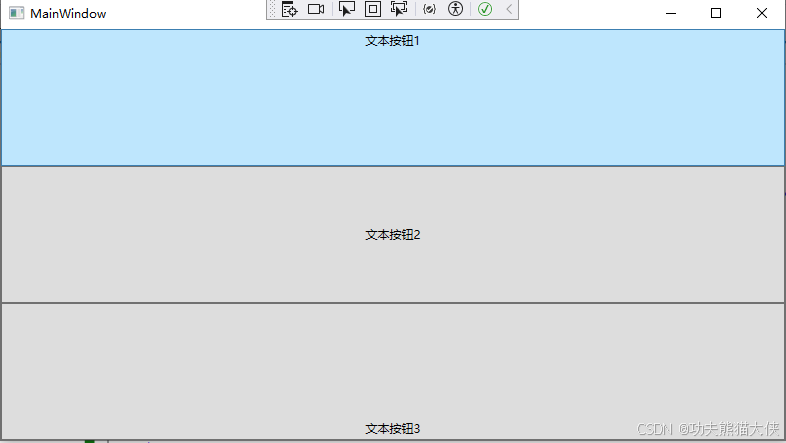
水平对齐:
<Window x:Class="WpfApp1.MainWindow"
        xmlns="http://schemas.microsoft.com/winfx/2006/xaml/presentation"
        xmlns:x="http://schemas.microsoft.com/winfx/2006/xaml"
        xmlns:d="http://schemas.microsoft.com/expression/blend/2008"
        xmlns:mc="http://schemas.openxmlformats.org/markup-compatibility/2006"
        xmlns:local="clr-namespace:WpfApp1"
        mc:Ignorable="d"
        Title="MainWindow" Height="450" Width="800">
    <Grid>
        <Grid.RowDefinitions>
            <RowDefinition/>
            <RowDefinition/>
            <RowDefinition/>
        </Grid.RowDefinitions>

        <Button Grid.Row="0" Padding="3" HorizontalContentAlignment="Left">文本按钮1</Button>
        <Button Grid.Row="1" Padding="3" HorizontalContentAlignment="Center">文本按钮2</Button>
        <Button Grid.Row="2" Padding="3" HorizontalContentAlignment="Right">文本按钮3</Button>
    </Grid>
</Window>
垂直对齐:
<Window x:Class="WpfApp1.MainWindow"
        xmlns="http://schemas.microsoft.com/winfx/2006/xaml/presentation"
        xmlns:x="http://schemas.microsoft.com/winfx/2006/xaml"
        xmlns:d="http://schemas.microsoft.com/expression/blend/2008"
        xmlns:mc="http://schemas.openxmlformats.org/markup-compatibility/2006"
        xmlns:local="clr-namespace:WpfApp1"
        mc:Ignorable="d"
        Title="MainWindow" Height="450" Width="800">
    <Grid>
        <Grid.RowDefinitions>
            <RowDefinition/>
            <RowDefinition/>
            <RowDefinition/>
        </Grid.RowDefinitions>

        <Button Grid.Row="0" Padding="3" VerticalContentAlignment="Top">文本按钮1</Button>
        <Button Grid.Row="1" Padding="3" VerticalContentAlignment="Center">文本按钮2</Button>
        <Button Grid.Row="2" Padding="3" VerticalContentAlignment="Bottom">文本按钮3</Button>
    </Grid>
</Window>
标签
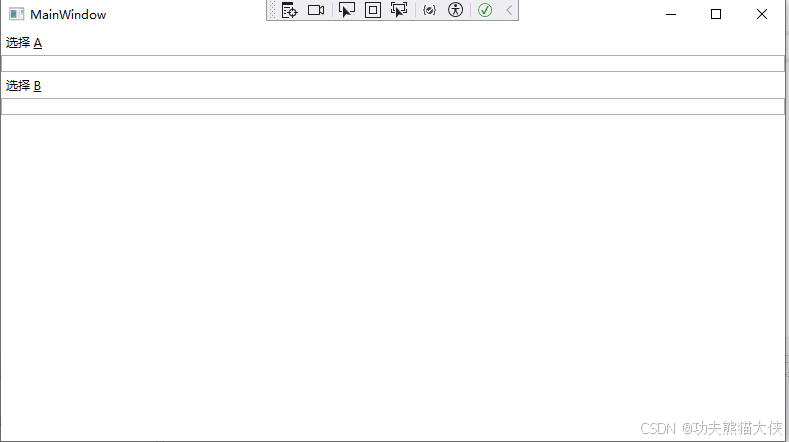
在所有内容控件中,最简单的是 Label 控件。与其他任意内容控件类似,Label 控件接受希望放入其中的单一内容。但不同的是 Label 控件支持记忆符-----本质上,记忆符能够为链接的控件设置焦点的快捷键。
<Window x:Class="WpfApp1.MainWindow"
        xmlns="http://schemas.microsoft.com/winfx/2006/xaml/presentation"
        xmlns:x="http://schemas.microsoft.com/winfx/2006/xaml"
        xmlns:d="http://schemas.microsoft.com/expression/blend/2008"
        xmlns:mc="http://schemas.openxmlformats.org/markup-compatibility/2006"
        xmlns:local="clr-namespace:WpfApp1"
        mc:Ignorable="d"
        Title="MainWindow" Height="450" Width="800">
    <StackPanel>
        <Label Target="{Binding ElementName=txtA}" >选择 _A</Label>
        <TextBox Name="txtA"></TextBox>
        <Label Target="{Binding ElementName=txtb}" >选择 _B</Label>
        <TextBox Name="txtb"></TextBox>
    </StackPanel>
</Window>
按钮
WPF 提供了三种类型按钮控件:熟悉的 Button 控件、CheckBox 控件和 RadioButton 控件。所有这些控件都是继承自 ButtonBase 类的内容控件。
注意:
所有按钮控件都支持访问快捷键,访问快捷键和 Label 控件中的记忆符类似。添加下划线字符来标识访问键。如果用户按下了 Alt 键和访问键,就会触发单击事件。
Button 控件:
Button 类表示一直使用的 Windows 下压按钮。它添加了两个可写属性:IsCancel 和 IsDefault.
- 如果将 IsCancel 属性设置为 true,按钮就成为窗口的取消按钮。在当前窗口的任何位置如果按下Esc 键,就会触发该按钮。
- 如果将 IsDefault 属性设置为 true,按钮就成为默认按钮(也就是接收按钮)。其行为取决于焦点在窗口中的当前位置。
ToggleButton 和 RepeatButton 控件
除 Button 类之外,还有三个类继承自 ButtonBase 类。这些类包括:
- GridViewColumnHeader 类,当使用基于网格的ListView 控件时,该类表示一列可以单击的标题。
- RepeatButton 类,只要按钮保持按下状态,该类就不断地触发 Click 事件。对于普通按钮,用户每次单击只触发一个Click 事件。
- ToggleButton 类,该类表示具有两个状态(按下状态和未按下状态)的按钮。当单击ToggleButton 按钮时,它会保持按下状态,直到再次单击该按钮以释放它为止。
RepeatButton 和 ToggleButton 类都是在 System.Windows.Controls.Primitives 名称空间中定义的,这表明它们通常不单独使用。相反,它们通常通过组合来构建更复杂的控件,或通过继承扩展其功能。
CheckBox 控件
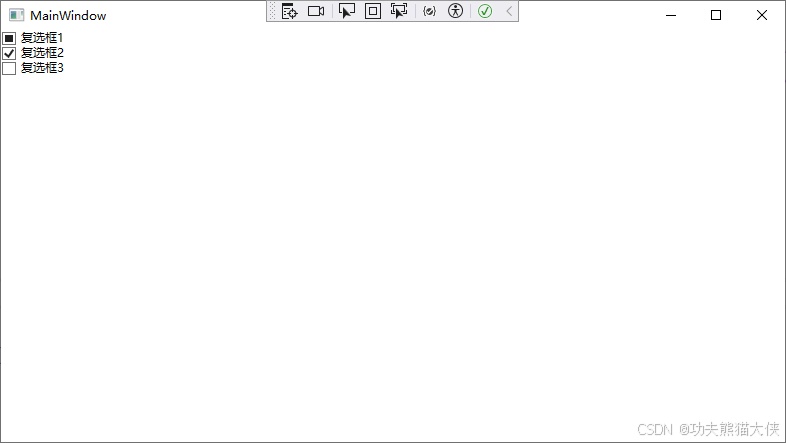
CheckBox 控件继承自 ToggleButton 类,这意味着用户可切换它们的开关状态。最重要的是,ToggleButton 类添加了 IsChecked 属性。此属性是可空的Boolean 类型,这意味着该属性可以设置为true,false 或null.
<Window x:Class="WpfApp1.MainWindow"
        xmlns="http://schemas.microsoft.com/winfx/2006/xaml/presentation"
        xmlns:x="http://schemas.microsoft.com/winfx/2006/xaml"
        xmlns:d="http://schemas.microsoft.com/expression/blend/2008"
        xmlns:mc="http://schemas.openxmlformats.org/markup-compatibility/2006"
        xmlns:local="clr-namespace:WpfApp1"
        mc:Ignorable="d"
        Title="MainWindow" Height="450" Width="800">
    <StackPanel>
        <CheckBox IsChecked="{x:Null}">复选框1</CheckBox>
        <CheckBox IsChecked="True">复选框2</CheckBox>
        <CheckBox IsChecked="False">复选框3</CheckBox>
    </StackPanel>
</Window>
RadioButton 控件
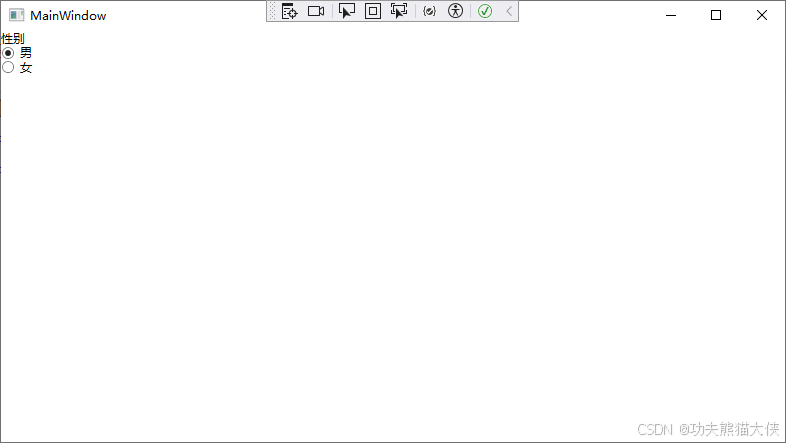
RadioButton 类也继承自 ToggleButton 类,并使用相同的 IsChecked 属性和相同的 Checked,Unchecked 以及Indeterminate 事件。此外,RadioButton 类还增加了 GroupName 属性,该属性用于控制如何对单选按钮进行分组。
<Window x:Class="WpfApp1.MainWindow"
        xmlns="http://schemas.microsoft.com/winfx/2006/xaml/presentation"
        xmlns:x="http://schemas.microsoft.com/winfx/2006/xaml"
        xmlns:d="http://schemas.microsoft.com/expression/blend/2008"
        xmlns:mc="http://schemas.openxmlformats.org/markup-compatibility/2006"
        xmlns:local="clr-namespace:WpfApp1"
        mc:Ignorable="d"
        Title="MainWindow" Height="450" Width="800">
    <StackPanel>
        <TextBlock>性别</TextBlock>
        <RadioButton GroupName="sex" IsChecked="True">男</RadioButton>
        <RadioButton GroupName="sex" IsChecked="False">女</RadioButton>
    </StackPanel>
</Window>
工具提示
ToolTip 属性是在 FrameworkElement 类中定义的,所以所有能放到 WPF 窗口上的元素都可以使用该属性。例如,下面的按钮具有基本的工具提示:
<Button ToolTip="我有一个提示消息" Padding="3">按钮</Button>
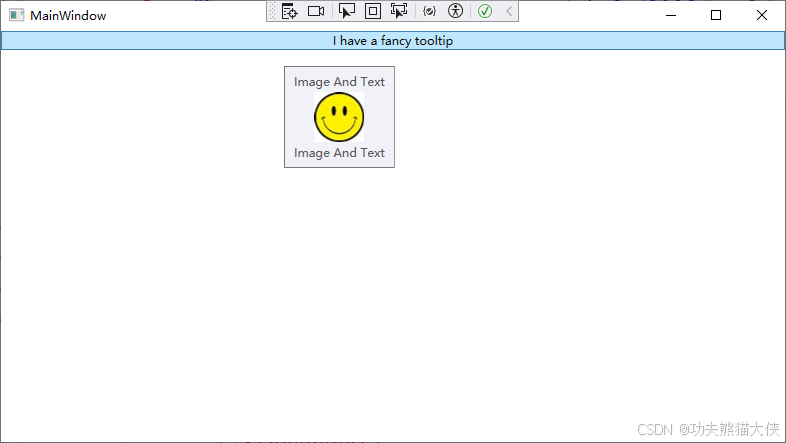
如果希望提供更复杂的工具提示内容,如组合的嵌套元素,就需要将 ToolTip 属性分为单独的元素。下面的示例使用更复杂的嵌套内容设置按钮的ToolTip属性。
<Window x:Class="WpfApp1.MainWindow"
        xmlns="http://schemas.microsoft.com/winfx/2006/xaml/presentation"
        xmlns:x="http://schemas.microsoft.com/winfx/2006/xaml"
        xmlns:d="http://schemas.microsoft.com/expression/blend/2008"
        xmlns:mc="http://schemas.openxmlformats.org/markup-compatibility/2006"
        xmlns:local="clr-namespace:WpfApp1"
        mc:Ignorable="d"
        Title="MainWindow" Height="450" Width="800">
    <StackPanel>
        <Button>
            <Button.ToolTip>
                <StackPanel>
                    <TextBlock Margin="3">Image And Text</TextBlock>
                    <Image Source="happyface.jpg" Stretch="None"/>
                    <TextBlock Margin="3">Image And Text</TextBlock>
                </StackPanel>
            </Button.ToolTip>
            <Button.Content>I have a fancy tooltip</Button.Content>
        </Button>
    </StackPanel>
</Window>
设置 ToolTip 对象的属性
ToolTip 是内容控件,因此可以调整它的标准属性,如Background 属性、Padding 属性以及Font 属性。还可修改在 ToolTip 类中定义成员,这些属性中的大部分用于帮助将工具提示放到所期望的位置。
| 名称 | 说明 |
|---|---|
| HasDropShadow | 决定提示框是否有黑色阴影 |
| Placement | 使用PlacementMode枚举值决定如何放置工具提示,默认是Mouse |
| HorizontalOffset VerticalOffset | 将工具提示微调到所希望的准确为止,可使用正值或负值。 |
| PlacementTarget | 允许相对于另一个元素定位工具提示。为使用该属性, Placement属性必须设置为Left/Right/Top/Bottom或Center. |
| PlacementRectangle | 用于偏移工具提示的位置。如果Placement属性被设置为Mouse 该属性无效。 |
| CustomPopupPlacementCallback | 允许使用代码动态的定位工具提示。 |
| StaysOpen | 该属性实际上不起作用,它的目的是一直保持打开状态的工具提示, 直到用户在其他地方单击鼠标才关闭该提示。然而ToolTipService.ShowDuration 属性重写了StaysOpen属性。 |
| IsEnabled IsOpen | 允许使用代码控制工具提示。通过IsEnabled 属性可暂时禁用工具提示,而通过IsOpen 属性可使用代码显示或隐藏工具提示。 |
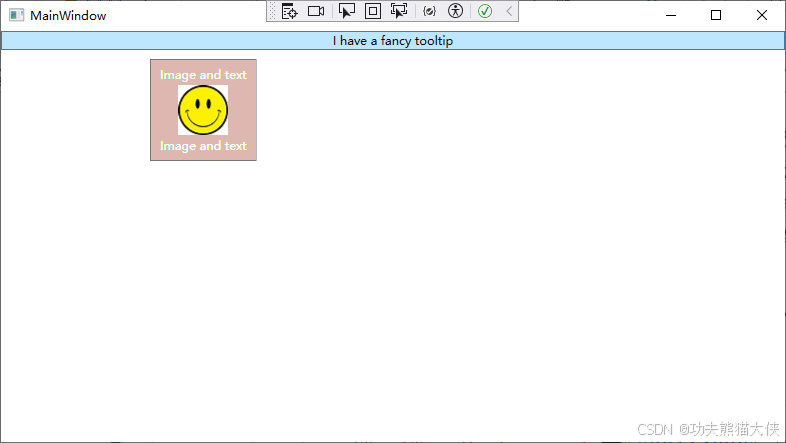
下面的示例使用 ToolTip 属性创建了一个工具提示,该工具提示窗口没有阴影效果,但使用了透明的红色背景,从而可透过该工具提示看到底层的窗口和控件:
<Window x:Class="WpfApp1.MainWindow"
        xmlns="http://schemas.microsoft.com/winfx/2006/xaml/presentation"
        xmlns:x="http://schemas.microsoft.com/winfx/2006/xaml"
        xmlns:d="http://schemas.microsoft.com/expression/blend/2008"
        xmlns:mc="http://schemas.openxmlformats.org/markup-compatibility/2006"
        xmlns:local="clr-namespace:WpfApp1"
        mc:Ignorable="d"
        Title="MainWindow" Height="450" Width="800">
    <StackPanel>
        <Button>
            <Button.ToolTip>
                <ToolTip Background="#60AA4030" Foreground="White" HasDropShadow="False">
                    <StackPanel>
                        <TextBlock Margin="3" >Image and text</TextBlock>
                        <Image Source="happyface.jpg" Stretch="None"/>
                        <TextBlock Margin="3" >Image and text</TextBlock>
                    </StackPanel>
                </ToolTip>
            </Button.ToolTip>
            <Button.Content>I have a fancy tooltip</Button.Content>
        </Button>
    </StackPanel>
</Window>
设置 ToolTipService 属性
使用 ToolTipService 类可以配置显示工具提示的相关延迟时间,ToolTipService 类的所有属性都是附加属性,所以可在控件标签中直接设置它们,如下所示:
<Window x:Class="WpfApp1.MainWindow"
        xmlns="http://schemas.microsoft.com/winfx/2006/xaml/presentation"
        xmlns:x="http://schemas.microsoft.com/winfx/2006/xaml"
        xmlns:d="http://schemas.microsoft.com/expression/blend/2008"
        xmlns:mc="http://schemas.openxmlformats.org/markup-compatibility/2006"
        xmlns:local="clr-namespace:WpfApp1"
        mc:Ignorable="d"
        Title="MainWindow" Height="450" Width="800">
    <StackPanel>
        <Button ToolTip="这是我的提示消息"
                ToolTipService.InitialShowDelay="1000"
                ToolTipService.ShowDuration="3000">
            I hava a tooltip
        </Button>
    </StackPanel>
</Window>
ToolTipService 类的属性:
| 名称 | 说明 |
|---|---|
| InitialShowDelay | 设置当鼠标悬浮在元素上时,工体提示显示之前的延迟时间(单位为毫秒) |
| ShowDuration | 设置如果用户不移动鼠标,在工具提示消失之前显示的时间(单位为毫秒) |
| BetweenShowDelay | 设置时间间隔 |
| ToolTip | 设置提示内容 |
| HasDropShadow | 确定工具提示是否具有黑色阴影 |
| ShowOnDisabled | 确定当相关联的元素被禁用后是否显示工具提示。 |
| Placement PlacementTarget PlacementRectangle VerticalOffset | 这些属性用来控制工具提示的位置。 |
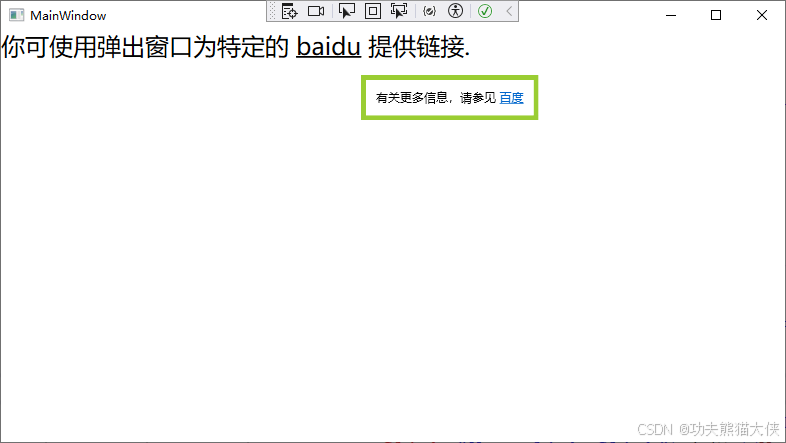
Popup控件
Popup控件在许多方面与 ToolTip 控件相同,尽管它们之间没有相互继承的关系。与ToolTip
类似,Popup 也只能包含单一内容,该单一内容可以包含任何 WPF元素(该内容存储在Popup.Child 属性中,而不像 TooiTip 内容那样存储在 TooiTip.Content 属性中)。另外,与 ToolTip控件一样,Popup 控件也可延伸出窗口的边界。最后,可使用相同的布局属性放置 Popup控件,并且可使用相同的 IsOpen 属性显示或隐藏 Popup 控件。
Popup 控件和 ToolTip 控件之间的区别更重要。这些区别包括:
- Popup控件永远不会自动显示。为显示 Popup控件,必须设置 IsOpen 属性。
- 默认情况下,Popup.StaysOpen 属性被设置为 true,并且 Popup控件会一直显示,直到明确地将 IsOpen 属性设置 false 为止。如果将 Popup,StaysOpen 属性设置为 false, 那么当用户在其他地方单击鼠标时,Popup 控件将消失。
- Popup拉件提供了 PopupAnimation 属性,当把 IsOpen 属性设置为 tue 时,通过该属性可控制 Popup控件进入视野的方式。可以选择 None(默认值)、Fade(弹出窗口的透明度逐渐增加)、Scroll(如果空间允许,弹出窗口将从窗口的左上角滑入)以及 Slide(如果间允许,弹出窗口将从上向下滑进其位置)。为使用这些动画中的任意一个,还必须将AllowsTransparency 属性设置为 true。
- Popup 控件可接收焦点。因此,可在其内部放置与用户交互的控件,如按钮。该功能是使用 Popup 控件(而不使用 ToolTip 控件)的主要原因之一。
- Popup 控件在 System.Windows.Controls.Primitive 名称空间中定义,因为它的最常见用法是用作更复杂控件的构件。在外观修饰方面可发现 Popup 控件和其他控件的区别很大。特别是,如果希望看到内容,就必须设置 Background 属性,因为 Popup控件不会从包含它的窗口继承背景设置,而且您需要自行添加边框(对于这个目的,Border 元素的效果堪称完美)
<Window x:Class="WpfApp1.MainWindow"
        xmlns="http://schemas.microsoft.com/winfx/2006/xaml/presentation"
        xmlns:x="http://schemas.microsoft.com/winfx/2006/xaml"
        xmlns:d="http://schemas.microsoft.com/expression/blend/2008"
        xmlns:mc="http://schemas.openxmlformats.org/markup-compatibility/2006"
        xmlns:local="clr-namespace:WpfApp1"
        mc:Ignorable="d"
        Title="MainWindow" Height="450" Width="800">
    <StackPanel>
        <TextBlock TextWrapping="Wrap" FontSize="24">
            你可使用弹出窗口为特定的
            <Run TextDecorations="Underline" MouseEnter="Run_MouseEnter">
                    baidu
            </Run>
            提供链接.
        </TextBlock>
        <Popup Name="popLink" StaysOpen="False" Placement="Mouse" MaxWidth="200"
               PopupAnimation="Slide" AllowsTransparency="True">
            <Border BorderBrush="YellowGreen" BorderThickness="5" Background="White">
                <TextBlock Margin="10" TextWrapping="Wrap">
                    有关更多信息,请参见
                    <Hyperlink NavigateUri="http://www.baidu.com"
                               Click="Hyperlink_Click">百度</Hyperlink>
                </TextBlock>
            </Border>
        </Popup>
    </StackPanel>
</Window>
特殊容器
内容控件不仅包括基本控件,如标签、按钮以及工具提示;它们还包含特殊容器,这些容器可用于构造用户界面中比较大的部分区域。
ScrollViewer
<Window x:Class="WpfApp1.MainWindow"
        xmlns="http://schemas.microsoft.com/winfx/2006/xaml/presentation"
        xmlns:x="http://schemas.microsoft.com/winfx/2006/xaml"
        xmlns:d="http://schemas.microsoft.com/expression/blend/2008"
        xmlns:mc="http://schemas.openxmlformats.org/markup-compatibility/2006"
        xmlns:local="clr-namespace:WpfApp1"
        mc:Ignorable="d"
        Title="MainWindow" Height="450" Width="800">
    <ScrollViewer VerticalScrollBarVisibility="Auto">
        <Grid Margin="3,3,10,3">
            <Grid.RowDefinitions>
                <RowDefinition/>
                <RowDefinition/>
                <RowDefinition/>
                <RowDefinition/>
                <RowDefinition/>
            </Grid.RowDefinitions>

            <Grid.ColumnDefinitions>
                <ColumnDefinition/>
                <ColumnDefinition/>
                <ColumnDefinition/>
            </Grid.ColumnDefinitions>

            <Label Grid.Row="0" Grid.Column="0" Margin="3" VerticalAlignment="Center">Home:</Label>
            <TextBox Grid.Row="0" Grid.Column="1" Margin="3" Height="auto" VerticalAlignment="Center"></TextBox>
            <Button Grid.Row="0" Grid.Column="2" Margin="3" Padding="2">Browse</Button>

            <Label Grid.Row="1" Grid.Column="0" Margin="3" VerticalAlignment="Center">Network:</Label>
            <TextBox Grid.Row="1" Grid.Column="1" Margin="3" Height="auto" VerticalAlignment="Center"></TextBox>
            <Button Grid.Row="1" Grid.Column="2" Margin="3" Padding="2">Browse</Button>

            <Label Grid.Row="2" Grid.Column="0" Margin="3" VerticalAlignment="Center">Web:</Label>
            <TextBox Grid.Row="2" Grid.Column="1" Margin="3" Height="auto" VerticalAlignment="Center"></TextBox>
            <Button Grid.Row="2" Grid.Column="2" Margin="3" Padding="2">Browse</Button>

            <Label Grid.Row="3" Grid.Column="0" Margin="3" VerticalAlignment="Center">Seconcary:</Label>
            <TextBox Grid.Row="3" Grid.Column="1" Margin="3" Height="auto" VerticalAlignment="Center"></TextBox>
            <Button Grid.Row="3" Grid.Column="2" Margin="3" Padding="2">Browse</Button>

            <Label Grid.Row="4" Grid.Column="0" Margin="3" VerticalAlignment="Center">Blog:</Label>
            <TextBox Grid.Row="4" Grid.Column="1" Margin="3" Height="auto" VerticalAlignment="Center"></TextBox>
            <Button Grid.Row="4" Grid.Column="2" Margin="3" Padding="2">Browse</Button>
        </Grid>
    </ScrollViewer>
</Window>
ScrollViewer 控件也支持水平滚动功能。但默认情况下,HorizontalScrollBarVisibility 属性设置为 Hidden。为了使用水平滚动功能,需要将该属性设置为Visible 或 Auto。
通过代码进行滚动:
LineUp()、LineDown(), 这两个方法向上和向下移动的效果相当于单击一次垂直滚动条两端的箭头按钮。
PageUp、PageDown() 方法,这两个方法向上或向下滚动一整屏,相当于在滚动滑块的上面或下面单击滚动条。
用于水平滚动的类似方法,包括 LineLeft()、LineRight()、PageLeft()和PageRight()。
使用ScrollToXxx() 这类方法,从而滚动到任何特定位置。对于垂直滚动,包括ScrollToEnd()和ScrollToHome(),滚动到底部和顶部。Scroll
| 方法 | 描述 |
|---|---|
| LineUp() LineDown() | 向上和向下移动的效果相当于单击一次垂直滚动条两端的箭头按钮。 |
| PageUp PageDown() | 这两个方法向上或向下滚动一整屏 |
| LineLeft() LineRight() | 向左和向右移动的效果相当于单击一次水平滚动条两端的箭头按钮。 |
| PageLeft() PageRight() | 这两个方法向左或向右滚动一整屏 |
| ScrollToHome() ScrollToEnd() | 滚动到内容的顶部或底部 |
| ScrollToVerticalOffset() | 滚动到垂直特定位置 |
| ScrollToLeftEnd() ScrollToRightEnd() | 滚动到内容的最左侧或最右侧 |
| ScrollToHorizontalOffset() | 滚动到水平特定位置 |
页面代码:
<Window x:Class="WpfApp1.MainWindow"
        xmlns="http://schemas.microsoft.com/winfx/2006/xaml/presentation"
        xmlns:x="http://schemas.microsoft.com/winfx/2006/xaml"
        xmlns:d="http://schemas.microsoft.com/expression/blend/2008"
        xmlns:mc="http://schemas.openxmlformats.org/markup-compatibility/2006"
        xmlns:local="clr-namespace:WpfApp1"
        mc:Ignorable="d"
        Title="MainWindow" Height="450" Width="800">
    <ScrollViewer x:Name="myScroll" VerticalScrollBarVisibility="Auto">
        <Grid Margin="3,3,10,3">
            <Grid.RowDefinitions>
                <RowDefinition/>
                <RowDefinition/>
                <RowDefinition/>
                <RowDefinition/>
                <RowDefinition/>
                <RowDefinition/>
                <RowDefinition/>
            </Grid.RowDefinitions>

            <Grid.ColumnDefinitions>
                <ColumnDefinition/>
                <ColumnDefinition/>
                <ColumnDefinition/>
            </Grid.ColumnDefinitions>

            <Button Grid.Row="0" Grid.Column="0" Name="btnLineDown" Click="btnLineDown_Click">Line Down</Button>
            <Button Grid.Row="0" Grid.Column="1" Name="btnPageDown" Click="btnPageDown_Click">Page Down</Button>

            <Label Grid.Row="1" Grid.Column="0" Margin="3" VerticalAlignment="Center">Home:</Label>
            <TextBox Grid.Row="1" Grid.Column="1" Margin="3" Height="auto" VerticalAlignment="Center"></TextBox>
            <Button Grid.Row="1" Grid.Column="2" Margin="3" Padding="2">Browse</Button>

            <Label Grid.Row="2" Grid.Column="0" Margin="3" VerticalAlignment="Center">Network:</Label>
            <TextBox Grid.Row="2" Grid.Column="1" Margin="3" Height="auto" VerticalAlignment="Center"></TextBox>
            <Button Grid.Row="2" Grid.Column="2" Margin="3" Padding="2">Browse</Button>

            <Label Grid.Row="3" Grid.Column="0" Margin="3" VerticalAlignment="Center">Web:</Label>
            <TextBox Grid.Row="3" Grid.Column="1" Margin="3" Height="auto" VerticalAlignment="Center"></TextBox>
            <Button Grid.Row="3" Grid.Column="2" Margin="3" Padding="2">Browse</Button>

            <Label Grid.Row="4" Grid.Column="0" Margin="3" VerticalAlignment="Center">Seconcary:</Label>
            <TextBox Grid.Row="4" Grid.Column="1" Margin="3" Height="auto" VerticalAlignment="Center"></TextBox>
            <Button Grid.Row="4" Grid.Column="2" Margin="3" Padding="2">Browse</Button>

            <Label Grid.Row="5" Grid.Column="0" Margin="3" VerticalAlignment="Center">Blog:</Label>
            <TextBox Grid.Row="5" Grid.Column="1" Margin="3" Height="auto" VerticalAlignment="Center"></TextBox>
            <Button Grid.Row="5" Grid.Column="2" Margin="3" Padding="2">Browse</Button>

            <Button Grid.Row="6" Grid.Column="0" Name="btnLineUp" Click="btnLineUp_Click">Line Up</Button>
            <Button Grid.Row="6" Grid.Column="1" Name="btnPageUp" Click="btnPageUp_Click">Page Up</Button>
        </Grid>
    </ScrollViewer>
</Window>
后台代码:
using System;
using System.Collections.Generic;
using System.Diagnostics;
using System.IO;
using System.Linq;
using System.Text;
using System.Threading.Tasks;
using System.Windows;
using System.Windows.Controls;
using System.Windows.Data;
using System.Windows.Documents;
using System.Windows.Input;
using System.Windows.Markup;
using System.Windows.Media;
using System.Windows.Media.Imaging;
using System.Windows.Navigation;
using System.Windows.Shapes;

namespace WpfApp1
{
    /// <summary>
    /// MainWindow.xaml 的交互逻辑
    /// </summary>
    public partial class MainWindow : Window
    {


        public MainWindow()
        {
            InitializeComponent();


        }

        private void btnLineDown_Click(object sender, RoutedEventArgs e)
        {
            this.myScroll.LineDown();
        }

        private void btnPageDown_Click(object sender, RoutedEventArgs e)
        {
            this.myScroll.PageDown();
        }

        private void btnPageUp_Click(object sender, RoutedEventArgs e)
        {
            this.myScroll.PageUp();
        }

        private void btnLineUp_Click(object sender, RoutedEventArgs e)
        {
            this.myScroll.LineUp();
        }
    }
}
GroupBox
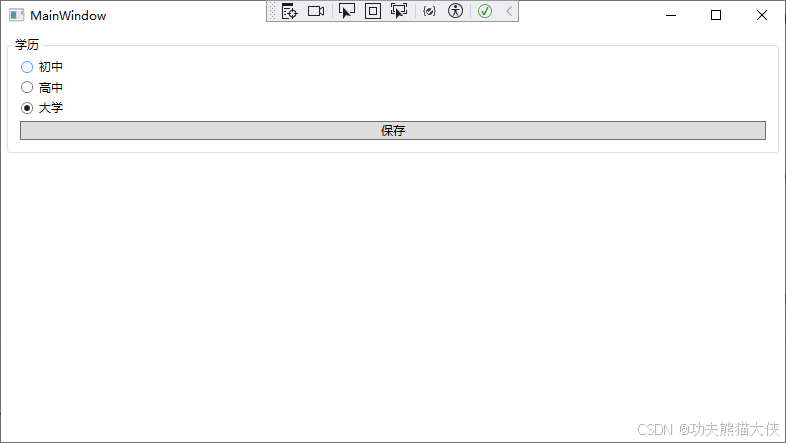
GroupBox 显示为具有圆角和标题的方框。
<Window x:Class="WpfApp1.MainWindow"
        xmlns="http://schemas.microsoft.com/winfx/2006/xaml/presentation"
        xmlns:x="http://schemas.microsoft.com/winfx/2006/xaml"
        xmlns:d="http://schemas.microsoft.com/expression/blend/2008"
        xmlns:mc="http://schemas.openxmlformats.org/markup-compatibility/2006"
        xmlns:local="clr-namespace:WpfApp1"
        mc:Ignorable="d"
        Title="MainWindow" Height="450" Width="800">
    <GroupBox Header="学历" Padding="5" Margin="5" VerticalAlignment="Top">
        <StackPanel>
            <RadioButton Margin="3">初中</RadioButton>
            <RadioButton Margin="3">高中</RadioButton>
            <RadioButton Margin="3" IsChecked="True">大学</RadioButton>
            <Button Margin="3">保存</Button>
        </StackPanel>
    </GroupBox>
</Window>
TabItem
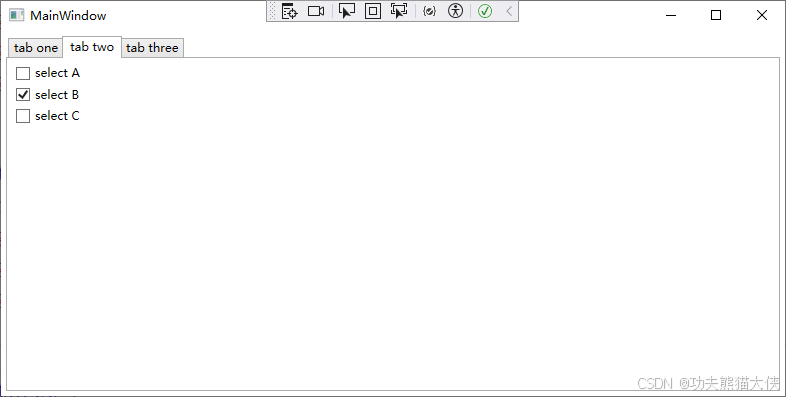
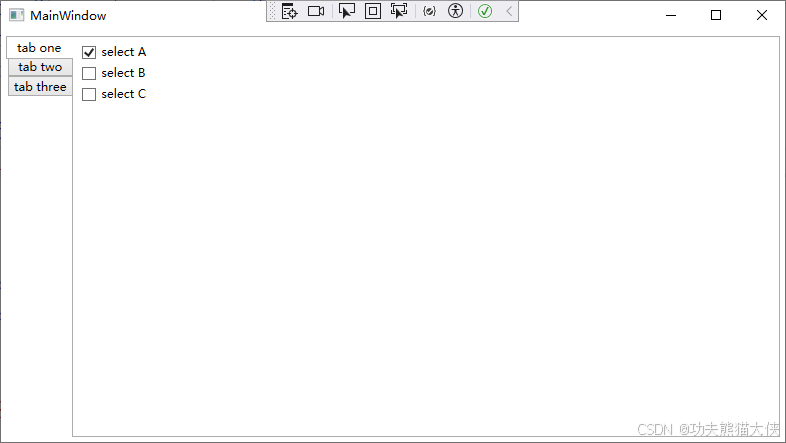
TabItem 表示 TabControl 控件中的一页。TabItem 类添加的唯一有意义的属性是IsSelected,该属性指示选项卡(tab) 当前是否显示在 TabControl 控件中。
<Window x:Class="WpfApp1.MainWindow"
        xmlns="http://schemas.microsoft.com/winfx/2006/xaml/presentation"
        xmlns:x="http://schemas.microsoft.com/winfx/2006/xaml"
        xmlns:d="http://schemas.microsoft.com/expression/blend/2008"
        xmlns:mc="http://schemas.openxmlformats.org/markup-compatibility/2006"
        xmlns:local="clr-namespace:WpfApp1"
        mc:Ignorable="d"
        Title="MainWindow" Height="450" Width="800">
    <TabControl Margin="5">
        <TabItem Header="tab one">
            <StackPanel Margin="3">
                <CheckBox Margin="3"  IsChecked="True">select A</CheckBox>
                <CheckBox Margin="3">select B</CheckBox>
                <CheckBox Margin="3">select C</CheckBox>
            </StackPanel>
        </TabItem>
        <TabItem Header="tab two" IsSelected="True">
            <StackPanel Margin="3">
                <CheckBox Margin="3">select A</CheckBox>
                <CheckBox Margin="3" IsChecked="True">select B</CheckBox>
                <CheckBox Margin="3">select C</CheckBox>
            </StackPanel>
        </TabItem>
        <TabItem Header="tab three">
            <StackPanel Margin="3">
                <CheckBox Margin="3">select A</CheckBox>
                <CheckBox Margin="3" >select B</CheckBox>
                <CheckBox Margin="3" IsChecked="True">select C</CheckBox>
            </StackPanel>
        </TabItem>
    </TabControl>
</Window>
提示:
可使用TabStripPlacement 属性,设置选项卡在侧边哪个位置显示。
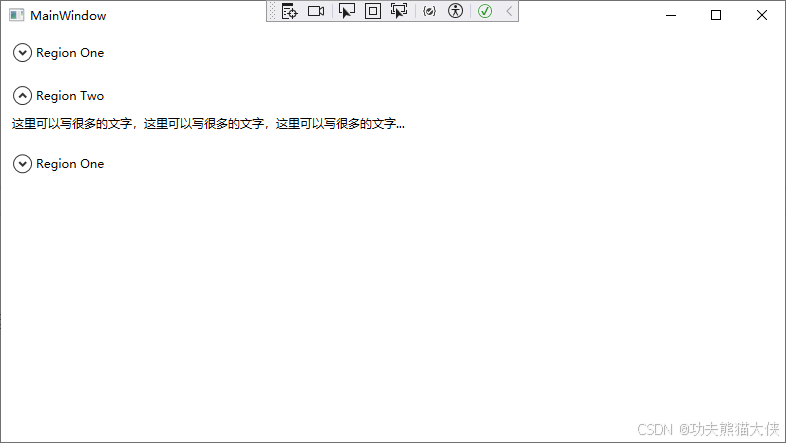
Expander
此控件通过单击小箭头按钮来显示或隐藏所包含的内容。
<Window x:Class="WpfApp1.MainWindow"
        xmlns="http://schemas.microsoft.com/winfx/2006/xaml/presentation"
        xmlns:x="http://schemas.microsoft.com/winfx/2006/xaml"
        xmlns:d="http://schemas.microsoft.com/expression/blend/2008"
        xmlns:mc="http://schemas.openxmlformats.org/markup-compatibility/2006"
        xmlns:local="clr-namespace:WpfApp1"
        mc:Ignorable="d"
        Title="MainWindow" Height="450" Width="800">
    <StackPanel>
        <Expander Margin="5" Padding="5" Header="Region One" >
            <Button Padding="3">按钮A</Button>
        </Expander>
        <Expander Margin="5" Padding="5" Header="Region Two" IsExpanded="True">
            <TextBlock TextWrapping="Wrap">
                这里可以写很多的文字,这里可以写很多的文字,这里可以写很多的文字...
            </TextBlock>
        </Expander>
        <Expander Margin="5" Padding="5" Header="Region One" IsExpanded="False">
            <StackPanel>
                <RadioButton>初中</RadioButton>
                <RadioButton>高中</RadioButton>
                <RadioButton>大学</RadioButton>
            </StackPanel>
        </Expander>
    </StackPanel>
</Window>
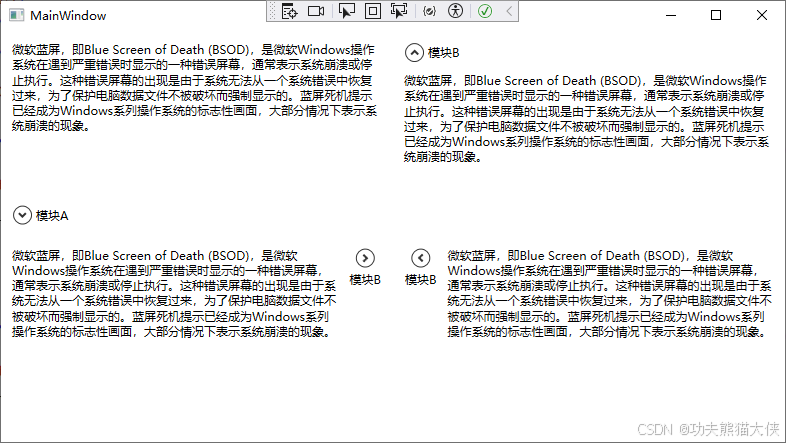
还可选择扩展器扩展的方向,是否折叠等属性。
<Window x:Class="WpfApp1.MainWindow"
xmlns="http://schemas.microsoft.com/winfx/2006/xaml/presentation"
xmlns:x="http://schemas.microsoft.com/winfx/2006/xaml"
xmlns:d="http://schemas.microsoft.com/expression/blend/2008"
xmlns:mc="http://schemas.openxmlformats.org/markup-compatibility/2006"
xmlns:local="clr-namespace:WpfApp1"
mc:Ignorable="d"
Title="MainWindow" Height="450" Width="800">
<Grid>
<Grid.RowDefinitions>
<RowDefinition/>
<RowDefinition/>
</Grid.RowDefinitions>
<Grid.ColumnDefinitions>
<ColumnDefinition/>
<ColumnDefinition/>
</Grid.ColumnDefinitions>
<Expander Grid.Row="0" Grid.Column="0" Margin="5" Padding="5" Header="模块A" ExpandDirection="Up" IsExpanded="True">
<TextBlock TextWrapping="Wrap">
微软蓝屏,即Blue Screen of Death (BSOD),是微软Windows操作系统在遇到严重错误时显示的一种错误屏幕,通常表示系统崩溃或停止执行。这种错误屏幕的出现是由于系统无法从一个系统错误中恢复过来,为了保护电脑数据文件不被破坏而强制显示的。蓝屏死机提示已经成为Windows系列操作系统的标志性画面,大部分情况下表示系统崩溃的现象。
</TextBlock>
</Expander>
<Expander Grid.Row="0" Grid.Column="1" Margin="5" Padding="5" Header="模块B" ExpandDirection="Down">
<TextBlock TextWrapping="Wrap">
微软蓝屏,即Blue Screen of Death (BSOD),是微软Windows操作系统在遇到严重错误时显示的一种错误屏幕,通常表示系统崩溃或停止执行。这种错误屏幕的出现是由于系统无法从一个系统错误中恢复过来,为了保护电脑数据文件不被破坏而强制显示的。蓝屏死机提示已经成为Windows系列操作系统的标志性画面,大部分情况下表示系统崩溃的现象。
</TextBlock>
</Expander>
<Expander Grid.Row="1" Grid.Column="0" Margin="5" Padding="5" Header="模块B" ExpandDirection="Left">
<TextBlock TextWrapping="Wrap">
微软蓝屏,即Blue Screen of Death (BSOD),是微软Windows操作系统在遇到严重错误时显示的一种错误屏幕,通常表示系统崩溃或停止执行。这种错误屏幕的出现是由于系统无法从一个系统错误中恢复过来,为了保护电脑数据文件不被破坏而强制显示的。蓝屏死机提示已经成为Windows系列操作系统的标志性画面,大部分情况下表示系统崩溃的现象。
</TextBlock>
</Expander>
<Expander Grid.Row="1" Grid.Column="1" Margin="5" Padding="5" Header="模块B" ExpandDirection="Right" IsExpanded="True">
<TextBlock TextWrapping="Wrap">
微软蓝屏,即Blue Screen of Death (BSOD),是微软Windows操作系统在遇到严重错误时显示的一种错误屏幕,通常表示系统崩溃或停止执行。这种错误屏幕的出现是由于系统无法从一个系统错误中恢复过来,为了保护电脑数据文件不被破坏而强制显示的。蓝屏死机提示已经成为Windows系列操作系统的标志性画面,大部分情况下表示系统崩溃的现象。
</TextBlock>
</Expander>
</Grid>
</Window>
文本控件
WPF 提供了三个用于输入文本的控件:TextBox、RichTextBox 和 PasswordBox。其中TextBox、RichTextBox 继承自 TextBoxBase 类,PasswordBox 继承自 Control 类。
多行文本
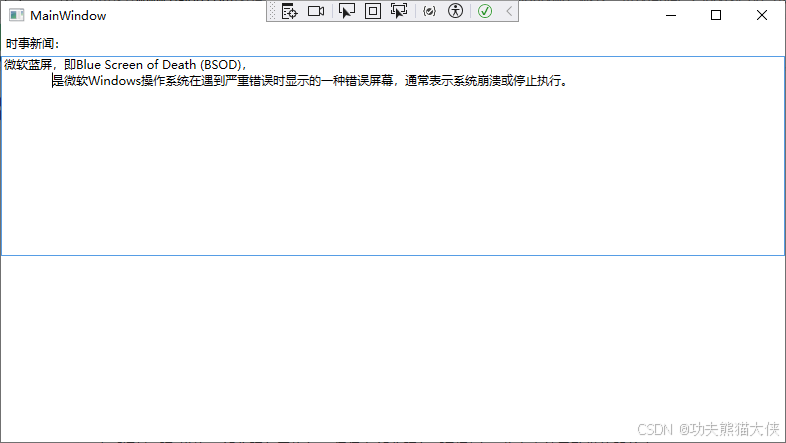
TextBox 控件通常存储单行文本(可通过设置 MaxLength 属性来限制字符的数量)。如果需要处理多行文本,可将 TextWrapping 属性设置为Wrap 或 WrapWidthOverflow.
<Window x:Class="WpfApp1.MainWindow"
        xmlns="http://schemas.microsoft.com/winfx/2006/xaml/presentation"
        xmlns:x="http://schemas.microsoft.com/winfx/2006/xaml"
        xmlns:d="http://schemas.microsoft.com/expression/blend/2008"
        xmlns:mc="http://schemas.openxmlformats.org/markup-compatibility/2006"
        xmlns:local="clr-namespace:WpfApp1"
        mc:Ignorable="d"
        Title="MainWindow" Height="450" Width="800">
    <StackPanel>
        <TextBlock Padding="5">时事新闻:</TextBlock>

        <!--
        TextWrapping:文本换行模式
        AcceptsReturn:是否接受enter按钮
        AcceptsTab:是否接受tab按钮
        -->
        <TextBox TextWrapping="Wrap" AcceptsReturn="True" AcceptsTab="True" Height="200">

        </TextBox>
    </StackPanel>
</Window>
提示:
TextBox 类还提供了几个方法,通过这些方法可以文本内容中移动。包括 LineUp(),LineDown(),PageUp(),PageDown(),ScrollToHome(),ScrollToEnd()以及ScrollToLine().
选择文本
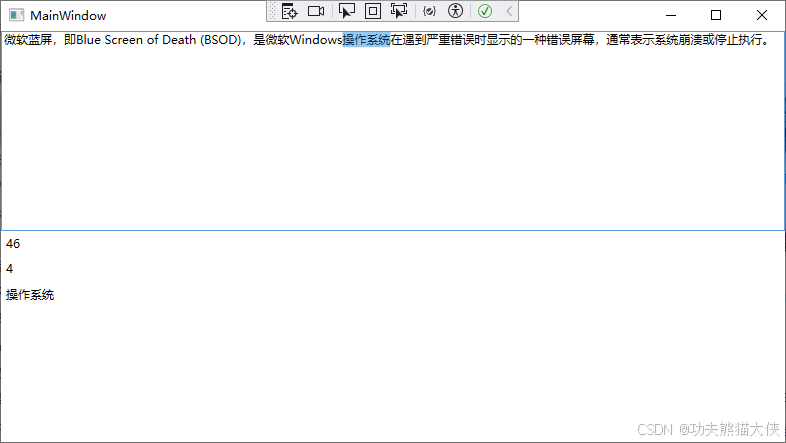
正如您已经了解到的,在任何文本框中都可以通过单击并拖动鼠标,或按住 Shif 键并使用方向键在文本中移动来选择文本。TextBox 类还提供了使用 SelectionStart、SelectionLength 以及SelectedText 属性,通过编程决定选择哪些文本或改变当前所选文本的能力。
页面:
<Window x:Class="WpfApp1.MainWindow"
        xmlns="http://schemas.microsoft.com/winfx/2006/xaml/presentation"
        xmlns:x="http://schemas.microsoft.com/winfx/2006/xaml"
        xmlns:d="http://schemas.microsoft.com/expression/blend/2008"
        xmlns:mc="http://schemas.openxmlformats.org/markup-compatibility/2006"
        xmlns:local="clr-namespace:WpfApp1"
        mc:Ignorable="d"
        Title="MainWindow" Height="450" Width="800">
    <StackPanel>


        <!--
        TextWrapping:文本换行模式
        AcceptsReturn:是否接受enter按钮
        AcceptsTab:是否接受tab按钮
        -->
        <TextBox Name="txtContent" TextWrapping="Wrap" AcceptsReturn="True" AcceptsTab="True" Height="200" SelectionChanged="TextBox_SelectionChanged">

        </TextBox>

        <TextBlock Name="tbStart" Padding="5"></TextBlock>
        <TextBlock Name="tbLength" Padding="5"></TextBlock>
        <TextBlock Name="tbSelectText" Padding="5"></TextBlock>
    </StackPanel>
</Window>
后台:
using System;
using System.Collections.Generic;
using System.Diagnostics;
using System.IO;
using System.Linq;
using System.Text;
using System.Threading.Tasks;
using System.Windows;
using System.Windows.Controls;
using System.Windows.Data;
using System.Windows.Documents;
using System.Windows.Input;
using System.Windows.Markup;
using System.Windows.Media;
using System.Windows.Media.Imaging;
using System.Windows.Navigation;
using System.Windows.Shapes;

namespace WpfApp1
{
    /// <summary>
    /// MainWindow.xaml 的交互逻辑
    /// </summary>
    public partial class MainWindow : Window
    {


        public MainWindow()
        {
            InitializeComponent();


        }

        private void TextBox_SelectionChanged(object sender, RoutedEventArgs e)
        {
            this.tbStart.Text=this.txtContent.SelectionStart.ToString();
            this.tbLength.Text=this.txtContent.SelectionLength.ToString();
            this.tbSelectText.Text = this.txtContent.SelectedText.ToString();
        }
    }
}
TextBox 类还提供了可控制文本选择行为的属性 AutoWordSelection。如果将该属性设为true,那么当在文本中拖动鼠标时文本框每次会选择整个单词。
提示:
当通过代码块操作文本框中的文本时,可使用 BeginChange() 和 EndChange() 方法将一系列动作合并起来,TextBox 会将其作为单独的更改 “块”进行处理。可在单个步骤中将这些操作撤销。
密码框
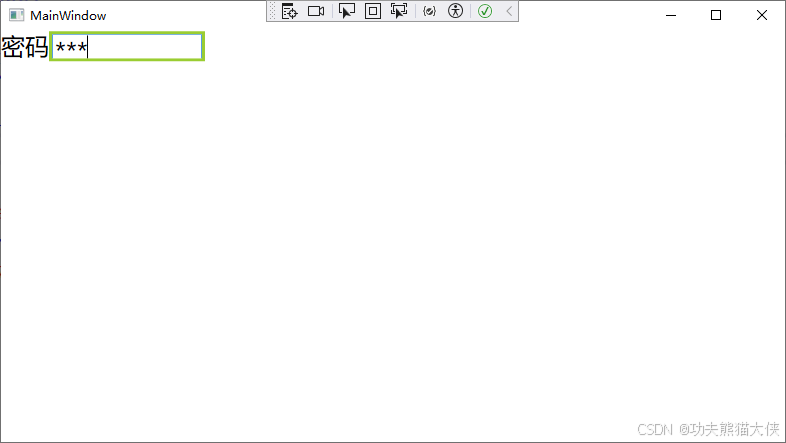
PasswordBox 看起来与TextBox 类似,但它通过显示圆圈符号字符串来屏蔽实际字符(可通过设置 PasswordChar 属性选择不同的屏蔽字符)。此外,PasswordBox 控件不支持剪贴板,从而不能复制内部的文本。
<Window x:Class="WpfApp1.MainWindow"
        xmlns="http://schemas.microsoft.com/winfx/2006/xaml/presentation"
        xmlns:x="http://schemas.microsoft.com/winfx/2006/xaml"
        xmlns:d="http://schemas.microsoft.com/expression/blend/2008"
        xmlns:mc="http://schemas.openxmlformats.org/markup-compatibility/2006"
        xmlns:local="clr-namespace:WpfApp1"
        mc:Ignorable="d"
        xmlns:sys="clr-namespace:System;assembly=System"
        Title="MainWindow" Height="450" Width="800">
    <StackPanel Orientation="Horizontal" VerticalAlignment="Top">

        <TextBlock Text="密码" FontSize="24"/>
        <Border BorderBrush="YellowGreen" BorderThickness="3" Height="30">
            <PasswordBox PasswordChar="*" FontSize="24" Width="150" Height="30" />
        </Border>

    </StackPanel>
</Window>
列表控件
WPF提供了许多封装项的集合的控件,包括将在本节介绍的简单 ListBox 和 ComboBox 控件,乃至更特的控件,如ListView、TreeView 和 TooIBar控件,这些控件将在后续章节中介绍。所有这些控件都继承自 ItemsControl 类。
ListBox
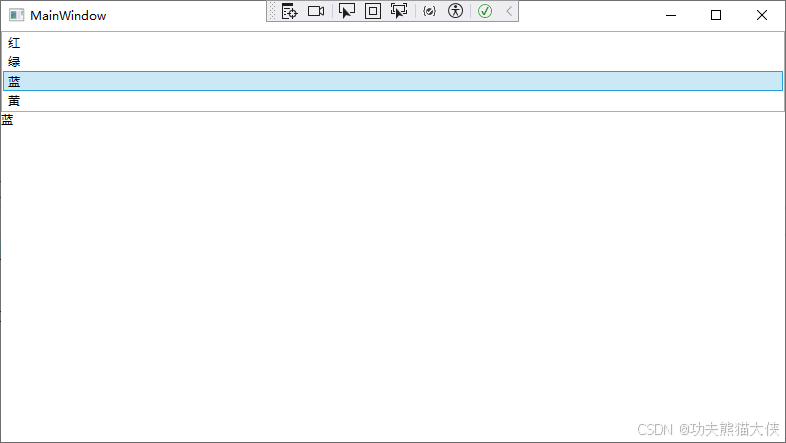
ListBox 类代表了一种最常用的Windows 设计,允许用户从长度可变的列表中选择一项。
注意:
果将 SelectionMode 属性设置 Multiple 或 Extended,ListBox 类还允许选择多项。在Multiple 模式下,可通过单击项进行选择或取消选择。在 Extended 模式下,需要按下Ctl键选择其他项,或按下 Shift 键选择某个选项范围。在这两种多选模式下,可用 Selectedltems 集合替代 Selectedltem 属性来获取所有选择的项。
页面:
<Window x:Class="WpfApp1.MainWindow"
        xmlns="http://schemas.microsoft.com/winfx/2006/xaml/presentation"
        xmlns:x="http://schemas.microsoft.com/winfx/2006/xaml"
        xmlns:d="http://schemas.microsoft.com/expression/blend/2008"
        xmlns:mc="http://schemas.openxmlformats.org/markup-compatibility/2006"
        xmlns:local="clr-namespace:WpfApp1"
        mc:Ignorable="d"
        Title="MainWindow" Height="450" Width="800">
    <StackPanel >

        <ListBox Name="lbColor" SelectionChanged="lbColor_SelectionChanged">
            <ListBoxItem>红</ListBoxItem>
            <ListBoxItem>绿</ListBoxItem>
            <ListBoxItem>蓝</ListBoxItem>
            <ListBoxItem>黄</ListBoxItem>
        </ListBox>

        <TextBlock Name="tbResult"></TextBlock>
    </StackPanel>
</Window>
后台:
using System;
using System.Collections.Generic;
using System.Diagnostics;
using System.IO;
using System.Linq;
using System.Text;
using System.Threading.Tasks;
using System.Windows;
using System.Windows.Controls;
using System.Windows.Data;
using System.Windows.Documents;
using System.Windows.Input;
using System.Windows.Markup;
using System.Windows.Media;
using System.Windows.Media.Imaging;
using System.Windows.Navigation;
using System.Windows.Shapes;

namespace WpfApp1
{
    /// <summary>
    /// MainWindow.xaml 的交互逻辑
    /// </summary>
    public partial class MainWindow : Window
    {


        public MainWindow()
        {
            InitializeComponent();


        }


        private void lbColor_SelectionChanged(object sender, SelectionChangedEventArgs e)
        {
            ListBoxItem lvi= this.lbColor.SelectedItem as ListBoxItem;

            this.tbResult.Text = lvi.Content.ToString();
        }
    }
}
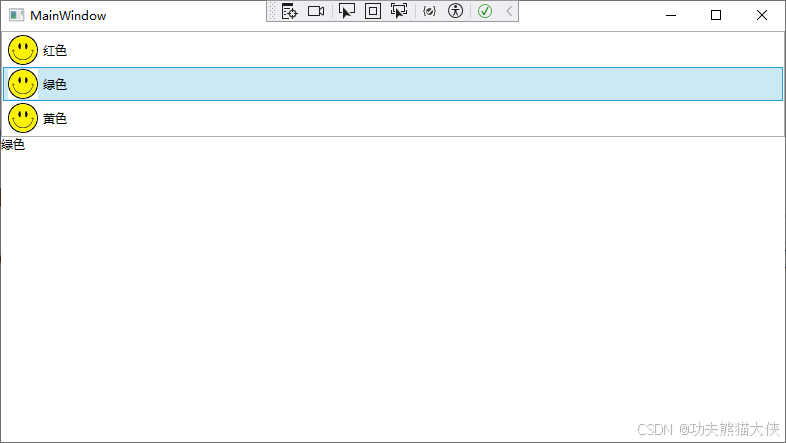
ListBox 控件是一个非常灵活的控件。它不仅可以包含ListBoxltem 对象,也可以驻留其他任意元素。这是因为 ListBoxltem 类继承自 ContentControl类,从而 ListBoxltemn 能够包含一段嵌套的内容。如果该内容继承自 UIElememt类,它将在 LisBox 控件中呈现出来。如果是其他类型的对象,ListBoxitem 对象会调用 ToString()方法并显示最终的文本。
页面:
<Window x:Class="WpfApp1.MainWindow"
        xmlns="http://schemas.microsoft.com/winfx/2006/xaml/presentation"
        xmlns:x="http://schemas.microsoft.com/winfx/2006/xaml"
        xmlns:d="http://schemas.microsoft.com/expression/blend/2008"
        xmlns:mc="http://schemas.openxmlformats.org/markup-compatibility/2006"
        xmlns:local="clr-namespace:WpfApp1"
        mc:Ignorable="d"
        Title="MainWindow" Height="450" Width="800">
    <StackPanel >

        <ListBox Name="lbColor" SelectionChanged="lbColor_SelectionChanged">
            <ListBoxItem>
                <StackPanel Orientation="Horizontal">
                    <Image Source="happyface.jpg" Width="30" Height="30"/>
                    <Label  VerticalAlignment="Center" >红色</Label>
                </StackPanel>
            </ListBoxItem>

            <ListBoxItem>
                <StackPanel Orientation="Horizontal">
                    <Image Source="happyface.jpg" Width="30" Height="30"/>
                    <Label  VerticalAlignment="Center" >绿色</Label>
                </StackPanel>
            </ListBoxItem>

            <ListBoxItem>
                <StackPanel Orientation="Horizontal">
                    <Image Source="happyface.jpg" Width="30" Height="30"/>
                    <Label  VerticalAlignment="Center" >黄色</Label>
                </StackPanel>
            </ListBoxItem>
        </ListBox>

        <TextBlock Name="tbResult"></TextBlock>
    </StackPanel>
</Window>
后台:
using System;
using System.Collections.Generic;
using System.Diagnostics;
using System.IO;
using System.Linq;
using System.Text;
using System.Threading.Tasks;
using System.Windows;
using System.Windows.Controls;
using System.Windows.Data;
using System.Windows.Documents;
using System.Windows.Input;
using System.Windows.Markup;
using System.Windows.Media;
using System.Windows.Media.Imaging;
using System.Windows.Navigation;
using System.Windows.Shapes;

namespace WpfApp1
{
    /// <summary>
    /// MainWindow.xaml 的交互逻辑
    /// </summary>
    public partial class MainWindow : Window
    {


        public MainWindow()
        {
            InitializeComponent();


        }


        private void lbColor_SelectionChanged(object sender, SelectionChangedEventArgs e)
        {
            ListBoxItem lvi= this.lbColor.SelectedItem as ListBoxItem;

            StackPanel sp = lvi.Content as StackPanel;

            Label lbl = sp.Children[1] as Label;

            this.tbResult.Text = lbl.Content.ToString();
        }
    }
}
实际上 ListBox 控件足够智能,它能隐式的创建 ListBoxItem 对象。这意味着可直接在 ListBox 元素中放置对象。
<ListBox Name="lbColor" SelectionChanged="lbColor_SelectionChanged">

    <StackPanel Orientation="Horizontal">
        <Image Source="happyface.jpg" Width="30" Height="30"/>
        <Label  VerticalAlignment="Center" >红色</Label>
    </StackPanel>

    <StackPanel Orientation="Horizontal">
        <Image Source="happyface.jpg" Width="30" Height="30"/>
        <Label  VerticalAlignment="Center" >绿色</Label>
    </StackPanel>

    <StackPanel Orientation="Horizontal">
        <Image Source="happyface.jpg" Width="30" Height="30"/>
        <Label  VerticalAlignment="Center" >黄色</Label>
    </StackPanel>

</ListBox>
ComboBox
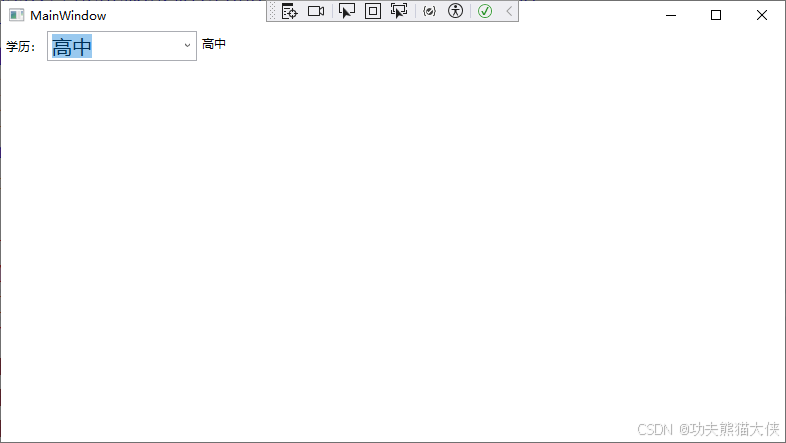
ComboBox 控件和LisiBox 控件类似。该控件包含 ComboBoxltem 对象的集合,既可以最式地也可以隐式地创建该集合。与ListBoxitem 类似,ComboBoxltem 也是可以包含任意嵌套元素的内容控件。
ComboBox 类和ListBox 类之间的重要区别是它们在窗口中呈现自身的方式。ComboBox 控件使用下拉列表,这意味着一次只能选择一项。
如果希望允许用户在组合框中通过输入文本选择一项,就必须将IsEditable属性设置为true,并且必须确保选项集合中存储的是普通的纯文本的ComboBoxitem 对象,或是提供了有意义的ToString()表示的对象。
范围控件
WPF提供了三个使用范围概念的控件。这些控件使用在特定最小值和最大值之间的数值。
这些控件。ScrollBar、ProgressBar 以及 Slider都继承自 RangeBase类(该类又继承自 Control
类)。尽管它们使用相同的抽象概念(范围),但工作方式却有很大的区别。
RangeBase 类的属性:
| 名称 | 说明 |
|---|---|
| Value | 控件的值,默认从0开始,类型为双精度浮点型。 |
| Maximum | 最大值 |
| Minimum | 最小值 |
| SmallChange | Value 属性为“小变化”向上或向下调整的数量。 |
| LargeChange | Value 属性为“大变化”向上或向下调整的数量。 |
Slider
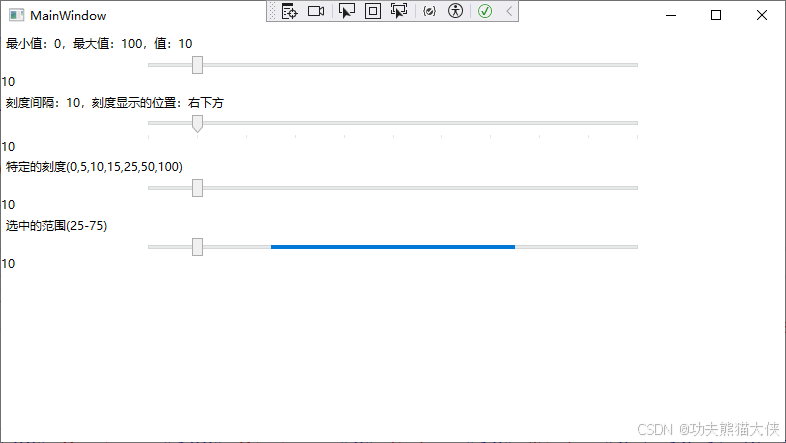
Slider 控件是偶尔用到的特控件—例如,当数字本身不是特别重要时可使用该控件设置数值。再比如,通过在滑动条上从一边向另一边拖动滑块设置媒体播放器的音量是非常合理的。滑块的大致位置指示相对音量(正常、小音量、大音量),但对于用户来说背后的数字没有意义。
Slider 控件的重要属性是在 RangeBase类中定义的。除这些属性外,还可使用下表中列出的所有属性:
| 名称 | 说明 |
|---|---|
| Orientation | 在竖直滑动条和水平滑动条之间切换 |
| Delay Interval | 当单击并按下滑动条的两侧时,控制滑块沿轨迹移动的速度。单位为毫秒。 Delay 是单击后在滑块移动一个单位(小变化)之前的时间。 Interval是当继续按住鼠标键时滑块再次移动之前的时间。 |
| TickPlacement | 决定刻度显示的位置,默认情况下,TickPlacement 被设置为None. |
| TickFrequency | 设置刻度之间的间隔 |
| Ticks | 如果希望在特定的不规则位置放置刻度,可使用 Ticks 集合。 |
| IsSnapToTickEnabled | 如果为true,当移动滑动条时,会自动跳到合适的位置 |
| IsSelectionRangeEnabled | 如果为true,可使用选择范围使滑动条的一部分显示阴影。 |
<Window x:Class="WpfApp1.MainWindow"
        xmlns="http://schemas.microsoft.com/winfx/2006/xaml/presentation"
        xmlns:x="http://schemas.microsoft.com/winfx/2006/xaml"
        xmlns:d="http://schemas.microsoft.com/expression/blend/2008"
        xmlns:mc="http://schemas.openxmlformats.org/markup-compatibility/2006"
        xmlns:local="clr-namespace:WpfApp1"
        mc:Ignorable="d"
        Title="MainWindow" Height="450" Width="800">
    <StackPanel >
        <Label>最小值:0,最大值:100,值:10</Label>
        <Slider Name="sid1" Width="500" Maximum="100" Minimum="0" Value="10"></Slider>
        <TextBlock Text="{Binding ElementName=sid1,Path=Value}"/>

        <Label>刻度间隔:10,刻度显示的位置:右下方</Label>
        <Slider Name="sid2" Width="500" Maximum="100" Minimum="0" Value="10" TickFrequency="10" IsSnapToTickEnabled="True" TickPlacement="BottomRight"></Slider>
        <TextBlock Text="{Binding ElementName=sid2,Path=Value}"/>

        <Label>特定的刻度(0,5,10,15,25,50,100)</Label>
        <Slider Name="sid3" Width="500" Maximum="100" Minimum="0" Value="10" Ticks="0,5,10,15,25,50,100" IsSnapToTickEnabled="True"></Slider>
        <TextBlock Text="{Binding ElementName=sid3,Path=Value}"/>

        <Label>选中的范围(25-75)</Label>
        <Slider Name="sid4" Width="500" Minimum="0" Maximum="100" Value="10" IsSelectionRangeEnabled="True" SelectionStart="25" SelectionEnd="75"></Slider>
        <TextBlock Text="{Binding ElementName=sid4,Path=Value}"/>
    </StackPanel>
</Window>
ProgressBar
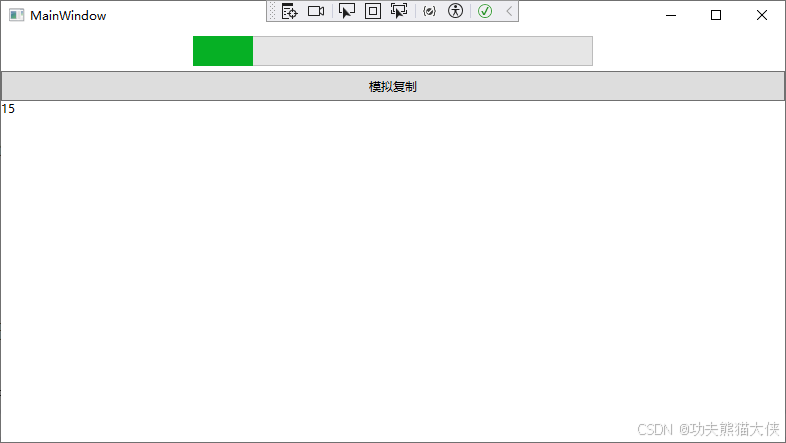
ProgressBar 控件指示长时间运行任务的进度。与 Slider 控件不同,ProgressBar 控件不能与用户进行交互。反而,需要由代码递增 Value 属性值(从技术角度看,WPF 规则建议不将ProgressBar 作为控件,因为它无法响应鼠标动作和键盘输入)。ProgressBar 控件具有4个设备无关单位的最小高度。如果希望看到更大、更传统的进度条,需要设置 Height 属性(或将它放入具有适当固定尺寸的容器中)。
使用 ProgressBar 控件的通常方式是将它作为长时间运行的状态指示器,甚至可能不知道该任务需要执行多长时间。有趣的是,可通过将 IsIndeterminate 属性设置为 true 来完成这一工作。
页面:
<Window x:Class="WpfApp1.MainWindow"
        xmlns="http://schemas.microsoft.com/winfx/2006/xaml/presentation"
        xmlns:x="http://schemas.microsoft.com/winfx/2006/xaml"
        xmlns:d="http://schemas.microsoft.com/expression/blend/2008"
        xmlns:mc="http://schemas.openxmlformats.org/markup-compatibility/2006"
        xmlns:local="clr-namespace:WpfApp1"
        mc:Ignorable="d"
        Title="MainWindow" Height="450" Width="800">
    <StackPanel >
        <ProgressBar Name="pb1" Height="30" Margin="5" Width="400" Value="0" Maximum="100" Visibility="Hidden"></ProgressBar>
        <Button Height="30" Click="Button_Click">模拟复制</Button>
        <TextBlock Text="{Binding ElementName=pb1,Path=Value}"></TextBlock>
    </StackPanel>
</Window>
后台:
using System;
using System.Collections.Generic;
using System.Diagnostics;
using System.IO;
using System.Linq;
using System.Text;
using System.Threading;
using System.Threading.Tasks;
using System.Windows;
using System.Windows.Controls;
using System.Windows.Data;
using System.Windows.Documents;
using System.Windows.Input;
using System.Windows.Markup;
using System.Windows.Media;
using System.Windows.Media.Imaging;
using System.Windows.Navigation;
using System.Windows.Shapes;

namespace WpfApp1
{
    /// <summary>
    /// MainWindow.xaml 的交互逻辑
    /// </summary>
    public partial class MainWindow : Window
    {


        public MainWindow()
        {
            InitializeComponent();


        }

        private async void Button_Click(object sender, RoutedEventArgs e)
        {
            pb1.Visibility = Visibility.Visible;

            for (int i = 0; i <= 100; i++)
            {
                int progress = i;
                await Task.Delay(50);  // 等待50毫秒
                Dispatcher.Invoke(() => pb1.Value = progress);  // 更新ProgressBar的值
            }
            pb1.Visibility = Visibility.Hidden;

        }
    }
}
日期控件
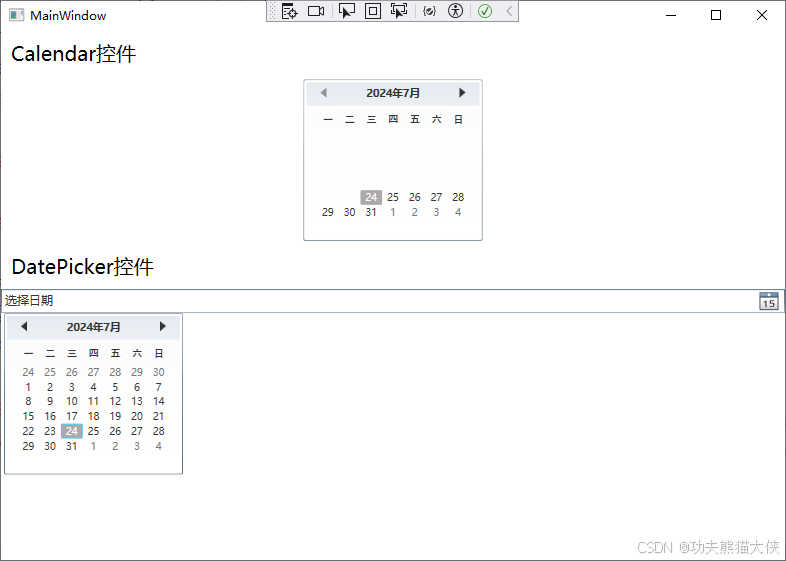
WPF包含两个日期控件:Calendar 和DatePicker。这两个控件都被设计为允许用户选择日期。
Calendar 控件显示日历,与在Windows 操作系统中看到的日历(例如,当配置系统日期时看到的日历)相似。该控件每次显示一个月份,允许从一个月份跳到另一个月份(通过单击箭头按钮),或眺到某个特定的月份(通过单击月份的标题头查看一年中的月份,然后单击月份)。
DatePicker 控件需要的空间更少。它模仿简单的文本框,该文本框以长日期格式或短日期格式保存日期字符串。DatePicker 控件提供了一个下拉箭头,当单击时,会弹出完整的日历视图,该视图和 Calendar控件显示的视图相同。这个弹出视图显示在其他任何内容的上面,就像是下拉组合框。
Calendar 类和 DatePicker 类的属性:
| 名称 | 说明 |
|---|---|
| DisplayDateStart DiplayDateEnd | 设置在日历视图中显示的日期范围,从第一个最早的日期到最后的日期. |
| BlackoutDates | 保存在日历中将被禁用或不能选择的日期集合。 |
| SelectedDate | 作为DateTime 对象提供选择的日期。 |
| SelectedDates | 作为DateTime 对象集合提供选择的日期。 |
| DisplayDate | 使用 DateTime 对象确定在日历视图中最初显示的日期。 |
| FirstDayOfWeek | 确定在日历中每行的开始位置 |
| IsTodayHighlighted | 确定日历视图是否通过突出显示指出档期日期。 |
| DisplayMode (只适用于Calendar控件) | 确定日历最初的月份显示模式。 |
| SelectionMode (只适用于 Calendar控件) | 确定允许的日期选择类型。 |
| IsDropDownOpen (只适用于DatePicker) | 确定是否打开DatePicker 控件中的下拉日历视图。 |
| SelectedDateFormat (只适用于DatePicker) | 确定在 DatePicker 控件的文本部分显示选择的日期的方式。 |
<Window x:Class="WpfApp1.MainWindow"
        xmlns="http://schemas.microsoft.com/winfx/2006/xaml/presentation"
        xmlns:x="http://schemas.microsoft.com/winfx/2006/xaml"
        xmlns:d="http://schemas.microsoft.com/expression/blend/2008"
        xmlns:mc="http://schemas.openxmlformats.org/markup-compatibility/2006"
        xmlns:local="clr-namespace:WpfApp1"
        mc:Ignorable="d"
        Title="MainWindow" Height="450" Width="800" Loaded="Window_Loaded">
    <StackPanel >
        <Label Padding="5" Margin="5" FontSize="20">Calendar控件</Label>
        <Calendar Name="cal"
            DisplayDateStart="2024-7-24"
            DisplayDateEnd="2024-8-30"
            DisplayDate="2024-7-24"
            />
        <Label Padding="5" Margin="5" FontSize="20">DatePicker控件</Label>
        <DatePicker IsDropDownOpen="True" SelectedDateFormat="Short"></DatePicker>
    </StackPanel>
</Window>
本章小结
本章介绍了WPF 的基本控件,包括基本元素,如标签、按钮、文本框以及列表。此外,还讨论了与控件模型背后的一些WPF 重要概念相关的内容,如画刷、字体以及内容模型。尽管大多数 WPF 控件很容易使用,然而通过理解这些概念,并理解WPF元素的不同分支如何结合在一起,将能更加容易地创建设计良好的窗口。
课后作业
|
| DisplayMode
(只适用于Calendar控件) | 确定日历最初的月份显示模式。 |
| SelectionMode
(只适用于 Calendar控件) | 确定允许的日期选择类型。 |
| IsDropDownOpen
(只适用于DatePicker) | 确定是否打开DatePicker 控件中的下拉日历视图。 |
| SelectedDateFormat
(只适用于DatePicker) | 确定在 DatePicker 控件的文本部分显示选择的日期的方式。 |
[外链图片转存中…(img-jaJihaiR-1721812369480)]
<Window x:Class="WpfApp1.MainWindow"
        xmlns="http://schemas.microsoft.com/winfx/2006/xaml/presentation"
        xmlns:x="http://schemas.microsoft.com/winfx/2006/xaml"
        xmlns:d="http://schemas.microsoft.com/expression/blend/2008"
        xmlns:mc="http://schemas.openxmlformats.org/markup-compatibility/2006"
        xmlns:local="clr-namespace:WpfApp1"
        mc:Ignorable="d"
        Title="MainWindow" Height="450" Width="800" Loaded="Window_Loaded">
    <StackPanel >
        <Label Padding="5" Margin="5" FontSize="20">Calendar控件</Label>
        <Calendar Name="cal"
            DisplayDateStart="2024-7-24"
            DisplayDateEnd="2024-8-30"
            DisplayDate="2024-7-24"
            />
        <Label Padding="5" Margin="5" FontSize="20">DatePicker控件</Label>
        <DatePicker IsDropDownOpen="True" SelectedDateFormat="Short"></DatePicker>
    </StackPanel>
</Window>
本章小结
本章介绍了WPF 的基本控件,包括基本元素,如标签、按钮、文本框以及列表。此外,还讨论了与控件模型背后的一些WPF 重要概念相关的内容,如画刷、字体以及内容模型。尽管大多数 WPF 控件很容易使用,然而通过理解这些概念,并理解WPF元素的不同分支如何结合在一起,将能更加容易地创建设计良好的窗口。
课后作业
略
