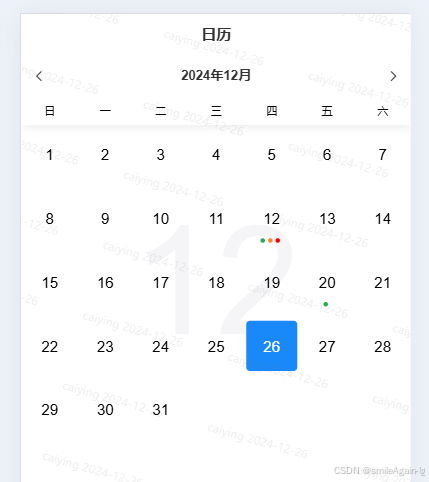
在vue3中使用vant日历组件(calendar)自定义下标的两种方法,推荐使用第二种:
日期下方加小圆点:
一、使用伪元素样式实现(::after伪元素小圆点样式会被覆盖,只能添加一个小圆点)
代码如下(示例):
<template>
  <div name="calendar" :no-toolbar="true">
    <van-calendar
      class="calendar-style"
      title="日历"
      :poppable="false"
      :show-confirm="false"
      v-model:show="show"
      switch-mode="month"
      :formatter="formatter"
    />
  </div>
</template>

<script setup>
import { ref } from 'vue';

// 控制日历的显示状态
const show = ref(true);

// 定义日期和对应的标识
const dateTime1 = [
  { date1: '20241220', value1: false, value2: true, value3: false },
  { date1: '20241212', value1: true, value2: false, value3: true }
];

// 格式化日历中的每一天
const formatter = (day) => {
  const year = day.date.getFullYear();
  const month = String(day.date.getMonth() + 1).padStart(2, '0'); // 确保月份是两位数
  const date = String(day.date.getDate()).padStart(2, '0'); // 确保日期是两位数
  const dateTime = `${year}${month}${date}`; // 格式化日期

  // 遍历日期数组,检查是否有匹配的日期
  dateTime1.forEach(item => {
    if (item.date1 === dateTime) {
      // 根据标识添加不同的类名
      if (item.value1) {
        day.className += " addOrangeDot"; // 添加橙色点
      }
      if (item.value2) {
        day.className += " addGreenDot"; // 添加绿色点
      }
      if (item.value3) {
        day.className += " addRedDot"; // 添加红色点
      }
    }
  });

  return day; // 返回处理后的day对象
};
</script>

<style lang="less" scoped>
.addGreenDot,
.addOrangeDot,
.addRedDot {
  position: relative; // 确保相对定位
}

// 绿点
::v-deep .addGreenDot::after {
  content: "";
  position: absolute;
  width: 6px;
  height: 6px;
  top: 56px; // 根据需要调整位置
  left: 25px; // 根据需要调整位置
  border-radius: 50%;
  background-color: rgb(34, 177, 76);
  margin-right: 12px!important;
  z-index: 1; // 确保它在其他元素之上
}

// 黄点
::v-deep .addOrangeDot::after {
  content: "";
  position: absolute;
  width: 6px;
  height: 6px;
  top: 56px; // 根据需要调整位置
  left: 25px; // 根据需要调整位置
  border-radius: 50%;
  background-color: #ff822c;
  margin-right: 12px!important;
  z-index: 1; // 确保它在其他元素之上
}

// 红点
::v-deep .addRedDot::after {
  content: "";
  position: absolute;
  width: 6px;
  height: 6px;
  top: 56px; // 根据需要调整位置
  left: 25px; // 根据需要调整位置
  border-radius: 50%;
  background-color: red;
  margin-right: 12px!important;
  z-index: 1; // 确保它在其他元素之上
}
</style>
二、通过插槽实现(推荐使用)
代码如下(示例):
<template>
  <f7-page name="calendar" :no-toolbar="true">
    <van-calendar
      class="calendar-style"
      title="日历"
      :poppable="false"
      :show-confirm="false"
      v-model:show="show"
      switch-mode="month"
      :formatter="formatter"
    >
      <template v-slot:bottom-info=day>
        <div class="dot-container">
          <div v-if="day.className&&day.className.includes('addGreenDot')" class="green-dot"></div>
          <div v-if="day.className&&day.className.includes('addOrangeDot')" class="orange-dot"></div>
          <div v-if="day.className&&day.className.includes('addRedDot')" class="red-dot"></div>
        </div>
      </template>
    </van-calendar>
  </f7-page>
</template>

<script setup>
import { ref } from 'vue';

// 控制日历的显示状态
const show = ref(true);

// 定义日期和对应的标识
const dateTime1 = [
  { date1: '20241220', value1: false, value2: true, value3: false },
  { date1: '20241212', value1: true, value2: true, value3: true }
];

// 格式化日历中的每一天
const formatter = (day) => {
  const year = day.date.getFullYear();
  const month = String(day.date.getMonth() + 1).padStart(2, '0'); // 确保月份是两位数
  const date = String(day.date.getDate()).padStart(2, '0'); // 确保日期是两位数
  const dateTime = `${year}${month}${date}`; // 格式化日期

  // 遍历日期数组,检查是否有匹配的日期
  dateTime1.forEach(item => {
    if (item.date1 === dateTime) {
      // 根据标识添加不同的类名
      if (item.value1) {
        day.className += " addOrangeDot"; // 添加橙色点
      }
      if (item.value2) {
        day.className += " addGreenDot"; // 添加绿色点
      }
      if (item.value3) {
        day.className += " addRedDot"; // 添加红色点
      }
    }
  });

  return day; // 返回处理后的day对象
};
</script>

<style lang="less" scoped>
.dot-container {
  display: flex;
  justify-content: center;
}

.green-dot {
  width: 5px;
  height: 5px;
  border-radius: 50%;
  background-color: rgb(34, 177, 76);
  margin-right: 3px;
  z-index: 1;
}

.orange-dot {
  width: 5px;
  height: 5px;
  border-radius: 50%;
  background-color: #ff822c;
  margin-right: 3px;
  z-index: 1;
}

.red-dot {
  width: 5px;
  height: 5px;
  border-radius: 50%;
  background-color: red;
  margin-right: 3px;
  z-index: 1;
}
</style>
