简介
我想要开发一个社交网站,社交网站存储好友列表成为了开发过程中的一大难题。
如果我想要保存每一个用户的好友信息该怎么保存呢?
用用户的id对应着好友的id,这样一条信息就是一个好友关系映射图,这张关系表可能长下面这样
| id | user_id | friend_id |
|---|---|---|
| 1 | 1 | 2 |
| 2 | 1 |
一个用户的好友由friend_id记录,1号用户和2号用户互为好友,这样的记录虽然冗余但是不得不记录下来。但是这样有很大的弊端。
假设我有200个用户,每个用户有300个好友,那么这样一张表就会有200*300 = 60000条记录。
用户的每次登录都会重新去数据库中读取记录,这样想想,是不是很可怕!!
为了解决这样的问题,我们可以将用户每次读取到的内容放在缓存中,这样当用户退出登录再次进入的时候,就直接读取缓存中的内容,减轻了我们数据库的压力。
而且缓存还有读取速度快的优势,能更加优化用户的体验。
SpringbootCache
在spring中自带cache,尤其是在springboot中,更是提供了注解来方便我们的使用,要想学好springboot的cache系统,我们还得先了解java给cache定义的几个规范
JSR-107规范
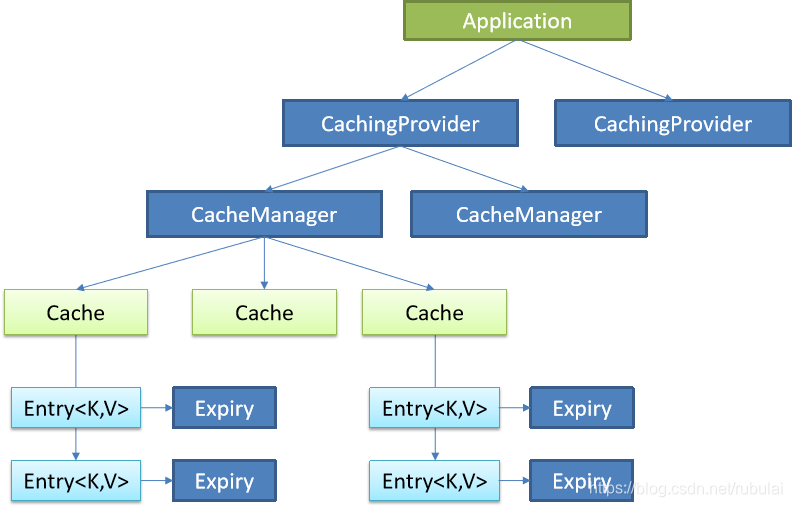
Java Caching定义了5个核心接口,分别是CachingProvider(缓存提供者)、CacheManager(缓存管理器)、Cache(缓存)、Entry(缓存键值对)和Expiry(缓存时效)。
- CachingProvider定义了创建、配置、获取、管理和控制多个CacheManager。一个应用可以在运行期访问多个CachingProvider。
- CacheManager定义了创建、配置、获取、管理和控制多个唯一命名的Cache,这些Cache存在于CacheManager的上下文中。一个CacheManager仅被一个CachingProvider所拥有。
- Cache是一个类似Map的数据结构并临时存储以Key为索引的值。一个Cache仅被一个CacheManager所拥有。
- Entry是一个存储在Cache中的key-value对。
- Expiry 每一个存储在Cache中的条目有一个定义的有效期。一旦超过这个时间,条目为过期的状态。一旦过期,条目将不可访问、更新和删除。缓存有效期可以通过ExpiryPolicy设置。
这张图展示了JSR-107规范定义的所有接口,但是没有具体的实现
一个应用里面可以有多个缓存提供者(CachingProvider),一个缓存提供者可以获取到多个缓存管理器(CacheManager),一个缓存管理器管理着不同的缓存(Cache),缓存中是一个个的缓存键值对(Entry),每个entry都有一个有效期(Expiry)。缓存管理器和缓存之间的关系有点类似于数据库中连接池和连接的关系。
上述规范介绍引自博客
重要概念
Cache 缓存接口,定义缓存操作。实现有:RedisCache、EhCacheCache、ConcurrentMapCache等
CacheManager 缓存管理器,管理各种缓存(Cache)组件
@Cacheable 主要针对方法配置,能够根据方法的请求参数对其结果进行缓存
@CacheEvict 清空缓存
@CachePut 保证方法被调用,又希望结果被缓存。
@EnableCaching 开启基于注解的缓存
keyGenerator 缓存数据时key生成策略
serialize 缓存数据时value序列化策略
springboot的默认缓存为ConcurrentMapCache
缓存工作原理
1、自动配置类:
CacheAutoConfiguration,通过CacheAutoConfiguration导入的CacheConfigurationImportSelector会向数组中添加一些缓存的配置类全类名
2、缓存的配置类
org.springframework.boot.autoconfigure.cache.GenericCacheConfiguration
org.springframework.boot.autoconfigure.cache.JCacheCacheConfiguration
org.springframework.boot.autoconfigure.cache.EhCacheCacheConfiguration
org.springframework.boot.autoconfigure.cache.HazelcastCacheConfiguration
org.springframework.boot.autoconfigure.cache.InfinispanCacheConfiguration
org.springframework.boot.autoconfigure.cache.CouchbaseCacheConfiguration
org.springframework.boot.autoconfigure.cache.RedisCacheConfiguration
org.springframework.boot.autoconfigure.cache.CaffeineCacheConfiguration
org.springframework.boot.autoconfigure.cache.GuavaCacheConfiguration
org.springframework.boot.autoconfigure.cache.SimpleCacheConfiguration(默认使用)
org.springframework.boot.autoconfigure.cache.NoOpCacheConfiguration
3、默认生效的配置类:SimpleCacheConfiguration
4、SimpleCacheConfiguration给容器中注册了一个CacheManager:ConcurrentMapCacheManager
@Configuration
@ConditionalOnMissingBean({CacheManager.class})
@Conditional({CacheCondition.class})
class SimpleCacheConfiguration {
    private final CacheProperties cacheProperties;
    private final CacheManagerCustomizers customizerInvoker;

    SimpleCacheConfiguration(CacheProperties cacheProperties, CacheManagerCustomizers customizerInvoker) {
        this.cacheProperties = cacheProperties;
        this.customizerInvoker = customizerInvoker;
    }

    @Bean
    public ConcurrentMapCacheManager cacheManager() {
        ConcurrentMapCacheManager cacheManager = new ConcurrentMapCacheManager();
        List<String> cacheNames = this.cacheProperties.getCacheNames();
        if (!cacheNames.isEmpty()) {
            cacheManager.setCacheNames(cacheNames);
        }

        return (ConcurrentMapCacheManager)this.customizerInvoker.customize(cacheManager);
    }
}
5、通过ConcurrentMapCacheManager可以获取和创建ConcurrentMapCache类型的缓存组件:ConcurrentMapCache的作用是数据保存在ConcurrentMap中
6、@Cacheable运行流程:
①方法运行之前,先去查询Cache(缓存组件),按照cacheNames指定的名字获取(CacheManager先获取相应的缓存,第一次获取缓存如果没有Cache组件会自动创建)
②去Cache中查找缓存的内容,使用的key默认就是方法的参数:
key默认是使用keyGenerator生成的,默认使用的是SimpleKeyGenerator
SimpleKeyGenerator生成key的默认策略:
如果没有参数:key = new SimpleKey();
如果有一个参数:key = 参数的值
如果有多个参数:key = new SimpleKey(params);
③没有查到缓存就调用目标方法
④将目标方法返回的结果放进缓存中
总结:@Cacheable标注的方法在执行之前会先检查缓存中有没有这个数据,默认按照参数的值为key查询缓存,如果没有就运行方法并将结果放入缓存,以后再来调用时直接使用缓存中的数据。
核心:
1️⃣使用CacheManager(ConcurrentMapCacheManager)按照名字得到Cache(ConcurrentMapCache)组件
2️⃣key使用keyGenerator生成,默认使用SimpleKeyGenerator
实操
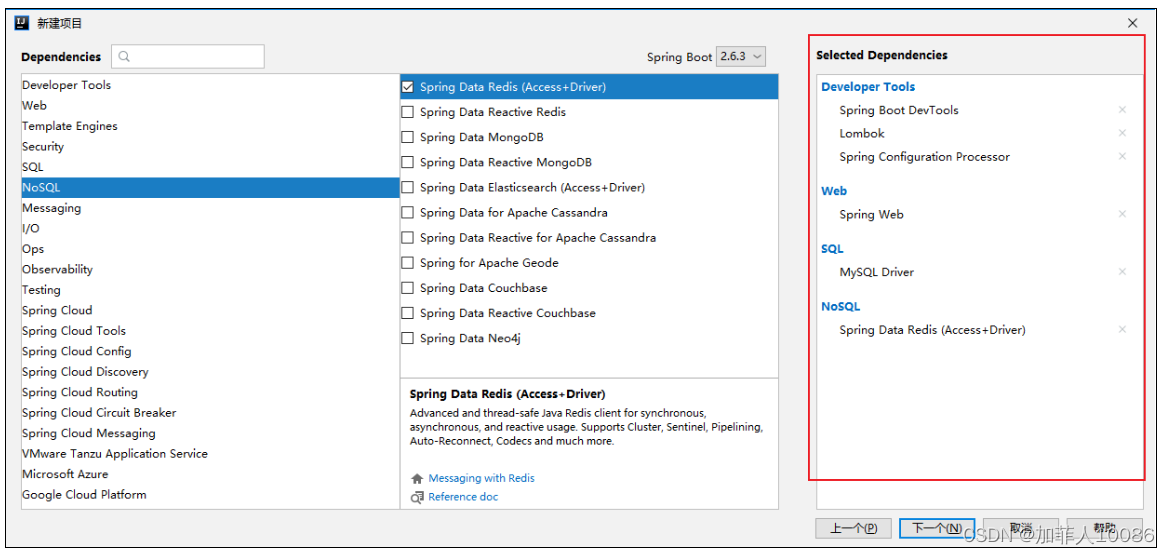
idea选择依赖表
		<dependency>
            <groupId>org.springframework.boot</groupId>
            <artifactId>spring-boot-starter-cache</artifactId>
        </dependency>
        <dependency>
            <groupId>org.springframework.boot</groupId>
            <artifactId>spring-boot-starter-web</artifactId>
        </dependency>
		<!--采用Mybatis-plus操作数据库-->
        <dependency>
            <groupId>com.baomidou</groupId>
            <artifactId>mybatis-plus-boot-starter</artifactId>
            <version>3.5.0</version>
        </dependency>
		<dependency>
            <groupId>mysql</groupId>
            <artifactId>mysql-connector-java</artifactId>
            <scope>runtime</scope>
        </dependency>
<!--    不导入redis包是因为redis也可以作缓存,当引入这个包时,springboot会自动将redis作为cacheManager,这样会
    无法进行ConcurrentMapCacheManager的演示,所以先注解掉,如果要采用redis作为缓存,再解封redis包

        <dependency>
        <groupId>org.springframework.boot</groupId>
            <artifactId>spring-boot-starter-data-redis</artifactId>
       </dependency>
    -->
导入上述依赖。
pojo包中的Product类
@Data
@AllArgsConstructor
@NoArgsConstructor
public class Product {
//    id要和数据库中的一致
    @TableId("productid")
    private String productId;
    private String category;
    private String name;
    private String descn;
}
dao包中的ProductMapper
@Mapper
@Repository
public interface ProductMapper extends BaseMapper<Product> {

}
service包中的ProductServiceImpl
@Service
public class ProductServiceImpl implements ProductService {
    @Autowired
    private ProductMapper productMapper;

    private static Integer count=0;

    @Override
    /*
    这里指定cacheManager的原因是cache的默认实现是SimpleCacheConfiguration,里面注册的
    CacheManager的bean名为cacheManager
     */
    @Cacheable(cacheNames = {"emp"},cacheManager = "cacheManager")
    public List<Product> guProduct() {
        System.out.println("这是第"+(++count)+"次调用此方法");
        return productMapper.selectList(null);
    }


    @Override
    @Cacheable("emp")
    public Product getProductById(String id){
        return productMapper.selectById(id);
    }

    @Override
    @CacheEvict(cacheNames = {"emp"},cacheManager = "cacheManager",allEntries = true)
    public int guProduct(Product product){
        System.out.println("因为你更新了数据,所以我会删除emp缓存中的所有数据");
        return productMapper.updateById(product);
    }
}
开启Mybatis-plus的日志,在application.properties中
#开启mybatis-plus的日志
mybatis-plus.configuration.log-impl=org.apache.ibatis.logging.stdout.StdOutImpl
controller包中的ProductController
@RestController
public class ProductController {

    @Autowired
    private ProductService productService;

    @RequestMapping("/getAll")
    @SneakyThrows
    public String getAllProduct(){
        ObjectMapper objectMapper = new ObjectMapper();
        List<Product> products = productService.guProduct();
        return objectMapper.writeValueAsString(products);
    }

    @RequestMapping("/update/{id}")
    @SneakyThrows
    public Integer update(@PathVariable("id")String id){
        Product product = new Product(id,"测试","测试","测试");
        int i = productService.guProduct(product);
        return i;
    }
}
在主启动类上加上这句注解
@SpringBootApplication
@EnableCaching //开启基于注解的缓存
public class SpringcacheApplication {

    public static void main(String[] args) {
        SpringApplication.run(SpringcacheApplication.class, args);
    }

}
启动
当在浏览器中输入
localhost:8080/getAll
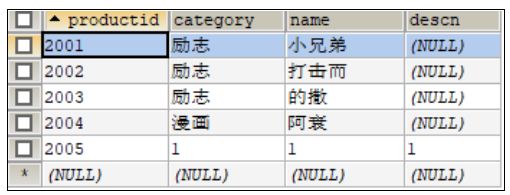
Sqlyog中的显示
控制台上显示
然后不断刷新,会发现count还是1,说明数据库中的结果已经进入了缓存,这个可以自行测试
当我在浏览器中输入
localhost:8080/update/2005
控制台输出
然后再次输入
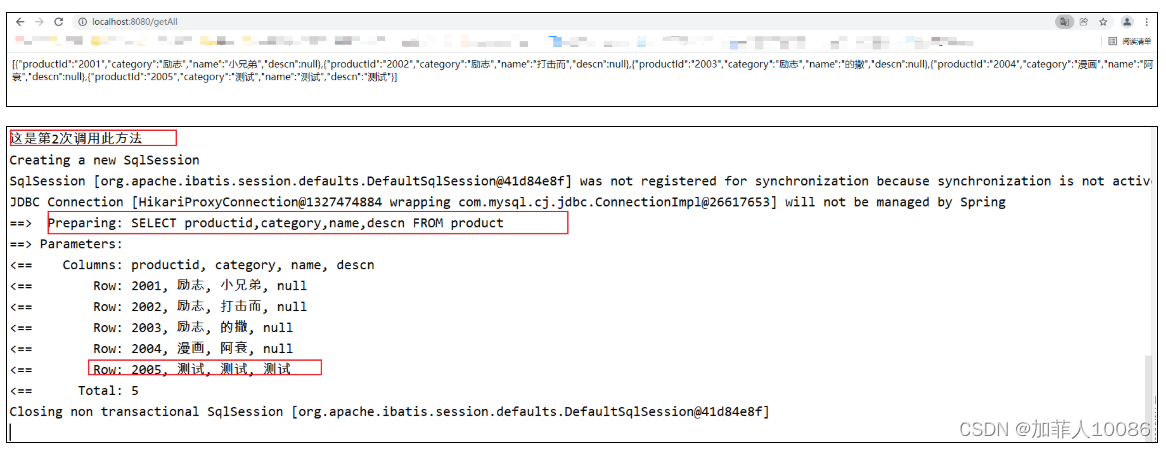
localhost:8080/getAll
控制台和页面输出
由于缓存的清除,只能再次读取数据库,还有一个CachePut注解,这个注解会整合上面的操作,也就是说,当执行一个update方法时,会自动更新缓存,但是要求两个方法的cache名和key值必须相同,不过开发中不常用,感兴趣的读者可以自行下去研究。
RedisCache
在SpringbootCache的基础上,我们导入redis的依赖
		<dependency>
            <groupId>org.springframework.boot</groupId>
            <artifactId>spring-boot-starter-data-redis</artifactId>
        </dependency>
此时springboot会自动的将Redis作为CacheManager进行注册,@Cacheable注解中的cacheManager将自动失效。我们需要开启一个新的Redis服务器,并进行配置。
在application.properties中输入下面两行配置
#默认主机地址为localhost,可以不用配置
spring.redis.host= localhost
#默认端口号为6379 可以不用配置
spring.redis.port= 6379
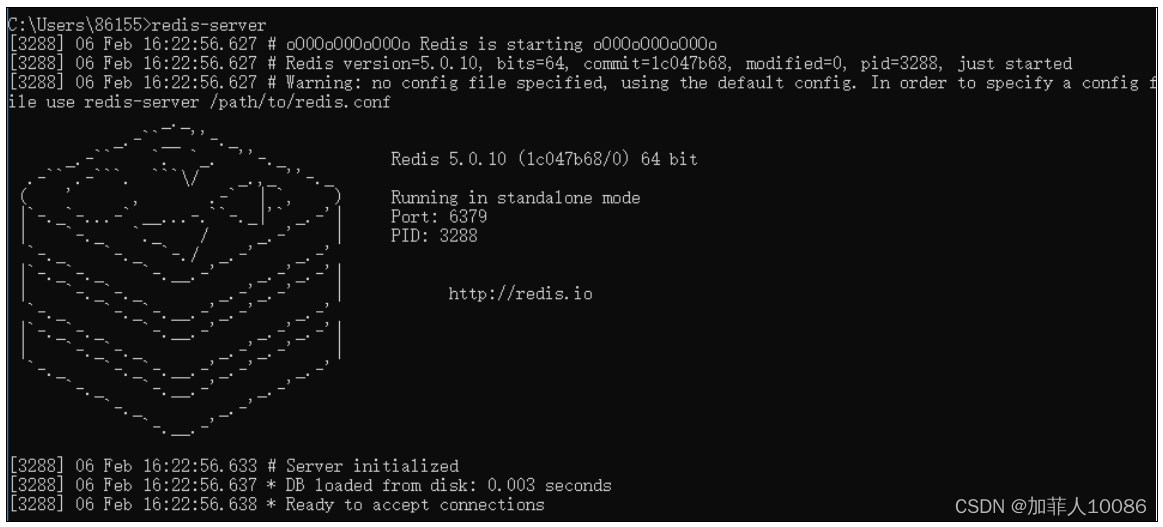
在本地开启一个redis-server服务
redis序列化
使用redis存储对象时,该对象必须可序列化(实现Serializable接口),否则会报错
在原先的product类中加上
@Data
@AllArgsConstructor
@NoArgsConstructor
//这个很重要,否则将无法序列化,无法将prduct转成json格式存储在redis中
public class Product implements Serializable {
//    id要和数据库中的一致
    @TableId("productid")
    private String productId;
    private String category;
    private String name;
    private String descn;
}
SpringBoot默认采用的是JDK的对象序列化方式,我们可以切换为使用JSON格式进行对象的序列化操作,这时需要我们自定义序列化规则(当然我们也可以使用Json工具先将对象转化为Json格式之后再保存至redis,这样就无需自定义序列化)。
我们可以拿JDK和json格式序列化做一个对比
JDK序列化【默认】
将对象继承自Serializable接口后的JDK序列化方式
我们能发现,key的名字为Keygenerator自动生成的,为"emp::SimpleKey []"序列化的结果就是一个个中文字符集,没有json的格式,不好观察。
JSON序列化
配置了上述的redis序列化config后,还需要自定义RedisCacheManager
使用SpringBoot提供的RedisCacheManager,在序列化数据的时候采用的是JDK的序列化机制,我们可以通过自定义CacheManager将数据的序列化改为JSON机制
@Configuration
public class MyRedisConfig extends CachingConfigurerSupport {

    @Bean
    public RedisCacheConfiguration redisCacheConfiguration(){
        Jackson2JsonRedisSerializer<Object> jackson2JsonRedisSerializer = new Jackson2JsonRedisSerializer<>(Object.class);
        RedisCacheConfiguration configuration = RedisCacheConfiguration.defaultCacheConfig();
        configuration = configuration.serializeValuesWith
                (RedisSerializationContext.SerializationPair.fromSerializer(jackson2JsonRedisSerializer))
                .entryTtl(Duration.ofDays(30));
        return configuration;
    }

}
配置好后,再次序列化我们就会采用json格式进行序列化了。
此时,就算不继承SerialIzable接口照样可以序列化
此时redis内的保存格式
保存为json格式。
另外,由于redis服务器和tomcat服务器是分开的,就算tomcat服务关闭了,cache也并不会消失,此时的数据全部保存在redis服务器中。
