深度学习
三.数据读取、神经网络
3.1 文件读取流程
有三种获取数据到TensorFlow程序的方法:
- QueueRunner:基于队列的输入管道从TensorFlow图形开头的文件中读取数据。
- Feeding:运行每一步时,Python代码提供数据。
- 预加载数据:TensorFlow图中的张量包含所有数据(对于小数据集)。
3.1.1 文件读取流程
- 第一阶段 构造文件名队列
- 第二阶段 读取与解码
- 第三阶段 批处理
注:这些操作需要启动运行这些队列操作的线程,以便我们在进行文件读取的过程中能够顺利进行入队出队操作。
1.构造文件名队列
tf.train.string input_producer(string_tensor,shuffle=True)
# string_tensor:含有文件名+路径的1阶张量
# num_epochs:过几遍数据,默认无限过数据
# shuffle:打乱文件名顺序
# return 文件队列
2.读取和解码
从队列当中读取文件内容,并进行解码操作。
1.读取文件内容
阅读器默认每次只读取一个样本
具体说来:
文本文件默认一次读取一行 图片文件默认一次读取一张图片 二进制文件一次读取指定字节数(最好是一个样本的字节数) TFRecords默认一次读取一个example
tf.TextLineReader:
# 阅读文本文件逗号分隔值(CSV)格式,默认按行读取
# return:读取器实例

tf.WholeFileReader
# 用于读取图片文件
# return:读取器实例

tf.FixedLengthRecordReader(record_bytes)
# 二进制文件
# 要读取每个记录是固定数量字节的二进制文件
# record_bytes:整型,指定每次读取(一个样本)的字节数
# return:读取器实例

tf.TFRecordReader
# 读取TFRecords文件
# return:读取器实例
注:
- 它们有共同的读取方法:read(fle_queue),并且都会返回一个Tensors元组(key文件名字,value默认的内容(一个样本))
- 由于默认只会读取一个样本,所以如果想要进行批处理,需要使用tf.train.batch或tf.traln.shuffle batch进行批处理操作,便于之后指定每批次多个
样本的训练。
2.内容解码
读取不同类型的文件,也应该对读取到的不同类型的内容进行相对应的解码操作,解码成统一的Tensor格式。
tf.decode_csv
# 解码文本文件内容

tf.image.decode_jpeg(contents)
	# 将JPEG编码的图像解码为uint8张量
    # return:uint8张量,3-D形状[height, width, channels]

tf.image.decode_png(contents)
	# 将PNG编码的图像解码为uint8张量
    # return:张量类型,3-D形状[height, width, channels]

tf.decode raw:解码二进制文件内容
	# 与tf.FixedLengthRecordReader搭配使用,二进制读取为uint8类型
注:解码阶段,默认所有的内容都解码成tf.uint8类型,如果之后需要转换成指定类型则可使用tf.cast0)进行相应转换。
3.批处理
解码之后,可以直接获取默认的一个样本内容了,但如果想要获取多个样本,需要加入到新的队列进行批处理。
tf.train.batch(tensors, batch_size,num_threads = 1, capacity = 32,name=None)
# 读取指定大小(个数)的张量
# tensors:可以是包含张量的列表,批处理的内容放到列表当中
# batch size:从队列中读取的批处理大小
# numthreads:进入队列的线程数
# capacity:整数,队列中元素的最大数量
# return:tensors

tf.train.shuffle batch
3.1.2 线程操作
以上用到的队列都是tf.train.QueueRunner对象。
每个QueueRunner都负责一个阶段,tf.train.start_queue_runners 函数会要求图中的每个QueueRunner启动它的运行队列操作的线程。(这些操作需要在会话中开启)
tf.train.start_queue_runners(sess=None, coord=None)
# 收集图中所有的队列线程,默认同时启动线程
# sess:所在的会话
# coord:线程协调器
# return:返回所有线程

tf.train.Coordinator()
# 线程协调员,对线程进行管理和协调
# request_stop():请求停止
# should_stop();询问是否结束
# join(threads=None,stop_grace_period_secs=120):回收线程
# return:线程协调员实例
3.2 图片数据
3.2.1 图像基本知识
我们平时接触到的图片有两种:一种黑白图片(灰度图),另一种是彩色图片。
-
图片三要素
组成一张图片特征值是所有的像素值,有三个维度:图片长度、图片宽度、图片通道数
图片的通道数是什么?
- 描述一个像素点,如果是灰度图,那么只需要一个数值来描述它,就是单通道。
- 如果一个像素点,有RGB三种颜色来描述它,就是三通道。
-
张量形状
在TensorFlow中如何用张量表示一张图片呢?
一张图片可以被表示成一个3D张量,即其形状为[height,width,channel],height就表示高,width表示宽,channel表示通道数。我们会经常遇到3D和4D的表示
- 单个图片:[height,width, channel]
- 多个图片:[batch,height,width,channel],batch表示一个批次的张量数量
3.2.2 图像特征值处理
为什么要缩放图片到统一大小?
在进行图像识别的时候,每个图片样本的特征数量要保持相同。所以需要将所有图片张量大小统一转换。另一方面,如果图片的像素量太大,通过这种方式适当减少像素的数量,减少训练的计算开销。
# 缩小放大图片
tf.image.resize_images(images, size)
# images:4-D形状[batch, height, width, channels]或3-D形状的张量[height,width,channels]的图片数据
# size:1-D int32张量:new_height,new_width,图像的新尺寸。
# return:4-D格式或者3-D格式图片
3.2.3 数据格式
- 存储:uint8(节约空间)
- 矩阵计算:float32(提高精度)
3.2.4 案例:狗图片读取
-
读取流程分析
- 构造文件名队列
- 读取与解码,从而使样本的形状和类型统一
- 批处理
-
代码
import tensorflow as tf
import os

tf.compat.v1.disable_eager_execution()


class Picture:
    """
    图片处理
    """

    def __init__(self):
        # 构造路径+文件名列表
        self.filename = os.listdir('./dog')
        self.filelist = [os.path.join('./dog/', file) for file in self.filename]

    def picture_read(self):
        """
        狗图片读取
        :return:
        """
        # 1. 构造文件名队列
        filename_queue = tf.compat.v1.train.string_input_producer(self.filelist)
        # 2. 读取与解码
        # 读取
        reader = tf.compat.v1.WholeFileReader()
        key, value = reader.read(filename_queue)  # key 为文件名,value 为文件内容
        # 解码
        image = tf.image.decode_jpeg(value)

        # 图像的形状、类型修改
        image_resized = tf.image.resize(image, [200, 200])
        image_resized.set_shape([200, 200, 3])

        # 3. 批处理
        image_batch = tf.compat.v1.train.batch([image_resized], batch_size=100, num_threads=1, capacity=100)
        print("image_batch:\n", image_batch)
        with tf.compat.v1.Session() as sess:
            # 线程协调员
            coord = tf.compat.v1.train.Coordinator()
            # 开启线程
            tf.compat.v1.train.start_queue_runners(sess=sess, coord=coord)
            key_new, value_new, image_new, image_resized_new = sess.run([key, value, image, image_resized])
            print("key_new:\n", key_new)
            print("value_new:\n", value_new)
            print("image_new:\n", image_new)
            print("image_resize_new:\n", image_resized_new)
            # 关闭线程
            coord.request_stop()
            # 回收线程
            coord.join()
        return None


if __name__ == '__main__':
    p = Picture()
    p.picture_read()
3.3. 二进制数据
CIFAR-10数据集由10个类的60000个32x32彩色图像组成,每个类有6000个图像。有50000个训练图像和10000个测试图像。
数据集分为五个训练批次和一个测试批次,每个批次有10000个图像。
-
二进制版本数据文件
- 二进制版本包含文件data_batch_1.bin,data_batch_2.bin,…,data batch 5.bin以及test batch.bin
-
这些文件中的每一个格式如下,数据中每个样本包含了特征值和目标值:
<1x标签><3072x像素>
...
<1x标签><3072x像素>
第一个字节是第一个图像的标签,它是一个0-9范围内的数字。接下来的3072个字节是图像像素的值。前1024个字节是红色通道值,中间1024个绿色,最后1024个蓝色。值以行优先顺序存储,因此前32个字节是图像第一行的红色通道值。每个文件都包含10000个这样的3073字节的“行”图像,但没有任何分隔行的限制。因此每个文件应该完全是30730000字节长。
3.3.1 流程分析
- 构造文件名队列
- 读取与解码
- 批处理
3.3.2 代码
import tensorflow as tf
import os

tf.compat.v1.disable_eager_execution()


class Cifar(object):
    def __init__(self):
        self.height = 32
        self.width = 32
        self.channel = 3
        self.image_bytes = self.height * self.width * self.channel  # 图片的大小
        self.label_bytes = 1  # 标签的大小
        self.all_bytes = self.label_bytes + self.image_bytes

    def read_and_decode(self, file_list):
        # 1. 构建文件名队列
        filename_queue = tf.compat.v1.train.string_input_producer(file_list)
        # 2. 读取与解码
        # 读取
        reader = tf.compat.v1.FixedLengthRecordReader(self.all_bytes)
        key, value = reader.read(filename_queue)  # key文件名 value文件内容
        # 解码
        decoded = tf.compat.v1.decode_raw(value, tf.uint8)
        # 将特征值和目标值分离
        label = tf.compat.v1.slice(decoded, [0], [self.label_bytes])
        content = tf.compat.v1.slice(decoded, [1], [self.image_bytes])
        # 调整图片形状
        image_reshaped = tf.compat.v1.reshape(content, shape=[self.channel, self.height, self.width])
        # 转置,将图片顺序转为height、width、chanels
        image_transposed = tf.compat.v1.transpose(image_reshaped, [1, 2, 0])
        print("image_reshaped:\n", image_reshaped)
        # 调整图像类型
        image_cast = tf.compat.v1.cast(image_transposed, tf.float32)
        # 3. 批处理
        label_batch, image_batch = tf.compat.v1.train.batch([label, image_cast], batch_size=100, num_threads=1,
                                                            capacity=100)
        print("label_batch:\n", label_batch)
        print("image_batch:\n", image_batch)
        # 4. 开启会话
        with tf.compat.v1.Session() as sess:
            # 开启线程
            coord = tf.train.Coordinator()
            threads = tf.compat.v1.train.start_queue_runners(sess=sess, coord=coord)
            key_new, value_new, decoded_new, label_new, content_new, image_reshaped_new, image_transposed_new, label_batch_new, image_batch_new = sess.run(
                [key, value, decoded, label, content, image_reshaped, image_transposed, label_batch, image_batch])
            print("label_batch_new:\n", label_batch_new)
            print("image_batch_new:\n", image_batch_new)

            # 关闭线程
            coord.request_stop()
            # 回收线程
            coord.join(threads)
        return None


if __name__ == '__main__':
    file_name = os.listdir("./cifar-10-batches-bin")
    # 构造文件名路径列表
    file_list = [os.path.join('./cifar-10-batches-bin/', file) for file in file_name if file[-3:] == 'bin']

    cifar = Cifar()
    cifar.read_and_decode(file_list)
3.4 TFRecords
3.4.1 什么是TFRecords文件
TFRecords其实是一种二进制文件,虽然它不如其他格式好理解,但是它能更好的利用内存,更方便复制和移动,并且不需要单独的标签文件。
使用步骤:
-
获取数据
-
将数据填入到 Example 协议内存块(protocol buffer)
-
将协议内存块序列化为字符串,并且通过 tf.python_io.TFRecordwriter 写入
到TFRecords文件。文件格式*.tfrecords
3.4.2 结构解析
Example:
	features
	feature {
		key: "image"
		value {
			bytes list {
				value:"377\374\375\372\356\351\365\361\350\356\352\350"
    		}
		}
	}
	feature {
		key: "label"
		value {
			int64 list {
				value:9
    		}
    	}
    }
}
- tf.train.Example 协议内存块(protocolpuffer)(协议内存块包含了字段Features )
- Features 包含了一个 Feature 字段
- Feature 中包含要写入的数据、并指明数据类型.这是一个样本的结构,批数据需要循环存入这样的结构
# 写入tfrecords文件
tf.train.Example(features=None)
	# features:tf.train.Features类型的特征实例。
	# return:example格式协议块

# 构建每个样本的信息键值对
tf.train.Features(feature=None)
	# feature:字典数据,key为要保存的名字
	# value为tf.train.Feature实例
	# return:Features类型


tf.train.Feature(options)
# options:例如
	# "bytes_list=tf.train. BytesList(value=[Bytes])
	# "int64_list=tf.train.Int64List(value=[Value])
# 支持存入的类型如下中
	# tf.train.Int64List(value=[Value])
	# tf.train.BytesList(value=[Bytes])
	# tf.train.FloatList(value=[value])
3.4.3 案例:CIFAR10数据存入TFRecords文件
- 分析
- 构造存储实例,tf.python_io.TFRecordWriter(path)
- 写入tfrecords文件
- opath:TFRecords文件的路径
- return:写文件
- method方法
- "write(record):向文件中写入一个example
- "close0:关闭文件写入器
- 循环将数据填入到 Example 协议内存块(protocol buffer)
- 代码
import tensorflow as tf
import os

tf.compat.v1.disable_eager_execution()


class Cifar(object):
    def __init__(self):
        self.height = 32
        self.width = 32
        self.channel = 3
        self.image_bytes = self.height * self.width * self.channel  # 图片的大小
        self.label_bytes = 1  # 标签的大小
        self.all_bytes = self.label_bytes + self.image_bytes

    def read_binary(self):
        file_name = os.listdir("./cifar-10-batches-bin")
        # 构造文件名路径列表
        file_list = [os.path.join('./cifar-10-batches-bin/', file) for file in file_name if file[-3:] == 'bin']
        # 1. 构建文件名队列
        filename_queue = tf.compat.v1.train.string_input_producer(file_list)
        # 2. 读取与解码
        # 读取
        reader = tf.compat.v1.FixedLengthRecordReader(self.all_bytes)
        key, value = reader.read(filename_queue)  # key文件名 value文件内容
        # 解码
        decoded = tf.compat.v1.decode_raw(value, tf.uint8)
        # 将特征值和目标值分离
        label = tf.compat.v1.slice(decoded, [0], [self.label_bytes])
        content = tf.compat.v1.slice(decoded, [1], [self.image_bytes])
        # 调整图片形状
        image_reshaped = tf.compat.v1.reshape(content, shape=[self.channel, self.height, self.width])
        # 转置,将图片顺序转为height、width、chanels
        image_transposed = tf.compat.v1.transpose(image_reshaped, [1, 2, 0])
        # 调整图像类型
        image_cast = tf.compat.v1.cast(image_transposed, tf.float32)
        # 3. 批处理
        label_batch, image_batch = tf.compat.v1.train.batch([label, image_cast], batch_size=100, num_threads=1,
                                                            capacity=100)
        # 4. 开启会话
        with tf.compat.v1.Session() as sess:
            # 开启线程
            coord = tf.train.Coordinator()
            threads = tf.compat.v1.train.start_queue_runners(sess=sess, coord=coord)
            label_value, image_value = sess.run([label_batch, image_batch])
            print("label_batch_new:\n", label_value)
            print("image_batch_new:\n", image_value)

            # 关闭线程
            coord.request_stop()
            # 回收线程
            coord.join(threads)
        return image_value, label_value

    def write_to_tfrecord(self, image_batch, label_batch):
        """
        将样本的特征值和目标值一起写入tfrecords文件
        :param image_batch:
        :param label_batch:
        :return:
        """
        with tf.compat.v1.python_io.TFRecordWriter("./cifar10.tfrecords") as writer:
            for i in range(100):
                # 1. 将图片和标签转换为字符串
                image = image_batch[i].tostring()
                label = label_batch[i][0]
                print("image:/n", image)
                print("label:/n", label)
                # 2. 构造样本
                example = tf.compat.v1.train.Example(features=tf.compat.v1.train.Features(feature={
                    "label": tf.compat.v1.train.Feature(int64_list=tf.compat.v1.train.Int64List(value=[label])),
                    "image": tf.compat.v1.train.Feature(bytes_list=tf.compat.v1.train.BytesList(value=[image]))
                }))
                # 3. 将序列化后的example写入文件
                writer.write(example.SerializeToString())
        return None


if __name__ == '__main__':
    cifar = Cifar()
    image_value, label_value = cifar.read_binary()
    cifar.write_to_tfrecord(image_value, label_value)
3.4.4 读取TFRecords文件API
读取这种文件整个过程与其他文件一样,只不过需要有个解析Example的步骤。从TFRecords文件中读取数据,可以使用 tf.TFRecordReader的 tf.parse_single_example 解析器。这个操作可以将 Example 协议内存块(protocol buffer)解析为张量。
# example多了一个步骤
feature = tf.parse single_example(values, features={
    "image": tf.FixedLenFeature([], tf.string),
    "label": tf.FixedLenFeature([],tf.int64)
})
-
tf.parse_single_example(serialized, features=None, name=None)
- 解析一个单一的Example原型
- serialized:标量字符串Tensor,一个序列化的Example
- features:dict字典数据,键为读取的名字,值为FixedLenFeature
- return:一个键值对组成的字典,键为读取的名字
-
tf.FixedLenFeature(shape, dtype)
- shape:输入数据的形状,一般不指定,为空列表
- dtype:输入数据类型,与存储进文件的类型要一致
- 类型只能是float32,int64,string
3.4.5 案例:读取CIFAR的TFRecords文件
- 分析
- 使用tf.train.string_input_producer构造文件队列
- tf.TFRecordReader 读取TFRecords数据并进行解析
- tf.parse_single_example进行解析
- tf.decode_raw解码
- 类型是bytes类型需要解码
- 其他类型不需要
- 处理图片数据形状以及数据类型,加入批处理队列
- 开启会话线程运行
- 代码
import tensorflow as tf
import os

tf.compat.v1.disable_eager_execution()


class Cifar(object):
    def __init__(self):
        self.height = 32
        self.width = 32
        self.channel = 3
        self.image_bytes = self.height * self.width * self.channel  # 图片的大小
        self.label_bytes = 1  # 标签的大小
        self.all_bytes = self.label_bytes + self.image_bytes

    def read_binary(self):
        file_name = os.listdir("./cifar-10-batches-bin")
        # 构造文件名路径列表
        file_list = [os.path.join('./cifar-10-batches-bin/', file) for file in file_name if file[-3:] == 'bin']
        # 1. 构建文件名队列
        filename_queue = tf.compat.v1.train.string_input_producer(file_list)
        # 2. 读取与解码
        # 读取
        reader = tf.compat.v1.FixedLengthRecordReader(self.all_bytes)
        key, value = reader.read(filename_queue)  # key文件名 value文件内容
        # 解码
        decoded = tf.compat.v1.decode_raw(value, tf.uint8)
        # 将特征值和目标值分离
        label = tf.compat.v1.slice(decoded, [0], [self.label_bytes])
        content = tf.compat.v1.slice(decoded, [1], [self.image_bytes])
        # 调整图片形状
        image_reshaped = tf.compat.v1.reshape(content, shape=[self.channel, self.height, self.width])
        # 转置,将图片顺序转为height、width、chanels
        image_transposed = tf.compat.v1.transpose(image_reshaped, [1, 2, 0])
        # 调整图像类型
        image_cast = tf.compat.v1.cast(image_transposed, tf.float32)
        # 3. 批处理
        label_batch, image_batch = tf.compat.v1.train.batch([label, image_cast], batch_size=100, num_threads=1,
                                                            capacity=100)
        # 4. 开启会话
        with tf.compat.v1.Session() as sess:
            # 开启线程
            coord = tf.train.Coordinator()
            threads = tf.compat.v1.train.start_queue_runners(sess=sess, coord=coord)
            label_value, image_value = sess.run([label_batch, image_batch])
            print("label_batch_new:\n", label_value)
            print("image_batch_new:\n", image_value)

            # 关闭线程
            coord.request_stop()
            # 回收线程
            coord.join(threads)
        return image_value, label_value

    def write_to_tfrecord(self, image_batch, label_batch):
        """
        将样本的特征值和目标值一起写入tfrecords文件
        :param image_batch:
        :param label_batch:
        :return:
        """
        with tf.compat.v1.python_io.TFRecordWriter("./cifar10.tfrecords") as writer:
            for i in range(100):
                # 1. 将图片和标签转换为字符串
                image = image_batch[i].tostring()
                label = label_batch[i][0]
                print("image:/n", image)
                print("label:/n", label)
                # 2. 构造样本
                example = tf.compat.v1.train.Example(features=tf.compat.v1.train.Features(feature={
                    "label": tf.compat.v1.train.Feature(int64_list=tf.compat.v1.train.Int64List(value=[label])),
                    "image": tf.compat.v1.train.Feature(bytes_list=tf.compat.v1.train.BytesList(value=[image]))
                }))
                # 3. 将序列化后的example写入文件
                writer.write(example.SerializeToString())
        return None

    def read_from_tfrecord(self):
        """
        从tfrecords文件中读取样本
        :return:
        """
        # 1. 构造文件名队列
        filename_queue = tf.compat.v1.train.string_input_producer(["cifar10.tfrecords"])
        # 2. 从文件中读取样本
        # 读取
        reader = tf.compat.v1.TFRecordReader()
        key, value = reader.read(filename_queue)
        # 解析example
        feature = tf.compat.v1.parse_single_example(value, features={
            "label": tf.compat.v1.FixedLenFeature([], tf.int64),
            "image": tf.compat.v1.FixedLenFeature([], tf.string)
        })
        image = feature["image"]
        label = feature["label"]
        # 解码
        image_decoded = tf.compat.v1.decode_raw(image, tf.uint8)
        # 调整形状
        image_reshaped = tf.compat.v1.reshape(image_decoded, shape=[self.height, self.width, self.channel])
        print("image_reshaped:\n", image_reshaped)
        image_batch, label_batch = tf.compat.v1.train.batch([image_reshaped, label], batch_size=100, num_threads=1,
                                                            capacity=100)
        print("image_batch:\n", image_batch)
        print("label_batch:\n", label_batch)

        with tf.compat.v1.Session() as sess:
            coord = tf.compat.v1.train.Coordinator()
            threads = tf.compat.v1.train.start_queue_runners(sess=sess, coord=coord)
            image_value, label_value = sess.run([image_batch, label_batch])
            print("label_value:\n", label_value)
            print("image_value:\n", image_value)
            # 关闭线程
            coord.request_stop()
            # 回收线程
            coord.join(threads)
        return None


if __name__ == '__main__':
    cifar = Cifar()
    # image_value, label_value = cifar.read_binary()
    # cifar.write_to_tfrecord(image_value, label_value)
    cifar.read_from_tfrecord()
3.5 神经网络基础
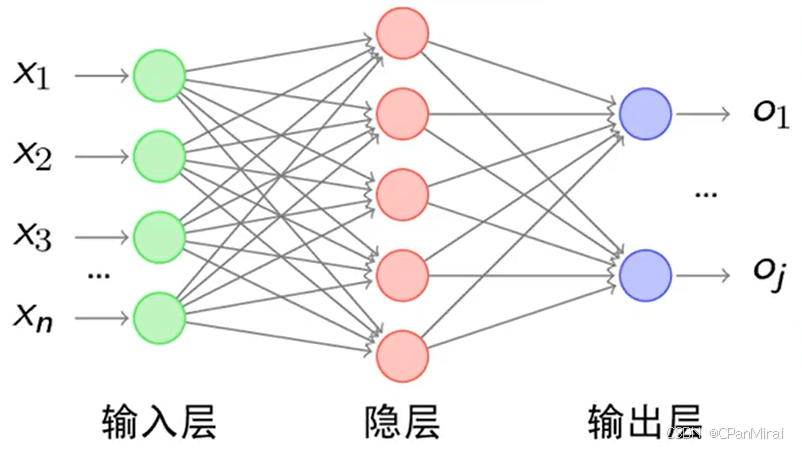
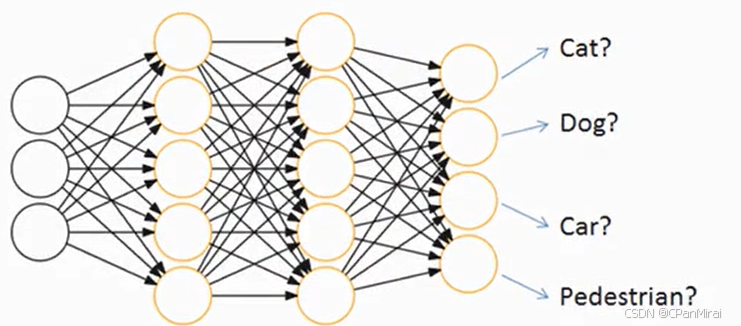
人工神经网络(Artificial Neural Network,简写为ANN)也简称为神经网络(NN)是一种模仿生物神经网络(动物的中枢神经系统,特别是大脑)结构和功能的计算模型。经典的神经网络结构包含三个层次的神经网络。分别为输入层,输出层以及隐藏层。
其中每层的圆圈代表一个神经元,隐藏层和输出层的神经元有输入的数据计算后输出,输入层的神经元只是输入。
-
神经网络的特点
- 每个连接都有个权值
- 同一层神经元之间没有连接
- 最后的输出结果对应的层也称之为全连接层
神经网络是深度学习的重要算法,在图像(如图像的分类、检测)和自然语言处理(如文本分类、聊天等)有很多应用。
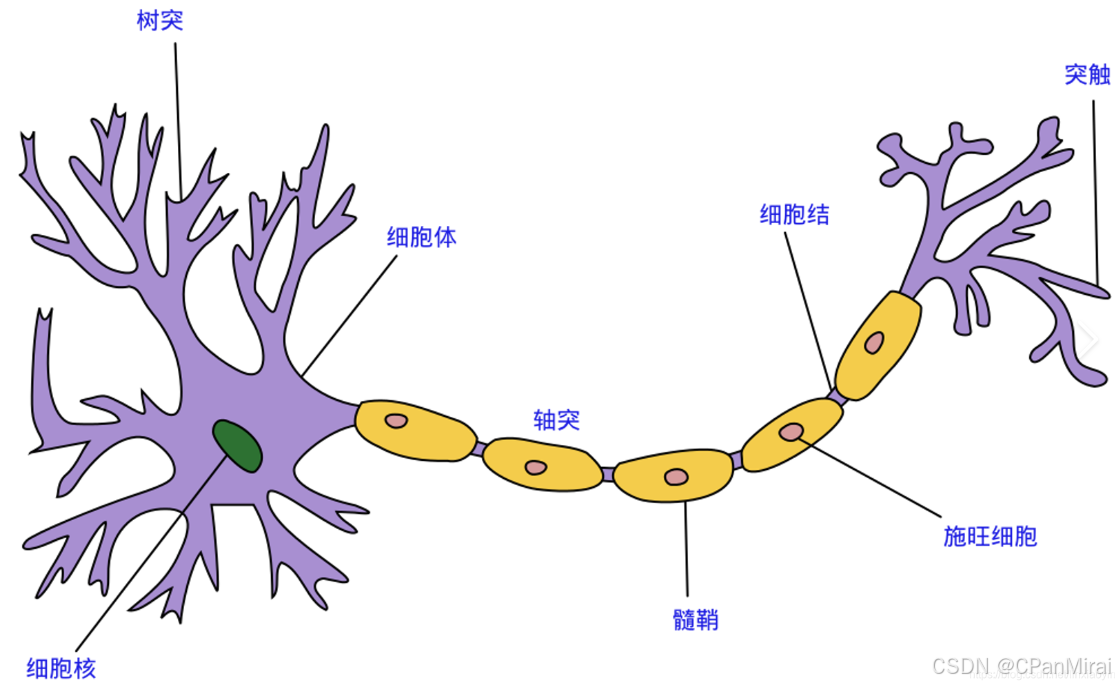
那么为什么设计这样的结构呢?首先从一个最基础的结构说起,神经元。以前也称之为感知机。神经元就是要模拟人的神经元结构。
一个神经元通常具有多个树突,主要用来接受传入信息;而轴突只有一条,轴突尾端有许多轴突末梢可以给其他多个神经元传递信息。轴突末梢跟其他神经元的树突产生连接,从而传递信号。这个连接的位置在生物学上叫做“突触”。
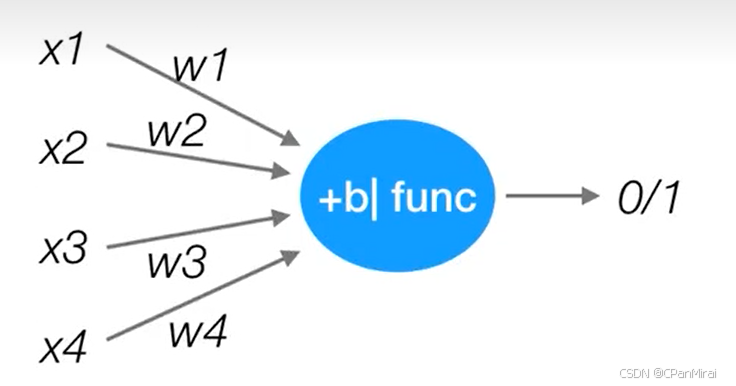
感知机(PLA:Perceptron Learning Algorithm)
感知机就是模拟这样的大脑神经网络处理数据的过程。感知机模型如下图:
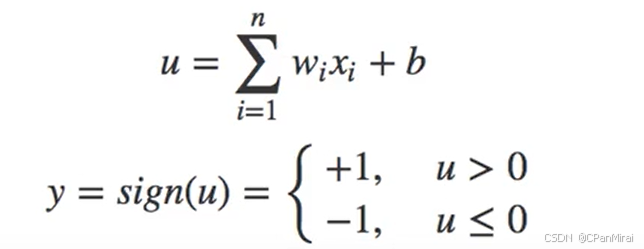
感知机是一种最基础的分类模型,类似于逻辑回归,可以去解决简单的或、与问题。不同的是,感知机的激活函数用的是sign,而逻辑回归用的sigmoid。感知机也具有连接的权重和偏置
3.6 神经网络原理
神经网络解决多分类问题最常用的方法是设置n个输出节点,其中n为类别的个数。
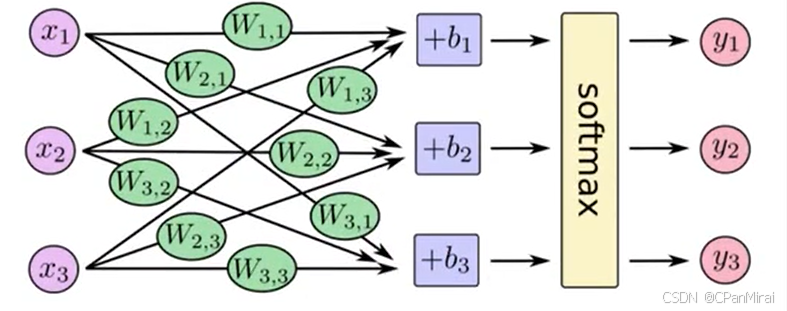
任意事件发生的概率都在0和1之间,且总有某一个事件发生(概率的和为1)。如果将分类问题中“一个样例属于某一个类别”看成一个概率事件,那么训练数据的正确答案就符合一个概率分布。如何将神经网络前向传播得到的结果也变成率分布呢?Softmax回归就是一个非常常用的方法。
3.6.1 softmax回归
softmax回归将神经网络输出转换为概率结果。
3.6.2 交叉熵损失
-
公式
其中y’是真实值,yi是预测值。
-
损失大小
神经网络最后的损失为平均每个样本的损失大小。
- 对所有样本的损失求和取其平均值
3.6.3 网络原理总结
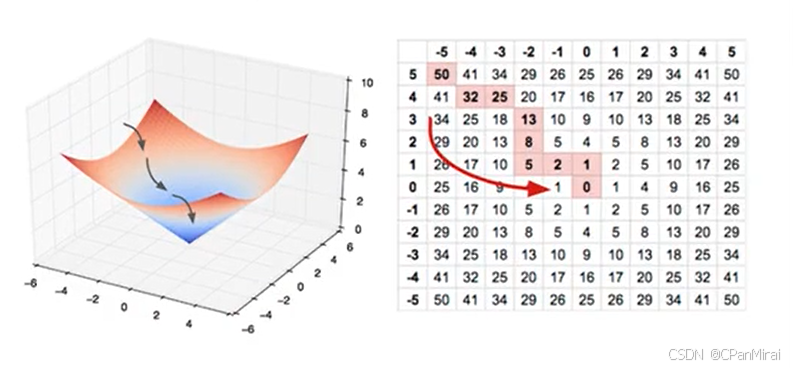
训练过程中计算机会尝试一点点增大或减小每个参数,看其能如何减少相比于训练数据集的误差,以望能找到最优的叔重、偏置参数组合。
3.6.4 softmax、交叉熵损失API
# 计算logits和labels之间的交叉损失熵
tf.nn.softmax_cross_entropy_with_logits(labels=None, logits=None,name=None)
	# labels:标签值(真实值)
	# logits:样本加权之后的值
	# return:返回损失值列表

# 计算张量的尺寸的元素平均值
tf.reduce_mean(input_tensor)
3.7 案例:Mnist手写数字识别
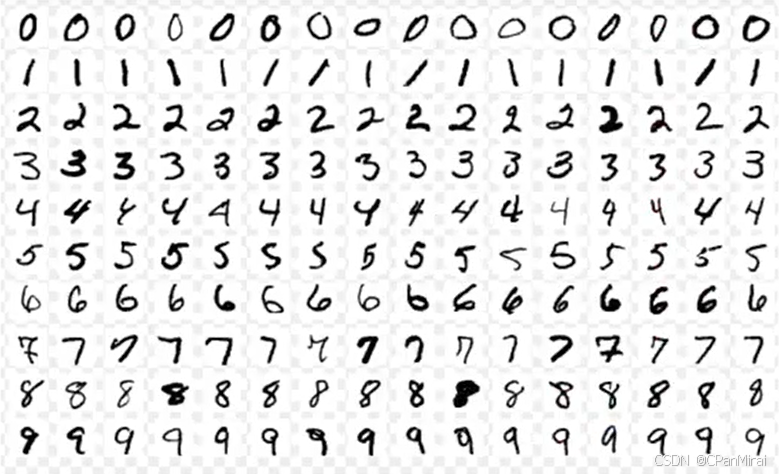
3.7.1 数据集介绍
文件说明:
- train-images-idx3-ubyte.gz: training set images (9912422 bytes)
- train-labels-idx1-ubyte.gz: training set labels (28881 bytes)
- t10k-images-idx3-ubyte.gz: test set images (1648877 bytes)
- t10k-labels-idx1-ubyte.gz: test set labels (4542 bytes)
网址:http://yann.lecun.com/exdb/mnist/
-
特征值
Mnist数据集可以从官网下载,网址: http://yann.lecun.com/exdb/mnist 下载下来的数据集被分成两部分:60000行的训练数据集(mnist.train)和10000行的测试数据集(mnist.test)。每一个MNIST数据单元有两部分组成:一张包含手写数字的图片和一个对应的标签。我们把这些图片设为“xs”,把这些标签设
为“ys”。训练数据集和测试数据集都包含xs和ys,比如训练数据集的图片是 mnist.train.images,训练数据
集的标签是 mnist.train.labels。 图片是黑白图片,每一张图片包含28像素X28像素。我们把这个数组展开成一个向量,长度是28x28=784。因此,在MNIST训练数据集中,mnist.train.images 是一个形状为[60000,784]的张量。
-
目标值
MNIST中的每个图像都具有相应的标签,0到9之间的数字表示图像中绘制的数字。用的是one-hot编码nn[0,0,0,1,0,0,0,0,0,0] ,从而mnist.train.labels[60000, 10]
3.7.2 Mnist数据获取API
import tensorflow as tf

if __name__ == '__main__':
    # Load the dataset
    (x_train, y_train), (x_test, y_test) = tf.keras.datasets.mnist.load_data()
    # Print shapes of the datasets
    print("Training set shape:", x_train.shape, y_train.shape)
    print("Test set shape:", x_test.shape, y_test.shape)

    # Print some sample images and labels
    print("First image in training set:")
    print(x_train[0])
    print("Label for first image:", y_train[0])
损失的话,我们用交叉熵损失来衡量,用梯度下降来进行优化。
3.8 线性神经网络局限性
它只能解决线性可分的问题,对于非线性问题则无法很好地处理。 此外,它也没有考虑到数据的复杂性和不确定性,因此在处理复杂问题时可能会遇到困难。
四.卷积神经网络
4.1 卷积神经网络介绍
4.1.1 卷积神经网络与传统多层神经网络对比
-
传统意义上的多层神经网络是只有输入层、隐藏层、输出层。其中隐藏层的层数根据需要而定,没有明确的理论推导来说明到底多少层合适
-
卷积神经网络CNN,在原来多层神经网络的基础上,加入了更加有效的特征学习部分,具体操作就是在原来的全连接层前面加入了卷积层与池化层。卷积神经网络出现,使得神经网络层数得以加深,“深度”学习由此而来。
通常所说的深度学习,一般指的是这些CN N等新的结构以及一些新的方法(比如新的激活函数Relu等),解决了传统多层神经网络的一些难以解决的问题。
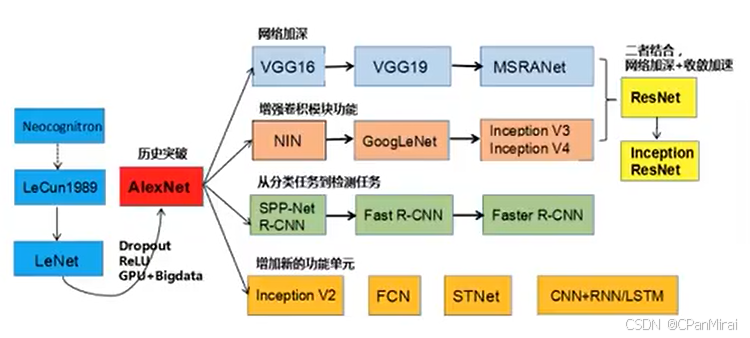
4.1.2 卷积神经网络发展历史
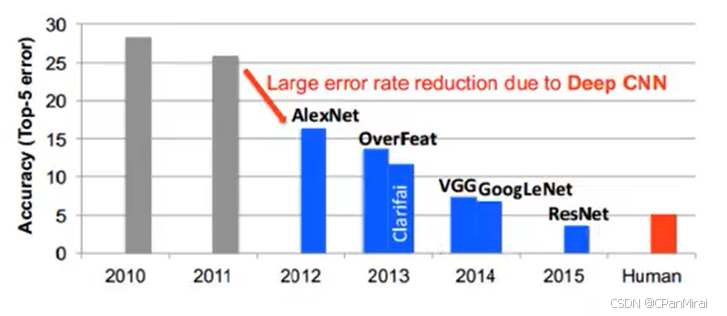
4.1.3 卷积网络ImageNet比赛错误率
ImageNet 可以说是计算机视觉研究人员进行大规模物体识别和检测时,最先想到的视觉大数据来源,最初由斯坦福大学李飞飞等人在 CVPR 2009 的一篇论文
中推出、并被用于替代 PASCAL数据集(后者在数据规模和多样性上都不如ImageNet)和 LabelMe 数据集(在标准化上不如 lmageNet)
ImageNet 不但是计算机视觉发展的重要推动者,也是这一波深度学习热潮的关键驱动力之一。
截至 2016 年,lmageNet 中含有超过 1500 万由人手工注释的图片网址,也就是带标签的图片,标签说明了图片中的内容,超过2.2万个类别。
4.2 卷积神经网络原理
4.2.1 卷积神经网络的三个结构
神经网络(neural networks)的基本组成包括输入层、隐藏层、输出层。而卷积神经网络的特点在开隐藏层分为卷积层和池化层(poolinglayer,又叫下采样层)以及激活层每一层的作用
- 卷积层 : 通过在原始图像上平移来提取特征
- 激活层 : 增加非线性分割能力
- 池化层 : 减少学习的参数,降低网络的复杂度(最大池化和平均池化),防止过拟合。
为了能够达到分类效果,还会有一个全连接层(Full Connection)也就是最后的输出层,进行损失计算并输出分类结果。
4.2.2 卷积层
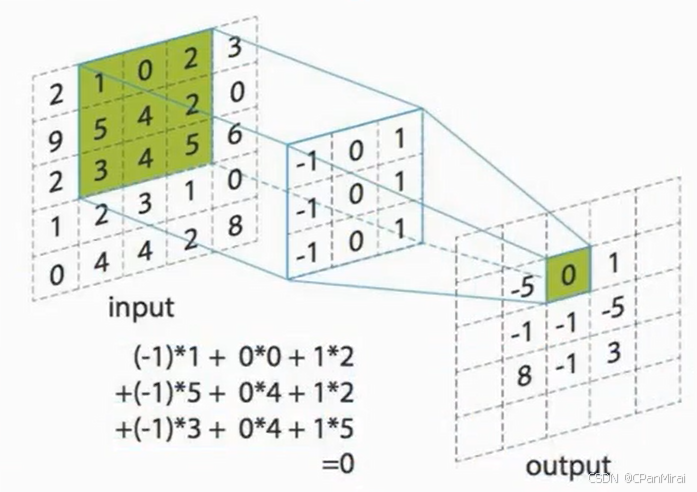
卷积神经网络中每层卷积层由若干卷积单元(卷积核)组成,每个卷积单元的参数都是通过反向传播算法(BP算法)最佳化得到的。
卷积运算的目的是特征提取,第一层卷积层可能只能提取一些低级的特征如边缘、线条和角等层级,更多层的网络能从低级特征中选代提取更复杂的特征。
-
卷积核(Filter)的四大要素
-
卷积核个数
- 那么如果在某一层结构当中,不止是一个人观察,多个人(卷积核)一起去观察。那就得到多张观察的结果。
- 不同的卷积核带的权重和偏置都不一样,即随机初始化的参数
- 那么如果在某一层结构当中,不止是一个人观察,多个人(卷积核)一起去观察。那就得到多张观察的结果。
-
卷积核大小
-
卷积核可以理解为一个观察的人,带着若干权重和一个偏置去观察,进行特征加权运算。
-
卷积核大小通常会选择(1*1、3*3、5*5), 是经常研究人员实验证明比较好的效果。
-
-
卷积核步长
- 指的是平移卷积核的步长
-
卷积核零填充大小
- 零填充就是在图片周围填充为0的像素。
2.总结-输出大小计算公式
-

