1 前端组件页面
使用的Vue+Element组件
在线cdn引入:
<script src="https://cdn.bootcdn.net/ajax/libs/vue/2.7.16/vue.js"></script>
<!-- 引入样式 -->
<script src="https://unpkg.com/element-ui/lib/index.js"></script>
<!-- 引入组件库 -->
<link rel="stylesheet" href="https://unpkg.com/element-ui/lib/theme-chalk/index.css">
组件页面,不是重点,不过多赘述
<!DOCTYPE html>
<html lang="en">
<head>
    <meta charset="UTF-8">
    <title>图片上传</title>
    <script src="https://cdn.bootcdn.net/ajax/libs/vue/2.7.16/vue.js"></script>
    <!-- 引入样式 -->
    <script src="https://unpkg.com/element-ui/lib/index.js"></script>
    <!-- 引入组件库 -->
    <link rel="stylesheet" href="https://unpkg.com/element-ui/lib/theme-chalk/index.css">
    <style>
        .avatar-uploader .el-upload {
            border: 1px dashed #d9d9d9;
            border-radius: 6px;
            cursor: pointer;
            position: relative;
            overflow: hidden;
        }

        .avatar-uploader .el-upload:hover {
            border-color: #409EFF;
        }

        .avatar-uploader-icon {
            font-size: 28px;
            color: #8c939d;
            width: 178px;
            height: 178px;
            line-height: 178px;
            text-align: center;
        }

        .avatar {
            width: 178px;
            height: 178px;
            display: block;
        }
    </style>
</head>

<body>

    <div id="app">
        <el-upload class="avatar-uploader" action="http://localhost:8080/upload/image" name="image"
            :show-file-list="false" :on-success="handleAvatarSuccess" :before-upload="beforeAvatarUpload">
            <img v-if="imageUrl" :src="imageUrl" class="avatar">
            <i v-else class="el-icon-plus avatar-uploader-icon"></i>
        </el-upload>
    </div>
</body>
<script>
    new Vue({
        el: '#app',
        data: {
            imageUrl: ''
        },
        methods: {
            handleAvatarSuccess(res, file) {
                // this.imageUrl = URL.createObjectURL(file.raw);
                this.imageUrl = res.data;
                //console.log(res.data);
                //console.log(res.msg);
                //console.log(file.raw.name);
                //console.log(file.raw.type);
            },
            beforeAvatarUpload(file) {
                const isLt2M = file.size / 1024 / 1024 < 2;
                if (!isLt2M) {
                    this.$message.error('上传头像图片大小不能超过 2MB!');
                }
                return isLt2M;
            }
        }
    })
</script>
</html>
注:
若是form表单,要注意数据提交的方式和格式:<form action="/upload/upload" method="post" enctype="multipart/form-data"> </form>
2 本地上传
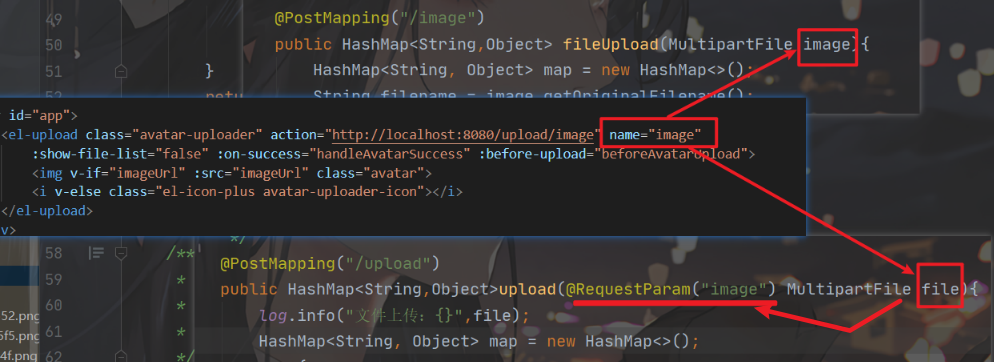
注意:当文件提交的name和后端的参数名称不对应时,可以通过@RequestParam("xxx"),来指定名称,如果名称不对应,那么获取到就是空字符串""而不是null
顾名思义,就是在运行相关代码的服务器上存储上传的数据【图片、音频、文本等】
本案例是将图片文件上传之后,存储到本地打包之后的target\classes\static\imgs目录下,这样在项目启动的过程中,就可以进行图片的存储和访问。
前端提交的路径:action=“http://localhost:8080/upload/image”,图片存储完成之后,给前端返回一个图片存储的访问路径:http://localhost:8080/imgs/+文件名
文件名:使用的是uuid随机字符串,拼接上截取到的文件后缀名。
【使用时间戳作为文件名并不太好,在并发情况下,若同一时间多用户存储,就会导致图片被覆盖】
注意:
1、使用MultipartFile image
2、使用getOriginalFilename()获取文件名
3、通过transferTo()方法写入
@RestController
@RequestMapping("/upload")
@Slf4j
public class UploadController {

    @PostMapping("/image")
    public HashMap<String,Object> fileUpload(MultipartFile image){
        HashMap<String, Object> map = new HashMap<>();
        String filename = image.getOriginalFilename();
        if(filename!=null&& !"".equals(filename)){
        	//文件最后一个“.”的位置
            int index = filename.lastIndexOf(".");
            //截取文件名
            String name = filename.substring(index);
            //拼接文件名
            String file = UUID.randomUUID().toString() + name;
            try {
                // 获取项目根目录
                String rootPath = System.getProperty("user.dir");
                // 拼接保存路径
                String savePath = rootPath + "/target/classes/static/imgs/" + file;
                File dest = new File(savePath);
                // 保存文件
                image.transferTo(dest);
                map.put("code",1);
                map.put("data","http://localhost:8080/imgs/"+file);
                map.put("msg","存储成功");
            } catch (IOException e) {
                map.put("code",0);
                map.put("msg","存储失败");
            }
        }else{
            map.put("code",0);
            map.put("msg","数据为空");
        }
        return map;
    }
}
3 上传到阿里云oss
3.1申请开通账号,做好先导准备
1、申请开通账号
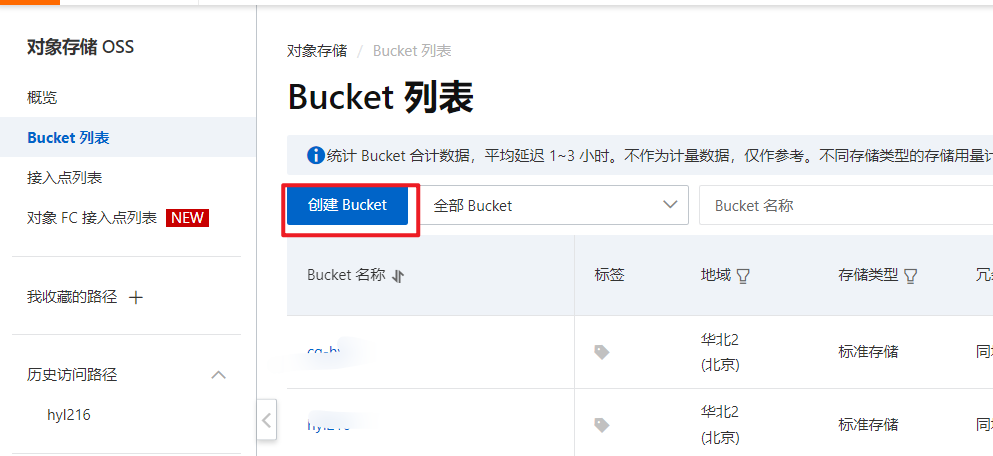
2、创建bucket【制定存储空间】
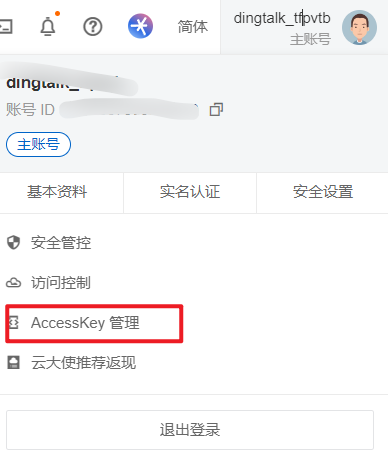
3、获取自己的秘钥
最终需要准备好如下数据:
在yaml配置文件中写入上述数据内容,在后面的util中,使用@value注入。
3.2 开始使用
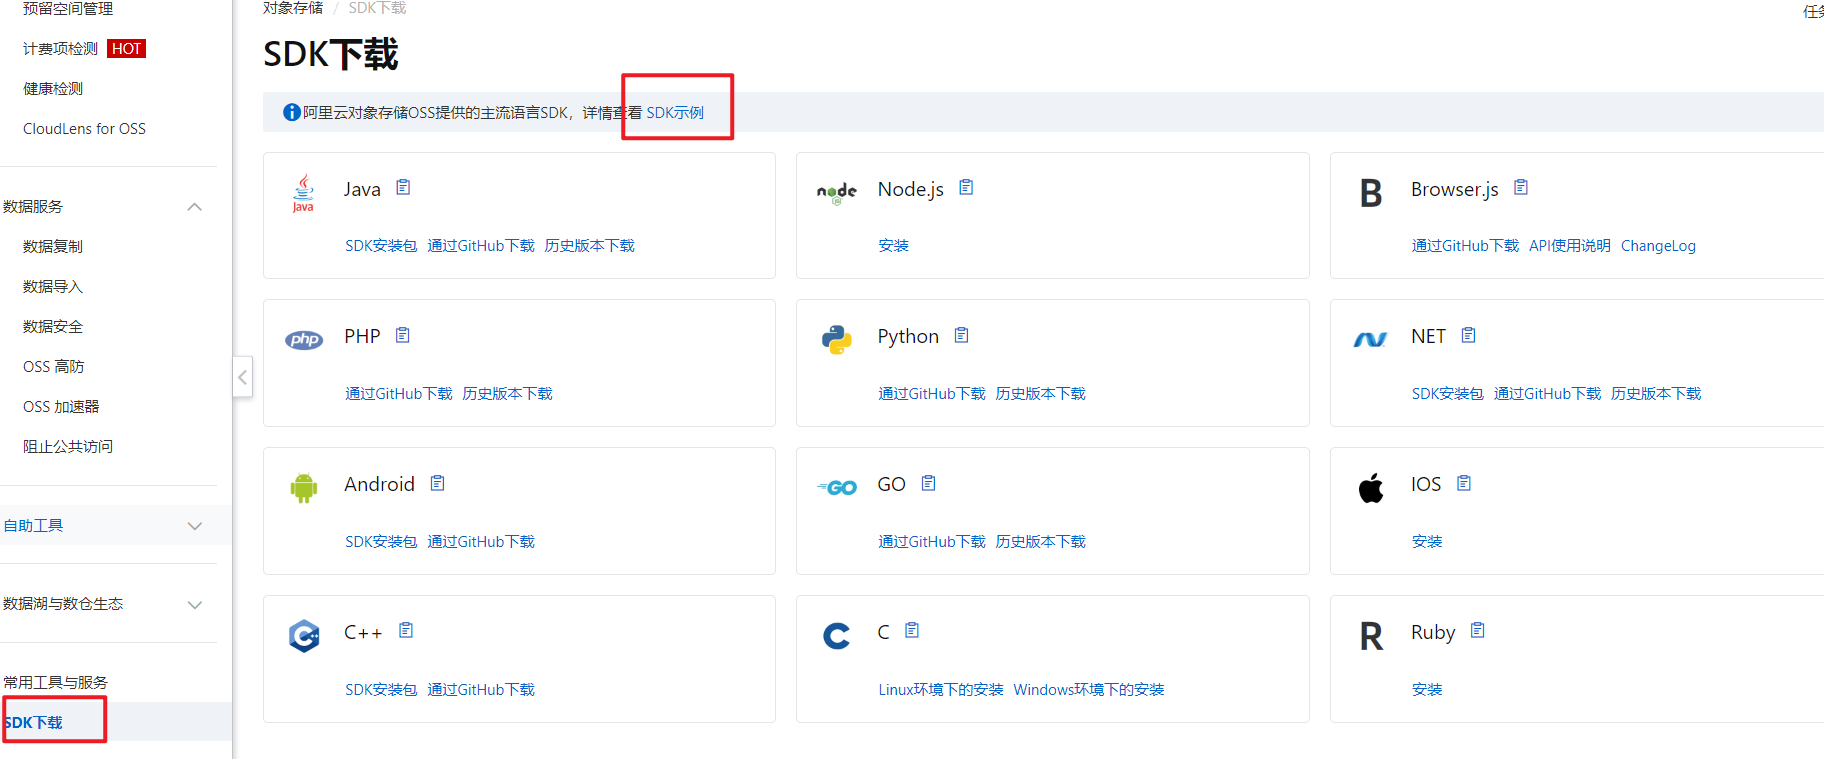
oss的使用是有专门的sdk文档的
第一步,引入pom坐标
<dependency>
    <groupId>com.aliyun.oss</groupId>
    <artifactId>aliyun-sdk-oss</artifactId>
    <version>3.15.1</version>
</dependency>
如果使用的是Java 9及以上的版本,则需要添加JAXB相关依赖。添加JAXB相关依赖示例代码如下:
<dependency>
    <groupId>javax.xml.bind</groupId>
    <artifactId>jaxb-api</artifactId>
    <version>2.3.1</version>
</dependency>
<dependency>
    <groupId>javax.activation</groupId>
    <artifactId>activation</artifactId>
    <version>1.1.1</version>
</dependency>
<!-- no more than 2.3.3-->
<dependency>
    <groupId>org.glassfish.jaxb</groupId>
    <artifactId>jaxb-runtime</artifactId>
    <version>2.3.3</version>
</dependency>
第二步:快速上手,以上传文件为例
官方参考代码如下,在此基础上修改。
import com.aliyun.oss.ClientException;
import com.aliyun.oss.OSS;
import com.aliyun.oss.OSSClientBuilder;
import com.aliyun.oss.OSSException;
import com.aliyun.oss.common.auth.CredentialsProviderFactory;
import com.aliyun.oss.common.auth.EnvironmentVariableCredentialsProvider;
import java.io.ByteArrayInputStream;

public class Demo {

    public static void main(String[] args) throws Exception {
        // Endpoint以华东1(杭州)为例,其它Region请按实际情况填写。
        String endpoint = "https://oss-cn-hangzhou.aliyuncs.com";
        // 从环境变量中获取访问凭证。运行本代码示例之前,请确保已设置环境变量OSS_ACCESS_KEY_ID和OSS_ACCESS_KEY_SECRET。
        EnvironmentVariableCredentialsProvider credentialsProvider = CredentialsProviderFactory.newEnvironmentVariableCredentialsProvider();
        // 填写Bucket名称,例如examplebucket。
        String bucketName = "examplebucket";
        // 填写Object完整路径,例如exampledir/exampleobject.txt。Object完整路径中不能包含Bucket名称。
        String objectName = "exampledir/exampleobject.txt";

        // 创建OSSClient实例。
        OSS ossClient = new OSSClientBuilder().build(endpoint, credentialsProvider);

        try {
            String content = "Hello OSS";
            ossClient.putObject(bucketName, objectName, new ByteArrayInputStream(content.getBytes()));
        } catch (OSSException oe) {
            System.out.println("Caught an OSSException, which means your request made it to OSS, "
                    + "but was rejected with an error response for some reason.");
            System.out.println("Error Message:" + oe.getErrorMessage());
            System.out.println("Error Code:" + oe.getErrorCode());
            System.out.println("Request ID:" + oe.getRequestId());
            System.out.println("Host ID:" + oe.getHostId());
        } catch (ClientException ce) {
            System.out.println("Caught an ClientException, which means the client encountered "
                    + "a serious internal problem while trying to communicate with OSS, "
                    + "such as not being able to access the network.");
            System.out.println("Error Message:" + ce.getMessage());
        } finally {
            if (ossClient != null) {
                ossClient.shutdown();
            }
        }
    }
}
确保在yaml文件中,已经准备好了前提要准备中的数据
application.yml
spring:
  #放行静态资源
  resources:
    static-locations: classpath:/templates,classpath:/static
  # 图片大小限制
  servlet:
    multipart:
      max-file-size: 10MB
      max-request-size: 100MB

alioss:
  endpoint: oss-cn-xxxxxxxx.aliyuncs.com
  access-key-id: LTxxxxxxxxxxxFK16N5MF3
  access-key-secret: rUzSTxxxxxxxxxx6Gub05w97d07KN
  bucket-name: hylxxx
注:两个关键点
new OSSClientBuilder().build(endpoint, accessKeyId, accessKeySecret);//创建对象
putObject(bucketName, objectName, new ByteArrayInputStream(bytes));//云端提交存储数据
编写AliOssUtil类
package com.hyl.utils;

import com.aliyun.oss.ClientException;
import com.aliyun.oss.OSS;
import com.aliyun.oss.OSSClientBuilder;
import com.aliyun.oss.OSSException;
import lombok.extern.slf4j.Slf4j;
import org.springframework.beans.factory.annotation.Value;
import org.springframework.stereotype.Component;

import java.io.ByteArrayInputStream;

/**
 * @author hyl
 * @version 1.0
 * @date 2024/5/3-16:29
 */
@Component
@Slf4j
public class AliOssUtil {

    @Value("${alioss.endpoint}")
    private String endpoint;
    @Value("${alioss.access-key-id}")
    private String accessKeyId;
    @Value("${alioss.access-key-secret}")
    private String accessKeySecret;
    @Value("${alioss.bucket-name}")
    private String bucketName;

    public String ossUpload(String objectName, byte[] bytes) {

        // 创建OSSClient实例。
        OSS ossClient = new OSSClientBuilder().build(endpoint, accessKeyId, accessKeySecret);

        try {
            ossClient.putObject(bucketName, objectName, new ByteArrayInputStream(bytes));
        } catch (OSSException oe) {
            System.out.println("Caught an OSSException, which means your request made it to OSS, "
                    + "but was rejected with an error response for some reason.");
            System.out.println("Error Message:" + oe.getErrorMessage());
            System.out.println("Error Code:" + oe.getErrorCode());
            System.out.println("Request ID:" + oe.getRequestId());
            System.out.println("Host ID:" + oe.getHostId());
        } catch (ClientException ce) {
            System.out.println("Caught an ClientException, which means the client encountered "
                    + "a serious internal problem while trying to communicate with OSS, "
                    + "such as not being able to access the network.");
            System.out.println("Error Message:" + ce.getMessage());
        } finally {
            if (ossClient != null) {
                ossClient.shutdown();
            }
        }
        //阿里云oss中文件访问路径规则 https://BucketName.Endpoint/ObjectName
        StringBuilder stringBuilder = new StringBuilder("https://");
        stringBuilder
                .append(bucketName)
                .append(".")
                .append(endpoint)
                .append("/")
                .append(objectName);

        log.info("文件上传到:{}", stringBuilder.toString());
        //返回图片存储路径
        return stringBuilder.toString();
    }
}
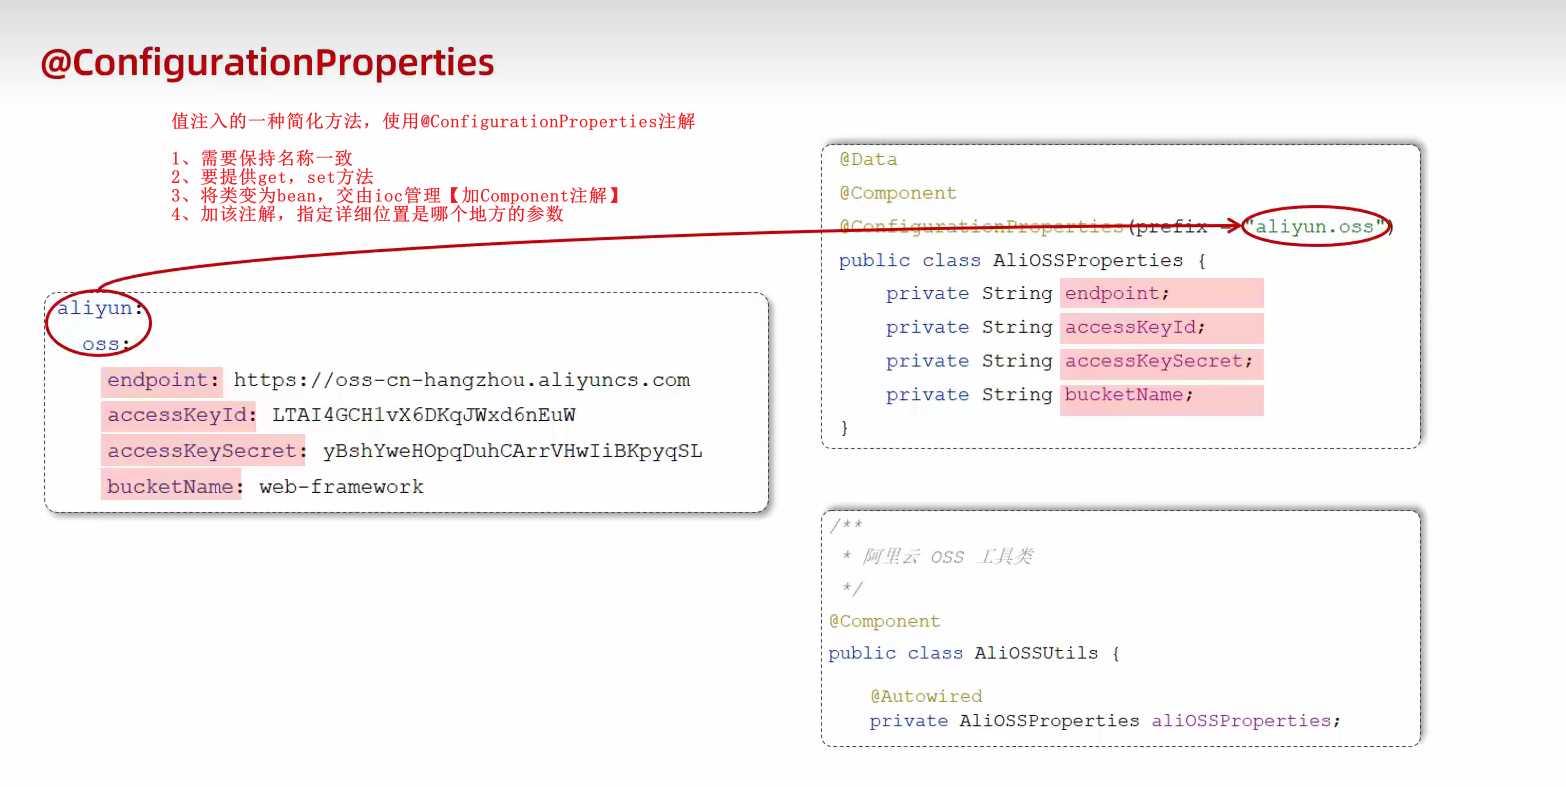
另一种注入方式,相对@Value的一种简化
编写controller
/**
 * @author hyl
 * @version 1.0
 * @date 2024/5/3-14:19
 */
@RestController
@RequestMapping("/upload")
@Slf4j
public class UploadController {
  	@Autowired
    private AliOssUtil aliOssUtil;

    /**
     * 文件上传
     * @param file
     * @return
     */
    @PostMapping("/upload")
    public HashMap<String,Object>upload(@RequestParam("image") MultipartFile file){
        log.info("文件上传:{}",file);
        HashMap<String, Object> map = new HashMap<>();
        try {
            //原始文件名
            String originalFilename = file.getOriginalFilename();
            //截取原始文件名的后缀   dfdfdf.png
            String extension = originalFilename.substring(originalFilename.lastIndexOf("."));
            //构造新文件名称
            String objectName = UUID.randomUUID().toString() + extension;

            //文件的请求路径
            String filePath = aliOssUtil.ossUpload(objectName,file.getBytes());
            map.put("code",1);
            map.put("data",filePath);
            map.put("msg","存储成功");
            return map;
        } catch (IOException e) {
            log.error("文件上传失败:{}", e);
        }
        map.put("code",0);
        map.put("msg","存储失败");
        return map;
    }
}
