-
首先了解刷新的原理
参考:http://blog.csdn.net/guolin_blog/article/details/9255575 -
转载注明出处:https://blog.csdn.net/qq_28996795/article/details/103247448
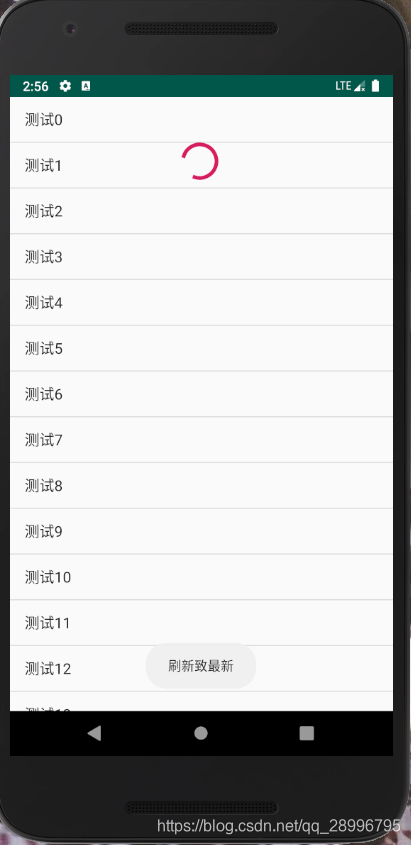
下面是实现的效果:
xml:
<?xml version="1.0" encoding="utf-8"?>
<LinearLayout xmlns:android="http://schemas.android.com/apk/res/android"
    android:orientation="vertical" android:layout_width="match_parent"
    android:layout_height="match_parent">
<FrameLayout
    android:layout_width="match_parent"
    android:layout_height="match_parent"
    android:id="@+id/fr"
    >
    //这里隐藏掉当前布局
    <LinearLayout
        android:layout_width="match_parent"
        android:layout_height="60dp"
        android:layout_marginTop="-60dp"
        android:id="@+id/l1"
        >
        <ProgressBar
            android:layout_width="wrap_content"
            android:layout_height="wrap_content"
            android:layout_marginLeft="180dp"
            android:id="@+id/bar"
            />
    </LinearLayout>
    <ListView
        android:id="@+id/list"
        android:layout_width="match_parent"
        android:layout_height="match_parent">
    </ListView>
</FrameLayout>
</LinearLayout>
Activity:代码 主要通过实现OnTouchListener监听来实现刷新
package com.example.newword;

import android.app.Activity;
import android.os.Bundle;
import android.os.Handler;
import android.util.Log;
import android.view.MotionEvent;
import android.view.View;
import android.widget.ArrayAdapter;
import android.widget.FrameLayout;
import android.widget.LinearLayout;
import android.widget.ListView;
import android.widget.ProgressBar;
import android.widget.Toast;

import androidx.swiperefreshlayout.widget.SwipeRefreshLayout;

import com.example.okhttp.R;

import java.util.ArrayList;
import java.util.List;

public class T2Activity extends Activity implements View.OnTouchListener {

    private ListView ls;
    private ProgressBar bar;
    private ListView list;
    private FrameLayout fr;

    float myx;
    private LinearLayout l1;

    boolean Yes=true;
    int State=0;

    @Override
    protected void onCreate(Bundle savedInstanceState) {
        super.onCreate(savedInstanceState);
        setContentView(R.layout.t2_1);
        initView();

    }

    private void initView() {
        bar = (ProgressBar) findViewById(R.id.bar);
        list = (ListView) findViewById(R.id.list);
        fr = (FrameLayout) findViewById(R.id.fr);
        list.setOnTouchListener(this);
        l1 = (LinearLayout) findViewById(R.id.l1);
        List<String> list=new ArrayList<>();
        for (int i = 0; i <50 ; i++) {
            list.add("测试"+i);
        }
        ArrayAdapter adapter=new ArrayAdapter(this,android.R.layout.simple_list_item_1,list);
        this.list.setAdapter(adapter);
    }

    /**
     * 刷新
     * @param v
     * @param event
     * @return
     */
    @Override
    public boolean onTouch(View v, MotionEvent event) {
    	//得到list 的第一个itme 位置
        int fist=list.getFirstVisiblePosition();
        if (Yes)
        {

            switch (event.getAction()) {
                case MotionEvent.ACTION_DOWN:
                    if (State==1)
                    {

                        Yes=false;
                        return false;
                    }
                    State=0;
                    //记录按下时屏幕的Y
                    myx = event.getRawY();
                    break;
                case MotionEvent.ACTION_MOVE:
                    float y1=event.getRawY()/2;
                    if ((int) (y1-myx)>=150)
                    {
                        State=1;
                        return false;
                    }
                    //位置为0时改变Margins
                    if (fist==0)
                    {
                        FrameLayout.LayoutParams pl=new FrameLayout.LayoutParams(l1.getLayoutParams());
                        pl.setMargins(0, (int) (y1-myx),0,0);
                        l1.setLayoutParams(pl);
                    }
                    break;
                case MotionEvent.ACTION_UP:
                    float y = event.getRawY()/2;
                    if (y - myx > 150) {
                        Log.i("TAG", "onTouch: " + y + "   " + myx);
                        bar.setVisibility(View.VISIBLE);
                        new Handler().postDelayed(() -> {
                            //bar.setVisibility(View.INVISIBLE);
                            //调用刷新回调
                            /*
                             * 刷新回调 这里可以写刷新方法 或者刷新的回调
                             * */
                            FrameLayout.LayoutParams p2=new FrameLayout.LayoutParams(l1.getLayoutParams());
                            p2.setMargins(0, -120,0,0);
                            l1.setLayoutParams(p2);
                            State=0;
                            Yes=true;
                            Toast.makeText(T2Activity.this,"刷新致最新",Toast.LENGTH_LONG).show();
                        }, 3000);
                        //失去焦点
                        return false;
                    }else //没有达到刷新
                    {
                        FrameLayout.LayoutParams p2=new FrameLayout.LayoutParams(l1.getLayoutParams());
                        p2.setMargins(0, -120,0,0);
                        l1.setLayoutParams(p2);
                        State=0;
                        Yes=true;
                    }
                    break;
            }
        }
        else
        {

            State=0;
        }
        return false;
    }
}
这样就达到完美想要的效果!我们也可以把进度条换成我们的布局文件通过改变外边距来达到其他样式的下拉刷新.
