前言
坐标拾取有几种方式,这里只讲scene.pickPosition。大体思路是:先获取点击的屏幕坐标,然后读取fbo中的深度缓存信息,有了屏幕坐标和深度信息,即可根据矩阵变换,重新计算得到顶点的世界坐标。
流程图大体图下:
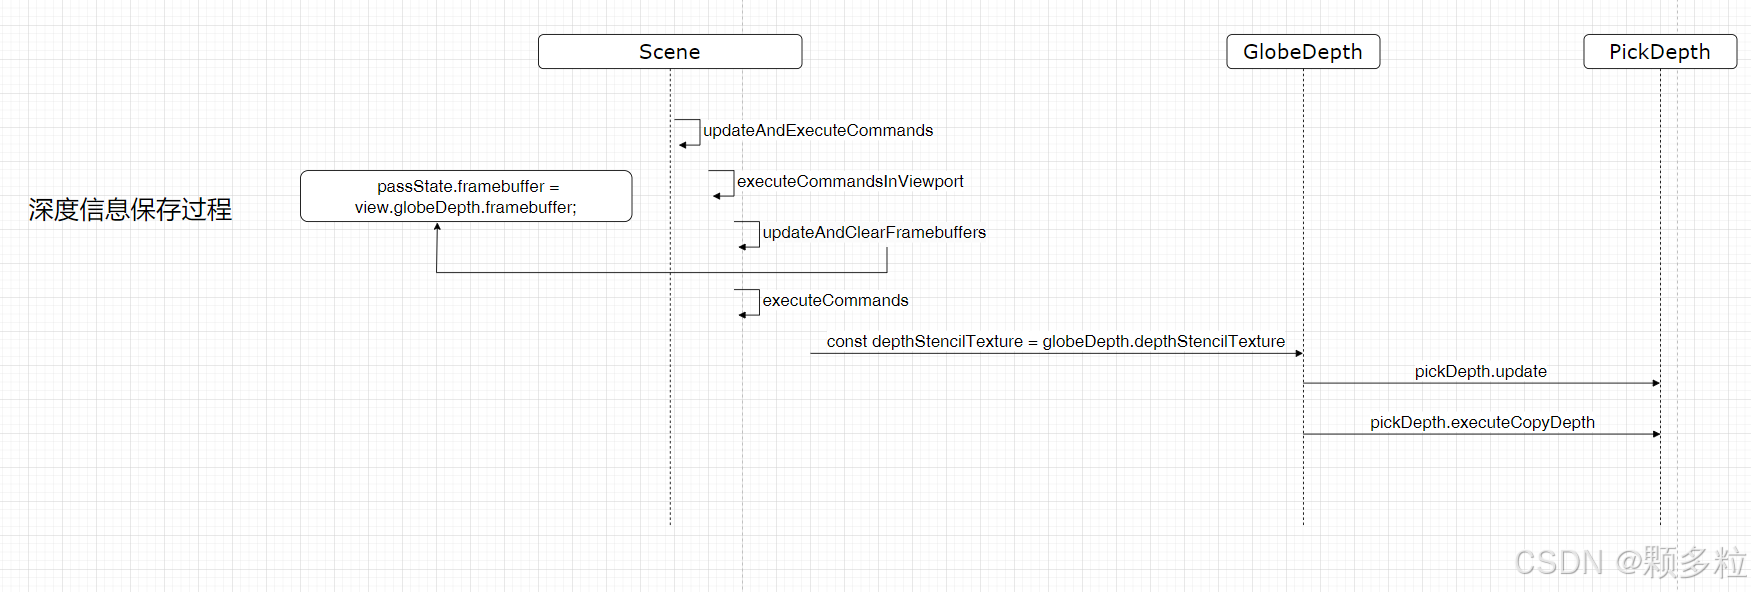

1.深度信息的存储
获取屏幕坐标这个就不讲了,直接讲如何获取深度信息,在此之前,需要先知道深度信息保存在哪里。
在初始化view的时候,会创建GlobeDepth,GlobeDepth会创建两个fbo:_pickColorFramebuffer和_outputFramebuffer,这两个fbo都有深度缓存纹理
function GlobeDepth() {
  ...
  this._pickColorFramebuffer = new FramebufferManager({
    depthStencil: true,
    supportsDepthTexture: true,
  });
  this._outputFramebuffer = new FramebufferManager({
    depthStencil: true,
    supportsDepthTexture: true,
  });
}
为什么要创建GlobeDepth呢,因为cesium并不是直接把场景渲染到屏幕,而是先渲染到fbo,再从fbo到屏幕。如果我们看Scene里面的流程,会发现通常情况下使用的fbo正是GlobeDepth创建的fbo。
 if (environmentState.isSunVisible && scene.sunBloom && !useWebVR) {
    passState.framebuffer = scene._sunPostProcess.update(passState);
    scene._sunPostProcess.clear(context, passState, clearColor);
  } else if (useGlobeDepthFramebuffer) {
    passState.framebuffer = view.globeDepth.framebuffer;//通常是使用这个
  } else if (usePostProcess) {
    passState.framebuffer = view.sceneFramebuffer.framebuffer;
  }
知道深度信息保存在哪里后,我们后面就能通过context.readPixels读取深度信息了。
2.获取坐标
获取坐标的核心方法是pickPositionWorldCoordinates,下面具体说明每一句的作用(仅展示核心代码),大体分两步,先通过pickDepth.getDepth获取深度值,再通过 SceneTransforms.drawingBufferToWgs84Coordinates计算世界坐标
Picking.prototype.pickPositionWorldCoordinates = function(
  scene,
  windowPosition,
  result
) {
 ...
  scene.view = defaultView;
  const drawingBufferPosition = SceneTransforms.transformWindowToDrawingBuffer(
    scene,
    windowPosition,
    scratchPosition
  );
...
  drawingBufferPosition.y = scene.drawingBufferHeight - drawingBufferPosition.y;

  const frustumCommandsList = defaultView.frustumCommandsList;
  const numFrustums = frustumCommandsList.length;
  for (let i = 0; i < numFrustums; ++i) {
    const pickDepth = this.getPickDepth(scene, i);
    const depth = pickDepth.getDepth(
      context,
      drawingBufferPosition.x,
      drawingBufferPosition.y
    );
    if (depth > 0.0 && depth < 1.0) {
      const renderedFrustum = frustumCommandsList[i];
      result = SceneTransforms.drawingBufferToWgs84Coordinates(
        scene,
        drawingBufferPosition,
        depth,
        result
      );
    }
  }
};
2.1获取深度值
在获取屏幕坐标后,通过SceneTransforms.transformWindowToDrawingBuffer将屏幕坐标值根据fbo的画布大小重新缩放一下,一般情况下,两者大小是一致的,接着翻转一下y值。
通过getPickDepth获取当前视锥体的PickDepth,这里为什么要用PickDepth呢,前面我们说过深度信息存在GlobeDepth的fbo里面,cesium并不是直接读取GlobeDepth的fbo的深度信息,而是将深度信息通过另外的Command转为rgb渲染到纹理,而这里就是PickDepth起关键作用。
如果我们查看PickDepth的updateCopyCommands方法就会发现,这个Command非常简单,就是采样depthTexture的值,然后转码为rgb渲染。
function updateCopyCommands(pickDepth, context, depthTexture) {
  if (!defined(pickDepth._copyDepthCommand)) {
    const fs =
      "uniform highp sampler2D u_texture;\n" +
      "in vec2 v_textureCoordinates;\n" +
      "void main()\n" +
      "{\n" +
      "    out_FragColor = czm_packDepth(texture(u_texture, v_textureCoordinates).r);\n" +
      "}\n";
    pickDepth._copyDepthCommand = context.createViewportQuadCommand(fs, {
      renderState: RenderState.fromCache(),
      uniformMap: {
        u_texture: function () {
          return pickDepth._textureToCopy;
        },
      },
      owner: pickDepth,
    });
  }

  pickDepth._textureToCopy = depthTexture;
  pickDepth._copyDepthCommand.framebuffer = pickDepth.framebuffer;
}
那么这里的depthTexture又是怎么来的呢,回到Scene的executeCommands方法,其中有如下代码,可以看到pickDepth接收的depthTexture正是globeDepth.depthStencilTexture,depthStencilTexture就是前面我们提到的globeDepth的fbo中存储深度信息的纹理
	const depthStencilTexture = globeDepth.depthStencilTexture;
    const pickDepth = scene._picking.getPickDepth(scene, index);
    pickDepth.update(context, depthStencilTexture);//传入深度纹理
    pickDepth.executeCopyDepth(context, passState);//执行copyDepthCommand,将深度信息转为rgb
有了这些信息,那么我们执行pickDepth._copyDepthCommand,然后再读取pickDepth.framebuffer的深度信息就可以拿到深度值了。
PickDepth.prototype.getDepth = function (context, x, y) {
  const pixels = context.readPixels({
    x: x,
    y: y,
    width: 1,
    height: 1,
    framebuffer: this.framebuffer,
  });

  const packedDepth = Cartesian4.unpack(pixels, 0, scratchPackedDepth);
  Cartesian4.divideByScalar(packedDepth, 255.0, packedDepth);
  return Cartesian4.dot(packedDepth, packedDepthScale);
};
这里的getDepth 除了读取像素值外,还要做一个解码的操作,因为前面我们是通过转码将深度信息转成了rgb渲染到纹理的,所以这里读取像素值后还不能直接使用,需要解码。
2.2转世界坐标
有深度信息后,可以调用SceneTransforms.drawingBufferToWgs84Coordinates计算世界坐标,这个方法逻辑也很清晰了,大体就是:屏幕坐标先转归一化设备坐标,再乘上逆的视图投影矩阵,再乘上逆的透视除法因子,最后得到世界坐标。
SceneTransforms.drawingBufferToWgs84Coordinates = function (
  scene,
  drawingBufferPosition,
  depth,
  result
) {
  if (scene.frameState.useLogDepth) {
    // transforming logarithmic depth of form
    // log2(z + 1) / log2( far + 1);
    // to perspective form
    // (far - far * near / z) / (far - near)
    const log2Depth = depth * uniformState.log2FarDepthFromNearPlusOne;
    const depthFromNear = Math.pow(2.0, log2Depth) - 1.0;
    depth = (far * (1.0 - near / (depthFromNear + near))) / (far - near);
  }

  const viewport = scene.view.passState.viewport;
  const ndc = Cartesian4.clone(Cartesian4.UNIT_W, scratchNDC);
  ndc.x = ((drawingBufferPosition.x - viewport.x) / viewport.width) * 2.0 - 1.0;
  ndc.y =
    ((drawingBufferPosition.y - viewport.y) / viewport.height) * 2.0 - 1.0;
  ndc.z = depth * 2.0 - 1.0;
  ndc.w = 1.0;

  let worldCoords;
  let frustum = scene.camera.frustum;
  if (!defined(frustum.fovy)) {
    const offCenterFrustum = frustum.offCenterFrustum;
    if (defined(offCenterFrustum)) {
      frustum = offCenterFrustum;
    }
    worldCoords = scratchWorldCoords;
    worldCoords.x =
      (ndc.x * (frustum.right - frustum.left) + frustum.left + frustum.right) *
      0.5;
    worldCoords.y =
      (ndc.y * (frustum.top - frustum.bottom) + frustum.bottom + frustum.top) *
      0.5;
    worldCoords.z = (ndc.z * (near - far) - near - far) * 0.5;
    worldCoords.w = 1.0;

    worldCoords = Matrix4.multiplyByVector(
      uniformState.inverseView,
      worldCoords,
      worldCoords
    );
  } else {
    worldCoords = Matrix4.multiplyByVector(
      uniformState.inverseViewProjection,
      ndc,
      scratchWorldCoords
    );

    // Reverse perspective divide
    const w = 1.0 / worldCoords.w;
    Cartesian3.multiplyByScalar(worldCoords, w, worldCoords);
  }
  return Cartesian3.fromCartesian4(worldCoords, result);
};