目录导航
前言
前面的章节我们讲了微服务专题06-云原生应用(Cloud Native Applications)。本节,继续微服务专题的内容分享,共计16小节,分别是:
- 微服务专题01-Spring Application
- 微服务专题02-Spring Web MVC 视图技术
- 微服务专题03-REST
- 微服务专题04-Spring WebFlux 原理
- 微服务专题05-Spring WebFlux 运用
- 微服务专题06-云原生应用(Cloud Native Applications)
- 微服务专题07-Spring Cloud 配置管理
- 微服务专题08-Spring Cloud 服务发现
- 微服务专题09-Spring Cloud 负载均衡
- 微服务专题10-Spring Cloud 服务熔断
- 微服务专题11-Spring Cloud 服务调用
- 微服务专题12-Spring Cloud Gateway
- 微服务专题13-Spring Cloud Stream (上)
- 微服务专题14-Spring Cloud Bus
- 微服务专题15-Spring Cloud Stream 实现
- 微服务专题16-Spring Cloud 整体回顾
本节内容重点为:
- Environment 端点:介绍
/env端点的使用场景,并且解读其源码,了解其中奥秘 - 基本使用:介绍
@EnableConfigServer、Environment仓储 - 分布式配置官方实现:介绍 Spring 官方标准分布式配置实现方式:JDBC 实现
- 动态配置属性 Bean:介绍
@RefreshScope基本用法和使用场景,并且说明其中的局限性 - 健康指标:介绍 Spring Boot 标准端口(
/health)以及 健康指标(Health Indicator) - 健康指标自定义实现:实现分布式配置的健康指标自定义实现
开源项目
做过 SpringCloud 配置管理的同学一定会接触一些企业级的配置管理框架,这里给出参考。
国内知名开源项目
国外知名开源项目
客户端
Spring Cloud Config 的前世今生
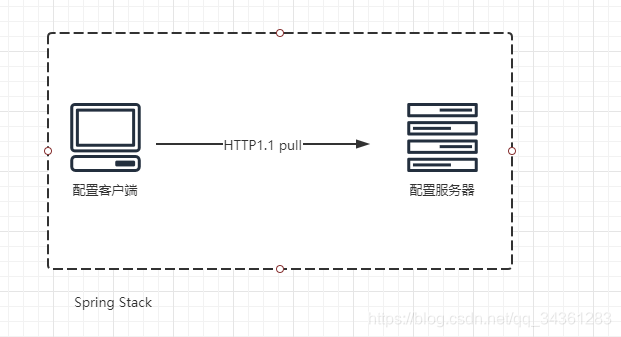
传统的配置管理是基于 Spring Stack 来实现的,所以 Client 与 Server 是通过 Spring 进行关联的:
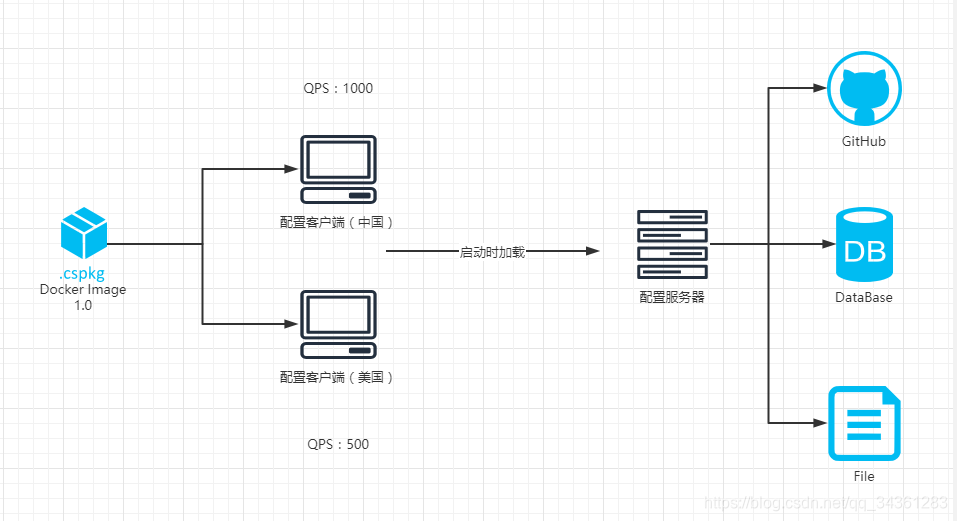
Q:Spring Cloud 的分布式配置如何设计的呢?
A:Spring Cloud 的配置读取是在客户端启动时就加载配置服务器。而通常分布在不同地域,不同机器上的客户端配置是不一样的,比如中国的 Client 的 QPS 是1000,而美国的 Client 的 QPS 是 500,则可通过服务熔断的机制 ${app.qps} 去设计。并且 SpringCloud 最新版本服务器端支持加载 Github/SVN、数据库以及配置文件这几种方式。
Java Client 自行读取 HttpClient
在传统的项目配置管理,Java Client 自行读取HttpClient,通常的流程是这样的:
- 首先获取配置文件文本信息
- 将文本信息转化为 Properties 对象
- 根据配置文件(yml/properties)的 key 读取到相应的值
- 业务逻辑代码加载 value 值(通过 Spring 注入配置)
- 新的配置就对于 APP 生效了
Q:传统意义上的配置客户端通过Http 拉取配置服务器上的配置有什么弊端?
A: 通过http拉取的过程中,Http1.1 版本的协议是无状态的,即短连接。这就意味着,客户端每次在更新的时候就必须采取轮询策略,而长期运作的情况显然不是我们愿意看到的结果。
配置三方库
面对 JavaClient 采用 Http 短连接的弊病,我们通常可以采用第三方库来对配置文件进行管理。
| 开源项目 | 配置源顺序(配置优先级覆盖) | 配置源(存储媒介) | 转换类型(编程便利性) |
|---|---|---|---|
| Apache Commons Configuration | Configuration | 丰富,基本支持所有类型 | |
| Spring FrameWork | addFirst()优先覆盖 | PropertySource |
Apache Commons Configuration
pom坐标如下:
<dependency>
	<groupId>commons-configuration</groupId>
	<artifactId>commons-configuration</artifactId>
	<version>1.9</version>
</dependency>
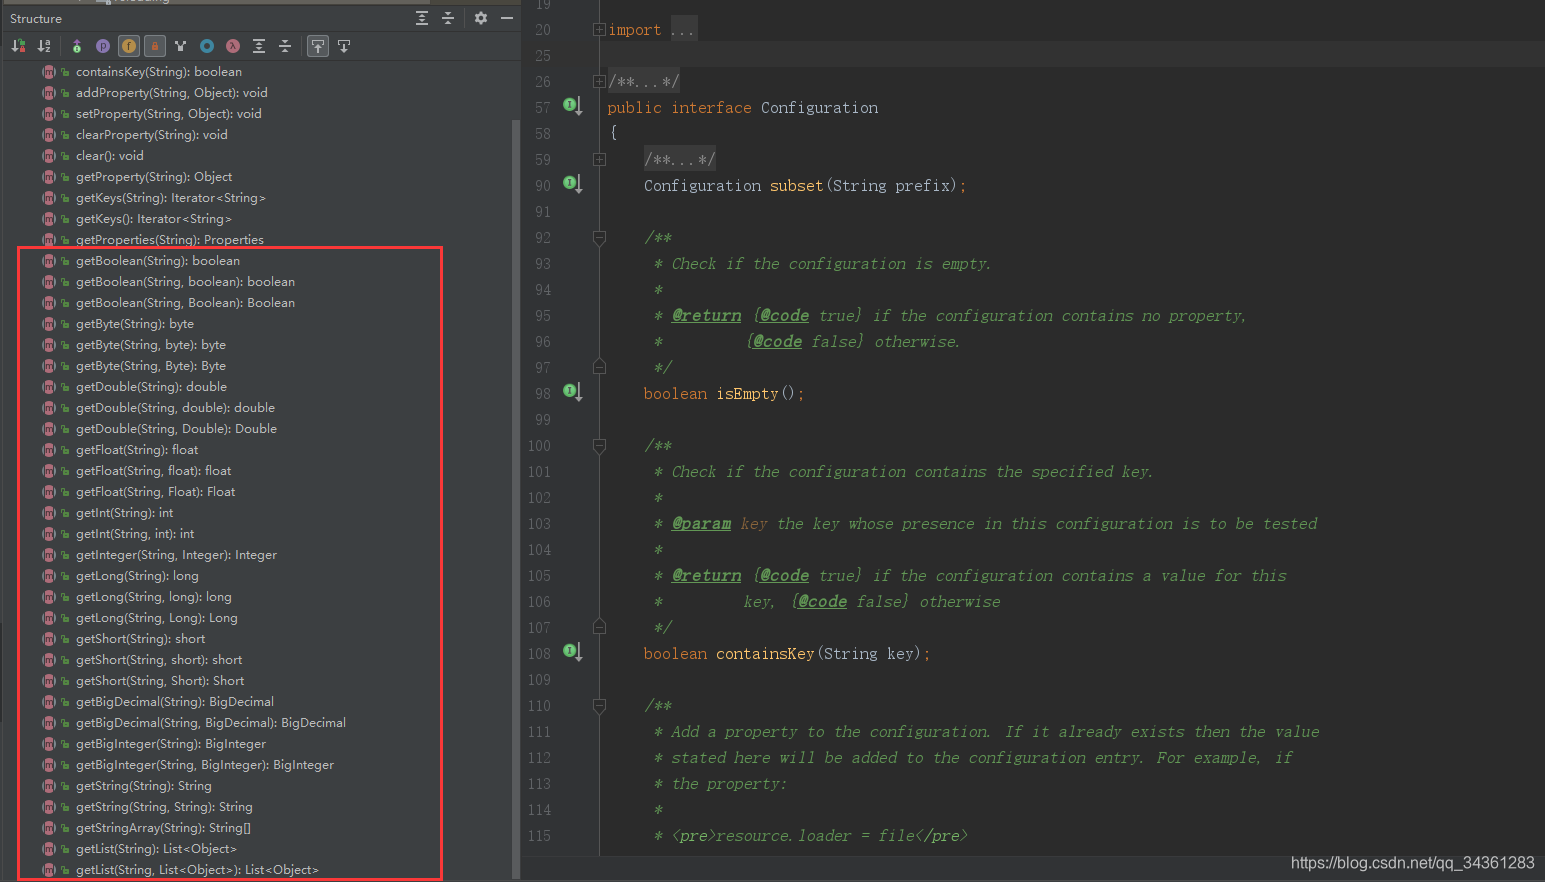
展开源码,发现 commons-configuration 包里面的核心类 Configuration 提供大多数常见类型的 Value 转换。
原因在于 Properties 集成了Hashtable 的 key 和 value 都是 Object 类型:
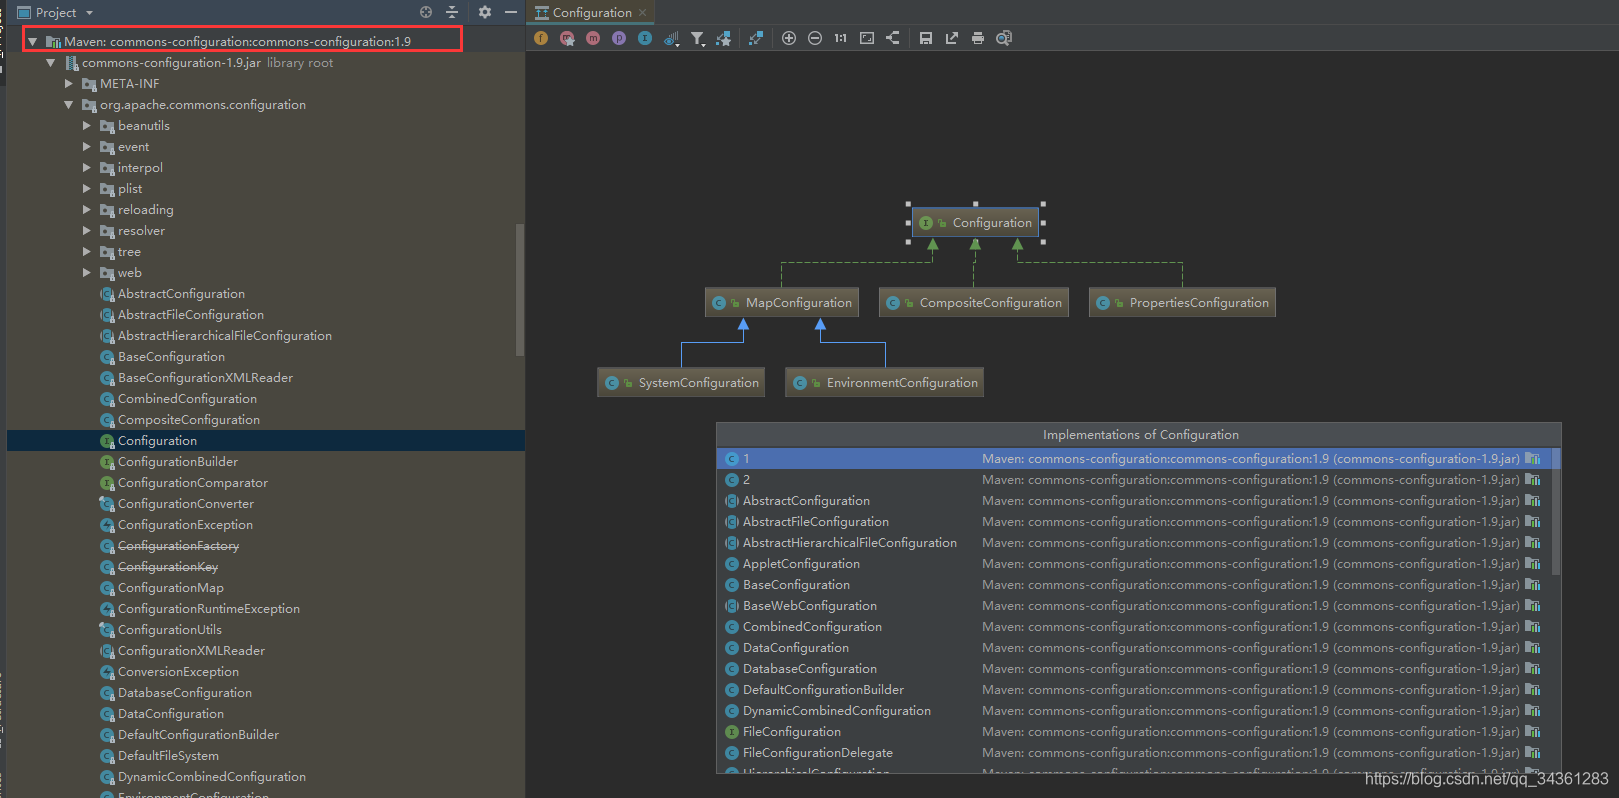
接下来看一下 Configuration 的实现类:
实现类有很多种,这里举例几个常见的子类实现用以说明:
-
PropertiesConfiguration: 将 Properties 作为Configuration配置 -
MapConfiguration: 以 Map 形式存储 配置信息EnvironmentConfiguration: OS 环境变量SystemConfiguration: Java 系统属性
-
CompositeConfiguration:将配置组合起来,存储方式为List < Configuration >
不论Spring原生的配置读取,还是第三方库的配置读取,最核心概念在于:配置源、以及它们优先次序、配置转换能力!
Q:看到这里,我们不禁思考,HTTP 资源算不算一个配置?
A:通常我们所说的配置源指的是文件、HTTP 资源、数据源、 Git 等,但是殊途同归,都是以URL形式存在,所以HTTP 资源算一个配置。
- 文件对应的URL路径 file:///
- http资源对应的URL路径 http://
- 数据源对应的URL路径jdbc://
- git 对应的URL路径 git://
Spring FrameWork
前面提到的 commons-configuration 方式使通过 Apache Commons Configuration 来实现的,那么在Spring FrameWork 则通过Environment作为媒介进行配置管理。
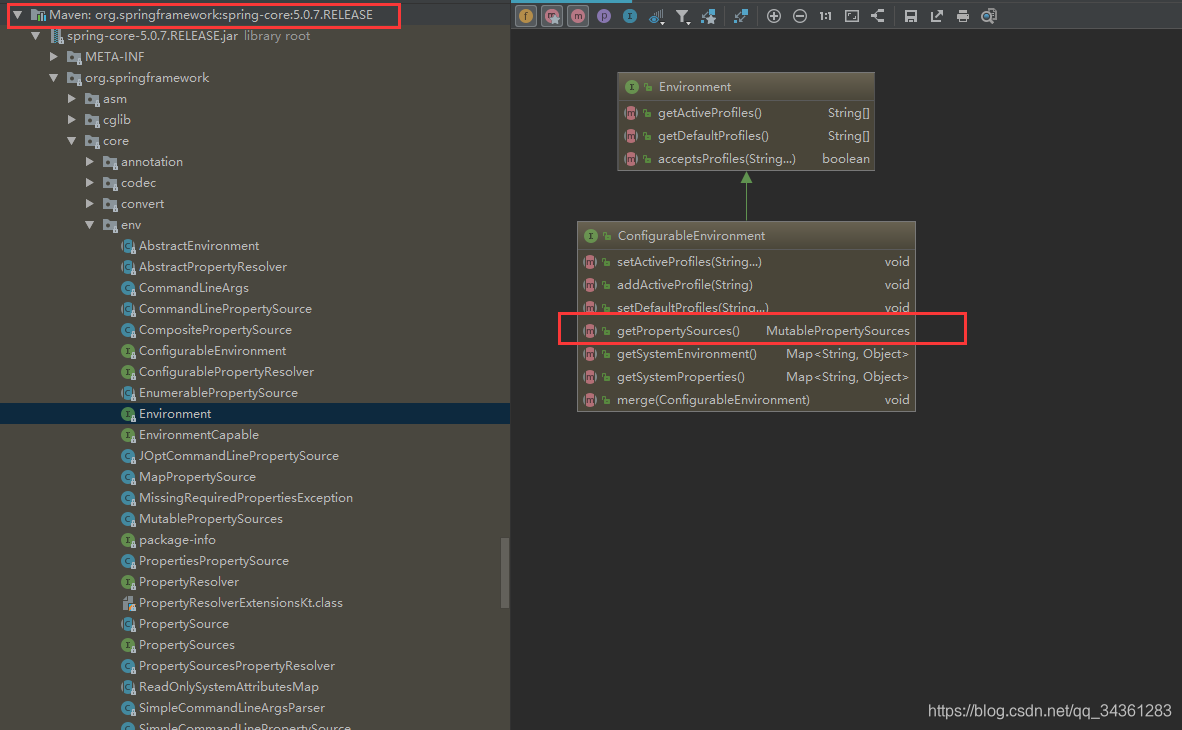
在其子实现类 ConfigurableEnvironment 有这样的方法:
MutablePropertySources getPropertySources();
而MutablePropertySources 则是用来存放配置源的集合的:
关于 PropertySource 配置源 ,对比 Apache 的 PropertiesConfiguration ,同样在 PropertySource 存在诸多实现类:
MapPropertySourcePropertiesPropertySource
CompositePropertySource: 将配置组合起来,存储方式为LinkedHashSet<PropertySource>,特点就是有序并且可以去重。
SystemEnvironmentPropertySource环境变量配置
Spring Cloud 客户端配置定位扩展 : PropertySourceLocator
Spring Cloud 客户端配置管理
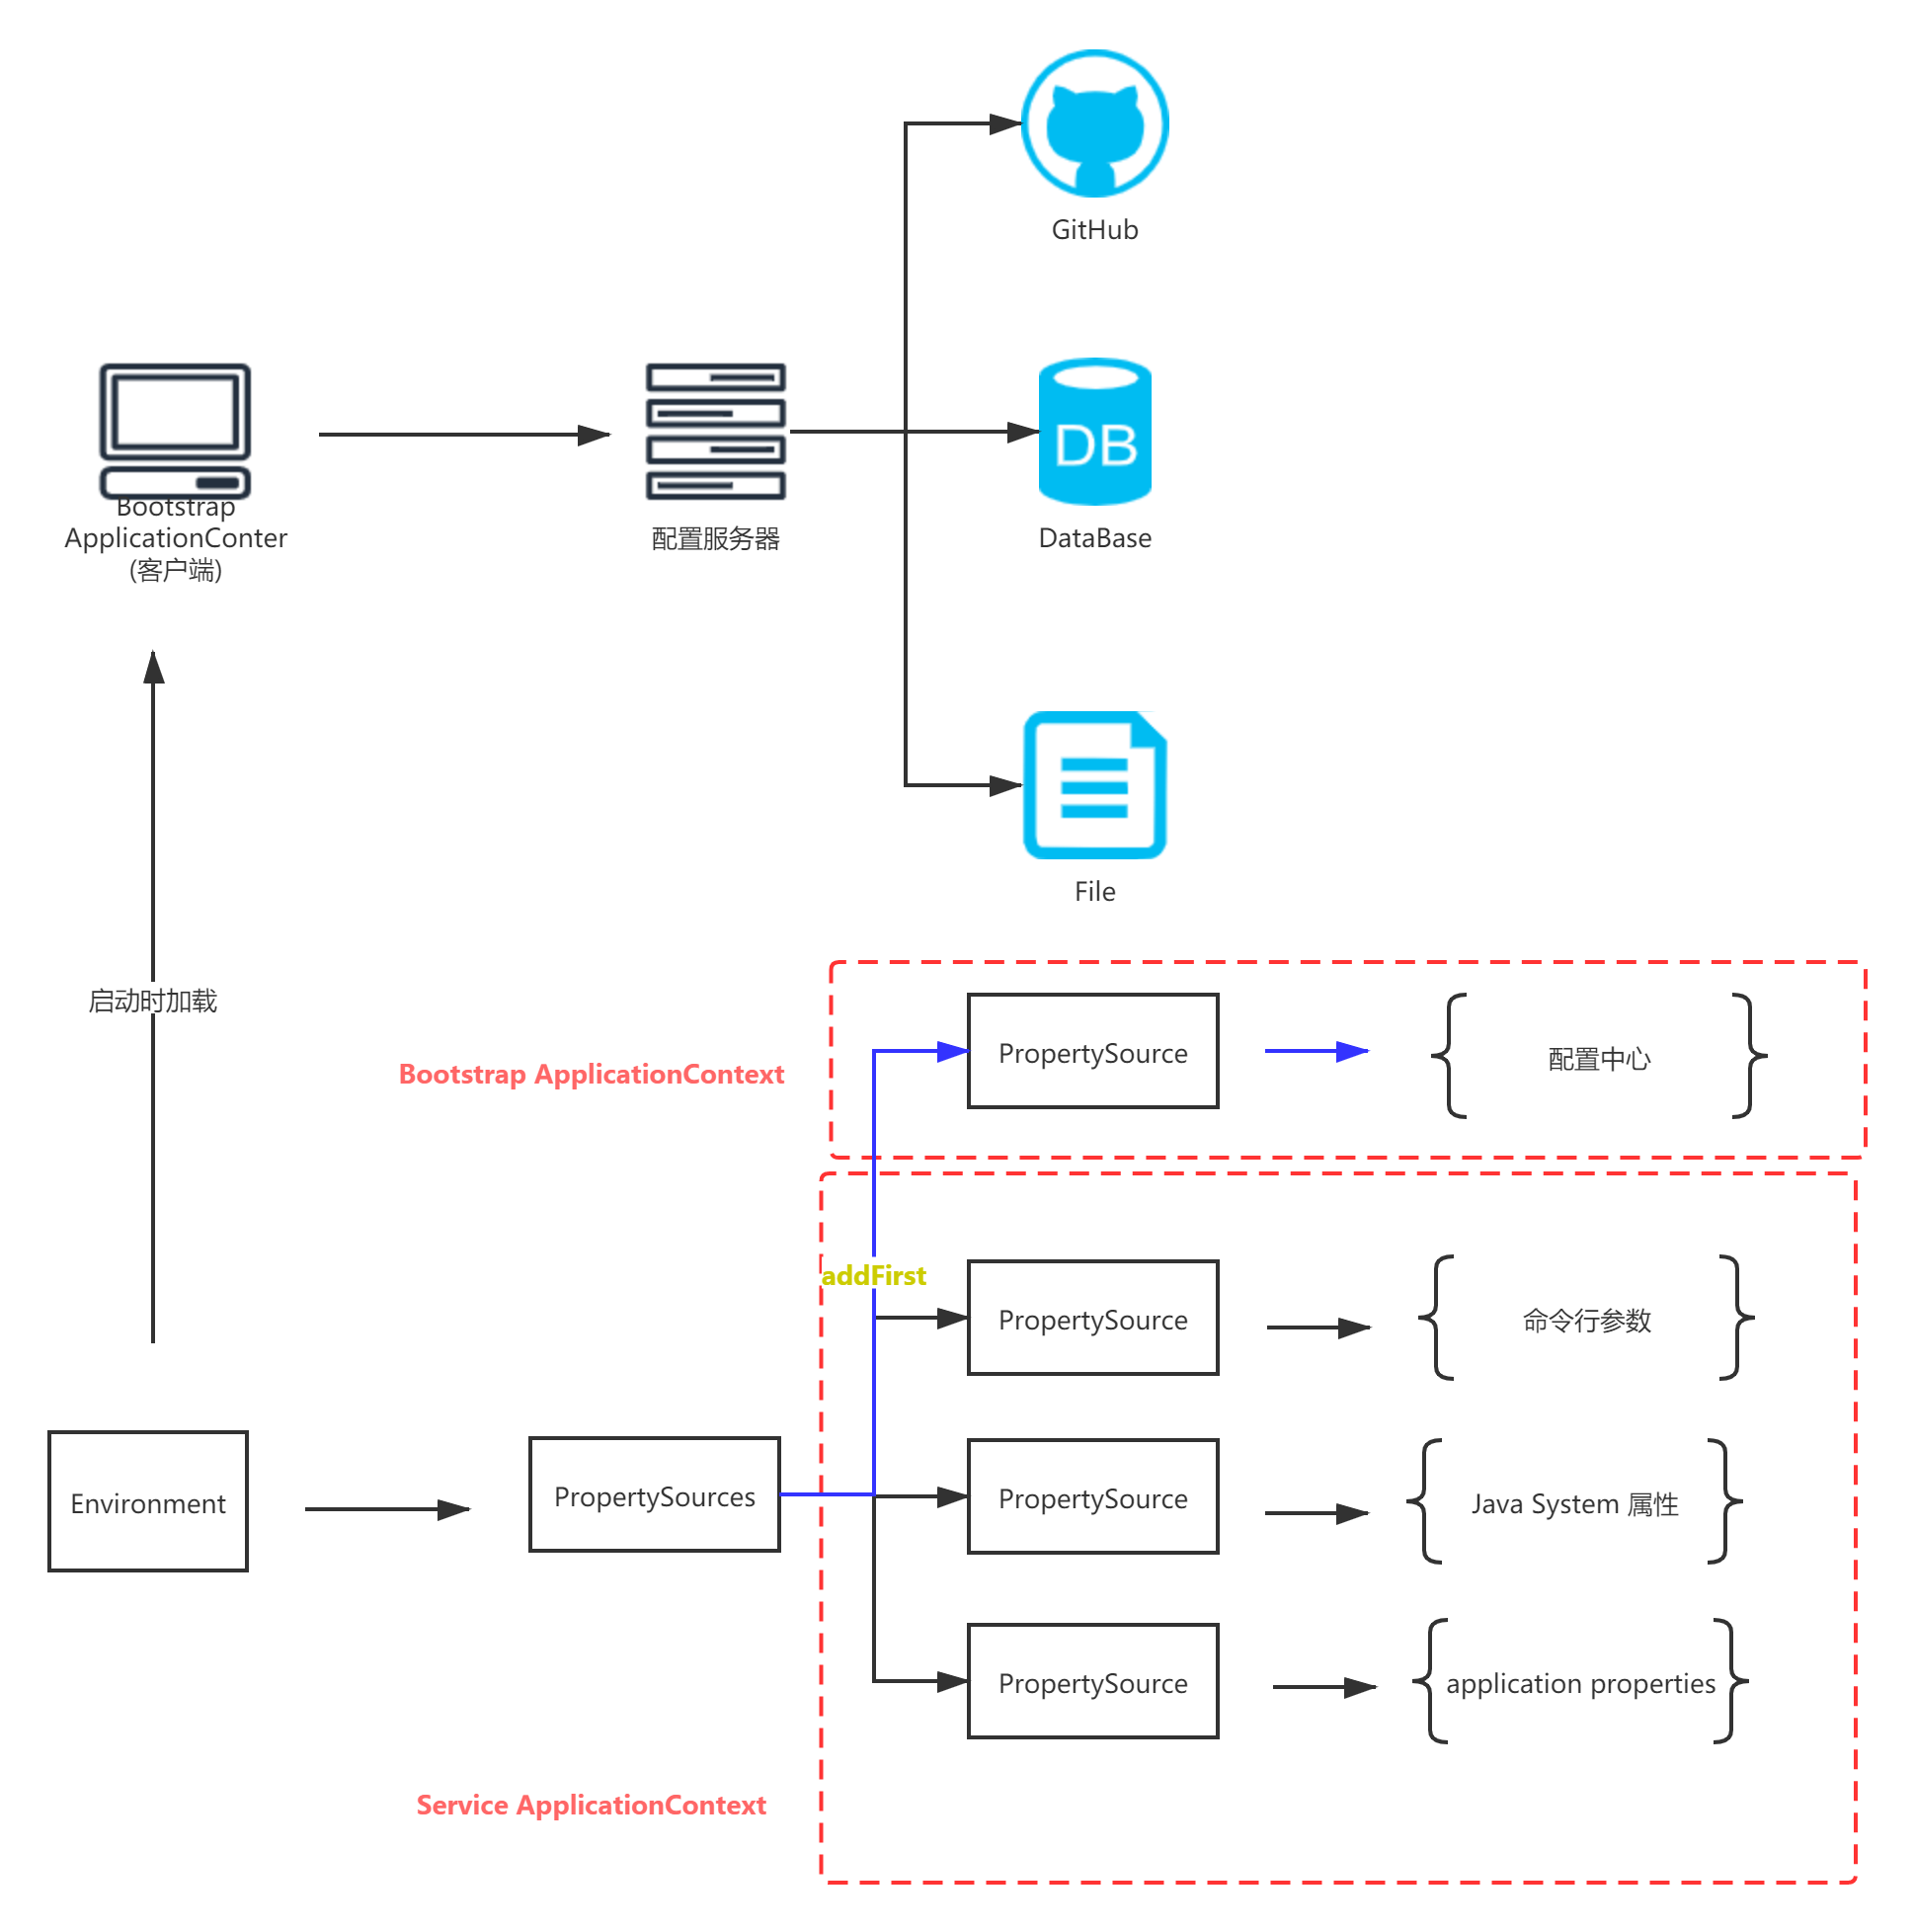
现在我们整理一下客户端与服务端的配置流程:
- 首先要明确一点,项目的外部化配置是有很多种形式的,比如命令行参数、Java System 属性、application properties 配置文件等。
- 但是现在想要通过一个服务器作为配置管理,就应该将配置中心的加载顺序放到首位。我们知道在 getProperties 的过程中,会采取 addFirst 的形式。
- 通过上一节的介绍了上下文层次的加载顺序问题,不就是正好可以解决这一个问题么?Bootstrap上下文是所有上下文的parent ,所以我们可以将配置中心置于Bootstrap ApplicationContext(Bootstrap父上下文)。将其他形式的配置设置为 Service ApplicationContext(服务级上下文)。
- 这样通过客户端启动时加载时就会优先加载来自于 Bootstrap 父上下文中的配置中心的内容。
服务端
基于 Git 实现
实现的效果是,通过配置 Spring Cloud Config 的服务端,将 Git 仓库中的配置加载出来:
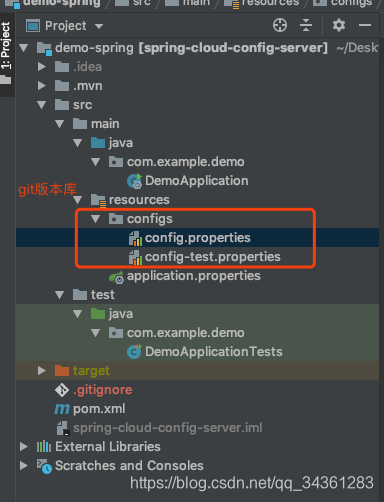
我这里将git版本库放在了/resources/configs目录下,并用以不同的profile加以区分。
- 配置服务端依赖,篇幅有限,完整依赖请移步至文末 Github 代码地址。
    <parent>
        <groupId>org.springframework.boot</groupId>
        <artifactId>spring-boot-starter-parent</artifactId>
        <version>2.3.1.RELEASE</version>
        <relativePath/> <!-- lookup parent from repository -->
    </parent>

    <properties>
        <spring-cloud.version>Hoxton.SR6</spring-cloud.version>
    </properties>

    <dependencies>
        <dependency>
            <groupId>org.springframework.cloud</groupId>
            <artifactId>spring-cloud-config-server</artifactId>
        </dependency>
        <dependency>
            <groupId>org.springframework.cloud</groupId>
            <artifactId>spring-cloud-starter</artifactId>
        </dependency>
    </dependencies>

    <dependencyManagement>
        <dependencies>
            <dependency>
                <groupId>org.springframework.cloud</groupId>
                <artifactId>spring-cloud-dependencies</artifactId>
                <version>${spring-cloud.version}</version>
                <type>pom</type>
                <scope>import</scope>
            </dependency>
        </dependencies>
    </dependencyManagement>
- 通过
@EnableConfigServer声明当前的服务是 Spring Cloud Config 的服务端。
@SpringBootApplication
@EnableConfigServer
public class DemoApplication {

    public static void main(String[] args) {
        SpringApplication.run(DemoApplication.class, args);
    }

}
- 配置文件相关
版本化配置
## 配置服务器应用名字
spring.application.name = config-server

## 设置服务端口号
server.port = 10086

## 配置服务器git本地文件系统路径
spring.cloud.config.server.git.uri = \
${user.dir}/src/main/resources/configs/
版本文件
config.properties文件:
name = jack
config-test.properties文件:
name = tom
- 服务访问
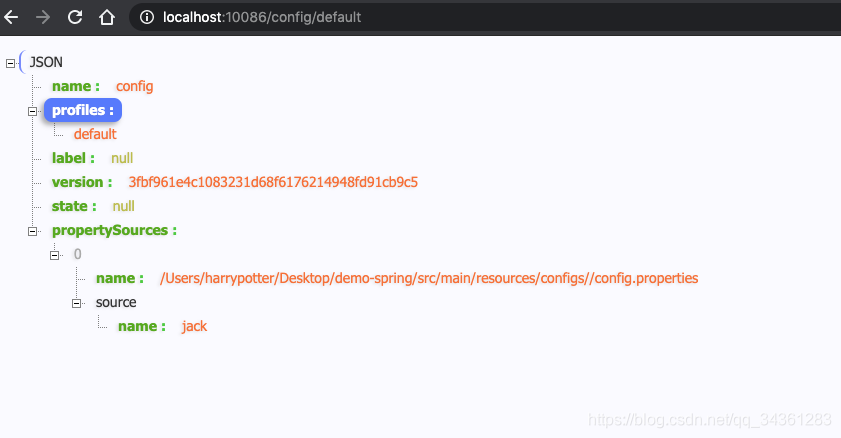
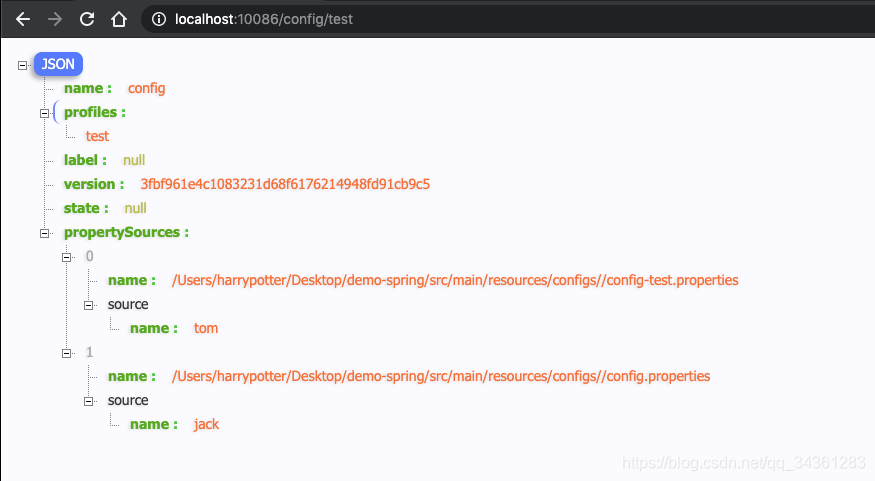
当我们访问:http://localhost:10086/config/default 实际上读取的是configs目录下的config.properties配置文件。
当我们访问:http://localhost:10086/config/test 实际上读取的是configs目录下的config-test.properties配置文件。
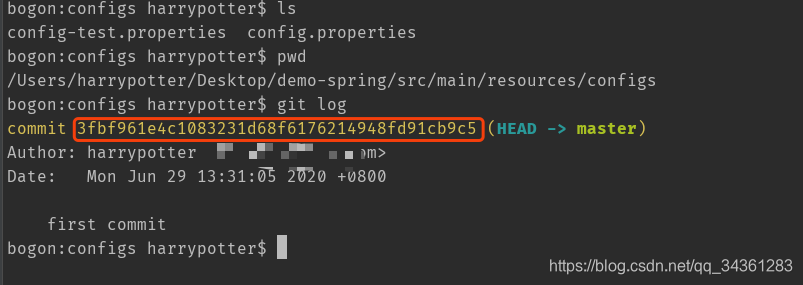
注意git的版本号:
Spring Cloud Config 实现一套完整的配置管理 API 设计。在配置的使用常采用三段式风格设置路径,即 /应用名/profile/ $ {label},$ {label} 代表分支。如果不声明分支则默认加载master主分支。如果profile环境也不声明就等同于 /应用名.properties。
以上演示的DEMO我们也要知道是有很多问题的:
- 复杂的版本更新机制( Git 仓库)
- 版本
- 分支
- 提交
- 配置
- 憋脚的内容更新(实时性不高)
- 客户端第一次启动拉取
- 需要整合 BUS 做更新通知
设计原理
前文 demo 中所演示的 Config Server 中涉及到 @EnableConfigServer 这个注解,现在我们就分析一下:
@Target(ElementType.TYPE)
@Retention(RetentionPolicy.RUNTIME)
@Documented
@Import(ConfigServerConfiguration.class)
public @interface EnableConfigServer {

}
注意使用了 @Import 说明实际配置类为 ConfigServerConfiguration :
@Configuration
public class ConfigServerConfiguration {
	class Marker {}

	@Bean
	public Marker enableConfigServerMarker() {
		return new Marker();
	}
}
我们发现,在 ConfigServerAutoConfiguration 里实际应用了 ConfigServerConfiguration 这个类:
@Configuration
@ConditionalOnBean(ConfigServerConfiguration.Marker.class)
@EnableConfigurationProperties(ConfigServerProperties.class)
@Import({ EnvironmentRepositoryConfiguration.class, CompositeConfiguration.class, ResourceRepositoryConfiguration.class,
		ConfigServerEncryptionConfiguration.class, ConfigServerMvcConfiguration.class })
public class ConfigServerAutoConfiguration {

}
从这里我们发现:当应用配置类标注了
@EnableConfigSever, 导入ConfigServerConfiguration,并注册MarkerBean,而MarkerBean 也是作为ConfigServerAutoConfiguration条件之一。
案例分析 JDBC 实现
-
JdbcTemplate Bean 来源
JdbcTemplateAutoConfiguration
-
SQL 来源
JdbcEnvironmentProperties,内容为:spring.cloud.config.server.jdbc.sql,如果不配置,默认使用DEFAULT_SQL,即:
SELECT KEY, VALUE from PROPERTIES where APPLICATION=? and PROFILE=? and LABEL=?
回顾上面的demo,结合源码,我们也会得出以下结论:
| KEY | VALUE | APPLICATION | PROFILE | LABEL |
|---|---|---|---|---|
| name | zhangsan | config | default | master |
| name | lisi | config | test | master |
本质说明:
-
JDBC :连接技术
-
DB : 存储介质
-
核心接口:
EnvironmentRepository
Q:是否可以自定义 EnvironmentRepository 实现?
A:前提:如何激活自定义的 EnvironmentRepository 实现,首先找到为什么默认是 Git 作为配置仓库的原因:
@Configuration
@ConditionalOnMissingBean(value = EnvironmentRepository.class, search = SearchStrategy.CURRENT)
class DefaultRepositoryConfiguration {
	...
	@Bean
	public MultipleJGitEnvironmentRepository defaultEnvironmentRepository(
	        MultipleJGitEnvironmentRepositoryFactory gitEnvironmentRepositoryFactory,
			MultipleJGitEnvironmentProperties environmentProperties) throws Exception {
		return gitEnvironmentRepositoryFactory.build(environmentProperties);
	}
}
当 Spring 应用上下文没有出现 EnvironmentRepository Bean 的时候,那么,默认激活 DefaultRepositoryConfiguration (Git 实现),否则采用自定义实现。
自定义实现
自定义 EnvironmentRepository Bean
    @Bean
    public EnvironmentRepository environmentRepository() {
        return (String application, String profile, String label) -> {
            Environment environment = new Environment("default", profile);
            List<PropertySource> propertySources = environment.getPropertySources();
            Map<String, Object> source = new HashMap<>();
            source.put("name", "test");
            PropertySource propertySource = new PropertySource("map", source);
            // 追加 PropertySource
            propertySources.add(propertySource);
            return environment;
        };
    }
以上实现将失效
DefaultRepositoryConfiguration装配。
比较 Spring Cloud 内建配置仓储的实现
-
Git 方式:早放弃
-
JDBC 方式:太简单
-
Zookeeper 方式: 比较适合做分布式配置
-
自定义方式:是高端玩家
后记
本节代码地址:https://github.com/harrypottry/spring-cloud-config-server
更多架构知识,欢迎关注本套Java系列文章:Java架构师成长之路
