目录导航
前言
前面的章节我们讲了Spring Cloud 配置管理 。本节,继续微服务专题的内容分享,共计16小节,分别是:
- 微服务专题01-Spring Application
- 微服务专题02-Spring Web MVC 视图技术
- 微服务专题03-REST
- 微服务专题04-Spring WebFlux 原理
- 微服务专题05-Spring WebFlux 运用
- 微服务专题06-云原生应用(Cloud Native Applications)
- 微服务专题07-Spring Cloud 配置管理
- 微服务专题08-Spring Cloud 服务发现
- 微服务专题09-Spring Cloud 负载均衡
- 微服务专题10-Spring Cloud 服务熔断
- 微服务专题11-Spring Cloud 服务调用
- 微服务专题12-Spring Cloud Gateway
- 微服务专题13-Spring Cloud Stream (上)
- 微服务专题14-Spring Cloud Bus
- 微服务专题15-Spring Cloud Stream 实现
- 微服务专题16-Spring Cloud 整体回顾
本节内容重点为:
- Zookeeper 客户端:介绍 Spring Cloud Discovery 结合 Apache Zookeeper 客户端的基本使用方法,包括服务发现激活、Eureka 客户端注册配置 以及 API 使用等
- Zookeeper 服务器:介绍 Apache Zookeeper 服务器作为服务注册中心的搭建方法
各个注册中心的对比
| 比较点 | Eureka | Zookeeper | Consul |
|---|---|---|---|
| 运维熟悉度 | 相对陌生 | 熟悉 | 更陌生 |
| 一致性(CAP) | AP(最终一致性) | CP(一致性强) | AP(最终一致性) |
| 一致性协议 | HTTP 定时轮训 | ZAB | RAFT |
| 通讯方式 | HTTP REST | 自定义协议 | HTTP REST |
| 更新机制 | Peer 2 Peer(服务器之间) + Scheduler(服务器和客户端) | ZK Watch | Agent 监听的方式 |
| 适用规模 | 20 K ~ 30 K 实例(节点) | 10K ~ 20K 实例(节点) | < 3K 实例(节点) |
| 性能问题 | 简单的更新机制、复杂设计、规模较大时 GC 频繁 | 扩容麻烦、规模较大时 GC 频繁 | 3K 节点以上,更新列表缓慢 |
为什么推荐使用 ZK 作为 Spring Cloud 的基础设施
CAP原则又称CAP定理,指的是在一个分布式系统中,一致性(Consistency)、可用性(Availability)、分区容错性(Partition tolerance)。CAP 原则指的是,这三个要素最多只能同时实现两点,不可能三者兼顾。
一致性模型
Zookeeper保证CP:一致性(Consistency)、分区容错性(Partition tolerance)。
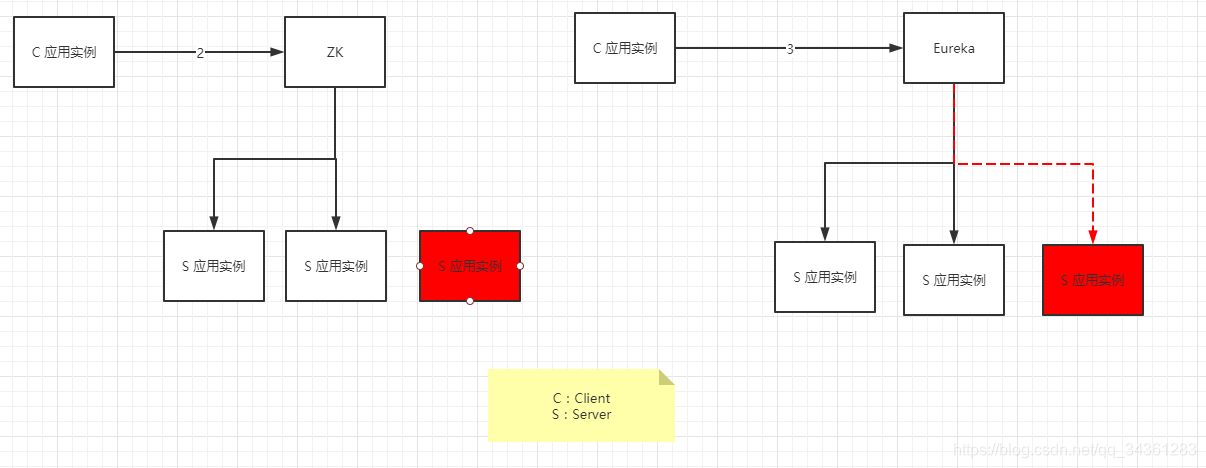
上图描述的是客户端分别请求以Zookeeper或者Eureka作为注册中心访问时,当服务端的一个应用实例挂掉的情况,注册中心做出了不同的反映的情形:
- 对于Zk来说,为了保证CP原则,返回给客户端的应用实例变为 3- 1 = 2 个。
- 对于Eureka来说,为了保证AP原则,返回给客户端的应用实例仍为3个,但是挂掉的实例是访问不到的。
不难想象,对于Eureka来说,当服务端应用实例挂掉后,以上图的情形来说会有1/3 的概率,获取不到实例,为了避免这种情况的发生,我们通常可以引入服务网关实现 “读写分离”的架构来解决这样的问题。
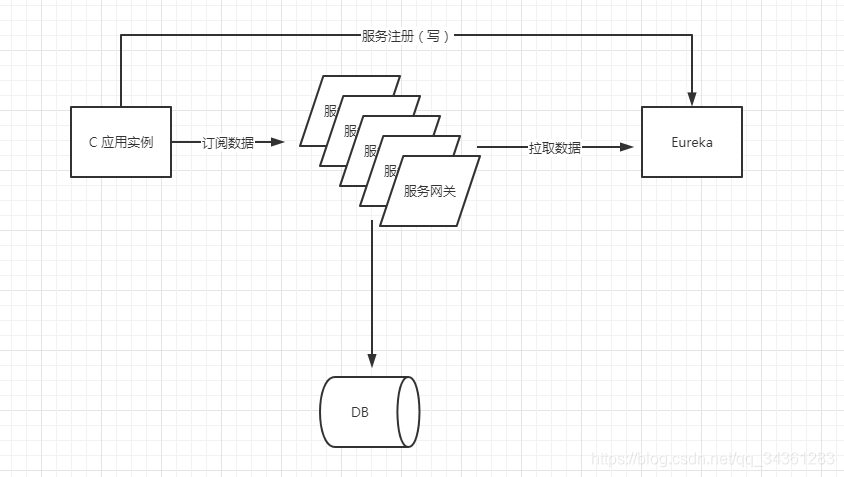
基于服务网关实现读写分离的架构
所谓的“读写分离”指的是:
- 写:是客户端直接向Eureka注册中心进行服务注册。
- 读:是服务网关通过拉取Eureka注册中心的数据,从而使客户端从服务网关间接的订阅数据。
我们知道,Eureka注册中心基于内存型的注册模式,将服务注册与服务发现分离开来的好处就在于防止二者并行,假设Client 的QPS是10w甚至更高,这时使Eureka注册中心直接暴露给客户端,必定会造成Eureka挂掉。
实际的业务场景,通常来说,即服务注册的请求相对较小,请求一次注册即可,更多的是服务发现,从Eureka拉取数据量比较大,即读多写少。
基于以上的结论,我们认为既然读多写少,我们就可以在读的时候做些文章,实现网关的分布式高可用,将网关拉取的数据加入缓存,再持久化到数据库,使客户端在读取数据的时候间接访问数据库,同时可以将数据库分库分表等等操作,这样就可以极大地扩展基于Eureka注册中心的性能。
维护相对熟悉
Zookeeper生态环境比较好
-
zookeeper 可以用作很多系统的配置信息的管理,比如 kafka、storm 等等很多分布式系统都会选用 zookeeper 来做一些元数据、配置信息的管理,包括 dubbo 注册中心不也支持 zookeeper 么?
-
hadoop、hdfs、yarn 等很多大数据系统,都选择基于 zookeeper 来开发 HA 高可用机制。
-
Zookeeper实现分布式锁也是比较常见的一种方式。
配置中心和服务注册中心单一化
所谓的单一化指的就是,使用Zookeeper做注册中心,Zookeeper同样可以做配置中心,如果在 Spring Cloud 传统的配置方面,使用Eureka 做注册中心、Git/JDBC 做配置中心。
Spring Cloud Discovery
通过zookeeper 的实验,我们可以同时测试两种效果:
-
注册发现
-
配置管理
Spring Cloud 增加 ZK 依赖
- 错误配置(高 ZK Client 版本 3.5,低服务器版本 3.4)
    <dependencies>

        <dependency>
            <groupId>org.springframework.boot</groupId>
            <artifactId>spring-boot-starter-web</artifactId>
        </dependency>

        <dependency>
            <groupId>org.springframework.cloud</groupId>
            <artifactId>spring-cloud-starter-zookeeper-discovery</artifactId>
        </dependency>
    </dependencies>
- 正确配置
<dependency>
    <groupId>org.springframework.cloud</groupId>
    <artifactId>spring-cloud-starter-zookeeper-all</artifactId>
    <exclusions>
        <exclusion>
            <groupId>org.apache.zookeeper</groupId>
            <artifactId>zookeeper</artifactId>
        </exclusion>
    </exclusions>
</dependency>
<dependency>
    <groupId>org.apache.zookeeper</groupId>
    <artifactId>zookeeper</artifactId>
    <version>3.4.12</version>
    <exclusions>
        <exclusion>
            <groupId>org.slf4j</groupId>
            <artifactId>slf4j-log4j12</artifactId>
        </exclusion>
    </exclusions>
</dependency>
启动 ZK
关于zk的使用以及原理,我们在前面分布式专题已经讲到,这里我们就以Windows版本做一个回顾吧!
zookeeper官网下载:zookeeper官网下载
我目前使用的版本是:3.5.8。
- 修改默认配置文件
zk默认读取zoo.cfg文件,从官网上下载的是没有的,我们这里复制一份,并修改zoo.cfg
文件:
我们可以在zookeeper根目录下创建一个/data文件夹用来存放数据。
tickTime=2000
initLimit=10
syncLimit=5
# 这里需要使用 "//"
dataDir=D://apache-zookeeper-3.5.8-bin//data
clientPort=2181
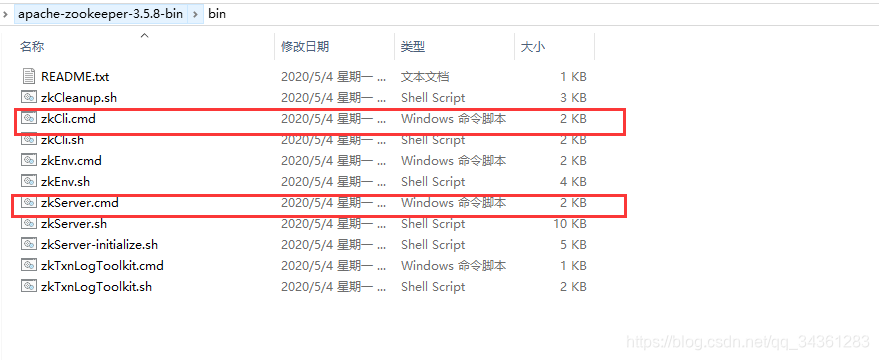
- zookeeper的启动与停止
首先双击zkServer.sh启动服务端,然后双击启动zkCli.sh 进入命令行
停止zookeeper可以直接杀死2181 端口即可:
首先查看2181端口所在的进程号:
netstat -aon|findstr “2181”
然后直接kill:
taskkill /pid 10756 /F
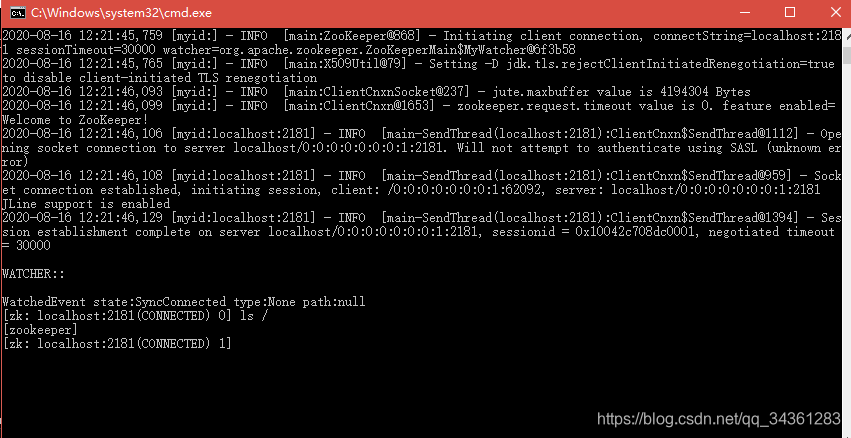
- zookeeper 命令行
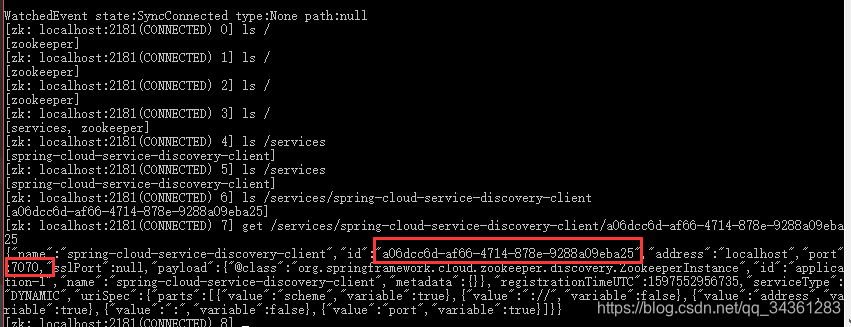
通过命令 ls / 查看节点,我们发现,本地localhost:2181 的服务已经启动成功!
编写核心类
- 引导类,使用@EnableDiscoveryClient 作为服务发现客户端:
@SpringBootApplication
@EnableDiscoveryClient // 尽可能使用 @EnableDiscoveryClient
public class ZkDSClientApplication {

    public static void main(String[] args) {
        SpringApplication.run(ZkDSClientApplication.class, args);
    }
}
- 编写Controller,根据 DiscoveryClient 的api 返回所有的服务名称,id,主机,端口号等信息
@RestController
public class ServiceController {

    @Autowired
    private DiscoveryClient discoveryClient;

    /**
     * 返回所有的服务名称
     *
     * @return
     */
    @GetMapping("/services")
    public List<String> getAllServices() {
        return discoveryClient.getServices();
    }

    @GetMapping("/service/instances/{serviceName}")
    public List<String> getAllServiceInstances(@PathVariable String serviceName) {
        return discoveryClient.getInstances(serviceName)
                .stream()
                .map(s ->
                        s.getServiceId() + " - " + s.getHost() + ":" + s.getPort()
                ).collect(Collectors.toList());
    }

}
我们注意到,接口 DiscoveryClient 是来自于 org.springframework.cloud.client.discovery下的。
并且功能有如下几种:
public interface DiscoveryClient {

	/**
	 * A human readable description of the implementation, used in HealthIndicator
	 * @return the description
	 */
	String description();

	/**
	 * Get all ServiceInstances associated with a particular serviceId
	 * @param serviceId the serviceId to query
	 * @return a List of ServiceInstance
	 */
	List<ServiceInstance> getInstances(String serviceId);

	/**
	 * @return all known service ids
	 */
	List<String> getServices();

}
其中 ServiceInstance 我们看看有哪些属性和方法?
public interface ServiceInstance {
	// 实例 id
	String getServiceId();
	//主机地址
	String getHost();
	// 端口号
	int getPort();
	//是否是https请求
	boolean isSecure();
	// 服务的 uri
	URI getUri();
	//与服务实例关联的键值对元数据
	Map<String, String> getMetadata();
	//实例方案
	default String getScheme() {
		return null;
	}
}
设置配置文件
spring.application.name = spring-cloud-service-discovery-client

# 服务端口
server.port = 7070

# 管理端口
management.server.port = 7071

# 开放 所有Web 管理 Endpoints
management.endpoints.web.exposure.include = *
结果测试
- 首先看服务发现的效果:
启动项目:
我们将7070端口作为服务端口,在zookeeper节点上查看一下是否注册成功:
我们发现,ZK 节点路径(/services/spring-cloud-service-discovery-client/)
由此可以得出结论:ZK 服务发现节点规则(/services/{spring.application.name}/{serviceId_UUID}/)。
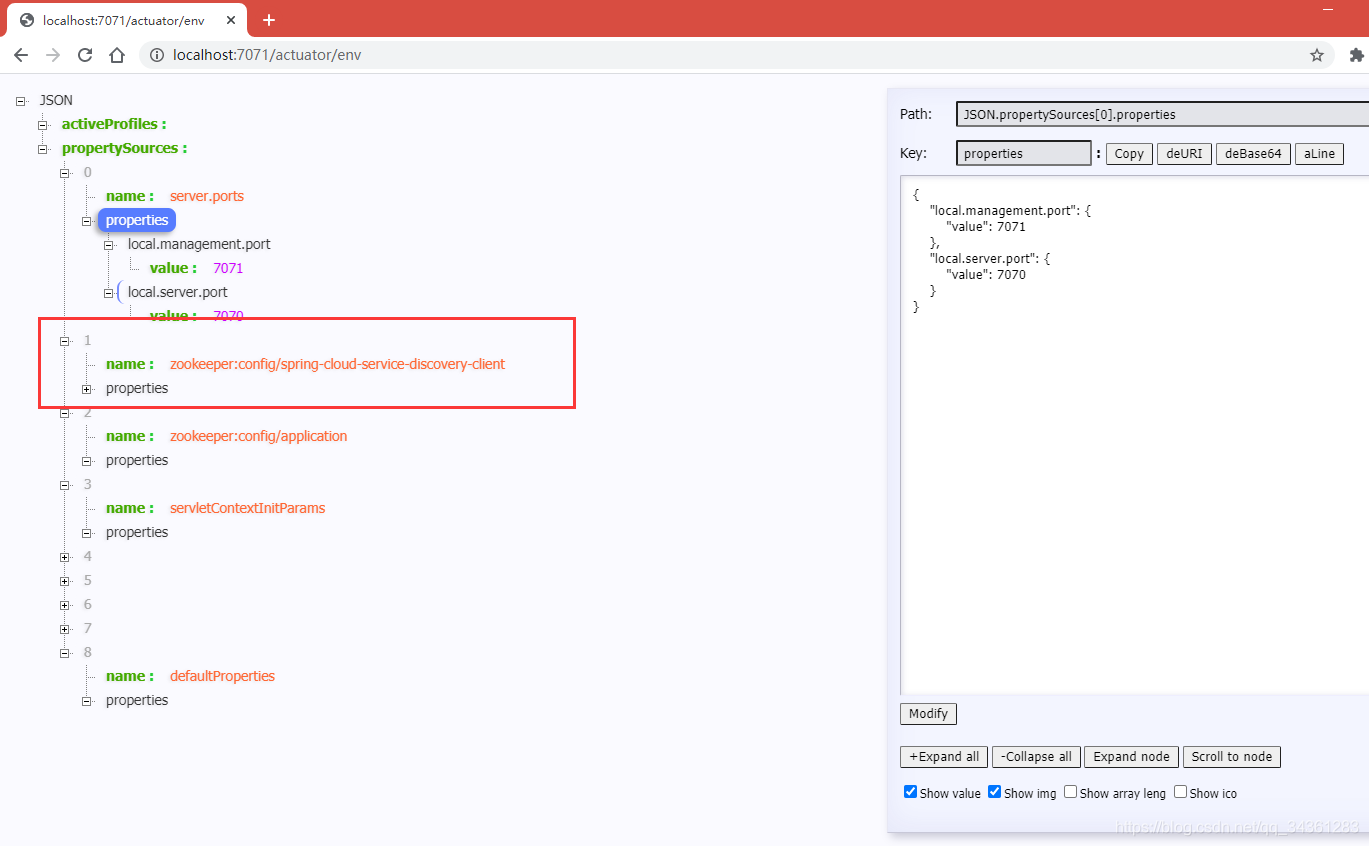
- 接下来看一下服务注册的效果:
直接访问浏览器:http://localhost:7071/actuator/env
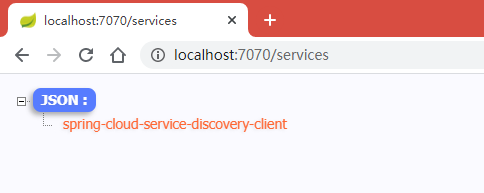
依据之前编写的Controller我们访问一下:
http://localhost:7070/services
(返回所有的服务名称)
http://localhost:7070/service/instances/spring-cloud-service-discovery-client
(指定某个实例,并获取详情信息)
后记
Eureka 2.0 不开源,Eureka 1.x 还可以用的
更多架构知识,欢迎关注本套Java系列文章:Java架构师成长之路
