目录导航
前言
前面的章节我们讲了 Spring Cloud 服务发现 并实现了微服务的注册与发现,客户端会把自己的网络信息注册到注册中心,比如 ZK ,或是 Eureka Server 上。
然而,这样的架构依然有以下问题,比如负载均衡。一般来说,在生产环境,各个微服务都会部署多个实例,那么服务消费者要如何将请求分摊到多个服务提供者实例上呢?
本节,继续微服务专题的内容分享,共计16小节,分别是:
- 微服务专题01-Spring Application
- 微服务专题02-Spring Web MVC 视图技术
- 微服务专题03-REST
- 微服务专题04-Spring WebFlux 原理
- 微服务专题05-Spring WebFlux 运用
- 微服务专题06-云原生应用(Cloud Native Applications)
- 微服务专题07-Spring Cloud 配置管理
- 微服务专题08-Spring Cloud 服务发现
- 微服务专题09-Spring Cloud 负载均衡
- 微服务专题10-Spring Cloud 服务熔断
- 微服务专题11-Spring Cloud 服务调用
- 微服务专题12-Spring Cloud Gateway
- 微服务专题13-Spring Cloud Stream (上)
- 微服务专题14-Spring Cloud Bus
- 微服务专题15-Spring Cloud Stream 实现
- 微服务专题16-Spring Cloud 整体回顾
本节内容重点为:
- RestTemplate :回顾 Spring Framework HTTP 组件 RestTemplate 的使用方法,结合 ClientHttpRequestInterceptor 实现简单负载均衡客户端
- 整合 Netflix Ribbon:作为 Spring Cloud 客户端负载均衡实现 ,Netflix Ribbon 提供了丰富的组件,包括负载均衡器、负载均衡规则、PING 策略等,根据前章所积累的经验,实现客户端负载均衡
RestTemplate 原理与扩展
所谓的负载均衡,通常就是解决在集群环境下,如何合理地将请求分发请求到不同的机器上以提高应用处理性能,实现高可用架构的一种服务治理手段。
负载均衡(Load Balance)。将负载(工作任务)进行平衡、分摊到多个操作单元上进行运行,例如FTP服务器、Web服务器、企业核心应用服务器和其它主要任务服务器等,从而协同完成工作任务。
在SpringCloud 里,通常我们可以用 Ribbon来解决此问题。Ribbion 是 Netflix 发布的负载均衡器,它能够控制 HTTP 和 TCP 客户端的行为。而 Ribbon 又依赖于 RestTemplate 实现的服务调用。
我们知道 RestTemplate 是Spring用于同步client端的核心类,简化了与http服务的通信,并满足RestFul原则,我们通常只需要提供URL等请求参数,根据 RestTemplate 的api提取结果即可。
通常我们可以这样去使用 RestTemplate:
/**
  * RestTemplate 服务调用工具类
  */
public abstract class urlUtil {

	@Autowired
    RestTemplate restTemplate;

   /**
     * @param urlPath url请求路径
     * @param method 请求方式
     * @param headers 请求头
     * @param param 请求参数
     * @param body 请求体
     * @param clazz 返回值类型
     * @param <T> 返回值
     * @return T
     */
    protected <T> T httpObjectRequest(String urlPath, HttpMethod method, MultiValueMap headers, Map param, String body, TypeReference<T> clazz) {
        try {
            HttpHeaders httpHeaders = new HttpHeaders();
            // 设置 ContentType
            httpHeaders.setContentType(MediaType.APPLICATION_JSON_UTF8);
            // 封装 HttpEntity
            HttpEntity<String> httpEntity = new HttpEntity<>(body, httpHeaders);
            // RestTemplate 核心调用
            ResponseEntity<String> responseEntity = restTemplate.exchange(urlPath, method, httpEntity, String.class);
            // 根据返回值状态进行判断
            if (200 != responseEntity.getStatusCodeValue() ) {
                return null;
            }
            // 成功返回请求数据
            T result = JSON.parseObject(responseEntity.getBody(), clazz);
            return result;
        } catch (Exception e) {
            throw new RuntimeException("远程接口请求异常");
        }
    }
}
HttpMessageConverter消息转换
那么 RestTemplate 是如何实现服务之间的调用过程的呢?接下来我们就根据 RestTemplate 源码分析一下其实现原理。
在 Spring源码里有一个关于 RestTemplate 核心类 即:HttpMessageConverter(HTTP 消息转换的处理接口),他所在的源码地址是:org.springframework.http.converter.HttpMessageConverter。这里我简单介绍一下 HttpMessageConverter 的功能。
public interface HttpMessageConverter<T> {

	/**
	 * @Nullable: 在spring5里标记。JSR 305 meta-annotations,注解做编译约束
     *  canRead:判断是否可读
	 */
	boolean canRead(Class<?> clazz, @Nullable MediaType mediaType);

	/**
	  * canWrite:判断是否可读是否可写
	  */
	boolean canWrite(Class<?> clazz, @Nullable MediaType mediaType);

    // 获取所有支持的媒体类型
    List<MediaType> getSupportedMediaTypes();

    //反序列化
    T read(Class<? extends T> clazz, HttpInputMessage inputMessage)
			throws IOException, HttpMessageNotReadableException;
}
在 HttpMessageConverter 里有一个重要的概念叫媒体类型(MediaType),常见的比如 text/html;text/xml;application/json,想必我们对它并不陌生,在RestTemplate 远程调用或者前后端交互会经常用到,实际上在 REST 里这被称之为自描述消息。
Q:REST 为什么要自我描述?
A:HTTP 协议特点是纯文本协议,所以需要自我描述,以便区分类型。
我们可以把 RestTemplate 分类:一类是 REST 服务端、另一类则是 REST 客户端。不论REST 服务端还是REST 客户端,共同做的的一件事就是序列化与反序列化。
- 反序列化:文本(通讯) 转化为 对象(程序使用)。
- 序列化:对象 转化为 文本。
实际上,Spring Web MVC 框架是依赖于 Servlet的,而Spring 框架在早期设计时,它就考虑到了去 Servlet 化。看上面的源码HttpMessageConverter提供的反序列化方法请求参数 HttpInputMessage ,就类似于 HttpServletRequest。
现在我们将 HttpInputMessage 与 HttpServletRequest 做一个简单的对比:
public interface HttpInputMessage extends HttpMessage {

	InputStream getBody() throws IOException;

	// 来自于 HttpInputMessage  父类 HttpMessage
	HttpHeaders getHeaders();

}
类比 HttpServletRequest:
public interface HttpServletRequest extends ServletRequest{

    // 来自于 HttpServletRequest  父类  ServletRequest
	public ServletInputStream getInputStream() throws IOException;

    public Enumeration<String> getHeaders(String name);
}
这里我们做一个总结:RestTemplate 的调用原理就在于,其利用 HttpMessageConverter 对一定媒体类型(JSON、XML、TEXT)序列化和反序列化从而实现调用过程。RestTemplate 不依赖于 Servlet API,也可以自定义实现。对于服务端而言,将 Servlet API 适配成 HttpInputMessage 以及 HttpOutputMessage。
RestTemplate 在 HttpMessageConverter 中的设计
我们点开 RestTemplate 源码不难发现,其对应多个 HttpMessageConverter,那么RestTemplate 如何决策正确媒体类型呢?
public class RestTemplate extends InterceptingHttpAccessor implements RestOperations {
    ...
    // List(先来先服务) 形式存储 HttpMessageConverter
    private final List<HttpMessageConverter<?>> messageConverters = new ArrayList<>();
    ...
    // 初始化过程
    public RestTemplate() {
		this.messageConverters.add(new ByteArrayHttpMessageConverter());
		this.messageConverters.add(new StringHttpMessageConverter());
		this.messageConverters.add(new ResourceHttpMessageConverter(false));
		this.messageConverters.add(new SourceHttpMessageConverter<>());
		this.messageConverters.add(new AllEncompassingFormHttpMessageConverter());

		if (romePresent) {
			this.messageConverters.add(new AtomFeedHttpMessageConverter());
			this.messageConverters.add(new RssChannelHttpMessageConverter());
		}

		if (jackson2XmlPresent) {
			this.messageConverters.add(new MappingJackson2XmlHttpMessageConverter());
		}
		else if (jaxb2Present) {
			this.messageConverters.add(new Jaxb2RootElementHttpMessageConverter());
		}
	   ...
	}
}
从以上的设计我们也不能看出 RestTemplate 接口实现了两个过程 :
- 添加内建
HttpMessageConvertor实现 - 有条件地添加第三方库
HttpMessageConvertor整合实现
问题场景: 假如有一个请求是 http://localhost:8080/person ,要获取person的数据。假设 Person 既能被 XML 读取,又能被 JSON 读取,我们发现 可能返回的是 XML 而不是 Jackson。在日常开发中,使用 Postman 、
curl场景最为明显。
为什么出现这种现象呢? 没有传递请求头,无从选择媒体类型。在 RestTemplate 上面的源码我们也注意到程序的默认的媒体类型是从上至下依次判断,即先来先服务。
所以通常可以设置为Content-Type: text/html; charset=utf-8。
客户端实现负载均衡
接下来,我们通过简单的 demo 演示一下,以 Zookeeper为注册中心,作为服务发现,将应用程序的注册信息通过使用 RestTemplate 做负载均衡的小案例:
首先在本地环境启动 注册中心 Zookeeper,在上节我们有了详细的 zk搭建与启动过程,这里不再赘述,最终的效果如下:

这里给出接下来的负载均衡实验的流程图:

- 首先通过服务发现机制获取到服务端所有的注册信息。实际上服务发现不单是由注册中心可以完成,同样地,去中心化的区块链也可以做到,我们本次实验使用zk作为服务发现
- 在客户端做服务负载均衡,这其中我们就可以设置一些负载均衡策略,比如Ribbon,或者我们自定义实现负载均衡策略。
接下来我们分别编写服务端与客户端的代码:
Spring Cloud Server Application
服务端代码比较简单,通过暴露对外一个接口用以接收消息即可。
1、首先加入pom依赖,适配zk与SpringCloud
    <properties>
        <spring-cloud.version>Finchley.RELEASE</spring-cloud.version>
    </properties>

    <dependency>
            <groupId>org.springframework.cloud</groupId>
            <artifactId>spring-cloud-starter-zookeeper-all</artifactId>
            <exclusions>
                <exclusion>
                    <groupId>org.apache.zookeeper</groupId>
                    <artifactId>zookeeper</artifactId>
                </exclusion>
            </exclusions>
   </dependency>

   <dependencyManagement>
        <dependencies>
            <dependency>
                <groupId>org.springframework.cloud</groupId>
                <artifactId>spring-cloud-dependencies</artifactId>
                <version>${spring-cloud.version}</version>
                <type>pom</type>
                <scope>import</scope>
            </dependency>
        </dependencies>
    </dependencyManagement>
2、通过 @EnableDiscoveryClient 激活服务发现客户端,设置启动类
@SpringBootApplication // 标准 Spring Boot 应用
@EnableDiscoveryClient // 激活服务发现客户端
public class SpringCloudServerApplication {

    public static void main(String[] args) {
        new SpringApplicationBuilder(SpringCloudServerApplication.class)
                .web(WebApplicationType.SERVLET)
                .run(args);
    }
}
3、新增配置文件 application.properties
# 当前应用名称
spring.application.name = spring-cloud-server-application

# 服务器端口(随机端口)
server.port = 0
这里使用随机端口,是因为我这里要演示负载均衡,所以启动三个不同端口的应用以模拟3个不同的服务端,会更方便一下,当然你也可以自行设置端口号。
4、编写服务端REST接口
@RestController
public class ServerController {

    @GetMapping("/say")
    public String say(@RequestParam String message)  {
        System.out.println("ServerController 接收到消息 - say : " + message);
        return "Hello, " + message;
    }
}
5、服务启动
这里我通过idea启动三次以模拟开启三个服务端,这里需要配置启动时将仅允许单实例启动选项勾掉:
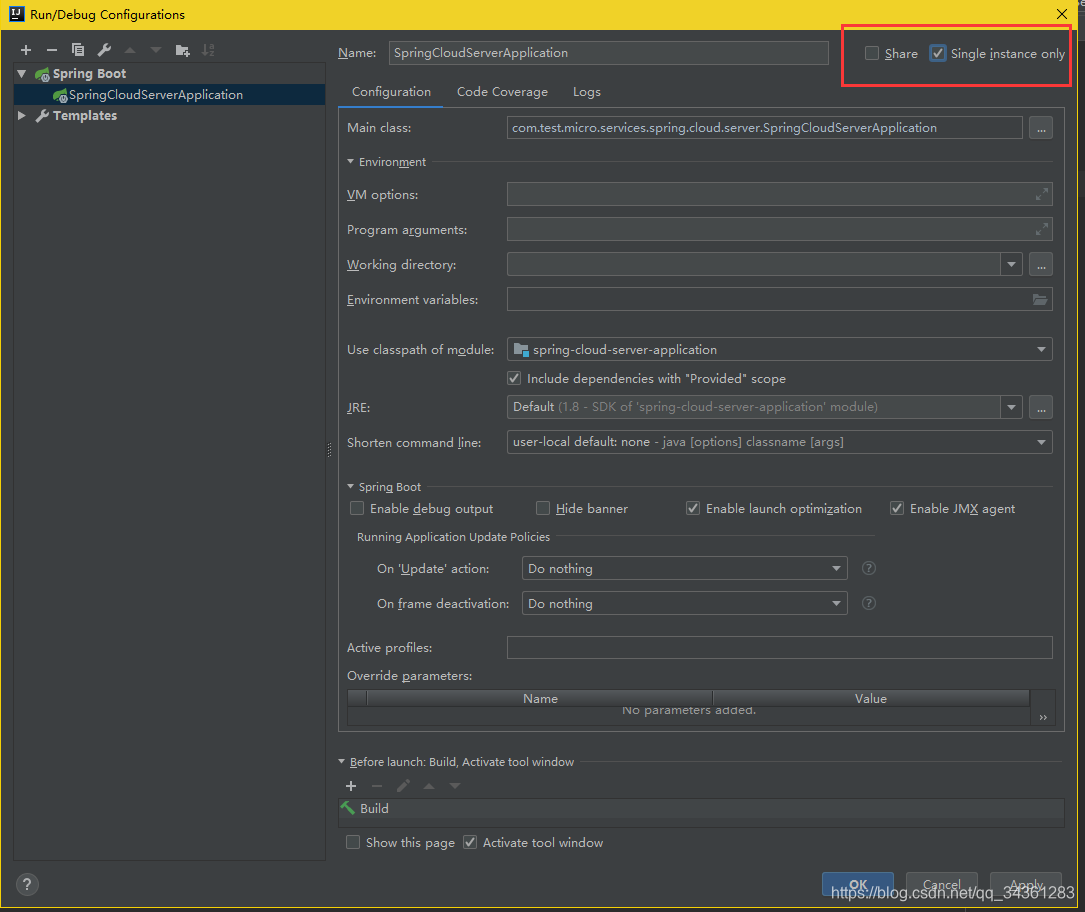
这样就可以连续点击idea绿色三角头三次,即启动三个不同端口的服务端:

所以我这里一共得到:
64073、64095、64108三个服务端实例
此时查看一下 zk,看是否都注册上了:
图示表示已经注册成功,接下来我们开始写客户端

Spring Cloud Client Application
设置 pom 依赖与启动类和配置文件与上面的服务端基本相似,这里不再演示,如有疑问,可以参考文末完整的演示代码。
1、实现 ClientHttpRequestInterceptor 接口,重写 intercept 方法
这里为什么通过实现 ClientHttpRequestInterceptor 接口就能够实现负载均衡呢?
首先我们看
public class RestTemplate extends InterceptingHttpAccessor implements RestOperations {
 	...
}
RestTemplate 是继承自 InterceptingHttpAccessor 拦截器的,最终在InterceptingHttpAccessor 抽象类里我们发现有getInterceptors方法,所以我们就可以自定义实现自己的客户端拦截器用以负载均衡。
public abstract class InterceptingHttpAccessor extends HttpAccessor {
	private final List<ClientHttpRequestInterceptor> interceptors = new ArrayList<>();

	public List<ClientHttpRequestInterceptor> getInterceptors() {
		return this.interceptors;
	}
}
自定义拦截器的实现过程:
- 首先定时任务,设置每10s获取最新的当前应用的机器列表,然后存入Map缓存
- 通过自定义拦截器实现路径拦截,做负载均衡机制
- 将最终要返回的地址封装并返回即可
public class LoadBalancedRequestInterceptor implements ClientHttpRequestInterceptor {

    // Map Key service Name , Value URLs
    private volatile Map<String, Set<String>> targetUrlsCache = new HashMap<>();

    @Autowired
    private DiscoveryClient discoveryClient;

    @Scheduled(fixedRate = 10 * 1000) // 10 秒钟更新一次缓存
    public void updateTargetUrlsCache() { // 更新目标 URLs
        // 获取当前应用的机器列表
        // http://${ip}:${port}
        Map<String, Set<String>> newTargetUrlsCache = Maps.newHashMap();
        discoveryClient.getServices().forEach(serviceName -> {
            List<ServiceInstance> serviceInstances = discoveryClient.getInstances(serviceName);
            Set<String> newTargetUrls = serviceInstances
                    .stream()
                    .map(s ->
                            s.isSecure() ?
                                    "https://" + s.getHost() + ":" + s.getPort() :
                                    "http://" + s.getHost() + ":" + s.getPort()
                    ).collect(Collectors.toSet());
            newTargetUrlsCache.put(serviceName, newTargetUrls);
        });
        this.targetUrlsCache = newTargetUrlsCache;
    }

    @Override
    public ClientHttpResponse intercept(HttpRequest request, byte[] body, ClientHttpRequestExecution execution) throws IOException {
        //  URI:  "/" + serviceName + "/say?message="
        URI requestURI = request.getURI();
        String path = requestURI.getPath();
        String[] parts = StringUtils.split(path.substring(1), "/");
        // serviceName
        String serviceName = parts[0];
        // "/say?message="
        String uri = parts[1];
        // 服务器列表快照
        List<String> targetUrls = new LinkedList<>(targetUrlsCache.get(serviceName));
        int size = targetUrls.size();
        // size =3 , index =0 -2
        int index = new Random().nextInt(size);
        // 选择其中一台服务器
        String targetURL = targetUrls.get(index);
        // 最终服务器 URL
        String actualURL = targetURL + "/" + uri + "?" + requestURI.getQuery();
        // 执行请求
        System.out.println("本次请求的 URL : " + actualURL);
        URL url = new URL(actualURL);
        URLConnection urlConnection = url.openConnection();
        // 响应头
        HttpHeaders httpHeaders = new HttpHeaders();
        // 响应主体
        InputStream responseBody = urlConnection.getInputStream();
        //适配重写的接口返回值类型 ClientHttpResponse.class
        return new SimpleClientHttpResponse(httpHeaders, responseBody);
    }

    private static class SimpleClientHttpResponse implements ClientHttpResponse {

        private HttpHeaders headers;

        private InputStream body;

        public SimpleClientHttpResponse(HttpHeaders headers, InputStream body) {
            this.headers = headers;
            this.body = body;
        }

        @Override
        public HttpStatus getStatusCode() throws IOException {
            return HttpStatus.OK;
        }

        @Override
        public int getRawStatusCode() throws IOException {
            return 200;
        }

        @Override
        public String getStatusText() throws IOException {
            return "OK";
        }

        @Override
        public void close() {

        }

        @Override
        public InputStream getBody() throws IOException {
            return body;
        }

        @Override
        public HttpHeaders getHeaders() {
            return headers;
        }
    }
}
2、设置 Controller 用以服务访问
@RestController
public class ClientController {

    @Autowired // 依赖注入自定义 RestTemplate Bean
    @CustomizedLoadBalanced
    private RestTemplate restTemplate;

    @Autowired
    @LoadBalanced // 依赖注入 Ribbon RestTemplate Bean
    private RestTemplate lbRestTemplate;

    @Value("${spring.application.name}")
    private String currentServiceName;

    @Autowired
    private DiscoveryClient discoveryClient;

    @GetMapping("/invoke/{serviceName}/say") // -> /say
    public String invokeSay(@PathVariable String serviceName,
                            @RequestParam String message) {

        // 自定义 RestTemplate 发送请求到服务器
        // 输出响应
        return restTemplate.getForObject("/" + serviceName + "/say?message=" + message, String.class);
    }

    @GetMapping("/lb/invoke/{serviceName}/say") // -> /say
    public String lbInvokeSay(@PathVariable String serviceName,
                              @RequestParam String message) {
        // Ribbon RestTemplate 发送请求到服务器
        // 输出响应
        return lbRestTemplate.getForObject("http://" + serviceName + "/say?message=" + message, String.class);
    }

    @Bean
    public ClientHttpRequestInterceptor interceptor() {
        return new LoadBalancedRequestInterceptor();
    }

    // Ribbon RestTemplate Bean
    @LoadBalanced
    @Bean
    public RestTemplate loadBalancedRestTemplate() {
        return new RestTemplate();
    }

    // 自定义 RestTemplate Bean
    @Bean
    @Autowired
    @CustomizedLoadBalanced
    public RestTemplate restTemplate() { // 依赖注入
        return new RestTemplate();
    }

   @Bean
    @Autowired
    public Object customizer(@CustomizedLoadBalanced Collection<RestTemplate> restTemplates,
                             ClientHttpRequestInterceptor interceptor) {
        restTemplates.forEach(r -> r.setInterceptors(Arrays.asList(interceptor)));
        return new Object();
    }

}
3、自定义负载均衡注解
@Target({ ElementType.FIELD, ElementType.PARAMETER, ElementType.METHOD })
@Retention(RetentionPolicy.RUNTIME)
@Documented
@Inherited
@Qualifier
public @interface CustomizedLoadBalanced {
}
4、启动测试
测试 Ribbon RestTemplate 发送请求到服务器:
http://localhost:8888/lb/invoke/spring-cloud-server-application/say?message=test

测试 自定义 RestTemplate 发送请求到服务器:
http://localhost:8888/invoke/spring-cloud-server-application/say?message=test
同理可得,这里不再演示。
后记
本节代码地址:
spring-cloud-server-application 服务端
spring-cloud-client-application客户端
更多架构知识,欢迎关注本套Java系列文章:Java架构师成长之路