react-native
一、react-native布局
- RN本质是在React的基础上添加了react-native组件库
- View理解为div
- Text理解为span
- RN样式是 非层叠样式:子元素不回继承父元素的样式(Text标签例外)
import React,{Component} from 'react';
import {Text,View} from 'react-native'

export default class App extends Component{
    render(){
        return(
            <View>
                <Text style={{color:'red',fontSize:40}}> hello World!</Text>
                <Text style={{fontSize:40}}>
                    <Text>Hello xiaoxiao!</Text>
                    <Text>Hello xiaoxiao!</Text>
                    <Text>Hello xiaoxiao!</Text>
                </Text>
            </View>
        );
    }
}
- 多个样式使用中括号数组来保存
import React,{Component} from 'react';
import {Text,StyleSheet,View} from 'react-native';

export default class App extends Component{
    render(){
        return(
            <View>
                <Text style={{color:'red',fontSize:40}}> hello World!</Text>
                <Text style={ss.ab}> hello World!</Text>
                {/* 多个样式:使用中括号数组来保存 */}
                <Text style={[ss.cd,ss.xyz]}>Hello 小小!</Text>
            </View>
        );
    }
}

const ss = StyleSheet.create({
    ab:{fontSize:30,color:'red'},
    cd:{fontSize:40,color:'green'},
    xyz:{borderRadius:10,backgroundColor:'blue'},
});
1.1flex 布局
const ss = StyleSheet.create({
    box:{
        backgroundColor:'pink',
        height:400,
        //flexDirection:内容布局方向
        flexDirection:'row-reverse',//行-逆向
        flexDirection:'column',//列
        flexDirection:'column-reverse',//列-逆向
        flexDirection:'row', //行

        //交叉轴:与主轴flexDirection垂直的方向
        alignItems:'stretch',//默认:拉伸充满
        alignItems:'flex-start',//起始对齐
        alignItems:'flex-end',//结尾对齐
        alignItems:'center',//居中

        //主轴布局
        justifyContent:'center',//居中
        justifyContent:'flex-end',//结尾对齐
        justifyContent:'flex-start',//默认:头对齐
        justifyContent:'space-between',//空白间隔中间
        justifyContent:'space-around',//空白环绕元素周围
        justifyContent:'space-evenly',//空白均分
    },
- 注意:子元素自身 在交叉轴的布局方式,会覆盖元素的规定
import React,{Component} from 'react';
import {Text,StyleSheet,View} from 'react-native';

export default class App extends Component{
    render(){
        return(
            //RN的容器view默认是 flex弹性盒子布局:
            <View style={ss.box}>
                <Text style={ss.one}> One</Text>
                <Text style={ss.two}> Two</Text>
                <Text style={ss.three}> Three</Text>
            </View>
        );
    }
}

const ss = StyleSheet.create({
    box:{
        backgroundColor:'pink',
        height:400,
        //flexDirection:内容布局方向
        flexDirection:'row-reverse',//行-逆向
        flexDirection:'column',//列
        flexDirection:'column-reverse',//列-逆向
        flexDirection:'row', //行

        //交叉轴:与主轴flexDirection垂直的方向
        alignItems:'stretch',//默认:拉伸充满
        alignItems:'flex-start',//起始对齐
        alignItems:'flex-end',//结尾对齐
        alignItems:'center',//居中

        //主轴布局
        justifyContent:'center',//居中
        justifyContent:'flex-end',//结尾对齐
        justifyContent:'flex-start',//默认:头对齐
        justifyContent:'space-between',//空白间隔中间
        justifyContent:'space-around',//空白环绕元素周围
        justifyContent:'space-evenly',//空白均分
    },


    one:{
        backgroundColor:'red',
        fontSize:40,
        //子元素自身  在交叉轴的布局方式,会覆盖元素的规定
        alignSelf:'stretch',
        //子元素在主轴上的份数
        flex:1,
        },
    two:{
        backgroundColor:'rgb(0,0,255)',
        fontSize:40,
        flex:2,
    },
    three:{
        backgroundColor:'#0f0',
        fontSize:40,
        flex:1,
        },
});
1.2获取屏幕的宽度
- RN的站手机屏幕份数如何
import React,{Component} from 'react';
import {Text,StyleSheet,View,Dimensions} from 'react-native';

//screen:屏幕宽和高
//window:窗口的宽和高
//差别在于弹出键盘时,屏幕高+键盘高;  即弹出键盘时   窗口高度会变小
const {width,height} = Dimensions.get('screen');

function rpx(p){
    return(width / 750) * p;
}


export default class App extends Component{
    render(){
        return(
            <View>
                <Text style={{backgroundColor:'red',fontSize:40 ,width:rpx(375)}}> hello World!</Text>
            </View>
        );
    }
}
二、基础组件的使用
- 组件库RN核心组件和API
2.1image组件
- web中:固定写法:网络图片{uri:图片地址} ,网络图片必须手动指定宽和高
import React,{Component} from 'react';
import {Text,StyleSheet,View,Image} from 'react-native';

/*
*1.本地图片
*2.网络图片
*/


export default class App extends Component{
    img = 'https://img-blog.csdnimg.cn/img_convert/bac14fa017fa75a905a5a035f7e32143.png';

    render(){
        return(
            <View>
                <Text style={{color:'red',fontSize:40}}> hello World!</Text>
                {/*
                web中:<img src=""/>
                rn中:采用全写 image source
                */}
                {/* 固定写法:网络图片{uri:图片地址} */}
                {/* 网络图片必须手动指定宽和高 */}
                <Image source={{uri:this.img}} style={{width:400,height:300}} />
                {/* blurRadius:模糊度 */}
                <Image source={{uri:this.img}} style={{width:400,height:300}} blurRadius={5} />
                {/* 本地图片:使用require进行引入,宽高默认与图片原大小一致 */}
                <Image source={require('./assets/123.jpg')} />
            </View>
        );
    }
}

const ss = StyleSheet.create({
    ab:{fontSize:30,color:'red'},
    cd:{fontSize:40,color:'green'},
    xyz:{borderRadius:10,backgroundColor:'blue'},
});
2.2、ImageBackground、StatusBar组件
import React,{Component} from 'react';
import {Text,StyleSheet,View,ImageBackground,StatusBar} from 'react-native';

export default class App extends Component{
    img = 'https://gimg2.baidu.com/image_search/src=http%3A%2F%2Fc-ssl.duitang.com%2Fuploads%2Fitem%2F202007%2F20%2F20200720193702_gkxei.thumb.400_0.jpg&refer=http%3A%2F%2Fc-ssl.duitang.com&app=2002&size=f9999,10000&q=a80&n=0&g=0n&fmt=auto?sec=1672219081&t=90e60a7088b16c90aa33bb332a1c17fe'
    render(){
        return(
            <View>
                {/* 状态栏:StatusBar  状态栏是否透明translucent默认设置为True */}
                <StatusBar backgroundColor="rgba(0,0,0,0)" translucent />
                {/* 背景图要求 必须给宽高 */}
                <ImageBackground source={{uri:this.img}} style={{width:'100%',height:'100%'}} />
                <Text style={{fontSize:50,color:'white',alignSelf:'center',marginTop:100,}}>小小</Text>
            </View>
        );
    }
}
三、Hook
3.1、模拟state状态值
- Hook可以使得在不编写class的情况下使用state以及其他的React特性
- useState:
模拟state状态值的一个方法
import React,{ useState } from 'react';

export default function App(){
  //class组件:state和setState配合更新界面
  //hook:运行在 函数组件中,使用类似state的方式 来局部更细

  //相当于在class中共:state={num:5}


  const [num,setNum] = useState(5);
  const [count,setCount] = useState(100)
  return(
      <div>
          <button onClick={()=> setNum(num + 1)}>{num}</button>
          <hr />
          <button onClick={()=>setCount(count + 10)}>{count}</button>
      </div>
  );
}
3.2模拟class中的生命周期
-方法 :模仿class中生命周期
import { cleanup } from '@testing-library/react';
import React,{ useState } from 'react';
import { useEffect } from 'react';

export default function App(){
  //class组件:state和setState配合更新界面
  //hook:运行在 函数组件中,使用类似state的方式 来局部更细

  //相当于在class中共:state={num:5}


  const [num,setNum] = useState(5);
  const [count,setCount] = useState(100)
  const[showSon,setShowSon] = useState(false);

  return(
      <div>
          <button onClick={()=> setNum(num + 1)}>{num}</button>
          <hr />
          <button onClick={()=>setCount(count + 10)}>{count}</button>
          <br />
          <button onClick={()=>setShowSon(!showSon)}>显示/隐藏</button>
          {showSon ? <Son />:null}
          <son />


      </div>
  );
}

function Son(){
  const[num,setNum] = useState(9)
  const[count,setCount] = useState(50)

  //模仿class生命周期
  //更新:当页面更新操作时,都会先卸载旧的,再挂载新的
  //参数2(count):数组,只有在数组中的变量  发生变化时  才会触发生命周期
  useEffect(() => {
    console.log("页面挂载完毕...");
    return () => {
      console.log("页面即将卸载...");
      // cleanup;
    };
  } ,[count]);
  return (
    <div>
      我是子组件
      <button onClick={()=> setNum(num + 2)}>{num}</button>
      <hr />
      <button onClick={()=> setCount(count + 2)}>count:{count}</button>
    </div>
  )

}
四、路由系统(单页应用)
-
安装路由模块:
npm install react-router-dom -
使用Route组件和Switch组件时报错
1)Module not found: Can‘t resolve ‘react-router-dom‘
2)export 'Switch' (imported as 'Switch') was not found in 'react-router-dom' -
问题原因:
react-router-dom版本不对 太新 -
解决办法:
(1)卸载安装好的react-router-dom:npm uninstall react-router-dom
(2)安装5版本:npm install react-router-dom@5
4.1路由响应,传参
使用组件:Link,BrowserRouter as Router,Route,Switch
- Link:链接
- Router:管理所有路由系统
- Switch:响应路由变化
- Route:存储 组件 和路径的对应关系
withRouter:会向组件的props中注入路由相关的值(高阶组件中的withRouter, 作用是将一个组件包裹进Route里面, 然后react-router的三个对象history, location, match就会被放进这个组件的props属性中)
例子:
1、通过路由实现单页跳转
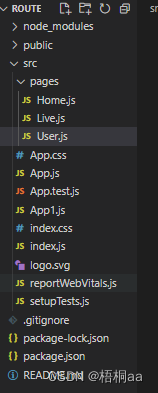
文件目录:
Home.js
import React, { Component } from 'react'

export default class Home extends Component {
  render() {
    return (
      <div>
        <h2>Home页面</h2>
      </div>
    );
  }
}
Live.js
import React, { Component } from 'react'

export default class Live extends Component {
  render() {
    return (
      <div>
        <h2>Live页面</h2>
      </div>
    );
  }
}
user.js
import React, { Component } from 'react'
import { withRouter } from 'react-router-dom';

class User extends Component {

  goHome(){
    this.props.history.push("/home");
  }

  render() {
    console.log(this.props);
    const{age,name}=this.props.match.params;
    return (
      <div>
        <h2>User页面</h2>
        <div>name={name}</div>
        <div>age={age}</div>

        {/* 路由通过代码的方式进行跳转 */}
        <button onClick={()=> this.goHome()}>跳转到 Home 页面</button>
      </div>
    );
  }
}

//withRouter:会向组件的props中注入路由相关的值
export default withRouter(User);
App.js
import React, { Component } from 'react';
//Router:管理所有路由系统
//Switch:响应路由变化
//Link:链接
//Route:存储 组件 和路径的对应关系
import {Link,BrowserRouter as Router,Route,Switch} from "react-router-dom";


//引入页面
import Home from "./pages/Home";
import Live from "./pages/Live";
import User from "./pages/User";


export default class App extends Component {
    render() {
      return (
        <Router>
          <ul>
            <li>
              <Link to="/home">Home</Link>
            </li>
            <li>
              <Link to="/live">Live</Link>
            </li>
            <li>
              <Link to="/user/亮亮/33"> 亮亮 </Link>
            </li>
            <li>
              <Link to="/user/明明/30"> 明明 </Link>
            </li>
          </ul>
        {/* Switch响应路由变化 */}


          {/*
          默认路径是模糊匹配模式:
          例如 路径 /a
          则可以匹配 /a 或 /a/****

          目前:path="/" 匹配 /或 /**
          exact:精确匹配; /就只能匹配/
          */}
          {/* <Route path="/" component={Home} /> */}
          <Switch>
          <Route path="/" exact Component={Home}></Route>
          <Route path="/home" component={Home}></Route>
          <Route path="/live" component={Live}></Route>
          {/* :代表的是参数 */}
          <Route path="/user/:name/:age" component={User}></Route>
        </Switch>
        </Router>
    );
  }
}
五、redux
react脚手架中没有集成状态管理模块
redux是一款独立的JavaScript状态管理模块,可以集成到react中进行使用
- 安装redux模块:
npm i react-redux
注意:
若出现报错:Module not found: Error: Can't resolve 'redux' in
解决办法:
执行:npm install --save redux react-redux
5.1、redux的基本用法
1、state:存储状态管理的初始值
2、reducer:相当于 mutations,用来保存一些修改 state 值的相关方法
- reducer就是一个函数,此函数固定要求 必须带两个参数,参数1是state 参数2:action
- action:操作state的相关触发方法和参数
3、创建store,用来管理所有状态相关
4、添加监听:state发生变更时就会触发
5、修改state值
/*
*VueX:
*
*store:管理所有状态
*
*state:存储初始值 都在state中存放
*mutations:保存操作 state 中的值的相关方式
*
*/

import {createStore} from 'redux'

//1、state:存储状态管理的初始值
const initState = {
  name:"dongdong",
  age:33,
  count:10
};

//2、reducer:相当于 mutations,用来保存一些修改 state 值的相关方法

//reducer就是一个函数,此函数固定要求  必须带两个参数,参数1是state 参数2:action
//action:操作state的相关触发方法和参数
const reducer = (state = initState,action) =>{
  switch (action.type) {
    case "updateName":
      return{
        ...state,
        name:action.name,
      };
      case "updateAge":
        return{
          ...state,
          age:action.age,
        };
        case "addCount":
        return{
          ...state,
          count:state.count + 1,
        };

    default:
      return state;
  }
};

//3、创建store,用来管理所有状态相关
const store = createStore(reducer)

//读取 store中存储的 state 值
console.log(store.getState())

//4、添加监听:state发生变更时就会触发
store.subscribe(() => {
  console.log("subscribe:",store.getState());
});

//5、修改state值
store.dispatch({type:"updateName",name:"铭铭"});

//更新年龄
store.dispatch({type:"updateAge",age:"18"});

//为count + 1
store.dispatch({type:"addCount"})
store.dispatch({type:"addCount"})
store.dispatch({type:"addCount"})
store.dispatch({type:"addCount"})
5.2、redux一些特殊用法
在react中使用redux需要一些特殊的用法 可以实现组件间的状态共享
创建components文件夹,文件夹下创建A.js和B.js实现AB之间的数据共享
./store/insex.js
//创建 store
import { createStore } from "redux";

//状态初始
const initState = {
    num:100,
    skills:["vue","react","angular"],
};

const reducer = (state=initState,action) =>{
    switch (action.type) {
        case 'addNum':
            return{
          ...state,
          num:state.num+1,
        };

        case "addSkill":
            //action ={type:'addSkill',skill.xxx}
            return{
                ...state,
                skills:state.skills.concat(action.skill),
            };
        default:
            return state;
    }
};

export default createStore(reducer);
A.js
import React, { Component } from 'react';
import { connect } from 'react-redux';

class A extends Component {
    state = {num : 1}

    addNum(){
        this.setState({ num:this.state.num + 1 });
    }
    render() {
        console.log(this.porps);

        const {num,addNum,skills,addSkill} = this.props;


        return (
        <div>
            <h2>A组件</h2>
            <button onClick={addNum}>{num}</button>
            <br />
            <button onClick={() => addSkill("新技能")}>新增技能</button>
            <ul>
                {skills.map((item,index) => (
                    <li key={index}> {item}</li>
                ))}
            </ul>
        </div>
        );
    }
}

//rcredux生成以下代码   使用redux有固定写法

const mapStateToProps = (state) => ({
  num:state.num,
  skills:state.skills,
});

const mapDispatchToProps = dispatch =>  ({
    addNum:()=>dispatch({type:"addNum"}),
    addSkill:skill => dispatch({type:"addSkill",skill:skill})
});

//固定写法:可以把redux 相关操作 嵌入到 组件中的 props 中
//mapStateToProps:映射 state到props 中,
//mapDispatchToProps:映射 dispatch 到 props中
export default connect(mapStateToProps, mapDispatchToProps)(A);
B.js
import React, { Component } from 'react';

import { connect } from 'react-redux';

class B extends Component {
    state = {num : 1}

    addNum(){
        this.setState({num:this.state.num+1})
    }
    render() {
        const{num,addNum,skills} = this.props;
        return (
        <div>
            <h2>B组件</h2>
            <button onClick={addNum}>{num}</button>
            <ul>
                {skills.map((item,index) => (
                    <li key="index"> {item} </li>
                ))}
            </ul>
        </div>
        );
    }
}


const mapStateToProps = (state) => ({
  num:state.num,
  skills:state.skills,
})

const mapDispatchToProps = dispatch =>  ({
    addNum:()=>dispatch({type:"addNum"}),
});

export default connect(mapStateToProps, mapDispatchToProps)(B)
六、基础组件的使用
6.1、button组件
import React, { Component } from 'react'
import { Text, View,Button } from 'react-native'

export default class App extends Component {
  render() {
    return (
      <View style={{alignItems:'center'}}>
        {/* title: 规定按钮的标题   */}
        <Button title="我是按钮"/>

        {/* color:iOS文本颜色  android 背景色  android标题如何是字母的话  全都自动转换为大写 */}
        <Button title='text color' color='green' />

        {/* onPress:点击事件  */}
        <Button title='点击事件' onPress={()=> alert('点击事件')} />

        {/* disabled:不可用  */}
        <Button title='不可用按钮' disabled />

        {/* 按钮不接受自定义样式  */}
        <Button title='样式' style={{color:'black'}} />
      </View>
    );
  }
}
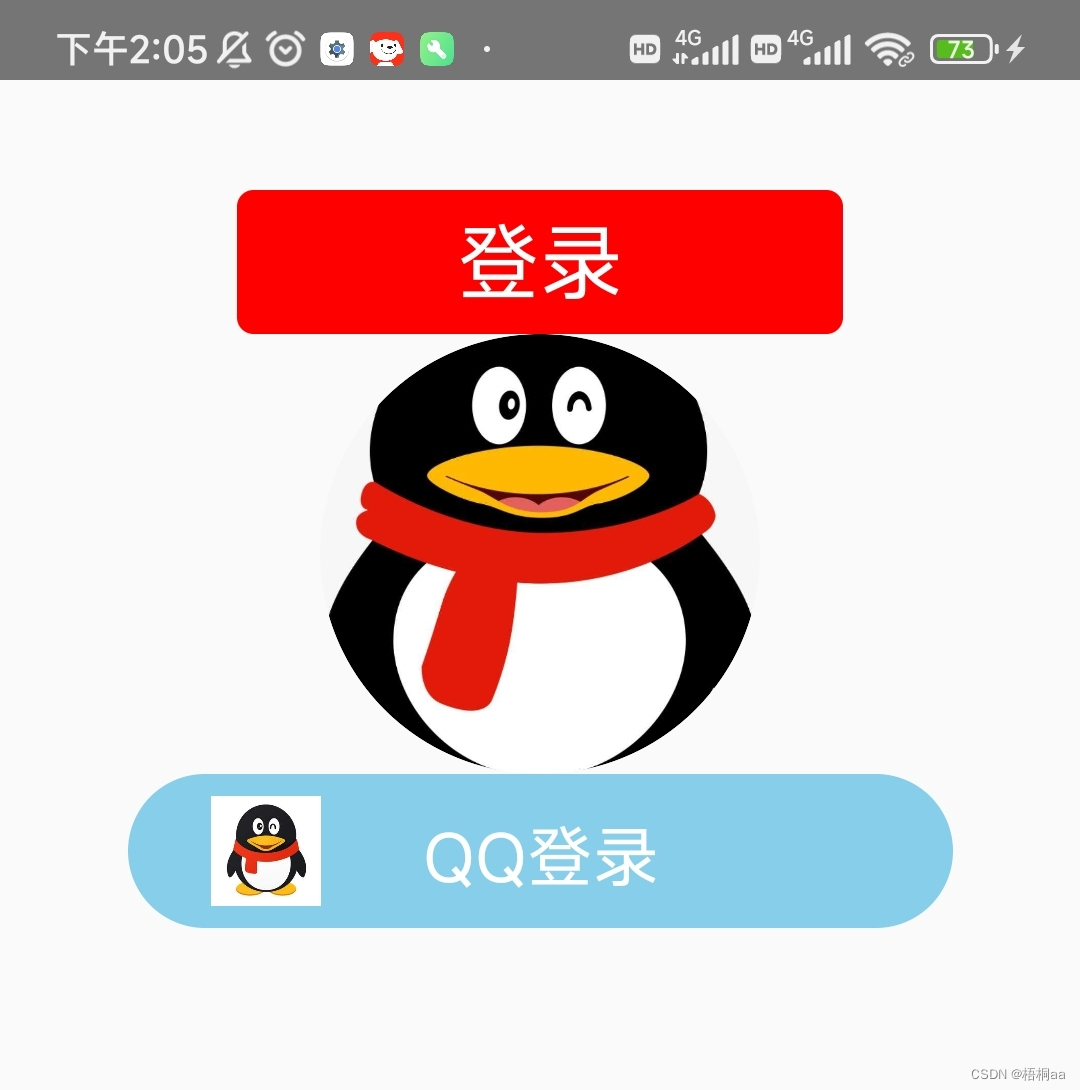
6.2、自定义按钮
import React, { Component } from 'react'
import { Image, Text, TouchableOpacity, View } from 'react-native'

export default class App extends Component {
  qq='https://gimg2.baidu.com/image_search/src=http%3A%2F%2Fimg.99ppt.com%2Fpic%2F7dee1c28-8d5e-43a7-b8e7-496568acd30b.jpg&refer=http%3A%2F%2Fimg.99ppt.com&app=2002&size=f9999,10000&q=a80&n=0&g=0n&fmt=auto?sec=1673069341&t=3b020c9b65126415db28f47df5c2f3d4';
  qqq='https://gimg2.baidu.com/image_search/src=http%3A%2F%2Fpic.616pic.com%2Fys_img%2F00%2F90%2F12%2FTCgK6N97Lc.jpg&refer=http%3A%2F%2Fpic.616pic.com&app=2002&size=f9999,10000&q=a80&n=0&g=0n&fmt=auto?sec=1673070024&t=72a862d72423f7538d25ae49409acb57';
  render() {
    return (
      <View style={{alignItems:'center'}}>
        {/* 普通自定义按钮 */}
        <TouchableOpacity
          //调整点击时的透明度
          activeOpacity={0.7}

          style={{
            backgroundColor:'red',
            marginTop:40,
            //圆角
            borderRadius:6,
            //上下内边距6
            paddingVertical:6,//margin-top:6,magin-bottom:6
            //左右内边距:40
            paddingHorizontal:80,//margin-left:80,margin-right:80
            }}>
          <Text style={{fontSize:30,color:'white'}}>登录</Text>
        </TouchableOpacity>

        {/*图片按钮 */}
        <TouchableOpacity
          //指定点击时的透明度
          activeOpacity={0.7}
          /* overflow:'hidden'超出部分隐藏的意思 */
          style={{BorderWidth:1,borderRadius:80,overflow:'hidden'}}>
          {/* 网络图片必须给宽高 */}
          <Image source={{uri:this.qq}} style={{width:160,height:160,borderRadius:80}}/>
        </TouchableOpacity>

        {/* 图片和文件组合按钮 */}
        <TouchableOpacity
          activeOpacity={0.6}
          style={{
            flexDirection:'row',
            allignItems:'center',
            backgroundColor:'skyblue',
            padding:10,
            borderRadius:60,
            width:300,
            justifyContent:'center',
          }}>
            {/* position:absolute绝对定位 不 */}
            <Image source={{uri:this.qqq}} style={{width:40,height:40,position:'absolute',left:30,top:8}} />
            <Text style={{paddingTop:4,color:'white',fontSize:24}}>QQ登录</Text>
        </TouchableOpacity>
      </View>
    )
  }
}
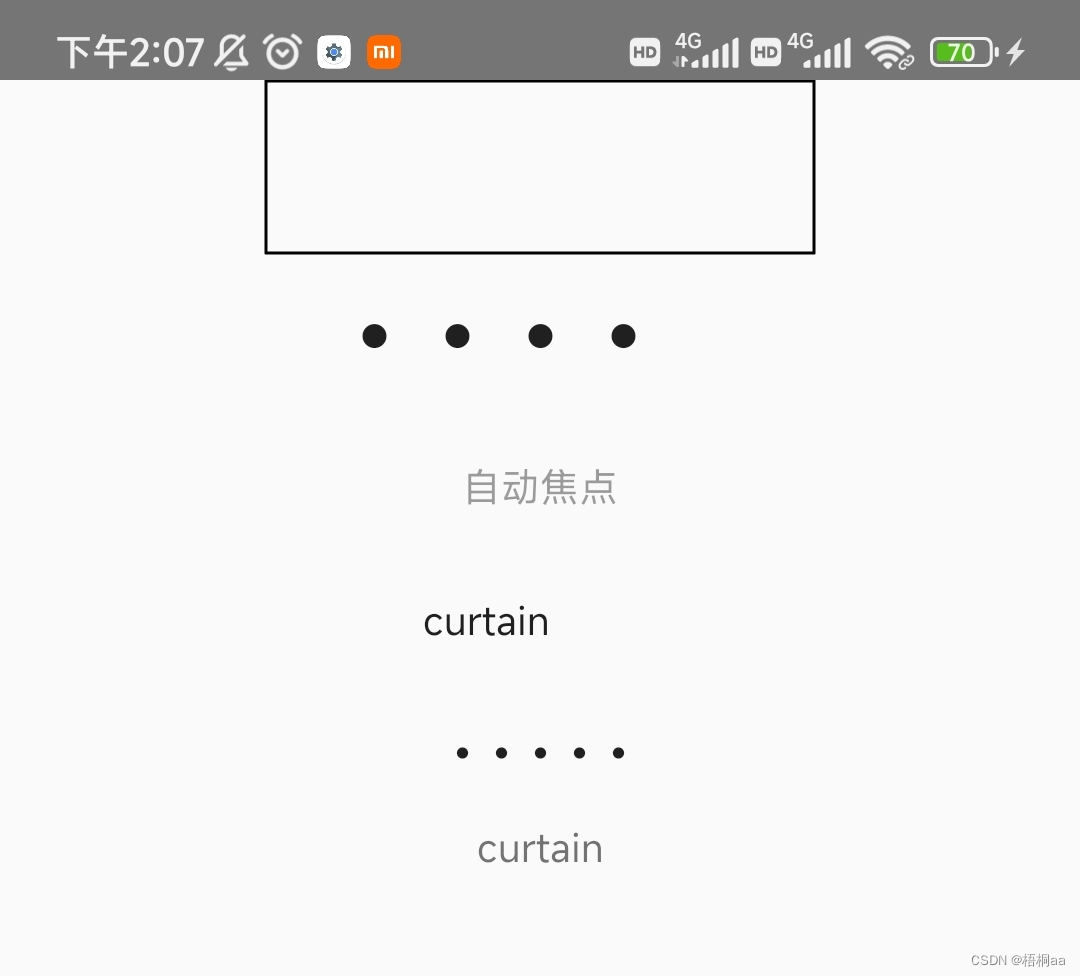
6.3、TextInput组件
import React, { Component } from 'react'
import { Text, View,TextInput } from 'react-native'

export default class App extends Component {
  state = {uname:'',password:''};
  render() {
    return (
      <View style={{alignItems:'center'}}>
        <TextInput
          style={{borderWidth:1,width:200,color:'black',fontSize:30}}
        />
        <TextInput placeholder='请输入密码'
        style={{fontSize:30}}
        secureTextEntry
        />
        <TextInput placeholder='自动焦点' autoFocus />

        {/* 双向数据绑定 */}
        <TextInput placeholder='请输入用户名' value={this.state.uname} onChangeText={this._onChangUname} />
        <TextInput placeholder='请输入密码' value={this.state.password} onChangeText={(password) => this.setState({password})} secureTextEntry/>
        <Text>{this.state.uname}</Text>
        {/* 密码 */}
        <Text >{this.state.password}</Text>
      </View>
    );
  }
  _onChangUname = (uname) => {
      console.log(uname);
      //语法糖写法:{uname:uname} 属性名和值一样,则简化{uname}
      this.setState({uname});
  };


}
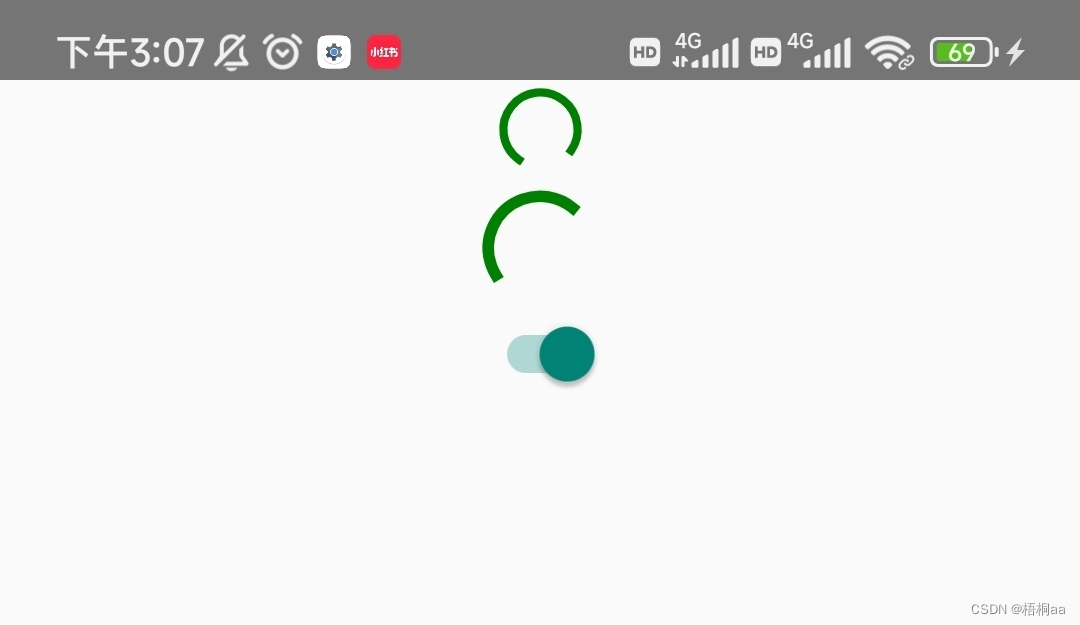
6.4、ActivityIndicator活动提示器组件、Switch开关组件
import React, { Component } from 'react'
import { ActivityIndicator, Switch, Text, View } from 'react-native'

export default class App extends Component {
  state={show:true};

  render() {
    return (
      <View style={{alignItems:'center'}}>

        <ActivityIndicator color="green"  size='large'/>
        {/* android手机:size是可以给数值的 */}
        <ActivityIndicator
          color="green"
          size={50}
          //开关打开就有动画旋转  关闭就没有
          animating={this.state.show}/>

        {/* 开关组件:是典型的受控组件-- 受到代码控制 */}
        <Switch value={this.state.show} onValueChange={(show) => this.setState({show})}/>
      </View>
    )
  }
}
6.5、基础组件练习
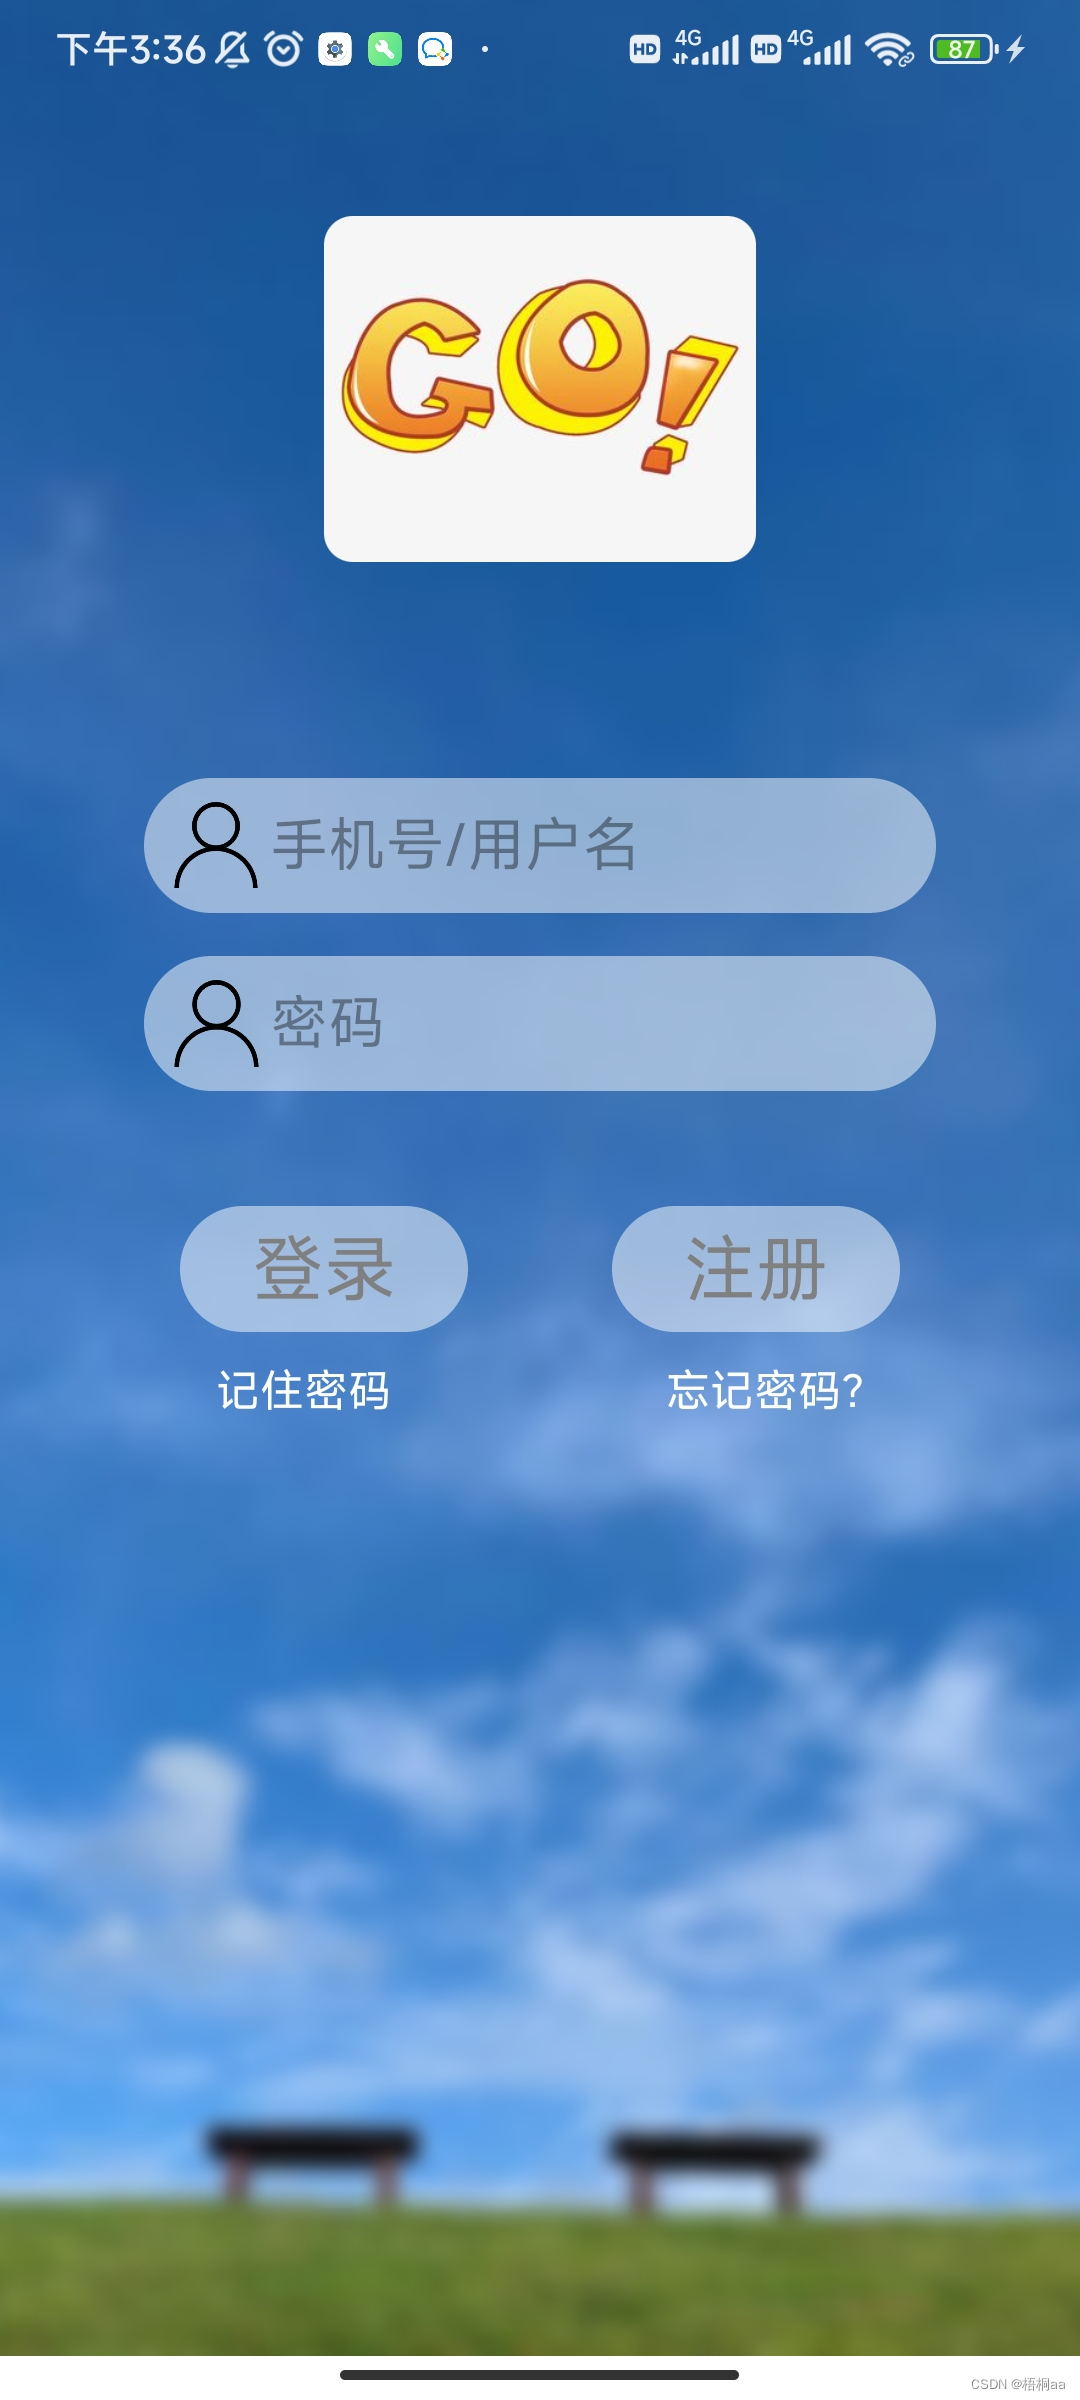
6.5.1、登录页面一练习
- 使用组件:
ImageBackground(背景图片), StatusBar(状态栏)、TextInput(文本框)、TouchableOpacity (自定义按钮)
import React, { Component } from 'react'
import { Dimensions, Image, ImageBackground, StatusBar, Text, View,StyleSheet, TextInput, TouchableOpacity } from 'react-native'


//rpx

const{width,height} = Dimensions.get('screen')

function rpx(p) {
  return(width / 750) * p;
}

export default class App extends Component {

  bgURL = 'https://pics2.baidu.com/feed/cb8065380cd791231aba89579dd8dc84b3b780a9.jpeg?token=f32a8184032f3697c7227e169974cf11';
  logo = 'https://img1.baidu.com/it/u=1833665414,2652999728&fm=253&fmt=auto&app=138&f=JPEG?w=354&h=500';
  render() {
    return (
      <View>
        {/* 状态栏 rgba(0,0,0,0)透明 translucent具有穿透效果 */}
        <StatusBar backgroundColor="rgba(0,0,0,0)" translucent />
        <ImageBackground
          /* 添加模糊度的 */
          blurRadius={4}
          source={{uri:this.bgURL}}
          //source={require('./assets/pic.jpg')}
          style={{width:'100%',height:'100%',alignItems:'center',}}
        >
          <Image source={{uri:this.logo}} style={ss.logo} />
          <View
            style={ss.inputArea}>
            <Image
              source={require('./assets/user.png')}
              style={{width:rpx(60),height:rpx(60)}}
            />
            <TextInput
              placeholder='手机号/用户名'
              style={{fontSize:rpx(40),color:'black',flex:1}}
              />
          </View>
          <View
            style={ss.inputArea}>
            <Image
              source={require('./assets/user.png')}
              style={{width:rpx(60),height:rpx(60)}}
            />
            <TextInput
              placeholder='密码'
              style={{
                fontSize:rpx(40),
                color:'black',
                //密码框选中所有  一份
                flex:1
              }}
              secureTextEntry
              />
          </View>

          <View style={ss.loginArea}>
            <TouchableOpacity
              activeOpacity={0.7}
              style={ss.loginBtn}>
              <Text style={{fontSize:rpx(50),color:'grey'}}>登录</Text>
            </TouchableOpacity>

            <TouchableOpacity
              activeOpacity={0.7}
              style={ss.loginBtn}>
              <Text style={{fontSize:rpx(50),color:'grey'}}>注册</Text>
            </TouchableOpacity>
          </View>

          <View style={{flexDirection:'row',justifyContent:'space-between',width:rpx(450) ,marginTop:rpx(20) }}>
            <TouchableOpacity>
              <Text style={{fontSize:rpx(30),color:'white'}}>记住密码</Text>
            </TouchableOpacity>

            <TouchableOpacity>
              <Text style={{fontSize:rpx(30),color:'white'}}>忘记密码?</Text>
            </TouchableOpacity>
          </View>
        </ImageBackground>
      </View>

    );
  }
}


const ss = StyleSheet.create({
  logo:{
    width:rpx(300),
    height:rpx(240),
    marginTop:rpx(150),
    borderRadius:rpx(20),
    marginBottom:rpx(120)
    },
  inputArea:{
    //输入框纯白改为透明
    backgroundColor:'rgba(255,255,255,0.5)',
    flexDirection:'row',
    borderRadius:rpx(100),
    width:rpx(550),
    paddingHorizontal:rpx(20),
    alignItems:'center',
    marginTop:rpx(30)
    },
  loginBtn:{
    backgroundColor:'rgba(255,255,255,0.5)',
    borderRadius:rpx(100),
    paddingHorizontal:rpx(50),
    paddingVertical:rpx(10),
    },
  loginArea:{
    flexDirection:'row',
    marginTop:rpx(80),
    justifyContent:'space-between',
    width:rpx(500)},
},
);
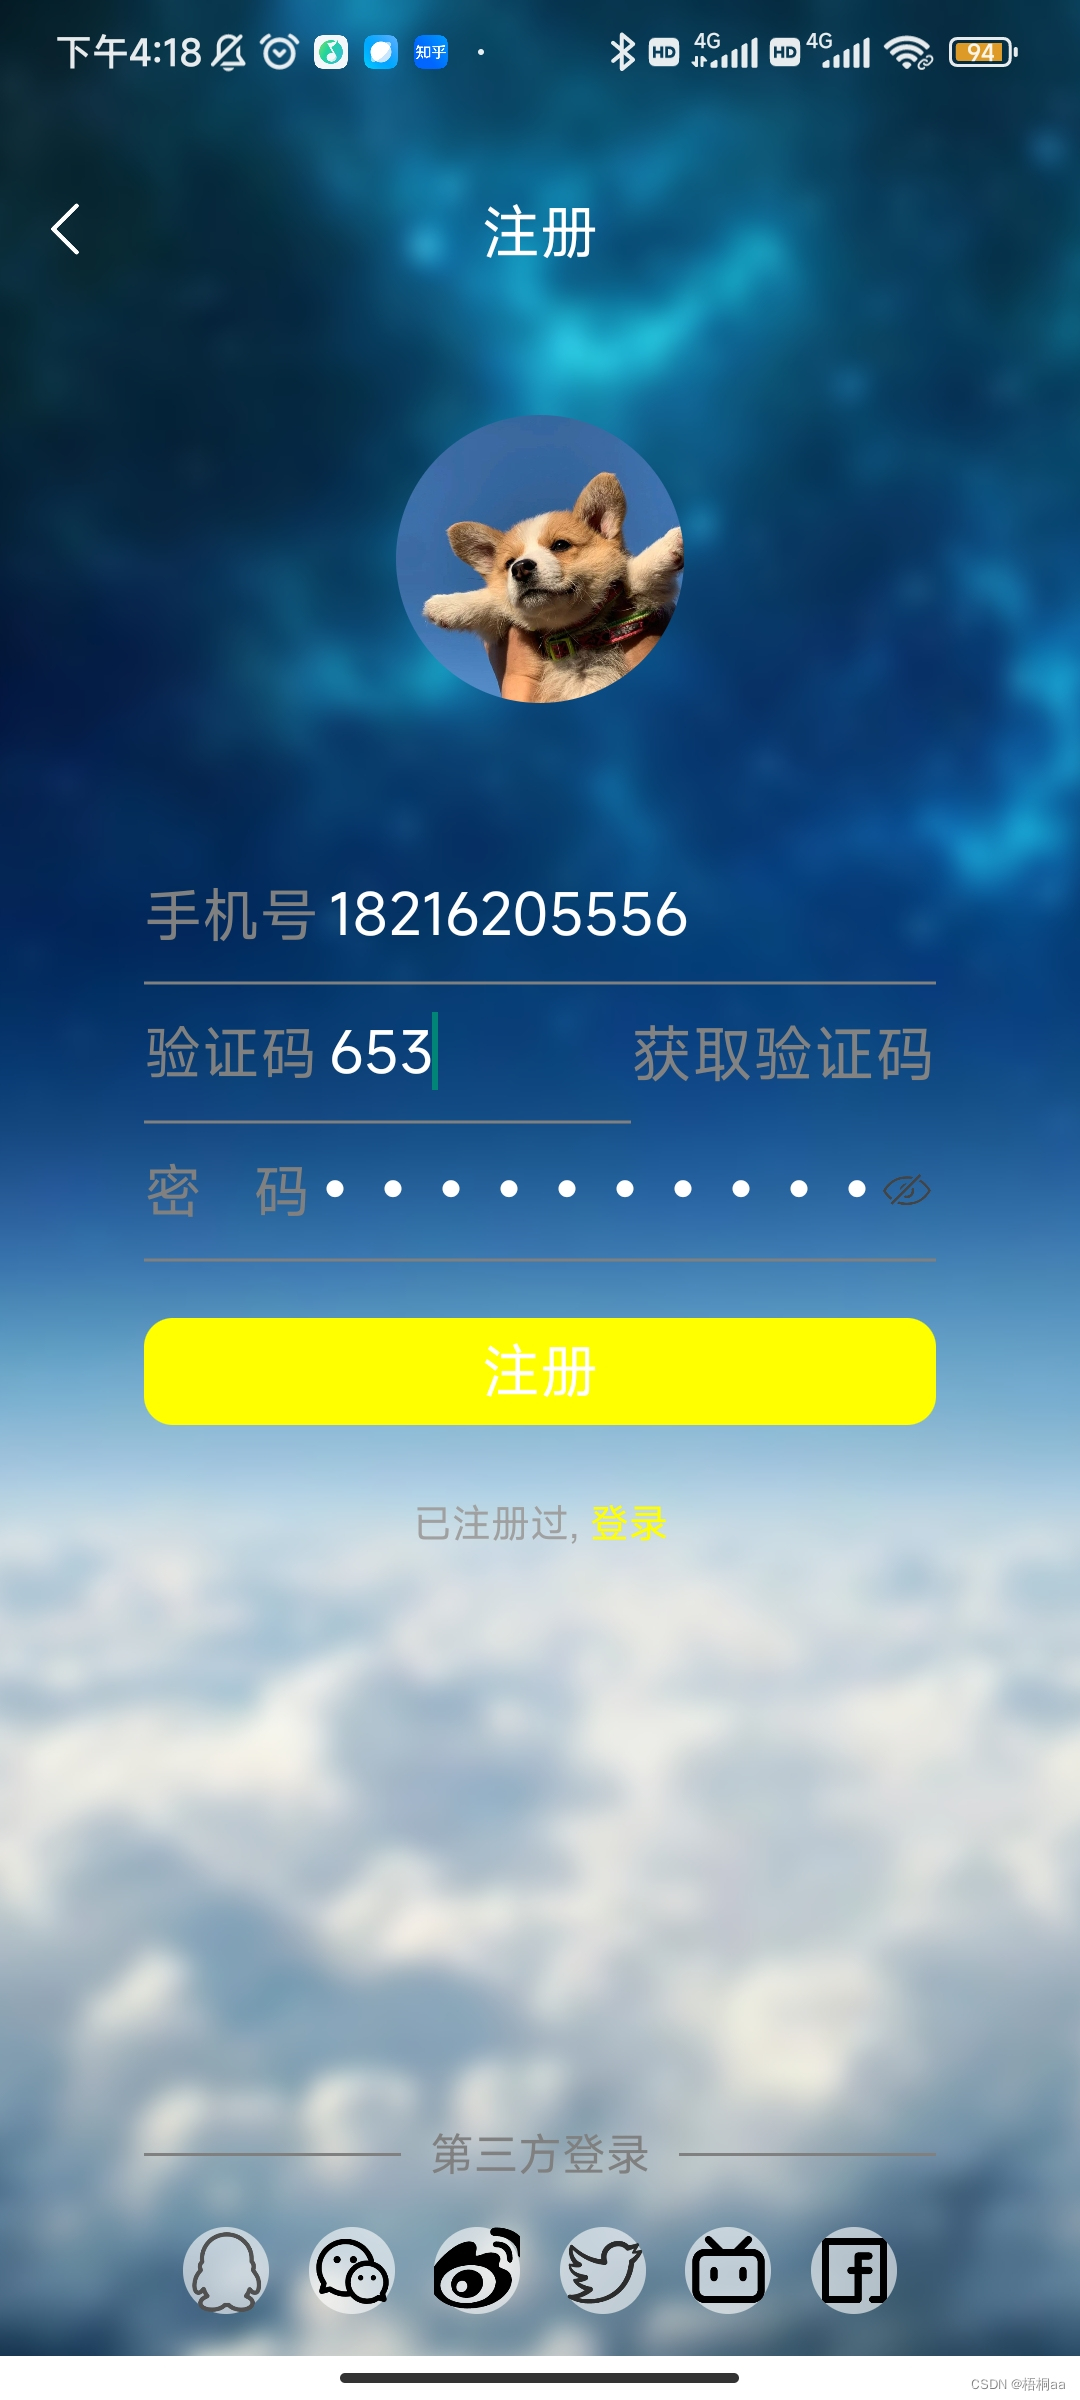
6.5.1、登录页面二练习
- posion:绝对定位:
style={{position:'absolute',left:rpx(20)}}> - 表示空格
import React, { Component } from 'react'
import { Text, StyleSheet, View, ImageBackground, StatusBar,Image, Dimensions, TouchableOpacity, TextInput } from 'react-native'
const{width,height} = Dimensions.get('screen') //屏幕宽高,不受键盘影响
function rpx(p){
return width/750 *p
}
export default class App extends Component {
//变:代码运行期间 变化靠 state 状态值
state = {hidePwd:true};
bg = 'https://pics0.baidu.com/feed/63d9f2d3572c11df7776a7a81749cbd7f603c208.jpeg?token=4b1b039f5f15831dbee4e5082058972e';
logo = 'https://gimg2.baidu.com/image_search/src=http%3A%2F%2Fc-ssl.duitang.com%2Fuploads%2Fblog%2F202104%2F22%2F20210422220415_2e4bd.jpg&refer=http%3A%2F%2Fc-ssl.duitang.com&app=2002&size=f9999,10000&q=a80&n=0&g=0n&fmt=auto?sec=1673429215&t=fddab190dabd28ac80c6d09520df72ff';
render() {
return (
//整个视图的默认高度:窗口高=屏幕高-键盘高
<View style={{height}}>
<StatusBar translucent backgroundColor="rgba(0,0,0,0)" />
<ImageBackground
source={{uri:this.bg}}
style={{width:'100%',height:'100%'}}
//模糊度
blurRadius={5}
>
<View style={ss.header}>
<TouchableOpacity
//posion:绝对定位
style={{position:'absolute',left:rpx(20)}}>
<Image source={require('./assets/left.png')} style={{width:rpx(50),height:rpx(50)}} />
</TouchableOpacity>
<Text style={{color:'white',fontSize:rpx(40)}}>注册</Text>
</View>
<View>
<Image
source={{uri:this.logo}}
style={ss.logo} />
</View>
<View style={ss.body}>
<View
style={ss.phone}>
<Text style={{fontSize:rpx(40),color:'grey'}}>手机号</Text>
<TextInput
style={{
//borderWidth:1,
//默认输入框很小需要大一点
flex:1,
fontSize:21,
color:'white'
}}></TextInput>
</View>
<View style={{flexDirection:'row' ,alignItems:'center'}}>
<View style={ss.code} >
<Text style={{fontSize:21,color:'gray'}}>验证码</Text>
<TextInput style={{flex:1,fontSize:21,color:'white'}}/>
</View>
<TouchableOpacity>
<Text style={{fontSize:22,color:'rgb(130,130,130)'}}>获取验证码</Text>
</TouchableOpacity>
</View>
<View style={ss.pwd}>
<Text style={{fontSize:rpx(40),color:'gray'}}>密 码</Text>
<TextInput style={{flex:1,fontSize:rpx(40),color:'white'}}
secureTextEntry = {this.state.hidePwd}
/>
<TouchableOpacity
onPress={() => this.setState({hidePwd:!this.state.hidePwd})} >
<Image
source={
this.state.hidePwd ? require('./assets/hide.png') : require('./assets/show.png')
}
style={{width:rpx(40),height:rpx(40)}}
/>
</TouchableOpacity>
</View>
<TouchableOpacity
activeOpacity={0.7}
style={ss.loginBtn}>
<Text style={ss.loginBtn_text}>注册</Text>
</TouchableOpacity>
<View style={{flexDirection:'row',alignSelf:'center',marginTop:rpx(50)}}>
<Text style={{color:'rgb(160,160,160)'}}>已注册过, </Text>
<TouchableOpacity>
<Text style={{color:'yellow'}}>登录</Text>
</TouchableOpacity>
</View>
{/* marginTop:'auto'填充到页面最下方 */}
<View style={{marginTop:rpx(400)}}>
<View style={{flexDirection:'row',alignItems:'center'}}>
<View style={{height:1,backgroundColor:'gray',flex:1}} />
<Text style={{color:'gray',marginHorizontal:rpx(20),fontSize:rpx(30)}}>第三方登录</Text>
<View style={{height:1,backgroundColor:'gray',flex:1}} />
</View>
<View style={{flexDirection:'row',justifyContent:'space-evenly',marginVertical:rpx(30)}}>
<TouchableOpacity
style={{backgroundColor:'rgba(255,255,255,0.6)',borderRadius:rpx(30)}}>
<Image
source={require('./assets/qq.png')}
style={{width:rpx(60),height:rpx(60)}}
/>
</TouchableOpacity>
<TouchableOpacity
style={{backgroundColor:'rgba(255,255,255,0.6)',borderRadius:rpx(30)}}>
<Image
source={require('./assets/wexin.png')}
style={{width:rpx(60),height:rpx(60)}}
/>
</TouchableOpacity>
<TouchableOpacity
style={{backgroundColor:'rgba(255,255,255,0.6)',borderRadius:rpx(30)}}>
<Image
source={require('./assets/webo.png')}
style={{width:rpx(60),height:rpx(60)}}
/>
</TouchableOpacity>
<TouchableOpacity
style={{backgroundColor:'rgba(255,255,255,0.6)',borderRadius:rpx(30)}}>
<Image
source={require('./assets/twitter.png')}
style={{width:rpx(60),height:rpx(60)}}
/>
</TouchableOpacity>
<TouchableOpacity
style={{backgroundColor:'rgba(255,255,255,0.6)',borderRadius:rpx(30)}}>
<Image
source={require('./assets/bilibili.png')}
style={{width:rpx(60),height:rpx(60)}}
/>
</TouchableOpacity>
<TouchableOpacity
style={{backgroundColor:'rgba(255,255,255,0.6)',borderRadius:rpx(30),overflow:'hidden'}}>
<Image
source={require('./assets/facebook.png')}
style={{width:rpx(60),height:rpx(60)}}
/>
</TouchableOpacity>
</View>
</View>
</View>
</ImageBackground>
</View>
)
}
}
const ss = StyleSheet.create({
logo:{
width:rpx(200),
height:rpx(200),
borderRadius:rpx(100),
alignSelf:'center',
marginTop:rpx(100)
},
header:{
flexDirection:'row',
marginTop:70,
justifyContent:'center'
},
body:{
//borderWidth:1,
width:rpx(550),
alignSelf:'center',
marginTop:rpx(100),
},
phone:{
flexDirection:'row',
alignItems:'center',
borderBottomWidth:1,
borderBottomColor:'gray',
},
code:{
flexDirection:'row',
flex:1,
alignItems:'center',
borderBottomWidth:1,
borderBottomColor:'gray',
},
pwd:{
flexDirection:'row',
alignItems:'center',
borderBottomWidth:1,
borderBottomColor:'gray'
},
loginBtn:{
backgroundColor:'yellow',
borderRadius:rpx(20),
paddingVertical:rpx(10),
marginTop:rpx(40),
},
loginBtn_text:{
fontSize:rpx(40),
color:'white',
textAlign:'center',
},
});
七、滚动组件使用
7.1、ScrollView组件
- 滚动组件:ScrollView(单纯的滚动效果,粗暴地把所有子元素一次性全部渲染出来)
import React from 'react';
import { StyleSheet, Text, SafeAreaView, ScrollView, StatusBar } from 'react-native';

const App = () => {
  return (
    <SafeAreaView style={styles.container}>
      <ScrollView style={styles.scrollView}>
        <Text style={styles.text}>
          Lorem ipsum dolor sit amet, consectetur adipiscing elit, sed do
          eiusmod tempor incididunt ut labore et dolore magna aliqua. Ut enim ad
          minim veniam, quis nostrud exercitation ullamco laboris nisi ut
          aliquip ex ea commodo consequat. Duis aute irure dolor in
          reprehenderit in voluptate velit esse cillum dolore eu fugiat nulla
          pariatur. Excepteur sint occaecat cupidatat non proident, sunt in
          culpa qui officia deserunt mollit anim id est laborum.
        </Text>
      </ScrollView>
    </SafeAreaView>
  );
}

const styles = StyleSheet.create({
  container: {
    flex: 1,
    paddingTop: StatusBar.currentHeight,
  },
  scrollView: {
    backgroundColor: 'pink',
    marginHorizontal: 20,
  },
  text: {
    fontSize: 42,
  },
});

export default App;
7.2、FlatList组件
7.2.1、竖向滚动展示
-
FlatList(高性能的简单列表组件)
(1)完全跨平台
(2)支持水平布局模式
(3)支持单独的头部组件
(4)支持单独的尾部组件
(5)支持自定义行间分隔线
(6)支持下拉刷新
(7)支持上拉加载
(8)支持跳转到指定行(ScrollToIndex)
(9)支持多列布局 -
如果需要分组/类/区,使用
-
FlatList的重要属性
(1)data:用于传入 要显示地数据数组
(2)renderItem:数组中地每一项地样子
(3)ItemSeparatorComponent:栏目地分割组件
(4)keyExtractor:循环生成胡每一个项目必须亦唯一标识的 key
(5)ListHeaderComponent:表头
import React, { Component } from 'react'
import { ActivityIndicator, FlatList, ScrollView, Text, View } from 'react-native'

export default class App extends Component {

  names = [
    '亮亮',
    '然然',
    '东东',
    '花花',
    '小新',
    '小李',
    '小凯',
    '燕子',
    '小月',
    '雨神',
  ];


  render() {

    /*
    *FlatList属于一个智能列表组件
    *用户只需要告知  有哪些数据需要进行展示,每天数据什么样
    *FlatList 就会自动开那个把每一条数据显示出来
    */

    /**
     * 重要属性
     * data:用于传入 要显示地数据数组
     * renderItem:数组中地每一项地样子
     * ItemSeparatorComponent:栏目的分割组件
     * keyExtractor:循环生成胡每一个项目必须亦唯一标识的  key
     * ListHeaderComponent:表头
     * ListFooterComponent:表尾
     */

    return (
      <FlatList
        data={this.names}
        renderItem={this._renderItem}
        ItemSeparatorComponent={this._ItemSwparatorComponent}
        keyExtractor={(item,index) => index + ''}
        //keyExtractor={this._keyExtractor}
        ListHeaderComponent={this._ListHeaderComponent}
        ListFooterComponent={this._ListFooterComponent}
        />
    );

  }

  _ListFooterComponent=() =>(
    <View style={{alignItems:'center',backgroundColor:'lightgray'}}>
      <ActivityIndicator color='red' size='large'></ActivityIndicator>
      <Text style={{fontSize:30}}>加载中...</Text>
    </View>
  );
  _ListHeaderComponent=() =>(
    <Text style={{fontSize:50,textAlign:'center',backgroundColor:'green',color:'white'}}>实验室成员</Text>
  );

  _keyExtractor =(item,index) => {
    //返回值必须是字符串
      console.log(item,index)
      return index + '';
  };

  _ItemSwparatorComponent =() => (
    <View style={{height:1,backgroundColor:'black'}} />
  );


  //本质上是循环遍历data属性地数组,类似于 this.names.forEach(obj=>{renderItem(item)})
  //语法糖:() =>{return xxx;} 函数体中只有一行代码进行返回,可以简化成() => xxx
//   _renderItem=({item}) => {

//     //let {item} = obj;//let item = obj.item
//     //console.log(obj)
//     //正常使用:
//     // let item = obj.item;
//     // let index = obj.index;
//     //语法糖写法
//     // let {item} = {index:0,item:'东东'}
//     // // //相当于
//     // let item = {index:0,item:'东东'}.item

//     return <Text style={{fontSize:120}}>{item}</Text>
//   };
_renderItem=({item}) => (
  <Text style={{fontSize:120}}>{item}</Text>
)
}
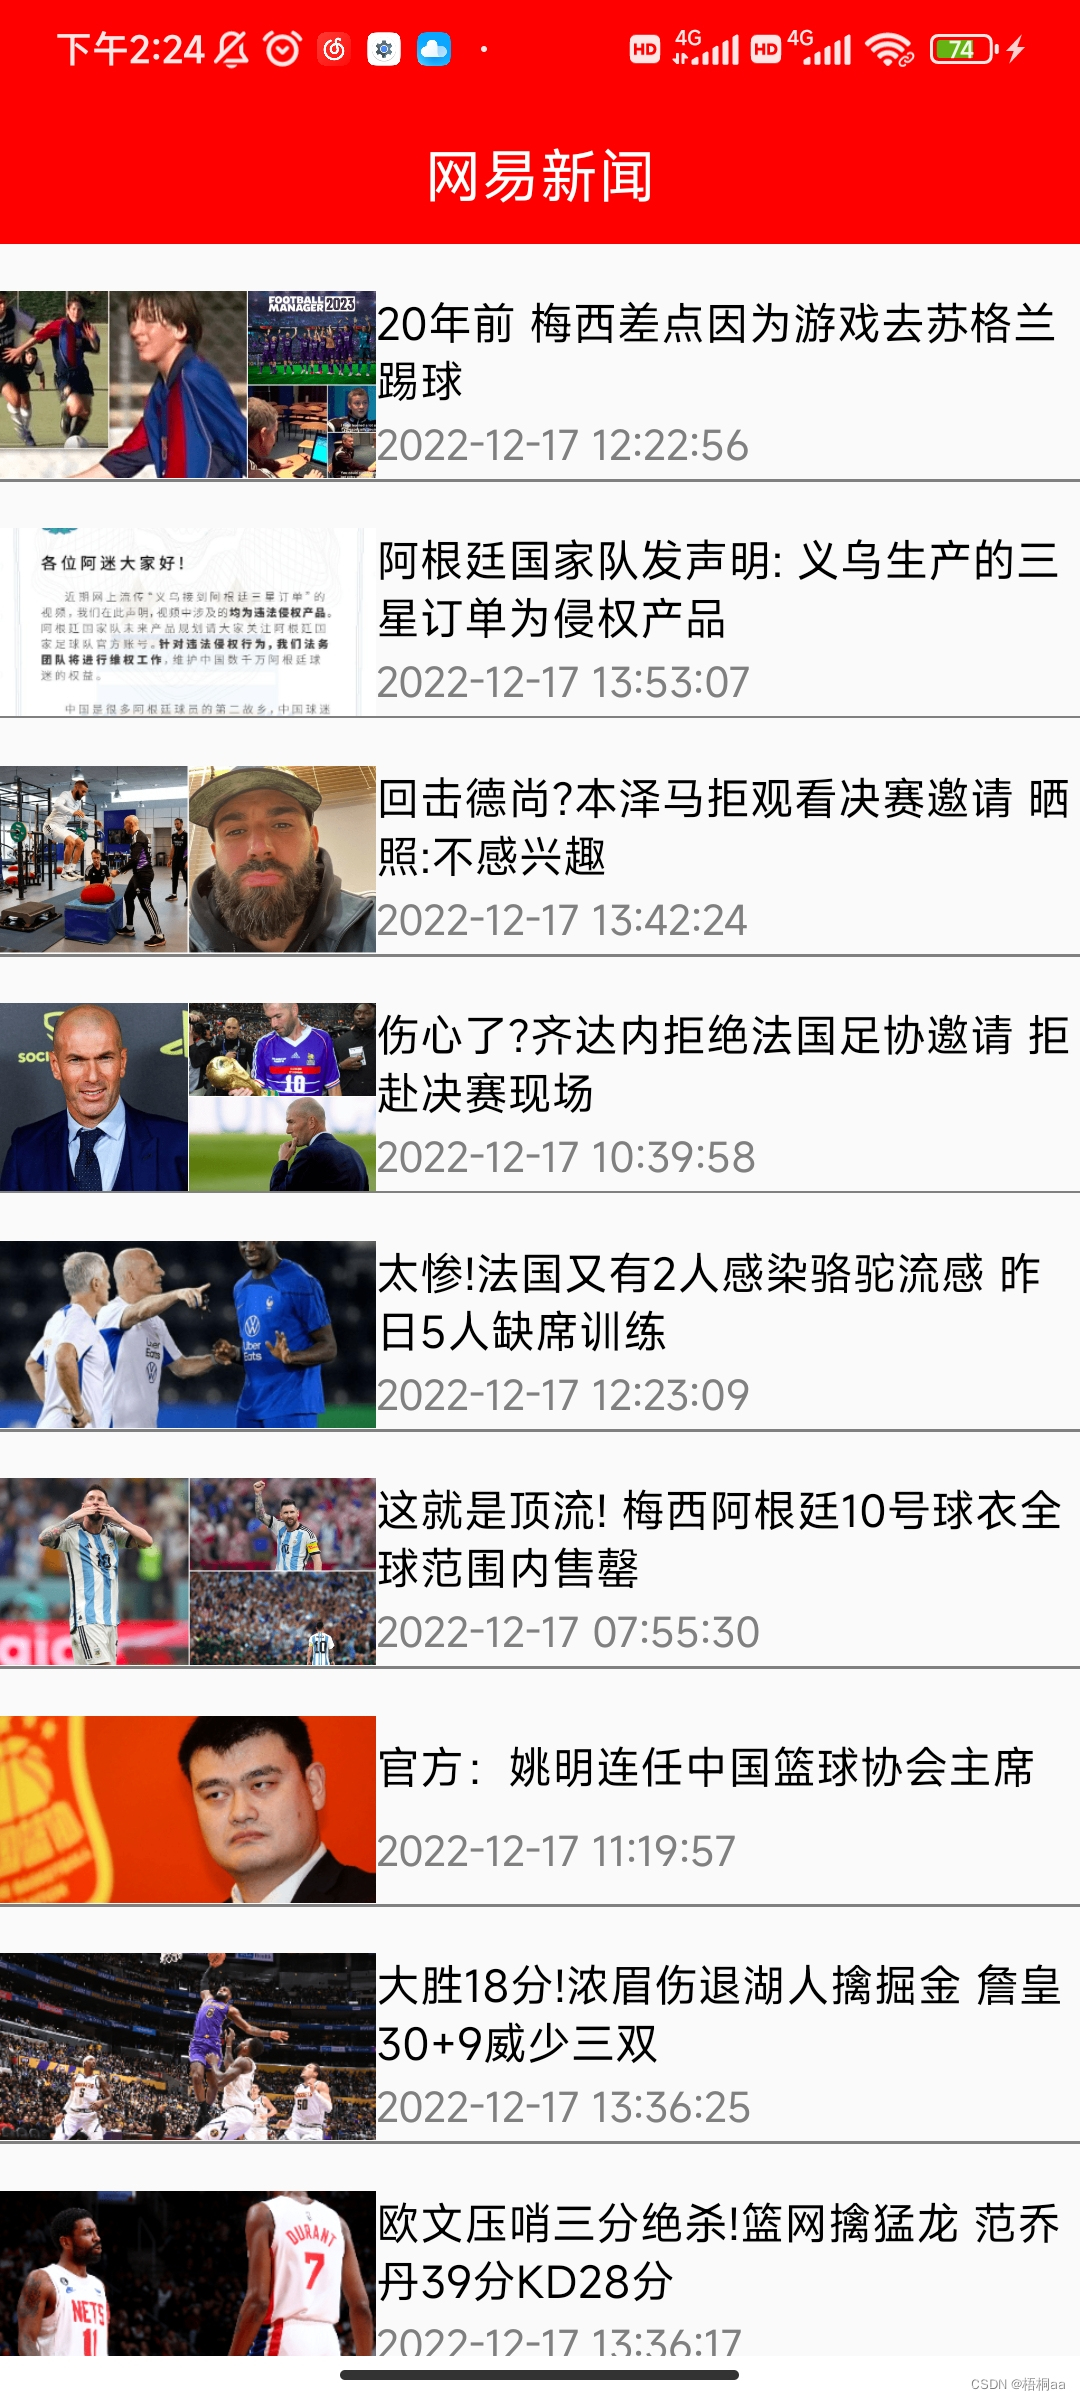
- 网易新闻练习
- FlatList重要方法
(1)、onEndReached:触底时触发的方法
(2)、onEndReachedThreshold:触底触发的阈值,默认值0,5代表50%,未出现的UI 高度 是整个可见列表区域的50% 高度时 触发 onEndReached
import React, { Component } from 'react'
import { Text, StyleSheet, View, Dimensions, StatusBar, FlatList ,Image, ActivityIndicator} from 'react-native'

//获取屏幕大小
const{width,height}  = Dimensions.get('screen');

function rpx(p) {
  return width/750*p ;
}

export default class App extends Component {
  //网络请求的数据是变化的
  state = {result:[],refreshing:false};

  /*//保存当前页数
  page =1;

  url = 'http://c.3g.163.com/nc/article/list/T1348649079062/0-20.html';
*/
  componentDidMount(){
    // let url='http://c.m.163.com/nc/article/headline/T1348647853363/0-40.html';
    let url='http://c.3g.163.com/nc/article/list/T1348649079062/0-20.html';

  /*  let url =this.url + 1; */

    fetch(url)
    .then((res)=> res.json())
    .then((res) => {
      console.log(res);
      this.setState({result:res.T1348649079062});
    });
  }

  render() {
    return (
      <View>
        <StatusBar backgroundColor="red" />
        <Text
          style={ss.nav}> 网易新闻 </Text>
          {/**
           * onEndReached:触底时触发的方法
           * onEndReachedThreshold:触底触发的阈值,默认值0,5代表50%,未出现的UI 高度 是整个可见列表区域的50% 高度时 触发 onEndReached
           * onRefresh:下拉刷新,当前下拉刷新的动画是否呈现
           * refreshing:和onRefresh配合使用, 下拉刷新的方法
           */}
          <FlatList
            data={this.state.result}
            renderItem={this._renderItem}
            style={{marginBottom:rpx(100)}}
            keyExtractor={(item,index)=>index + ''}
            //中间加线
            ItemSeparatorComponent={() => (
              <View style={{backgroundColor:'gray',height:1}} />
            )}
            ListFooterComponent={this._ListFooterComponent}
            onEndReached={this._onEndReached}
            onEndReachedThreshold={0.1}
            onRefresh={this._onRefresh}
            refreshing={this.state.refreshing}
            />
      </View>
    );
  }


  _onRefresh = () =>{
    //console.log('下拉刷新');
    this.setState({refreshing:false});
    /*
      this.setState({refreshing:ture});
      let url = this.url + 1;//刷新就是第一页

      fetch(url)
      .then((res) => res.json())
      .then((res) =>{
        this.setState({result:res.result,refreshing:false});
        this.page = 1;
      });
      */
  };

  _onEndReached=() => {
    alert('触底!')
    /*
    let nextPage = this.page + 1;
    let url = this.url + nextPage;

    fetch(url)
    .then((res) => res.json())
    .then((res) => {
      console.log(res);
      //将返回的数据  添加到之前的数组中
      this.setState({result:result.state.result.concat(res.result)});
      //请求成功后 更新页数
      this.page = nextPage;
    });
    */
  };
  _ListFooterComponent=() =>(
    <View style={{alignItems:'center',backgroundColor:'rgb(200,200,200)',paddingVertical:rpx(20)}}>
      <ActivityIndicator color='red' size='large'></ActivityIndicator>
      <Text style={{fontSize:30,color:'black'}}>加载中,请稍后...</Text>
    </View>
  );
  _renderItem=({item}) => (
    <View style={{flexDirection:'row',marginTop:rpx(30)  }}>
      <Image
        source={{uri:item.imgsrc}}
        style={{
          width:rpx(261),
          height:rpx(130),
          marginTop:rpx(3),
          }} />
      <View
        //flex:1 父元素不要被子元素顶出去
        style={{flex:1,justifyContent:'space-evenly'}}>
        <Text style={{fontSize:rpx(30),color:'black'}}>{item.ltitle}</Text>
        <Text style={{fontSize:rpx(28),color:'gray'}} >{item.mtime}</Text>
      </View>
    </View>
  );

}


const ss = StyleSheet.create({
  nav:{fontSize:rpx(40),
    backgroundColor:'red',
    textAlign:'center',
    color:'white',
    paddingTop:rpx(40),
    paddingBottom:rpx(20)
    },
});
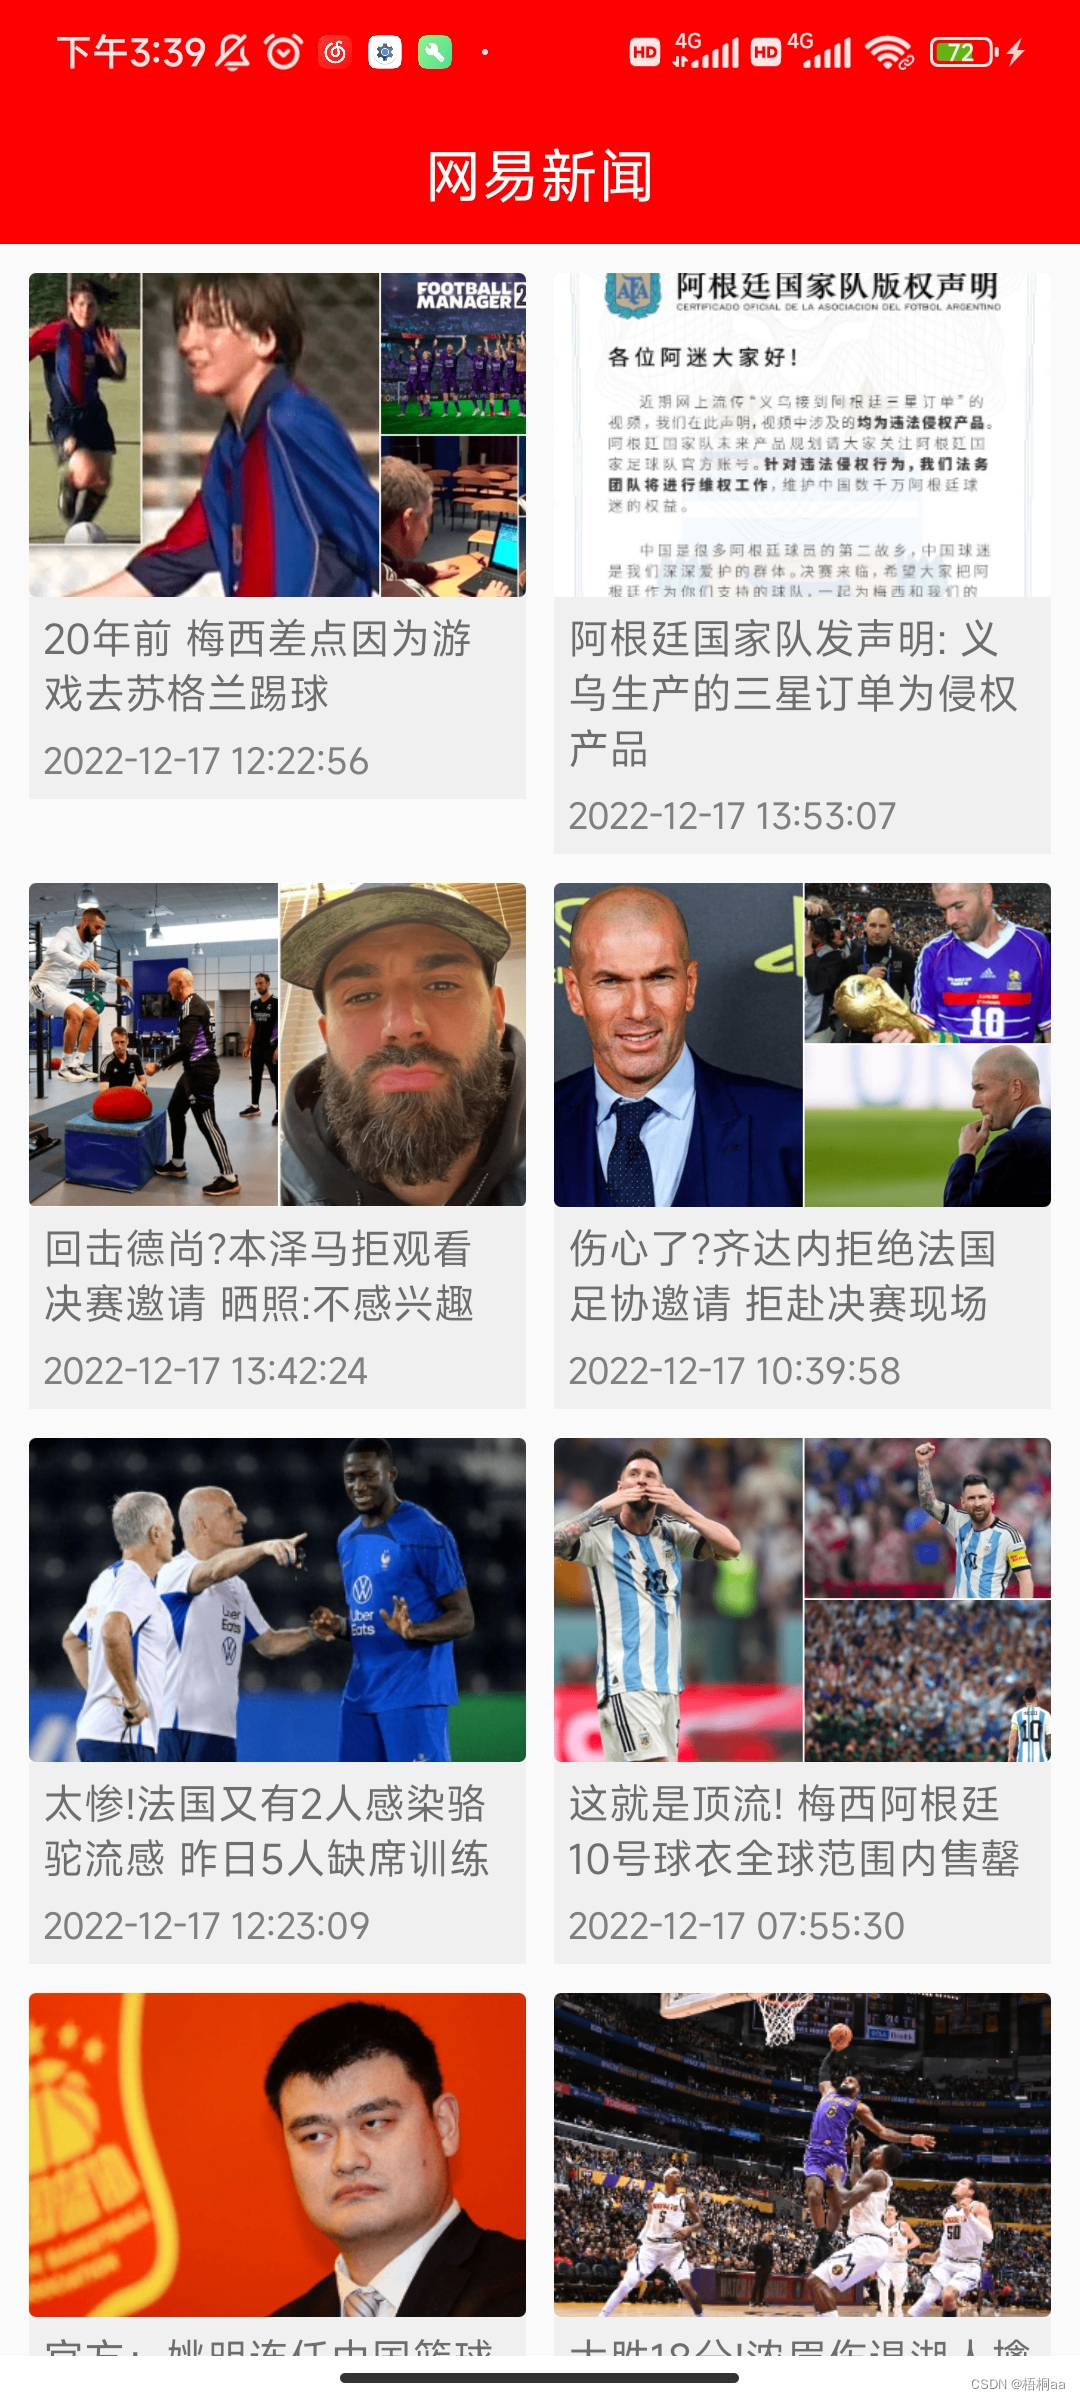
- numColumns:多列布局
import React, { Component } from 'react'
import { Text, StyleSheet, View, Dimensions, StatusBar, FlatList ,Image, ActivityIndicator} from 'react-native'

//获取屏幕大小
const{width,height}  = Dimensions.get('screen');

function rpx(p) {
  return width/750*p ;
}

export default class App extends Component {
  //网络请求的数据是变化的
  state = {result:[],refreshing:false};

  /*//保存当前页数
  page =1;

  url = 'http://c.3g.163.com/nc/article/list/T1348649079062/0-20.html';
*/
  componentDidMount(){
    // let url='http://c.m.163.com/nc/article/headline/T1348647853363/0-40.html';
    let url='http://c.3g.163.com/nc/article/list/T1348649079062/0-20.html';

  /*  let url =this.url + 1; */

    fetch(url)
    .then((res)=> res.json())
    .then((res) => {
      console.log(res);
      this.setState({result:res.T1348649079062});
    });
  }

  render() {
    return (
      <View>
        <StatusBar backgroundColor="red" />
        <Text
          style={ss.nav}> 网易新闻 </Text>
          {/**
           * onEndReached:触底时触发的方法
           * onEndReachedThreshold:触底触发的阈值,默认值0,5代表50%,未出现的UI 高度 是整个可见列表区域的50% 高度时 触发 onEndReached
           * onRefresh:下拉刷新,当前下拉刷新的动画是否呈现
           * refreshing:和onRefresh配合使用, 下拉刷新的方法
           * numColumns:多列布局
           */}
          <FlatList
            data={this.state.result}
            renderItem={this._renderItem}
            style={{marginBottom:rpx(100)}}
            keyExtractor={(item,index)=>index + ''}
            //中间加线
            // ItemSeparatorComponent={() => (
            //   <View style={{backgroundColor:'gray',height:1}} />
            // )}
            ListFooterComponent={this._ListFooterComponent}
            onEndReached={this._onEndReached}
            onEndReachedThreshold={0.1}
            onRefresh={this._onRefresh}
            refreshing={this.state.refreshing}
            numColumns={2}
            />
      </View>
    );
  }


  _onRefresh = () =>{
    //console.log('下拉刷新');
    this.setState({refreshing:false});
    /*
      this.setState({refreshing:ture});
      let url = this.url + 1;//刷新就是第一页

      fetch(url)
      .then((res) => res.json())
      .then((res) =>{
        this.setState({result:res.result,refreshing:false});
        this.page = 1;
      });
      */
  };

  _onEndReached=() => {
    alert('触底!')
    /*
    let nextPage = this.page + 1;
    let url = this.url + nextPage;

    fetch(url)
    .then((res) => res.json())
    .then((res) => {
      console.log(res);
      //将返回的数据  添加到之前的数组中
      this.setState({result:result.state.result.concat(res.result)});
      //请求成功后 更新页数
      this.page = nextPage;
    });
    */
  };
  _ListFooterComponent=() =>(
    <View style={{alignItems:'center',backgroundColor:'rgb(200,200,200)',paddingVertical:rpx(20)}}>
      <ActivityIndicator color='red' size='large'></ActivityIndicator>
      <Text style={{fontSize:30,color:'black'}}>加载中,请稍后...</Text>
    </View>
  );
  _renderItem=({item}) => {
    //间距:20px
    let box_w = rpx(750 - 20 * 3) / 2;

    return (
    <View style={{marginLeft:rpx(20),width:box_w,marginTop:rpx(20)}}>
      <Image
          source={{uri:item.imgsrc}}
          style={{
            width:box_w,
            height:rpx((130 * box_w) / 261 * 2.5),
            borderRadius:rpx(5),
          }} />
      <View
      //flex:1 父元素不要被子元素顶出去
        style={{padding:rpx(10),backgroundColor:'rgb(240,240,240)'}}>
        <Text style={{fontSize:rpx(28)}}>{item.ltitle}</Text>
        <Text style={{fontSize:rpx(25),color:'gray',marginTop:rpx(10)}}>{item.mtime}</Text>
      </View>
    </View>);
};

}


const ss = StyleSheet.create({
  nav:{fontSize:rpx(40),
    backgroundColor:'red',
    textAlign:'center',
    color:'white',
    paddingTop:rpx(40),
    paddingBottom:rpx(20)
    },
});
7.2.2、横向滚动展示
- onScroll:滚动事件,滚动视图滚动时自动触发!
- pagingEnabled:按页滚动
- horizontal:横向滚动
import React, { Component } from 'react'
import { Text, StyleSheet, View, FlatList, Dimensions,Image } from 'react-native'

const{width,height} = Dimensions.get('screen')

export default class App extends Component {

  state = {result:[]};

  componentDidMount(){
    let url='http://c.3g.163.com/nc/article/list/T1348648517839/0-20.html';

    fetch(url)
    .then((res) => res.json())
    .then((res) => {
      console.log(res);
      this.setState({result:res.T1348648517839});

      // 定时器在创建之后,不用的时候需要销毁;否则会狼垡欸系统资源

      //请求完毕后,需要启动定时器 --每2.5s滚动到下一张图

      //js语法:属性a=6; 变量不存在时会自动创建
      ths.timer = setInterval(() => {
        let nextP = this.curP + 1;

        //判断如果最后一张,则跳转回到第一张
        if (nextP == this.state.result.length) nextP = 0;

        //需要一个变量 关联到 滚动视图, 然后通过变量来操作滚动视图!
        //current:代表变量当前绑定的组件
        this.fl.current.scrollToIndex({index:nextP});
        //bug: 滚动特别快,如果开启debug模式  可能导致图片滚动特别快!此时关闭debug模式即可!

      },2500);
    });

  }

  //卸载周期
  componnentWillUnmount(){
    //清理定时器!
    clearInterval(this.timer);
  }

  //变量  关联  组件 的固定写法
  fl = React.createRef();

  render() {
    return (
      <View>
        {/**
         * horizontal:横向滚动
         * pagingEnabled:按页滚动
         * onScroll:滚动事件,滚动视图滚动时自动触发!
         * ref:固定属性,用于关联变量
         */}
        <FlatList
          ref={this.fl}
          data={this.state.result}
          keyExtractor={(item,index) => index +''}
          renderItem={this._renderItem}
          horizontal
          pagingEnabled
          onScroll={this._onScroll}
        />
      </View>
    );
  }

  _onScroll=(event) => {
    {/**
     *RN事件传参  不是 DOM 的默认事件,而是 RN 自己提供的独特同步事件
     *RN事件:传入之后就会自动把所有信息改为null,无法打印查看
     *要想打印查看事件中的值,则必须使用 event.persist()
     */}
    // event.persist();
    // console.log(event);

    let x = event.nativeEvent.contentOffset.x;//横向偏移量
    let w = event.nativeEvent.layoutMeasurement.width; //每个子视图的宽度

    this.curP = Math.round(x/w);
    console.log(this.curP);
  };

  _renderItem=({item}) => (
    <Image source={{uri:item.imgsrc}} style={{width,height:height-20}} />
  );

};

const styles = StyleSheet.create({})
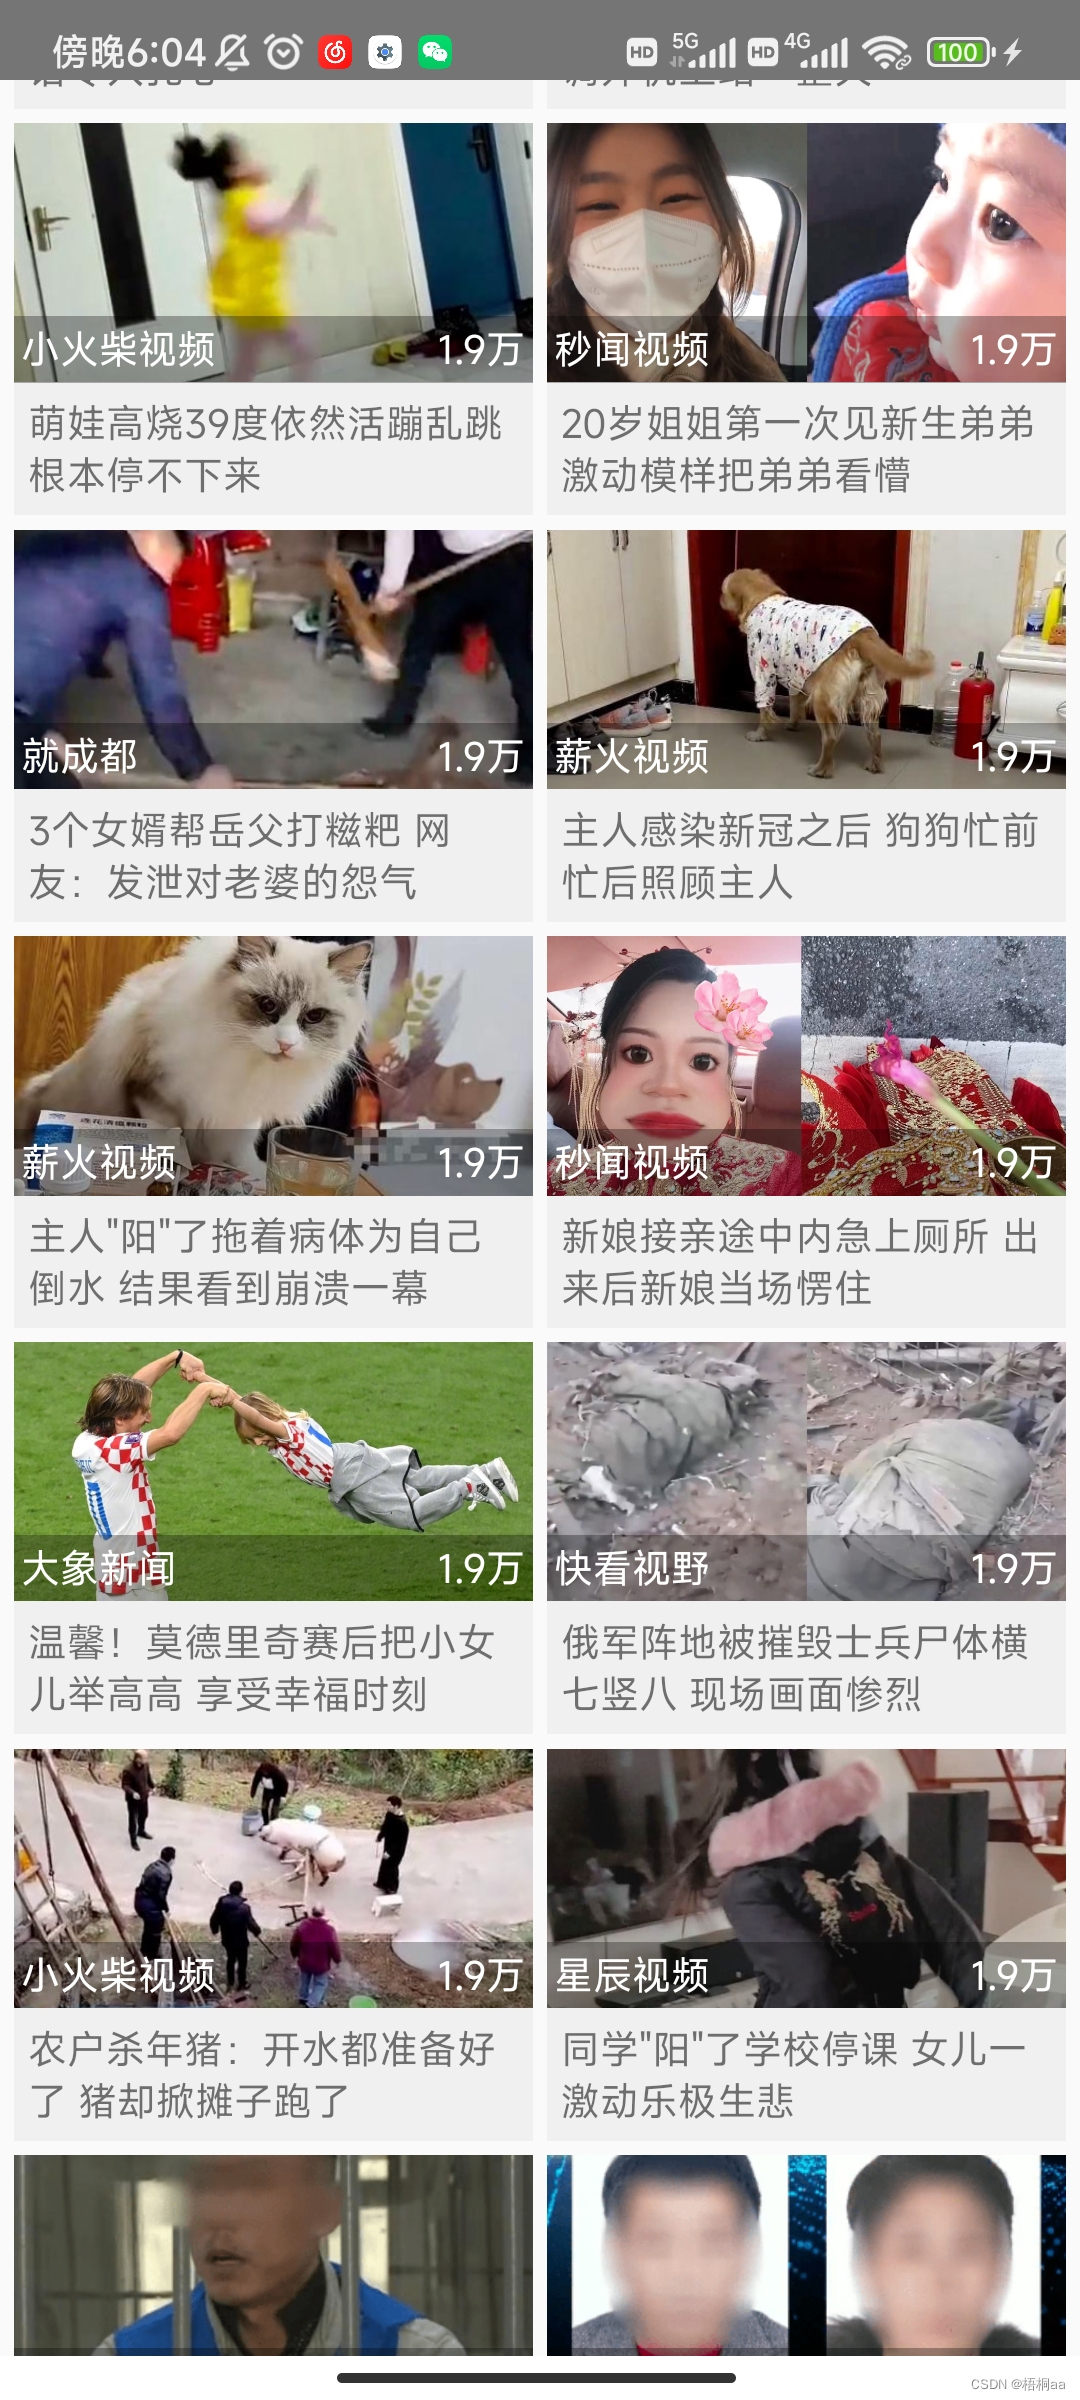
7.2.3、小练习
import React, { Component } from 'react'
import { Text, StyleSheet, View, FlatList, Dimensions,Image, ActivityIndicator } from 'react-native'

const{width,height} = Dimensions.get('screen')

function rpx(p) {
  return (width / 750) * p;
}

export default class App extends Component {
  state={data:[],refreshing:false}

  // 分页接口有不同策略
  //1、页数方式 xxx?page=1&count=6  --服务器负责页数逻辑
  //2、偏移量方式 xxx?limit=20&offset=偏移量  limit代表数量   offset 代表从序号开始
  url = 'http://c.m.163.com/nc/article/headline/T1348647853363/0-40.html  '
  componentDidMount(){
    let url = 'http://c.m.163.com/nc/article/headline/T1348647853363/0-40.html  ';
    // let url = 'http://c.m.163.com/nc/video/detail/VC3PL396B.html  ';
    fetch(url)
    .then((res) => res.json())
    .then((res) => {
      console.log(res);
     this.setState({data:res.T1348647853363})
    });
  };

  render() {
    return (
      <FlatList
        data={this.state.data}
        keyExtractor={(item,index) => index + '' }
        numColumns={2}
        renderItem = {this._renderItem}
        onEndReached={this._onEndReached}
        onEndReachedThreshold={0.1}
        ListFooterComponent={this._ListFooterComponent}
        refreshing={this.state.refreshing}
        onRefresh={this._onRefresh}
      >
      </FlatList>
    );
  }


  _onRefresh= ()=>{
      this.setState({refreshing:true});

      let url = this.url + 0

      fetch(url)
      .then((res) => res.json())
      .then((res) => {
        this.setState({data:res.data,refreshing:flase});
      });
  };

  _ListFooterComponent=() => {
    return(
      <View style={{paddingVertical:rpx(10),alignItems:'center'}}>
        <ActivityIndicator color='blue' size="large" />
        <Text style={{fontSize:rpx(30),color:'gray'}}>加载中...</Text>
      </View>
    );
  };


  _onEndReache=() => {
    //偏移量:就是当前已有元素
    let url= this.url + this.state.data.length

    fetch(url)
    .then((res) => res.json())
    .then((res) => {
      console.log(res);
      this.setState({data:this.state.data.concat(res.data)})
    });

  }


  _renderItem = ({item}) =>{

    let daynum = item.daynum;

    if(daynum >= 10000) {
      daynum /= 10000;
      //保留一位小数
      daynum = daynum.toFixed(1);
      daynum += "万";
    }

    //图片比例:1014:507

    //间隔10px
    let box_w = rpx(750-10*3)/2;

    return(
      <View
        style={{
          width:box_w,
          marginLeft:rpx(10),
          marginTop:rpx(10),
          backgroundColor:'rgb(240,240,240)',
          }}>
        <View>
          <Image
            source={{uri:item.imgsrc}}
            style={{width:box_w,height:(507 * box_w) / 1014}} />
          <View
            style={{
              backgroundColor:'rgba(0,0,0,0.3)',
              flexDirection:'row',
              justifyContent:'space-between',
              position:'absolute',
              left:0,
              right:0,
              bottom:0,
              padding:rpx(5),
              }}>
            <Text style={{color:'white'}}>{item.source}</Text>
            <Text style={{color:'white'}}>{daynum}</Text>
          </View>
        </View>
        <Text style={{margin:rpx(10)}}>{item.title}</Text>
    </View>
    )
  }


}

const styles = StyleSheet.create({})
八、路由组件
8.1、搭建带有路由的项目包
- 在React Native 项目中安装所需要的软件包:
npm install @react-navigation/native - 将依赖项安装到一个裸React Native 项目中:
npm install react-native-gesture-handler react-native-screens - 导航器分三种:
1)栈式导航
2)标签栏导航
3)侧边栏导航 - 安装堆栈导航器库:
npm install @react-navigation/stack
问题:
(1)、 Unable to resolve module @react-navigation/stack
解决办法:npm install @react-navigation/native-stack/yarn add @react-navigation/stack
(2)、Unable to resolve module react-native-safe-area-context
解决办法:1、npm install --save react-navigation 2、 npm install --save react-native-gesture-handler
(3)、requireNativeComponent: “RNSScreen” was not found in the UIManager
解决办法:npm install react-native-gesture-handler react-native-screens
(4)、RNCSafeAreaProvider" was not found in the UIManager
解决办法:yarn add react-native-safe-area-view react-native-safe-area-context
