目录
Spring Boot与缓存
什么是cache
cache 是一个高性能的分布式内存对象缓存系统,用于动态Web应用以减轻数据库负载。它通过在内存中缓存数据和对象来减少读取数据库的次数,从而提供动态、数据库驱动网站的速度。
java cache:JSR107
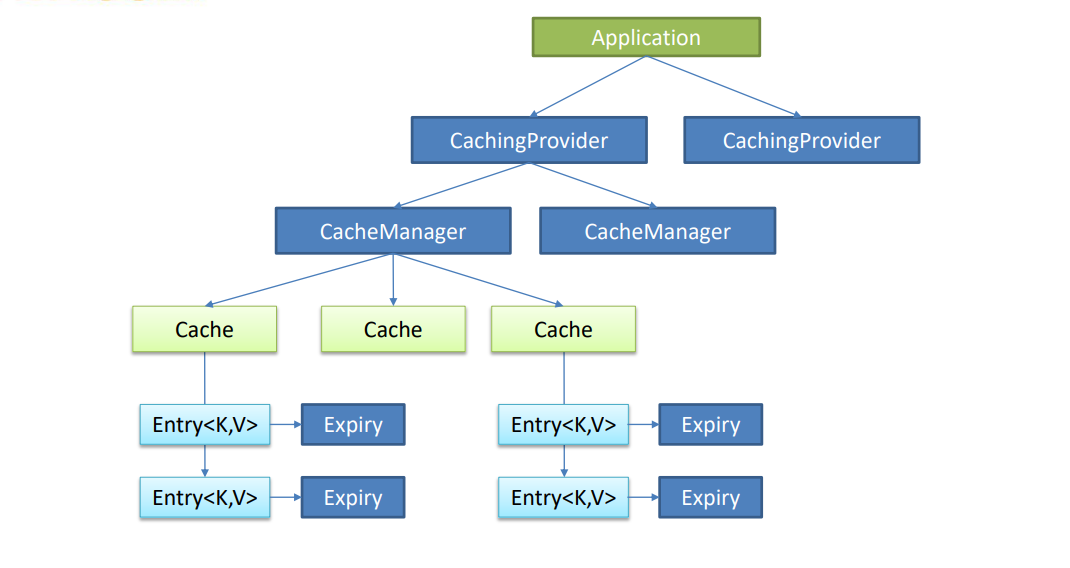
Java Caching定义了5个核心接口,分别是CachingProvider, CacheManager, Cache, Entry 和 Expiry。
- CachingProvider:定义了创建、配置、获取、管理和控制多个CacheManager。一个应用可以在运行期访问多个CachingProvider。
- CacheManager:定义了创建、配置、获取、管理和控制多个唯一命名的Cache,这些Cache存在于CacheManager的上下文中。一个CacheManager仅被一个CachingProvider所拥有。
- Cache:是一个类似Map的数据结构并临时存储以Key为索引的值。一个Cache仅被一个CacheManager所拥有。
- Entry:是一个存储在Cache中的key-value对。
- Expiry:每一个存储在Cache中的条目有一个定义的有效期,即Expiry Duration。一旦超过这个时间,条目为过期的状态。一旦过期,条目将不可访问、更新和删除。缓存有效期可以通过ExpiryPolicy设置。
Spring缓存抽象
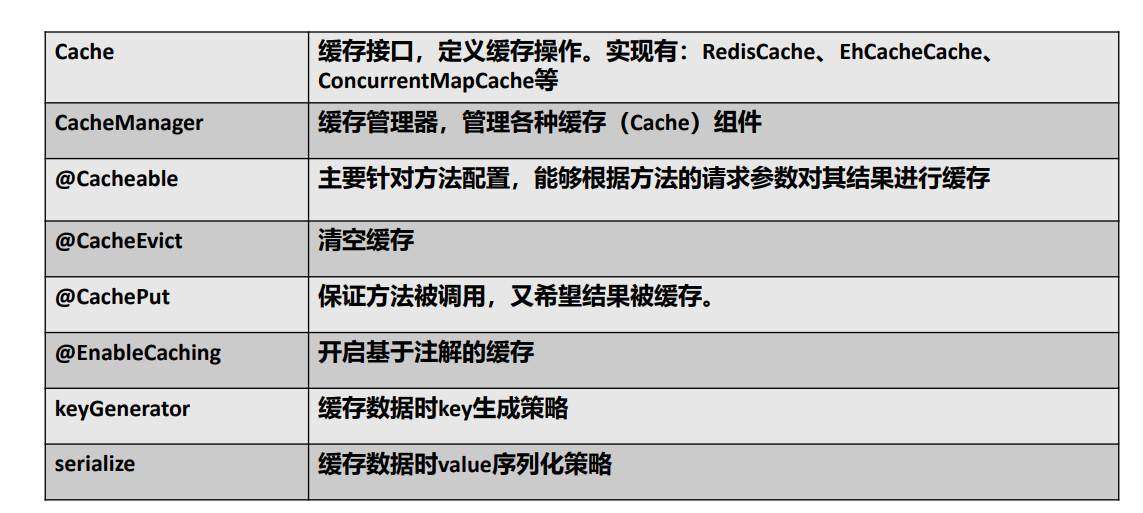
Spring从3.1开始定义了org.springframework.cache.Cache 和org.springframework.cache.CacheManager接口来统一不同的缓存技术; 并支持使用JCache(JSR-107)注解简化我们开发;
1. 几个重要概念&缓存注解
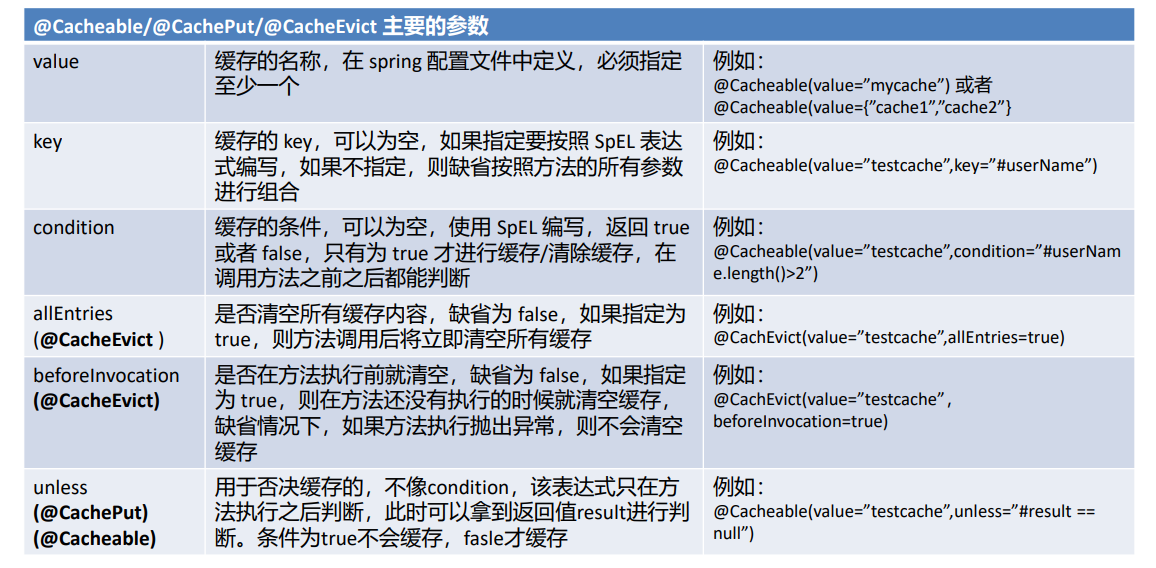
2. 在上面常用的三个注解:@Cacheable、@CachePut、@CacheEvict中,主要有以下的参数可以将要缓存的数据进行过滤和配置。主要参数如下:
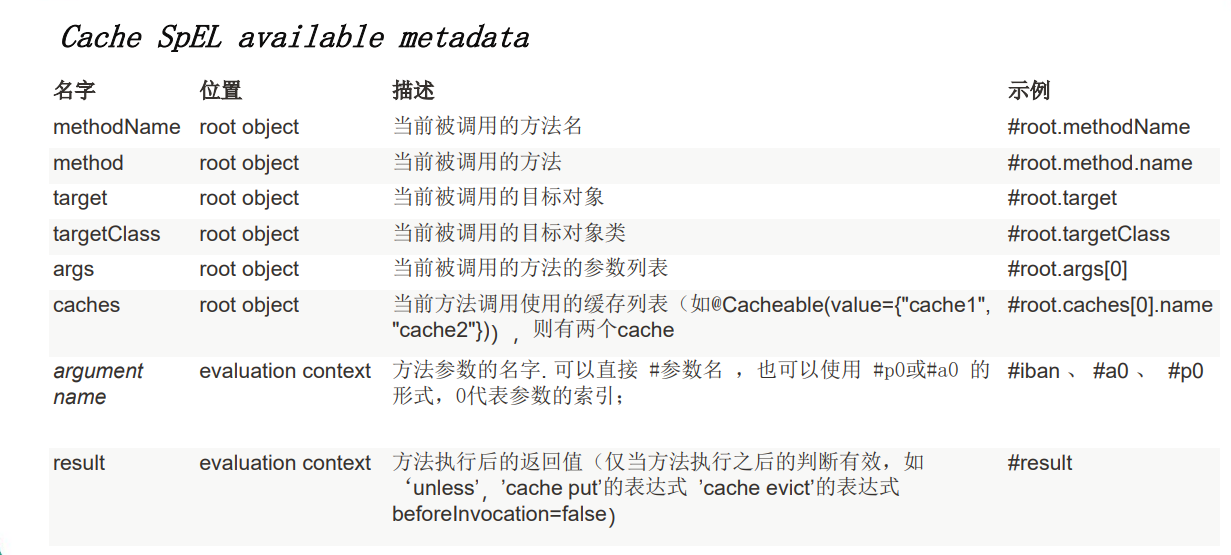
3. 在以上的参数:key、condition、unless中,除了可以使用字符串进行配置,也可以使用SpEL表达式进行动态的配置。主要SpEL表达式介绍如下:
redis和cache的使用场景和区别
- 存储方式:cache 把数据全部存在内存之中,断电后会挂掉,数据不能超过内存大小 ;redis有部分存在硬盘上,这样能保证数据的持久性,支持数据的持久化。cache挂掉后,数据不可恢复; redis数据丢失后可以通过aof恢复 。
- 数据支持类型:Redis和cache都是将数据存放在内存中,cache只支持<key,value>型数据,不过cache还可用于缓存其他东西,例如图片、视频等等;Redis不仅仅支持简单的k/v类型的数据,同时还提供list,set,hash等数据结构的存储。
- 可靠性上:Cache不支持数据持久化,断电或重启后数据消失,但其稳定性是有保证的。Redis支持数据持久化和数据恢复,允许单点故障,但是同时也会付出性能的代价。
- 应用场景: Cache:动态系统中减轻数据库负载,提升性能;做缓存,适合多读少写,大数据量的情况(如人人网大量查询用户信息、好友信息、文章信息等)。Redis:适用于对读写效率要求都很高,数据处理业务复杂和对安全性要求较高的系统(如新浪微博的计数和微博发布部分系统,对数据安全性、读写要求都很高)。
SpringBoot缓存的使用
在真实的开发中,cache缓存的使用一般也会整合Redis一起使用;当然也可以不整合Redis,直接使用Cache,两者操作的区别是:只引入’spring-boot-starter-cache’模块,不要引入’spring-boot-starter-data-redis’模块。然后使用@EnableCaching开启缓存,直接使用使用缓存注解就可以实现缓存了,其缓存的value是该注解下方法的返回结果,key如果不进行配置的话默认是方法名。
下面就来实现SpringBoot 整合redis实现缓存:
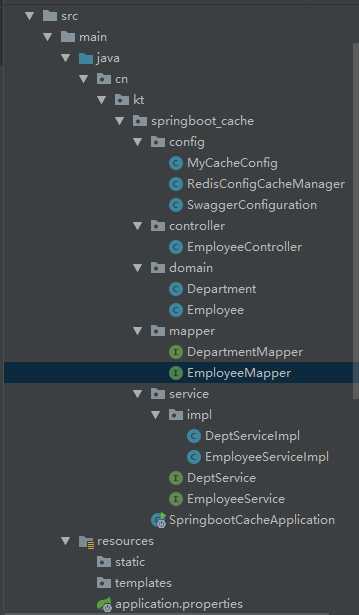
目录结构如下:
0. 开启缓存的注解:@EnableCaching
在项目启动类中:
package cn.kt.springboot_cache;

import org.mybatis.spring.annotation.MapperScan;
import org.springframework.boot.SpringApplication;
import org.springframework.boot.autoconfigure.SpringBootApplication;
import org.springframework.cache.annotation.EnableCaching;

@MapperScan("cn.kt.springboot_cache.mapper")
@EnableCaching
@SpringBootApplication
public class SpringbootCacheApplication {

    public static void main(String[] args) {
        SpringApplication.run(SpringbootCacheApplication.class, args);
    }
}
1. 导入数据库文件
本次使用的数据库是:springboot_cache
创建了两个表:
DROP TABLE IF EXISTS `department`;
CREATE TABLE `department`  (
  `id` int(11) NOT NULL AUTO_INCREMENT,
  `departmentName` varchar(255) CHARACTER SET utf8 COLLATE utf8_general_ci NULL DEFAULT NULL,
  PRIMARY KEY (`id`) USING BTREE
) ENGINE = InnoDB AUTO_INCREMENT = 4 CHARACTER SET = utf8 COLLATE = utf8_general_ci ROW_FORMAT = Dynamic;

INSERT INTO `department` VALUES (1, '软件部');
INSERT INTO `department` VALUES (2, '产品部');
INSERT INTO `department` VALUES (3, '测试部门');

DROP TABLE IF EXISTS `employee`;
CREATE TABLE `employee`  (
  `id` int(11) NOT NULL AUTO_INCREMENT,
  `lastName` varchar(255) CHARACTER SET utf8 COLLATE utf8_general_ci NULL DEFAULT NULL,
  `email` varchar(255) CHARACTER SET utf8 COLLATE utf8_general_ci NULL DEFAULT NULL,
  `gender` varchar(255) CHARACTER SET utf8 COLLATE utf8_general_ci NULL DEFAULT NULL,
  `d_id` int(11) NULL DEFAULT NULL,
  PRIMARY KEY (`id`) USING BTREE
) ENGINE = InnoDB AUTO_INCREMENT = 5 CHARACTER SET = utf8 COLLATE = utf8_general_ci ROW_FORMAT = Dynamic;

INSERT INTO `employee` VALUES (1, 'Nick', '[email protected]', '男', 1);
INSERT INTO `employee` VALUES (2, '路飞', '[email protected]', '男', 1);
INSERT INTO `employee` VALUES (4, 'lufei', NULL, NULL, NULL);
2. 导入依赖
 <dependencies>
        <dependency>
            <groupId>org.springframework.boot</groupId>
            <artifactId>spring-boot-starter-web</artifactId>
        </dependency>
        <dependency>
            <groupId>org.mybatis.spring.boot</groupId>
            <artifactId>mybatis-spring-boot-starter</artifactId>
            <version>2.1.4</version>
        </dependency>

        <dependency>
            <groupId>org.springframework.boot</groupId>
            <artifactId>spring-boot-starter-cache</artifactId>
        </dependency>
        <dependency>
            <groupId>org.springframework.boot</groupId>
            <artifactId>spring-boot-starter-data-redis</artifactId>
        </dependency>
        <dependency>
            <groupId>mysql</groupId>
            <artifactId>mysql-connector-java</artifactId>
            <version>5.1.6</version>
        </dependency>
        <dependency>
            <groupId>org.projectlombok</groupId>
            <artifactId>lombok</artifactId>
            <optional>true</optional>
        </dependency>
        <dependency>
            <groupId>org.springframework.boot</groupId>
            <artifactId>spring-boot-starter-test</artifactId>
            <scope>test</scope>
            <exclusions>
                <exclusion>
                    <groupId>org.junit.vintage</groupId>
                    <artifactId>junit-vintage-engine</artifactId>
                </exclusion>
            </exclusions>
        </dependency>
        <dependency>
            <groupId>junit</groupId>
            <artifactId>junit</artifactId>
            <scope>test</scope>
        </dependency>
        <dependency>
            <groupId>org.apache.commons</groupId>
            <artifactId>commons-lang3</artifactId>
            <version>3.8.1</version>
        </dependency>
    </dependencies>
3. 编写配置文件
# 数据库驱动:
spring.datasource.driver-class-name=com.mysql.jdbc.Driver
# 数据库连接地址
spring.datasource.url=jdbc:mysql://localhost:3306/springboot_cache?useUnicode=true&characterEncoding=utf8
# 数据库用户名&密码:
spring.datasource.username=root
spring.datasource.password=123456
# mybatis需要开启驼峰命名匹配规则
mybatis.configuration.map-underscore-to-camel-case=true
logging.level.cn.kt.springboot_cache.mapper=debug


# Redis数据库索引(默认为0)
spring.redis.database=0
# Redis服务器地址
spring.redis.host=127.0.0.1
# Redis服务器连接端口
spring.redis.port=6379
# Redis服务器连接密码(默认为空)
spring.redis.password=
# 连接超时时间(毫秒)
spring.redis.timeout=5000ms
4. 创建javaBean封装类
Department.java
public class Department implements Serializable {

    private Integer id;
    private String departmentName;
	/* 省略get、set、构造方法 */
}
Employee.java
public class Employee implements Serializable {

    private Integer id;
    private String lastName;
    private String email;
    private String gender; //性别 1男  0女
    private Integer dId;
	/* 省略get、set、构造方法 */
5. 编写dao层
本次实践是使用了mybatis,采用简单的注解做持久层
EmployeeMapper.java
package cn.kt.springboot_cache.mapper;

import cn.kt.springboot_cache.domain.Employee;
import org.apache.ibatis.annotations.*;

/**
 * @author tao
 * @date 2021-09-01 7:48
 * 概要:
 */
@Mapper
public interface EmployeeMapper {

    @Select("SELECT * FROM employee WHERE id = #{id}")
    public Employee getEmpById(Integer id);

    @Update("UPDATE employee SET lastName=#{lastName},email=#{email},gender=#{gender},d_id=#{dId} WHERE id=#{id}")
    public void updateEmp(Employee employee);

    @Delete("DELETE FROM employee WHERE id=#{id}")
    public void deleteEmpById(Integer id);

    @Insert("INSERT INTO employee(lastName,email,gender,d_id) VALUES(#{lastName},#{email},#{gender},#{dId})")
    public void insertEmployee(Employee employee);

    @Select("SELECT * FROM employee WHERE lastName = #{lastName}")
    Employee getEmpByLastName(String lastName);
}
6. 编写service层
Service接口
EmployeeService.java
package cn.kt.springboot_cache.service;

import cn.kt.springboot_cache.domain.Employee;

/**
 * @author tao
 * @date 2021-09-20 10:08
 * 概要:
 */
public interface EmployeeService {
    Employee getEmp(Integer id);

    Employee updateEmp(Employee employee);

    void deleteEmp(Integer id);

    Employee getEmpByLastName(String lastName);
}
Service实现类
EmployeeServiceImpl.java
package cn.kt.springboot_cache.service.impl;

import cn.kt.springboot_cache.domain.Employee;
import cn.kt.springboot_cache.mapper.EmployeeMapper;
import cn.kt.springboot_cache.service.EmployeeService;
import org.springframework.beans.factory.annotation.Autowired;
import org.springframework.cache.annotation.CacheEvict;
import org.springframework.cache.annotation.CachePut;
import org.springframework.cache.annotation.Cacheable;
import org.springframework.cache.annotation.Caching;
import org.springframework.stereotype.Service;

/**
 * @author tao
 * @date 2021-09-20 10:23
 * 概要:
 */
@Service
public class EmployeeServiceImpl implements EmployeeService {
    @Autowired
    EmployeeMapper employeeMapper;

    /**
     * 将方法的运行结果进行缓存;以后再要相同的数据,直接从缓存中获取,不用调用方法;
     * CacheManager管理多个Cache组件的,对缓存的真正CRUD操作在Cache组件中,每一个缓存组件有自己唯一一个名字;
     *
     * @param id
     * @return
     */
    //key = "#id+#root.methodName+#root.caches[0].name",
    //@Cacheable(cacheNames = {"emp"}, keyGenerator = "myKeyGenerator", condition = "#a0>1")
    @Cacheable(cacheNames = {"emp"}, key = "#id", condition = "#a0>1")
    public Employee getEmp(Integer id) {
        System.out.println("查询" + id + "号员工");
        Employee emp = employeeMapper.getEmpById(id);
        return emp;
    }

    //更新的key和缓存中的key要相同
    @CachePut(cacheNames = {"emp"}, key = "#result.id")
    public Employee updateEmp(Employee employee) {
        System.out.println("updateEmp:" + employee);
        employeeMapper.updateEmp(employee);
        return employee;
    }

    @CacheEvict(value = "emp", key = "#id"/*beforeInvocation = true*/)
    public void deleteEmp(Integer id) {
        System.out.println("deleteEmp:" + id);
        employeeMapper.deleteEmpById(id);
        //int i = 10/0;
    }

    // @Caching 定义复杂的缓存规则
    @Caching(
            // 定义了三个缓存规则,进行缓存了三次:分别根据lastName、返回结果id、返回结果email为key进行缓存
            cacheable = {
                    @Cacheable(value = "emp", key = "#lastName")
            },
            put = {
                    @CachePut(value = "emp", key = "#result.id"),
                    @CachePut(value = "emp", key = "#result.email")
            }
    )
    public Employee getEmpByLastName(String lastName) {
        return employeeMapper.getEmpByLastName(lastName);
    }
}
7. 编写控制层
EmployeeController.java
package cn.kt.springboot_cache.controller;

import cn.kt.springboot_cache.domain.Employee;
import cn.kt.springboot_cache.service.EmployeeService;
import org.springframework.beans.factory.annotation.Autowired;
import org.springframework.web.bind.annotation.GetMapping;
import org.springframework.web.bind.annotation.PathVariable;
import org.springframework.web.bind.annotation.RestController;

/**
 * @author tao
 * @date 2021-09-20 10:26
 * 概要:
 */

@RestController
public class EmployeeController {

    @Autowired
    private EmployeeService employeeService;

    @GetMapping("/emp/{id}")
    public Employee getEmployee(@PathVariable("id") Integer id) {
        Employee emp = employeeService.getEmp(id);
        return emp;
    }

    @GetMapping("/emp")
    public Employee update(Employee employee) {
        Employee emp = employeeService.updateEmp(employee);

        return emp;
    }

    @GetMapping("/delemp")
    public String deleteEmp(Integer id) {
        employeeService.deleteEmp(id);
        return "success";
    }

    @GetMapping("/emp/lastname/{lastName}")
    public Employee getEmpByLastName(@PathVariable("lastName") String lastName) {
        return employeeService.getEmpByLastName(lastName);
    }
}
8. 编写MyCacheConfig配置类(可选)
在该配置类中。主要对Cache进行一些配置,如配置keyGenerator,当然这个可以使用key进行代替。
@Configuration
public class MyCacheConfig {

    @Bean("myKeyGenerator")
    public KeyGenerator keyGenerator() {
        return new KeyGenerator() {

            @Override
            public Object generate(Object target, Method method, Object... params) {
                return method.getName() + "[" + Arrays.asList(params).toString() + "]";
            }
        };
    }
}
测试结果
在上面的demo中,定义了简单的CRUD,并且使用了Cache的常用注解,可以通过get请求直接进行测试。
-
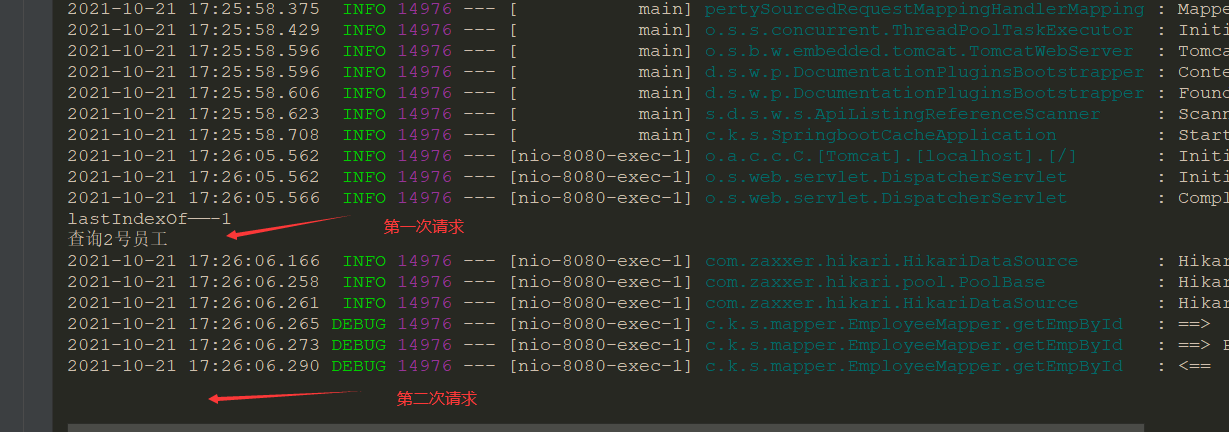
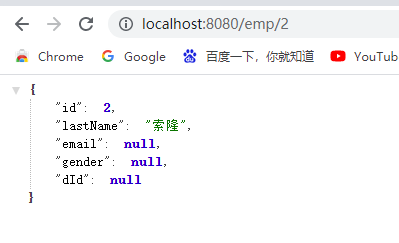
请求两次:http://localhost:8080/emp/2
发现第二次请求并没有执行dao层的方法体,但数据仍然查出来了
原因是先查询了缓存 -
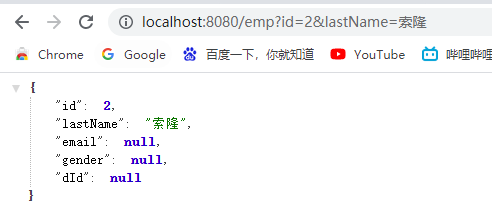
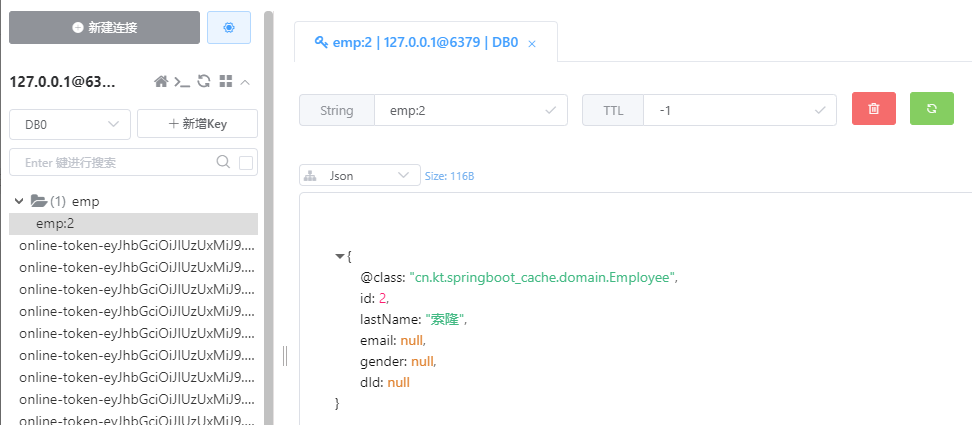
执行CacheEvict的更新请求:http://localhost:8080/emp?id=2&lastName=索隆
@CachePut:既调用方法,又更新缓存数据;同步更新缓存
再执行:http://localhost:8080/emp/2
发现修改了数据库,和更新了缓存,再次查询并不会执行查询的dao层的方法体 -
执行删除操作:http://localhost:8080/delemp?id=2
@CacheEvict:缓存清除
发现缓存数据已经清除 -
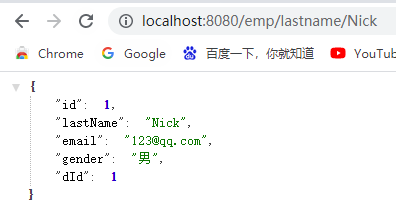
测试@Caching 定义复杂的缓存规则:http://localhost:8080/emp/lastname/Nick
由于再实现类中定义了三个缓存规则,进行缓存了三次:分别根据lastName、返回结果id、返回结果email为key进行缓存
Cache根据配置的规则缓存了三次
整合redis注解缓存并设置时间
查阅了相关资料,Cache注解中并没有提供想Redis一样设置缓存过期时间的方法,但这个功能再开发中又相对的很重要,因此整理出了下面的一种方法:通过全部配置RedisCacheManager,再查询时进行过滤判断,在缓存存入Redis时进行过期时间的配置。
这种形式使用是将 cacheName后加#可以区分时间
操作方法如下:
- 新建配置类RedisConfigCacheManager.java
package cn.kt.springboot_cache.config;

import org.apache.commons.lang3.StringUtils;
import org.springframework.data.redis.cache.*;
import org.springframework.data.redis.serializer.GenericJackson2JsonRedisSerializer;
import org.springframework.data.redis.serializer.RedisSerializationContext;

import java.time.Duration;
import java.util.Map;

/**
 * Created by tao.
 * Date: 2021/10/21 15:21
 * 描述:
 */


public class RedisConfigCacheManager extends RedisCacheManager {


    public RedisConfigCacheManager(RedisCacheWriter cacheWriter, RedisCacheConfiguration defaultCacheConfiguration) {
        super(cacheWriter, defaultCacheConfiguration);
    }

    public RedisConfigCacheManager(RedisCacheWriter cacheWriter, RedisCacheConfiguration defaultCacheConfiguration, String... initialCacheNames) {
        super(cacheWriter, defaultCacheConfiguration, initialCacheNames);
    }

    public RedisConfigCacheManager(RedisCacheWriter cacheWriter, RedisCacheConfiguration defaultCacheConfiguration, boolean allowInFlightCacheCreation, String... initialCacheNames) {
        super(cacheWriter, defaultCacheConfiguration, allowInFlightCacheCreation, initialCacheNames);
    }

    public RedisConfigCacheManager(RedisCacheWriter cacheWriter, RedisCacheConfiguration defaultCacheConfiguration, Map<String, RedisCacheConfiguration> initialCacheConfigurations) {
        super(cacheWriter, defaultCacheConfiguration, initialCacheConfigurations);
    }

    public RedisConfigCacheManager(RedisCacheWriter cacheWriter, RedisCacheConfiguration defaultCacheConfiguration, Map<String, RedisCacheConfiguration> initialCacheConfigurations, boolean allowInFlightCacheCreation) {
        super(cacheWriter, defaultCacheConfiguration, initialCacheConfigurations, allowInFlightCacheCreation);
    }

    private static final RedisSerializationContext.SerializationPair<Object> DEFAULT_PAIR = RedisSerializationContext.SerializationPair
            .fromSerializer(new GenericJackson2JsonRedisSerializer());

    private static final CacheKeyPrefix DEFAULT_CACHE_KEY_PREFIX = cacheName -> cacheName + ":";

    @Override
    protected RedisCache createRedisCache(String name, RedisCacheConfiguration cacheConfig) {
        final int lastIndexOf = StringUtils.lastIndexOf(name, '#');
        System.out.println("lastIndexOf——" + lastIndexOf);
        if (lastIndexOf > -1) {
            final String ttl = StringUtils.substring(name, lastIndexOf + 1);
            final Duration duration = Duration.ofSeconds(Long.parseLong(ttl));
            cacheConfig = cacheConfig.entryTtl(duration);
            //修改缓存key和value值的序列化方式
            cacheConfig = cacheConfig.computePrefixWith(DEFAULT_CACHE_KEY_PREFIX)
                    .serializeValuesWith(DEFAULT_PAIR);
            final String cacheName = StringUtils.substring(name, 0, lastIndexOf);
            return super.createRedisCache(cacheName, cacheConfig);
        } else {
            final Duration duration = Duration.ofSeconds(-1);
            cacheConfig = cacheConfig.entryTtl(duration);
            //修改缓存key和value值的序列化方式
            cacheConfig = cacheConfig.computePrefixWith(DEFAULT_CACHE_KEY_PREFIX)
                    .serializeValuesWith(DEFAULT_PAIR);
            final String cacheName = StringUtils.substring(name, 0);
            return super.createRedisCache(cacheName, cacheConfig);
        }
    }
}
- 在上述可选的MyCacheConfig配置类中加入以下方法
/*redis配置类*/
    @Bean
    @Primary
    public RedisCacheManager redisCacheManager(RedisConnectionFactory factory) {
        ObjectMapper om = new ObjectMapper();
        RedisSerializer<String> redisSerializer = new StringRedisSerializer();
        Jackson2JsonRedisSerializer<Object> jackson2JsonRedisSerializer = new Jackson2JsonRedisSerializer<>(
                Object.class);
        // 解决查询缓存转换异常的问题
        om.setVisibility(PropertyAccessor.ALL, JsonAutoDetect.Visibility.ANY);
        om.enableDefaultTyping(ObjectMapper.DefaultTyping.NON_FINAL);
        jackson2JsonRedisSerializer.setObjectMapper(om);
        // 配置序列化(解决乱码的问题)
        RedisCacheConfiguration config = RedisCacheConfiguration.defaultCacheConfig()
                .entryTtl(Duration.ofMillis(-1))
                .serializeKeysWith(RedisSerializationContext.SerializationPair.fromSerializer(redisSerializer))
                .serializeValuesWith(RedisSerializationContext.SerializationPair.fromSerializer(jackson2JsonRedisSerializer))
                .disableCachingNullValues();
        RedisCacheWriter cacheWriter = RedisCacheWriter.nonLockingRedisCacheWriter(factory);

        /*return RedisConfigCacheManager.builder(factory)
//                .withInitialCacheConfigurations()
                .transactionAware()
                .build();*/
        return new RedisConfigCacheManager(cacheWriter, config);
}
参考文章:https://www.cnblogs.com/mrsans/articles/14113591.html
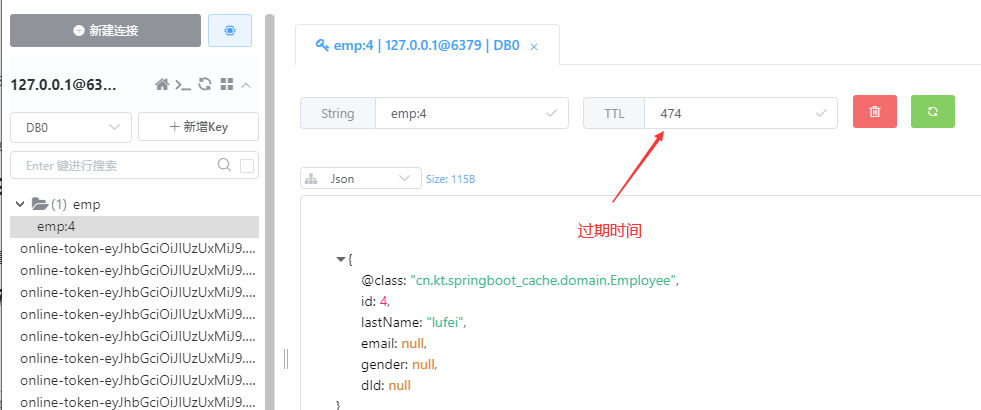
通过以上配置,即可以自定义的配置缓存的过期时间,单位秒
如何配置过期时间呢?
在cacheNames 缓存名后面加上 ”#过期时间“
@Cacheable(cacheNames = {“emp#500”}, key = “#id”, condition = “#a0>1”)
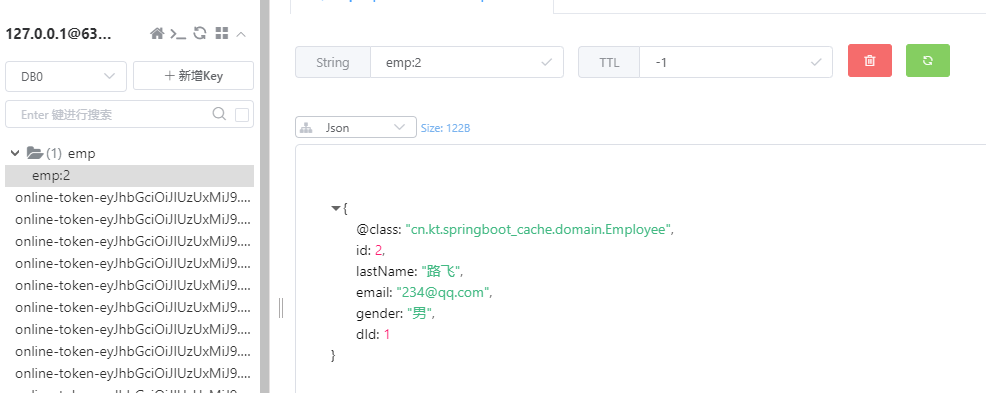
结果如下:
