什么是流?
Node.js诞生之初就是为了提高IO性能,其中
文件操作系统和网络模块实现了流接口。Node.js中的Stream就是处理流式数据的抽象接口。
应用程序为什么使用流来处理数据?
常见问题
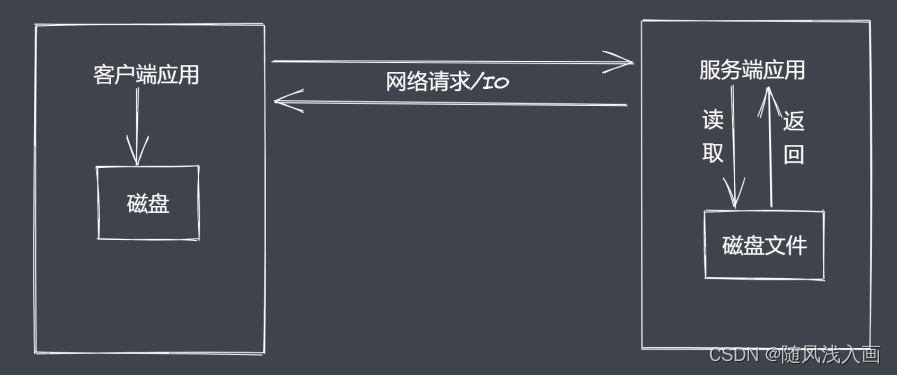
- 同步读取资源文件,用户需要等待数据读取完成
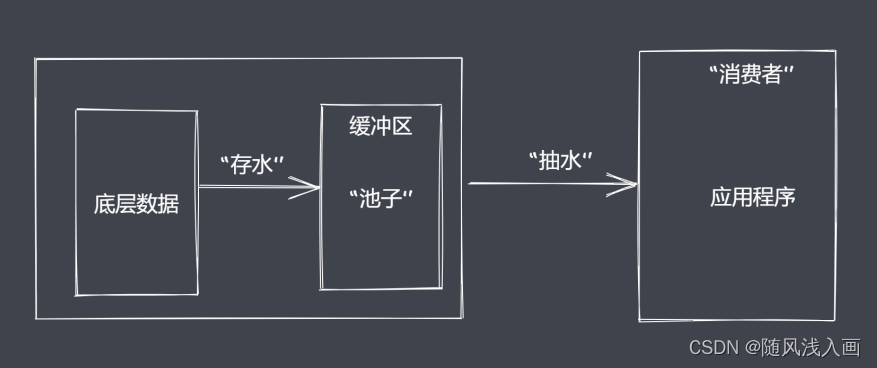
- 资源文件最终一次性加载至内存,开销较大.node底层采用的v8引擎 ,默认情况下v8提供的内存大小也就1个G多一点。因此可以采用流来操作数据。如下图所示,我们可以将资源文件像水一样一点一点抽到池子里缓存,然后再选择需要的方式来抽干尺子里的水,这样用户就能够分段的看到资源里的内容,同时对内存的开销也友好了很大多。
- 除了数据的分段传输和内存减少使用之外,流操作还能配合管道对分段的数据进行需求加工。比如原始数据是字符串,我们可以利用管道将它传给能够实现数据转换为buffer的单元,还可传给执行压缩操作的单元,只要类型支持语法正常,就可以一直往后去处理,回到最终来使用数据。
流处理数据的优势
- 时间效率: 流的
分段处理可以同时操作多个数据chunk - 空间效率: 同一时间流无须占据大
内存空间 - 使用方便: 流配合
管道,扩展程序变得简单
Node.js中的四种流
- Readable:
可读流,能够实现数据的读取 - Writeeale:
可写流,能够实现数据的写操作 - Duplex:
双工流,既可读又可写 - Tranform:
转换流,可读可写,还能实现数据修改转换
Node.js流特点
- Sream 模块实现了四个具体的抽象,也就是上面提到的四个类。如果我们要实现自己的可读流与可写流操作就需要继承相应的类,然后再去重写它们内部所必须实现的方法。但是这种需求是不常见的,比如fs、http等等这些模块本身已经实现了流操作的接口,所以在使用的时候我们可以调用具体模块的api来达到生产或消费数据的操作。
- 所有流都继承自EventEmitter,然后就可以基于发布订阅的模式去具备发布数据的读写事件,再之后就是由数据循环来监控事件的执行时机从而完成数据的处理。
流的用法示例
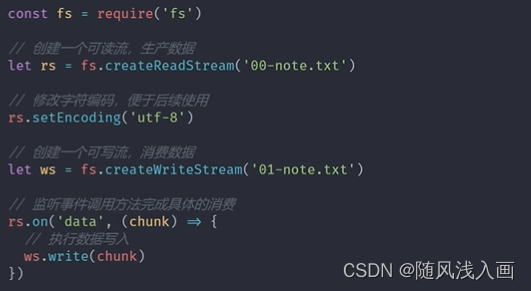
将test中的内容拷贝到test1里边去
const fs = require('fs')

let rs = fs.createReadStream('./test.txt')
let ws = fs.createWriteStream('./test1.txt')
rs.pipe(ws) // pipe:管道操作
Node.js中的可读流
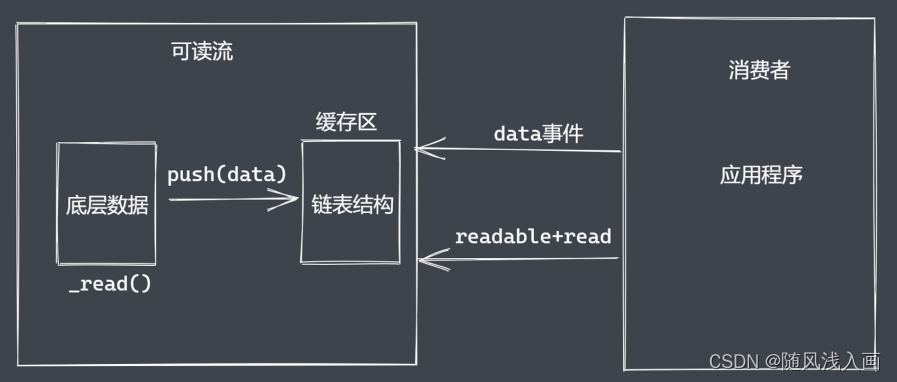
可读流就是专门生产供程序消费数据的流处于流的上游,node中最常见的数据生产方式其实就是读取磁盘文件或读取网络请求中的内容。如何自定义可读流?
如何自定义可读流
- 继承stream里的Readable类
- 重写_read方法调用push产出数据
自定义可读流的问题
- 底层数据读取完成之后如何处理?
- 在底层数据读取完成之后去给push传递null值,这样内部就知道数据读取完毕了
- 消费者如何获取可读流中的数据?
- Readable提供了两个事件:Readable事件和data事件
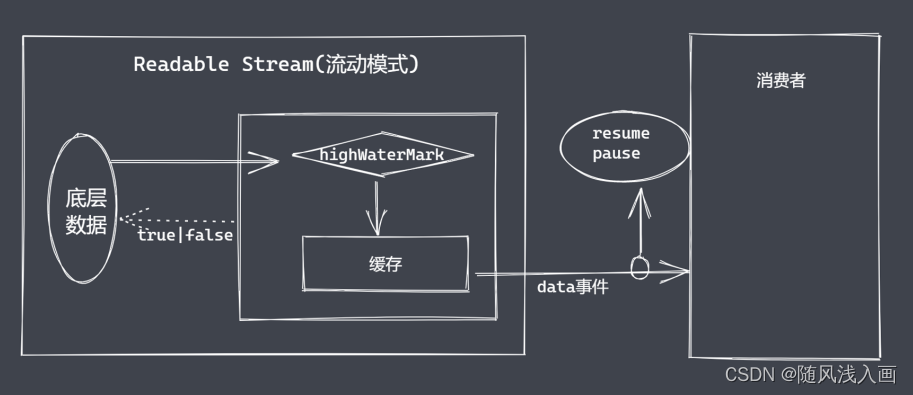
- Readable为什么需要这两个事件呢?主要还是为了满足不同的数据使用场景,有些时候只是需要按需去读取定量的数据,而有些时候我们折需要源源不断的将数据全部读出,基于这样的需求在Readable的内部实现上就存在两种模式。一种是流动模式,一种是暂停模式,对于使用者来说在于消费数据的时候是否需要主动调用read方法来读取数据。
消费数据
- readable事件:当流中存在可读取数据时触发
- data事件: 当流中数据块传给消费者后触发
const {Readable} = require('stream')

// 模拟底层数据
let source = ['111', '222', '333']

// 自定义类继承 Readable
class MyReadable extends Readable{
  constructor(source) {
    super()
    this.source = source
  }
  // 重写_read的方法
  _read() {
    let data = this.source.shift() || null
    this.push(data)
  }
}

// 实例化
let myReadable = new MyReadable(source)

/* myReadable.on('readable', () => {
  let data = null
  // readable默认是暂停的模式,如果需要源源不断的读需要用到循环,然后调用read方法。read里的2表示读取的长度
  while((data = myReadable.read(2)) != null) {
    console.log(data.toString())
  }
}) */

// data 默认是流动模式,能源源不断拿到所需要的值
myReadable.on('data', (chunk) => {
  // console.log(chunk)
  console.log(chunk.toString())
})
可读流总结
- 明确数据产生与消费流程
- 利用API实现自定义可读流
- 明确数据消费的事件使用
Node.js中的可写流
用于消费数据的流,处于流的下游。常见就是往磁盘中写入内容,或者对tcp或http的网络响应做出操作。
自定义可写流
- 继承stream模块的Writeable
- 重写_write方法,调用write执行写入
可写流事件
- pipe事件:可读流调用pipe()方法时触发
- unpipe事件:可读流调用unpipe()方法时触发,如果pipe是数据的到来,那么unpipe就是数据的切断
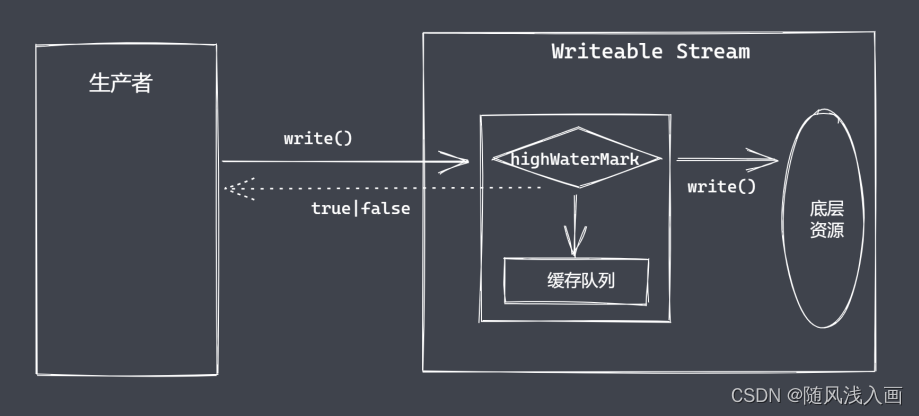
- drain事件:write返回false,数据可执行写入时触发。假设我们需要写入100个字节,但是流中的缓存上限是80,这样子的话就不能执行一次性的写入了,就需要经过一段慢慢消化处理的过程之后,再去继续执行写入新的数据。而这个drain就是想要抽干需要被写入的数据。
const {Writable} = require('stream')

class MyWriteable extends Writable{
  constructor() {
    super()
  }
  _write(chunk, en, done) {
    process.stdout.write(chunk.toString() + '<----')
    process.nextTick(done)
  }
}

let myWriteable = new MyWriteable()

myWriteable.write('拉勾教育', 'utf-8', () => {
  console.log('end')
})
Duple &&Transform
Node.js中stream是流操作的抽象接口集合。
可读、可写、双工、转换是单一抽象的具体实现。
流操作的核心功能就是处理数据。
Node.js诞生之初就是解决密集型IO事务。
Node.js中凡是处理数据的模块都继承了流和EventEmitter
Duplex是双工流,既能生产数据又能消费数据。
自定义Duple双工流
- 继承Duplex类
- 重写_read方法,调用push生产数据
- 重写_write方法,调用write消费数据
- Transform也是一个双工流
用Duple实现数据的读与写
let {Duplex} = require('stream')

class MyDuplex extends Duplex{
  constructor(source) {
    super()
    this.source = source
  }
  _read() {
    let data = this.source.shift() || null
    this.push(data)
  }
  _write(chunk, en, next) {
    process.stdout.write(chunk)
    process.nextTick(next)
  }
}

let source = ['a', 'b', 'c']
let myDuplex = new MyDuplex(source)

/* myDuplex.on('data', (chunk) => {
  console.log(chunk.toString())
}) */
myDuplex.write('拉勾教育', () => {
  console.log(1111)
})
自定义Transform转换流
- 继承Transform类
- 重写_transform类,调用push和callback
- 重写_flush方法,处理剩余数据
用Transform将小写转换成大写
let {Transform} = require('stream')

class MyTransform extends Transform{
  constructor() {
    super()
  }
  _transform(chunk, en, cb) {
    this.push(chunk.toString().toUpperCase())
    cb(null)
  }
}

let t = new MyTransform()

t.write('a')

t.on('data', (chunk) => {
  console.log(chunk.toString())
})
文件可读流创建和消费
const fs = require('fs')

let rs = fs.createReadStream('test.txt', {
  flags: 'r',
  encoding: null,
  fd: null,
  mode: 438,
  autoClose: true,
  start: 0,
  // end: 3,
  highWaterMark: 4 // 缓存区缓存的字节数
})

// rs.on('data', (chunk) => { // data消费数据
//   console.log(chunk.toString())
//   rs.pause() // 暂停
//   setTimeout(() => {
//     rs.resume() // 流动
//   }, 1000)
// })

// rs.on('readable', () => { // readable消费数据
//   // let data = rs.read()
//   // console.log(data)
//   while((data = rs.read(1)) !== null) {
//     console.log(data.toString())
//     // 查看缓存中的字节数
//     console.log('----------', rs._readableState.length)
//   }
// })

rs.on('open', (fd) => {
  console.log(fd, '文件打开了')
})

// 默认情况下close当前的流是一个暂停模式,所以close得在数据被消费或出错之后才能出触发
rs.on('close', () => {
  console.log('文件关闭了')
})

let bufferArr = []
// 消费数据
rs.on('data', (chunk) => {
  console.log(chunk);
  // 因为这边接收到的是一个连续的数据,所以得先缓存起来,最后在end中拿到完整的数据
  bufferArr.push(chunk)
})

// end在close之前执行,表示当前的数据都被消费完毕了
rs.on('end', () => {
  // 在end中拿到完整的数据
  console.log(Buffer.concat(bufferArr).toString())
  console.log('当数据被清空之后')
})

rs.on('error', (err) => {
  console.log('出错了')
})
文件可写流
const fs = require('fs')

const ws = fs.createWriteStream('test.txt', {
  flags: 'w',
  mode: 438,
  fd: null,
  encoding: "utf-8",
  start: 0,
  highWaterMark: 3
})

let buf = Buffer.from('abc')

// 字符串 或者  buffer ===》 fs rs
ws.write(buf, () => {
  console.log('ok2')
})

ws.write('小星星', () => {
  console.log('ok1')
})

ws.on('open', (fd) => {
  console.log('open', fd)
})

ws.write("22")

// close 是在数据写入操作全部完成之后再执行
ws.on('close', () => {
  console.log('文件关闭了')
})

// end 执行之后就意味着数据写入操作完成
ws.end('小星星')


// error
ws.on('error', (err) => {
  console.log('出错了')
})
write执行流程
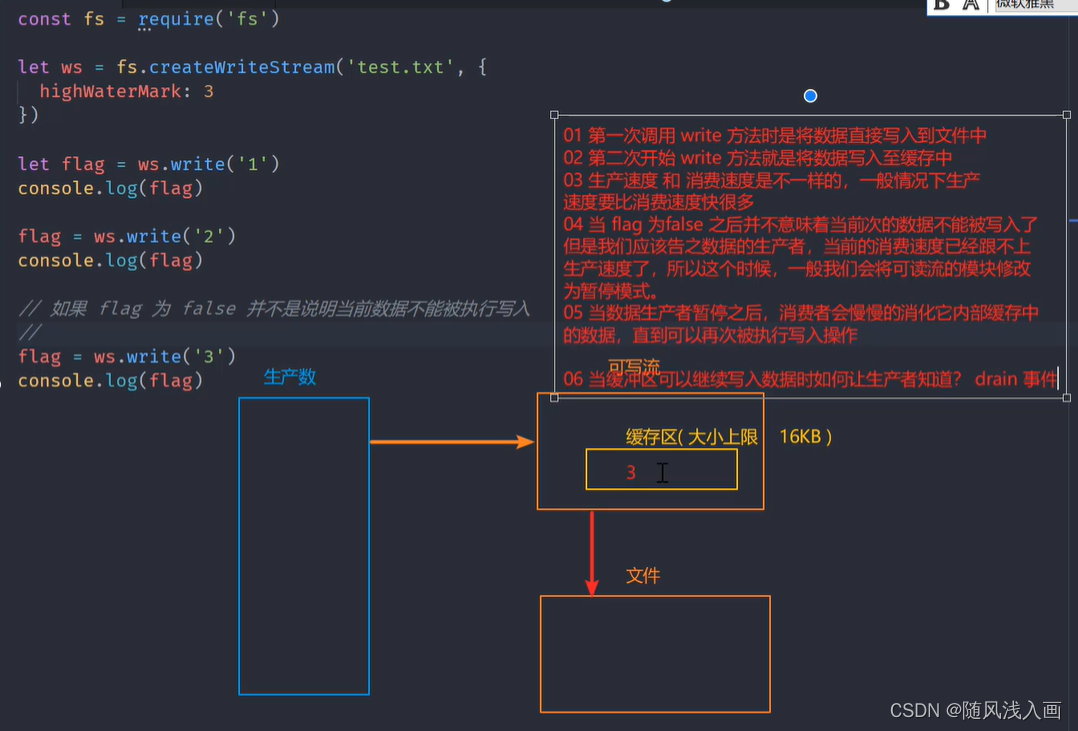
const fs = require('fs')

let ws = fs.createWriteStream('test.txt', {
  highWaterMark: 3
})

let flag = ws.write('1')
console.log(flag) // true

flag = ws.write('2')
console.log(flag) // true

flag = ws.write('3')
console.log(flag) // false

// 如果 flag 为 false 并不是说明当前数据不能被执行写入
//

ws.on('drain', () => {
  console.log('11') // 11
})
使用drain实现分批写入(限流操作)
/**
 * 需求:“小星星” 写入指定的文件
 * 01 一次性写入
 * 02 分批写入
 * 对比:
 */
let fs = require('fs')

let ws = fs.createWriteStream('test.txt', {
  highWaterMark: 3
})

// ws.write('小星星')
let source = "小星星".split('')
let num = 0
let flag = true

function executeWrite () {
  flag = true
  while(num !== 3 && flag) {
    flag = ws.write(source[num])
    num++
  }
}

executeWrite()

ws.on('drain', () => {
  console.log('drain 执行了,可以继续写入数据了')
  executeWrite()
})
背压机制
Node.js的stream已实现了背压机制
可读流太快了
硬盘的写入速度,远远小于硬盘的读取速度。如果可读流太快,而可写流的无法迅速的消费可读流传输的数据,写入流将会把 chunk,push 到写队列中方便之后使用,这样就会造成数据在内存中的累积。这个时候将会触发 backpressur(背压) 机制。如果没有 backpressur(背压) 机制,系统将会出现如下的问题:
- 内存溢出
- 其他进程变得缓慢
- 垃圾收集器将超负荷运作
背压机制是如何解决这些问题的?
在代码中调用pipe时,它会向可写流发出信号,表示有数据准备传输。当我们的可写流使用 write() 写入数据时,如果写队列繁忙,或者内部缓存区已经溢出了,write() 将会返回false。
这个时候,背压机制就会启动,它会暂停任何数据传入到可写流中,并等待可写流准备好,清空内部缓存区后。将会发出 drain 事件,并恢复可读流的传输。
这就意味着 pipe 只会使用固定大小的内存,不会存在内存泄漏的问题。
文件可读流与可写流对于数据的操作方式
let fs = require('fs')

let rs = fs.createReadStream('test.txt', {
  highWaterMark: 4
})

let ws = fs.createWriteStream('test1.txt', {
  highWaterMark: 1
})

let flag = true

// 文件可读流读取数据
rs.on('data', (chunk) => {
  // 文件可写流写入数据
  flag = ws.write(chunk, () => {
    console.log('写完了')
  })
  if (!flag) {
    // 开启暂停模式
    rs.pause()
  }
})

ws.on('drain', () => {
  // 文件有新的空间可以接纳数据了
  rs.resume() // 开启流动模式
})
上面代码就相当于
let fs = require('fs')

let rs = fs.createReadStream('test.txt', {
  highWaterMark: 4
})
let ws = fs.createWriteStream('test1.txt', {
  highWaterMark: 1
})
rs.pipe(ws) // 开启背压机制
模拟文件可读流open方法实现
const fs = require('fs')
const EventEmitter = require('events')

class MyFileReadStream extends EventEmitter{
  constructor(path, options = {}) {
    super()
    this.path = path
    this.flags = options.flags || "r"
    this.mode = options.mode || 438
    this.autoClose = options.autoClose || true
    this.start = options.start || 0
    this.end = options.start
    this.highWaterMark = options.highWaterMark || 64 * 1024

    this.open()
  }
  open() {
    // 原生 open 方法来打开指定位置上的文件
    fs.open(this.path, this.flags, this.mode, (err, fd) => {
      if (err) {
        this.emit('error', err)
      }
      this.fd = fd
      this.emit('open', fd)
    })
  }
}

let rs = new MyFileReadStream('test.txt')

rs.on('open', (fd) => {
  console.log('open', fd)
})

rs.on('error', (err) => {
  console.log(err)
})
模拟文件可读流read实现
const fs = require('fs')
const EventEmitter = require('events')

class MyFileReadStream extends EventEmitter{
  constructor(path, options = {}) {
    super()
    this.path = path
    this.flags = options.flags || "r"
    this.mode = options.mode || 438
    this.autoClose = options.autoClose || true
    this.start = options.start || 0
    this.end = options.start
    this.highWaterMark = options.highWaterMark || 64 * 1024
    this.readOffset = 0

    this.open()

    this.on('newListener', (type) => {
      if (type === 'data') {
        this.read()
      }
    })
  }
  open() {
    // 原生 open 方法来打开指定位置上的文件
    fs.open(this.path, this.flags, this.mode, (err, fd) => {
      if (err) {
        this.emit('error', err)
      }
      this.fd = fd
      this.emit('open', fd)
    })
  }
  read() {
    if (typeof this.fd !== 'number') {
      return this.once('open', this.read)
    }

    let buf = Buffer.alloc(this.highWaterMark)

    fs.read(this.fd, buf, 0, this.highWaterMark, this.readOffset, (err, readBytes) => {
      if (readBytes) {
        this.readOffset += readBytes
        this.emit('data', buf)
        this.read()
      } else {
        this.emit('end')
        this.close()
      }
    })
  }
  close() {
    fs.close(this.fd, () => {
      this.emit('close')
    })
  }
}

let rs = new MyFileReadStream('test.txt')

/*rs.on('open', (fd) => {
  console.log('open', fd)
})

rs.on('error', (err) => {
  console.log(err)
}) */

rs.on('data', (chunk) => {
  console.log(chunk)
})

rs.on('close', () => {
  console.log('close')
})

rs.on('end', () => {
  console.log('end')
})
模拟文件可读流(优化)
const fs = require('fs')
const EventEmitter = require('events')

class MyFileReadStream extends EventEmitter{
  constructor(path, options = {}) {
    super()
    this.path = path
    this.flags = options.flags || "r"
    this.mode = options.mode || 438
    this.autoClose = options.autoClose || true
    this.start = options.start || 0
    this.end = options.end
    this.highWaterMark = options.highWaterMark || 64 * 1024
    this.readOffset = 0

    this.open()

    this.on('newListener', (type) => {
      if (type === 'data') {
        this.read()
      }
    })
  }
  open() {
    // 原生 open 方法来打开指定位置上的文件
    fs.open(this.path, this.flags, this.mode, (err, fd) => {
      if (err) {
        this.emit('error', err)
      }
      this.fd = fd
      this.emit('open', fd)
    })
  }
  read() {
    if (typeof this.fd !== 'number') {
      return this.once('open', this.read)
    }

    let buf = Buffer.alloc(this.highWaterMark)

    let howMuchToRead
    /* if (this.end) {
      howMuchToRead = Math.min(this.end - this.readOffset + 1, this.highWaterMark)
    } else {
      howMuchToRead = this.highWaterMark
    } */

    howMuchToRead = this.end ? Math.min(this.end - this.readOffset + 1, this.highWaterMark) : this.highWaterMark

    fs.read(this.fd, buf, 0, howMuchToRead, this.readOffset, (err, readBytes) => {
      if (readBytes) {
        this.readOffset += readBytes
        this.emit('data', buf.slice(0, readBytes))
        this.read()
      } else {
        this.emit('end')
        this.close()
      }
    })
  }
  close() {
    fs.close(this.fd, () => {
      this.emit('close')
    })
  }
}

let rs = new MyFileReadStream('test.txt', {
  end: 7,
  highWaterMark: 3
})

rs.on('data', (chunk) => {
  console.log(chunk)
})
