一、认识CSS
1、认识CSS
(1)CSS
CSS表示层叠样式表(Cscading Style Sheet,简称:CSS,又称为又称串样式列表、级联样式表、串接样式表、阶层式样式表)是为网页添加样式的代码。
(2)CSS是一种语言吗
MDN解释:CSS 也不是真正的编程语言,甚至不是标记语言。它是一门样式表语言;
MDN解释:CSS 也不是真正的编程语言,甚至不是标记语言。它是一门样式表语言;
2、CSS的历史
(1)发展历程
早期的网页都是通过HTML来编写的,但是我们希望HTML页面可以更加丰富:
- 这个时候就增加了很多具备特殊样式的元素:比如i、strong、del等等;
- 后来也有不同的浏览器实现各自的样式语言,但是没有统一的规划;
- 1994年,哈肯·维姆·莱和伯特·波斯合作设计CSS,在1996年的时候发布了CSS1;
- 直到1997年初,W3C组织才专门成立了CSS的工作组,1998年5月发布了CSS2;
- 在2006~2009非常流行 “DIV+CSS”布局的方式来替代所有的html标签;
- 从CSS3开始,所有的CSS分成了不同的模块(modules),每一个“modules”都有于CSS2中额外增加的功能,以及向后兼容。
- 直到2011年6月7日,CSS 3 Color Module终于发布为W3C Recommendation。
(2)总结
-
总结:CSS的出现是为了美化HTML的,并且让结构(HTML)与样式(CSS)分离;
- 美化方式一:为HTML添加各种各样的样式,比如颜色、字体、大小、下划线等等;‘
- 美化方式二:对HTML进行布局,按照某种结构显示(CSS进行布局 – 浮动、flex、grid);
3、CSS结构
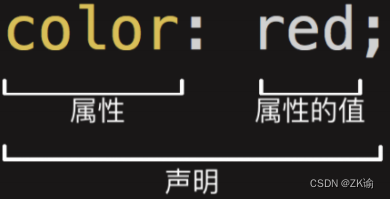
声明(Declaration)一个单独的CSS规则,如 color: red; 用来指定添加的CSS样式。
- 属性名(Property name):要添加的css规则的名称;
- 属性值(Property value):要添加的css规则的值;
二、CSS样式应用到元素
1、三种方法
CSS提供了3种方法,可以将CSS样式应用到元素上:
-
内联样式(inline style)
-
内部样式表(internal style sheet)、文档样式表(document style sheet)、内嵌样式表(embed style sheet)
-
外部样式表(external style sheet)
2、内联样式(inline style)
- 内联样式(inline style),也有人翻译成行内样式。
- 内联样式表存在于HTML元素的style属性之中
- CSS样式之间用分号;隔开,建议每条CSS样式后面都加上分号;
- 很多资料不推荐这种写法:
- 1.在原生的HTML编写过程中确实这种写法是不推荐的
- 2.在Vue的template中某些动态的样式是会使用内联样式的;
<!DOCTYPE html>
<html lang="en">
<head>
  <meta charset="UTF-8">
  <meta http-equiv="X-UA-Compatible" content="IE=edge">
  <meta name="viewport" content="width=device-width, initial-scale=1.0">
  <title>Document</title>
</head>
<body>
  <!-- 内联样式 -->
  <div style="color: red; font-size: 30px;">我是div元素</div>

  <h1 style="font-size: 100px;">我是标题</h1>
</body>
</html>
3、内部样式表(internal style sheet)
- 内部样式表(internal style sheet)
- 将CSS放在HTML文件元素里的
<!DOCTYPE html>
<html lang="en">
<head>
  <meta charset="UTF-8">
  <meta http-equiv="X-UA-Compatible" content="IE=edge">
  <meta name="viewport" content="width=device-width, initial-scale=1.0">
  <title>Document</title>

  <style>
      /* 选择器 */
      /* 两个div都可以找到 */
      /* div{
        color: red;
        font-size: 30px;
        background-color: orange;
      } */
      /* 找到class为.div-one的元素 */
      .div-one{
        color: red;
        font-size: 30px;
        background-color: blue;
      }
  </style>
</head>
<body>
  <!-- 内联样式 -->
  <div class="div-one">我是div元素</div>
  <div>
    我也是div元素
  </div>
  <p>
    我是段落
  </p>
  <h1>
    我是标题
  </h1>
</body>
</html>
4、外部样式表(external style sheet)
-
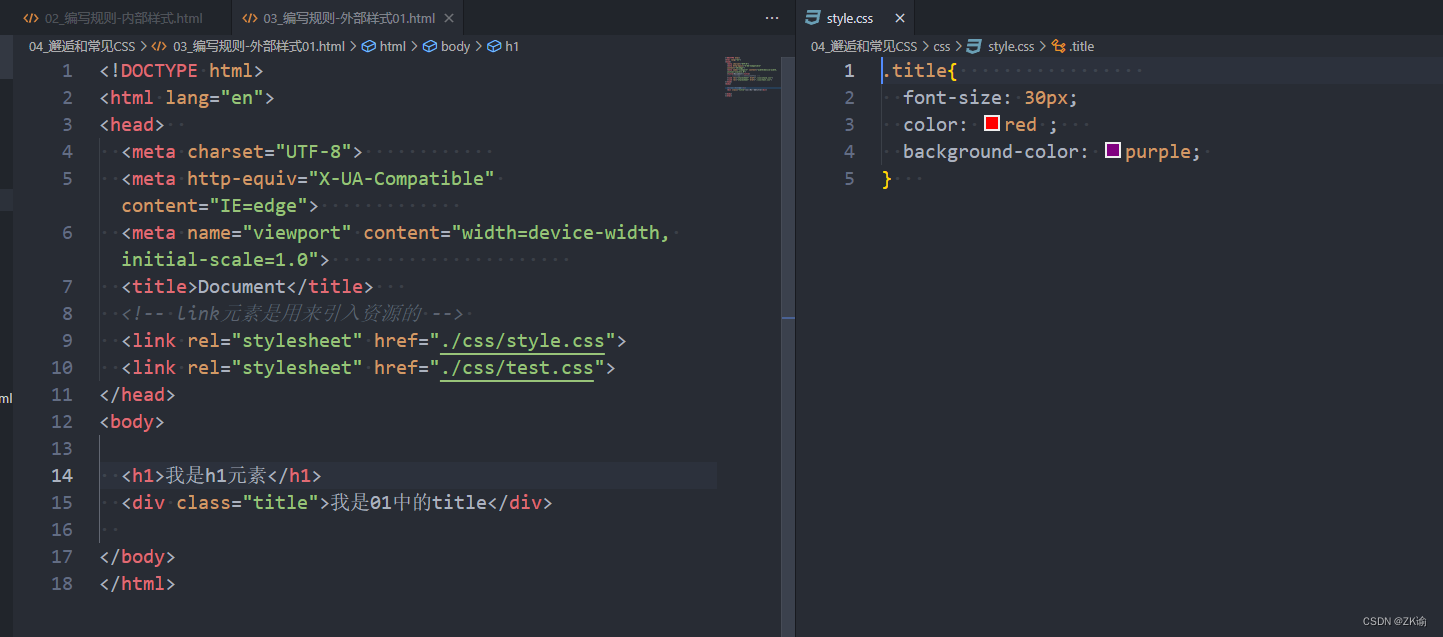
外部样式表(external style sheet) 是将css编写一个独立的文件中,并且通过元素引入进来;
-
使用外部样式表主要分成两个步骤:
- 第一步:将css样式在一个独立的css文件中编写(后缀名为.css);
- 第二步:通过link元素引入进来;
-
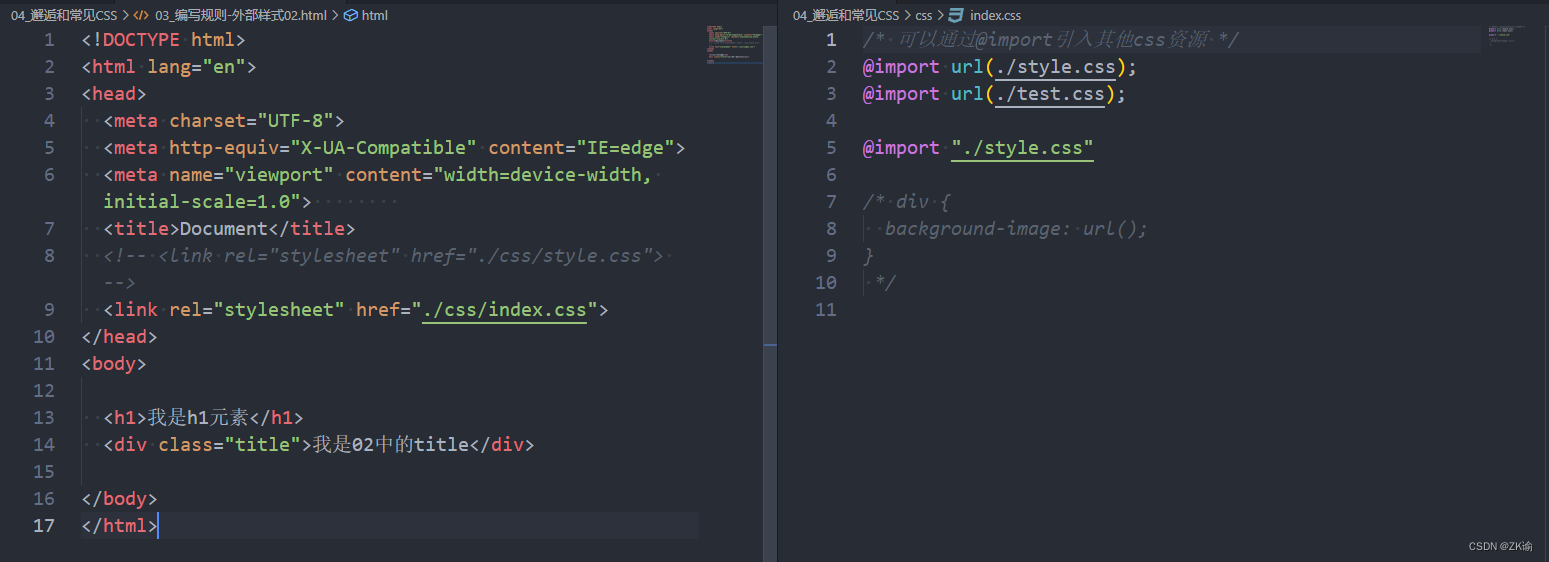
@import
- 可以在style元素或者CSS文件中使用@import导入其他的CSS文件
- 可以在style元素或者CSS文件中使用@import导入其他的CSS文件
5、CSS的注释
- CSS代码也可以添加注释来方便阅读:
- CSS的注释和HTML的注释是不一样的;
- /* 注释内容 */
<!DOCTYPE html>
<html lang="en">
<head>
  <meta charset="UTF-8">
  <meta http-equiv="X-UA-Compatible" content="IE=edge">
  <meta name="viewport" content="width=device-width, initial-scale=1.0">
  <title>Document</title>
  <style>
    /* css注释 */
    .box{
      /* 字体大小 */
      font-size: 30px;
      /* 前景色 */
      color: red;
    }
  </style>
</head>
<body>
    <div class="box">我是盒子</div>
</body>
</html>
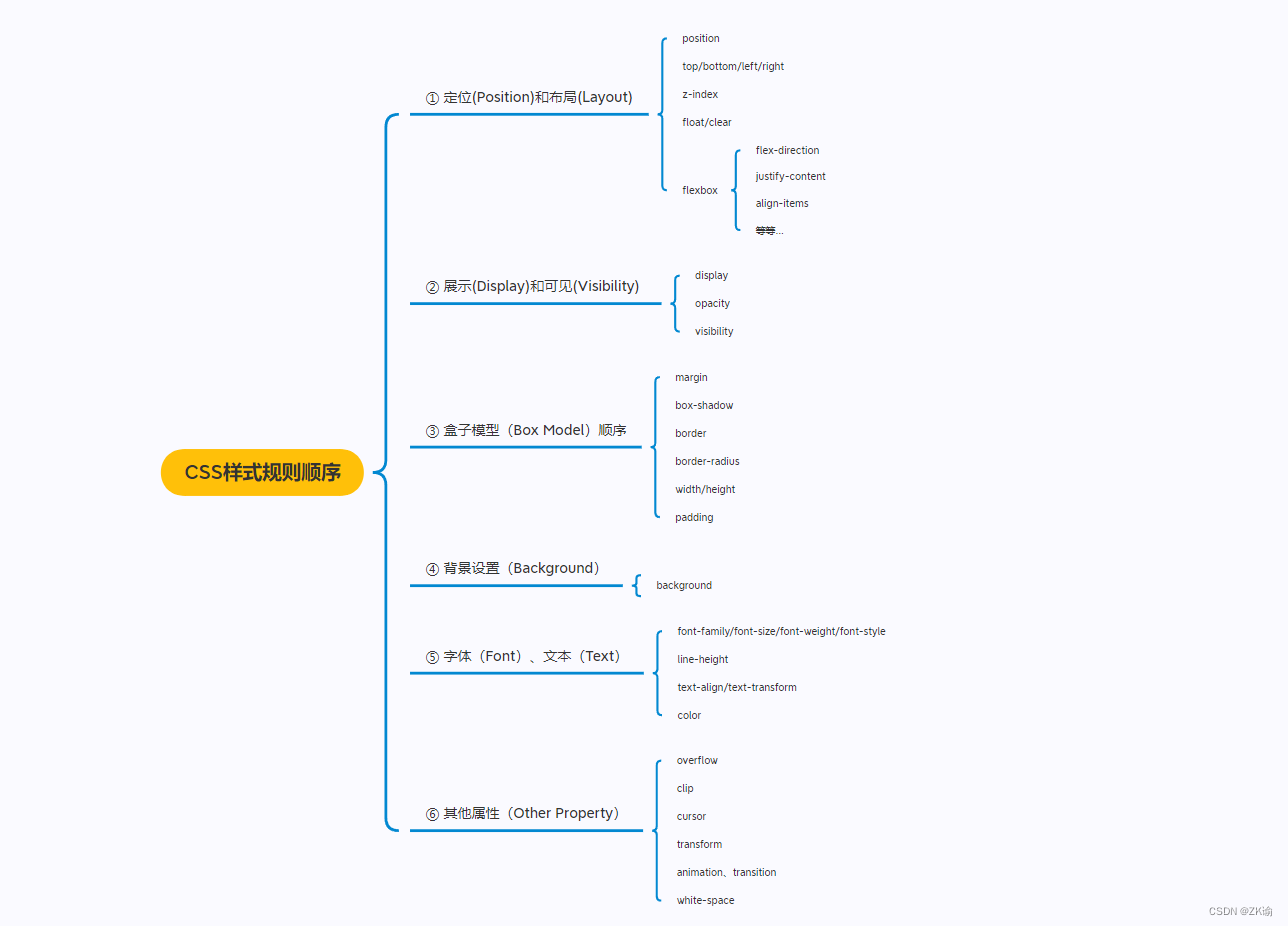
6、推荐顺序
7、CSS属性的官方文档
(1)CSS官方文档地址
https://www.w3.org/TR/?tag=css
(2)CSS推荐文档地址:
https://developer.mozilla.org/zhCN/docs/Web/CSS/Reference#%E5%85%B3%E9%94%AE%E5%AD%97%E7%B4%A2%E5%BC%95
(3)查询某些CSS是否可用
由于浏览器版本、CSS版本等问题,查询某些CSS是否可用:
- 可以到https://caniuse.com/查询CSS属性的可用性
- 这个网站在后续的browserlist工具中我们再详细说明;
8、常用的CSS属性
(1)font-size:文字大小
<!DOCTYPE html>
<html lang="en">
<head>
  <meta charset="UTF-8">
  <meta http-equiv="X-UA-Compatible" content="IE=edge">
  <meta name="viewport" content="width=device-width, initial-scale=1.0">
  <title>Document</title>
  <style>
    /* font-size */
    .title{
      font-size: 24px;
    }
  </style>
</head>
<body>
  <div class="title">Hello world</div>
</body>
</html>
(2)color:前景色(文字颜色)
color属性用来设置文本内容的前景色
包括文字、装饰线、边框、外轮廓等的颜色
<!DOCTYPE html>
<html lang="en">
<head>
  <meta charset="UTF-8">
  <meta http-equiv="X-UA-Compatible" content="IE=edge">
  <meta name="viewport" content="width=1, initial-scale=1.0">
  <title>Document</title>
  <style>
    .title {
      font-size: 24px;
      color: chocolate;
    }
  </style>
</head>
<body>
  <div class="title">我是div啊</div>
</body>
</html>
(3)background-color:背景色
<!DOCTYPE html>
<html lang="en">
<head>
  <meta charset="UTF-8">
  <meta http-equiv="X-UA-Compatible" content="IE=edge">
  <meta name="viewport" content="width=device-width, initial-scale=1.0">
  <title>Document</title>
</head>
<style>
  .title {
    font-size: 24px;
    color: chocolate;
    background-color: black;
  }
</style>
<body>

  <div class="title">Hello World</div>

</body>
</html>
(4)width :宽度
<!DOCTYPE html>
<html lang="en">
<head>
  <meta charset="UTF-8">
  <meta http-equiv="X-UA-Compatible" content="IE=edge">
  <meta name="viewport" content="width=device-width, initial-scale=1.0">
  <title>Document</title>
  <style>
    .title {
      font-size: 24px;
      color: red;
      background-color: black;
      height: 200px;
      width: 200px;
    }
  </style>
</head>
<body>
  <div class="title">Hell World</div>
  <!-- <span>我是span元素</span> -->
</body>
</html>
(5)height:高度
三、补充
1、link元素
- link元素是外部资源链接元素,规范了文档与外部资源的关系
- link元素通常是在head元素中
- 最常用的链接是样式表(CSS);
- 此外也可以被用来创建站点图标(比如 “favicon” 图标);
- link元素常见的属性:
- href:此属性指定被链接资源的URL。 URL 可以是绝对的,也可以是相对的。
- rel:指定链接类型,常见的链接类型:https://developer.mozilla.org/zh-CN/docs/Web/HTML/Link_types
- icon:站点图标;
- stylesheet:CSS样式;
- 优化方法
<!DOCTYPE html>
<html lang="en">
<head>
  <meta charset="UTF-8">
  <meta http-equiv="X-UA-Compatible" content="IE=edge">
  <meta name="viewport" content="width=device-width, initial-scale=1.0">
  <title>京东(JD.COM)-正品低价、品质保障、配送及时、轻松购物!</title>
  <!-- 引入css -->
  <link rel="stylesheet" href="./css/style.css">
  <!-- 引入icon(站点图标)  -->
  <link rel="icon" href="../images/favicon.ico">
</head>
<body>

</body>
</html>
2、认识进制
如何表示二进制、八进制、十六进制?
-
二进制(0b开头, binary):其中的数字由0、1组成,可以回顾之前学习过的机器语言。
-
八进制(0o开头, Octonary):其中的数字由0~7组成。
-
十六进制(0x开头, hexadecimal):其中的数字由0~9和字母a-f组成(大小写都可以)
3、CSS颜色的表示方法
(1)表示方法1-颜色关键字(color keywords)
- 是不区分大小写的标识符,它表示一个具体的颜色;
- https://developer.mozilla.org/zh-CN/docs/Web/CSS/color_value#%E8%AF%AD%E6%B3%95
(2)表示方法2-RGB颜色
- RGB是一种色彩空间,通过R(red,红色)、G(green,绿色)、B(blue,蓝色)三原色来组成了不同的颜色;
- 也就是通过调整这三个颜色不同的比例,可以组合成其他的颜色;
- RGB各个原色的取值范围是 0~255
(3)RGB的表示方法
RGB颜色可以通过以#为前缀的十六进制字符和函数(rgb()、rgba())标记表示
-
方式一:十六进制符号:#RRGGBB[AA]
- R(红)、G(绿)、B (蓝)和A (alpha)是十六进制字符(0–9、A–F);A是可选的。
- 比如,#ff0000等价于#ff0000ff;
- R(红)、G(绿)、B (蓝)和A (alpha)是十六进制字符(0–9、A–F);A是可选的。
-
方式二:十六进制符号:#RGB[A]
- R(红)、G(绿)、B (蓝)和A (alpha)是十六进制字符(0–9、A–F);
-
三位数符号(#RGB)是六位数形式(#RRGGBB)的减缩版。
- 比如,#f09和#ff0099表示同一颜色。
- 四位数符号(#RGBA)是八位数形式(#RRGGBBAA)的减缩版。
- 比如,#0f38和#00ff3388表示相同颜色
-
方式三:函数符:
rgb[a](R, G, B[, A])- R(红)、G(绿)、B (蓝)可以是(数字),或者(百分比),255相当于100%。
- A(alpha)可以是0到1之间的数字,或者百分比,数字1相当于100%(完全不透明)。
<!DOCTYPE html>
<html lang="en">
<head>
  <meta charset="UTF-8">
  <meta http-equiv="X-UA-Compatible" content="IE=edge">
  <meta name="viewport" content="width=device-width, initial-scale=1.0">
  <title>Document</title>
  <style>
    .box {
      /* color: rebeccapurple;
      background-color: red; */

      /* background-color: rgb(100, 100, 100); */
      /* background-color: #646464; */

      /* 表示一个纯黑色 */
      /* background-color: rgb(0, 0, 0); */
      /* background-color: #000000; */
      /* background-color: #000; */

      /* 表示一个纯白色 */
      /* background-color: rgb(255, 255, 255); */
      /* background-color: #FFFFFF; */
      /* background-color: #FFF; */
      background-color: #f30213;
    }
  </style>
</head>
<body>
  <div class="box">哈哈哈哈</div>
</body>
</html>
4、Chrome浏览器开发者工具
(1)查看源码
打开Chrome调试工具:
-
方式一:右键 – 检查
-
方式二:快捷键 – F12
(2)其他技巧
-
快捷键:ctrl+ 可以调整页面或者调试工具的字体大小;
-
可以通过删除某些元素来查看网页结构;
-
可以通过增删css来调试网页样式;
5、浏览器渲染的流程
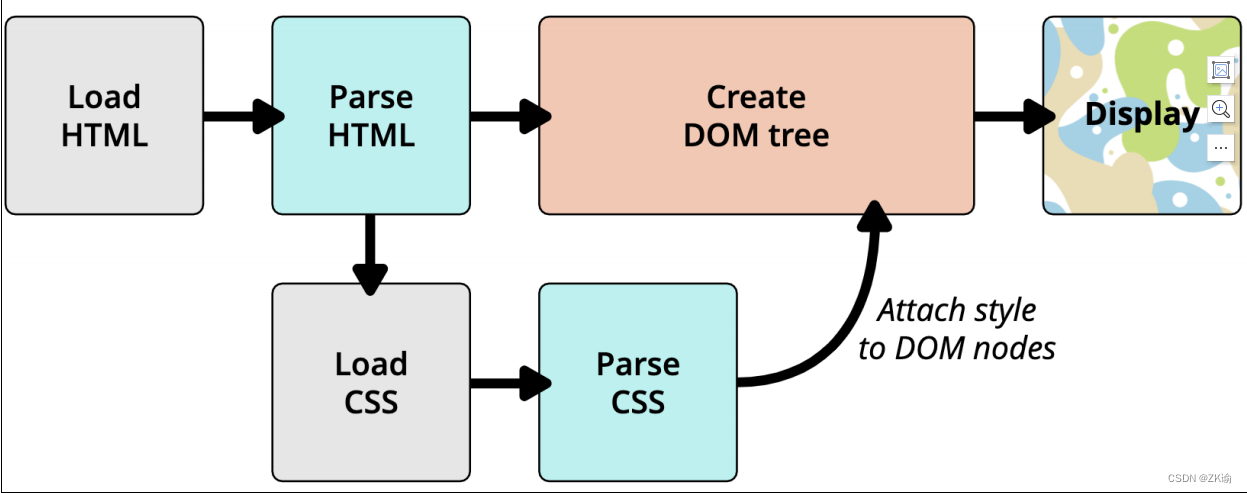
html和css渲染的时候,html是不用等待css的
四、CSS属性详解
1、CSS文本的属性
(1)CSS属性 – text-decoration(常用)
- text-decoration用于设置文字的装饰线
- decoration是装饰/装饰品的意思;
- text-decoration有如下常见取值:
- none:无任何装饰线
- 可以去除a元素默认的下划线
- underline:下划线
- overline:上划线
- line-through:中划线(删除线)
- none:无任何装饰线
<!DOCTYPE html>
<html lang="en">
<head>
  <meta charset="UTF-8">
  <meta http-equiv="X-UA-Compatible" content="IE=edge">
  <meta name="viewport" content="width=device-width, initial-scale=1.0">
  <title>Document</title>
  <link rel="stylesheet" href="./css/reset.css">
  <style>
    .baidu {
      text-decoration: underline;
      cursor: pointer;
    }
    .google {
      text-decoration: line-through;
      /* 设置文本的颜色(前景色)-->线也设置了颜色 */
      color: red;
    }
    .bing {
      text-decoration: overline;
    }

    /* 将默认的线除去 */
    a {
      text-decoration: none;
    }

  </style>
</head>
<body>
  <!-- a元素默认有添加text-decoration -->
  <a href="http://www.baidu.com">百度一下</a>

  <!-- span元素也添加装饰线 -->
  <span class="baidu">百度一下</span>

  <!-- 装饰线其他值  -->
  <span class="google">Google一下</span>
  <span class="bing">必应一下</span>

  <a href="http://www.taobao.com">淘宝一下</a>
</body>
</html>
- a元素有下划线的本质是被添加了text-decoration属性
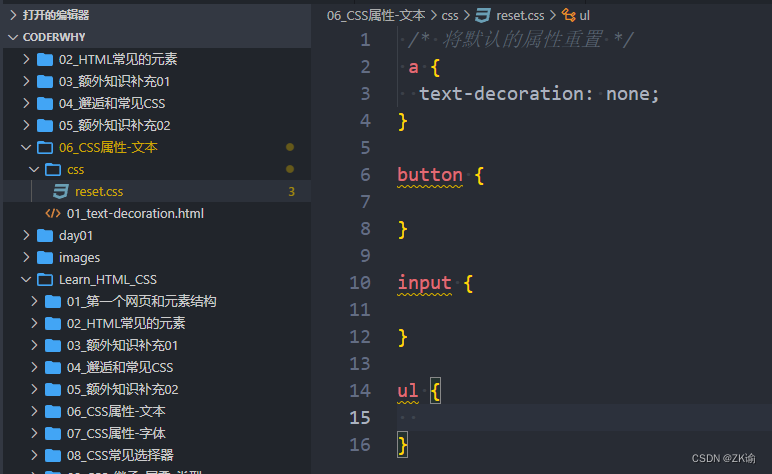
- 清除元素的默认属性通常在目录下面创建一个css文件夹,下面reset.css
(2)text-transform(一般)
- text-transform用于设置文字的大小写转换
- Transform单词是使变形/变换(形变);
- text-transform有几个常见的值
- capitalize:(使…首字母大写, 资本化的意思)将每个单词的首字符变为大写
- uppercase:(大写字母)将每个单词的所有字符变为大写
- lowercase:(小写字母)将每个单词的所有字符变为小写
- none:没有任何影响
- 实际开发中用JavaScript代码转化的更多
<!DOCTYPE html>
<html lang="en">
<head>
  <meta charset="UTF-8">
  <meta http-equiv="X-UA-Compatible" content="IE=edge">
  <meta name="viewport" content="width=device-width, initial-scale=1.0">
  <title>Document</title>
  <style>
    .info {
      text-transform: capitalize;
      text-transform: uppercase;
      text-transform: lowercase;
    }
  </style>
</head>
<body>

  <div class="info">
    my name is zky!
  </div>
  <p>
    有关 CSS 选择器语法的初学者介绍,请参阅 CSS 选择器教程。注意,规则定义中的任何 CSS 语法错误都将使整个规则无效,无效的规则将被浏览器忽略。注意 CSS 定义完全是基于(ASCII)文本的,而 DOM-CSS / CSSOM(规则管理系统)是基于对象的。
  </p>
</body>
</html>
(3)text-indent(一般)
- text-indent用于设置第一行内容的缩进
- text-indent: 2em; 刚好是缩进2个文字
<!DOCTYPE html>
<html lang="en">
<head>
  <meta charset="UTF-8">
  <meta http-equiv="X-UA-Compatible" content="IE=edge">
  <meta name="viewport" content="width=device-width, initial-scale=1.0">
  <title>Document</title>
  <style>
    p {
      font-size: 10px;
      /* text-indent: 值应该根据实际的字体来调节; */
      /* em:相对于字体的大小 */
      /* text-indent: 20px; */
      text-indent: 2em;
    }
  </style>
</head>
<body>

  <h2>标题</h2>
  <p>
    有关 CSS 选择器语法的初学者介绍,请参阅 CSS 选择器教程。注意,规则定义中的任何 CSS 语法错误都将使整个规则无效,无效的规则将被浏览器忽略。注意 CSS 定义完全是基于(ASCII)文本的,而 DOM-CSS / CSSOM(规则管理系统)是基于对象的。
  </p>

</body>
</html>
(4)text-align(重要)
- text-align: 直接翻译过来设置文本的对齐方式;
- MDN: 定义行内内容(例如文字)如何相对它的块父元素对齐;
- 常用的值
- left:左对齐
- right:右对齐
- center:正中间显示
- justify:两端对齐,最后一行不起作用
inline的常规对齐方式设置
<!DOCTYPE html>
<html lang="en">
<head>
  <meta charset="UTF-8">
  <meta http-equiv="X-UA-Compatible" content="IE=edge">
  <meta name="viewport" content="width=device-width, initial-scale=1.0">
  <title>Document</title>
  <style>
    .box {
      background-color: #F00;
      color: white;
      /* text-align: center; */
      /* text-align: left; */
      /* text-align: right; */
      /* 需要特殊配置 */
      text-align: justify;
    }
  </style>
</head>
<body>
   <div class="box">我是div元素</div>
</body>
</html>
图片、input居中
<!DOCTYPE html>
<html lang="en">
<head>
  <meta charset="UTF-8">
  <meta http-equiv="X-UA-Compatible" content="IE=edge">
  <meta name="viewport" content="width=device-width, initial-scale=1.0">
  <title>Document</title>
  <style>
    .box {
      background-color: #F00;
      height: 300px;

      /* 让图片居中 */
      text-align: center;
    }
    img {
      width: 200px;
    }
  </style>
</head>
<body>
  <div class="box">
    <!-- <img src="../images/gouwujie01.jpg" alt=""> -->

    <!-- input也能text-align居中 -->
    <input type="text">
  </div>
</body>
</html>
只能用于行内级的居中不能用于快级的居中
<!DOCTYPE html>
<html lang="en">
<head>
  <meta charset="UTF-8">
  <meta http-equiv="X-UA-Compatible" content="IE=edge">
  <meta name="viewport" content="width=device-width, initial-scale=1.0">
  <title>Document</title>
  <style>
    .box {
      background-color: #F00;
      height: 300px;

      text-align: center;
    }
    .content {
      background-color: #0f0;
      height: 200px;
      width: 200px;

      /* 修改为inline级 */
      /* display: inline-block; */

      /* 设置margin */
      margin: 0 auto;
    }
  </style>
</head>
<body>
  <div class="box">
    <div class="content"></div>
  </div>
</body>
</html>
justify的使用
<!DOCTYPE html>
<html lang="en">
<head>
  <meta charset="UTF-8">
  <meta http-equiv="X-UA-Compatible" content="IE=edge">
  <meta name="viewport" content="width=device-width, initial-scale=1.0">
  <title>Document</title>
  <style>
    .box {
      width: 300px;
      background-color: #f00;
      color: white;

      /* justify两端对齐:最后一行不起作用 */
      /* text-align: justify; */

      /* 思考:怎么使得最后一行是起作用的? */
      text-align-last: justify;
    }
  </style>
</head>
<body>
  <div class="box">
    希腊雅典阿提卡动物园的兽医,正在抢救一头小老虎。这是一头遭遗弃的小白虎,据信是非法野生动物贸易的受害者。

路透社17日报道,小白虎是清洁工2月28日在动物园停车场的垃圾桶下发现的,3个月大。清洁工立即通知了动物园。

“没有人知道它从哪里来,也不知道它怎么来的。”动物园创始人让-雅克·勒苏厄说,这显然是肆无忌惮的行为,非法获得这只小白虎后,又因为它残疾而决定抛弃它。
Similarly, each contiguous sequence of sibling text nodes generates a text sequence containing their text contents, which is assigned the same styles as the generating text nodes. If the sequence contains no text, however, it does not generate a text sequence.
  </div>
</body>
</html>
(5)letter-spacing、word-spacing(一般)
- letter-spacing、word-spacing分别用于设置字母、单词之间的间距
- 默认是0,可以设置为负数
<!DOCTYPE html>
<html lang="en">
<head>
  <meta charset="UTF-8">
  <meta http-equiv="X-UA-Compatible" content="IE=edge">
  <meta name="viewport" content="width=device-width, initial-scale=1.0">
  <title>Document</title>
  <style>
    .box {
      /* 设置字母与字母之间的间隙 */
      letter-spacing: 10px;

      /* 设置单词与单词之间的空隙 */
      word-spacing: 10px;
    }
  </style>
</head>
<body>
  <div class="box">my name is zkyaaa</div>
</body>
</html>
2、CSS字体的属性
(1)font-size
- font-size决定文字的大小
- 常用的设置
- 具体数值+单位
- 比如100px
- 也可以使用em单位(不推荐):1em代表100%,2em代表200%,0.5em代表50%
- 百分比
- 基于父元素的font-size计算,比如50%表示等于父元素font-size的一半
- 具体数值+单位
<!DOCTYPE html>
<html lang="en">
<head>
  <meta charset="UTF-8">
  <meta http-equiv="X-UA-Compatible" content="IE=edge">
  <meta name="viewport" content="width=device-width, initial-scale=1.0">
  <title>Document</title>
  <style>
    .home {
      font-size: 20px;
    }
    .box {
      /* 字体设置的方式一:px */
      /* font-size: 50px; */

      /* 字体设置的方式二:em */
      /* 了解:em  -->em是相对于父元素的字体的尺寸*/
      /* font-size: 2em; */

      /* 字体设置的方式三:百分比% */
      /* MDN查文档:Percentages	refer to the parent element's font size */
      font-size: 80%;
    }

    /* .box1 {

    } */
  </style>
</head>
<body>
  <div class="home">
    <div class="box">我是div元素</div>
  </div>

  <div class="box1">我是div元素</div>
</body>
</html>
(2)font-family
- font-family用于设置文字的字体名称
- 可以设置1个或者多个字体名称;
- 浏览器会选择列表中第一个该计算机上有安装的字体;
- 或者是通过 @font-face 指定的可以直接下载的字体。
body {
  font-family: 'Franklin Gothic Medium', 'Arial Narrow', Arial, sans-serif;
}

<!DOCTYPE html>
<html lang="en">
<head>
  <meta charset="UTF-8">
  <meta http-equiv="X-UA-Compatible" content="IE=edge">
  <meta name="viewport" content="width=device-width, initial-scale=1.0">
  <title>Document</title>
  <link rel="stylesheet" href="./css/reset.css">
  <style>

  </style>
</head>
<body>

</body>
</html>
(3)font-weight
- font-weight用于设置文字的粗细(重量)
- 常见的取值:
- 100 | 200 | 300 | 400 | 500 | 600 | 700 | 800 | 900 :每一个数字表示一个重量
- normal:等于400
- bold:等于700
- strong、b、h1~h6等标签的font-weight默认就是bold
<!DOCTYPE html>
<html lang="en">
<head>
  <meta charset="UTF-8">
  <meta http-equiv="X-UA-Compatible" content="IE=edge">
  <meta name="viewport" content="width=device-width, initial-scale=1.0">
  <title>Document</title>
  <style>
    .box {
      /* font-weight: bold; */
      font-weight: 700;
    }
  </style>
</head>
<body>
  <div class="box">我是div元素</div>
  <div>我是div元素</div>
</body>
</html>
(4)font-style(一般)
- font-style用于设置文字的常规、斜体显示
- normal:常规显示
- italic(斜体):用字体的斜体显示(通常会有专门的字体)
- oblique(倾斜):文本倾斜显示(仅仅是让文字倾斜)
- em、i、cite、address、var、dfn等元素的font-style默认就是italic
<!DOCTYPE html>
<html lang="en">
<head>
  <meta charset="UTF-8">
  <meta http-equiv="X-UA-Compatible" content="IE=edge">
  <meta name="viewport" content="width=device-width, initial-scale=1.0">
  <title>Document</title>
  <style>
    .box {
      /* 斜体:字体本身支持斜体时,显示的斜体*/
      /* font-style: italic; */

      /* 倾斜:让文本进行倾斜 */
      font-style: oblique;
    }
  </style>
</head>
<body>
  <div class="box">我是div元素</div>
  <div>我是div元素</div>
</body>
</html>
(5)font-variant(了解)
- font-variant可以影响小写字母的显示形式
- variant是变形的意思;
- 可以设置的值如下
- normal:常规显示
- small-caps:将小写字母替换为缩小过的大写字母
<!DOCTYPE html>
<html lang="en">
<head>
  <meta charset="UTF-8">
  <meta http-equiv="X-UA-Compatible" content="IE=edge">
  <meta name="viewport" content="width=device-width, initial-scale=1.0">
  <title>Document</title>
  <style>
    .box {
      font-variant: small-caps;
    }
  </style>
</head>
<body>
  <div class="box">My Name Is Zky</div>
</body>
</html>
(6)line-height (重点)
- line-height用于设置文本的行高
- 行高可以先简单理解为一行文字所占据的高度
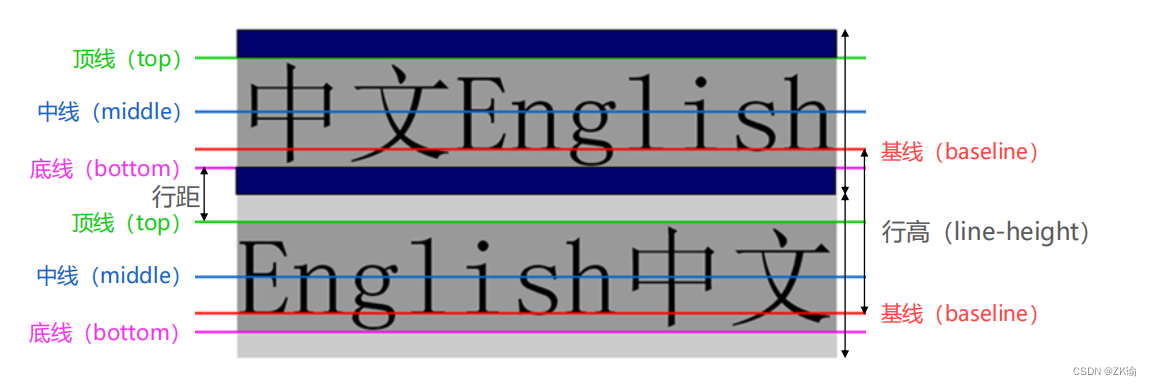
- 行高的严格定义是:两行文字基线(baseline)之间的间距
- 基线(baseline):与小写字母x最底部对齐的线
- 注意区分height和line-height的区别
- height:元素的整体高度
- line-height:元素中每一行文字所占据的高度
- 应用实例:假设div中只有一行文字,如何让这行文字在div内部垂直居中
- 让line-height等同于height
<!DOCTYPE html>
<html lang="en">
<head>
  <meta charset="UTF-8">
  <meta http-equiv="X-UA-Compatible" content="IE=edge">
  <meta name="viewport" content="width=device-width, initial-scale=1.0">
  <title>Document</title>
  <style>
    .box {
      height: 100px;
      background-color: #f00;
      color: #fff;
      /* 设置height==line-height */
      line-height: 100px;
    }
  </style>
</head>

<body>

  <div class="box"> 我是div元素 </div>

</body>
</html>
(7)font缩写属性
- font是一个缩写属性
- font 属性可以用来作为 font-style , font-variant , font-weight , font-size , line-height 和 font-family 属性的简写;
- font-style font-variant font-weight font-size/line-height font-family
- 规则:
- font-style、font-variant、font-weight可以随意调换顺序,也可以省略
- /line-height可以省略,如果不省略,必须跟在font-size后面
- font-size、font-family不可以调换顺序,不可以省略
- 参考:https://developer.mozilla.org/zh-CN/docs/Web/CSS/font#%E8%AF%AD%E6%B3%95
<!DOCTYPE html>
<html lang="en">
<head>
  <meta charset="UTF-8">
  <meta http-equiv="X-UA-Compatible" content="IE=edge">
  <meta name="viewport" content="width=device-width, initial-scale=1.0">
  <title>Document</title>
  <style>
    .box {
      /* 关于字体的属性 */
      /* font-size: 30px;
      font-weight: 700;
      font-variant: small-caps;
      font-style: italic;
      font-family: serif;
      line-height: 30px; */

      /* 缩写属性 */
      /* 1.5的行高是相对于font-size的 */
      font: italic small-caps 700 30px/1.5 serif;
    }
  </style>
</head>
<body>
  <div class="box">我是div元素</div>
</body>
</html>
3、CSS常见选择器
(1)CSS选择器(selector)
什么是CSS选择器
- 按照一定的规则选出符合条件的元素,为之添加CSS样式
选择器的种类繁多,大概可以这么归类
- 通用选择器(universal selector)
- 元素选择器(type selectors)
- 类选择器(class selectors)
- id选择器(id selectors)
- 属性选择器(attribute selectors)
- 组合(combinators)
- 伪类(pseudo-classes)
- 伪元素(pseudo-elements)
(2)通用选择器
- 通用选择器(universal selector)
- 所有的元素都会被选中;
- 一般用来给所有元素作一些通用性的设置
- 比如内边距、外边距;
- 比如重置一些内容;
- 效率比较低,尽量不要使用;
<!DOCTYPE html>
<html lang="en">
<head>
  <meta charset="UTF-8">
  <meta http-equiv="X-UA-Compatible" content="IE=edge">
  <meta name="viewport" content="width=device-width, initial-scale=1.0">
  <title>Document</title>
  <style>
    /* * {
      font-size: 30px;
      background-color: #f00;
    } */

    /* 更推荐的做法 */
    body, p, div, span,h2 {
      margin:0;
      padding: 0;
    }
  </style>
</head>
<body>
  <div>我是div元素</div>
  <p>我是P元素</p>

  <div>
    <h2>我是h2元素</h2>
    <p>我也是p元素<span>呵呵呵呵呵</span></p>
  </div>
</body>
</html>
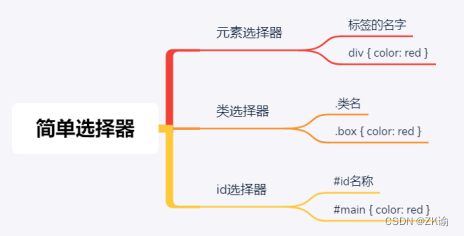
(3)简单选择器(重点)
-
简单选择器是开发中用的最多的选择器:
- 元素选择器(type selectors), 使用元素的名称;
- 类选择器(class selectors), 使用 .类名 ;
- id选择器(id selectors), 使用 #id;
-
id注意事项
- 一个HTML文档里面的id值是唯一的,不能重复‘
- id值如果由多个单词组成,单词之间可以用中划线-、下划线_连接,也可以使用驼峰标识
- 最好不要用标签名作为id值
- 中划线又叫连字符(hyphen)
- 一个HTML文档里面的id值是唯一的,不能重复‘
<!DOCTYPE html>
<html lang="en">
<head>
  <meta charset="UTF-8">
  <meta http-equiv="X-UA-Compatible" content="IE=edge">
  <meta name="viewport" content="width=device-width, initial-scale=1.0">
  <title>Document</title>
  <style>
    div {
      color: red;
    }

    .box {
      color: blue;
    }
    #home {
      color: green;
    }
  </style>
</head>
<body>
  <!-- 在同一个HTML中id要不重复 -->
  <div>我是div1</div>
  <div class="box">我是div2</div>
  <div id="home">我是div3</div>

  <!-- calss/id的名称比较复杂 -->
  <div class="box one"></div>
  <div class="box-one box0-first"></div>
  <div class="box_one box0_first"></div>
  <!-- 大驼峰、小驼峰 -->
  <!-- <div class="boxOne Box0First"></div> -->

</body>
</html>
(4)属性选择器(attribute selectors)(了解)
-
拥有某一个属性 [att]
-
属性等于某个值 [att=val]
-
了解
<!DOCTYPE html>
<html lang="en">
<head>
  <meta charset="UTF-8">
  <meta http-equiv="X-UA-Compatible" content="IE=edge">
  <meta name="viewport" content="width=device-width, initial-scale=1.0">
  <title>Document</title>

  <style>
    [title] {
      color: red;
    }
    /* 挑选出来之后在属性=某个值 */
    [title=div] {
      background-color: blue;
    }

  </style>

</head>
<body>
  <div>我是div元素</div>
  <div title="div">我也是div元素</div>
  <p>我是p元素</p>
  <h2 title="h2">我是h2元素</h2>
</body>
</html>
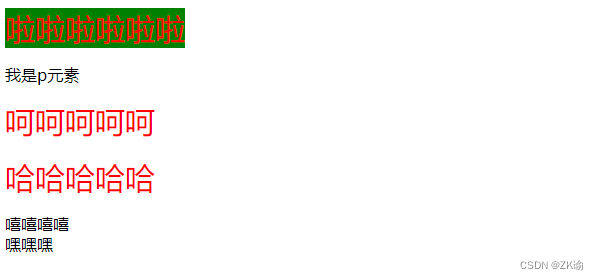
(5)后代选择器(descendant combinator)(重要)
-
后代选择器一: 所有的后代(直接/间接的后代)
-
选择器之间以空格分割
-
-
-
后代选择器二: 直接子代选择器(必须是直接自带)
- 选择器之间以 > 分割
- 选择器之间以 > 分割
<!DOCTYPE html>
<html lang="en">
<head>
  <meta charset="UTF-8">
  <meta http-equiv="X-UA-Compatible" content="IE=edge">
  <meta name="viewport" content="width=device-width, initial-scale=1.0">
  <title>Document</title>
  <style>
    /* home的下面的所有的span */
    .home span {
      color: red;
      font-size: 30px;
    }
    /* .home的子代的span元素(紧挨着home的span)设置背景元素 */
    /* 大于号 >表示直接子代 */
    .home > span {
      background-color: green;
    }
  </style>
</head>

<body>
  <div class="home">
    <span>啦啦啦啦啦啦</span>
    <div class="box">
      <p>我是p元素</p>
      <span>呵呵呵呵呵</span>
    </div>

    <div class="content">
      <div class="desc">
        <p>
          <span>哈哈哈哈哈</span>
        </p>
      </div>
    </div>
  </div>

  <!-- 不希望被选中 -->
  <span>嘻嘻嘻嘻</span>
  <div>
    <span>嘿嘿嘿</span>
  </div>

</body>
</html>
(6)弟选择器(sibling combinator)(了解)
- 兄弟选择器一: 相邻兄弟选择器
- 使用符号 + 连接
- 使用符号 + 连接
- 兄弟选择器二: 普遍兄弟选择器 ~
- 使用符号 ~ 连接
- 使用符号 ~ 连接
<!DOCTYPE html>
<html lang="en">
<head>
  <meta charset="UTF-8">
  <meta http-equiv="X-UA-Compatible" content="IE=edge">
  <meta name="viewport" content="width=device-width, initial-scale=1.0">
  <title>Document</title>
  <style>
    /* 设置相邻兄弟两种方式 */
    /* 方式一 */
    /* .box + div {
      color: red;
    } */
    /* 方式二 */
    .box + .content {
      color: red;
    }

    /* 设置所有兄弟 */
    .box ~ div {
      font-size: 50px;
    }
  </style>
</head>
<body>
  <div class="home">
    <div class="box">呵呵呵呵</div>
    <div class="content">哈哈哈哈哈哈</div>
    <div>嘻嘻嘻嘻</div>
    <div>嘿嘿嘿嘿</div>
  </div>
</body>
</html>
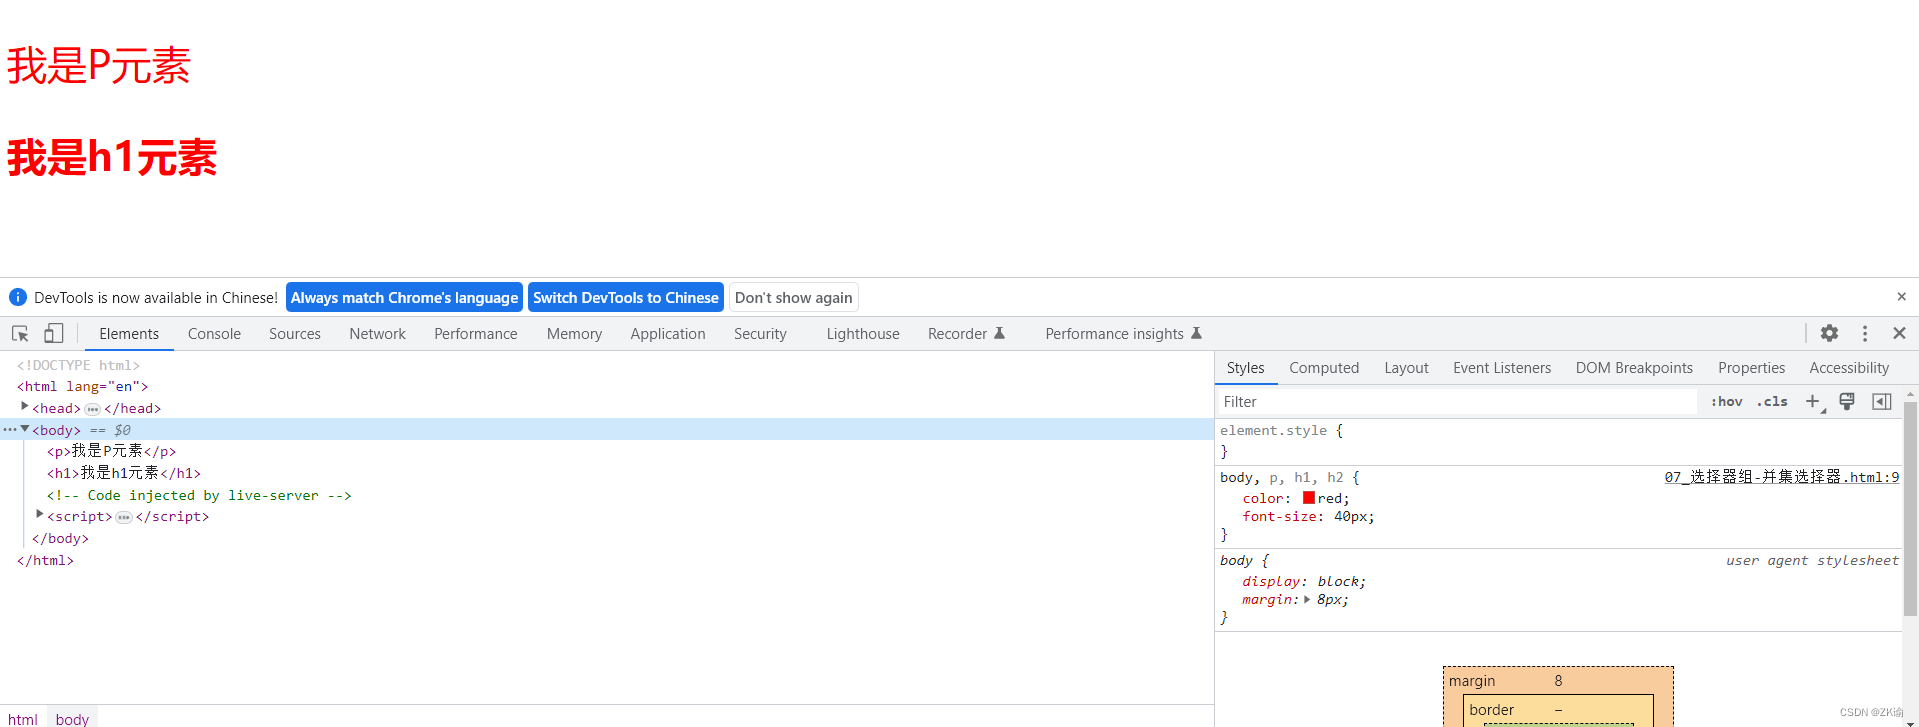
(7)选择器组(重要)
-
交集选择器: 需要同时符合两个选择器条件(两个选择器紧密连接)
- 在开发中通常为了精准的选择某一个元素;
- 在开发中通常为了精准的选择某一个元素;
-
并集选择器: 符合一个选择器条件即可(两个选择器以,号分割)
- 在开发中通常为了给多个元素设置相同的样式;
- 在开发中通常为了给多个元素设置相同的样式;
<!DOCTYPE html>
<html lang="en">
<head>
  <meta charset="UTF-8">
  <meta http-equiv="X-UA-Compatible" content="IE=edge">
  <meta name="viewport" content="width=device-width, initial-scale=1.0">
  <title>Document</title>
  <style>
    body, p, h1, h2 {
      color: red;
      font-size: 40px;
    }
  </style>
</head>
<body>
  <p>我是P元素</p>
  <h1>我是h1元素</h1>
</body>
</html>
(8)认识伪类
-
什么是伪类呢?
- Pseudo-classes: 翻译过来是伪类;
- 伪类是选择器的一种,它用于选择处于特定状态的元素;
-
比如我们经常会实现的: 当手指放在一个元素上时, 显示另外一个颜色;
-
常见的伪类有
-
1.动态伪类(dynamic pseudo-classes)
- :link、:visited、:hover、:active、:focus
-
2.目标伪类(target pseudo-classes)
- :target
-
3.语言伪类(language pseudo-classes)
-
-
:lang( )
-
4.元素状态伪类(UI element states pseudo-classes)
- :enabled、:disabled、:checked
-
5.结构伪类(structural pseudo-classes)(后续学习)
-
:nth-child( )、:nth-last-child( )、:nth-of-type( )、:nth-last-of-type( )
-
:first-child、:last-child、:first-of-type、:last-of-type
-
:root、:only-child、:only-of-type、:empty
-
6.否定伪类(negation pseudo-classes)(后续学习)
- :not()
-
所有的伪类: https://developer.mozilla.org/zh-CN/docs/Web/CSS/Pseudo-classes
-
动态伪类(dynamic pseudo-classes)
- 使用举例
* a:link 未访问的链接
* a:visited 已访问的链接
* a:hover 鼠标挪动到链接上(重要)
* a:active 激活的链接(鼠标在链接上长按住未松开) - 使用注意
- :hover必须放在:link和:visited后面才能完全生效
- :active必须放在:hover后面才能完全生效
- 所以建议的编写顺序是 :link、:visited、:hover、:active
- 除了a元素,:hover、:active也能用在其他元素上
- 动态伪类 - :focus
- :focus指当前拥有输入焦点的元素(能接收键盘输入)
- 文本输入框一聚焦后,背景就会变红色
- 因为链接a元素可以被键盘的Tab键选中聚焦,所以:focus也适用于a元素
- 动态伪类编写顺序建议为
- :link、:visited、:focus、:hover、:active
- 直接给a元素设置样式,相当于给a元素的所有动态伪类都设置了
- 相当于a:link、a:visited、a:hover、a:active、a:focus的color都是red···
- :focus指当前拥有输入焦点的元素(能接收键盘输入)
- 使用举例
-
<!DOCTYPE html>
<html lang="en">
<head>
  <meta charset="UTF-8">
  <meta http-equiv="X-UA-Compatible" content="IE=edge">
  <meta name="viewport" content="width=device-width, initial-scale=1.0">
  <title>Document</title>
  <style>
    /* a元素的链接从来没有被访问过 */
    a:link {
      color: red;
    }

    /* a元素被访问过了颜色 */
    a:visited {
      color: green;
    }

    /* a/input 元素聚焦(获取焦点) */
    a:focus {
      color: yellow;
    }

    /* a元素鼠标放在上面 */
    a:hover {
      color: blue;
    }

    /* 点下去了,但是还没松手 */
    a:active {
      color: purple;
    }

    /* a上面的所有的状态都是blue */
    /* a {
      color: blue;
    } */

  </style>
</head>
<body>
  <a href="http://www.mi.com">小米</a>
  <a href="http://www.baidu.com">百度</a>

  <input type="text">

  <div>我是div元素</div>
</body>
</html>
(9)伪元素(pseudo-elements)(重要)
- 常用的伪元素有
- :first-line、::first-line
- :first-letter、::first-letter
- :before、::before
- :after、::after
- 为了区分伪元素和伪类,建议伪元素使用2个冒号,比如::first-line
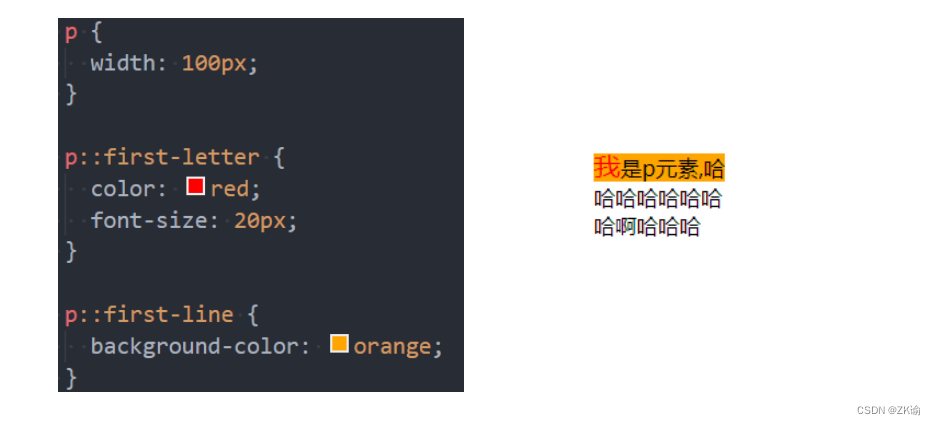
- 伪元素 - ::first-line - ::first-letter(了解)
- ::first-line可以针对首行文本设置属性
- ::first-letter可以针对首字母设置属性
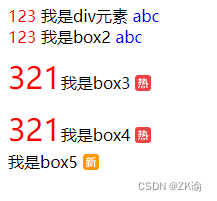
- 伪元素 - ::before和::after(常用)
- ::before和::after用来在一个元素的内容之前或之后插入其他内容(可以是文字、图片)
- 常通过 content 属性来为一个元素添加修饰性的内容。
<!DOCTYPE html>
<html lang="en">
<head>
  <meta charset="UTF-8">
  <meta http-equiv="X-UA-Compatible" content="IE=edge">
  <meta name="viewport" content="width=device-width, initial-scale=1.0">
  <title>Document</title>
  <style>
    .before {
      color: red;
    }
    .after {
      color: blue;
    }

    /* 伪元素 */
    .item::before {
      content: "321";
      color: red;
      font-size: 30px;
    }

    .item::after {
      /* content: "abc"; */
      content: url(../images/hot_icon.svg);
      color: green;
      font-size: 40px;

      /* 位置不是很好看 */
      position: relative; /*相对定位*/
      left: 5px;
      top: 2px
    }

    .new::after {
      /* 位置不是很好看 */
      content: url(../images/new_icon.svg);
      /* 位置不是很好看 */
      position: relative;
      left: 5px;
      top: 2px
    }

    /* 额外的补充 */
    .box6::after {
      /* 使用伪元素的过程中,不要将content省略 */
      content: "";

      display: inline-block;
      width: 8px;
      height: 8px;
      background-color: #f00;
    }
  </style>
</head>
<body>
  <div class="bax">
    <!-- 还需要考虑换行符 -->
    <span class="before">123</span>
    我是div元素
    <span class="after">abc</span>
  </div>

  <div class="box2">
    <span class="before">123</span>
    我是box2
    <span class="after">abc</span>
  </div>

  <!-- 伪元素 -->
  <!-- 增加其他的话只需要添加item就可以了 -->
  <div class="box3 item">我是box3</div>
  <div class="box4 item">我是box4</div>
  <div class="box5 new">我是box5</div>

  <!-- 伪元素补充 -->
  <div class="box6">我是box6</div>
</body>
</html>
