目录
前言
梳理每个模块的使用和代码,小技巧以及整个比赛的设计流程。
第一步需要做的事情
比赛官方提供了LCD的驱动程序,直接在此程序上添加其他的,就不需要点LCD的引脚也不需要移动LCD的驱动程序。
●新建一个文件夹将官方提供的HAL_LCD移入新建的文件夹中,注意文件夹不能含有中文字符。
●main.c中有很多关于LCD的显示函数,将不需要的删去即可。
●官方还提供了I2C的驱动程序,将I2C的驱动程序直接添加进去。
Cube MX中的设置
因为比赛时间原因,我们将比赛内容所需要的功能系统的进行统一的设置。
GPIO引脚设置:
①LED的设置:(PC8~PC15)output
将out—level设置为high高电平使程序开始LED处于灭的状态,
给LED起上自己的名字(LED1,LED2)方便程序的书写,
PD2output,设置锁存器,使LED与LCD不起冲突。
②按键的设置:(PB0~PB2,PA0) intput,起名B1~B4。
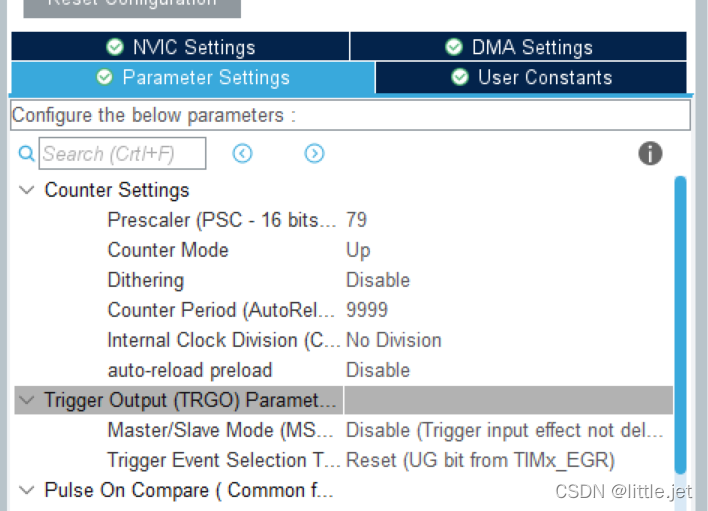
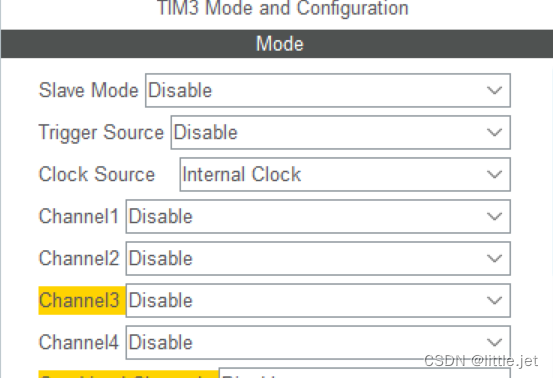
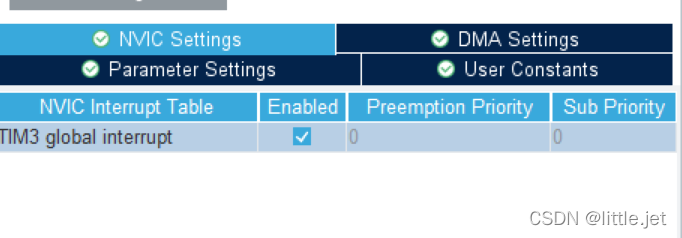
为按键设置计数器TIM3,将Clock Source设置为 Internal Clock,设置parameter将Prescal 设置为79,Counter Period设置为9999,打开中断。

③ADC的设置:在Aanalog中选择ADC2,选择N15接口。
④USAT的设置:在Connectivity中选择USAT1,模式选择Asynhrous,根据题意设置波特率(一般为9600),打开中断。
⑤I2C的设置:将PB6,PB7设置output。
RCC,SYS,COLCK的设置:
RCC->Crystal/Ceramic Resonator
SYS->Serial Wire
Clock->24HZ->HSE->PLLCLK->80HZ
LED
新建两个空白文件分别命名为led.c、led.h,保存后添加在工程里。
led.c文件:
#include "led.h"
void LED_Disp(unsigned char dsled)
{
	HAL_GPIO_WritePin(GPIOC,GPIO_PIN_All,GPIO_PIN_SET);//将所有灯初始化为高电平
	HAL_GPIO_WritePin(GPIOC,dsled<<8,GPIO_PIN_RESET); //点亮dsled
	HAL_GPIO_WritePin(GPIOD,GPIO_PIN_2,GPIO_PIN_SET);  //锁存器的开启
	HAL_GPIO_WritePin(GPIOD,GPIO_PIN_2,GPIO_PIN_RESET);
}
led.h文件
#ifndef _LED_
#define _LED_

#include "main.h"//避免定义和命名重复
void LED_Disp(unsigned char dsled);
#endif
main.c
添加LED显示函数void LED_Disp(unsigned char dsled);
#include "led.h"
初始化LED_Disp(0x00);
点亮LED1:
LED_Disp(0x01);
HAL_Delay(500);
LED_Disp(0x00);
HAL_Delay(500);LED2为(0x02),LED3为(0x04)....2进制转16进制。
KEY
新建两个空白文件分别命名为interrupt.c、interrupt.h,保存后添加在工程里。
interrupt.c
#include "intterupt.h"
struct keys key[]={0,0,0,0};

void HAL_TIM_PeriodElapsedCallback(TIM_HandleTypeDef *htim)
{
	if(htim->Instance==TIM3)
	{
		key[0].key_sta=HAL_GPIO_ReadPin(B1_GPIO_Port,B1_Pin);
		key[1].key_sta=HAL_GPIO_ReadPin(B2_GPIO_Port,B2_Pin);
		key[2].key_sta=HAL_GPIO_ReadPin(B3_GPIO_Port,B3_Pin);
		key[3].key_sta=HAL_GPIO_ReadPin(B4_GPIO_Port,B4_Pin);
	}
	for(int i=0;i<4;i++)
	{
		switch(key[i].key_judge)
		{
			case 0:     //防抖
			{
				if(key[i].key_sta==0)
					key[i].key_judge=1;
			}
			break;
			case 1:
			{
				if(key[i].key_sta==0)
				{
					key[i].key_flag=1;
					key[i].key_judge=2;
				}
				else
				{
					key[i].key_judge=0;
				}
				break;
			 case 2:
			{
				if(key[i].key_sta==1)
				{
					key[i].key_judge=0;
				}
			}
			}
		}
	}
}
interrupt.h
#ifndef _intterupt_
#define _intterupt_

#include "main.h"
#include "stdbool.h"
struct keys
{
	unsigned char key_judge;
	bool key_sta;
	bool key_flag;
};
void HAL_TIM_PeriodElapsedCallback(TIM_HandleTypeDef *htim);
#endif
main.c
添加函数void HAL_TIM_PeriodElapsedCallback(TIM_HandleTypeDef *htim);
引入变量extern struct keys key[];
#include "intterupt.h"
打开tim3 HAL_TIM_Base_Start_IT(&htim3);
按键实现:
if(key[0].key_flag==1)
{
............写需要实现的功能
key[0].key_flag=0;//置零
}
不加计时器的按键(简单的实现按键功能)
void Key_Scan()
{
    if(HAL_GPIO_ReadPin(B1_GPIO_Port,B1_Pin)==GPIO_PIN_RESET)
    {
        HAL_Delay(10);
        if(HAL_GPIO_ReadPin(B1_GPIO_Port,B1_Pin)==GPIO_PIN_RESET)
            {
               while(HAL_GPIO_ReadPin(B1_GPIO_Port,B1_Pin)==GPIO_PIN_RESET)
                {
                    .........

                }

            }
    }
}
I2C
在I2C.c中或main.c中添加一段初始化程序 。(在主函数中添加#include i2c.h)
uint8_t eeprom_read(unsigned char address)
{
	unsigned char val;
	I2CStart( );  //起始
	I2CSendByte(0xa0);  //从设备地址发送字节(0xa0)末位为0表示写入
	I2CWaitAck( ); //等待确认

	I2CSendByte(address);//发送存储位置
	I2CWaitAck( );

	I2CStart( );
	I2CSendByte(0xa1);  //发送位置读入
	I2CWaitAck( );
	val=I2CReceiveByte( ); //接收的字节
	I2CWaitAck( );
	I2CStop( );
	return (val);
}

uint8_t eeprom_write(unsigned char address,unsigned char info)
{
	I2CStart( );
	I2CSendByte(0xa0);
	I2CWaitAck( );

	I2CSendByte(address);
	I2CWaitAck( );
	I2CSendByte(info);
	I2CWaitAck( );
	I2CStop( );
}
