1. 简介
Dubbo是一款高性能、轻量级的开源Java RPC框架,由阿里巴巴公司开发并开源。它提供了三大核心能力:面向接口的远程方法调用、智能负载均衡和自动服务注册与发现。
1.1 主要特性
- 面向接口代理的高性能RPC调用:提供高性能的基于代理的远程调用解决方案,服务以接口为粒度,为开发者屏蔽远程调用底层细节;
- 服务自动注册与发现:支持基于ZooKeeper的集群环境中的服务注册与发现,使得服务消费者能够动态地感知到服务提供者的变化;
- 智能负载均衡:内置多种负载均衡策略,能够根据实际情况自动选择最优的服务提供者;
- 高度可扩展性:提供服务熔断、服务降级等多种灵活的扩展点,能够应对不同的业务场景;
- 运行期流量调度:可以在运行期间配置路由规则,实现灰度发布、流量控制等功能;
- 可视化的服务治理与运维:提供丰富的监控手段,支持服务治理、运维、运维监控等功能;
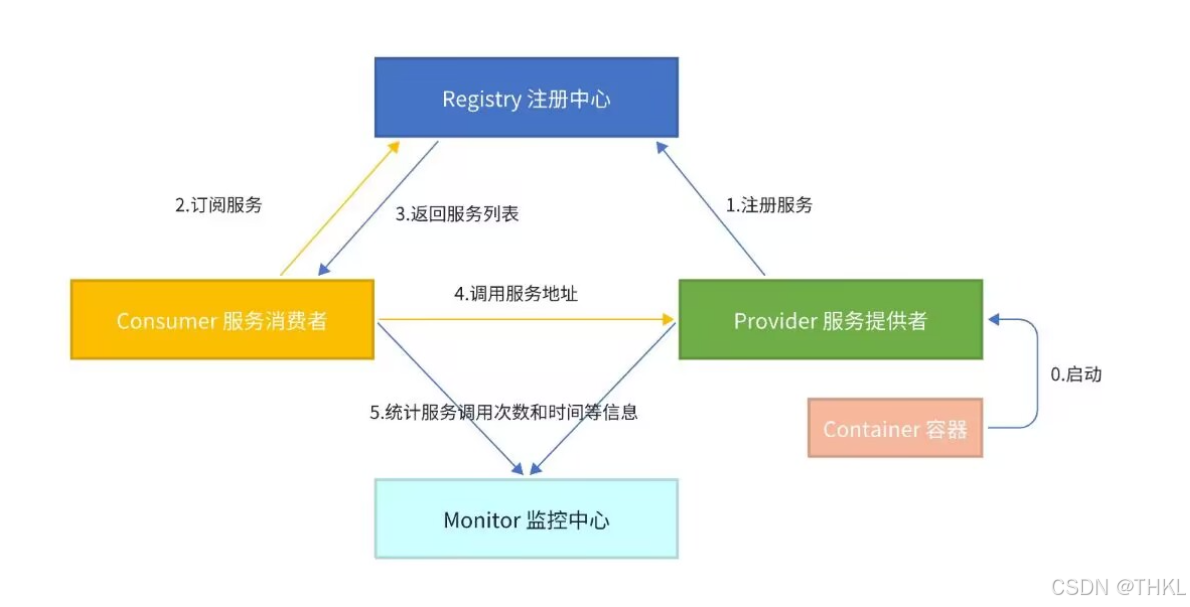
1.2 架构组成
- Provider:暴露服务的服务提供方;
- Consumer:调用远程服务的服务消费方;
- Registry:服务注册与发现的注册中心;
- Monitor:统计服务的调用次数和调用时间的监控中心;
- Container:服务运行容器。
工作原理:
- 启动时服务提供者向注册中心注册自己提供的服务;
- 服务消费者启动时向注册中心订阅自己所需的服务;
- 注册中心返回服务提供者地址列表给消费者;
- 服务消费者从提供者地址列表中,根据负载均衡算法直接调用提供者;
- 监控中心统计调用次数和时间。
1.3 注册中心
注册中心是Dubbo架构中的一个核心组件,负责服务的注册与发现。在Dubbo中,服务提供者在启动时会在注册中心注册自己提供的服务,而服务消费者则会向注册中心订阅自己所需的服务。注册中心维护着服务提供者的列表,当服务提供者发生变更时(例如上线或下线),注册中心会通知服务消费者,从而实现服务列表的动态更新。
Dubbo支持多种注册中心实现,常用的有:
- ZooKeeper:ZooKeeper是一个分布式应用程序协调服务,它提供了数据发布/订阅、负载均衡、命名服务、分布式协调/通知等功能,非常适合作为Dubbo的注册中心;
- Redis:Redis 是一个开源的、高性能的键值数据库,它也可以作为Dubbo的注册中心。Redis 注册中心的特点是轻量级和简单易用;
- Multicast:多播注册中心是基于UDP多播的网络协议实现的,它不需要单独的注册中心服务器,适用于小规模、局域网环境;
- Nacos:Nacos是一个更现代的服务发现和配置管理平台,它集成了服务注册中心和服务配置中心的功能,也可以作为Dubbo的注册中心;
- Simple:Dubbo还提供了一个简单的注册中心实现,它通常用于本地开发和测试环境。
在实际应用中,ZooKeeper是使用最广泛的Dubbo 注册中心实现,它在分布式系统中有很好的稳定性和成熟度。然而,随着Nacos等新技术的出现,ZooKeeper的地位可能会受到挑战,因为Nacos提供了更为丰富的功能和更好的用户体验。
1.4 Zookeeper
ZooKeeper是一个开源的分布式协调服务,由Apache软件基金会维护。它为分布式应用提供一致性服务,并处理分布式环境中经常出现的各种问题,如数据一致性问题、集群管理、分布式锁等。
ZooKeeper的架构通过一个简单的数据模型来实现,该模型类似于标准的文件系统。它运行在一组服务器上,这些服务器共同维护一个共享的层次化命名空间,这个命名空间由一系列数据节点组成,称为znode。客户端可以通过这些znode来读取数据、监控数据变化,以及更新数据。
ZooKeeper在设计时就考虑了高可用性和容错性。它可以容忍集群中部分服务器的故障,并能够在剩余的服务器上继续运行。ZooKeeper还非常注重性能,能够处理成千上万的客户端。
ZooKeeper在分布式系统中被广泛应用于各种场景:
- 配置管理:分布式系统中的配置信息可以通过ZooKeeper进行集中管理;
- 集群管理:ZooKeeper可以用来管理集群中的成员关系,例如节点加入或离开集群的通知;
- 分布式锁:在分布式系统中,多个进程可能需要访问共享资源,ZooKeeper可以提供分布式锁服务,确保数据的一致性;
- 同步服务:在分布式系统中,不同服务或任务之间可能需要同步操作,ZooKeeper可以提供这种同步机制。
2. 快速使用
2.1 安装Zookeeper注册中心
请先确保系统上安装了Java环境,因为ZooKeeper是用Java编写的
java -version
确保 Java 版本是8或更高版本,因为ZooKeeper3.5.x需要 Java8或更高版本。
下载Zookeeper:Zookeeper官方下载地址
Windows系统下安装
-
下载并解压 apache-zookeeper-3.8.4-bin.tar.gz;
-
在ZooKeeper解压目录下,找到
conf文件夹,并将zoo_sample.cfg文件复制一份,重命名为zoo.cfg; -
编辑
zoo.cfg文件,根据需要配置ZooKeeper。例如,可以设置数据目录(dataDir)和日志目录(dataLogDir)。# The number of milliseconds of each tick tickTime=2000 # The number of ticks that the initial # synchronization phase can take initLimit=10 # The number of ticks that can pass between # sending a request and getting an acknowledgement syncLimit=5 # The directory where the snapshot is stored. dataDir=C:\\zookeeper\\data # The directory where the log files are stored. dataLogDir=C:\\zookeeper\\logs # The port at which the clients will connect clientPort=2181确保
dataDir和dataLogDir指定的路径存在,或者可以手动创建这些目录。 -
启动Zookeeper
打开命令提示符(CMD),切换到ZooKeeper解压目录下的 bin 目录,然后运行
zkServer.cmd来启动 ZooKeeper 服务。cd C:\path\to\zookeeper\apache-zookeeper-3.7.0-bin\bin zkServer.cmd -
验证Zookeeper
在另一个命令提示符窗口中,运行
zkServer.cmd status来检查ZooKeeper服务的状态。zkServer.cmd status -
停止Zookeeper
当需要停止ZooKeeper服务时,可以在命令提示符中运行
zkServer.cmd stop。zkServer.cmd stop -
连接到Zookeeper
可以使用 zkCli.cmd 来连接到ZooKeeper服务,并执行一些基本操作。
zkCli.cmd -server localhost:2181
Linux(CentOS7)系统下安装
首先分享一个链接服务器的工具Xshell和xfp免费版
百度网盘地址:https://pan.baidu.com/s/1AFU5Ox_DH1RoQrZSMrjLYQ?pwd=uvyw
提取码:uvyw
-
下载ZooKeeper(可以找到下载链接右键复制链接地址)
wget https://dlcdn.apache.org/zookeeper/zookeeper-3.9.2/apache-zookeeper-3.9.2-bin.tar.gz -
解压ZooKeeper
tar -zxf apache-zookeeper-3.7.0-bin.tar.gz -
配置ZooKeeper
在ZooKeeper解压目录下,复制一份配置文件样本并命名为
zoo.cfg。cd apache-zookeeper-3.7.0-bin cp conf/zoo_sample.cfg conf/zoo.cfg然后编辑
conf/zoo.cfg文件,根据需要配置ZooKeeper。例如,可以设置数据目录(dataDir)和日志目录(dataLogDir)。# The number of milliseconds of each tick tickTime=2000 # The number of ticks that the initial # synchronization phase can take initLimit=10 # The number of ticks that can pass between # sending a request and getting an acknowledgement syncLimit=5 # The directory where the snapshot is stored. dataDir=/var/lib/zookeeper # The directory where the log files are stored. dataLogDir=/var/log/zookeeper # The port at which the clients will connect clientPort=2181 -
启动ZooKeeper
在ZooKeeper解压目录下,使用
zkServer.sh脚本来启动ZooKeeper服务。./bin/zkServer.sh start可以使用
status参数来检查ZooKeeper服务的状态。./bin/zkServer.sh status -
停止ZooKeeper
当需要停止ZooKeeper服务时,可以使用以下命令:
./bin/zkServer.sh stop -
连接到ZooKeeper
可以使用
zkCli.sh脚本来连接到ZooKeeper服务,并执行一些基本操作。./bin/zkCli.sh -server localhost:2181
Linux(CentOS7)使用Docker安装
在CentOS7系统上使用Docker安装ZooKeeper是一个相对简单和快速的过程。以下是详细步骤:
-
安装Docker
首先确保CentOS系统上已经安装了Docker。如果没有安装,可以使用以下命令来安装Docker:
sudo yum install -y yum-utils device-mapper-persistent-data lvm2 sudo yum-config-manager --add-repo https://download.docker.com/linux/centos/docker-ce.repo sudo yum install -y docker-ce docker-ce-cli containerd.io sudo systemctl start docker sudo systemctl enable docker -
拉取ZooKeeper镜像
使用Docker命令拉取ZooKeeper官方镜像:
sudo docker pull zookeeper -
运行ZooKeeper容器
运行一个ZooKeeper容器实例。以下命令将启动一个名为
zookeeper的ZooKeeper容器,并映射端口2181(客户端连接端口):sudo docker run -d --name zookeeper -p 2181:2181 zookeeper如果需要持久化ZooKeeper的数据,可以挂载一个卷到容器中的
/data目录:sudo docker run -d --name zookeeper -p 2181:2181 -v /usr/local/zookeeper/data:/data -v /usr/local/zookeeper/conf:/conf -v /usr/local/zookeeper/logs:/datalog zookeeper确保替换
/usr/local/zookeeper/*为实际的宿主机目录,用于存储ZooKeeper的数据。配置文件(/usr/local/zookeeper/conf 会得到挂载的容器内部的那份配置文件)如下:
dataDir=/data # 存储数据文件的目录 dataLogDir=/datalog # 存储事务日志文件的目录 tickTime=2000 # 基本时间单元,影响各种超时设置 initLimit=5 # 启动时等待客户端连接的最长时间 syncLimit=2 # leader 等待 follower 的最长时间 autopurge.snapRetainCount=3 # 数据快照文件保留个数 autopurge.purgeInterval=0 # 自动清理数据快照和事务日志的时间间隔 maxClientCnxns=60 # 单个客户端与服务器之间的最大连接数 standaloneEnabled=true # 启用单机模式 admin.enableServer=true # 启用 admin 服务器 server.1=localhost:2888:3888;2181 # 集群中的节点列表 -
验证ZooKeeper
运行以下命令来检查ZooKeeper容器的状态:
sudo docker ps还可以使用
docker logs命令查看ZooKeeper的日志:sudo docker logs zookeeper -
连接到 ZooKeeper
可以使用 Docker 执行命令来连接到 ZooKeeper 容器,并使用
zkCli.sh工具进行操作:sudo docker exec -it zookeeper zkCli.sh
2.2 安装运行dubbo-admin
Dubbo-Admin是Dubbo的可视化管理控制台,它可以用于服务治理和运维监控。
提供了以下主要功能:
- 服务治理:Dubbo-Admin可以用于注册和管理Dubbo服务。它支持服务的发布、订阅和监控,可以查看和管理注册中心中的服务信息、提供者和消费者列表等。
- 服务监控:Dubbo-Admin可以提供Dubbo服务的健康状况、性能指标和调用日志等监控信息。它可以显示服务的调用次数、响应时间、错误率等指标,帮助开发人员和运维人员监控服务的运行情况。
- 服务测试:Dubbo-Admin提供了服务测试的功能,可以通过界面进行服务的测试和调试,方便开发人员进行接口的开发和调试工作。
- 配置管理:Dubbo-Admin可以用于管理Dubbo的配置信息,包括协议配置、注册中心配置、服务提供者和消费者的配置等。
正常安装启动
-
安装Java环境
Dubbo-Admin是一个Java Web应用程序,因此需要确保系统上已经安装了Java运行环境(JRE)或Java开发工具包(JDK)可以从Oracle官网下载并安装Java。
-
下载Dubbo-Admin
可以从Dubbo-Admin的GitHub仓库下载最新的发布版本:
git clone https://github.com/apache/dubbo-admin.git cd dubbo-admin或者直接访问GitHub的Release 页面下载对应的压缩包并解压。
-
配置Dubbo-Admin
在
dubbo-admin-server/src/main/resources/application.properties文件中,配置注册中心的地址和其他相关配置。例如,如果使用 ZooKeeper 作为注册中心,配置如下:admin.registry.address=zookeeper://localhost:2181 admin.config-center=zookeeper://localhost:2181 admin.metadata-report.address=zookeeper://localhost:2181确保替换
localhost:2181为ZooKeeper实例地址。 -
将dubbo-admin-server目录下pom.xml做如下修改
<!-- 注释掉 --> <dependency> <groupId>org.springframework.boot</groupId> <artifactId>spring-boot-starter-test</artifactId> <scope>test</scope> </dependency> <!-- 注释掉 --> <plugin> <artifactId>maven-resources-plugin</artifactId> <executions> <execution> <id>copy Vue.js frontend content</id> <phase>generate-resources</phase> <goals> <goal>copy-resources</goal> </goals> <configuration> <outputDirectory>src/main/resources/public</outputDirectory> <overwrite>true</overwrite> <resources> <resource> <directory>${project.parent.basedir}/dubbo-admin-ui/target/dist</directory> </resource> </resources> </configuration> </execution> </executions> </plugin> -
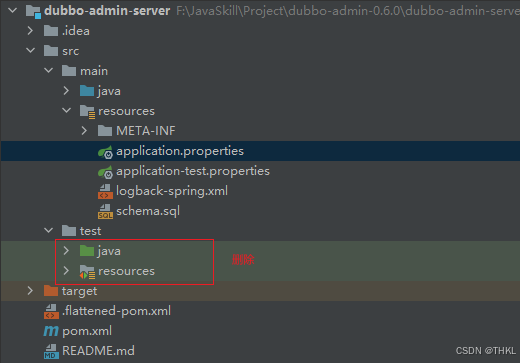
把test下删除,不要测试类,我在打包时出现报错了
-
构建Dubbo-Admin
在Dubbo-Admin的dubbo-admin-service目录下,使用Maven来构建项目(这个过程可能会有点久):
mvn clean package构建完成后,会在
dubbo-admin-distribution/target目录下找到dubbo-admin-0.6.0-SNAPSHOT.jar(版本号可能会有所不同)。 -
运行Dubbo-Admin
使用Java命令运行Dubbo-Admin:
java -jar dubbo-admin-server-0.6.0-SNAPSHOT.jar确保替换
dubbo-admin-server-0.6.0-SNAPSHOT.jar为构建的实际文件名,jar包也可以放到Linux下运行。 -
接下来启动前端项目dubbo-admin-ui,是一个Vue项目,在这个目录下的命令行执行如下
# 运行 npm run dev -
访问Dubbo-Admin
打开浏览器,访问http://localhost:8080,应该能看到Dubbo-Admin的登录页面。
默认的用户名和密码是
root/root。 -
使用Dubbo-Admin
登录后,可以看到服务治理、服务查询、服务测试等功能。可以通过Dubbo-Admin查看服务的状态、调用情况,并进行一些服务治理操作。
Docker安装启动
-
安装Docker
确保系统上已经安装了Docker,如果没有安装,请参考前面的步骤安装Docker。
-
拉取Dubbo-Admin镜像
使用Docker命令拉取Dubbo-Admin官方镜像:
sudo docker pull apache/dubbo-admin -
运行Dubbo-Admin容器
运行一个Dubbo-Admin容器实例。以下命令将启动一个名为
dubbo-admin的Dubbo-Admin容器,并映射端口8080(HTTP 服务端口):sudo docker run -d --name dubbo-admin -p 8080:8080 apache/dubbo-admin -
配置Dubbo-Admin
Dubbo-Admin在启动时需要知道注册中心的信息,可以通过环境变量来配置这些信息。例如,如果使用ZooKeeper作为注册中心,可以使用以下命令启动容器,并设置ZooKeeper的地址:
sudo docker run -d --name dubbo-admin -p 8080:8080 \
  -e DUBBO_REGISTRY_ADDRESS=zookeeper://localhost:2181 \
  apache/dubbo-admin
确保替换
localhost:2181为ZooKeeper实例地址。 -
访问Dubbo-Admin
打开浏览器,访问http://localhost:8080,应该能看到Dubbo-Admin的登录页面。
默认的用户名和密码是
root/root。 -
使用Dubbo-Admin
登录后,可以看到服务治理、服务查询、服务测试等功能。可以通过Dubbo-Admin查看服务的状态、调用情况,并进行一些服务治理操作。
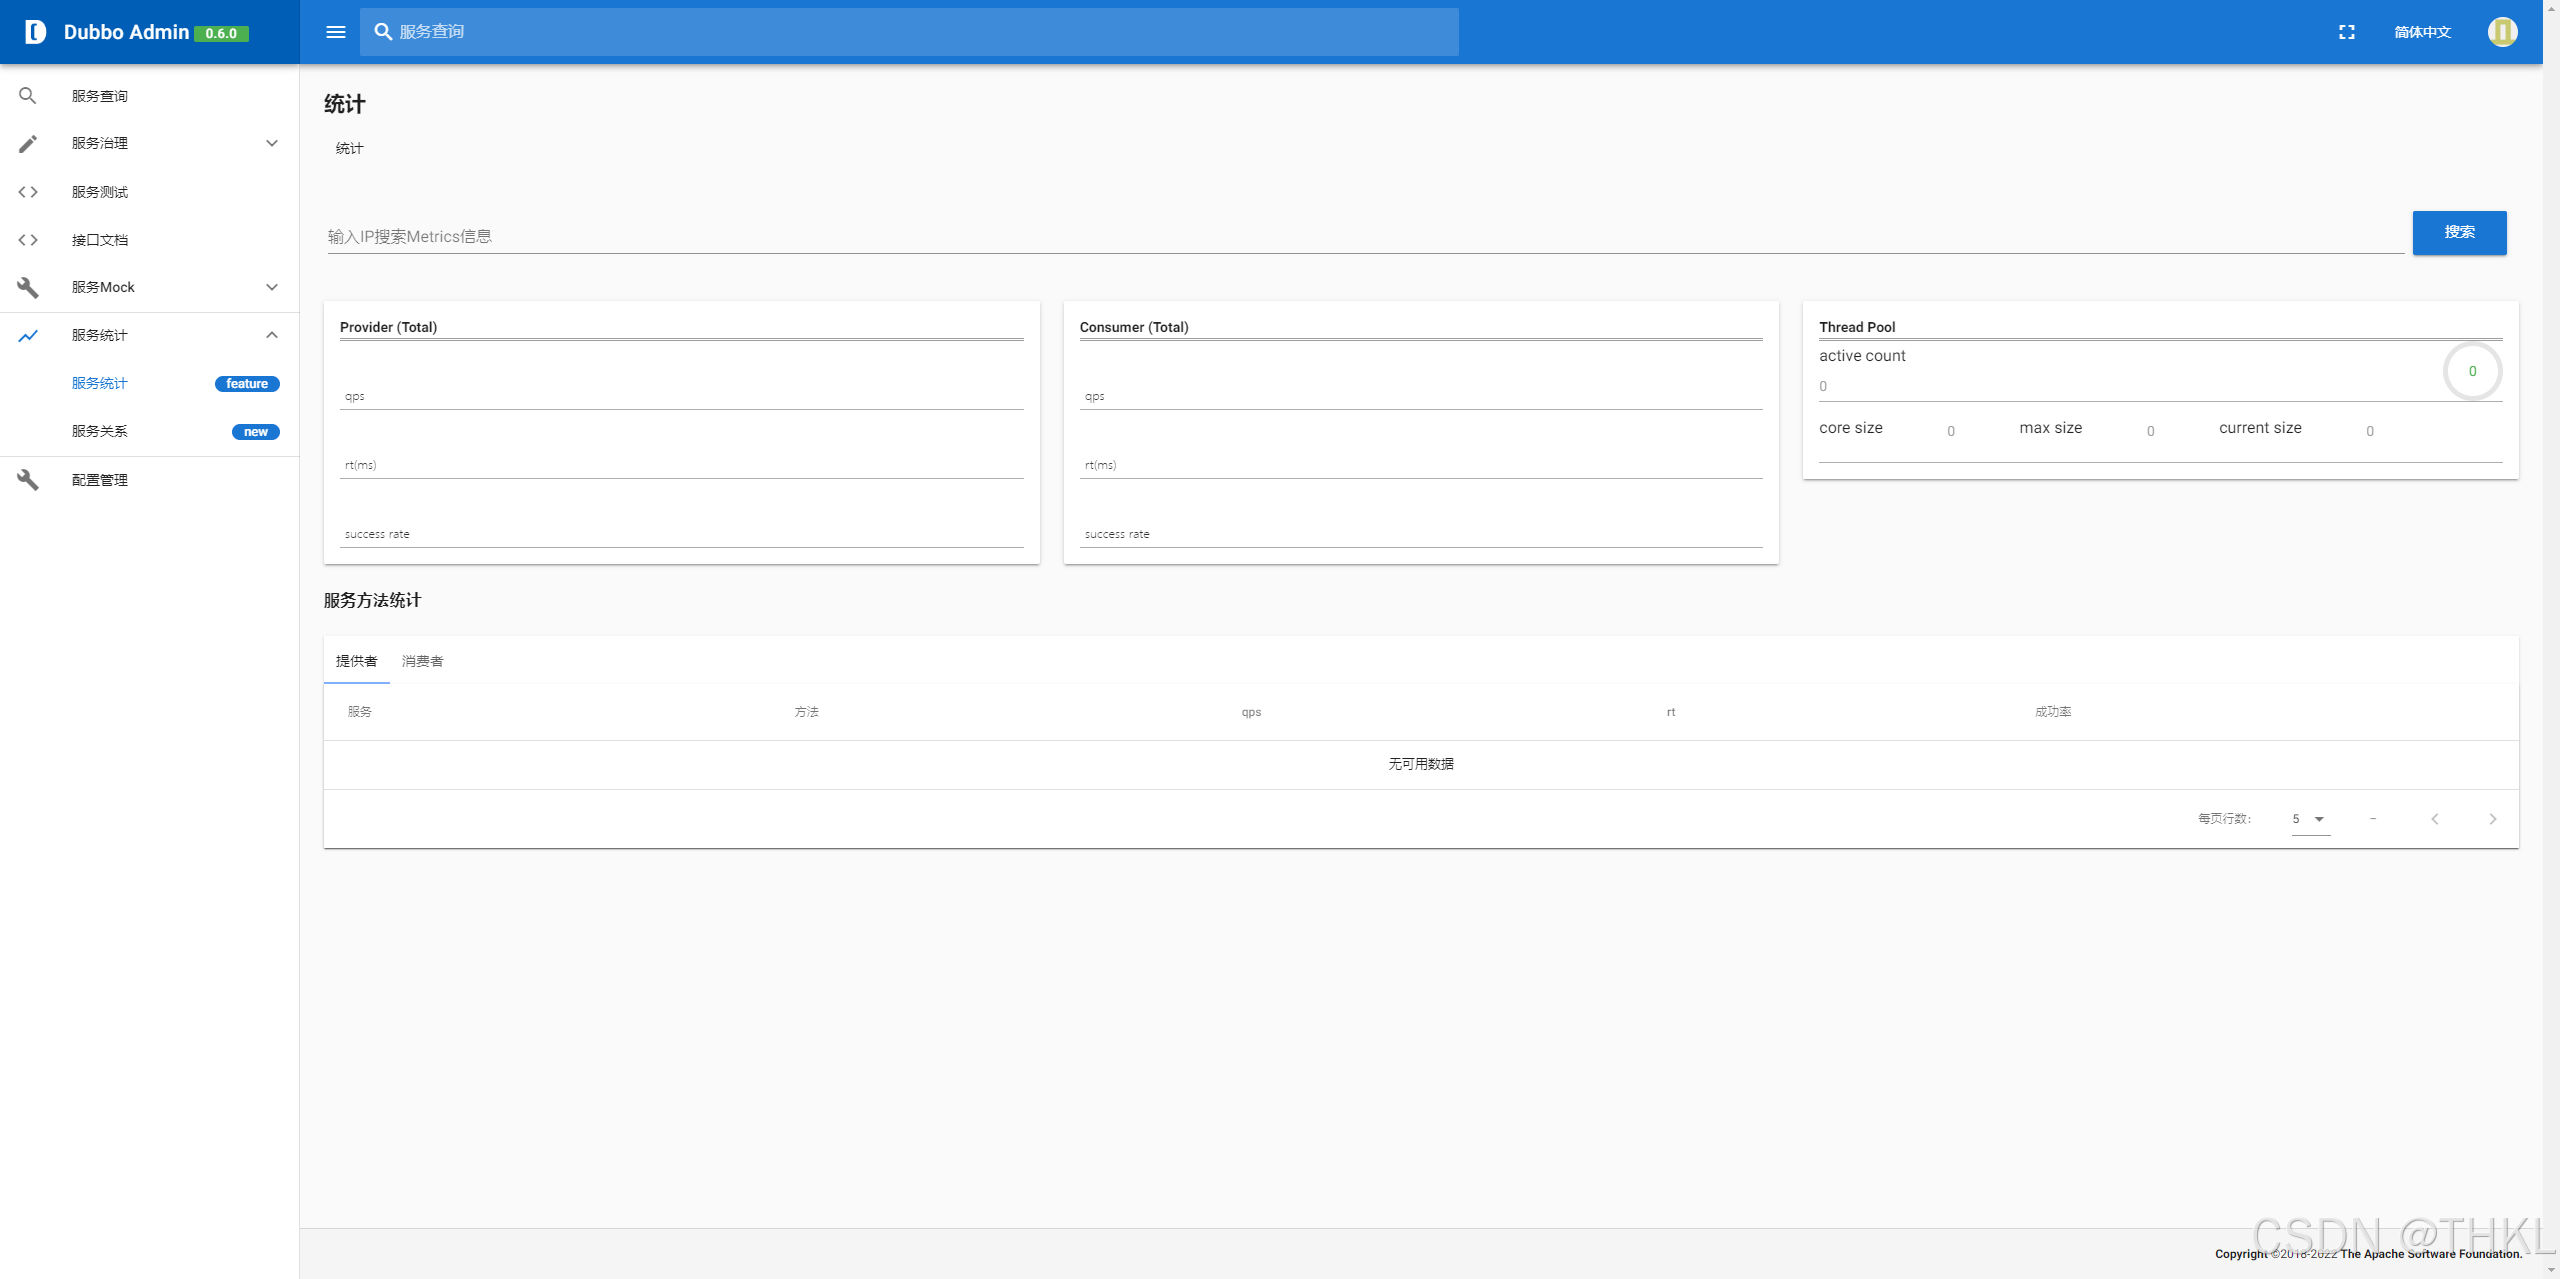
运行的页面图
2.3 构建服务提供者
基于SpringBoot和ZooKeeper构建一个服务提供者模块
-
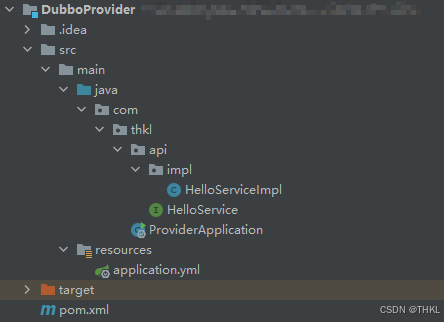
整个目录结构如下
-
创建Maven项目,pom.xml文件内容,添加 Dubbo 和 ZooKeeper 依赖
<?xml version="1.0" encoding="UTF-8"?> <project xmlns="http://maven.apache.org/POM/4.0.0" xmlns:xsi="http://www.w3.org/2001/XMLSchema-instance" xsi:schemaLocation="http://maven.apache.org/POM/4.0.0 http://maven.apache.org/xsd/maven-4.0.0.xsd"> <modelVersion>4.0.0</modelVersion> <groupId>com.thkl</groupId> <artifactId>DubboProvider</artifactId> <version>1.0-SNAPSHOT</version> <packaging>war</packaging> <name>DubboProvider Maven Webapp</name> <!-- FIXME change it to the project's website --> <url>http://www.example.com</url> <properties> <project.build.sourceEncoding>UTF-8</project.build.sourceEncoding> <maven.compiler.source>1.7</maven.compiler.source> <maven.compiler.target>1.7</maven.compiler.target> </properties> <!-- SpringBoot工程需要继承的父工程 --> <parent> <groupId>org.springframework.boot</groupId> <artifactId>spring-boot-starter-parent</artifactId> <version>2.6.2</version> </parent> <dependencies> <!-- Spring Boot Web Starter --> <dependency> <groupId>org.springframework.boot</groupId> <artifactId>spring-boot-starter-web</artifactId> </dependency> <!-- Dubbo Spring Boot Starter --> <dependency> <groupId>org.apache.dubbo</groupId> <artifactId>dubbo-spring-boot-starter</artifactId> <version>2.7.8</version> </dependency> <!-- ZooKeeper Client --> <dependency> <groupId>org.apache.curator</groupId> <artifactId>curator-framework</artifactId> <version>4.2.0</version> </dependency> <dependency> <groupId>org.apache.curator</groupId> <artifactId>curator-recipes</artifactId> <version>4.2.0</version> </dependency> </dependencies> <build> <plugins> <plugin> <groupId>org.springframework.boot</groupId> <artifactId>spring-boot-maven-plugin</artifactId> <executions> <execution> <goals> <goal>repackage</goal> </goals> </execution> </executions> </plugin> </plugins> </build> </project> -
配置 application.properties
在
src/main/resources/application.yml文件中配置 Dubbo 和 ZooKeeper 相关的配置。server: port: 8082 dubbo: application: name: dubbo-provider registry: address: zookeeper://localhost:2181 protocol: name: dubbo port: 20880 -
创建服务接口
创建一个服务接口,例如
HelloService。public interface HelloService { String sayHello(String name); } -
实现服务接口
创建一个服务实现类,实现
HelloService接口。import org.apache.dubbo.config.annotation.Service; import org.springframework.stereotype.Component; @DubboService(version = "1.0.0") @Component public class HelloServiceImpl implements HelloService { @Override public String sayHello(String name) { return "Hello, " + name; } } -
启用 Dubbo
在 Spring Boot 应用程序的主类上添加
@EnableDubbo注解。import org.apache.dubbo.config.spring.context.annotation.EnableDubbo; import org.springframework.boot.SpringApplication; import org.springframework.boot.autoconfigure.SpringBootApplication; @EnableDubbo @SpringBootApplication public class ProviderApplication { public static void main(String[] args) { SpringApplication.run(ProviderApplication.class, args); } } -
运行服务提供者
启动 Spring Boot 应用程序。服务提供者会自动注册到 ZooKeeper 注册中心。
这样,你就成功构建了一个基于 Spring Boot 和 ZooKeeper 的服务提供者模块。服务消费者可以通过 Dubbo 和 ZooKeeper 来发现并调用这个服务。
2.4 构建服务消费者
基于SpringBoot和ZooKeeper构建一个服务消费者模块
-
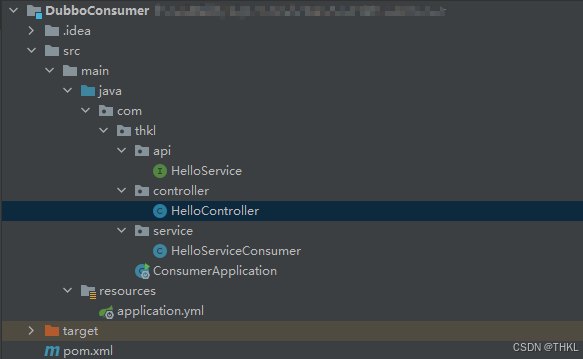
整个目录结构如下
-
创建Maven项目,pom.xml文件内容,添加 Dubbo 和 ZooKeeper 依赖
<?xml version="1.0" encoding="UTF-8"?> <project xmlns="http://maven.apache.org/POM/4.0.0" xmlns:xsi="http://www.w3.org/2001/XMLSchema-instance" xsi:schemaLocation="http://maven.apache.org/POM/4.0.0 http://maven.apache.org/xsd/maven-4.0.0.xsd"> <modelVersion>4.0.0</modelVersion> <groupId>com.thkl</groupId> <artifactId>DubboConsumer</artifactId> <version>1.0-SNAPSHOT</version> <packaging>jar</packaging> <properties> <project.build.sourceEncoding>UTF-8</project.build.sourceEncoding> <maven.compiler.source>1.7</maven.compiler.source> <maven.compiler.target>1.7</maven.compiler.target> </properties> <!-- SpringBoot工程需要继承的父工程 --> <parent> <groupId>org.springframework.boot</groupId> <artifactId>spring-boot-starter-parent</artifactId> <version>2.6.2</version> </parent> <dependencies> <!-- Spring Boot Web Starter --> <dependency> <groupId>org.springframework.boot</groupId> <artifactId>spring-boot-starter-web</artifactId> </dependency> <!-- Dubbo Spring Boot Starter --> <dependency> <groupId>org.apache.dubbo</groupId> <artifactId>dubbo-spring-boot-starter</artifactId> <version>2.7.8</version> </dependency> <!-- ZooKeeper Client --> <dependency> <groupId>org.apache.curator</groupId> <artifactId>curator-framework</artifactId> <version>4.2.0</version> </dependency> <dependency> <groupId>org.apache.curator</groupId> <artifactId>curator-recipes</artifactId> <version>4.2.0</version> </dependency> </dependencies> <build> <plugins> <plugin> <groupId>org.springframework.boot</groupId> <artifactId>spring-boot-maven-plugin</artifactId> <executions> <execution> <goals> <goal>repackage</goal> </goals> </execution> </executions> </plugin> </plugins> </build> </project> -
配置 application.properties
在
src/main/resources/application.yml文件中配置 Dubbo 和 ZooKeeper 相关的配置。server: port: 8083 dubbo: application: name: dubbo-consumer registry: address: zookeeper://localhost:2181 -
创建服务接口
本来正常步骤是需要将服务提供者的接口打包,然后用pom文件导入,这里使用简单的方式,直接将服务的接口拿过来,路径必须保证正确,即和服务提供者相同;
public interface HelloService { String sayHello(String name); } -
引用服务
使用
@DubboReference注解来引用服务提供者提供的HelloService。import com.thkl.api.HelloService; import org.apache.dubbo.config.annotation.DubboReference; import org.springframework.stereotype.Service; @Service public class HelloServiceConsumer { @DubboReference(version = "1.0.0") private HelloService helloService; public String sayHello(String name) { return helloService.sayHello(name); } } -
创建控制器
创建一个 Spring MVC 控制器,使用
HelloServiceConsumer来调用服务。import org.springframework.web.bind.annotation.GetMapping; import org.springframework.web.bind.annotation.RequestParam; import org.springframework.web.bind.annotation.RestController; @RestController public class HelloController { private final HelloServiceConsumer helloServiceConsumer; public HelloController(HelloServiceConsumer helloServiceConsumer) { this.helloServiceConsumer = helloServiceConsumer; } @GetMapping("/hello") public String hello(@RequestParam String name) { return helloServiceConsumer.sayHello(name); } } -
启用 Dubbo
在 Spring Boot 应用程序的主类上添加
@EnableDubbo注解。import org.apache.dubbo.config.spring.context.annotation.EnableDubbo; import org.springframework.boot.SpringApplication; import org.springframework.boot.autoconfigure.SpringBootApplication; @EnableDubbo @SpringBootApplication public class ConsumerApplication { public static void main(String[] args) { SpringApplication.run(ConsumerApplication.class, args); } } -
运行服务消费者
启动 Spring Boot 应用程序。服务消费者会自动连接到 ZooKeeper 注册中心,并查找服务提供者。
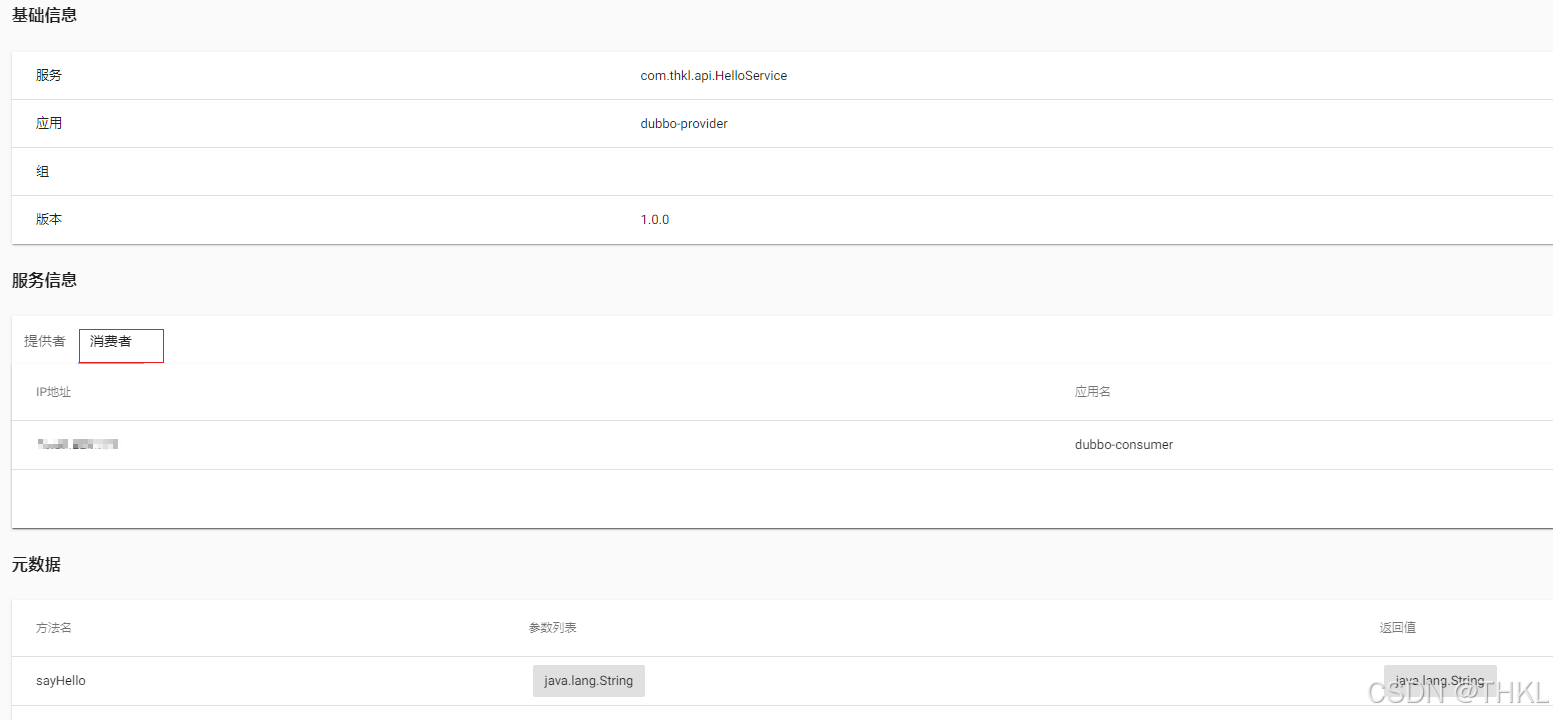
这样,你就成功构建了一个基于 Spring Boot 和 ZooKeeper 的服务消费者模块。服务消费者可以通过 Dubbo 和 ZooKeeper 来发现并调用服务提供者提供的服务。通过查看HelloService详情页里的消费者
调用接口也能成功
自此快速使用完成
