文章目录
什么是 harbor
Harbor是一个开源的企业级Docker Registry管理工具,它提供了一个安全、可靠、可扩展的平台,用于存储、管理和分发Docker镜像。Harbor可以帮助组织和团队更好地管理Docker镜像,并提高应用程序构建和部署的效率。
虽然Docker官方提供了公共的镜像仓库,但是从安全和效率等方面考虑,部署我们私有环境内的Registry也是非常必要的。
Harbor是由VMware公司开源的企业级的Docker Registry管理项目,相比Docker官方拥有更丰富的权限权利和完善的架构设计,适用大规模docker集群部署提供仓库服务。
它主要提供 Dcoker Registry 管理界面UI,可基于角色访问控制,镜像复制, AD/LDAP 集成,日志审核等功能,完全的支持中文。
特点
-
安全:Harbor提供了完整的认证和授权机制,支持LDAP、AD等集成方式,可以让用户更加安全地管理和使用Docker镜像。
-
可靠:Harbor提供了多个镜像仓库,支持复制和高可用性,确保应用程序的部署和升级是平滑和无缝的。
-
可扩展:Harbor是一个可扩展的平台,可以支持数千个并发构建和部署,从而满足高流量的应用程序部署需求。
-
用户友好:Harbor提供了一个直观、易于使用的Web界面,让用户可以轻松地查找、上传和下载Docker镜像。
-
灵活性:Harbor提供了一个可定制的平台,可以根据组织和团队的需求进行自定义配置。
Harbor的部署和使用非常简单,可以使用Docker Compose轻松地在本地环境中部署。Harbor还提供了API和CLI工具,可以方便地与其他DevOps工具集成。Harbor已被广泛采用,并被认为是企业级Docker Registry管理工具的首选之一。
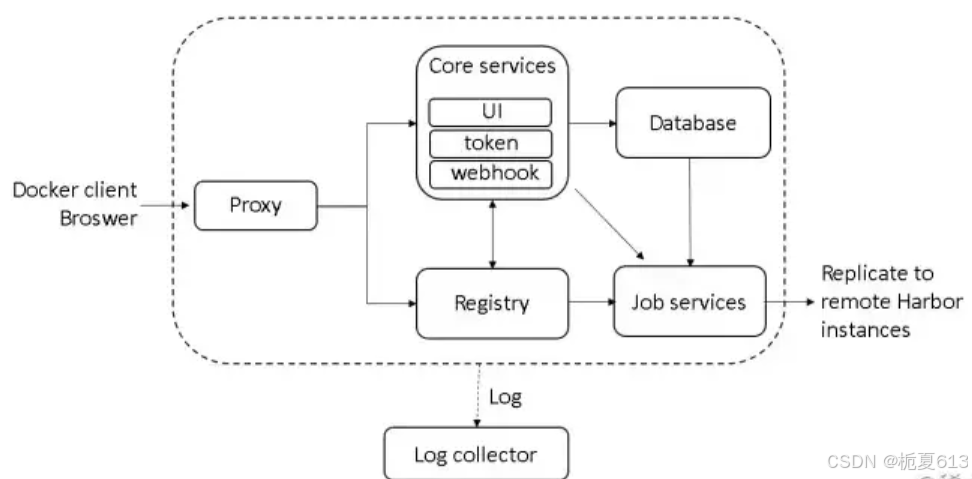
Proxy: Harbor的registry、UI、token services等组件,都处在一个反向代理后边。该代理将来自浏览器、docker clients的请求转发到后端服务上。
Registry: 负责存储Docker镜像,以及处理Docker push/pull请求。因为Harbor强制要求对镜像的访问做权限控制, 在每一次push/pull请求时,Registry会强制要求客户端从token service那里获得一个有效的token。
Core services: Harbor的核心功能,主要包括如下3个服务:
UI:图形界面
WebHook:及时获取registry上image状态变化情况,在registry上配置 webhook,把状态变化传递给UI模块。
Token服务:负责根据用户权限给每个docker push/pull命令签发token。Docker 客户端向Registry服务发起的请求,如果不包含token,会被重定向到这里,获得token后再重新向Registry进行请求。
Database:为core services提供数据库服务,负责储存用户权限、审计日志、Docker image分组信息等数据。
Job services: 主要用于镜像复制,本地镜像可以被同步到远程Harbor实例上。
Log collector: 负责收集其他组件的日志到一个地方。
主要功能
基于角色的访问控制
用户与Docker镜像仓库通过“项目”进行组织管理,一个用户可以对多个镜像仓库在同一命名空间(project)里有不同的权限。
基于镜像的复制策略
镜像可以在多个Registry实例中复制(可以将仓库中的镜像同步到远程的Harbor,类似于MySQL主从同步功能),尤其适合于负载均衡,高可用,混合云和多云的场景。
图形化用户界面
用户可以通过浏览器来浏览,检索当前Docker镜像仓库,管理项目和命名空间。
支持 AD/LDAP
Harbor可以集成企业内部已有的AD/LDAP,用于鉴权认证管理。
镜像删除和垃圾回收
Harbor支持在Web删除镜像,回收无用的镜像,释放磁盘空间。image可以被删除并且回收image占用的空间。
审计管理
所有针对镜像仓库的操作都可以被记录追溯,用于审计管理。
RESTful API
RESTful API 提供给管理员对于Harbor更多的操控, 使得与其它管理软件集成变得更容易。
部署简单
提供在线和离线两种安装工具, 也可以安装到vSphere平台(OVA方式)虚拟设备。 Harbor 的所有组件都在 Docker 中部署,所以 Harbor 可使用 Docker Compose 快速部署。
注意: 由于 Harbor 是基于 Docker Registry V2 版本, docker 17.06.0-ce+ and docker-compose 1.18.0+
部署
配置 dns
我使用的是 192.168.142.158 当作镜像站的dns
初始化
下载 dns
apt install -y bind9
cd /etc/bind
编辑 named.conf.local
//
// Do any local configuration here
//

// Consider adding the 1918 zones here, if they are not used in your
// organization
//include "/etc/bind/zones.rfc1918";


zone "hq.com" {   //正向解析
        type master;
        file "/etc/bind/db.hq.com.conf";   //解析区域对应的配置文件
};
// 反向解析 .
zone "142.168.192.in-addr.arpa"  {
    type master;
    file "/etc/bind/db.hq.arpa.conf";
};
编辑 named.conf.options
options {
        directory "/var/cache/bind";
        listen-on port 53 { any;};
        allow-query {any;};
        // If there is a firewall between you and nameservers you want
        // to talk to, you may need to fix the firewall to allow multiple
        // ports to talk.  See http://www.kb.cert.org/vuls/id/800113

        // If your ISP provided one or more IP addresses for stable
        // nameservers, you probably want to use them as forwarders.
        // Uncomment the following block, and insert the addresses replacing
        // the all-0's placeholder.

        forwarders {
             8.8.8.8;
             8.8.4.4;
        };

        //========================================================================
        // If BIND logs error messages about the root key being expired,
        // you will need to update your keys.  See https://www.isc.org/bind-keys
        //========================================================================
        dnssec-validation auto;

        listen-on-v6 { any; };
};
配置正向解析
cp db.0 db.hq.com.conf
编辑 db.hq.com.conf
;
; BIND reverse data file for broadcast zone
;
$TTL    604800
@       IN      SOA     hq.com. root.hq.com. (
                              2         ; Serial
                         604800         ; Refresh
                          86400         ; Retry
                        2419200         ; Expire
                         604800 )       ; Negative Cache TTL
;
@       IN      NS      localhost.
@       IN      A       192.168.142.158
hq      IN      A       192.168.142.158
配置反向解析
cp db.127 db.hq.arpa.conf
编辑 db.hq.arpa.conf
;
; BIND reverse data file for local loopback interface
;
$TTL    604800
@       IN      SOA     hq.com. root.hq.com. (
                              1         ; Serial
                         604800         ; Refresh
                          86400         ; Retry
                        2419200         ; Expire
                         604800 )       ; Negative Cache TTL
;
@       IN      NS      localhost.
1.0.0   IN      PTR     localhost.
158     IN      PTR     hq.hq.com.
编辑 /etc/resolve.conf
nameserver 192.168.142.158
重启服务
systemctl restart bind9
解析
dig hq.hq.com
;; QUESTION SECTION:
;hq.hq.com.                     IN      A

;; ANSWER SECTION:
hq.hq.com.              604800  IN      A       192.168.142.158
看见这个信息就说明解析成功了,要想让别的主机可以解析到这个域名就需要在别的主机的 /etc/resolv.conf 中加入该 ip ,相同的也是要执行最上面两个命令,将那个服务永久关闭,这样下次重启服务的时候就不会被刷掉了
扩展
如果你手动编辑了 /etc/resolv.conf 并希望保持这些更改,重启 systemd-resolved 服务确实会覆盖你的更改。为了避免这种情况,你可以考虑以下方法:
你可以使用 resolvconf 程序更新 /etc/resolv.conf,该程序允许你将 DNS 设置持久化:这样确保了重启也会生效
apt update
apt install -y resolvconf
vim /etc/resolvconf/resolv.conf.d/head
nameserver 192.168.142.158
更新配置
resolvconf -u
部署 harbor
网络源:https://github.com/goharbor/harbor/releases/tag/v2.11.1
虚拟机没办法科学上网的就只能下载离线包了,能通过网络源下载的就是用下面这句话
wget https://github.com/goharbor/harbor/releases/download/v2.11.1/harbor-offline-installer-v2.11.1.tgz
创建文件夹
mkdir -p /docker/harbor
解压
tar zxvf harbor-offline-installer-v2.11.1.tgz -C /docker/harbor
解压出来就是一个 harbor 文件夹,进入此文件夹
编辑配置文件,先备份一份
cp harbor.yml.tmpl harbor.yml
文件注释有点多,看着不舒服的可以使用
sed -i '/^[[:space:]]*#/d;/^[[:space:]]*$/d' harbor.yml
不想改的也可以不执行这句话
修改配置
修改这几项就好了
vim harbor.yml

hostname: hq.hq.com
harbor_admin_password: 123456
database:
  password: 123456
data_volume: /docker/harbor/data
关于 http 和 https 我们选择哪一个,一般来说如果是自己用的话 http 完全够用了,大家可以自己选择是否注释 https 那几行(我使用的 http)
没有 /docker/harbor/data 就创建 mkdir /docker/harbor/data
ok 现在配置改好了我们执行两个脚本
./prepare # 为 harbor 启动的容器生成一些必要的文件(环境)
./install.sh # 以 pull 镜像并启动容器
执行 prepare
root@slave03:/docker/harbor/harbor# ./prepare
prepare base dir is set to /docker/harbor/harbor
WARNING:root:WARNING: HTTP protocol is insecure. Harbor will deprecate http protocol in the future. Please make sure to upgrade to https
Generated configuration file: /config/portal/nginx.conf
Generated configuration file: /config/log/logrotate.conf
Generated configuration file: /config/log/rsyslog_docker.conf
Generated configuration file: /config/nginx/nginx.conf
Generated configuration file: /config/core/env
Generated configuration file: /config/core/app.conf
Generated configuration file: /config/registry/config.yml
Generated configuration file: /config/registryctl/env
Generated configuration file: /config/registryctl/config.yml
Generated configuration file: /config/db/env
Generated configuration file: /config/jobservice/env
Generated configuration file: /config/jobservice/config.yml
Generated and saved secret to file: /data/secret/keys/secretkey
Successfully called func: create_root_cert
Generated configuration file: /compose_location/docker-compose.yml
Clean up the input dir
执行 install.sh
root@slave03:/docker/harbor/harbor# ./install.sh

[Step 0]: checking if docker is installed ...

Note: docker version: 27.3.1

[Step 1]: checking docker-compose is installed ...

Note: Docker Compose version v2.29.7

[Step 2]: loading Harbor images ...
Loaded image: goharbor/prepare:v2.11.1
Loaded image: goharbor/harbor-db:v2.11.1
Loaded image: goharbor/harbor-exporter:v2.11.1
Loaded image: goharbor/redis-photon:v2.11.1
Loaded image: goharbor/nginx-photon:v2.11.1
Loaded image: goharbor/harbor-portal:v2.11.1
Loaded image: goharbor/harbor-core:v2.11.1
Loaded image: goharbor/harbor-log:v2.11.1
Loaded image: goharbor/harbor-jobservice:v2.11.1
Loaded image: goharbor/harbor-registryctl:v2.11.1
Loaded image: goharbor/registry-photon:v2.11.1
Loaded image: goharbor/trivy-adapter-photon:v2.11.1


[Step 3]: preparing environment ...

[Step 4]: preparing harbor configs ...
prepare base dir is set to /docker/harbor/harbor
WARNING:root:WARNING: HTTP protocol is insecure. Harbor will deprecate http protocol in the future. Please make sure to upgrade to https
Clearing the configuration file: /config/registryctl/env
Clearing the configuration file: /config/registryctl/config.yml
Clearing the configuration file: /config/nginx/nginx.conf
Clearing the configuration file: /config/core/app.conf
Clearing the configuration file: /config/core/env
Clearing the configuration file: /config/log/rsyslog_docker.conf
Clearing the configuration file: /config/log/logrotate.conf
Clearing the configuration file: /config/registry/passwd
Clearing the configuration file: /config/registry/config.yml
Clearing the configuration file: /config/db/env
Clearing the configuration file: /config/portal/nginx.conf
Clearing the configuration file: /config/jobservice/env
Clearing the configuration file: /config/jobservice/config.yml
Generated configuration file: /config/portal/nginx.conf
Generated configuration file: /config/log/logrotate.conf
Generated configuration file: /config/log/rsyslog_docker.conf
Generated configuration file: /config/nginx/nginx.conf
Generated configuration file: /config/core/env
Generated configuration file: /config/core/app.conf
Generated configuration file: /config/registry/config.yml
Generated configuration file: /config/registryctl/env
Generated configuration file: /config/registryctl/config.yml
Generated configuration file: /config/db/env
Generated configuration file: /config/jobservice/env
Generated configuration file: /config/jobservice/config.yml
loaded secret from file: /data/secret/keys/secretkey
Generated configuration file: /compose_location/docker-compose.yml
Clean up the input dir


Note: stopping existing Harbor instance ...
WARN[0000] /docker/harbor/harbor/docker-compose.yml: the attribute `version` is obsolete, it will be ignored, please remove it to avoid potential confusion
[+] Running 8/8
 ✔ Container harbor-jobservice  Removed                                             0.0s
 ✔ Container registryctl        Removed                                             0.0s
 ✔ Container harbor-core        Removed                                             0.0s
 ✔ Container harbor-db          Removed                                             0.0s
 ✔ Container registry           Removed                                             0.0s
 ✔ Container redis              Removed                                             0.0s
 ✔ Container harbor-log         Removed                                             0.0s
 ✔ Network harbor_harbor        Removed                                             0.3s


[Step 5]: starting Harbor ...
WARN[0000] /docker/harbor/harbor/docker-compose.yml: the attribute `version` is obsolete, it will be ignored, please remove it to avoid potential confusion
[+] Running 10/10
 ✔ Network harbor_harbor        Created                                             0.1s
 ✔ Container harbor-log         Started                                             0.3s
 ✔ Container registry           Started                                             1.1s
 ✔ Container harbor-db          Started                                             1.2s
 ✔ Container registryctl        Started                                             1.2s
 ✔ Container redis              Started                                             1.1s
 ✔ Container harbor-portal      Started                                             1.2s
 ✔ Container harbor-core        Started                                             1.6s
 ✔ Container harbor-jobservice  Started                                             2.2s
 ✔ Container nginx              Started                                             2.3s
✔ ----Harbor has been installed and started successfully.----
查看镜像
root@slave03:/docker/harbor/harbor# docker ps -a
CONTAINER ID   IMAGE                                 COMMAND                  CREATED          STATUS                             PORTS                                     NAMES
3f6bebc041d9   goharbor/nginx-photon:v2.11.1         "nginx -g 'daemon of…"   About a minute ago   Up About a minute (healthy)   0.0.0.0:80->8080/tcp, [::]:80->8080/tcp   nginx
4d1b79f2a986   goharbor/harbor-jobservice:v2.11.1    "/harbor/entrypoint.…"   About a minute ago   Up About a minute (healthy)                                             harbor-jobservice
6ac22f3160bc   goharbor/harbor-core:v2.11.1          "/harbor/entrypoint.…"   About a minute ago   Up About a minute (healthy)                                             harbor-core
7370b925c089   goharbor/harbor-registryctl:v2.11.1   "/home/harbor/start.…"   About a minute ago   Up About a minute (healthy)                                             registryctl
9c0c69e17ceb   goharbor/harbor-portal:v2.11.1        "nginx -g 'daemon of…"   About a minute ago   Up About a minute (healthy)                                             harbor-portal
a85b5a75b0f7   goharbor/harbor-db:v2.11.1            "/docker-entrypoint.…"   About a minute ago   Up About a minute (healthy)                                             harbor-db
4acecfde1f4b   goharbor/redis-photon:v2.11.1         "redis-server /etc/r…"   About a minute ago   Up About a minute (healthy)                                             redis
efbf85333631   goharbor/registry-photon:v2.11.1      "/home/harbor/entryp…"   About a minute ago   Up About a minute (healthy)                                             registry
042812c8b703   goharbor/harbor-log:v2.11.1           "/bin/sh -c /usr/loc…"   About a minute ago   Up About a minute (healthy)   127.0.0.1:1514->10514/tcp                 harbor-log
访问
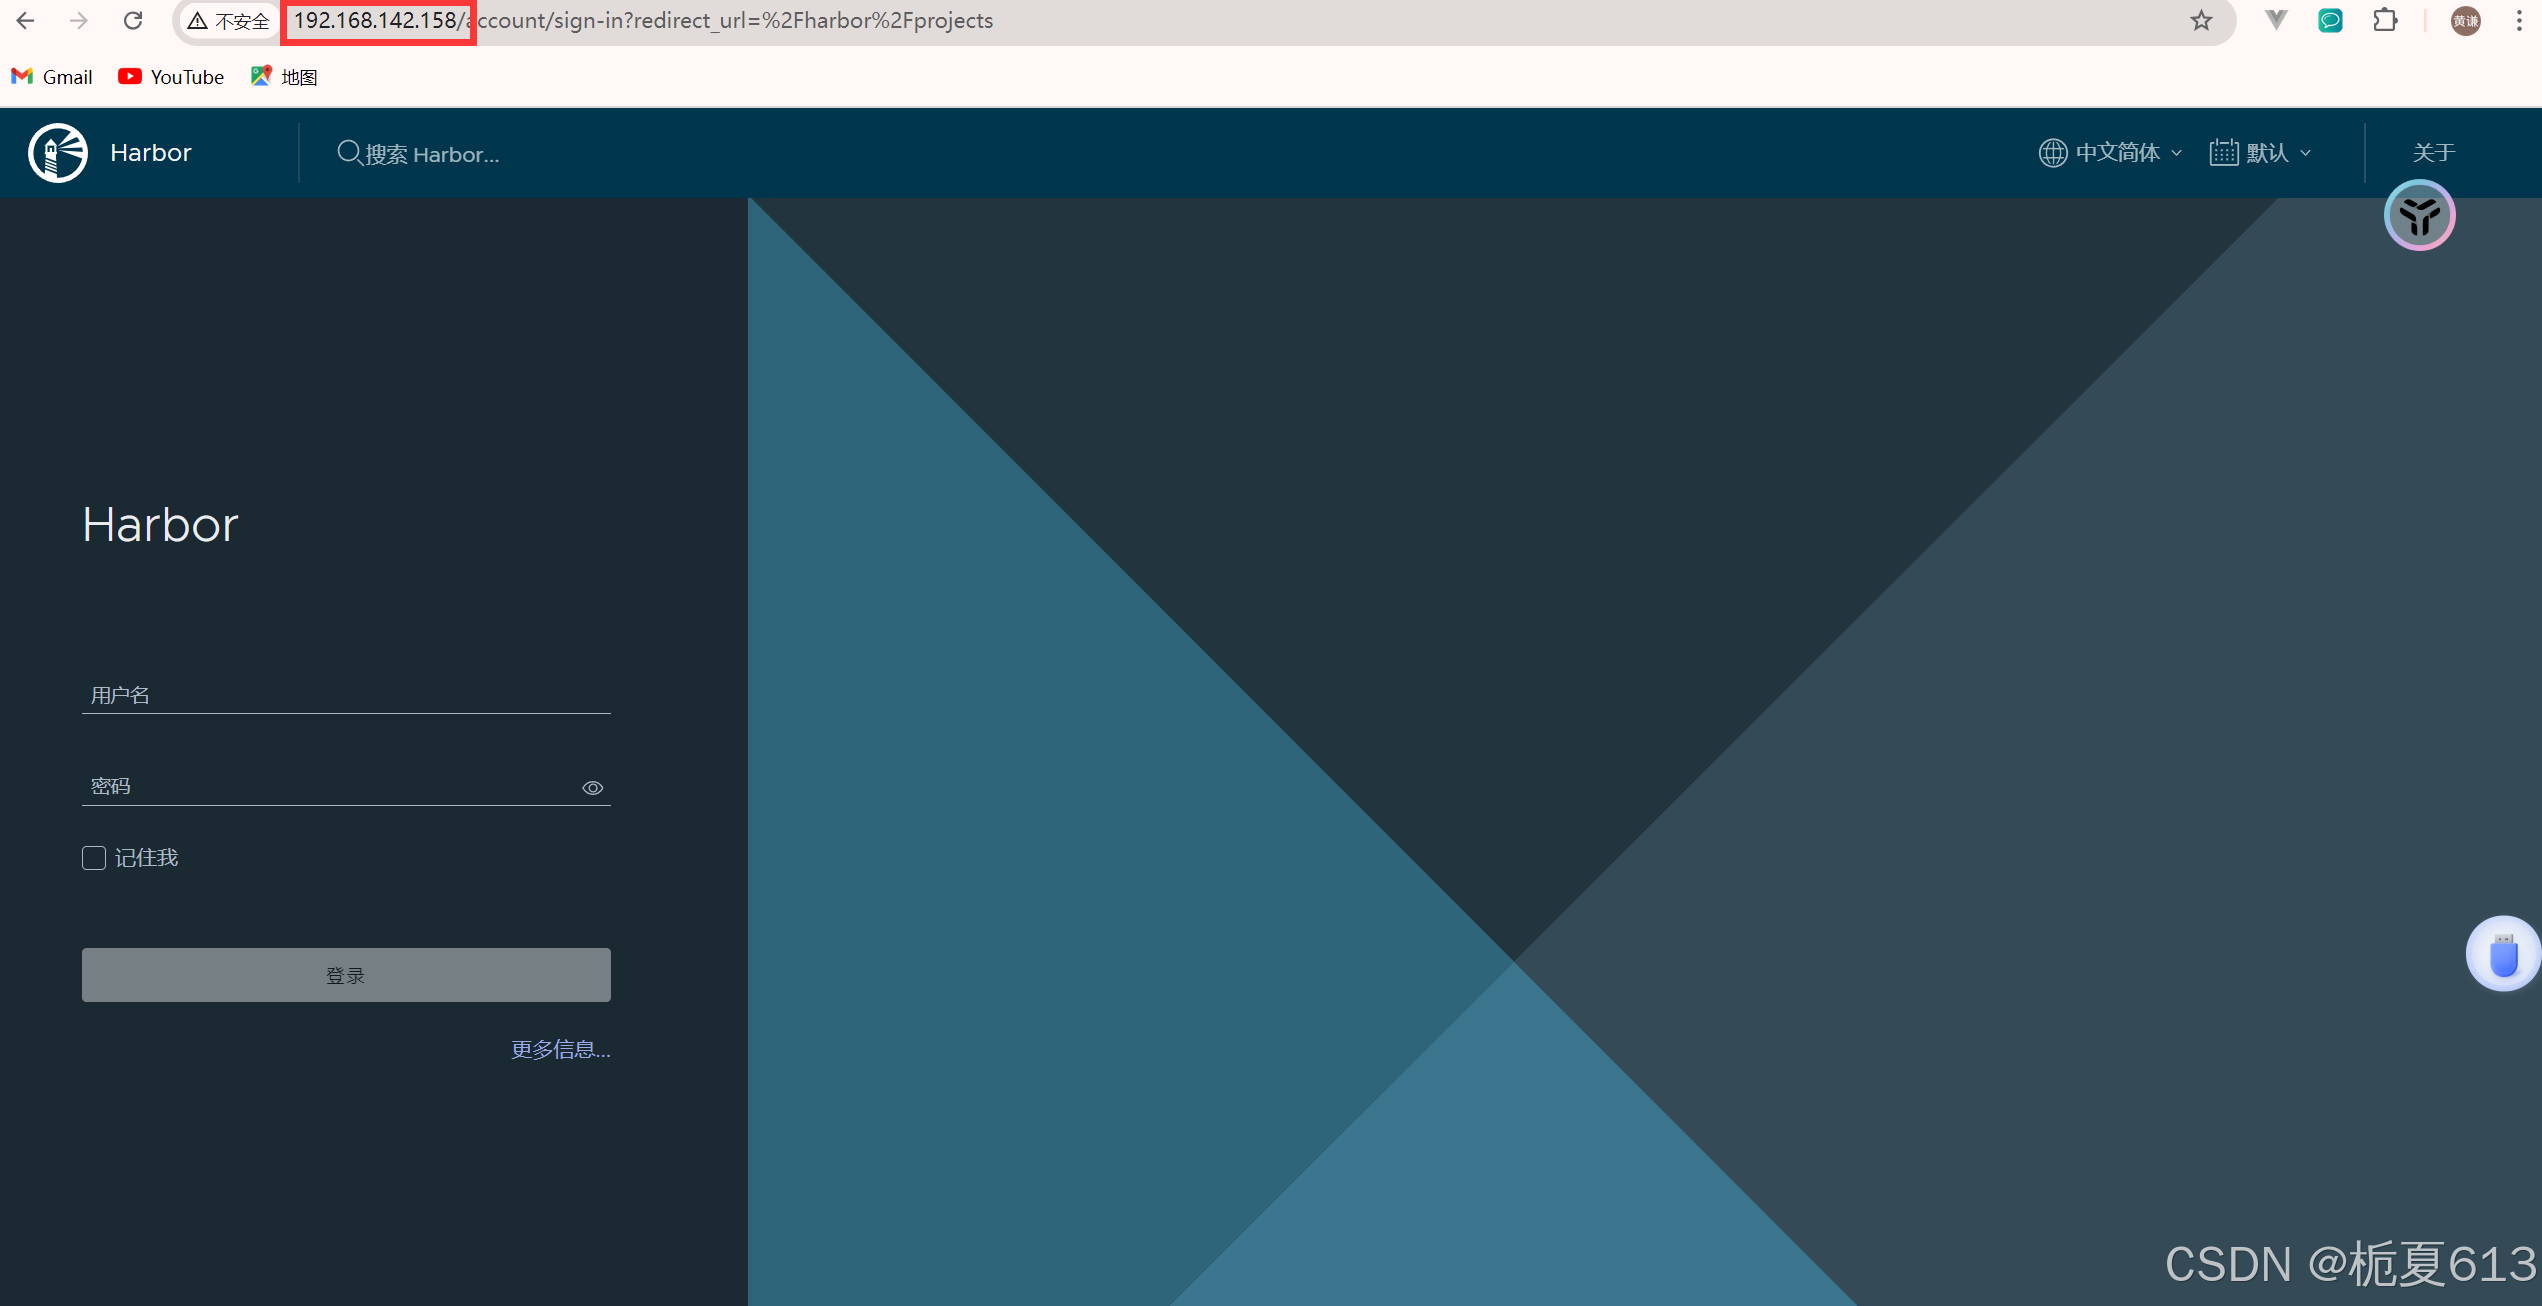
如果你的 window 能解析到你的dns那你也可以使用域名访问,当然使用 ip 也可以,上述的 dns 我创建出来只是为了别的主机以后使用镜像的时候使用的
账号密码分别是 admin 和 123456
自制镜像
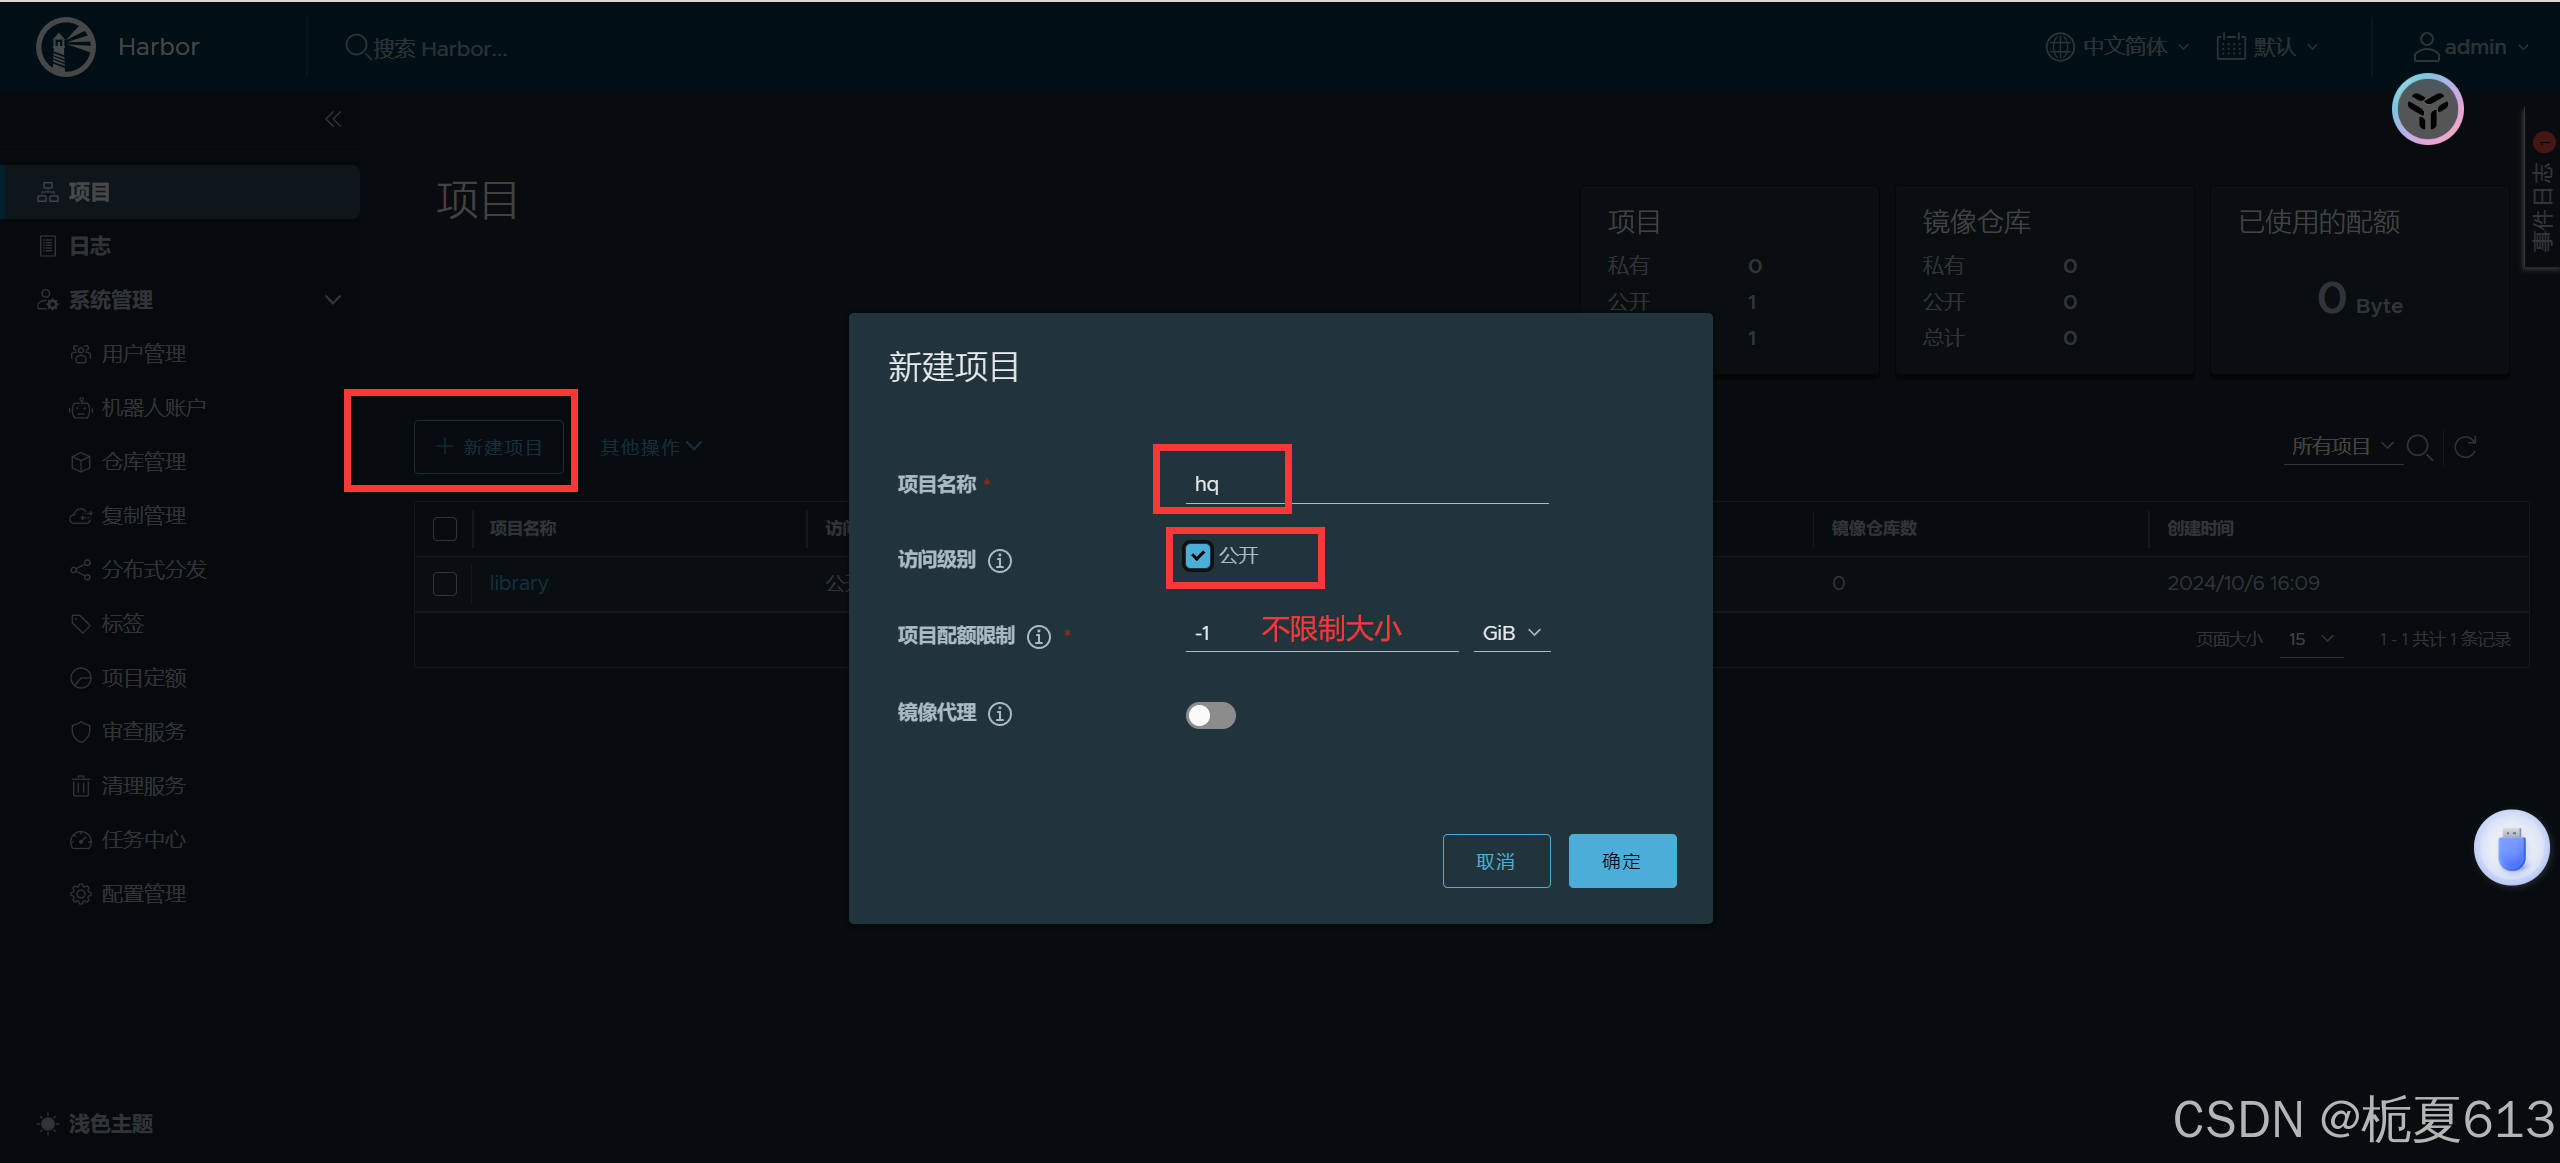
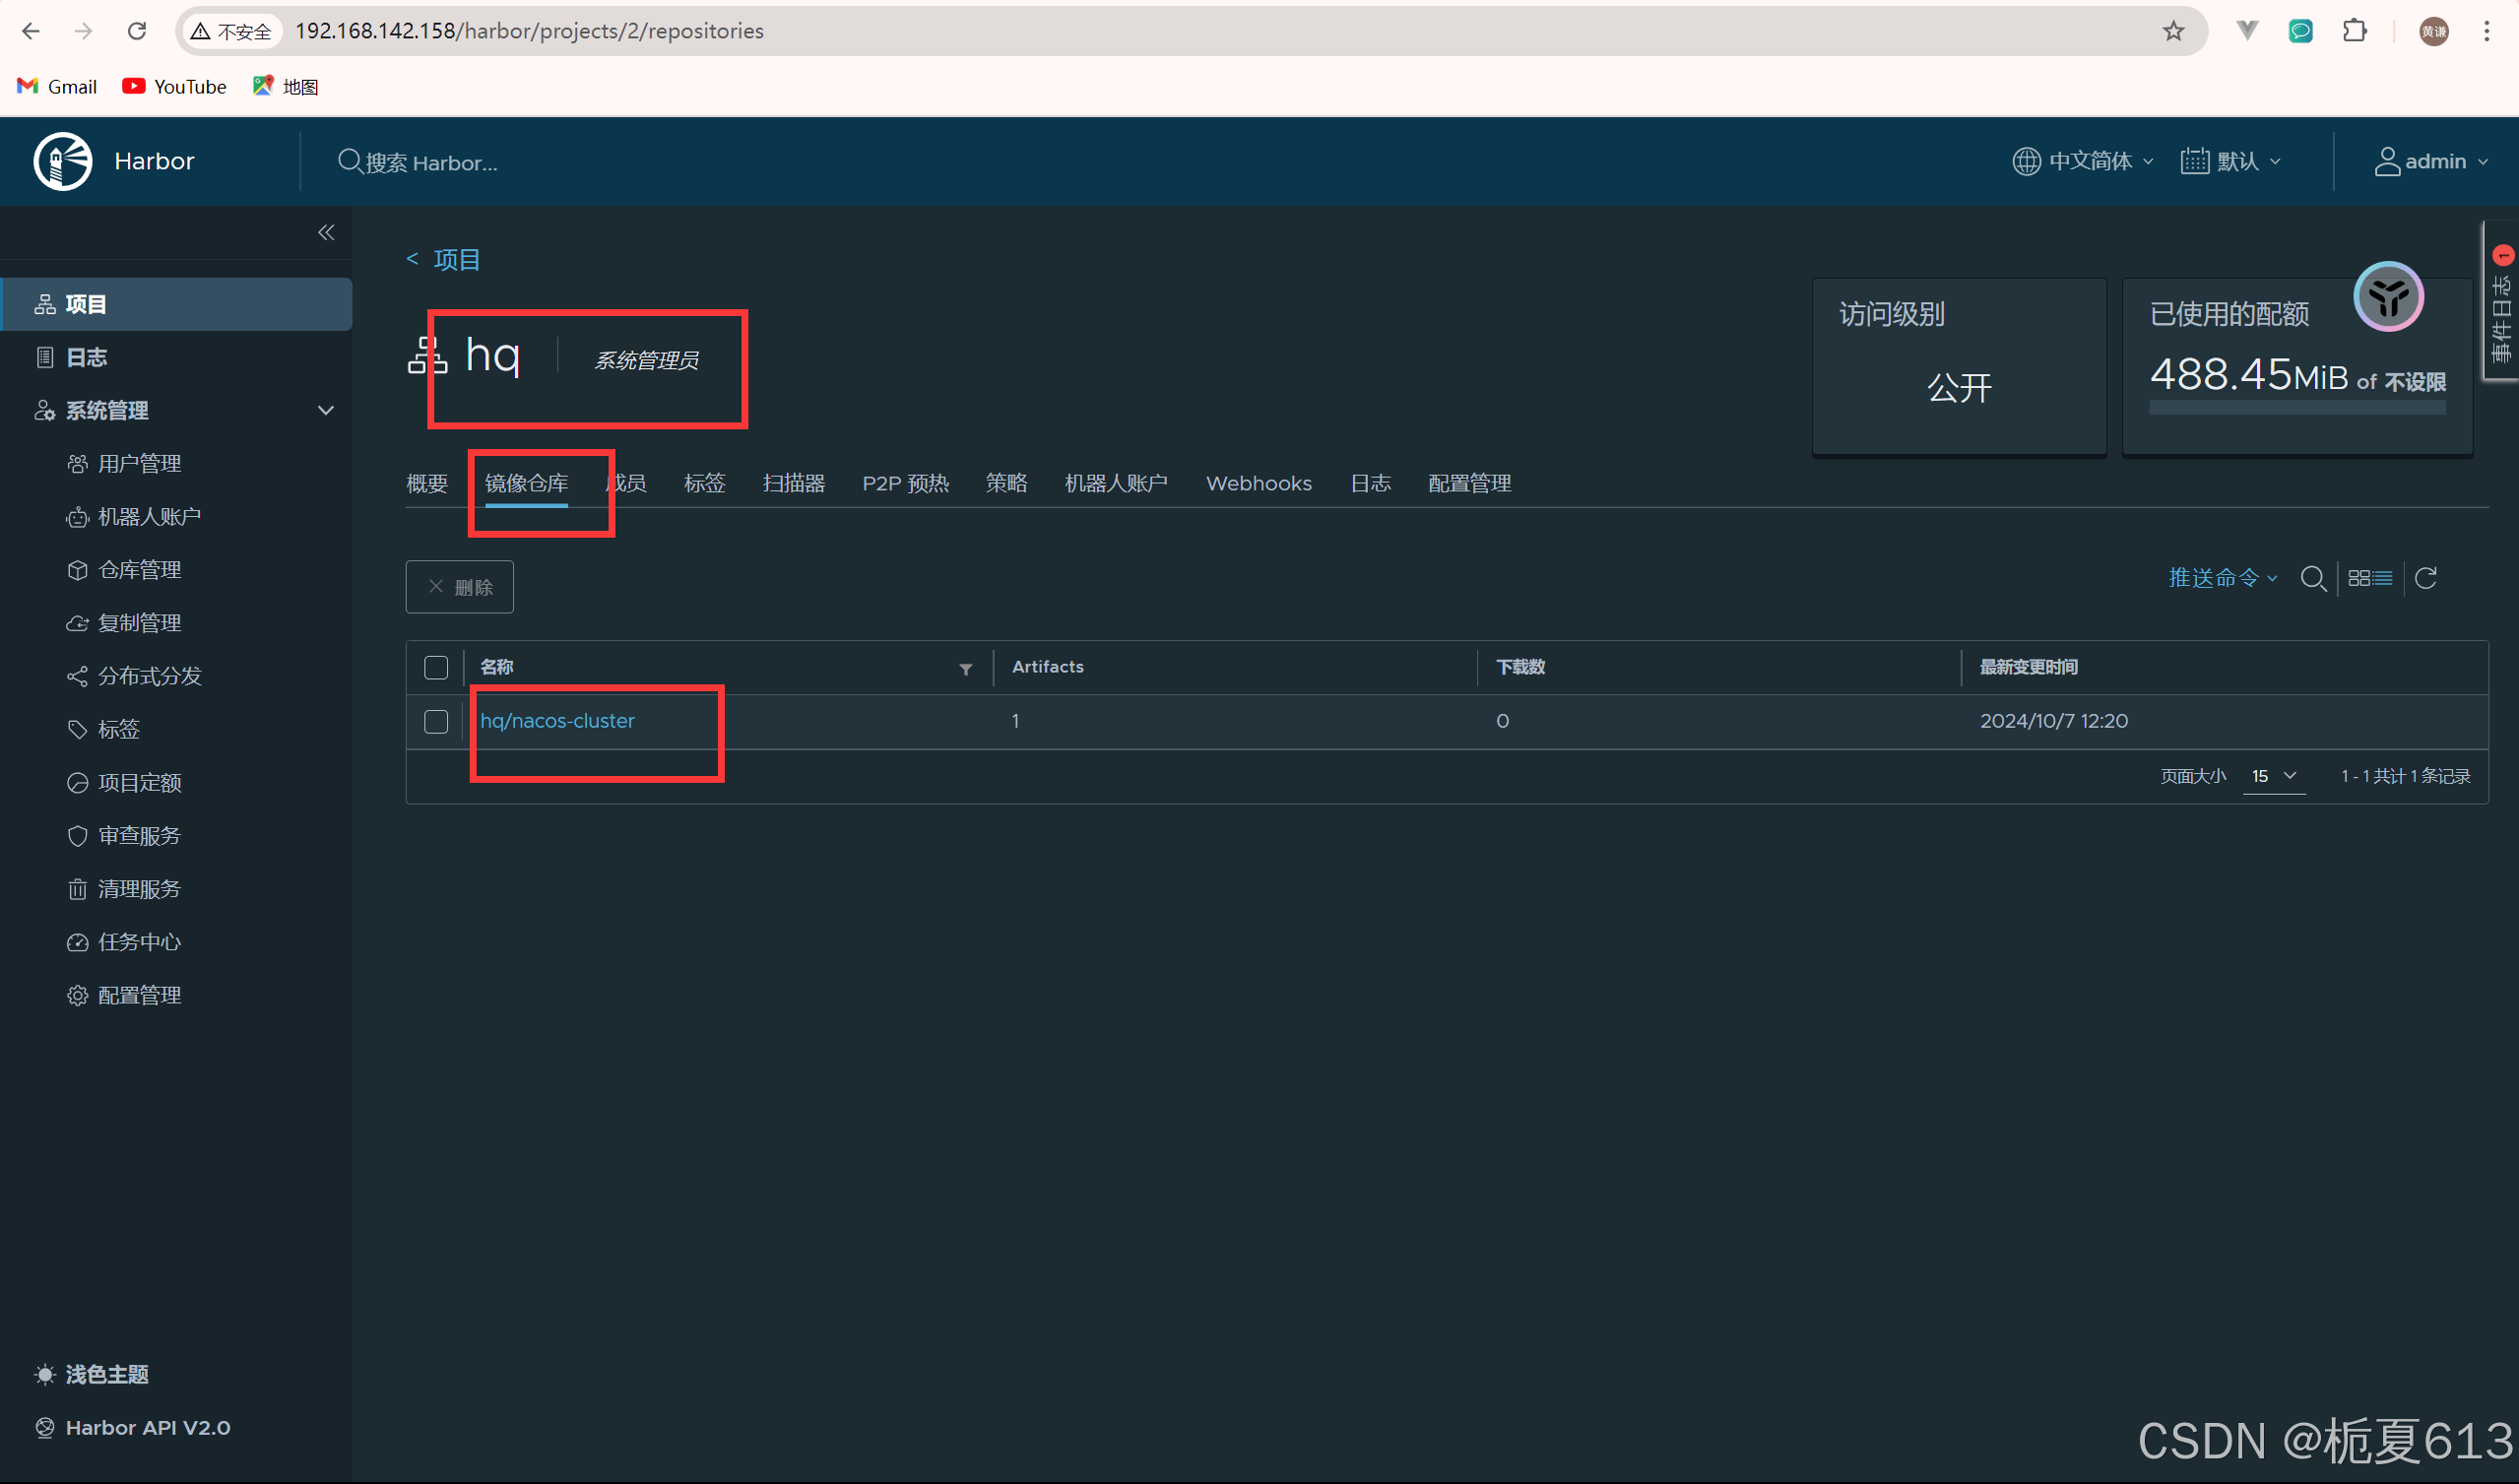
创建镜像仓库
上传镜像
先登录
docker login http://hq.hq.com
此时我们遇到了一个报错:
Error response from daemon: Get "https://hq.hq.com/v2/": dial tcp 192.168.142.158:443: connect: connection refused
这个报错表示 docker 在使用 https 的形式去登录,但是我在上面配置的时候明明配置的是 http 的方式,此时的我也是有点懵逼的,看我操作:
编辑 daemon.json,没有这个文件的就创建
vim /etc/docker/daemon.json

{
    "insecure-registries" : ["hq.hq.com"]
}
重启 docker
systemctl daemon_reload
systemctl restart docker.service
查看 Insecure Registries
docker info
Insecure Registries:
  1.1.1.1:80
  hq.hq.com:5000
  127.0.0.0/8
看见域名就说明添加配置成功了
访问一下:
curl http://hq.hq.com/v2/
报错
{"errors":[{"code":"UNAUTHORIZED","message":"unauthorized: unauthorized"}]}
没有报错当我没说,报错了就再重启下docker看看
docker login hq.hq.com
Username: admin
Password:
WARNING! Your password will be stored unencrypted in /root/.docker/config.json.
Configure a credential helper to remove this warning. See
https://docs.docker.com/engine/reference/commandline/login/#credential-stores

Login Succeeded
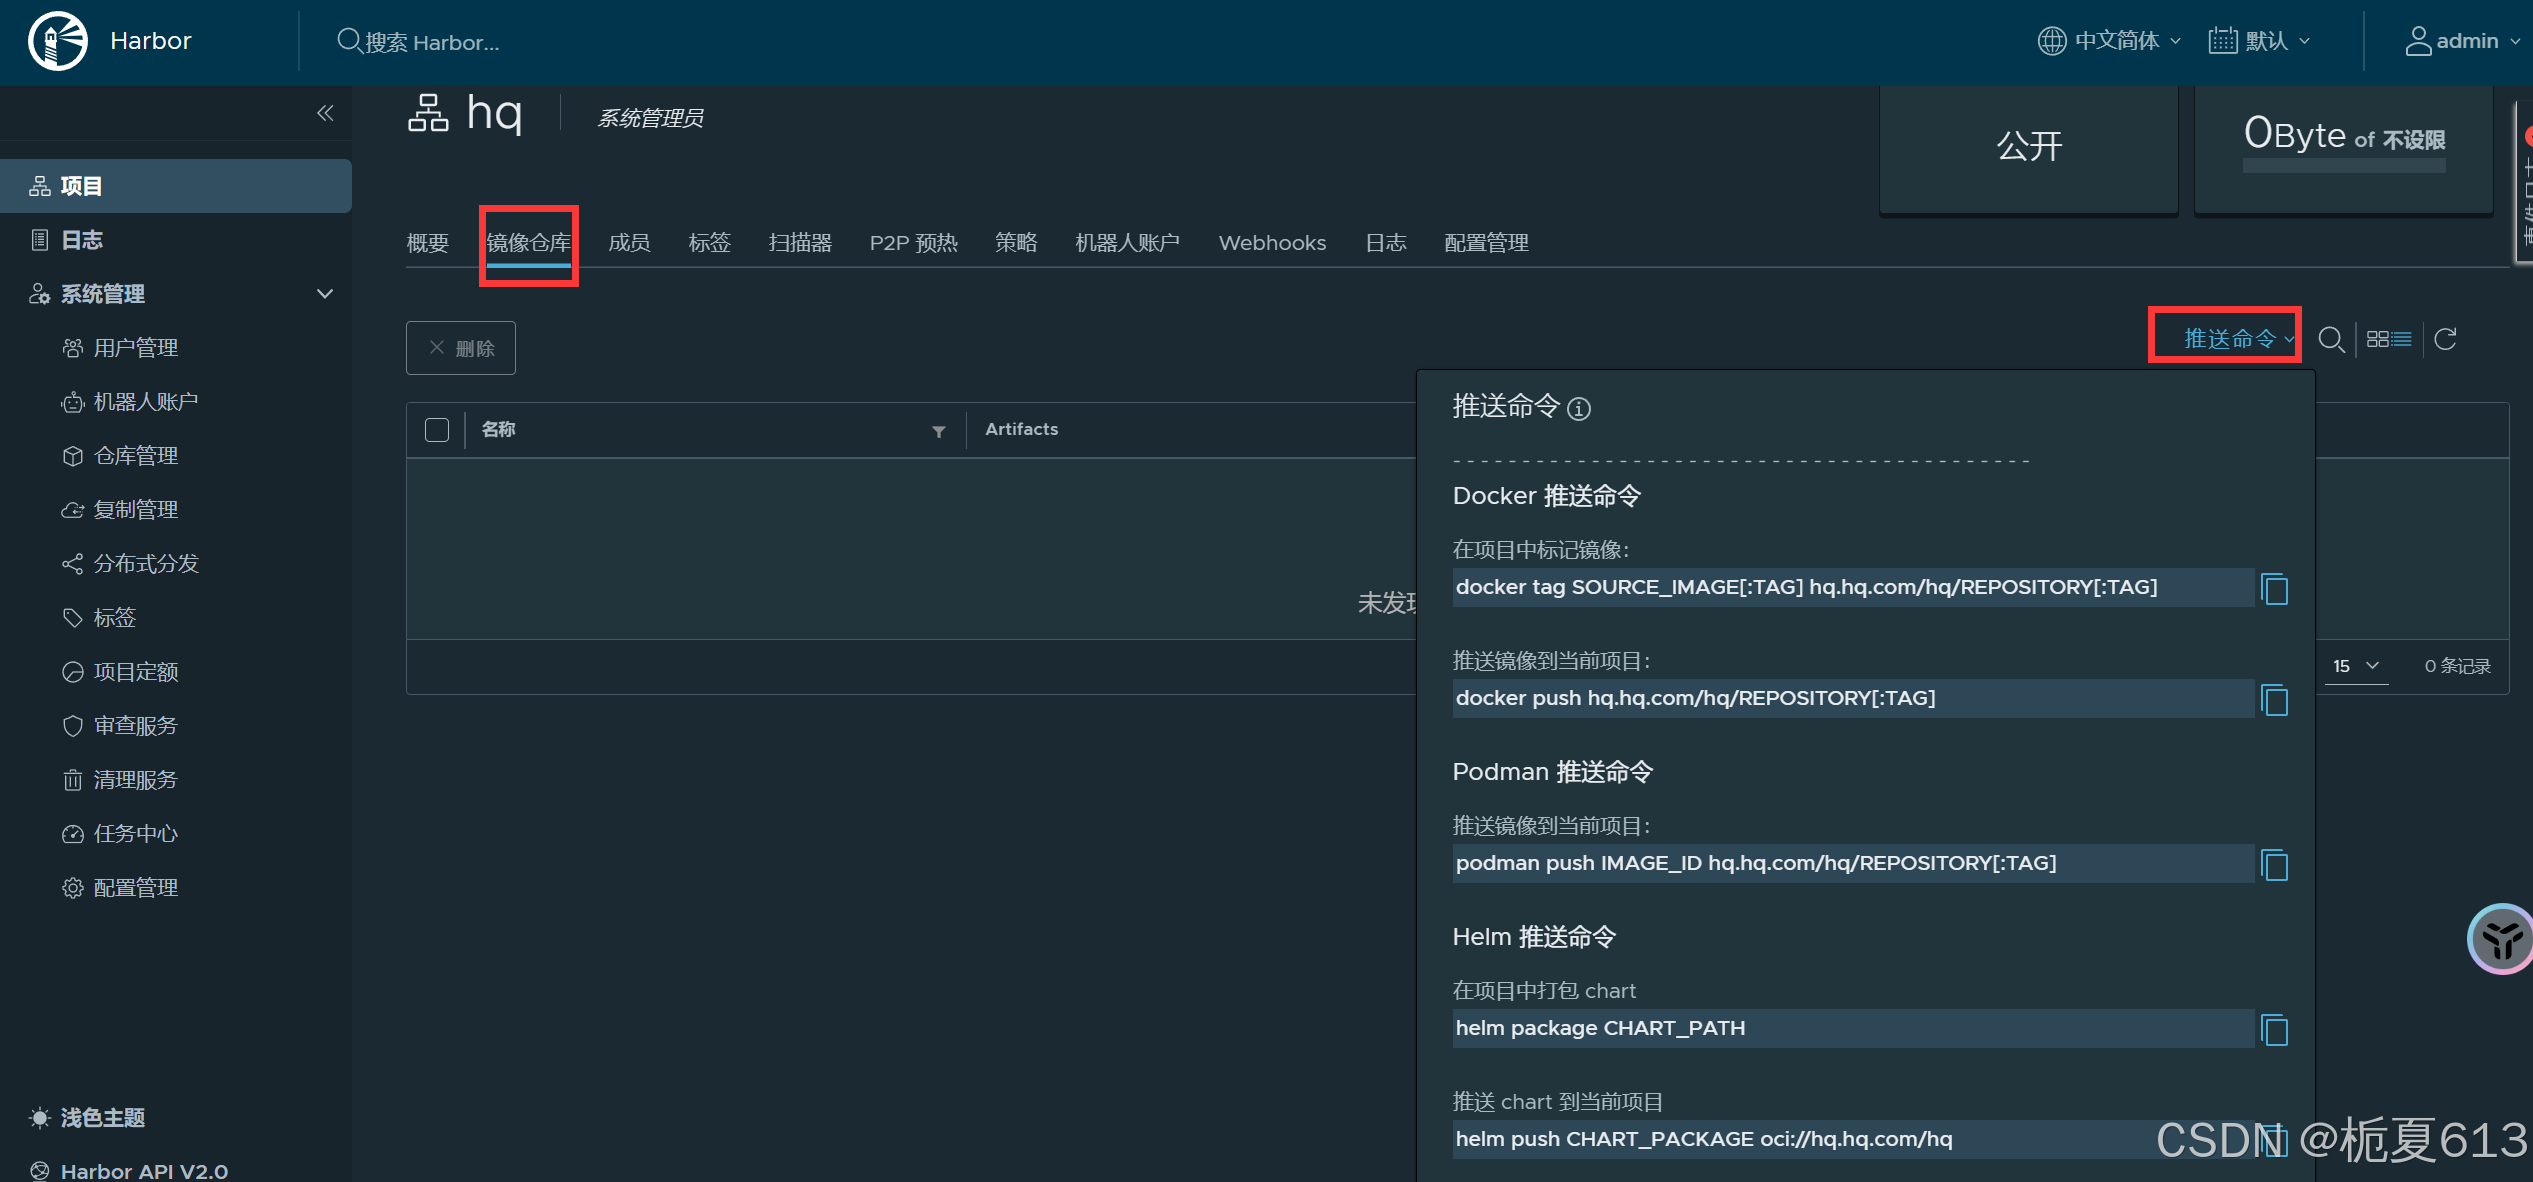
根据推送命令我们演示一下:
root@master:~/.docker# docker image ls
REPOSITORY                    TAG                            IMAGE ID       CREATED         SIZE
nacos/nacos-server            v2.2.0                         440657d52bc3   21 months ago   1.07GB
我这里推送的是 nacos
打标记
docker tag nacos/nacos-server:v2.2.0 hq.hq.com/hq/nacos-cluster:v2.2.0
此时再看
root@master:~/.docker# docker image ls
REPOSITORY                    TAG                            IMAGE ID       CREATED         SIZE
nacos/nacos-server            v2.2.0                         440657d52bc3   21 months ago   1.07GB
hq.hq.com/hq/nacos-cluster    v2.2.0                         440657d52bc3   21 months ago   1.07GB
开始推送
docker push hq.hq.com/hq/nacos-cluster:v2.2.0
The push refers to repository [hq.hq.com/hq/nacos-cluster]
5f70bf18a086: Pushed
0848096adb74: Pushed
4c6a137e16af: Pushed
bbe52c006636: Pushed
35a5e16bd0e7: Pushed
2268d9bf40bd: Pushed
70c7021c4e31: Pushed
7e7fc9f47535: Pushed
29d47ba0de5f: Pushed
174f56854903: Pushed
v2.2.0: digest: sha256:cda66d06b60b6cd28f597660fd90ed63f684c427bc0c878fd402c4b5e7c0bad8 size: 2415
此时此刻,我们就成功推送项目上去了
那我们其他的主机能否获取呢?
拉取镜像
我再开一台虚拟机实现:
前面的在 /etc/resolv.conf 下添加 158 主机的操作我就省略了
在添加了 dns 之后
docker login hq.hq.com
Username: admin
Password:
WARNING! Your password will be stored unencrypted in /root/.docker/config.json.
Configure a credential helper to remove this warning. See
https://docs.docker.com/engine/reference/commandline/login/#credential-stores

Login Succeeded
登录之后就可以拉取镜像了
docker pull <harbor_host>/<project_name>/<image_name>:<tag>
docker pull hq.hq.com/hq/nacos-cluster:v2.2.0
v2.2.0: Pulling from hq/nacos-cluster
Digest: sha256:cda66d06b60b6cd28f597660fd90ed63f684c427bc0c878fd402c4b5e7c0bad8
Status: Downloaded newer image for hq.hq.com/hq/nacos-cluster:v2.2.0
hq.hq.com/hq/nacos-cluster:v2.2.0
查看是否拉取下来了
docker image ls
ok,也是成功拉取下来了
hq.hq.com/hq/nacos-cluster v2.2.0 440657d52bc3 21 months ago 1.07GB
