Spring
1、Spring概述
-
Spring是什么?
Spring框架是一个开放源代码的J2EE(现在更名JavaEE了)应用程序框架(准确来说是一个框架体系),由Rod Johnson发起,是针对bean的生命周期进行管理的轻量级容器。
Spring官网:Spring | Home
外话:Spring在英文中是春天的意思,正如英文名一样,Spring开启了Java的春天,让Java成为现在很多企业开发的首选语言,成功稳固了Java的地位,它是目前最受欢迎的企业级 Java 应用程序开发框架,毫不夸张地说,想从事Java开发Spring是必学的(当然也就是就目前而言,说不定又出来了一个很牛的框架呢)
-
Spring的特点:
- 轻量。完整的Spring框架可以在一个大小只有1MB多的JAR文件里发布。并且Spring所需的处理开销也是微不足道的
- 控制反转。Spring通过一种称作控制反转(IOC))的技术促进了低耦合
- 面向切面。Spring提供了面向切面编程(AOP)的丰富支持,允许通过分离应用的业务逻辑与系统级服务(例如审计(auditing)和事务(transaction)管理)进行内聚性的开发
- 组件化。Spring 实现了使用简单的组件配置组合成一个复杂的应用。在 Spring 中可以使用 XML 和 Java 注解组合这些对象。这使得我们可以基于一个个功能明确、边界清晰的组件有条不紊的搭 建超大型复杂应用系统
- 声明式。很多以前需要编写代码才能实现的功能,现在只需要声明需求即可由框架代为实现
- 一站式。在 IOC 和 AOP 的基础上可以整合各种企业应用的开源框架和优秀的第三方类库。而且 Spring 旗下的项目已经覆盖了广泛领域,很多方面的功能性需求可以在 Spring Framework 的基 础上全部使用 Spring 来实现
-
Spring的优点:
-
提高Java开发的效率。主要体现在易于测试、易于开发这两点,易于测试是因为Spring为Junit提供了方便的测试环境,易于开发有三点体现:一是因为Spring本身是框架,符合框架一般性的特点(简化开发),二是有了Spring,用户不必再为单实例模式类、属性文件解析等这些很底层的需求编写代码,可以更专注于上层的应用,三是Spring提供的IoC容器,我们可以将对象之间的依赖关系交由Spring进行控制,避免硬编码1所造成的过度程序耦合
-
使用灵活轻巧。灵活体现:Spring并不强制应用完全依赖于Spring,开发者可自由选用Spring框架的部分或全部;轻巧体现:Spring最初版本只有2M!后来经过Spring设计师的精心设计,使用了大量设计模式,让Spring逐渐趋于完美
-
提高Java程序的性能。Spring框架的设计师在Spring中封装了大量的设计模式4,让开发的Java程序具有更优秀的性能
……
-
-
Spring家族体系
Spring是一个家族,常见的有:Spring Framework、Spring MVC、Spring Boot、Spring Cloud……
- Spring Framwork:是Spring家族的基础,其他Spring框架都是在它的基础上诞生的,一般而言,我们通常说的Spring就是指Spring Framework,它与Spring MVC 和 MyBatis 三者的整合合称SSM
- Spring MVC:是基于MVC模式,使用Java语言开发实现的一个轻量级 Web 框架,解决页面代码和后台代码的分离
- Spring Boot:用来简化新Spring应用的初始搭建以及开发过程
- Spring Cloud:是一系列框架的有序集合,它将各家公司开发的比较成熟、经得起实际考验的服务框架组合起来,最终给开发者留出了一套简单易懂、易部署和易维护的分布式系统开发工具包
……
推荐阅读:
- Spring发展史:Spring Boot/Cloud 背后豪华的研发团队了
2、IOC
IOC(Inversion Of Control,反转控制):一种资源获取方式,以前获取某个资源需要主动(创建所需的对象,通过对象)获取,现在使用IOC思想就是被动接受(直接使用Spring框架为我们创建好的对象),同时是面向对象编程中的一种设计原则,可以用来减低计算机代码之间的耦合度
2.1 IOC概述
-
获取资源的传统方式
自己做饭:买菜、洗菜、择菜、改刀、炒菜,全过程参与,费时费力,必须清楚了解资源创建整个过程 中的全部细节且熟练掌握。 在应用程序中的组件需要获取资源时,传统的方式是组件主动的从容器中获取所需要的资源,在这样的 模式下开发人员往往需要知道在具体容器中特定资源的获取方式,增加了学习成本,同时降低了开发效率
-
反转控制方式获取资源
点外卖:下单、等、吃,省时省力,不必关心资源创建过程的所有细节。 反转控制的思想完全颠覆了应用程序组件获取资源的传统方式:反转了资源的获取方向——改由容器主 动的将资源推送给需要的组件,开发人员不需要知道容器是如何创建资源对象的,只需要提供接收资源 的方式即可,极大的降低了学习成本,提高了开发的效率。这种行为也称为查找的被动形式
-
DI(Dependency Injection,依赖注入)
DI 是 IOC 的另一种表述方式:即组件以一些预先定义好的方式(例如:set 方法)接受来自于容器 的资源注入。相对于IOC而言,这种表述更直接。 所以结论是:IOC 就是一种反转控制的思想, 而 DI 是对 IOC 的一种具体实现
-
IOC的优点:
- 提高开发效率。所有的资源类都是使用已经创建好的,不需要手动创建,同时不需要关注对象的创建过程
- 便于与测试。借由IOC容器,我们的业务代码不需要为单元测试作出修改,只需要在测试的时候,把测试的实例注册到IOC的容器中就可以了
- 提高程序的可维护性。IOC降低了类之间的耦合度,降低耦合度
-
IOC容器的实现:
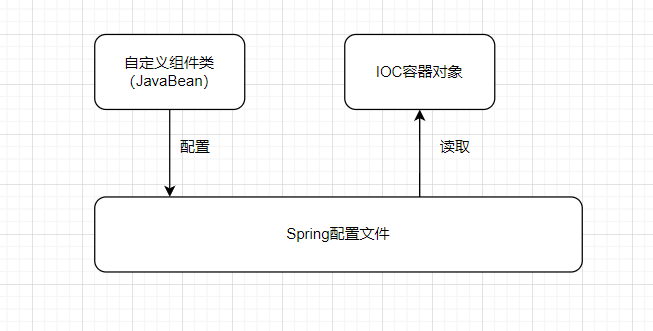
Spring 的 IOC 容器就是 IOC 思想的一个落地的产品实现。IOC 容器中管理的组件也叫做 bean。在创建 bean 之前,首先需要创建 IOC 容器。Spring中提供了 IOC 容器的两种实现方式:
BeanFactory和ApplicationContext-
方式一:
BeanFactory这是 IOC 容器的基本实现,是 Spring 内部使用的接口。面向 Spring 本身,不提供给开发人员使用。
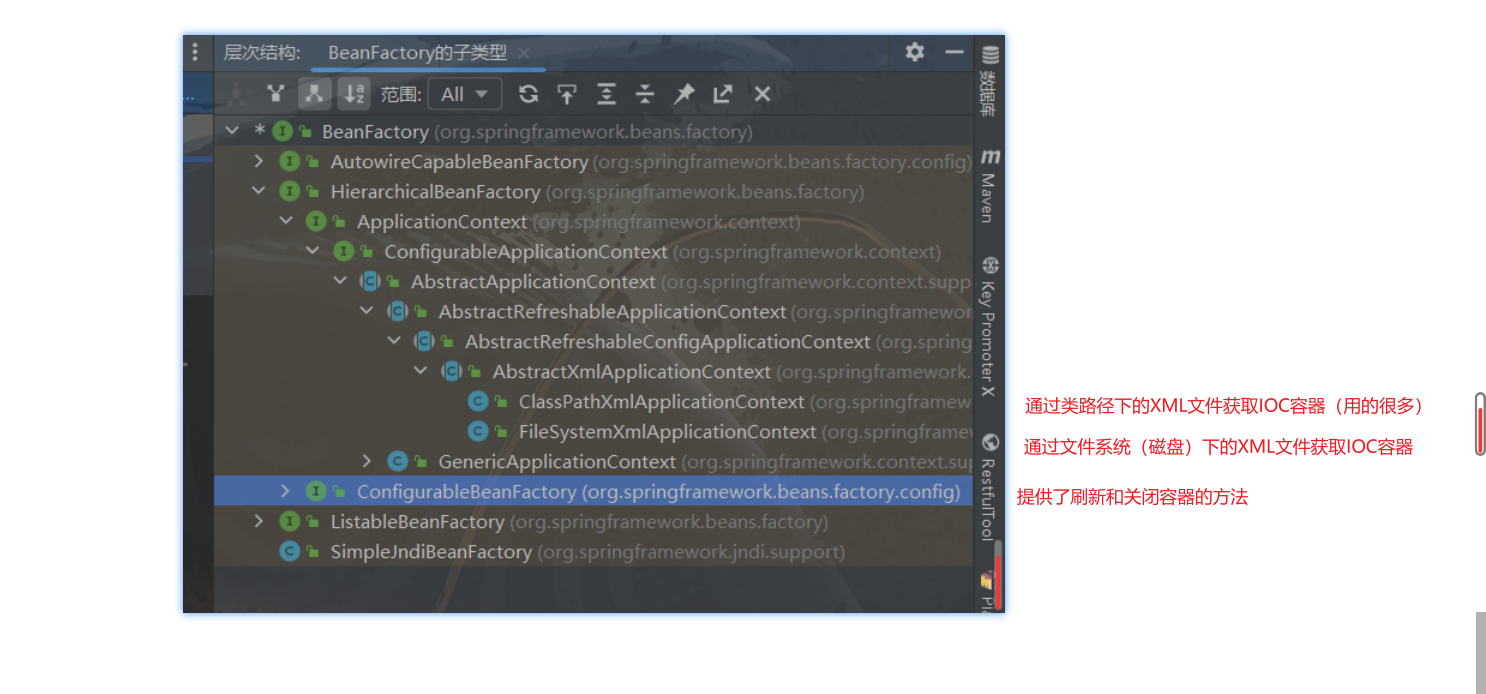
双击Shift,搜索BeanFactory,然后Ctrl+H查看BeanFactory的类继承关系
-
方式二:
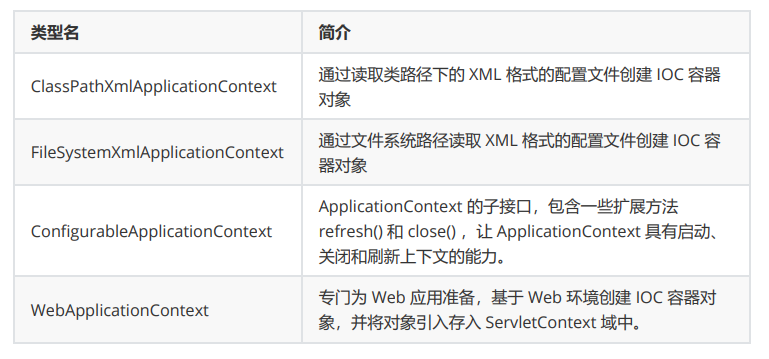
ApplicationContextBeanFactory的子接口,提供了更多高级特性。面向 Spring 的使用者,几乎所有场合都使用ApplicationContext而不是底层的 BeanFactory
-
2.2 基于XML管理Bean
使用注解管理Bean比使用XML要更加简便,但当我们在项目中使用第三方类库时,我们无法在别人写的jar包中使用注解管理Bean对象,所以XML管理也是必须要会的
2.2.1 快速入门
-
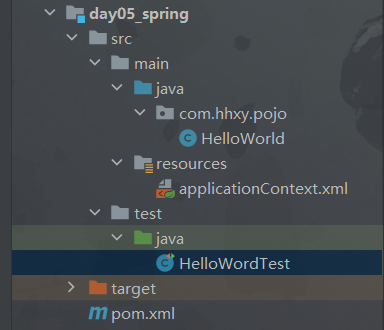
Step1:创建Maven工程
目录结构:
-
Step2:导入依赖
pom.xml:
<?xml version="1.0" encoding="UTF-8"?> <project xmlns="http://maven.apache.org/POM/4.0.0" xmlns:xsi="http://www.w3.org/2001/XMLSchema-instance" xsi:schemaLocation="http://maven.apache.org/POM/4.0.0 http://maven.apache.org/xsd/maven-4.0.0.xsd"> <modelVersion>4.0.0</modelVersion> <groupId>org.example</groupId> <artifactId>day05_spring</artifactId> <version>1.0-SNAPSHOT</version> <properties> <maven.compiler.source>8</maven.compiler.source> <maven.compiler.target>8</maven.compiler.target> <project.build.sourceEncoding>UTF-8</project.build.sourceEncoding> </properties> <dependencies> <!--DI依赖的jar包--> <dependency> <!--spring(间接引入ioc容器依赖)--> <groupId>org.springframework</groupId> <artifactId>spring-context</artifactId> <version>5.3.22</version> </dependency> <!--junit--> <dependency> <groupId>junit</groupId> <artifactId>junit</artifactId> <version>4.13.2</version> </dependency> </dependencies> </project> -
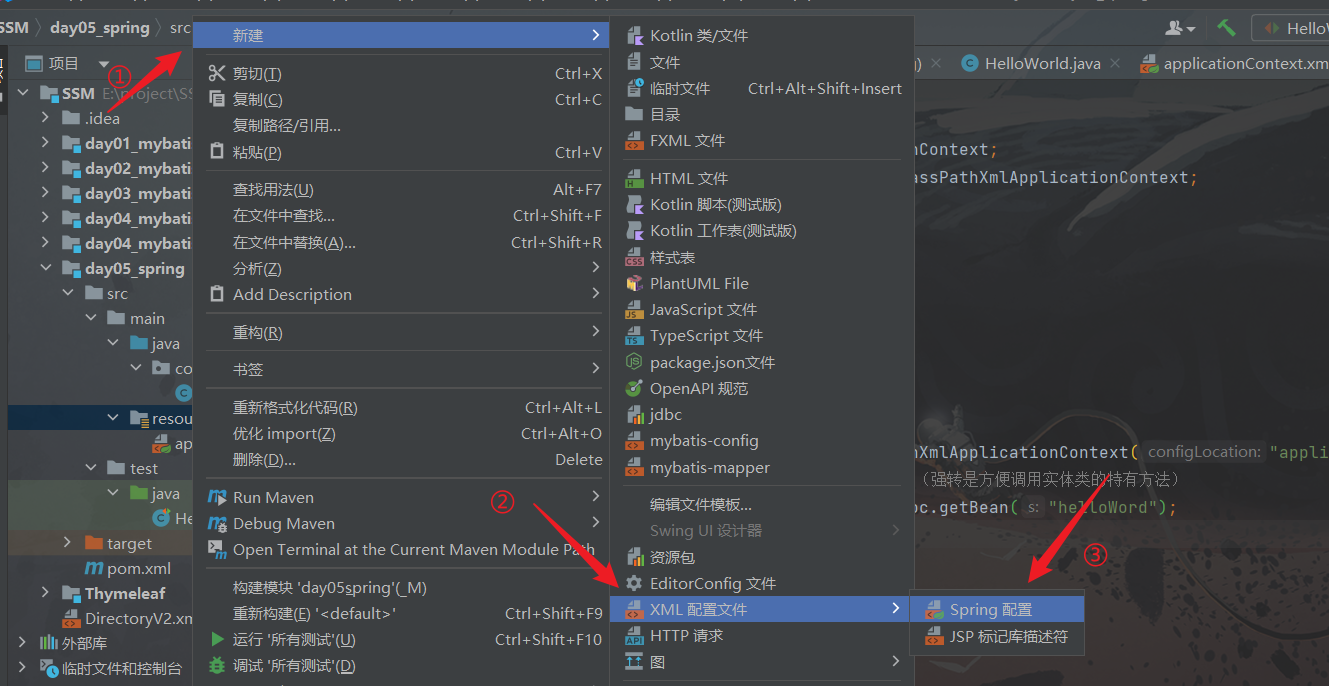
Step3:编写spring配置文件
applicationContext.xml:
<?xml version="1.0" encoding="UTF-8"?> <beans xmlns="http://www.springframework.org/schema/beans" xmlns:xsi="http://www.w3.org/2001/XMLSchema-instance" xsi:schemaLocation="http://www.springframework.org/schema/beans http://www.springframework.org/schema/beans/spring-beans.xsd"> <!--为实体类配置一个bean对象,然后将bean对象交给IOC容器进行管理--> <bean id="helloWord" class="com.hhxy.pojo.HelloWorld"></bean> </beans>备注:bean类的创建可以在实体类创建后进行创建,这样会有提示
-
Step4:编写实体类
HelloWord:
package com.hhxy.pojo; /** * @author ghp * @date 2022/9/13 */ public class HelloWorld { public void sayHello(){ System.out.println("Hello IOC!"); } } -
Step5:测试
测试类:
import com.hhxy.pojo.HelloWorld;
import org.junit.Test;
import org.springframework.context.ApplicationContext;
import org.springframework.context.support.ClassPathXmlApplicationContext;

/**
 * XML配置IOC入门测试
 * @author ghp
 * @date 2022/9/13
 */
public class HelloWordTest {
    @Test
    public void hellWorldTest(){
        //1、获取IOC容器
        ApplicationContext ioc = new ClassPathXmlApplicationContext("applicationContext.xml");
        //2、通过Bean的id获取IOC容器中的HelloWorld类的bean对象(强转是方便调用实体类的特有方法)
        HelloWorld helloWord = (HelloWorld) ioc.getBean("helloWord");
        //3、调用实体类方法
        helloWord.sayHello();
    }
}
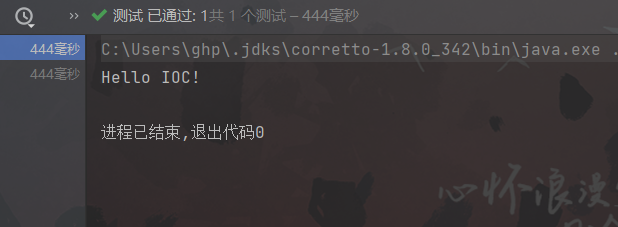
测试结果:
拓展:
注意事项:Spring框架为实体类创建一个对象底层是使用反射进行实现的,而反射创建对象百分之99都是利用无参构造器来创建对象的,因为我们可以百分百肯定无参构造器长啥样,而无法确定一个类的有参构造器长啥样,所以为了提高容错率(当然这也是一种规范),当我们创建实体类时,如果实体类有有参构造方法,就必须手动创建一个无参构造方法,不然会报异常
org.springframework.context.support.AbstractApplicationContext refresh当然了,强大的IDEA会在编译时,就会给出警告
~ o(* ̄▽ ̄*)ブ
2.2.2 获取Bean三种方式
Spring配置文件 spring-ioc.xml:
<?xml version="1.0" encoding="UTF-8"?>
<beans xmlns="http://www.springframework.org/schema/beans"
       xmlns:xsi="http://www.w3.org/2001/XMLSchema-instance"
       xsi:schemaLocation="http://www.springframework.org/schema/beans http://www.springframework.org/schema/beans/spring-beans.xsd">
    <!--为Student实体类配置一个bean对象-->
    <bean id="studentOne" class="com.hhxy.pojo.Student"></bean>
    <bean id="studentTwo" class="com.hhxy.pojo.Student"></bean>
</beans>
-
方式一:根据id获取
Spring配置文件:
测试类:
//1、获取IOC容器 ApplicationContext ioc = new ClassPathXmlApplicationContext("spring-ioc.xml"); //2、获取IOC容器中的Bean对象 Student studentOne = (Student) ioc.getBean("studentOne"); //打印输出 System.out.println(studentOne); -
方式二:根据类型获取
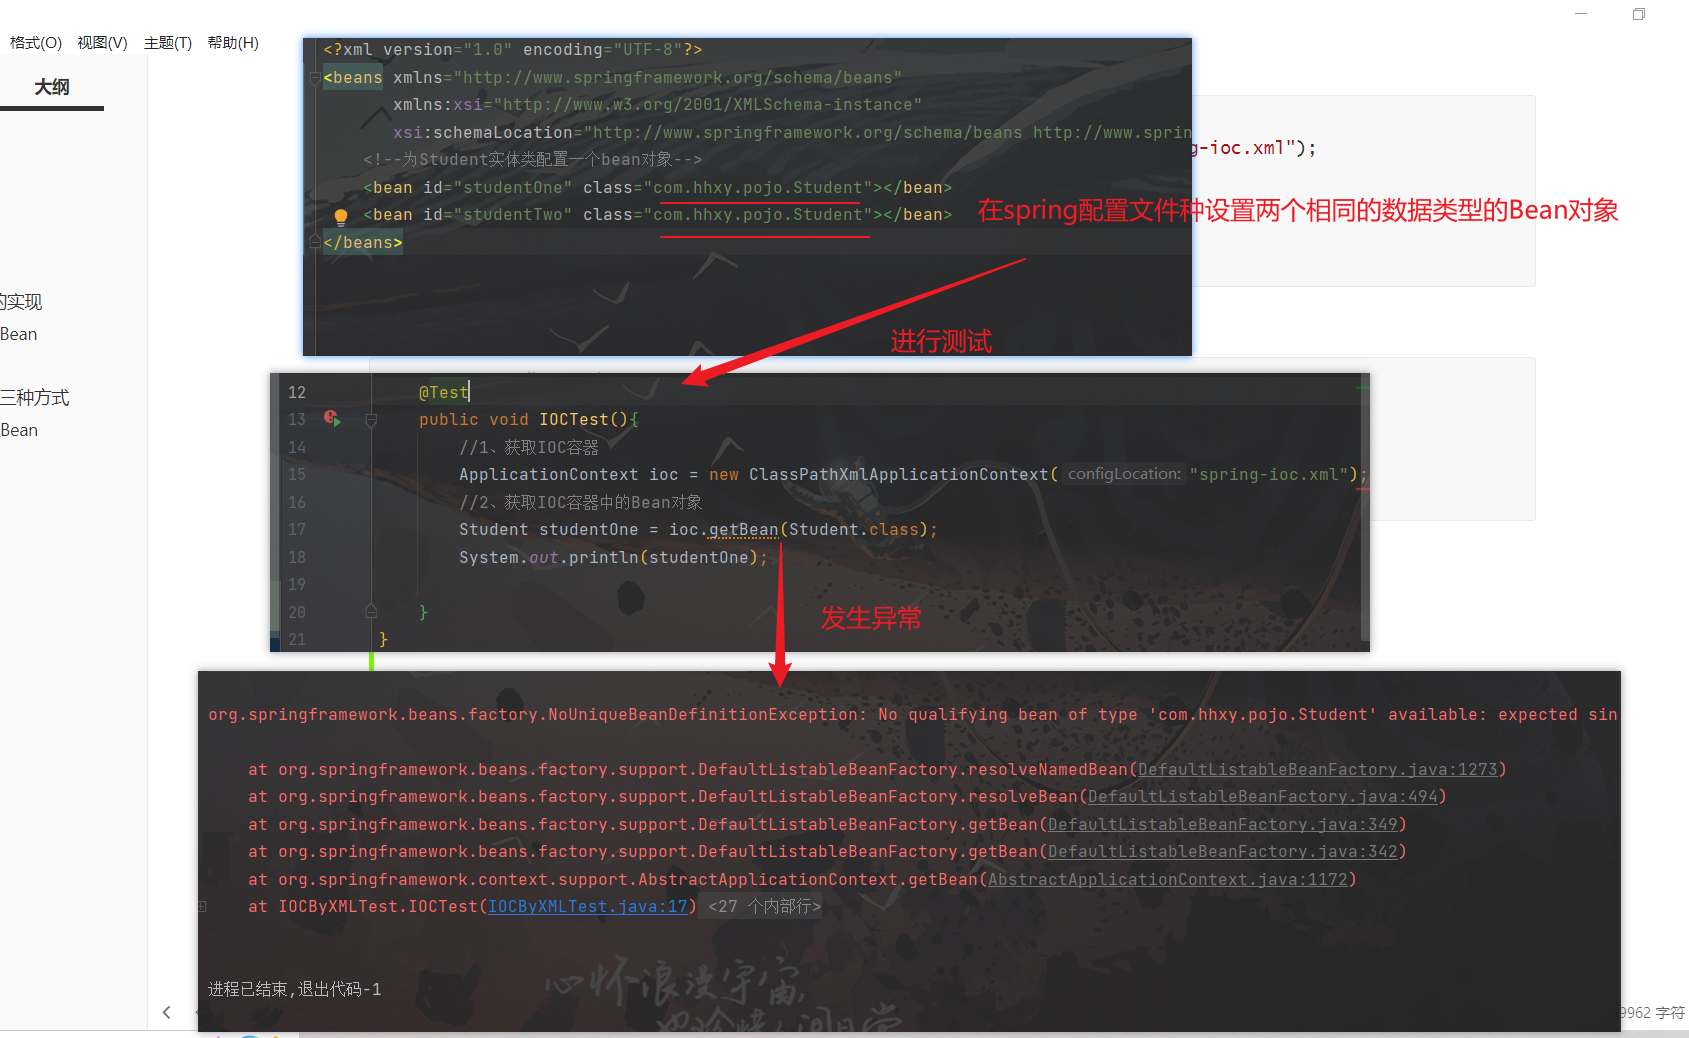
//1、获取IOC容器 ApplicationContext ioc = new ClassPathXmlApplicationContext("spring-ioc.xml"); //2、获取IOC容器中的Bean对象 Student student = ioc.getBean(Student.class); System.out.println(student);注意事项一:必须保障Spring配置文件中Bean对象的唯一性
使用这种方式获取Bean对象,配置文件种必须有且只有一个该数据类型的Bean对象,否则会报
org.springframework.beans.factory.NoUniqueBeanDefinitionException异常(另外两种方式不存在这个问题)举一个反例:
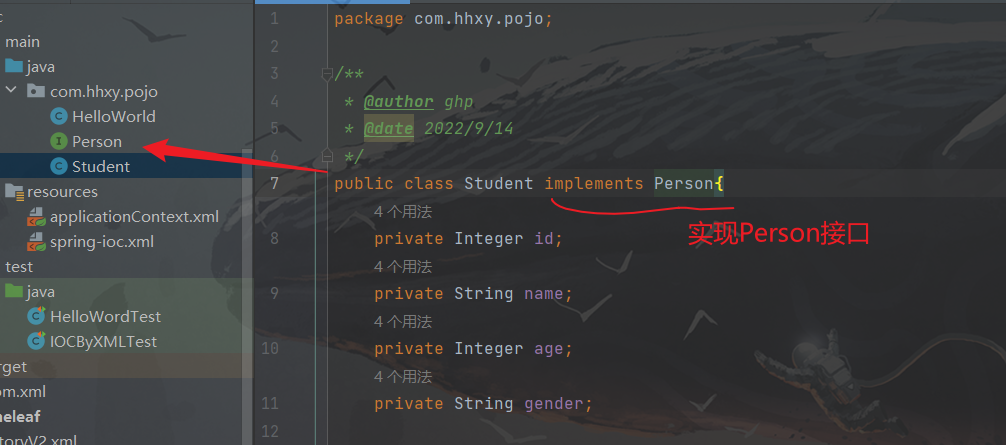
注意事项二:可以通过Bean对象的接口类型获取该Bean对象,前提也需要该Bean对象必须唯一
这是因为IOC容器对象的
getBean方法是向上兼容5的,这样虽然可以获取,诞生获取的Bean对象无法使用实现类的的特有方法//1、获取IOC容器 ApplicationContext ioc = new ClassPathXmlApplicationContext("spring-ioc.xml"); //2、获取IOC容器中的Bean对象 Person person = ioc.getBean(Person.class); System.out.println(person); -
方式三:根据id和类型获取
        //1、获取IOC容器
        ApplicationContext ioc = new ClassPathXmlApplicationContext("spring-ioc.xml");
        //2、获取IOC容器中的Bean对象
        Student studentOne = ioc.getBean("studentOne", Student.class);
        System.out.println(studentOne);
2.2.3 依赖注入
依赖注入就是指为实体类的属性6进行赋值的这一过程,本质就是通过成员变量的Set方法给成员变量设置值,所以使用这种方式Set方法是必须要有的,否则报
org.springframework.beans.NotWritablePropertyException异常
-
spring-ioc.xml:
<?xml version="1.0" encoding="UTF-8"?> <beans xmlns="http://www.springframework.org/schema/beans" xmlns:xsi="http://www.w3.org/2001/XMLSchema-instance" xsi:schemaLocation="http://www.springframework.org/schema/beans http://www.springframework.org/schema/beans/spring-beans.xsd"> <!--为Student实体类配置一个bean对象--> <bean id="studentOne" class="com.hhxy.pojo.Student"> <property name="id" value="1"></property> <property name="name" value="张三"></property> <property name="age" value="22"></property> <property name="gender" value="男"></property> </bean> <bean id="studentTwo" class="com.hhxy.pojo.Student"></bean> </beans> -
测试类:
import com.hhxy.pojo.Student; import org.junit.Test; import org.springframework.context.ApplicationContext; import org.springframework.context.support.ClassPathXmlApplicationContext; /** * @author ghp * @date 2022/9/14 */ public class IOCByXMLTest { @Test public void IOCTest(){ //1、获取IOC容器 ApplicationContext ioc = new ClassPathXmlApplicationContext("spring-ioc.xml"); //2、获取IOC容器中的Bean对象 Student studentOne = ioc.getBean("studentOne", Student.class); System.out.println(studentOne); } } -
测试结果:
拓展:为特殊类型的属性赋值
前面我们是给普通属性(基本数据类型的属性)进行赋值,现在我们学习一下如何给特殊属性赋值,主要包括:给属性赋值为null、给属性赋值特殊符号、为对象类型的属性赋值、为数组类型的属性赋值、为集合类型的属性赋值
给属性赋值为null,由于
value属性设置的是字面量7,所以无法直接使用,可以通过使用null标签进行赋值<property name="name"> <null/> <!-- 这里也可以使用双标签:<null></null> name、value属性也可以这样写 --> </property>给属性赋值特殊符号,需要进行转义,转义有两种方式
方式一:使用转义符
<property name="expression" value="a < b"/>方式二:使用CDATA区
<property name="expression">
    <value><![CDATA[a < b]]></value>
</property>
为对象类型的属性赋值
方式一:引用外部已声明的bean
    <bean id="studentOne" class="com.hhxy.pojo.Student">
        <property name="id" value="1"></property>
        <property name="name" value="张三"></property>
        <property name="age" value="22"></property>
        <property name="gender" value="男"></property>
        <property name="clazz" ref="clazzRef"></property>
    </bean>
    <bean id="clazzRef" class="com.hhxy.pojo.Clazz">
        <property name="id" value="1"></property>
        <property name="className" value="计科一班"></property>
    </bean>
测试结果:
方式二:使用级联方式
注意事项:必须先给对象的属性进行实例化,否则会报错(这种方式其实就是起到一个修改的作用,还是推荐使用方式一)
可以直接在Student类中将clazz字段直接使用
new进行实例化,或者使用外部引入的方式也是对clazz字段进行了实例化<bean id="studentOne" class="com.hhxy.pojo.Student"> <property name="id" value="1"></property> <property name="name" value="张三"></property> <property name="age" value="22"></property> <property name="gender" value="男"></property> <!--使用级联,先使用ref给对象的属性进行赋值,否则会报错--> <property name="clazz" ref="clazzRef"></property> <property name="clazz.id" value="2"></property> <property name="clazz.clazzName" value="计科二班"></property> </bean> <bean id="clazzRef" class="com.hhxy.pojo.Clazz"> <property name="id" value="1"></property> <property name="clazzName" value="计科一班"></property> </bean>测试结果:
方式三:内部bean
<bean id="studentOne" class="com.hhxy.pojo.Student"> <property name="id" value="1"></property> <property name="name" value="张三"></property> <property name="age" value="22"></property> <property name="gender" value="男"></property> <property name="clazz"> <bean id="clazzInner" class="com.hhxy.pojo.Clazz"> <property name="id" value="2"></property> <property name="clazzName" value="计科二班"></property> </bean> </property> </bean>注意:内部Bean对象只能在外部Bean的内部使用,无法在外部访问(即:无法直接通过IOC容器获取内部Bean对象),这一点类似于内部类
为数组类型的属性赋值:
    <bean id="studentOne" class="com.hhxy.pojo.Student">
        <property name="id" value="1"></property>
        <property name="name" value="赵六"></property>
        <property name="age" value="26"></property>
        <property name="gender" value="女"></property>
        <!--
        数组存储的是字面量类型的数据,使用value,直接进行赋值
        数组存储的是类对象类型的数据,使用ref,引用外部已申明的bean
        -->
        <property name="hobbies">
            <array>
                <value>唱</value>
                <value>跳</value>
                <value>rap</value>
            </array>
        </property>
    </bean>
测试成功:
为集合类型的属性赋值:
为List集合类型的属性进行赋值
方式一:使用list标签进行外部引入
<bean id="clazzOne" class="com.hhxy.pojo.Clazz"> <property name="id" value="1"></property> <property name="clazzName" value="计科一班"></property> <property name="students"> <!-- List集合中的元素是类对象类型的就用ref 如果是普通类型的就使用value --> <list> <ref bean="student1"></ref> <ref bean="student2"></ref> </list> </property> </bean> <bean id="student1" class="com.hhxy.pojo.Student"> <property name="id" value="1"></property> <property name="name" value="赵六"></property> <property name="age" value="26"></property> <property name="gender" value="女"></property> </bean> <bean id="student2" class="com.hhxy.pojo.Student"> <property name="id" value="2"></property> <property name="name" value="张三"></property> <property name="age" value="25"></property> <property name="gender" value="女"></property> </bean>方式二:引入集合类型的bean
	<bean id="clazzOne" class="com.hhxy.pojo.Clazz">
        <property name="id" value="1"></property>
        <property name="clazzName" value="计科一班"></property>
        <property name="students" ref="studentList"></property>
    </bean>

    <!--配置一个集合类型的bean,前提需要使用util的约束(IDEA会自动导入约束)-->
    <util:list id="studentList">
        <ref bean="student1"></ref>
        <ref bean="student2"></ref>
    </util:list>

    <bean id="student1" class="com.hhxy.pojo.Student">
        <property name="id" value="1"></property>
        <property name="name" value="赵六"></property>
        <property name="age" value="26"></property>
        <property name="gender" value="女"></property>
    </bean>

    <bean id="student2" class="com.hhxy.pojo.Student">
        <property name="id" value="2"></property>
        <property name="name" value="张三"></property>
        <property name="age" value="25"></property>
        <property name="gender" value="女"></property>
    </bean>
测试结果:
为Map集合类型的属性进行赋值
方式一:使用map标签进行外部引入
<bean id="student" class="com.hhxy.pojo.Student"> <property name="id" value="1"></property> <property name="name" value="张三"></property> <property name="age" value="22"></property> <property name="gender" value="男"></property> <property name="teacherMap"> <map> <!-- Map的键如果是字面量使用key,如果是类类型的值就用key-ref Map的值如果是字面量使用value,如果是类类型的值就用value-ref --> <entry key="老师1" value-ref="teacherOne"></entry> <entry key="老师2" value-ref="teacherTwo"></entry> </map> </property> </bean> <bean id="teacherOne" class="com.hhxy.pojo.Teacher"> <property name="id" value="1"></property> <property name="teacherName" value="张三"></property> </bean> <bean id="teacherTwo" class="com.hhxy.pojo.Teacher"> <property name="id" value="2"></property> <property name="teacherName" value="李四"></property> </bean>方式二:引入集合类型的bean
<bean id="student" class="com.hhxy.pojo.Student"> <property name="id" value="1"></property> <property name="name" value="张三"></property> <property name="age" value="22"></property> <property name="gender" value="男"></property> <property name="teacherMap" ref="teacherMap"></property> </bean> <util:map id="teacherMap"> <entry key="老师1" value-ref="teacherOne"></entry> <entry key="老师2" value-ref="teacherTwo"></entry> </util:map> <bean id="teacherOne" class="com.hhxy.pojo.Teacher"> <property name="id" value="1"></property> <property name="teacherName" value="张三"></property> </bean> <bean id="teacherTwo" class="com.hhxy.pojo.Teacher"> <property name="id" value="2"></property> <property name="teacherName" value="李四"></property> </bean>方式三:使用命名空间
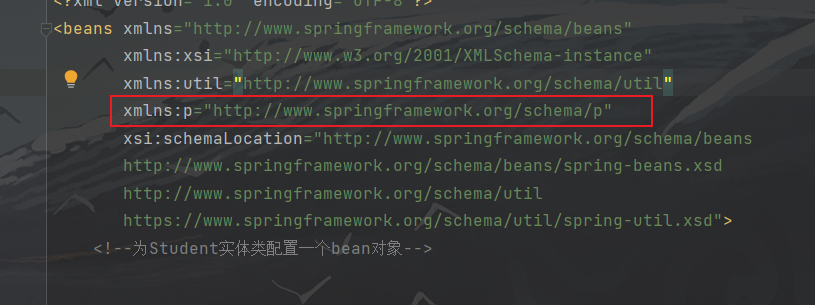
和前面配置集合类型bean时,也需要提前引入约束,不同的是前面引入
util约束IDEA会自动导入,而引入命名空间的约束(P约束)却需要手动引入备注:这种方式用的很少,但是要看得懂。该方式不仅能用来为Map集合的属性来赋值,还能用来给其他所有类型的属性来赋值
xmlns:p="http://www.springframework.org/schema/p"
    <!--
	带ref的属性是用来给类类型的属性进行赋值的,不带是给普通属性进行赋值的,取值可以是id或类类型
	-->
	<bean id="studentSpace" class="com.hhxy.pojo.Student"
          p:id="666" p:name="小明" p:teacherMap-ref="teacherMap">
    </bean>

    <util:map id="teacherMap">
        <entry key="老师1" value-ref="teacherOne"></entry>
        <entry key="老师2" value-ref="teacherTwo"></entry>
    </util:map>

    <bean id="teacherOne" class="com.hhxy.pojo.Teacher">
        <property name="id" value="1"></property>
        <property name="teacherName" value="张三"></property>
    </bean>

    <bean id="teacherTwo" class="com.hhxy.pojo.Teacher">
        <property name="id" value="2"></property>
        <property name="teacherName" value="李四"></property>
    </bean>
测试结果:
2.2.4 构造器注入
构造器注入就是指给实体类的构造器的参数进行赋值
-
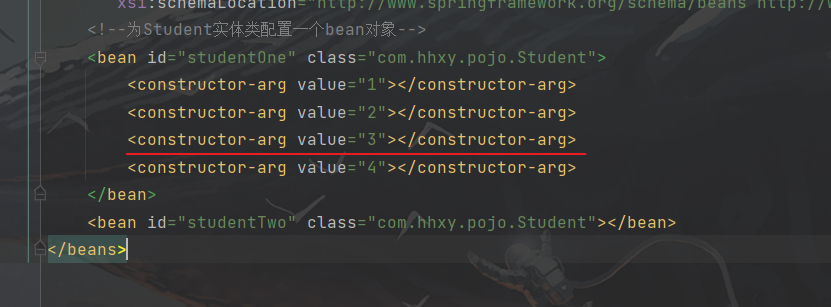
spring-ioc.xml:
<?xml version="1.0" encoding="UTF-8"?> <beans xmlns="http://www.springframework.org/schema/beans" xmlns:xsi="http://www.w3.org/2001/XMLSchema-instance" xsi:schemaLocation="http://www.springframework.org/schema/beans http://www.springframework.org/schema/beans/spring-beans.xsd"> <!--为Student实体类配置一个bean对象--> <bean id="studentOne" class="com.hhxy.pojo.Student"> <constructor-arg value="1"></constructor-arg> <constructor-arg value="2"></constructor-arg> <constructor-arg value="3"></constructor-arg> <constructor-arg value="4"></constructor-arg> </bean> <bean id="studentTwo" class="com.hhxy.pojo.Student"></bean> </beans>注意事项:构造器注入先根据设置参数的个数匹配与之对应的构造器(这个类似于super,this方法寻找构造方法),如果没有匹配到与之对应的构造器会报
org.springframework.beans.factory.BeanCreationException异常,然后再按照构造器中参数的顺序进行一次赋值 -
测试类:
import com.hhxy.pojo.Student; import org.junit.Test; import org.springframework.context.ApplicationContext; import org.springframework.context.support.ClassPathXmlApplicationContext; /** * @author ghp * @date 2022/9/14 */ public class IOCByXMLTest { @Test public void IOCTest(){ //1、获取IOC容器 ApplicationContext ioc = new ClassPathXmlApplicationContext("spring-ioc.xml"); //2、获取IOC容器中的Bean对象 Student studentOne = ioc.getBean("studentOne", Student.class); System.out.println(studentOne); } } -
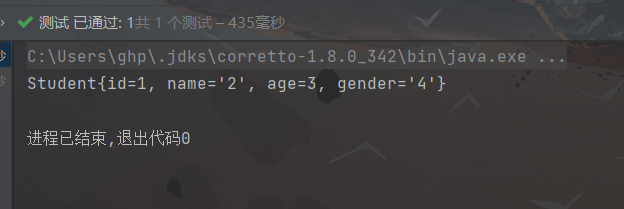
测试结果:
拓展:
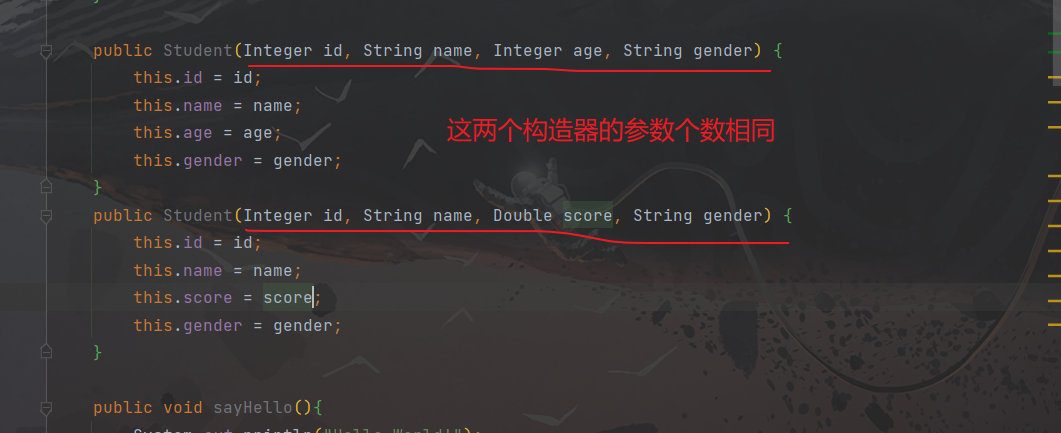
匹配优先级问题
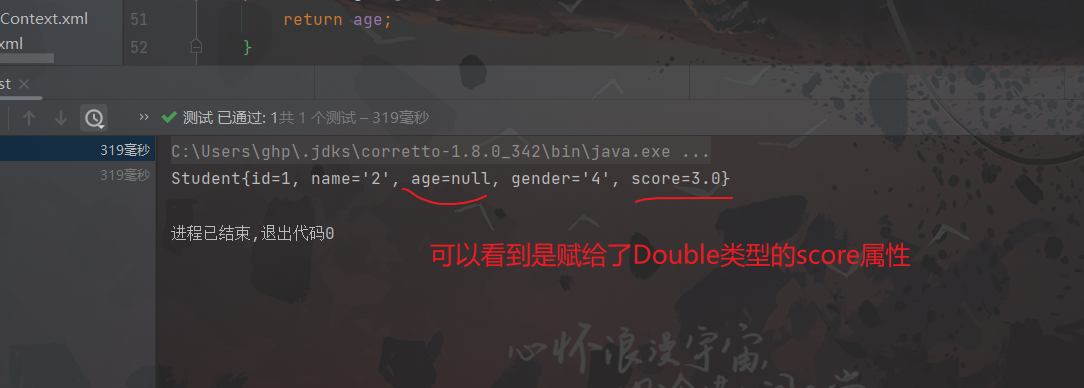
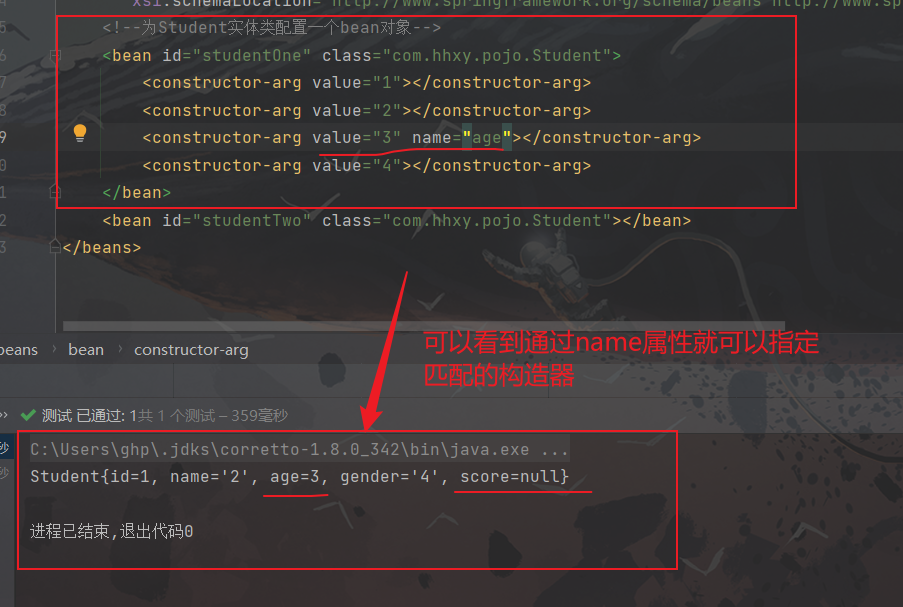
当我们的有两个有相同参数的构造器,这时候进行构造器注入会优先匹配精度高的(具体遇到再说吧,现在知道这么多也很快就忘记了,还不如不记😆)。如果想要设置给指定的属性,可以使用
name属性指明要赋值的属性;示例:
使用
name属性修改默认匹配的构造器:
2.3.5 数据源注入
数据源8注入就是指为数据源对象配置一个Bean对象,然后将该Bean对象将放到IOC容器中
-
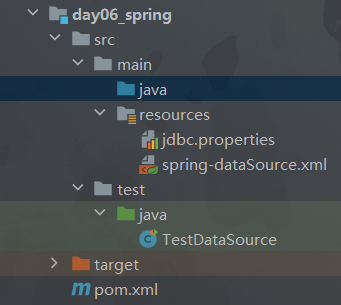
Step1:创建Mven工程
项目目录:
-
Step2:导入依赖
pom.xml:
<?xml version="1.0" encoding="UTF-8"?> <project xmlns="http://maven.apache.org/POM/4.0.0" xmlns:xsi="http://www.w3.org/2001/XMLSchema-instance" xsi:schemaLocation="http://maven.apache.org/POM/4.0.0 http://maven.apache.org/xsd/maven-4.0.0.xsd"> <modelVersion>4.0.0</modelVersion> <groupId>org.example</groupId> <artifactId>day06_spring</artifactId> <version>1.0-SNAPSHOT</version> <properties> <maven.compiler.source>8</maven.compiler.source> <maven.compiler.target>8</maven.compiler.target> <project.build.sourceEncoding>UTF-8</project.build.sourceEncoding> </properties> <dependencies> <!--mysql驱动--> <dependency> <groupId>mysql</groupId> <artifactId>mysql-connector-java</artifactId> <version>8.0.16</version> </dependency> <!--德鲁伊数据源(数据库连接池)--> <dependency> <groupId>com.alibaba</groupId> <artifactId>druid</artifactId> <version>1.2.12</version> </dependency> <!--spring(间接引入ioc容器依赖)--> <dependency> <groupId>org.springframework</groupId> <artifactId>spring-context</artifactId> <version>5.3.22</version> </dependency> <!--junit--> <dependency> <groupId>junit</groupId> <artifactId>junit</artifactId> <version>4.13.2</version> </dependency> </dependencies> </project> -
Step3:编写spring配置文件
spring-ioc.xml:
<?xml version="1.0" encoding="UTF-8"?>
<beans xmlns="http://www.springframework.org/schema/beans"
       xmlns:xsi="http://www.w3.org/2001/XMLSchema-instance"
       xmlns:context="http://www.springframework.org/schema/context"
       xsi:schemaLocation="http://www.springframework.org/schema/beans http://www.springframework.org/schema/beans/spring-beans.xsd http://www.springframework.org/schema/context https://www.springframework.org/schema/context/spring-context.xsd">
    <!--引入properties文件,前提是必须引入context约束(上下文约束)-->
    <context:property-placeholder location="classpath:jdbc.properties"/>
    <!--数据库链接池创建bean对象-->
    <bean id="dataSource" class="com.alibaba.druid.pool.DruidDataSource">
        <property name="driverClassName" value="${jdbc.driver}"></property>
        <property name="url" value="${jdbc.url}"></property>
        <property name="username" value="${jdbc.username}"></property>
        <property name="password" value="${jdbc.password}"></property>
    </bean>
</beans>
jdbc.properties:
jdbc.driver=com.mysql.cj.jdbc.Driver jdbc.url=jdbc:mysql:///ssm?useSSL=false&characterEncoding=utf8&useServerPrepStmts=true&serverTimezone=UTC jdbc.username=root jdbc.password=32345678 -
Step4:
import com.alibaba.druid.pool.DruidDataSource;
import org.junit.Test;
import org.springframework.context.support.ClassPathXmlApplicationContext;
import java.sql.SQLException;

/**
 * @author ghp
 * @date 2022/9/15
 */
public class TestDataSource {
    @Test
    public void dataSourceTest() throws SQLException {
        //1、获取IOC对象
        ClassPathXmlApplicationContext ioc = new ClassPathXmlApplicationContext("spring-dataSource.xml");
        //2、获取IOC中的Bean对象
        DruidDataSource dataSource = ioc.getBean(DruidDataSource.class);
        //测试输出
        System.out.println(dataSource.getConnection());
    }
}
测试结果:
2.3.6 Bean的作用域和生命周期
Bean的作用域
在Spring中可以通过配置bean标签的scope属性来指定bean的作用域范围,各取值含义参加下表:
如果是在WebApplicationContext环境下还会有另外两个作用域(但不常用):
-
spring配置文件:
<bean class="com.hhxy.User" scope="prototype"></bean> -
测试类:
@Test
public void testBeanScope(){
	ApplicationContext ac = new ClassPathXmlApplicationContext("springscope.xml");
	User user1 = ac.getBean(User.class);
	User user2 = ac.getBean(User.class);
	System.out.println(user1==user2);
    //当scope取值prototype时,输出:false
    //当scope取值singleton时,输出:true
}
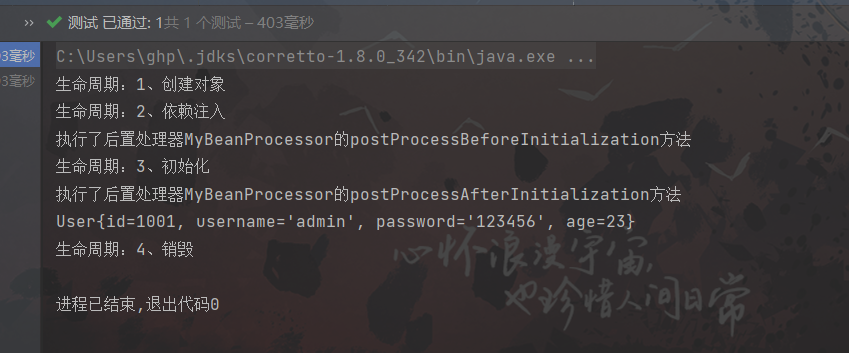
Bean的生命周期
- bean对象创建(通过newInstance方法调用无参构造器)
- 给bean对象设置属性
- bean对象初始化之前操作(由bean的后置处理器负责)
- bean对象初始化(需在配置bean时指定初始化方法)
- bean对象初始化之后操作(由bean的后置处理器负责)
- bean对象就绪可以使用 bean对象销毁(需在配置bean时指定销毁方法)
- IOC容器关闭(或者Web服务器关闭)
备注:上述生命周期是针对单例bean对象而言的,对于多例bean对象,IOC容器无法管理多例bean对象的销毁
示例:
测试Bean对象的生命周期
-
Step1:
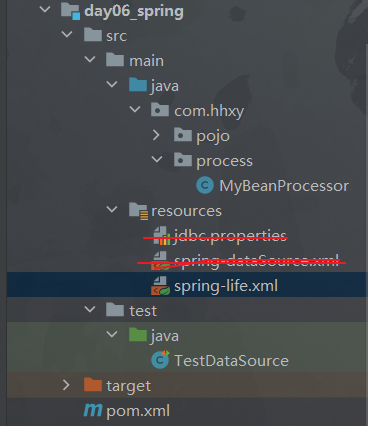
目录结构:
备注:这里导入依赖的步骤就省略了,这里的依赖就是快速入门中的依赖
-
Step2:编写spring配置文件
spring-life.xml:
<?xml version="1.0" encoding="UTF-8"?> <beans xmlns="http://www.springframework.org/schema/beans" xmlns:xsi="http://www.w3.org/2001/XMLSchema-instance" xmlns:context="http://www.springframework.org/schema/context" xsi:schemaLocation="http://www.springframework.org/schema/beans http://www.springframework.org/schema/beans/spring-beans.xsd http://www.springframework.org/schema/context https://www.springframework.org/schema/context/spring-context.xsd"> <!--引入properties文件--> <context:property-placeholder location="classpath:jdbc.properties"/> <!--为User类创建Bean对象--> <bean class="com.hhxy.pojo.User" init-method="initMethod" destroy-method="destroyMethod"> <property name="id" value="1001"></property> <property name="username" value="admin"></property> <property name="password" value="123456"></property> <property name="age" value="23"></property> </bean> <!--为IOC容器配置一个自定义的后置处理器--> <bean class="com.hhxy.process.MyBeanProcessor"></bean> </beans>备注:自定义的后置处理器针对IOC容器中所有的Bean对象
-
MyBeanProcessor:
package com.hhxy.process; import org.springframework.beans.BeansException; import org.springframework.beans.factory.config.BeanPostProcessor; /** * 自定义一个bean的后置处理器 * @author ghp * @date 2022/9/15 */ public class MyBeanProcessor implements BeanPostProcessor { /** * 该方法在bean对象的生命周期初始化之前执行 * @param bean IOC创建的bean对象 */ @Override public Object postProcessBeforeInitialization(Object bean, String beanName) throws BeansException { System.out.println("执行了后置处理器MyBeanProcessor的postProcessBeforeInitialization方法"); return BeanPostProcessor.super.postProcessBeforeInitialization(bean, beanName); } /** * 该方法在bean对象的生命周期的初始化之后执行 */ @Override public Object postProcessAfterInitialization(Object bean, String beanName) throws BeansException { System.out.println("执行了后置处理器MyBeanProcessor的postProcessAfterInitialization方法"); return BeanPostProcessor.super.postProcessAfterInitialization(bean, beanName); } } -
User:
package com.hhxy.pojo; /** * @author ghp * @date 2022/9/15 */ public class User { private Integer id; private String username; private String password; private Integer age; public User() { System.out.println("生命周期:1、创建对象"); } public User(Integer id, String username, String password, Integer age) { this.id = id; this.username = username; this.password = password; this.age = age; } public Integer getId() { return id; } public void setId(Integer id) { System.out.println("生命周期:2、依赖注入"); this.id = id; } public String getUsername() { return username; } public void setUsername(String username) { this.username = username; } public String getPassword() { return password; } public void setPassword(String password) { this.password = password; } public Integer getAge() { return age; } public void setAge(Integer age) { this.age = age; } public void initMethod() { System.out.println("生命周期:3、初始化"); } public void destroyMethod() { System.out.println("生命周期:4、销毁"); } @Override public String toString() { return "User{" + "id=" + id + ", username='" + username + '\'' + ", password='" + password + '\'' + ", age=" + age + '}'; } } -
测试类:
/** * 测试Bean的生命周期 */ @Test public void beanLifeTest(){ //1、获取IOC对象 // ClassPathXmlApplicationContext ioc = new ClassPathXmlApplicationContext("spring-dataSource.xml"); //关闭IOC容器的方法在ConfigurableApplicationContext对象中,使用上面的对象无法关闭IOC容器 ConfigurableApplicationContext ioc = new ClassPathXmlApplicationContext("spring-life.xml"); //2、获取IOC中的Bean对象 User user = ioc.getBean(User.class); //测试输出 System.out.println(user); ioc.close(); }注意:
- 销毁方法存在
ConfigurableApplicationContext对象中的,使用ClassPathXmlApplicationContext无法执行close方法 - 使用多例模式(即
scope="prototype"时),无法执行销毁方法,因为spring无法管理非单例bean的完整生命周期
测试结果:
- 销毁方法存在
2.3.7 FactoryBean机制
FactoryBean是Spring提供的一种整合第三方框架的常用机制。和普通的bean不同,配置一个 FactoryBean类型的bean,在获取bean的时候得到的并不是class属性中配置的这个类的对象,而是
getObject()方法的返回值。通过这种机制,Spring可以帮我们把复杂组件创建的详细过程和繁琐细节都屏蔽起来,只把最简洁的使用界面展示给我们
-
工厂类:
package com.hhxy.factory; import com.hhxy.pojo.User; import org.springframework.beans.factory.FactoryBean; /** * @author ghp * @date 2022/9/15 */ public class UserFactoryBean implements FactoryBean<User> { /** * @return 创建的对象 */ @Override public User getObject() throws Exception { return new User(); } /** * @return 工厂创建对象的类型 */ @Override public Class<?> getObjectType() { return User.class; } } -
spring配置文件:
<?xml version="1.0" encoding="UTF-8"?> <beans xmlns="http://www.springframework.org/schema/beans" xmlns:xsi="http://www.w3.org/2001/XMLSchema-instance" xsi:schemaLocation="http://www.springframework.org/schema/beans http://www.springframework.org/schema/beans/spring-beans.xsd"> <!--为工厂类配置Bean,这个Bean是get方法返回的User对象,而不是工厂对象--> <bean class="com.hhxy.factory.UserFactoryBean"></bean> </beans> -
测试类:
    /**
     * 测试FactoryBean机制
     */
    @Test
    public void factoryBeanTest(){
        //1、获取IOC对象
        ClassPathXmlApplicationContext ioc = new ClassPathXmlApplicationContext("spring-factory.xml");
        //2、获取IOC中的Bean对象
        User user = ioc.getBean(User.class);
        //测试输出
        System.out.println(user);
    }
2.3 基于注解管理Bean
和 XML 配置文件一样,注解本身并不能执行,注解本身仅仅只是做一个标记,具体的功能是框架检测 到注解标记的位置,然后针对这个位置按照注解标记的功能来执行具体操作。 本质上:所有一切的操作都是Java代码来完成的,XML和注解只是告诉框架中的Java代码如何执行。Spring 为了知道程序员在哪些地方标记了什么注解,就需要通过扫描的方式,来进行检测。然后根据注 解进行后续操作。
-
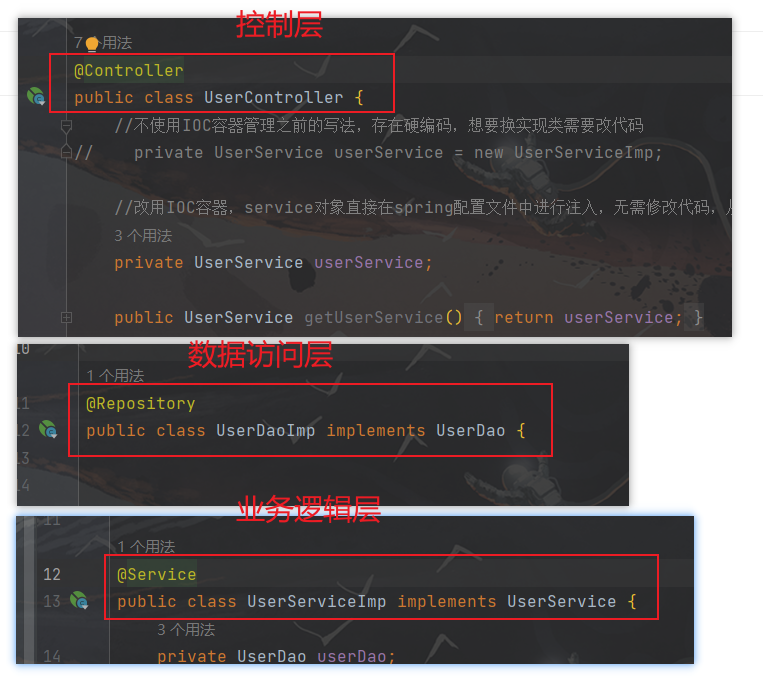
表示组件的常用注解:
Component:将类标识为普通组件Controller:将类标识为控制层组件Service:将类标识为业务层组件Repository:将类标识为持久层组件
备注:后三个注解都是由
Component注解扩展出来的,需要注意的是注解不能加在接口上
示例:
-
Step1:创建Mvaen工程
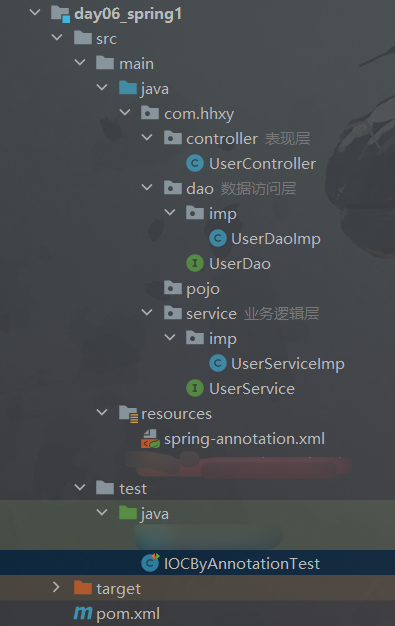
目录结构:
-
Step2:导入依赖
和2.2.2的一样,略……
-
Step3:编写spring配置文件
spring-ani=notation.xml:
<?xml version="1.0" encoding="UTF-8"?> <beans xmlns="http://www.springframework.org/schema/beans" xmlns:xsi="http://www.w3.org/2001/XMLSchema-instance" xmlns:context="http://www.springframework.org/schema/context" xsi:schemaLocation="http://www.springframework.org/schema/beans http://www.springframework.org/schema/beans/spring-beans.xsd http://www.springframework.org/schema/context https://www.springframework.org/schema/context/spring-context.xsd"> <!--扫描组件,需要先创建命名空间引入约束--> <!--方式一:指定包(效率更高)--> <context:component-scan base-package="com.hhxy.controller,com.hhxy.dao.imp,com.hhxy.service.imp"></context:component-scan> <!--方式二:使用包扫描(使用方便)--> <!-- <context:component-scan base-package="com.hhxy"></context:component-scan>--> </beans>拓展:
-
排除扫描:(用的很多)
<context:component-scan base-package="com.hhxy"> <!-- type的取值 annotation:根据注解排除,expression中设置要排除的注解的全类名 assignable:根据类型排除,expression中设置要排除的类型的全类名 还有其他的取值,以后在学,这两给最常用 --> <!--排除@controller注解标记的所有类--> <context:exclude-filter type="annotation" expression="org.springframework.stereotype.Controller"/> </context:component-scan> -
指定扫描:(几乎不用,了解即可)
    <context:component-scan base-package="com.hhxy" use-default-filters="false">
        <!--
        use-default-filters:是否扫描包下所有内容(默认是true),想要使用指定扫描需要设置称true
        type的取值
        annotation:根据注解指定,expression中设置要排除的注解的全类名
        assignable:根据类型指定,expression中设置要排除的类型的全类名
        -->
        <!--只扫描com.hhxy包下的@controller注解标记的类-->
        <context:include-filter type="annotation" expression="org.springframework.stereotype.Controller"/>
    </context:component-scan>
-
-
Step4:编写Java代码
这里需要使用注解标记类,标记后再到spring配置文件中扫描组件
-
Step5:测试
import com.hhxy.controller.UserController;
import com.hhxy.dao.UserDao;
import com.hhxy.service.UserService;
import org.junit.Test;
import org.springframework.context.ApplicationContext;
import org.springframework.context.support.ClassPathXmlApplicationContext;

/**
 * 测试使用注解管理Bean
 * @author ghp
 * @date 2022/9/16
 */
public class IOCByAnnotationTest {
    /**
     * 测试注解管理Bean
     */
    @Test
    public void annotationTest(){
        //1、获取IOC容器对象
        ApplicationContext ioc = new ClassPathXmlApplicationContext("spring-annotation.xml");
        //2、获取Bean对象
        //获取Controller层组件对象
        UserController userController = ioc.getBean(UserController.class);
        System.out.println(userController);
        //获取Service层组件
        UserService userService = ioc.getBean(UserService.class);
        System.out.println(userService);
        //获取Dao层组件
        UserDao userDao = ioc.getBean(UserDao.class);
        System.out.println(userDao);
    }
}
拓展:使用注解管理的Bean对象的id
在我们使用XML方式管理Bean的时候,每个Bean都有一个唯一标识,便于在其他地方引用。现在使用 注解后,每个组件仍然应该有一个唯一标识:
默认情况类名首字母小写就是bean的id。例如:UserController类对应的Bean的id就是userController
自定义Bean的id:
2.4 自动装配
自动装配:根据指定的策略,在IOC容器中匹配某一个Bean,自动为指定的Bean中所依赖的类类型或接口类型属性进行赋值
2.4.1 基于XML实现自动装配
使用XML实现Bean对象的自动装配,需要使用使用
autowire属性来指定自动装配的策略自动装配匹配策略有:
no:没有策略(默认),此时Bean对象的属性采用默认值
default:采用默认策略(等价no)
byType:根据要赋值属性的类型进行匹配,然后为属性赋值(用的很多)组要注意两种特殊情况:
- 匹配不到一个Bean,要赋值的属性使用默认值(这种情况一般会报
NullPointerException异常)- 匹配到多个Bean,IDEA直接在编译阶段报错,运行时会报
NoUniqueBeanDefinitionException异常
byName:根据要赋值的属性的名称进行匹配,然后为属性赋值(很少用,但byType不行时就用byName)
constructor:根据赋值属性与构造器的参数个数和参数类型进行匹配,然后为属性赋值(几乎不用,前两个搭配就够了)使用构造器进行自动装配的例子
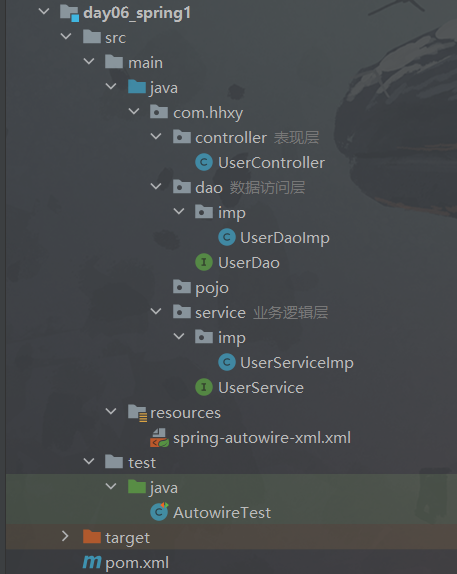
示例:
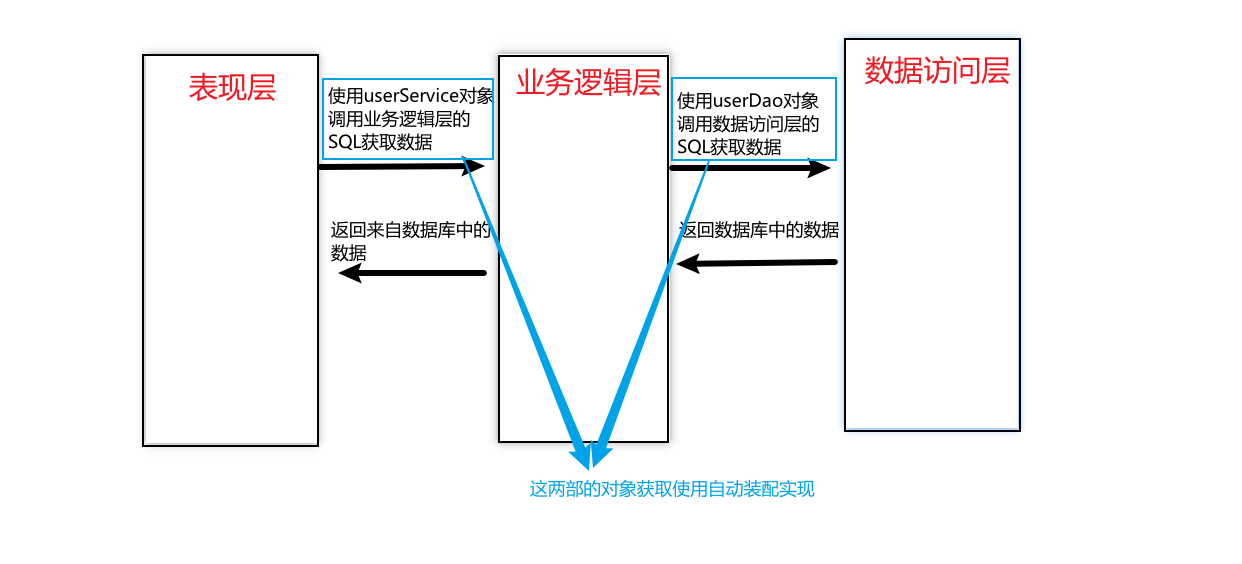
思路(使用三层架构进行模拟):
目录结构:
<?xml version="1.0" encoding="UTF-8"?>
<beans xmlns="http://www.springframework.org/schema/beans"
       xmlns:xsi="http://www.w3.org/2001/XMLSchema-instance"
       xsi:schemaLocation="http://www.springframework.org/schema/beans http://www.springframework.org/schema/beans/spring-beans.xsd">

    <!--为UserDaoImp类配置Bean对象-->
    <bean id="userDao" class="com.hhxy.dao.imp.UserDaoImp"></bean>
    <!--手动为UserServiceImp类配置Bean对象-->
    <bean id="userService" class="com.hhxy.service.imp.UserServiceImp" autowire="byType">
        <!--手动为UserDao接口对象赋值一个实体类对象-->
<!--        <property name="userDao" ref="userDao"></property>-->
    </bean>
    <!--为UserController类配置Bean对象-->
    <bean id="userController" class="com.hhxy.controller.UserController" autowire="byType">
        <!--手动为UserService接口对象进行赋值一个实现类对象-->
<!--        <property name="userService" ref="userService"></property>-->
    </bean>
</beans>
测试:
    /**
     * 测试基于XML实现的自动装配
     */
    @Test
    public void autowireByXMLTest(){
        //1、获取IOC容器对象
        ApplicationContext ioc = new ClassPathXmlApplicationContext("spring-autowire-xml.xml");
        //2、获取Bean对象
        UserController userController = ioc.getBean(UserController.class);
        userController.saveUser();
    }
测试结果:
2.4.2 基于注解实现自动装配
-
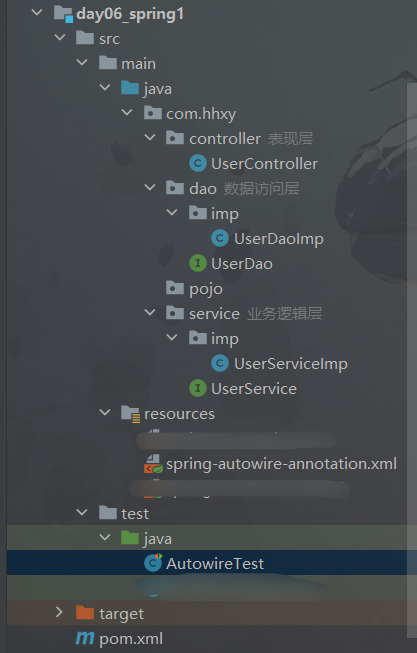
Step1:创建Maven工程
目录结构:
-
Step2:导入依赖
-
Step3:编写spring配置文件
<?xml version="1.0" encoding="UTF-8"?> <beans xmlns="http://www.springframework.org/schema/beans" xmlns:xsi="http://www.w3.org/2001/XMLSchema-instance" xmlns:context="http://www.springframework.org/schema/context" xsi:schemaLocation="http://www.springframework.org/schema/beans http://www.springframework.org/schema/beans/spring-beans.xsd http://www.springframework.org/schema/context https://www.springframework.org/schema/context/spring-context.xsd"> <!--扫描组件--> <context:component-scan base-package="com.hhxy"></context:component-scan> </beans> -
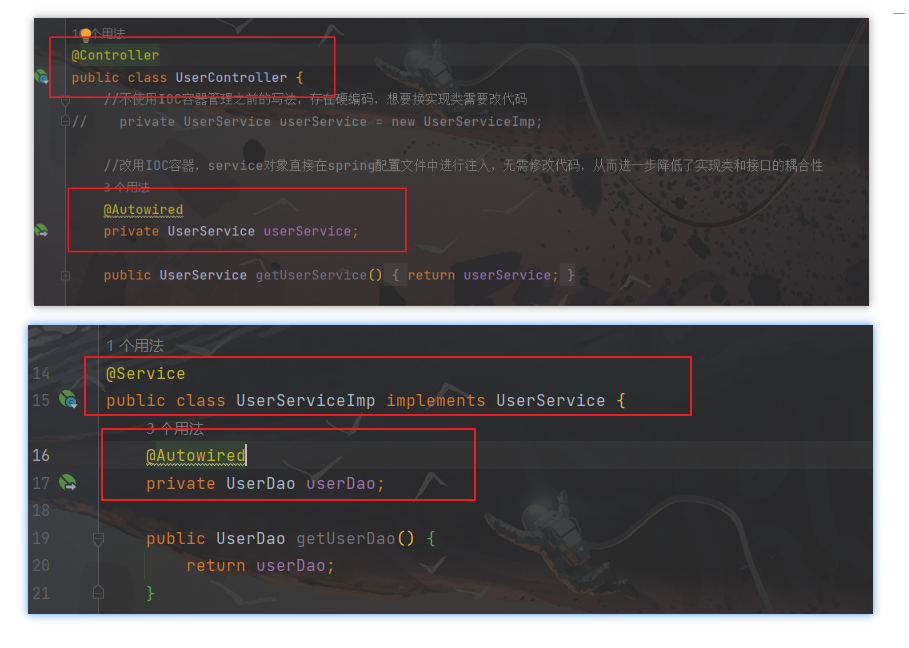
Step4:编写Java代码
备注:
@Autowired标识在以下三个地方,都能实现Bean的自动装配- 该注解标识成员变量,不需要设置成员变量set方法(官方不推荐)
- 该注解标识set方法(官方推荐)
- 该注解标识在为该成员变量的有参构造方法上
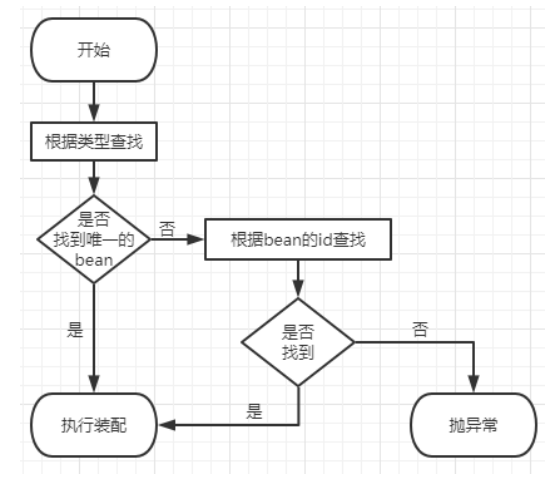
@Autowired注解的匹配策略:-
默认是使用
byType策略进行匹配的; -
当匹配到多个Bean时会自动转换成
byName策略进行匹配; -
当
byType和byName策略都无法成功匹配到Bean,就直接报NoUniqueBeanDefinitionException异常。此时可以使用
@Qualifier注解指定一个id所对应的Bean为属性赋值 -
当一个都没有匹配到时,会报
NOSuchBeanDefinitionException异常,这和XML实现不同是因为@Autowire注解中有一个required属性,它默认取值为true,未完成自动装配就抛异常。当我们将其设置称false时:@Autowire(required=false),此时就报空指针异常,和XML实现时一样了(这种情况几乎不会遇到,99%的自动装配使用byType和byName就够了)
总结起来就是一张图:
-
Step5:测试
    /**
     * 测试基于注解实现的自动装配
     */
    @Test
    public void autowireByAnnotationTest(){
        //1、获取IOC容器对象
        ApplicationContext ioc = new ClassPathXmlApplicationContext("spring-autowire-annotation.xml");
        //2、获取Bean对象
        UserController userController = ioc.getBean(UserController.class);
        userController.saveUser();
    }
测试结果和基于XML实现的自动装配是一样的
3、AOP
3.1 代理模式
AOP的底层实现是离不开代理模式的,所以在了解AOP前需要先来了解代理模式。所谓的代理模式是23种设计模式种的一种,属于结构型模式,它的作用是:通过提供一个代理类,让我们在调用目标 方法的时候,不再是直接对目标方法进行调用,而是通过代理类间接调用,让不属于目标方法核心逻辑 的代码从目标方法中剥离出来——解耦。调用目标方法时先调用代理对象的方法,减少对目标方法的调用和打扰,同时让附加功能能够集中在一起也有利于统一维护。
推荐阅读:
- 每日一个设计模式之【代理模式】
- Spring AOP 和代理的关系?
3.1.1 静态代理
静态代理:代理类和委托类的关系在运行前就确定了
示例:
-
Step1:创建Java工程
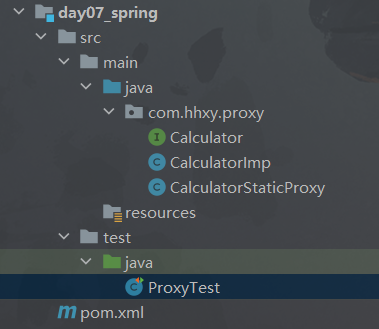
目录结构:
-
Step2:编写目标类
1)编写目标类的接口
package com.hhxy.proxy;

/**
 * @author ghp
 * @date 2022/9/17
 */
public interface Calculator {
    /**
     * 加法
     */
    int add(int i, int j);
}
2)编写目标类
package com.hhxy.proxy; /** * 目标类(委托类) * @author ghp * @date 2022/9/17 */ public class CalculatorImp implements Calculator{ /** * 加法 */ @Override public int add(int i, int j) { int result = i + j; System.out.println("方法内部: result = "+result); return result; } } -
Step3:编写代理类
须知:如果目标类实现了接口,代理类也需要实现
package com.hhxy.proxy;

/**
 * 静态代理类
 * @author ghp
 * @date 2022/9/17
 */
public class CalculatorStaticProxy implements Calculator {
    //1、获取目标类对象
    private CalculatorImp target;
    public CalculatorStaticProxy(CalculatorImp target) {
        this.target = target;
    }

    //2、给代理对象的方法添加附加代码
    /**
     * 加法
     */
    @Override
    public int add(int i, int j) {
        System.out.println("add方法运行前逻辑");
        int result = target.add(i, j);
        System.out.println("add方法运行后逻辑");
        return result;
    }
}
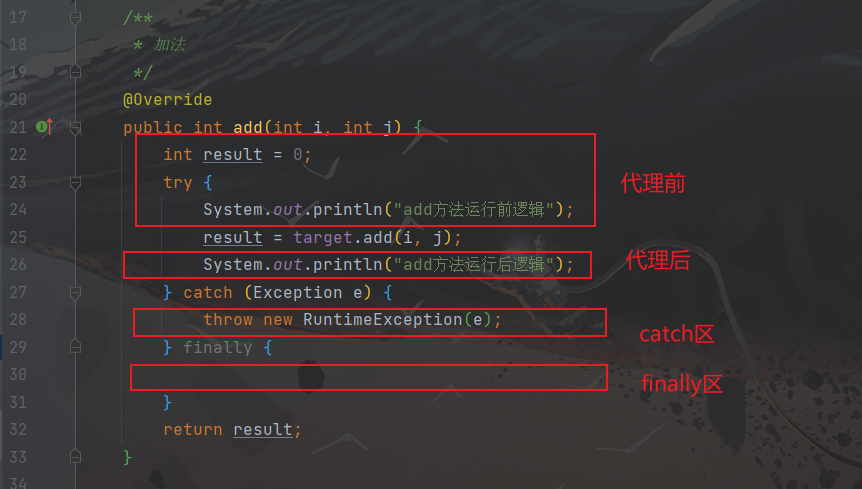
代理类可以给代理对象的方法添加附加代码的地方有四个,分别是:代理前,代理后,catch,finally
-
Step4:测试
    @Test
    public void staticProxyTest(){
        //1、获取静态代理类对象
        CalculatorStaticProxy staticProxy = new CalculatorStaticProxy(new CalculatorImp());
        //2、通过代理对象调用目标类的方法
        staticProxy.add(1,2);
    }
测试结果:
静态代理确实实现了解耦,但是由于代码都写死了(一个静态代理方法只能为一个目标类的方法进行代理),完全不具备任何的灵活性。就拿日志功能来 说,将来其他地方也需要附加日志,那还得再声明更多个静态代理类,那就产生了大量重复的代码,日志功能还是分散的,没有统一管理。 提出进一步的需求:将日志功能集中到一个代理类中,将来有任何日志需求,都通过这一个代理 类来实现。这就需要使用动态代理技术了!
3.1.2 动态代理
动态代理:代理类和委托类的关系在运行时确定,能够帮助任何类创建代理类(底层是使用反射实现的)。
动态代理分为两种:JDK动态代理、CGLIB动态代理
JDK代理:基于接口进行动态代理,使用反射技术
只能对该类所实现接口中定义的方法进行代理,同时代理类需要实现目标类的接口(基于这种特性,可以趣称JDK代理方式为 拜把子模式),否则报
java.lang.ClassCastException: com.sun.proxy.$Proxy4 cannot be cast to com.hhxy.proxy.Calculator异常,这在实际编程中有一定的局限性,而且使用反射的效率也不高,生成的代理类在com.sun.proxy包下,类名为$proxy数字CGLIB代理:基于类进行动态代理,使用字节码技术
比使用反射的效率要高,但CGBIL不能对final修饰的方法进行代理,因为CGBIL原理是动态生成委托类(目标类)的子类,生成的代理类和目标类在同一包下(基于这种特性,可以趣称CGLIB代理方式为 认干爹模式)
JDK代理
-
Step1:创建Java工程
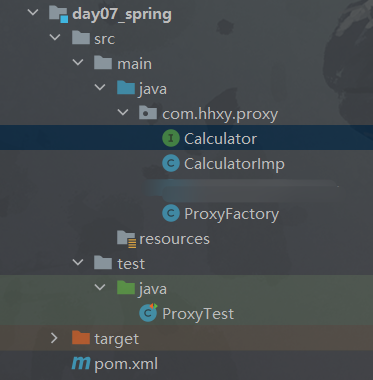
目录结构:
-
Step2:编写目标类
和静态代理中的目标类一样,略……
-
Step3:编写代理类
package com.hhxy.proxy; import java.lang.reflect.InvocationHandler; import java.lang.reflect.Method; import java.lang.reflect.Proxy; /** * 动态生成代理类的工具类 * @author ghp * @date 2022/9/17 */ public class ProxyFactory { private Object target;//目标类对象 public ProxyFactory(Object target){ this.target = target; } /** * 获取动态代理类对象 * @return */ public Object getProxy() { /** public static Object newProxyInstance(ClassLoader loader,Class<?>[] interfaces,InvocationHandler h) 参数一: loader表示目标类的类加载器 参数二: interfaces表示对象实现的所有接口对象的Class对象的数组 参数三: h表示匿名内部类对象,它是JDK动态代理类实现的核心代码 */ return Proxy.newProxyInstance(target.getClass().getClassLoader(), target.getClass().getInterfaces(), new InvocationHandler() { /** * 这是代理类执行 目标对象中的方法 的方法 * @param proxy 表示代理类的对象 * @param method 表示要执行的方法 * @param args 表示要执行方法的参数列表 */ @Override public Object invoke(Object proxy, Method method, Object[] args) throws Throwable { System.out.println(method.getName()+"方法执行前逻辑"); Object result = method.invoke(target, args); System.out.println(method.getName()+"方法执行后逻辑"); return result; } }); } }知识拓展:
类加载器有四种:
- 根类加载器:也称启动类加载器(BootstrapClassLoader),用于加载核心类库(底层用C实现的)
- 扩展类加载器(ExtClassLoader):用于加载阔赞类库
- 应用类加载器(AppClassLoader):用于加载开发者写的类或者第三方jar包中的类
- 自定义类加载器(DefineClassLoader):该种类加载器有开发者自己定义,作用是从实际场景出发,解决一些应用上的问题,例如:热部署、加密……
-
Step4:测试
    /**
     * 测试JDK动态代理
     */
    @Test
    public void dynamicProxyTest(){
        //1、获取动态代理工厂类对象
        ProxyFactory proxyFactory = new ProxyFactory(new CalculatorImp());
        //2、获取静态代理类对象
        Calculator dynamicProxy = (Calculator) proxyFactory.getProxy();
        //3、通过代理类对象调用目标类的方法
        dynamicProxy.add(1,2);
    }
测试结果和静态代理是一样的
CGLIB代理
这里只提供一个简单使用CGLIB进行动态代理的案例
详情见:CGLIB(Code Generation Library) 介绍与原理 | 菜鸟教程 (runoob.com)
-
Step1:创建Java工程
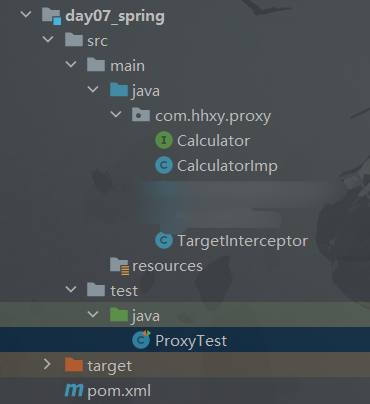
结构目录:
-
Step2:导入依赖
pom.xml:
<?xml version="1.0" encoding="UTF-8"?> <project xmlns="http://maven.apache.org/POM/4.0.0" xmlns:xsi="http://www.w3.org/2001/XMLSchema-instance" xsi:schemaLocation="http://maven.apache.org/POM/4.0.0 http://maven.apache.org/xsd/maven-4.0.0.xsd"> <modelVersion>4.0.0</modelVersion> <groupId>org.example</groupId> <artifactId>day07_spring</artifactId> <version>1.0-SNAPSHOT</version> <properties> <maven.compiler.source>8</maven.compiler.source> <maven.compiler.target>8</maven.compiler.target> <project.build.sourceEncoding>UTF-8</project.build.sourceEncoding> </properties> <dependencies> <!--cglib依赖的jar包--> <dependency> <groupId>cglib</groupId> <artifactId>cglib-nodep</artifactId> <version>3.3.0</version> </dependency> <dependency> <groupId>cglib</groupId> <artifactId>cglib</artifactId> <version>3.3.0</version> </dependency> </dependencies> </project> -
Step3:编写目标代码
和静态代理中的目标类一样,略……
-
Step4:编写代理类
package com.hhxy.proxy; import net.sf.cglib.proxy.MethodInterceptor; import net.sf.cglib.proxy.MethodProxy; import java.lang.reflect.Method; /** * 目标对象拦截器,作用类似于JDK动态代理中的InvocationHandler接口 * @author ghp * @date 2022/9/17 */ public class TargetInterceptor implements MethodInterceptor { /** * 这是代理类执行 目标对象中的方法 的方法 * @param o 表示目标对象 * @param method 表示目标方法 * @param objects 表示目标方法的参数列表 * @param methodProxy 表示代理类的对象 */ @Override public Object intercept(Object o, Method method, Object[] objects, MethodProxy methodProxy) throws Throwable { System.out.println(method.getName()+"方法执行前逻辑"); Object result = methodProxy.invokeSuper(o, objects); System.out.println(method.getName()+"方法执行后逻辑"); return result; } } -
Step5:测试
    /**
     * 测试CGLIB动态代理
     */
    @Test
    public void cglibTest(){
        //1、获取字节码增强器对象Enhancer
        Enhancer enhancer = new Enhancer();
        //2、将目标类设置成父类
        enhancer.setSuperclass(CalculatorImp.class);
        //3、设置拦截器TargetInterceptor
        enhancer.setCallback(new TargetInterceptor());
        //4、生成动态类对象
        Calculator dynamicProxy = (Calculator) enhancer.create();
        //5、通过代理类对象调用目标类的方法
        dynamicProxy.add(1,2);
    }
测试结果和静态代理是一样的
3.2 AOP概述
-
AOP是什么?
AOP(Aspect Oriented Programming,面向切面编程)是一种设计思想,是OOP(Object Oriented Programming,面向对象编程)的一种补充和完善。AOP以通过 预编译方式 和 运行期动态代理方式 实现在不修改源代码的情况下给程序动态统一添加额外功能的一种技术。
-
AOP和OOP的联系?
OOP概念接触的算是比较早的,它的出现时间也是很早的,随着第一个面对对象语言的诞生而诞生,而AOP是后来随着OOP的发展而诞生的,AOP是OOP的补充,两者并不排斥,可以相辅相成。主要是OOP无法面对哪些分散的业务进行抽取,就拿最典型的日志来说,每一个方法都需要进行日志输出,但每一个方法的日志输出信息都不同,我们是无法使用OOP进行抽取的,OOP只适合那种连续性的业务抽取,不适合这种零散的业务抽取,于是AOP就随之诞生了,但总的来讲AOP和OOP的目的都是为了降低项目的耦合度。
PS:以上纯属个人理解,持续更新纠正中(•̀ ω •́ )✧哈哈,如有错误,欢迎您的指正(●’◡’●)
-
AOP的作用:
- 提高程序的扩展性。AOP引用代理模式,可以很好地对代码进行扩展,增强代码的功能
- 提高代码的可重用性。AOP抽取了重复的非核心业务代码,能够大大提高代码的可重用性
- 降低各组件间的耦合度。AOP是面向切面编程,将非核心业务代码都抽取出来了,降低了非核心代码和核心代码的耦合度,提高了组件的内聚性
- 提高开发效率。核心代码和非核心代码的分离,可以让开发者更关注于核心,并且非核心代码可以重用,从而大大提高开发效率
……
-
AOP相关基础概念
-
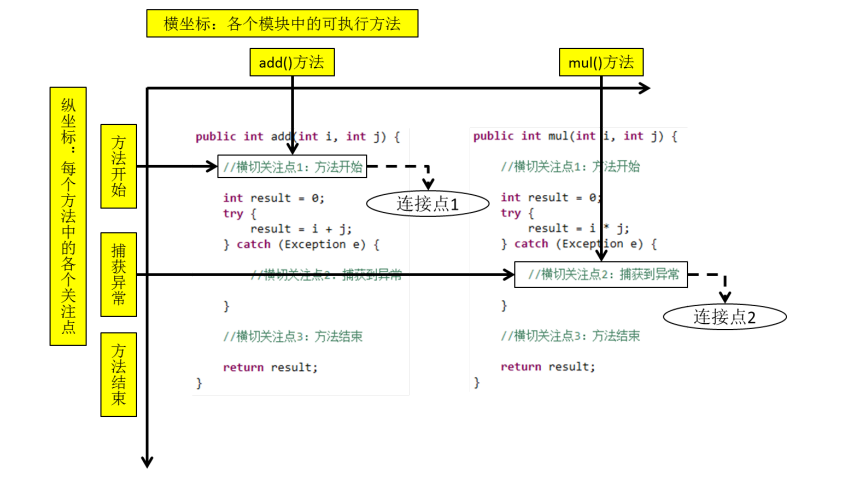
横切关注点
横切关注点是一个方法中的非核心业务代码,从每个方法中抽取出来的同一类非核心业务(例如日志就是一个类的非核心业务)。在同一个项目中,我们可以使用多个横切关注点对相关方法进行多个不同方面的增强。 这个概念不是语法层面天然存在的,而是根据附加功能的逻辑上的需要:有十个附加功能,就有十个横切关注点。
-
通知
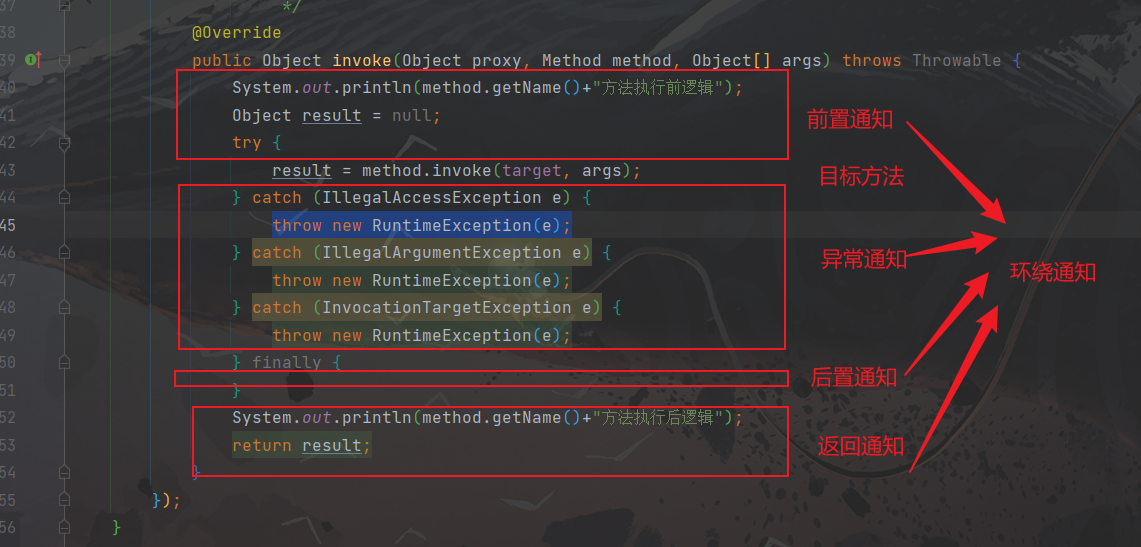
抽取并封装横切关注点而形成的方法称作通知,每一个横切关注点上要做的事情都需要写一个方法来实现,这样的方法就叫通知方法(其实本质就是将所有横切关注点进行封装的代码),简称通知(例如代理方法)。通知中有很多代码,根据代码的不同位置,可以分为:
- 前置通知(Before Advice):在目标方法执行前的代码
- 异常通知(After Throwing Advice):目标方法有异常后执行的代码
- 返回通知(After Returning Advice):目标方法正常执行后执行的代码
- 后置通知(After Advice):目标方法最终结束后执行的代码
- 环绕通知(Around Advice):除目标方法以外的所有代码(这个就相当于一个完整的代理方法)
备注:异常通知和返回通知是互斥关系
图示:
-
切面
封装了通知方法的类(例如代理类)
-
目标
是被代理类(即委托类)的目标对象
-
代理
是向目标对象应用通知之后创建的代理对象。需要注意的是代理对象一般是有AOP帮我们创建的,无需手动创建
-
连接点
指抽取横切关注点的位置,属于纯逻辑层面的概念。
需要注意的是,并不是所有横切关注点的位置能被称为连接点,只有哪些被抽取成通知的横切关注点才能被称为连接点
-
切入点
定位连接点的方式,本质就是一个表达式,属于代码层面的概念。 我们需要使用切入点表达式将通知套到连接点上,从而实现功能的增强。每个类的方法中都包含多个连接点,所以连接点是类中客观存在的事物(从逻辑上来说)。 如果把连接点看作数据库中的记录,那么切入点就是查询记录的 SQL 语句。 Spring 的 AOP 技术可以通过切入点定位到特定的连接点。 切点通过 org.springframework.aop.Pointcut 接口进行描述,它使用类和方法作为连接点的查询条件。
说了一大推,总结起来就是:可以把切入点看作一个方法的引用,它是在连接点上用来引用通知的。
总结:AOP是对OOP的补充(弥补OOP无法抽取封装横切关注点的不足),AOP可以通过对多个横切关注点进行抽取封装成多个通知,这些通知又经过封装形成切面,期间被抽取的横切关注点的位置就称之为连接点,同时还需要使用切入点定位连接点然后引用通知,最终我们就能通过代理访问目标了
-
3.3 基于注解的AOP
3.3.1 前置知识
AOP主要使用代理模式,其中Spring中关于基于注解的AOP实现,如图所示:

- 动态代理(InvocationHandler):JDK原生的实现方式,需要被代理的目标类必须实现接口。因为这个技术要求代理对象和目标对象实现同样的接口(兄弟两个拜把子模式)
- CGLIB:通过继承被代理的目标类(认干爹模式)实现代理,所以不需要目标类实现接口
- Aspectj9:本质上是静态代理,支持所有情况的代理,它是将代理逻辑“织入”被代理的目标类编译得到的字节码文件,所以最 终效果是动态的。Spring只是借用了AspectJ中的注解,但是并没有使用它的编译器和织入器。其实现原理是JDK动态代理和CGLIB,在运行时生成代理类
总结:Spring基于注解开发,就是使用JDK代理和CGLIB代理来实现动态代理,然后使用Aspectj的注解来进行调用的过程。这也是Spring框架的一大十分亮眼的特点:一站式,可以随意整合市面上几乎所有优秀的框架(就问你服不服,你的就是我的,而且我还是取其精华,去其糟泊,简直是虾仁猪心啊🤣)
3.3.2 快速入门
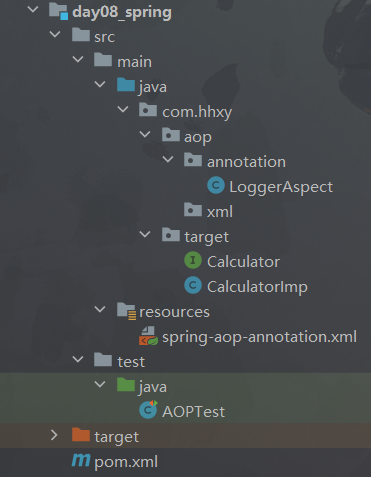
-
Step1:创建Maven工程
目录结构:
-
Step2:导入依赖
pom.xml:
<?xml version="1.0" encoding="UTF-8"?> <project xmlns="http://maven.apache.org/POM/4.0.0" xmlns:xsi="http://www.w3.org/2001/XMLSchema-instance" xsi:schemaLocation="http://maven.apache.org/POM/4.0.0 http://maven.apache.org/xsd/maven-4.0.0.xsd"> <modelVersion>4.0.0</modelVersion> <groupId>org.example</groupId> <artifactId>day08_spring</artifactId> <version>1.0-SNAPSHOT</version> <packaging>jar</packaging> <properties> <maven.compiler.source>8</maven.compiler.source> <maven.compiler.target>8</maven.compiler.target> <project.build.sourceEncoding>UTF-8</project.build.sourceEncoding> </properties> <dependencies> <!--spring上下文--> <dependency> <groupId>org.springframework</groupId> <artifactId>spring-context</artifactId> <version>5.3.22</version> </dependency> <!--spring-aspects(由于依赖具有传递性,和spring-context一样会间接导入aspects所需依赖)--> <dependency> <groupId>org.springframework</groupId> <artifactId>spring-aspects</artifactId> <version>5.3.22</version> </dependency> <!--junit--> <dependency> <groupId>junit</groupId> <artifactId>junit</artifactId> <version>4.13.2</version> <scope>test</scope> </dependency> </dependencies> </project> -
Step3:编写目标类
1)Calculator:
package com.hhxy.target;

/**
 * @author ghp
 * @date 2022/9/17
 */
public interface Calculator {
    /**
     * 加法
     */
    int add(int i, int j);

    /**
     * 除法
     */
    int div(int i,int j);
}
2)CalculatorImp:
package com.hhxy.target; import org.springframework.stereotype.Component; /** * @author ghp * @date 2022/9/17 */ @Component public class CalculatorImp implements Calculator { // /** * 加法 */ @Override public int add(int i, int j) { int result = i + j; System.out.println("目标方法内部: result = "+result); return result; } /** * 除法 */ //如果接口中没有这个方法,则代理对象中也没有这个方法 public int div(int i,int j){ int result = i / j; System.out.println("目标方法内部: result = "+result); return result; } } -
Step4:编写切面
package com.hhxy.aop.annotation; import org.aspectj.lang.JoinPoint; import org.aspectj.lang.ProceedingJoinPoint; import org.aspectj.lang.Signature; import org.aspectj.lang.annotation.*; import org.springframework.stereotype.Component; import java.util.Arrays; /** * 抽取日志业务的切面类 * @author ghp * @date 2022/9/18 */ @Component @Aspect public class LoggerAspect { /** * 在切面类中设置公共的切入表达式,方便切入表达式的重用 */ @Pointcut("execution(* com.hhxy.target.CalculatorImp.*(..))") public void pointCut(){} /** * 前置通知 */ //需要使用指定的注解将方法标识为通知方法,然后定位到连接点(注解所在这一行就是一个切入点) // @Before("execution(public int com.hhxy.target.CalculatorImp.add(int,int))") //上面那种写法只能给一个方法加前置通知,我们现在给所有方法添加前置通知 // @Before("execution(* com.hhxy.target.CalculatorImp.*(..))") @Before("pointCut()") //使用JoinPoint获取定位方法的信息(会动态获取,底层使用了反射) public void beforeAdvice(JoinPoint joinPoint){ //获取连接点所在方法的签名信息(签名信息就是方法的声明信息,需要使用getName方法获取方法名) Signature signature = joinPoint.getSignature();//int com.hhxy.target.Calculator.add(int,int) //获取连接点所在方法的参数列表 Object[] args = joinPoint.getArgs(); System.out.println("这是"+signature.getName()+"的前置通知"+",方法参数"+ Arrays.toString(args)); } /** * 异常通知 */ //throwing属性用于指定exception来接收目标方法产生的异常(注意还要给通知添加一个异常类型的参数) @AfterThrowing(value = "pointCut()",throwing = "exception") public void exceptionAdvice(JoinPoint joinPoint,Throwable exception){ //获取连接点所在方法的签名信息(签名信息就是方法的声明信息,需要使用getName方法获取方法名) Signature signature = joinPoint.getSignature();//int com.hhxy.target.Calculator.add(int,int) //获取连接点所在方法的参数列表 Object[] args = joinPoint.getArgs(); System.out.println("这是"+signature.getName()+"的异常通知"+",方法参数"+ Arrays.toString(args)+",异常"+ exception); } /** * 后置通知 * @param joinPoint */ @After("pointCut()") public void afterAdvice(JoinPoint joinPoint){ //获取连接点所在方法的签名信息(签名信息就是方法的声明信息,需要使用getName方法获取方法名) Signature signature = joinPoint.getSignature();//int com.hhxy.target.Calculator.add(int,int) //获取连接点所在方法的参数列表 Object[] args = joinPoint.getArgs(); System.out.println("这是"+signature.getName()+"的后置通知"+",方法参数"+ Arrays.toString(args)); } /** * 返回通知 */ //returning属性用于指定result来接收目标方法的返回值(注意还要给通知添加一个Object类型的参数) @AfterReturning(value = "pointCut()",returning = "result") public void afterReturningAdvice(JoinPoint joinPoint,Object result){ //获取连接点所在方法的签名信息(签名信息就是方法的声明信息,需要使用getName方法获取方法名) Signature signature = joinPoint.getSignature();//int com.hhxy.target.Calculator.add(int,int) //获取连接点所在方法的参数列表 Object[] args = joinPoint.getArgs(); System.out.println("这是"+signature.getName()+"的返回通知"+",方法参数"+ Arrays.toString(args)+",方法返回值"+result); } /** * 环绕通知 */ // @Around("pointCut()")//关闭环绕通知,因为使用了其他四个就没必要使用环绕通知了,想要测试就关闭其他四个再开启这个 public Object aroundAdvice(ProceedingJoinPoint joinPoint){ Object result = null; try { System.out.println("环绕通知-->前置通知"); //执行目标方法 result = joinPoint.proceed(); System.out.println("环绕通知-->返回通知"); } catch (Throwable e) { System.out.println("环绕通知-->异常通知"); throw new RuntimeException(e); }finally { System.out.println("环绕通知-->后置通知"); } return result; } } -
Step5:编写spring配置文件
spring-aop-annotation.xml:
<?xml version="1.0" encoding="UTF-8"?> <beans xmlns="http://www.springframework.org/schema/beans" xmlns:xsi="http://www.w3.org/2001/XMLSchema-instance" xmlns:context="http://www.springframework.org/schema/context" xmlns:aop="http://www.springframework.org/schema/aop" xsi:schemaLocation="http://www.springframework.org/schema/beans http://www.springframework.org/schema/beans/spring-beans.xsd http://www.springframework.org/schema/context https://www.springframework.org/schema/context/spring-context.xsd http://www.springframework.org/schema/aop https://www.springframework.org/schema/aop/spring-aop.xsd"> <!--注意事项: - 切面类和目标类都需要交给IOC进行管理(IOC是AOP的基础) - 切面类需要使用@Aspect注解进行标识,告诉JVM这是一个切面类 --> <!--扫描组件--> <context:component-scan base-package="com.hhxy"></context:component-scan> <!--想要基于注解实现注解,就必须写上这个标签--> <aop:aspectj-autoproxy/> </beans> -
Step6:测试
import com.hhxy.target.Calculator;
import org.junit.Test;
import org.springframework.context.ApplicationContext;
import org.springframework.context.support.ClassPathXmlApplicationContext;

/**
 * 测试AOP
 * @author ghp
 * @date 2022/9/18
 */
public class AOPTest {

    /**
     * 测试基于注解实现的AOP
     */
    @Test
    public void aopByAnnotationTest(){
        //1、获取IOC对象
        ApplicationContext ioc = new ClassPathXmlApplicationContext("spring-aop-annotation.xml");
        //2、获取代理对象(无法通过IOC获取目标对象)
        Calculator calculatorProxy = ioc.getBean(Calculator.class);
        //3、通过代理对象调用目标方法
        calculatorProxy.div(1,1);
    }
}
测试结果:
通知的执行顺序于Spring的版本有关系:
- Spring5.3.x以前的版本: 前置通知 → 执行目标方法 → 后置通知 → 返回通知 或 异常通知 前置通知 \to 执行目标方法 \to 后置通知 \to 返回通知~或~异常通知 前置通知→执行目标方法→后置通知→返回通知 或 异常通知
- Spring5.3.x以后的版本: 前置通知 → 执行目标方法 → 返回通知 或 异常通知 → 后置通知 前置通知 \to 执行目标方法 \to 返回通知~或~异常通知 \to 后置通知 前置通知→执行目标方法→返回通知 或 异常通知→后置通知
3.3.3 切入点表达式语法
- 用
*号代替“权限修饰符”和“返回值”部分表示“权限修饰符”和“返回值”不限 - 在包名的部分,一个
*号只能代表包的层次结构中的一层,表示这一层是任意的。 例如:*.Hello匹配com.Hello,不匹配com.atguigu.Hello - 在包名的部分,使用
..表示包名任意、包的层次深度任意 在类名的部分,类名部分整体用号代替,表示类名任意 在类名的部分,可以使用号代替类名的一部分 例如:Service匹配所有名称以Service结尾的类或接口 - 在方法名部分,可以使用
*号表示方法名任意 - 在方法名部分,可以使用
*号代替方法名的一部分 例如:*Operation匹配所有方法名以Operation结尾的方法 - 在方法参数列表部分,使用
(..)表示参数列表任意 - 在方法参数列表部分,使用
(int,..)表示参数列表以一个int类型的参数开头 - 在方法参数列表部分,基本数据类型和对应的包装类型是不一样的,例如:切入点表达式中使用int和实际方法中Integer是不匹配的
- 在方法返回值部分,如果想要明确指定一个返回值类型,那么必须同时写明权限修饰符
- 例如:
execution(public int ..Service.(.., int))正确√ - 例如:
execution( int ..Service.*(.., int))错误×
- 例如:
3.3.4 切面的优先级
-
相同目标方法上同时存在多个切面时,切面的优先级控制切面的内外嵌套顺序。
- 优先级高的切面:外面
- 优先级低的切面:里面
-
使用
@Order注解可以控制切面的优先级:@Order(较小的数):优先级高@Order(较大的数):优先级低
切面默认的优先级是
Integer.MAX_VALUE(Integer的最大取值)
3.4 基于XML的AOP
用的最多的还是基于注解的AOP,基于XML的AOP还是用的比较少的。具体实现和注解差不太多,只是将注解换成了XML中的标签。
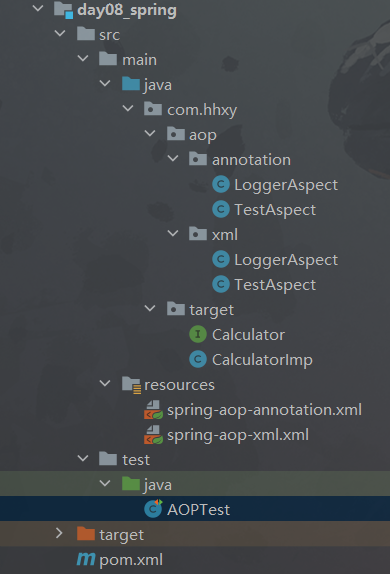
-
Step1:创建Maven工程
目录结构:
-
Step2:导入依赖
和3.3.2中的依赖一样,略……
-
Step3:编写目标类
和3.3.2中的目标类一样,略……
-
Step4:编写切面类
只是将3.3.2中的切面类上面的注解去掉,注意别去掉用于管理Bean的注解,略……
-
Step5:编写spring配置文件
<?xml version="1.0" encoding="UTF-8"?>
<beans xmlns="http://www.springframework.org/schema/beans"
       xmlns:xsi="http://www.w3.org/2001/XMLSchema-instance"
       xmlns:context="http://www.springframework.org/schema/context"
       xmlns:aop="http://www.springframework.org/schema/aop"
       xsi:schemaLocation="http://www.springframework.org/schema/beans http://www.springframework.org/schema/beans/spring-beans.xsd http://www.springframework.org/schema/context https://www.springframework.org/schema/context/spring-context.xsd http://www.springframework.org/schema/aop https://www.springframework.org/schema/aop/spring-aop.xsd">

    <!--扫描组件-->
    <context:component-scan base-package="com.hhxy.aop.xml"></context:component-scan>
    <context:component-scan base-package="com.hhxy.target"></context:component-scan>

    <!--配置AOP-->
    <aop:config>
        <!--设置一个公共的切入点表达式-->
        <aop:pointcut id="pointCut" expression="execution(* com.hhxy.target.CalculatorImp.*(..))"/>
        <!--
        aspect: 将组件设置成切面
        advisor: 设置通知
        pointcut: 设置切入点表达式
        -->
        <!--通过ref将组件设置成切面,ref中取值为组件的id(这里是使用注解管理Bean,所以id是组件名首字母小写)-->
        <aop:aspect ref="loggerAspect">
            <!--
            method设置通知方法的方法名
            pointcut设置切入点表达式,可以使用point-ref引入公共的切入点表达式
            args-names
            -->
            <!--前置通知-->
            <aop:before method="beforeAdvice" pointcut-ref="pointCut"></aop:before>
            <!--返回通知-->
            <aop:after-returning method="afterReturningAdvice" returning="result" pointcut-ref="pointCut"></aop:after-returning>
            <!--异常通知-->
            <aop:after-throwing method="exceptionAdvice" throwing="exception" pointcut-ref="pointCut"></aop:after-throwing>
            <!--后置通知-->
            <aop:after method="afterAdvice" pointcut-ref="pointCut"></aop:after>
            <!--环绕通知-->
<!--            <aop:around method="aroundAdvice" pointcut-ref="pointCut"></aop:around>-->
        </aop:aspect>
        <!--设置第二个切面-->
        <aop:aspect ref="testAspect" order="1">
            <aop:before method="beforeAdvice" pointcut-ref="pointCut"></aop:before>
        </aop:aspect>
    </aop:config>

</beans>
备注:千万不要将
com.hhxy.aop.annotation包下的类给扫描了,否则直接报错BeanDefinitionStoreException,因为同时会扫描到两个同类型、同id的Bean
4、事务
4.1 事务概述
-
什么是事务?
事务(Transaction)这个词起源于对数据库的操作,它是用户定义的一个数据库操作序列,这些操作要么不做、要么全做,是一个不可分割的工作单位。例如:在关系型数据库中,一个事务可以是一个SQL语句,一组SQL语句,甚至是整个程序,通常而言一个程序包含多个事务。事务的开始和结束有用户显示定义,如果用户没有显示定义则有数据库根据默认的规则自动管理划分事务。
举一个简单例子:
比如银行转帐业务,账户A要将自己账户上的1000元转到B账 户下面,A账户余额首先要减去1000元,然后B账户要增加1000元。假如在中间网络出现了问题,A账户减去1000元已经结束,B因为网络中断而操作 失败,那么整个业务失败,必须做出控制,要求A账户转帐业务撤销。这才能保证业务的正确性,完成这个操作就需要事务,将A账户资金减少和B账户资金增加方 到一个事务里面,要么全部执行成功,要么操作全部撤销,这样就保持了数据的安全性。
上面这个例子中的一系列动作就构成了一个转账事务。
上面这个例子属于生活中的事务,而使用Java代码形成的事务称之为Java事务,可以近似理解为访问或改变数据库的Java代码。
个人总结:事务的本质就是操作,只是这些操作比较特殊,具有ACID特性,它可以以行为来表示,也可以以代码来表示,但是最终都会通过事务诞生出一个结果
-
事物的ACID特性:
- 原子性(Atomicity):事物是数据库的不可分割的逻辑工作单位,要么全做,要么全不做
- 一致性(Consistency):事物的执行结果必须使数据库从一个一致性状态转变成另一个一致性状态
- 隔离性(Isolation):一个事物的执行不能被其他事物干扰
- 持续性(Durability,也称永久性Permanence):事物一旦提交或回滚,它对数据库的改变是永久的
-
Java事务的分类:
- JDBC事务:DBC 事务是用 Connection 对象控制的。Connection接口提供了两种事务模式:自动提交 和 手动提交(默认)
- JTA事务:指Java事务API(Java Transaction API),是JavaEE数据库事务规范,JTA只提供了事务管理接口,由应用程序服务器厂商(如WebSphere Application Server)提供实现,JTA事务比JDBC更强大,支持分布式事务
- 容器事务:主要指的是J2EE应用服务器提供的事务管理,局限于EJB (Enterprise Java Beans,企业级JavaBean) 应用中使用
-
Java事务的实现形式:
-
编程式事务:通过编码方式实现事务,将事务代码嵌到业务方法中来控制事务的提交和回滚
-
声明式事务:通过编写XML让框架实现事务,将事务代码从业务方法中分离出来,以声明的方式来实现事务
-
-
编程式事务和声明式事务的比较:
- 使用声明式事务进行开发效率更高。声明式事务是通过编写XML让框架实现事务,对开发人员屏蔽了许多细节
- 使用声明式事务能够降低代码的冗余。声明式事务对事物代码进行了抽取和封装,能够让事物代码重复使用
- 声明式事务是低侵入式的,不会污染代码。声明式事务底层采用AOP,本质是采用代理模式,并不会影响到原本的代码
- 使用编程式事务更灵活。编程式事务的粒度更小,可以作用到代码块,而声明式事务只能作用到方法,同时大量的封装让声明式事务的性能相对较低
- 使用编程式事务不易失效。生命式事务配置步骤比较多,对于不熟练的新手而言很容易出现事务失效,而编程式事务就很难出现这种情况
-
什么是事务管理?
事务管理是企业级应用程序开发中必备技术,用来管理事务确保数据的完整性和一致性,具体可以看4.3.1的例子来体会。
Spring在底层通过IOC和AOP(这个是核心,IOC是辅助)实现事物管理,同时Spring支持编程式事务管理和声明式的事务管理
4.2 编程式事务
在spring的编程式事务中,我们可以使用spring-jdbc框架,该框架封装了原生的JDBC代码,大大简化了JDBC的开发。其中JDBC Template是该框架的主要实现类,我们可以使用JDBC Template对象来实现编程式事务并进行管理。
使用原始的JDBC编写的事务,如下所示:
Connection conn = ...;
try {
// 开启事务:关闭事务的自动提交
conn.setAutoCommit(false);
	// 核心操作
    ...
	// 提交事务
	conn.commit();
}catch(Exception e){
    // 回滚事务
	conn.rollBack();
}finally{
    //释放资源
    conn.close();
}
JDBC Template快速入门
JDBC Template 是spring-jdbc核心包(core)中的核心类,它可以通过配置文件、注解、Java 配置类等形式获取数据库的相关信息,实现了对 JDBC 开发过程中的驱动加载、连接的开启和关闭、SQL 语句的创建与执行、异常处理、事务处理、数据类型转换等操作的封装。我们只要对其传入SQL 语句和必要的参数即可轻松进行 JDBC 编程,从而大大简化了原生JDBC开发。
-
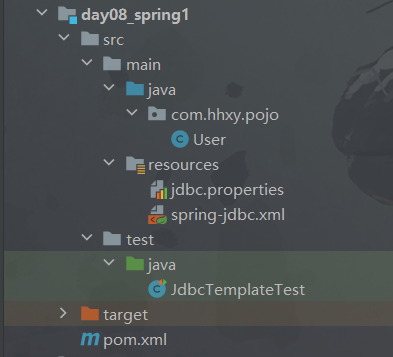
Step1:创建Maven工程
目录结构:
-
Step2:导入依赖
pom.xml:
<?xml version="1.0" encoding="UTF-8"?> <project xmlns="http://maven.apache.org/POM/4.0.0" xmlns:xsi="http://www.w3.org/2001/XMLSchema-instance" xsi:schemaLocation="http://maven.apache.org/POM/4.0.0 http://maven.apache.org/xsd/maven-4.0.0.xsd"> <modelVersion>4.0.0</modelVersion> <groupId>org.example</groupId> <artifactId>day08_spring1</artifactId> <version>1.0-SNAPSHOT</version> <properties> <maven.compiler.source>8</maven.compiler.source> <maven.compiler.target>8</maven.compiler.target> <project.build.sourceEncoding>UTF-8</project.build.sourceEncoding> </properties> <dependencies> <!--mysql驱动--> <dependency> <groupId>mysql</groupId> <artifactId>mysql-connector-java</artifactId> <version>8.0.27</version> </dependency> <!--druid数据源--> <dependency> <groupId>com.alibaba</groupId> <artifactId>druid</artifactId> <version>1.2.12</version> </dependency> <!--spring上下文--> <dependency> <groupId>org.springframework</groupId> <artifactId>spring-context</artifactId> <version>5.3.22</version> </dependency> <!--引入spring持久化层支持的jar包,间接引入spring-jdbc--> <dependency> <groupId>org.springframework</groupId> <artifactId>spring-orm</artifactId> <version>5.3.1</version> </dependency> <!--spring测试,spring整合了其他测试框架,能够进行更加高效便捷的测试--> <dependency> <groupId>org.springframework</groupId> <artifactId>spring-test</artifactId> <version>5.3.1</version> </dependency> <!--junit--> <dependency> <groupId>junit</groupId> <artifactId>junit</artifactId> <version>4.13.2</version> <scope>test</scope> </dependency> </dependencies> </project> -
Step3:编写spring配置文件
spring-jdbc.xml:
<?xml version="1.0" encoding="UTF-8"?>
<beans xmlns="http://www.springframework.org/schema/beans"
       xmlns:xsi="http://www.w3.org/2001/XMLSchema-instance"
       xmlns:context="http://www.springframework.org/schema/context"
       xsi:schemaLocation="http://www.springframework.org/schema/beans http://www.springframework.org/schema/beans/spring-beans.xsd http://www.springframework.org/schema/context https://www.springframework.org/schema/context/spring-context.xsd">

    <!--引入数据库连接相关的配置文件-->
    <context:property-placeholder location="classpath:jdbc.properties"/>

   <!--为数据源创建一个Bean-->
    <bean id="dataSourceRef" class="com.alibaba.druid.pool.DruidDataSource">
        <property name="driverClassName" value="${jdbc.driver}"></property>
        <property name="url" value="${jdbc.url}"></property>
        <property name="username" value="${jdbc.username}"></property>
        <property name="password" value="${jdbc.password}"></property>
    </bean>

    <!--为JdbcTemplate类创建一个Bean-->
    <bean class="org.springframework.jdbc.core.JdbcTemplate">
        <property name="dataSource" ref="dataSourceRef"></property>
    </bean>
</beans>
jdbc.properties:
jdbc.driver=com.mysql.cj.jdbc.Driver jdbc.url=jdbc:mysql:///ssm?useSSL=false&characterEncoding=utf8&useServerPrepStmts=true&serverTimezone=UTC jdbc.username=root jdbc.password=32345678 -
Step4:编写实体类
略……
见表:
-
Step5:测试
import com.hhxy.pojo.User;
import org.junit.Test;
import org.junit.runner.RunWith;
import org.springframework.beans.factory.annotation.Autowired;
import org.springframework.jdbc.core.BeanPropertyRowMapper;
import org.springframework.jdbc.core.JdbcTemplate;
import org.springframework.test.context.ContextConfiguration;
import org.springframework.test.context.junit4.SpringJUnit4ClassRunner;

import java.util.List;

/**
 * @author ghp
 * @date 2022/9/18
 */
//指定当前测试类在Spring的测试环境中,然后就可以直接通过依赖注入获取IOC容器中的Bean对象了
@RunWith(SpringJUnit4ClassRunner.class)
//设置Spring测试环境的配置文件
@ContextConfiguration("classpath:spring-jdbc.xml")
public class JdbcTemplateTest {
    //因为前面已经通过@ContextConfiguration将该类添加到了配置文件中,所以这里可以直接使用自动装配,无需扫描文件
    @Autowired
    private JdbcTemplate jdbcTemplate;

    /**
     * 测试添加数据
     */
    @Test
    public void insertTest(){
        String sql = "insert into tb_user values(null,?,?,?,?,?)";
        //调用JdbcTemplate对象执行SQL(update方法能够实现增删改)
        jdbcTemplate.update(sql,"王八","1438",38,"男","[email protected]");
        //jdbcTemplate默认是使用自动提交事务的,无需手动提交
    }

    /**
     * 根据id查询User表
     */
    @Test
    public void selectByIdTest(){
        String sql = "select * from tb_user where id = ?";
        //调用JdbcTemplate对象执行SQL
        /**
         * 第一个参数表示查询的SQL,第二个参数表示查询结果映射的实体类,最后的参数表示给占位符赋值(可以是多个)
         */
        User user = jdbcTemplate.queryForObject(sql, new BeanPropertyRowMapper<>(User.class), 2);
        System.out.println(user);
    }

    /**
     * 查询多条数据
     */
    @Test
    public void selectAllTest(){
        String sql = "select * from tb_user";
        //调用JdbcTemplate对象执行SQL
        List<User> users = jdbcTemplate.query(sql, new BeanPropertyRowMapper<>(User.class));
//        System.out.println(users);
        users.forEach(System.out::println);//让它换行输出
    }

    /**
     * 查询表中的总记录数
     */
    @Test
    public void selectCountTest(){
        String sql = "select count(*) from tb_user";
        //调用JdbcTemplate对象执行SQL
        Integer count = jdbcTemplate.queryForObject(sql, Integer.class);
        System.out.println(count);
    }
}
4.3 声明式事务
4.3.1 基于注解实现声明式事务
4.3.1.1 快速入门
案例代码已开源到Gitee和Github
前期准备:
建表 t_book:
CREATE TABLE `t_book`
(
    `book_id`   int(11) NOT NULL AUTO_INCREMENT COMMENT '主键',
    `book_name` varchar(20)      DEFAULT NULL COMMENT '图书名称',
    `price`     int(11)          DEFAULT NULL COMMENT '价格',
    `stock`     int(10) unsigned DEFAULT NULL COMMENT '库存(无符号)',
    PRIMARY KEY (`book_id`)
) ENGINE = InnoDB
  AUTO_INCREMENT = 3
  DEFAULT CHARSET = utf8;
insert into `t_book`(`book_id`, `book_name`, `price`, `stock`)
values (1, '斗破苍
穹', 80, 100),
       (2, '斗罗大陆', 50, 100);
建表 t_user:
CREATE TABLE `t_user`
(
    `user_id`  int(11) NOT NULL AUTO_INCREMENT COMMENT '主键',
    `username` varchar(20)      DEFAULT NULL COMMENT '用户名',
    `balance`  int(10) unsigned DEFAULT NULL COMMENT '余额(无符号)',
    PRIMARY KEY (`user_id`)
) ENGINE = InnoDB
  AUTO_INCREMENT = 2
  DEFAULT CHARSET = utf8;
insert into `t_user`(`user_id`, `username`, `balance`)
values (1, 'admin', 50);
小知识:
当我们对数据库中的数据进行更新时,面对不合理的数据,例如:张三去买书,但是它的账户余额比要买的书的价格要低,此时不能让他成功买书;或者是张三有足够的价格去买书,但是书的库存不够,此时也不能购买成功。
面对这种类型的情况,有两种方式解决:
方式一:数据库层面。可以使用
unsigned关键字进行限制,当数据为负数时,直接报异常,事务进行回滚方式二:Java代码层面。可以在更新操作前,进行数据的比较或判断
正式开始:
-
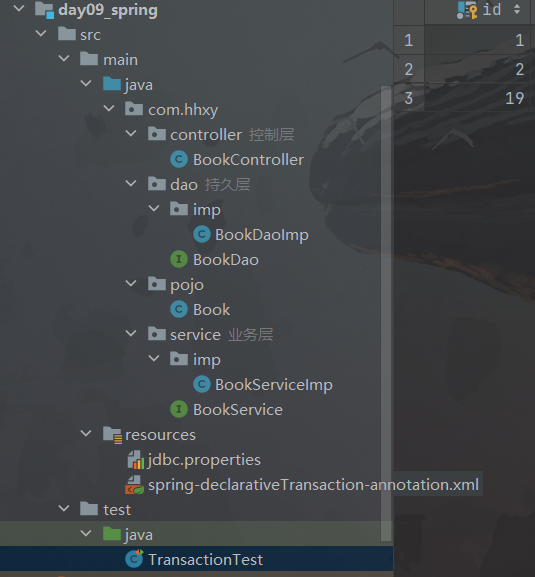
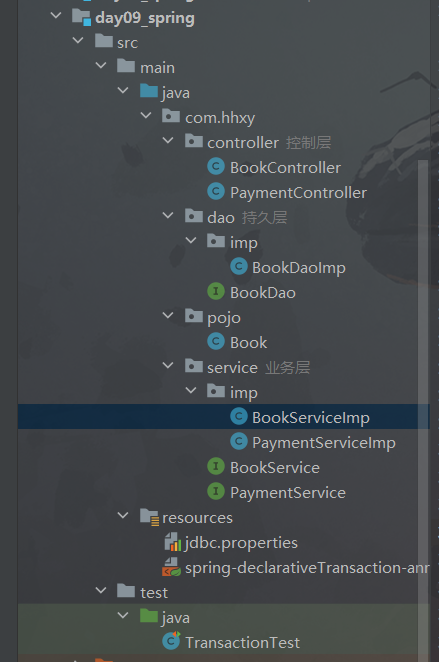
Step1:创建Maven工程
目录结构:
-
Step2:导入依赖
<?xml version="1.0" encoding="UTF-8"?> <project xmlns="http://maven.apache.org/POM/4.0.0" xmlns:xsi="http://www.w3.org/2001/XMLSchema-instance" xsi:schemaLocation="http://maven.apache.org/POM/4.0.0 http://maven.apache.org/xsd/maven-4.0.0.xsd"> <modelVersion>4.0.0</modelVersion> <groupId>org.example</groupId> <artifactId>day09_spring</artifactId> <version>1.0-SNAPSHOT</version> <properties> <maven.compiler.source>8</maven.compiler.source> <maven.compiler.target>8</maven.compiler.target> <project.build.sourceEncoding>UTF-8</project.build.sourceEncoding> </properties> <dependencies> <!--mysql驱动--> <dependency> <groupId>mysql</groupId> <artifactId>mysql-connector-java</artifactId> <version>8.0.16</version> </dependency> <!--druid数据源--> <dependency> <groupId>com.alibaba</groupId> <artifactId>druid</artifactId> <version>1.2.12</version> </dependency> <!--spring上下文--> <dependency> <groupId>org.springframework</groupId> <artifactId>spring-context</artifactId> <version>5.3.22</version> </dependency> <!--spring-orm--> <dependency> <groupId>org.springframework</groupId> <artifactId>spring-orm</artifactId> <version>5.3.22</version> </dependency> <!--spring测试环境--> <dependency> <groupId>org.springframework</groupId> <artifactId>spring-test</artifactId> <version>5.3.22</version> </dependency> <!--junit--> <dependency> <groupId>junit</groupId> <artifactId>junit</artifactId> <version>4.13.2</version> <scope>test</scope> </dependency> </dependencies> </project> -
Step3:编写spring配置文件
<?xml version="1.0" encoding="UTF-8"?> <beans xmlns="http://www.springframework.org/schema/beans" xmlns:xsi="http://www.w3.org/2001/XMLSchema-instance" xmlns:context="http://www.springframework.org/schema/context" xsi:schemaLocation="http://www.springframework.org/schema/beans http://www.springframework.org/schema/beans/spring-beans.xsd http://www.springframework.org/schema/context https://www.springframework.org/schema/context/spring-context.xsd"> <!--引入数据连接需要的配置文件--> <context:property-placeholder location="classpath:jdbc.properties"></context:property-placeholder> <!--为Druid数据源配置一个Bean对象--> <bean id="dataSourceRef" class="com.alibaba.druid.pool.DruidDataSource"> <property name="driverClassName" value="${jdbc.driver}"></property> <property name="url" value="${jdbc.url}"></property> <property name="username" value="${jdbc.username}"></property> <property name="password" value="${jdbc.password}"></property> </bean> <!--扫描组件--> <context:component-scan base-package="com.hhxy"></context:component-scan> <!--为JdbcTemplate配置一个Bean对象--> <bean class="org.springframework.jdbc.core.JdbcTemplate"> <property name="dataSource" ref="dataSourceRef"></property> </bean> </beans> -
Step4:编写组件
1)数据访问层
BookDao:
略……
BookDaoImp:
package com.hhxy.dao.imp;

import com.hhxy.dao.BookDao;
import org.springframework.beans.factory.annotation.Autowired;
import org.springframework.jdbc.core.JdbcTemplate;
import org.springframework.stereotype.Repository;

/**
 * @author ghp
 * @date 2022/9/19
 */
@Repository
public class BookDaoImp implements BookDao {

    //自动装配,获取JdbcTemplate对象
    @Autowired
    private JdbcTemplate jdbcTemplate;

    /**
     * 根据bookId查询图书的价格
     */
    @Override
    public Integer getPriceByBookId(Integer bookId) {
        String sql = "select price from t_book where book_id = ?";
        Integer price = jdbcTemplate.queryForObject(sql, Integer.class, bookId);
        return price;
    }

    /**
     * 根据bookId更新图书的库存
     */
    @Override
    public void updateStock(Integer bookId) {
        String sql = "update t_book set stock = stock - 1 where book_id = ?";
        jdbcTemplate.update(sql, bookId);
    }

    /**
     * 根据userId更新用户的余额
     */
    @Override
    public void updateBalance(Integer userId,Integer price) {
        String sql = "update t_user set balance = balance - ? where user_id = ?";
        jdbcTemplate.update(sql,price,userId);
    }
}
2)业务逻辑层
BookService:
略……
BookServiceImp:
package com.hhxy.service.imp;

import com.hhxy.dao.BookDao;
import com.hhxy.service.BookService;
import org.springframework.beans.factory.annotation.Autowired;
import org.springframework.stereotype.Service;

/**
 * @author ghp
 * @date 2022/9/19
 */
@Service
public class BookServiceImp implements BookService {

    //自动装配,获取BookDao对象
    @Autowired
    private BookDao bookDao;


    /**
     * 买书的方法
     */
    @Override
    public void buyBook(Integer userId, Integer bookId) {
        //查询图书的价格
        Integer price = bookDao.getPriceByBookId(bookId);
        //更新图书的库存
        bookDao.updateStock(bookId);
        //更新用户的余额
        bookDao.updateBalance(userId,price);
    }
}
3)控制层
BookController:
package com.hhxy.controller; import com.hhxy.service.BookService; import org.springframework.beans.factory.annotation.Autowired; import org.springframework.stereotype.Controller; /** * @author ghp * @date 2022/9/19 */ @Controller public class BookController { //自动装配,获取BookService对象 @Autowired private BookService bookService; /** * 调用BookService对象的买书方法 实现买书功能 */ public void buyBook(Integer userId,Integer bookId){ bookService.buyBook(userId, bookId); } } -
Step5:测试
import com.hhxy.controller.BookController;
import org.junit.Test;
import org.junit.runner.RunWith;
import org.springframework.beans.factory.annotation.Autowired;
import org.springframework.test.context.ContextConfiguration;
import org.springframework.test.context.junit4.SpringJUnit4ClassRunner;

/**
 * @author ghp
 * @date 2022/9/19
 */
@RunWith(SpringJUnit4ClassRunner.class)
@ContextConfiguration("classpath:spring-declarativeTransaction-annotation.xml")
public class TransactionTest {

    @Autowired
    private BookController bookController;

    /**
     * 测试注解实现的声明式事务(买书)
     */
    @Test
    public void annotationTransactionBuyBookTest(){
        bookController.buyBook(1,1);
    }
}
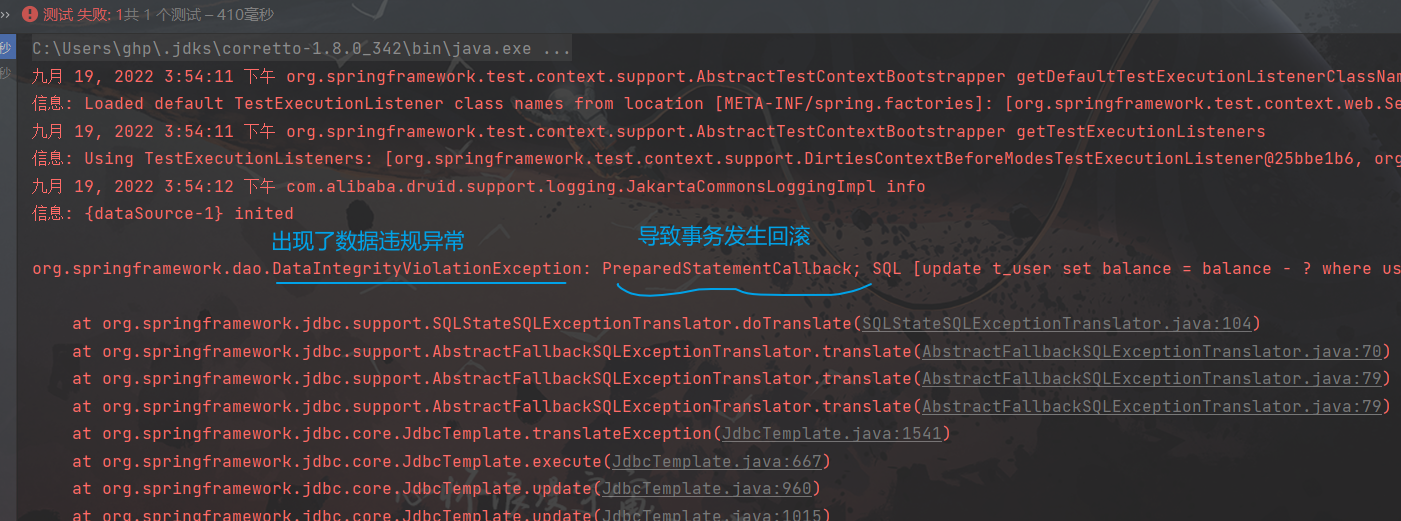
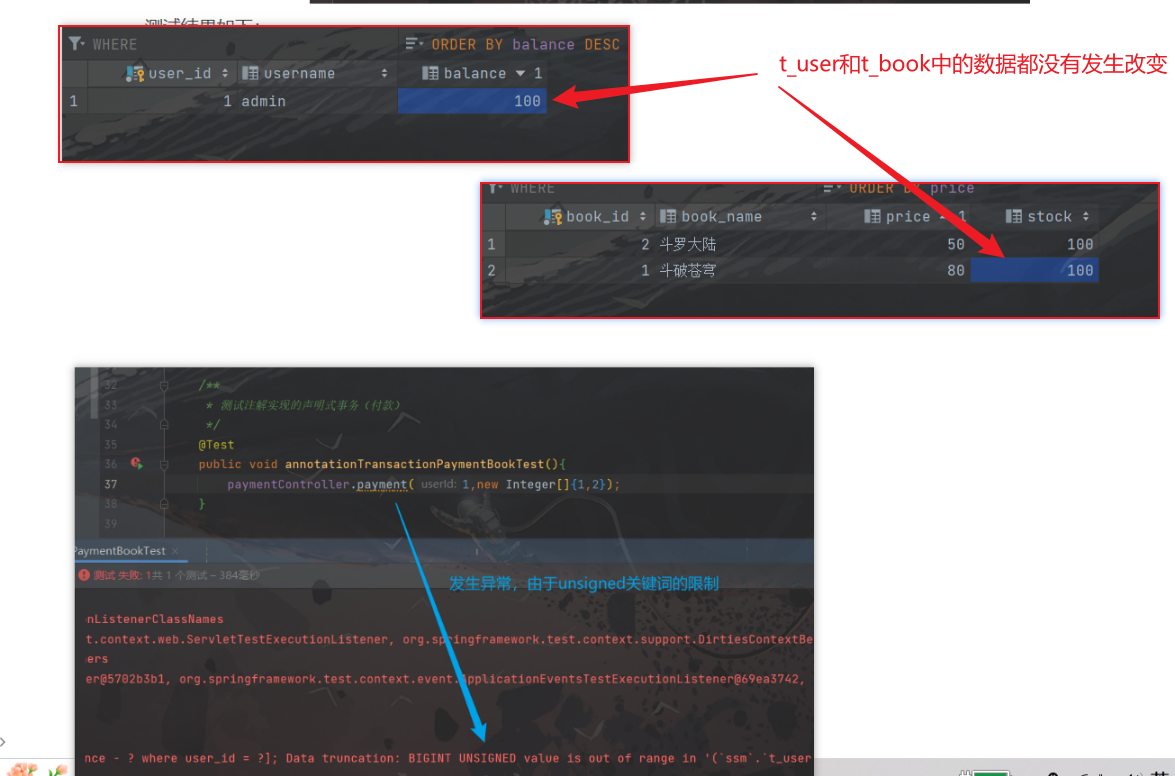
测试结果:
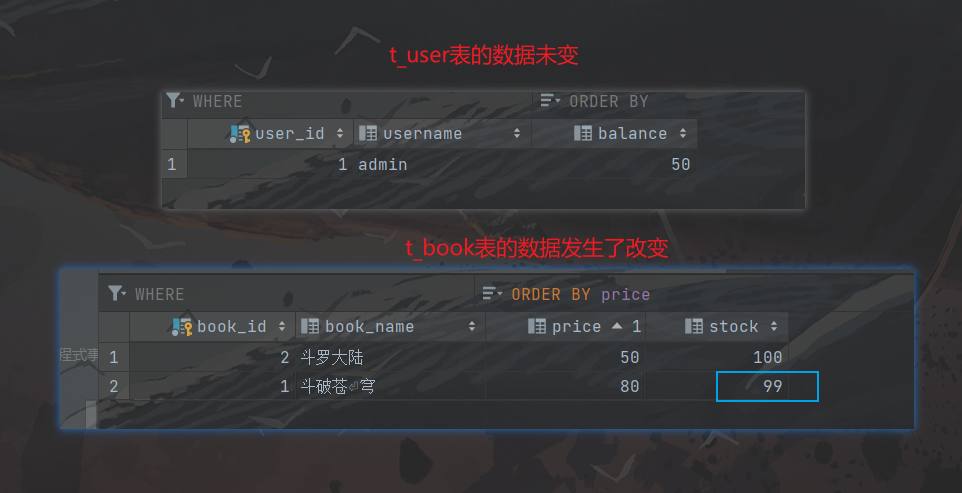
但是我们可以发现t_book中的数据发生了更新,只有t_user中的数据没有发生更新
出现这种情况是因为,在MySQL中默认是一个SQL独占一个事务,且自动提交。所以当第三个更新用户余额的SQL失败时,并不会影响到前两个SQL的执行,这就导致书的价格能够被查到,书的库存也减1了,但是用户余额却没变,这显然是十分滑稽的🤣!书店老板平白无故丢失一本书😂。所以我们需要给这三个SQL添加一个事务
解决方案:声明事务
声明事务的步骤如下
-
Step1:在spring配置文件中配置事务管理器
spring-declarativeTransaction-annotation.xml:
<?xml version="1.0" encoding="UTF-8"?> <beans xmlns="http://www.springframework.org/schema/beans" xmlns:xsi="http://www.w3.org/2001/XMLSchema-instance" xmlns:context="http://www.springframework.org/schema/context" xmlns:tx="http://www.springframework.org/schema/tx" xsi:schemaLocation="http://www.springframework.org/schema/beans http://www.springframework.org/schema/beans/spring-beans.xsd http://www.springframework.org/schema/context https://www.springframework.org/schema/context/spring-context.xsd http://www.springframework.org/schema/tx http://www.springframework.org/schema/tx/spring-tx.xsd"> <!--引入数据连接需要的配置文件--> <context:property-placeholder location="classpath:jdbc.properties"></context:property-placeholder> <!--为Druid数据源配置一个Bean对象--> <bean id="dataSourceRef" class="com.alibaba.druid.pool.DruidDataSource"> <property name="driverClassName" value="${jdbc.driver}"></property> <property name="url" value="${jdbc.url}"></property> <property name="username" value="${jdbc.username}"></property> <property name="password" value="${jdbc.password}"></property> </bean> <!--扫描组件--> <context:component-scan base-package="com.hhxy"></context:component-scan> <!--为JdbcTemplate配置一个Bean对象--> <bean class="org.springframework.jdbc.core.JdbcTemplate"> <property name="dataSource" ref="dataSourceRef"></property> </bean> <!--==================新增的配置==================--> <!--配置事务管理器--> <bean id="transactionManager" class="org.springframework.jdbc.datasource.DataSourceTransactionManager"> <property name="dataSource" ref="dataSourceRef"></property> </bean> <!--开启事务的注解驱动,将事务管理器中的环绕通知作用到连接点,连接点使用@Transactional进行标识 transaction-manager属性用于指定事务管理器,默认是transactionManager这个id名 --> <tx:annotation-driven transaction-manager="transactionManager"/> <!--===========================================--> </beans> -
Step2:使用开启事务驱动的注解
@Transactional将这个注解加在Service的方法上,让这个方法成为一个大事务,只要这个方法中的有异常,就会回滚到事务之前
备注:当该注解加在Service的类上,则该类中的所有方法都是一个独立的事务,都会被事务管理器进行管理
这时候异常一旦发生,这三个SQL就都会不起作用了
-
4.2.1.2 事务的属性
该小节主要介绍:只读、超时、回滚策略、事务的隔离级别、事务的传播行为
-
只读
限定该事务只进行查询,一旦该事务中存在增、删、改,就报
SQLException异常。对一个查询操作来说,如果我们把它设置成只读,就能够明确告诉数据库,这个操作不涉及写操作,这样数据库就能够针对查询操作来进行优化事务的只读通过
@Transactional注解的readOnly属性设置,默认是false,表示事务可读可写 -
超时
事务在执行过程中,有可能因为遇到某些问题,导致程序卡住,从而长时间占用数据库资源。而长时间占用资源,大概率是因为程序运行出现了问题(可能是Java程序或MySQL数据库或网络连接等等)。 此时这个很可能出问题的程序应该被回滚,撤销它已做的操作,事务结束,把资源让出来,让其他正常 程序可以执行
总结:事务超过规定的时间,会进行回滚然后报
TransactionTimedOutException通过
@Transactional注解的timeout属性设置事务的最大等待时间,一旦超过这个时间就会报TransactionTimedOutException异常,timeout属性默认取值是 -1,表示事务一直等待直到被执行,除非程序关闭或遇到异常 -
回滚策略
指的是事务遇到异常该以哪一种方式进行回滚。声明式事务默认只针对运行时异常回滚,编译时异常不回滚。 可以通过
@Transactional中的相关属性设置回滚策略。@Transactional回滚策略相关属性有:rollbackFor属性:需要设置一个Class类型的对象,让该类型的异常回滚rollbackForClassName属性:需要设置一个字符串类型的全类名 ,指定某一种异常回滚noRollbackFor属性:需要设置一个Class类型的对象 ,让该类型的异常不回滚norollbackForClassName属性:需要设置一个字符串类型的全类名,指定某一种异常不回滚
小知识:
noRollbackFor属性接收的数据类型为数组,在注解中数组类型只有一个数组可以省略大括号,有多个则不能省但是事务仍然被提交了,并没有回滚(需要注意的是数学运算异常一定要放在SQL执行后面,不然直接还没有执行事务程序就已经停掉了,还有就是保障用户有足够的前买书,否则事务还没执行完就被其他的运行异常给停掉了)
-
事务的隔离级别
数据库系统必须具有隔离并发运行各个事务的能力,使它们不会相互影响,避免各种并发问题。一个事 务与其他事务隔离的程度称为隔离级别。SQL标准中规定了多种事务隔离级别,不同隔离级别对应不同 的干扰程度,隔离级别越高,数据一致性就越好,但并发性越弱
隔离级别一共有四种:
- 读未提交(READ UNCOMMITTED):允许事务A读取事务B未提交的修改。存在脏读10问题
- 读已提交(READ COMMITTED):要求事务A只能读取事务B已提交的修改。解决了脏读问题,但存在不可重复读11问题
- 可重复读(REPEATABLE READ):确保事务A可以多次从一个字段中读取到相同的值,即在事务A执行期间禁止其它事务对这个字段进行更新。通过共享锁12解决了不可重复读问题,但是存在幻读13问题(是MySQL默认的隔离级别)
- 串行化(SERIALIZABLE):通过间隙锁14确保事务A可以多次从一个表中读取到相同的行,即在事务A执行期间,禁止其它 事务对这个表进行写(添加、更新、删除)操作。可以避免任何并发问题,但性能十分低下
常见的Oracle数据库和MySQL数据库对事物隔离级别的支持:
使用方式(一般使用默认的就行了):
@Transactional(isolation = Isolation.DEFAULT)//使用数据库默认的隔离级别 @Transactional(isolation = Isolation.READ_UNCOMMITTED)//读未提交 @Transactional(isolation = Isolation.READ_COMMITTED)//读已提交 @Transactional(isolation = Isolation.REPEATABLE_READ)//可重复读(MySQL默认) @Transactional(isolation = Isolation.SERIALIZABLE)//串行化 -
事务的传播行为
指的就是当一个事务方法被另一个事务方法调用时,这个事务方法应该以哪种事务来运行。例如:methodA事务方法调用methodB事务方法时,methodB是继续在调用者methodA的事务中运行呢,还是为自己开启一个新事务运行,这就是由methodB的事务传播行为决定的。而事务的传播行为可以使用
@Transactional注解种的propagation属性进行设置propagation属性的七种取值:
-
REQUIRED:支持当前事务,如果当前没有事务,就新建一个事务(默认的取值)
-
SUPPORTS:支持当前事务,如果当前没有事务,就以非事务方式执行
-
MANDATORY:支持当前事务,如果当前没有事务,就抛出异常
-
REQUIRES_NEW:新建事务,如果当前存在事务,把当前事务挂起
-
NOT_SUPPORTED:以非事务方式执行操作,如果当前存在事务,就把当前事务挂起
-
NEVER:以非事务方式执行,如果当前存在事务,则抛出异常
-
NESTED:支持当前事务,如果当前事务存在,则执行一个嵌套事务,如果当前没有事务,就新建一个事务
示例:
编写结账方法:
package com.hhxy.service.imp;

import com.hhxy.service.BookService;
import com.hhxy.service.PaymentService;
import org.springframework.beans.factory.annotation.Autowired;
import org.springframework.stereotype.Service;
import org.springframework.transaction.annotation.Transactional;

/**
 * @author ghp
 * @date 2022/9/19
 */
@Service
public class PaymentServiceImp implements PaymentService {

    //自动装配一个BookService对象,用于付款
    @Autowired
    private BookService bookService;

    /**
     * 结账的方法
     */
    @Override
    @Transactional
    public void payment(Integer userId, Integer[] bookIds) {
        //默认情况是使用payment(结账)的事务,只要有一本书买不了,那么就一本也买不了o((>ω< ))o
        for (Integer bookId : bookIds) {
            bookService.buyBook(userId,bookId);
        }
    }
}
使用原始的事务传播行为,测试结果如下:
结账的时候,一旦有一本书买不了,就一本书都买不了(体会一下中华文化的博大精深吧🤣)
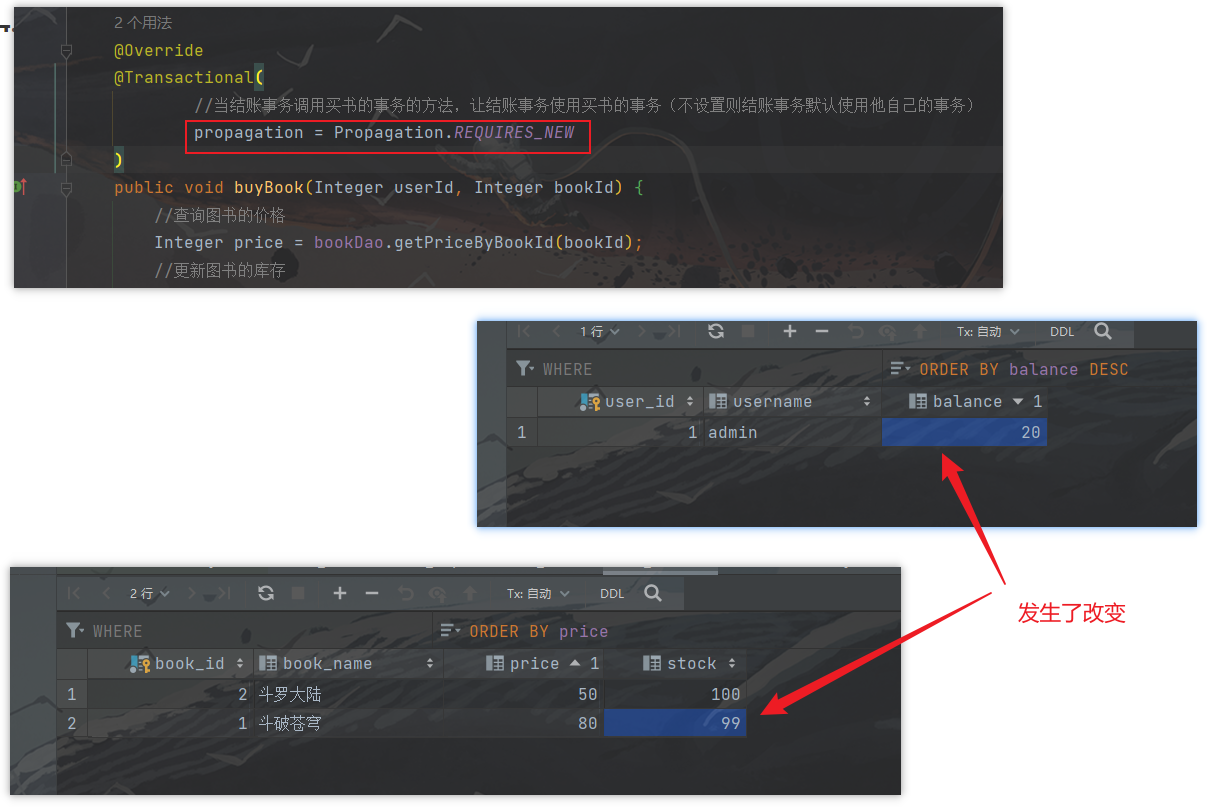
使用新建事务的传播行为,可以发现仍然会报上面的异常,但是数据库的数据发了了改变:
结账时只要有一本书能买的起,就能够成功购买这本书
-
4.2.1.2小结,虽然这些事物的属性很多,但是在平常的开发中使用属性默认的取值就够了,我们只需要知道这些属性有什么用,如何用就够了😄
推荐阅读:
- java面试之脏读、幻读、不可重复读
- MySQL串行化隔离级别(间隙锁实现)
- [阿里三连问: 事务传播行为到底是什么? ](https://zhuanlan.zhihu.com/p/378534787#:~:text=事务传播行为(propagation,behavior)指的就是当一个事务方法被另一个事务方法调用时,这个事务方法应该如何进行。 例如:methodA事务方法调用methodB事务方法时,methodB是继续在调用者methodA的事务中运行呢,还是为自己开启一个新事务运行,这就是由methodB的事务传播行为决定的。)
4.3.1 基于XML实现声明式事务
先将4.3.1.1中的
@Transaction注解删掉,其他的不用改变,然后就能够通过编写spring配置文件来实现声明式事务了😄备注:XML实现事务管理用的较少,Spring官方还是更加偏向支持注解实现声明式事务的(●’◡’●)
示例:
-
Step1:创建Maven工程
略……
-
Step2:导入依赖
相比于使用注解实现声明式事务,需要多添加一个依赖
<!--使用XML实现声明式事务所必须的依赖--> <dependency> <groupId>org.springframework</groupId> <artifactId>spring-aspects</artifactId> <version>5.3.22</version> </dependency> -
Step3:编写spring配置文件
spring-declarativeTransaction-xml.xml:
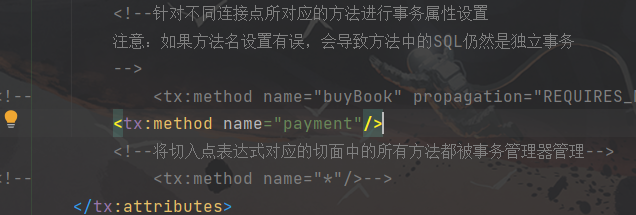
<?xml version="1.0" encoding="UTF-8"?> <beans xmlns="http://www.springframework.org/schema/beans" xmlns:xsi="http://www.w3.org/2001/XMLSchema-instance" xmlns:context="http://www.springframework.org/schema/context" xmlns:tx="http://www.springframework.org/schema/tx" xmlns:aop="http://www.springframework.org/schema/aop" xsi:schemaLocation="http://www.springframework.org/schema/beans http://www.springframework.org/schema/beans/spring-beans.xsd http://www.springframework.org/schema/context https://www.springframework.org/schema/context/spring-context.xsd http://www.springframework.org/schema/tx http://www.springframework.org/schema/tx/spring-tx.xsd http://www.springframework.org/schema/aop https://www.springframework.org/schema/aop/spring-aop.xsd"> <!--引入数据库连接的配置文件--> <context:property-placeholder location="classpath:jdbc.properties"></context:property-placeholder> <!--为Druid数据源配置一个Bean对象,让IOC能够进行管理--> <bean id="dataSourceRef" class="com.alibaba.druid.pool.DruidDataSource"> <property name="driverClassName" value="${jdbc.driver}"></property> <property name="url" value="${jdbc.url}"></property> <property name="username" value="${jdbc.username}"></property> <property name="password" value="${jdbc.password}"></property> </bean> <!--为JdbcTemplate配置一个Bean对象--> <bean class="org.springframework.jdbc.core.JdbcTemplate"> <property name="dataSource" ref="dataSourceRef"></property> </bean> <!--扫描组件--> <context:component-scan base-package="com.hhxy"></context:component-scan> <!--配置事务管理器--> <bean id="transactionManager" class="org.springframework.jdbc.datasource.DataSourceTransactionManager"> <property name="dataSource" ref="dataSourceRef"></property> </bean> <!--配置事务通知,用于配置事务的属性取值 id用于表示事务通知,方便引用 transaction-manager属性用于指定事务管理器,默认是transactionManager这个id名 --> <tx:advice id="transactionByXml" transaction-manager="transactionManager"> <tx:attributes> <!--针对不同连接点所对应的方法进行事务属性设置 注意:如果方法名设置有误,会导致方法中的SQL仍然是独立事务 同时tx:method标签中还有很多事务属性相关的标签,具体可以参考4.2.1.2 --> <tx:method name="buyBook"/> <!--将切入点表达式对应的切面中的所有方法都被事务管理器管理--> <!-- <tx:method name="*"/> --> </tx:attributes> </tx:advice> <!--配置AOP--> <aop:config> <!--把事务通知通过作用点表达式作用到连接点(即Service中的事务方法)--> <aop:advisor advice-ref="transactionByXml" pointcut="execution(* com.hhxy.service.imp.BookServiceImp.*(..))"></aop:advisor> </aop:config> </beans> -
Step4:编写组件类
和4.3.1.1中一样,略……
注意:需要将
@Transaction注解给去掉 -
Step5:测试
1)测试1:测试使用声明式事务管理后,事务方法中一旦发生异常,是否发生回滚
    /**
     * 测试XML实现的声明式事务的买书方法
     */
    @Test
    public void xmlTransactionBuyBookTest(){
        bookController.buyBook(1,1);
    }
当spring配置是这样是,事务方法buyBook中一旦发生异常,就回滚(具体结果和4.3.1.1一样,不过多赘述了):
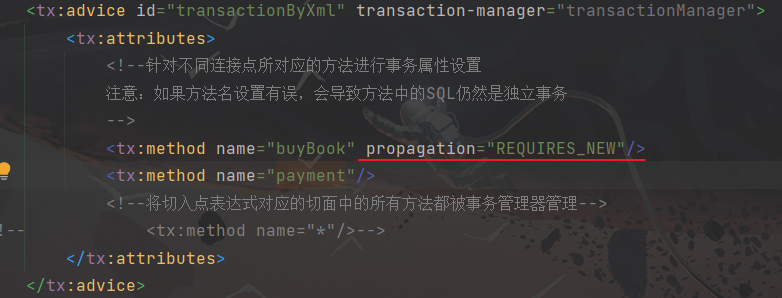
2)测试2:测试使用声明式事务管理后,使用progation属性,将传播行为设置为新建事务(即:以buyBook的事务为准)
    /**
     * 测试XML实现的声明式事务的结账方法
     */
    @Test
    public void xmlTransactionPaymentBookTest(){
        paymentController.payment(1,new Integer[]{1,2});
    }
会发现结账后,能买几本书就支付基本书的钱,然后钱不够就报异常(同样的和4.3.1.1的测试结果一致)
总结
略……等我有了更深的理解再来总结吧😄先学习怎么用
参考文章:
- 框架的低侵入如何理解?
- 请问什么叫代码污染?
- 说一说Spring家族
- Spring IoC 容器_w3cschool
- 什么是控制反转(IOC)?
- 浅析控制反转 - 知乎 (zhihu.com)
- 深入理解Java中的字段与属性的区别
- 什么是JavaBean、bean? 什么是POJO、PO、DTO、VO、BO ? 什么是EJB、EntityBean?
- 数据库、数据源、数据库连接、数据库连接池的关系
- 为什么 Spring和IDEA 都不推荐使用 @Autowired 注解
- Spring为啥不推荐使用@Autowired注解?
- 面试官:请你说一下 Bean 的生命周期 - 知乎 (zhihu.com)
- Spring AOP 和代理的关系?
- Cglib和jdk动态代理的区别
- CGLIB(Code Generation Library) 介绍与原理 | 菜鸟教程 (runoob.com)
- 🚀一文搞懂:jdk动态代理,cglib,Spring AOP和Aspectj
- 【Spring】——声明式事务配置详解
- Java中事务总结详解(精华)
- Spring的编程式事务和声明式事务详解
- Spring JdbcTemplate(使用详解)
- java面试之脏读、幻读、不可重复读
- MySQL串行化隔离级别(间隙锁实现)
- 阿里三连问: 事务传播行为到底是什么?
硬编码就是将数据直接嵌入到程序或其他可执行对象的源代码中的软件开发实践,与从外部获取数据或在运行时生成数据不同 ↩︎
低侵入式就是指Spring对项目的影响小,反之就是高侵入式。如果使用Spring到项目中几乎不会对其他技术造成影响;如果想要去除此框架改用其他框架,代码的改动也会很小 ↩︎
代码污染是指代码让整个项目变得很不规范,比如增加一个需求后,要实现该需求,就破坏了原代码的封装性,以及稳定性,实现这个需求的代码就造成了代码污染 ↩︎
设计模式是前辈们对代码开发经验的总结,是解决特定问题的一系列套路 ↩︎
向上兼容就是当Spring发现IOC没有该种类型的对象时,会转而去寻早它的实现类所对应的对象 ↩︎
Java种属性(property)就是指含有get和set方法的字段,而字段(field)就是类的成员变量,也称作域 ↩︎
字面量也就是字面上的值,并没有特殊含义,比如2就是2,name就是字符串name,null就是字符串null ↩︎
数据源可以直接理解为数据库连接池,当然数据库连接池是它其中的一个作用,数据源还具有观测数据、分析测定数据…… ↩︎
AspectJ 是一个基 Java语言的AOP框架,在 Spring 2.0 以后,新增了对 AspectJ 框架的支持。在Spring框架中建议使用AspectJ框架开发AOP ↩︎
脏读就是读没有用的数据,比如事务A是新增一条记录,但是事务A回滚了,此时事务B却读取了这个被回滚的数据,这个事务B读取事务A回滚的数据这个过程就叫做脏读 ↩︎
不可重复读问题是指一个事务内多次根据同一查询条件查询出来的同一行记录的值不一致,比如事务A提交一条记录准备更新数据但事务还没提交,此时事务B访问了该条数据,等事务A提交后事务B又访问了这条数据,事务B两次访问得到的数据不一致,这个过程称之为不可重复读 ↩︎
共享锁,又称为读锁,可以查看但无法修改和删除的一种数据锁(只能读,不能写) ↩︎
幻读是指一个事务内多次根据同一条件查询出来的记录行数不一致,比如事务A查询了表中记录总数,之后事务B新增了一条记录,此时事务A再次查询发现表种的总记录数发生了改变,这个过程称作幻读 ↩︎
间隙锁,是一个在索引记录之间的间隙上的锁,保证某个间隙内的数据在锁定情况下不会发生任何变化 ↩︎

