主要技术内容
1.pytest设计 接口测试 框架设想
common—公共的东西封装
1.request请求
2.Session
3.断言
4.Log
5.全局变量
6.shell命令
❖ config---配置文件及读取
❖ Log—
❖ payload—请求参数—*.yaml及读取
❖ testcases—conftest.py; testcase1.py…….可以有包,最好按模块就近划分
❖ result/report— 运行数据和报告
❖ 测试 策略—组织 运行all_test.py; p0_test.py; ……
2.框架执行简化流程
1.初始化配置
2.查找测试 用例套件
3.运行套件
4.初始化测试 数据pytest.fixture()
5.执行测试用例
6.读取yaml等测试数据
7.request运行
8.assert验证
9.allure记录报告
10.可与ienkins集成发邮件
3.测试 套件设计 模块化思想
4.测试 用例和套件落地思路
搜索功能—五个接口请求—返回股票stock信息;返回讨 论信息,组合,用户,群组;综合
❖ 搜索是个套件,五个接口分别是测试 用例,鉴于pytest 套件的灵活性,可以设计为 一个文件一个类下-【搜索】 下5个不同测试 方法【接口】(或可一个文件一个方法一 个接口设计 也行,灵活性强。这需要根据实际权 衡,如 果需要灵活多选择 后者,如果相对稳 定建议前者)
❖ 如果是通用的功能,可以放在共享的文件中-conftest.py
5.pytest的相关回顾
1. pytest是一个非常成熟的全功能的Python测试 框架
2. 简单 灵活,容易上手;支持参数化;
3. 能够支持简单 的单元测试 和复杂的功能测试 ,还可以用来做 selenium/appnium等自动化测试 、接口自动化测试 (pytest+requests);
4. pytest具有很多第三方插件,并且可以自定义扩 展, 比较好用的如pytest -selenium(多浏览 器执行)、 pytest-html(完美html测试报 告生成)、 pytest-rerunfailures(失败case重复执行)、 pytest-xdist(多CPU分发 )等;pytest-assume(允许每次测试 多次失败),
5. 测试 用例的skip和xfail处理;
6. 可以很好的和jenkins集成;
7. https://docs.pytest.org/en/latest/contents.html#toc
pytest安装,导入相关依赖库
Pip install –U pytest U表示升级 ➢ Pip intall –U pytest-html ➢ pip install -U pytest-rerunfailures ➢ Pip install pytest-assume ➢ Pip install pytest-allure ➢ Pip install pytest-xdist ➢ Pip list查看 ➢ Pytest –h 帮助 兹测试学
Pytest框架结构
Import pytest
类似的setup,teardown同样更灵活,
模块级 (setup_module/teardown_module)模块始末,全局的
函数级(setup_function/teardown_function)不在类中的函数有用
类级 (setup_class/teardown_class)只在类中前后运行一次
方法级(setup_method/teardown_methond)运行在类中方法始末
session()
#这是一个模块model
import pytest


@pytest.fixture(scope="module", autouse=True)
def setup_model():
    print("setup_model")
    yield
    print("teardown_model")

#类class在模块中定义,它们可以包含多个方法和数据成员。
class TestClassA:

    def setup_class(self):
        print('\nsetup class')


    def teardown_class(self):
        print('\nteardown_class')


    #方法method是与类关联的函数
    def setup_method(self):
        print("\nsetup_method")


    def teardown_method(self):
        print("\nteardown_method")

    def test_method_1(self):
        print("TestClassA: test_method_1")

    def test_method_2(self):
        print("TestClassA: test_method_2")


class TestClassB:
    def test_method_1(self):
        print("TestClassB: test_method_1")

    def test_method_2(self):
        print("TestClassB: test_method_2")


#全局函数function,class内的函数function是方法method


def setup_function():
    print("setup_function")


def teardown_function():
    print("teardown_function")


def test_function_1():
    print("test_function_1")


def test_function_2():
    print("test_function_2")


if __name__ == "__main__":
    pytest.main()
module
import pytest

# 功能函数
def multiply(a, b):
    return a * b

# ====== fixture ======
def setup_module():
    print("setup_module():在整个模块之前执行")

def teardown_module():
    print("teardown_module():在整个模块之后执行")

def setup_function(function):
    print("setup_function():在每个方法之前执行")

def teardown_function(function):
    print("teardown_function():在每个方法之后执行")

def test_multiply_1():
    print("正在执行test1")
    assert multiply(3, 4) == 12

def test_multiply_2():
    print("正在执行test2")
    assert multiply(3, 'a') == 'aaa'
class
def multiply(a, b):
    """Return the product of two numbers."""
    return a * b


# Test fixture for the multiply function
class TestMultiply:
    def setup_class(cls):
        print("setup_class(): Executed before any method in this class")

    def teardown_class(cls):
        print("teardown_class(): Executed after all methods in this class")

    def setup_method(self):
        print("setup_method(): Executed before each test method")

    def teardown_method(self):
        print("teardown_method(): Executed after each test method")

    def test_multiply_3(self):
        """Test multiply with two integers."""
        print("Executing test3")
        assert multiply(3, 4) == 12

    def test_multiply_4(self):
        """Test multiply with an integer and a string (should fail)."""
        print("Executing test4")
        # Note: This test will raise a TypeError due to incompatible types.
        assert multiply(3, 'a') == 'aaa'
Pytest框架assert断言使用 断言:支持显示最常见的子表达式的值,包括调用,属性,比较以及二元和一元运算符。 包含,相等,不等,大于 小于运算,assertnot 假
assert “h” in “hello”(判断h在hello中)
assert 3==4(判断3=4)
assert 3!=4(判断3!=4)
assert f() ==4 (判断f()方法返回值是否=4)
assert 5>6 (判断5>6为真)
assert not xx (判断xx不为真)
assert {'0', '1', '3', '8'} == {'0', '3', '5', '8'} 断言列表或者字典
import pytest

def intest():
    assert 'h' in "hello"
    assert 3==4
    # (判断3=4)
    assert 3!=4
    # (判断3!=4)
    assert f() ==4
    # (判断f()方法返回值是否=4)
    assert 5>6
    # (判断5>6为真)
    assert not xx
    # (判断xx不为真)
    assert {'0', '1', '3', '8'} == {'0', '3', '5', '8'}
    # 断言列表或者字典


def add(a, b):
    return a+b
# 测试相等

def test_add1():
    assert add(3, 4) == 7


# 测试不相等
def test_add_2():
    assert add(17, 22) != 50


# 测试大于或等于
def test_add_3():
    assert add(17, 22) <= 50


# 测试小于或等于
def test_add_4():
    assert add(17, 22) >= 38

# 功能:用于判断素数
def is_prime(n):
    if n <= 1:
        return False
    for i in range(2, n):
        if n % i == 0:
            return False
    return True

# 判断是否为True
def test_true_1():
    assert is_prime(13)

# 判断是否为True
def test_true_2():
    assert is_prime(7) is True
# 判断是否不为True
def test_true_3():
     assert not is_prime(4)
# 判断是否不为True
def test_true_4():
    assert is_prime(6) is not True
# 判断是否为False
def test_false_1():
    assert is_prime(8) is False

# 测试包含
def test_in():
 a = "hello"
 b = "he"
 assert b in a

# 测试不包含
def test_not_in():
    a = "hello"
    b = "hi"
    assert b not in a


if __name__ == "__main__":
    pytest.main()
pytest-fixture的灵活
Fixture优势 :
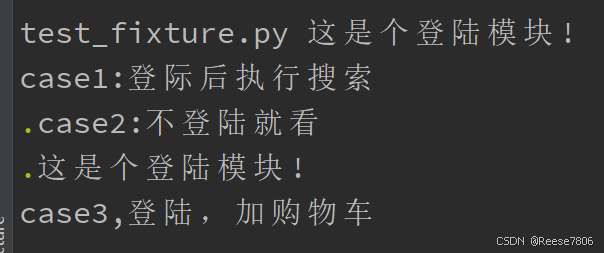
1、对于setup,teardown,可以不起这两个名字,所以命名方式 灵活。(可独立命名,声明后激活)前置后置
import pytest

@pytest.fixture()
def login():
    print('这是个登陆模块!')


def test_soso(login):
    print('case1:登际后执行搜索')


def test_cakan():
    print('case2:不登陆就看')


def test_cart(login):
    print('case3:登陆,加购物车')
2、数据共享。在conftest.py配置里写方法可以实现 数据共享 ,不需要import导入。可以跨文件共享
创建conftest文件
import pytest

@pytest.fixture()
def login():
    print('From_conftest - 这是个登陆模块!')
import pytest
def test_soso(login):
print('case1:登际后执行搜索')
def test_cakan():
print('case2:不登陆就看')
def test_cart(login):
print('case3:登陆,加购物车')
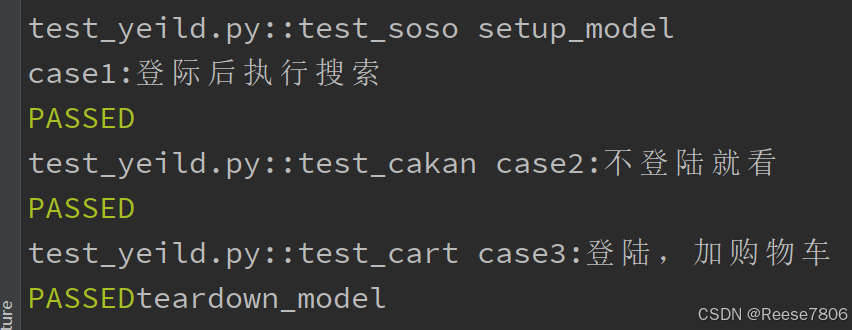
3、 神奇的yield,提供返回值,不是return;;相当于setup 和 teardown
import pytest


@pytest.fixture(scope="module", autouse=True)
def setup_model():
    print("setup_model")
    yield
    print("teardown_model")


def test_soso(setup_model):
    print('case1:登际后执行搜索')


def test_cakan():
    print('case2:不登陆就看')


def test_cart(setup_model):
    print('case3:登陆,加购物车')


if __name__ == "__main__":
    pytest.main()
pytest-fixture
1.Fixture(scope=“function”,params=None, autouse=False, ids=None, name=None):
2.可以使用此装饰器定义fixture
1. scope:=module,session,class,function;
function:每个test都运行,默认是function的scope ,
class:每个 class的所有test只运行一次;
module:每个module的所有test只运行一次;
session:每个session只运行一次
#这是一个模块model
import pytest


@pytest.fixture(scope="class", autouse=True)
def setup_model():
    print("setup_model_class")
    yield
    print("teardown_model_class")

#类class在模块中定义,它们可以包含多个方法和数据成员。
class TestClassA:

    def setup_class(self):
        print('\nsetup class')


    def teardown_class(self):
        print('\nteardown_class')


    #方法method是与类关联的函数
    def setup_method(self):
        print("\nsetup_method")


    def teardown_method(self):
        print("\nteardown_method")

    def test_method_1(self):
        print("TestClassA: test_method_1")

    def test_method_2(self):
        print("TestClassA: test_method_2")


class TestClassB:
    def test_method_1(self):
        print("TestClassB: test_method_1")

    def test_method_2(self):
        print("TestClassB: test_method_2")


#全局函数function,class内的函数function是方法method


def setup_function():
    print("setup_function")


def teardown_function():
    print("teardown_function")


def test_function_1():
    print("test_function_1")


def test_function_2():
    print("test_function_2")


if __name__ == "__main__":
    pytest.main()
2. params:可选多个参数调用fixture
3. Autouse:如果是True,则为 所有测试 激活fixture,如果是False,则需要显式参考来激活。
#这是一个模块model
import pytest


@pytest.fixture(scope="class")
def setup_model():
    print("setup_model_class")
    yield
    print("teardown_model_class")

#类class在模块中定义,它们可以包含多个方法和数据成员。
class TestClassA:

    def setup_class(self):
        print('\nsetup class')


    def teardown_class(self):
        print('\nteardown_class')


    #方法method是与类关联的函数
    def setup_method(self):
        print("\nsetup_method")


    def teardown_method(self):
        print("\nteardown_method")

    def test_method_1(self,setup_model):
        print("TestClassA: test_method_1")

    def test_method_2(self):
        print("TestClassA: test_method_2")


class TestClassB:
    def test_method_1(self):
        print("TestClassB: test_method_1")

    def test_method_2(self):
        print("TestClassB: test_method_2")


#全局函数function,class内的函数function是方法method


def setup_function():
    print("setup_function")


def teardown_function():
    print("teardown_function")


def test_function_1():
    print("test_function_1")


def test_function_2():
    print("test_function_2")


if __name__ == "__main__":
    pytest.main()
4. ids:每个字符串ID的列表,每个字符串对应 于param,这是测试 ID的一部分。
import pytest


@pytest.fixture(params=['www.baidu.com','www.bingying.com'],
                ids=['case1','case2'])
def urls(request):
    return request.param


def test_url(urls):
    url = urls
    print("url:",url)
5. Name:fixture的名称。
3.fixture带参数传递 -通过固定参数request传递 ;传二个以上参数(通过字典,其实算一个),可 以传多个组合测试 。
import pytest


@pytest.fixture(params=['www.baidu.com','www.bingying.com'],
                ids=['case1','case2'])
def urls(request):
    return request.param


def test_url(urls):
    url = urls
    print("url:",url)
传一个字典
import pytest


@pytest.fixture(params=[{'name':'baidu','url':'www.baidu.com'},{'name':'biying','url':'www.biying'}])
def urls_name(request):
    url = request.param['url']
    name = request.param['name']
    return url,name


def test_name_url(urls_name):
    url,name = urls_name
    print(name,url)
4.参数化:@pytest.mark.parametrize(“login_r”, test_user_data, indirect=True) indeirect=True 是把 login_r当作函数去执行
fixture传二个参数与数据驱动结合
@pytest.mark.parametrize 装饰器接受两个主要参数:
- 第一个参数是一个字符串,表示测试函数中需要参数化的参数名称,多个参数之间用逗号分隔。
- 第二个参数是一个列表或元组,其中每个元素都是一个参数组合,每个组合也是一个元组或列表,其元素顺序必须与第一个参数中列出的参数顺序相匹配。
直接在测试函数上使用
import pytest

# 假设我们有一个函数,它接受两个参数并返回它们的和
def add(a, b):
    return a + b

# 使用 parametrize 装饰器,指定测试函数的参数和对应的值
@pytest.mark.parametrize("a, b, expected", [
    (1, 2, 3),   # 第一组参数
    (2, 3, 5),   # 第二组参数
    (-1, 1, 0),  # 第三组参数
    (0, 0, 0),   # 第四组参数
])
def test_add(a, b, expected):
    assert add(a, b) == expected
类级别使用它,对整个类的所有测试方法进行参数化
两组数据组合
两组数据参数化,从下往上执行
pytest-fixture
1.Fixture 显示调用
2.Fixture 应用usefixtures
3.autouse=True自动激活
4.可以使用多个fixture
5.可以嵌套fixture
55:00
fixture结合parametrize+yaml进行搜索接口 测试
读取url
读取yaml文件,请求access_token,在test里create_tag
import pytest
import requests
import os
import yaml


def _base_data(file_name):
    cur_path = os.path.dirname(os.path.realpath(__file__))
    yaml1 = os.path.join(cur_path, file_name)
    f1 = open(yaml1)  # 打开yaml文件
    data = yaml.load(f1, Loader=yaml.FullLoader)  # 使用load方法加载
    return data

@pytest.fixture(autouse=True)
def get_base_data():
    base_data = _base_data('tag.yml')
    for v in base_data.values():  #读值
        print(v)
        return v


test_user_data2 = [{"tag": {"name": 'mou1moumou'}},{"tag": {"name": 'maimai2'}},{"tag": {"name": 'sl2ience'}}]


@pytest.fixture(autouse=True)
def query_param(request):
    return request.param


@pytest.mark.parametrize("query_param", test_user_data2, indirect=True)
def test_tag(get_base_data, query_param):
    method = get_base_data.get('method')
    url = get_base_data.get('url')
    params = get_base_data.get('param')
    res = requests.request(method=method, url=url, params=params)
    data = res.json()
    access_token = data['access_token']
    tag_params = query_param
    response = requests.post('https://api.weixin.qq.com/cgi-bin/tags/create?access_token='+access_token, json=tag_params)
    assert 'tag' in response.json()
读取测试数据
读取多个测试数据,待解决!
import yaml
import os
import pytest

def _base_data(file_name):
    cur_path = os.path.dirname(os.path.realpath(__file__))
    yaml1 = os.path.join(cur_path, file_name)
    f1 = open(yaml1)  # 打开yaml文件
    data = yaml.load(f1, Loader=yaml.FullLoader)  # 使用load方法加载
    return data


@pytest.fixture(scope="module")
def get_test_data():
    test_data = _base_data('tag_data.yml')
    test_user_data2 = test_data.get('test_user_data2')
    return test_user_data2


@pytest.mark.parametrize("tag_data", get_test_data(), indirect=True)
def test_functionality(tag_data):
    # test_case 是一个字典,包含 'name', 'input', 'expected_output' 等键
    response= requests.get(url='https://api.weixin.qq.com/cgi-bin/token', param={'grant_type': 'client_credential',
                               'appid': 'wx2e193b26f5edc5cf',
                               'secret': '99fe9aa25e42f30fa81c5d83816e4fc7'})
    access_token = response['access_token']
    response_tag = requests.post('https://api.weixin.qq.com/cgi-bin/tags/create?access_token=' + access_token, json= tag_data)
    print(response_tag)
附:fixture工厂模式
私有方法
html测试报告
安装
pip install pytest-html执行
pytest --html=report.html -vs test_yml_func.py
在当前目录生成report.html
