一、认识vue3及vue3的优势
1、框架层面
响应式底层API的变化,proxy数组下标的修改,对象动态添加属性;
vue3对ts的支持比vue2更强;
vue3增加了组合式API,增强了逻辑组合能力
配套的工程化工具也有了更新
2、 市场层面
vue3的市场在扩大
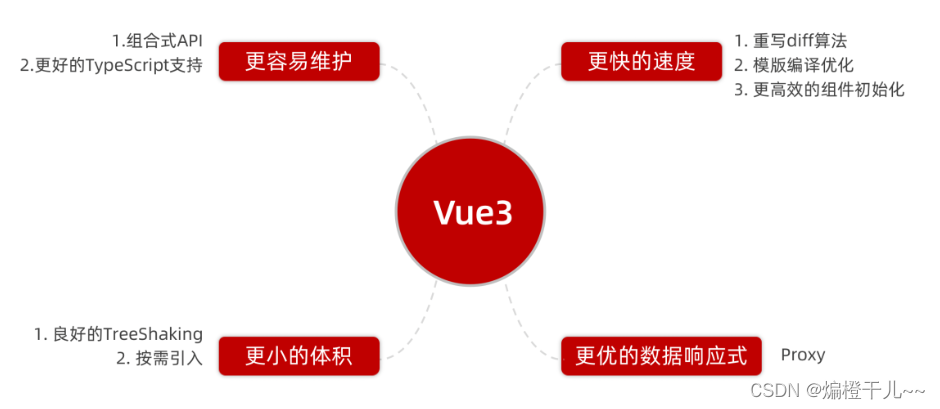
3、vue3的优势:
二、创建vue3项目
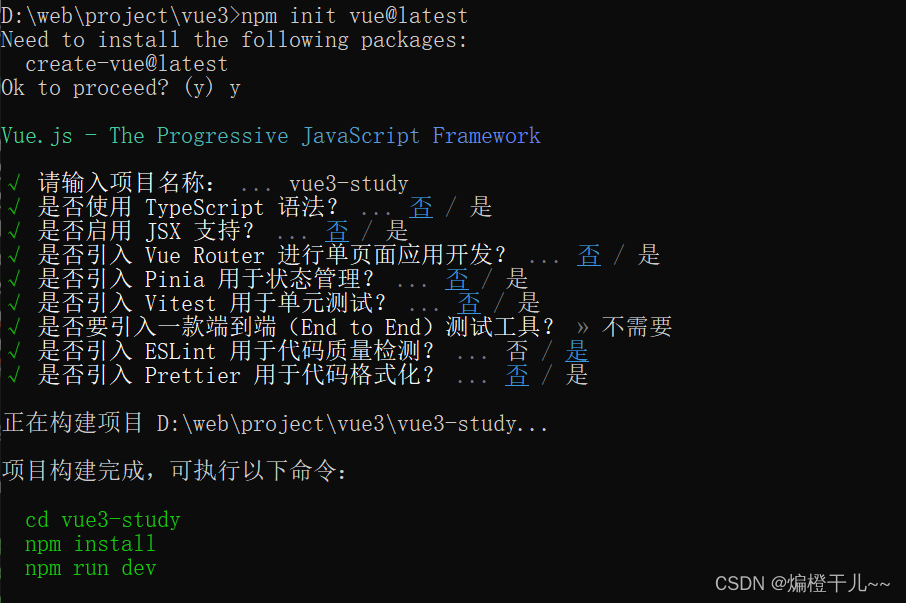
执行如下命令,这一指令将会安装并执行create-vue(create-vue使用vite作为底层工具链)
npm init vue@latest注: 如果输入npm init vue@latest之后没有反应,始终卡着不动,修改一下npm的源地址
npm config set registry https://registry.npmmirror.com注: vue3项目下载后,是没有node-modules的,需要执行npm i,自行安装一下。
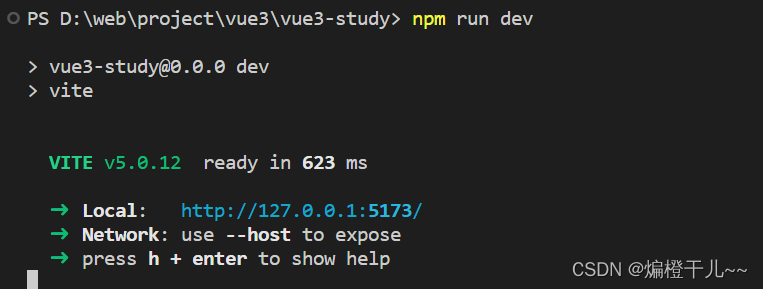
node-modules安装完成后,执行npm run dev,即可启动项目。
访问http://127.0.0.1:5173/,即可访问项目。
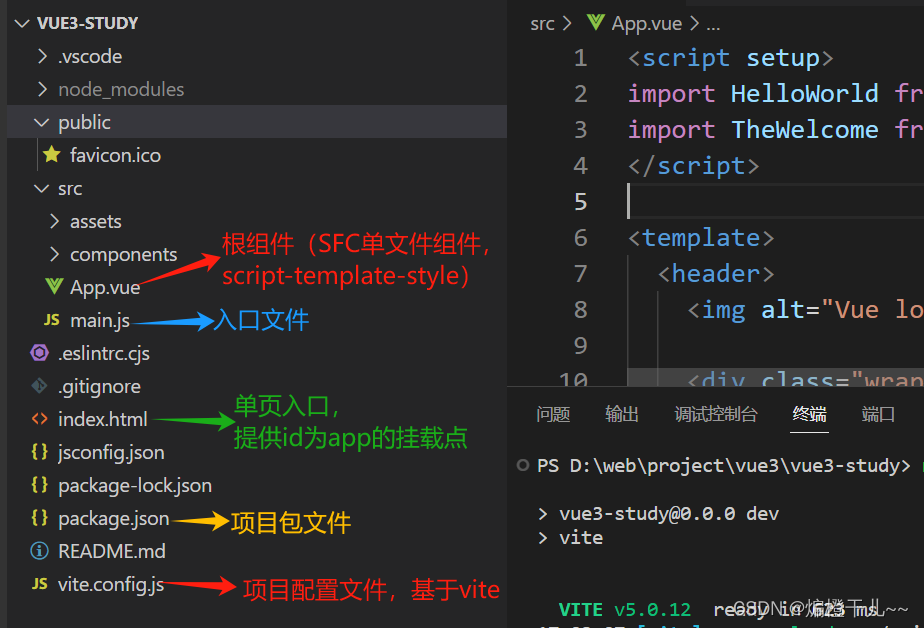
三、认识vue3目录结构
APP.vue 根组件与vue2的区别:
1、脚本script与模板template顺序调换
2、模板template不再要求唯一根元素
3、脚本script添加setup标识,支持组合式API
四、setup语法
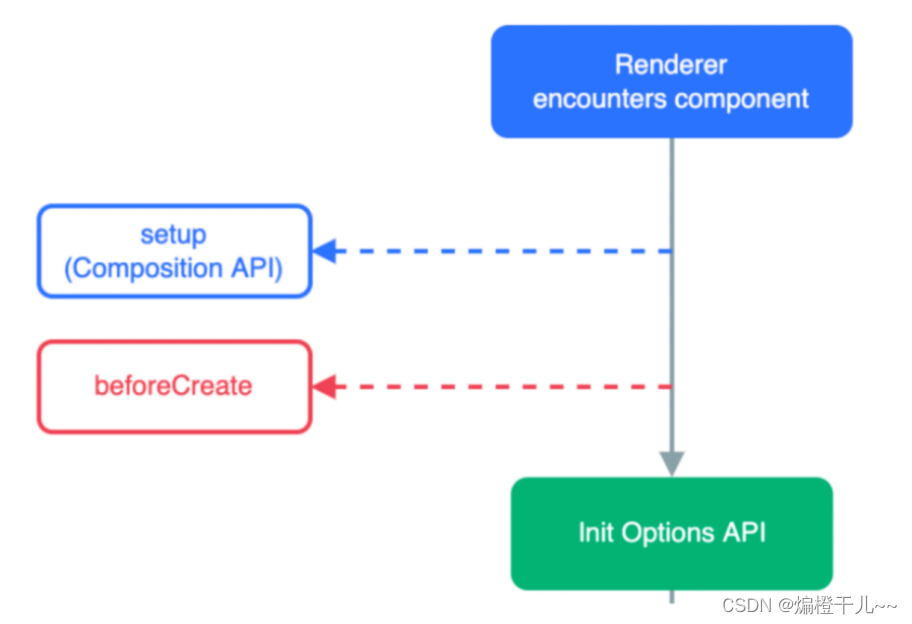
1、执行时机
在beforeCreate钩子之前执行
2、setup代码书写特点
在setup函数中声明的变量和函数,都需要return出去,才可以在模板中使用。
<script>
  export default {
    setup(){
      const message = 'this is message'
      const logMessage = ()=>{
        console.log(message)
      }
      // 必须return才可以
      return {
        message,
        logMessage
      }
    }
  }
</script>3、setup语法糖
在script标签添加setup标记后,不需要再添加export default {},不再需要return,组件也无需注册,可直接使用。
<script setup>
  const message = 'this is message'
  const logMessage = ()=>{
    console.log(message)
  }
</script>
五、reactive和ref函数
reactive函数和ref函数都需要在script中按需引入。
1、reactive函数
只能声明响应的对象。简单类型的响应数据不能使用reactive。
<script setup>
  // 利用reactive生成响应式数据
  // 导入reactive
  import { reactive } from 'vue'
  // reactive 只能声明响应的对象。简单类型的响应数据不能使用reactive。简单类型的响应式数据用ref声明。
  const state = reactive({count:0})
  const changeCount = () => {
    state.count++
  }
</script>2、ref函数
接收简单类型或者对象类型的数据传入并返回一个响应式的对象 。
<script setup>
  // 利用ref生成简单的响应式对象
  // 导入ref
  import { ref } from 'vue'
  const count = ref(0)
  const state = ref({count: 0})
  // 在script中使用ref生成的响应式对象,如果想访问这个对象的原始值,必须加.value
  // 在模板中可直接使用,不用加.value
  const changeCount = () => {
    count.value++
    state.value.count++
  }
</script>
3、reactive和ref对比
1、都是用来生成响应式数据
2、不同点:
a、reactive不能处理简单的响应式数据
b、ref参数类型支持更好,但是必须通过.value做访问修改
c、ref函数内部的实现依赖于reactive函数
3、在实际工作中更推荐使用ref函数,减少记忆负担
六、computed计算属性
计算属性基本思想和Vue2保持一致,vue3组合式API下的计算属性只是修改了API写法。
<script setup>
  // computed 计算属性
  import { computed, ref } from 'vue'
  const count = ref(0)
  const doubleCount = computed(() => count.value * 2)
</script>
七、watch监视
wacth侦听一个或者多个数据的变化,数据变化时执行回调函数,俩个额外参数 immediate控制立刻执行,deep开启深度侦听。
1、watch监视单个参数
<script setup>
  // watch 监视
  import { watch, ref } from 'vue'
  const count = ref(0)
  watch(count, (newVal, oldVal) => {
    console.log('newVal', newVal)
    console.log('oldVal', oldVal)
  })
</script>2、watch监视多个参数
用数组的形式监视响应式数据,同时newVal和oldVal的值也变成一个数组,数组中的值的顺序和监视的响应式数据是一致的。
<script setup>
  // watch 监视
  import { watch, ref } from 'vue'
  const count = ref(0)
  const age = ref(18)
  // watch 监视多个数据
  watch([age, count], (newVal, oldVal) => {
    // newVal和oldVal也变成一个数组
    // 数组中的值的顺序和监视的响应式数据是一致的
    console.log('newVal', newVal)
    console.log('oldVal', oldVal)
  })
</script>
3、watch立即侦听immediate
<script setup>
  // watch 监视
  import { watch, ref } from 'vue'
  const count = ref(0)
  // immediate 立即侦听
  watch(count, (newVal, oldVal) => {
    console.log('newVal', newVal)
    console.log('oldVal', oldVal)
  }, {
    immediate: true
  })
</script>4、watch深度监听deep
watch对ref生成的响应式数据的深度监听需要用到deep属性,而watch默认对reactive生成的响应式数据进行深度监听,无需再使用deep属性。
<script setup>
  // watch 监视
  import { watch, ref, reactive } from 'vue'
  const count = ref(0)
  const age = ref(18)
  const state = ref({count: 0})
  // deep 深度侦听
  const changeCount = () => {
    state.value.count++
  }
  watch(state, (newVal) => {
    console.log('newVal', newVal)
  }, {
    deep: true
  })
  // watch 默认对reactive生成的响应式对象进行深度侦听
  const stateReactive = reactive({ count: 0 })
  const changeCountReactive = () => {
    stateReactive.count++
  }
  watch(stateReactive, (newVal) => {
    console.log('newVal', newVal)
  })
</script>
八、生命周期钩子函数
基本使用:导入生命函数,执行生命函数,传入回调。
onBeforeUpdate, onUpdated是数据在变化后会执行。
<script setup>
// 要导入对应的生命周期钩子函数
import { onBeforeMount, onMounted, onBeforeUpdate, onUpdated, ref } from 'vue'
console.log('setup')
onBeforeMount(() => {
  console.log("onBeforeMount")
})
onMounted(() => {
  console.log("onMounted")
})
onBeforeUpdate(() => {
  console.log("onBeforeUpdate")
})
onUpdated(() => {
  console.log("onUpdated")
})

const count = ref(0)
// 变化:钩子函数可以多次调用
</script>

<template>
  <div>{{ count }}</div>
  <button @click="count++">+</button>
</template>
vue3的生命周期函数可以多次调用使用。
<script setup>
// 要导入对应的生命周期钩子函数
import { onBeforeMount, onMounted, onBeforeUpdate, onUpdated, ref } from 'vue'
console.log('setup')
onBeforeMount(() => {
  console.log("onBeforeMount")
})
onMounted(() => {
  console.log("onMounted1")
})
onBeforeUpdate(() => {
  console.log("onBeforeUpdate")
})
onUpdated(() => {
  console.log("onUpdated")
})
onMounted(() => {
  console.log("onMounted2")
})

const count = ref(0)
// 变化:钩子函数可以多次调用
</script>

<template>
  <div>{{ count }}</div>
  <button @click="count++">+</button>
</template>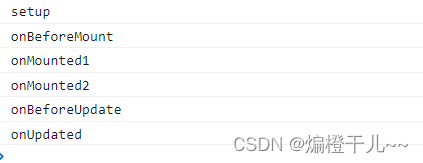
九、父子通信
1、父传子
vue3中的父传子与vue2的父传子思想一致,只是在写法上略有不同。vue3的父组件在引入子组件后不用注册,可直接使用;vue3的子组件在接收参数值时,使用不用导入的宏函数defineProps。
// 父组件
<script setup>
// 子组件导入,vue3不用在注册了
import sonCom from './components/sonCom.vue'
import { ref } from 'vue'
const msg = ref('父组件数据')
</script>

<template>
  <div class="box">
    <h1>父组件</h1>
    <sonCom :msg="msg"></sonCom>
  </div>
</template>

<style scoped>
  .box {
    height: 300px;
    border: 1px solid lightblue;
  }
</style>
// 子组件
<script setup>
// 宏函数(不用导入,可直接使用)defineProps
// 直接接收数据,不进行校验
defineProps(['msg'])
// 如果使用校验,则使用defineProps的对象写法
defineProps({
msg: {
type: String,
required: true
}
})
// 如果要在script中使用defineProps接收的值,需要声明一个变量接收defineProps的值
const msgJs = defineProps({
msg: {
type: String,
required: true
}
})
console.log(msgJs.msg)
</script>
<template>
<div class="son-box">
<h1>子组件</h1>
<p>接收到的数据:{{msg}}</p>
</div>
</template>
<style scoped>
.son-box {
height: 150px;
border: 1px solid lightsalmon;
}
</style>2、子传父
a、使用宏函数defineEmits生成emit函数
b、使用emit函数触发自定义事件
c、父组件中监听emit中触发的事件
注:在使用defineEmits的时候,必须把事件名在数组中定义好
<script setup>
// 子组件导入,vue3不用在注册了
import sonCom from './components/sonCom.vue'
const getMsg = (val) => {
  console.log(val)
}
</script>

<template>
  <div class="box">
    <h1>父组件</h1>
    <sonCom @send-msg="getMsg"></sonCom>
  </div>
</template>

<style scoped>
  .box {
    height: 300px;
    border: 1px solid lightblue;
  }
</style>
<script setup>
// 使用宏函数defineEmits生成emit函数
// 使用emit函数触发自定义事件
// 父组件中监听emit中触发的事件
// 注意:在使用defineEmits的时候,必须把事件名在数组中定义好
const emit = defineEmits(['send-msg'])
const sonEmit = () => {
emit('send-msg','子组件的数据')
}
</script>
<template>
<div class="son-box">
<button @click="sonEmit">子传父</button>
</div>
</template>
<style scoped>
.son-box {
height: 150px;
border: 1px solid lightsalmon;
}
</style>3、模板引用(父组件获取子组件内部的属性和方法)
a、ref的基本使用
<script setup>
import { onMounted, ref } from 'vue'
// 调用ref函数,得到ref对象
const h1Ref = ref(null)
onMounted(() => {
  console.log(h1Ref.value)
})
</script>

<template>
  <div class="box">
    <!-- 通过ref标识,绑定ref对象 -->
    <h1 ref="h1Ref">父组件</h1>
  </div>
</template>
b、defineExpose使用
vue3中组合式API 组件内部的书型盒方法都是默认不暴露给父组件的,如果想让父组件访问子组件的属性和方法,要用defineExpose()向外暴露。
<script setup>
import { onMounted, ref } from 'vue'
import sonCom from './components/sonCom.vue'
// 调用ref函数,得到ref对象
const h1Ref = ref(null)
onMounted(() => {
  console.log(h1Ref.value)
})
const sonFn = ref(null)
const getSonFn = () => {
  console.log(sonFn.value.msg)
  sonFn.value.logMsg()
}
</script>

<template>
  <div class="box">
    <!-- 通过ref标识,绑定ref对象 -->
    <h1 ref="h1Ref">父组件</h1>
    <sonCom ref="sonFn"></sonCom>
    <button @click="getSonFn">调用子组件</button>
  </div>
</template>

<style scoped>
  .box {
    height: 300px;
    border: 1px solid lightblue;
  }
</style>
<script setup>
import { ref } from "vue"
// vue3中组合式API 组件内部的书型盒方法都是默认不暴露给父组件的
// 如果想让父组件访问子组件的属性和方法,要用defineExpose()向外暴露
const msg = ref('子组件')
const logMsg = () => {
console.log(msg.value)
}
defineExpose({
msg,
logMsg
})
</script>
<template>
<div class="son-box">
<h2>子组件</h2>
</div>
</template>
<style scoped>
.son-box {
height: 150px;
border: 1px solid lightsalmon;
}
</style>4、provide和inject实现跨层级传值
a、传递普通数据
<script setup>
import fatherCom from './components/fatherCom.vue'
import { provide, ref } from 'vue'
// 传递普通类型的数据
// let str = '传递的祖先数据'
// provide('parentKey', str)
// const changeMsg = () => {
//   str = '改变后的值'
//   // 点击button后,子组件接收的数据不会修改,还是'传递的祖先数据'
// }
</script>

<template>
  <div class="box">
    <fatherCom></fatherCom>
    <h1>祖先组件</h1>
    <button @click="changeMsg">change</button>
  </div>
</template>

<style scoped>

  .box {
    height: 500px;
    padding: 30px;
    border: 1px solid lightseagreen;
  }
</style>
<script setup>
import sonCom from './sonCom.vue'
</script>
<template>
<div class="father">
<sonCom></sonCom>
<h1>父组件</h1>
</div>
</template>
<style scoped>
.father {
height: 200px;
padding: 30px;
border: 1px solid lightcoral;
}
</style><script setup>
import { inject } from 'vue'
const str = inject('parentKey')
</script>
<template>
<div class="son">
<h3>子组件</h3>
接收到数据:{{ str }}
</div>
</template>
<style scoped>
.son {
height: 100px;
padding: 30px;
border: 1px solid lightblue;
}
</style>b、传递响应数据(fatherCom同上)
<script setup>
import fatherCom from './components/fatherCom.vue'
import { provide, ref } from 'vue'

// 传递响应数据
// let str = ref('传递的祖先数据')
// provide('parentKey', str)
// const changeMsg = () => {
//   str.value = '改变后的值'
//   // 点击button后,子组件接收的数据会修改,是'改变后的值'
// }

</script>

<template>
  <div class="box">
    <fatherCom></fatherCom>
    <h1>祖先组件</h1>
    <button @click="changeMsg">change</button>
  </div>
</template>

<style scoped>

  .box {
    height: 500px;
    padding: 30px;
    border: 1px solid lightseagreen;
  }
</style>
<script setup>
import { inject } from 'vue'
const str = inject('parentKey')
</script>
<template>
<div class="son">
<h3>子组件</h3>
接收到数据:{{ str }}
</div>
</template>
<style scoped>
.son {
height: 100px;
padding: 30px;
border: 1px solid lightblue;
}
</style>c、传递方法(fatherCom同上)
<script setup>
import fatherCom from './components/fatherCom.vue'
import { provide, ref } from 'vue'
// 让子组件点击按钮的时候,修改祖先组件中的值
let str = ref('传递的祖先数据')
provide('parentKey', str)
const changeMsg = () => {
  str.value = '改变后的值'
}
// provide不仅能传递数据,还可以传递方法
provide('changeMsg', changeMsg)
</script>

<template>
  <div class="box">
    <fatherCom></fatherCom>
    <h1>祖先组件</h1>
    <button @click="changeMsg">change</button>
  </div>
</template>

<style scoped>

  .box {
    height: 500px;
    padding: 30px;
    border: 1px solid lightseagreen;
  }
</style>
<script setup>
import { inject } from 'vue'
const str = inject('parentKey')
const changeMsg = inject('changeMsg')
const changeStr = () => {
changeMsg()
}
</script>
<template>
<div class="son">
<h3>子组件</h3>
接收到数据:{{ str }}
<button @click="changeStr">change 祖先</button>
</div>
</template>
<style scoped>
.son {
height: 100px;
padding: 30px;
border: 1px solid lightblue;
}
</style>