以下分析基于API23。
Activity的启动过程最终通过ActivityThread中的performLaunchActivity()来完成。
private Activity performLaunchActivity(ActivityClientRecord r, Intent customIntent) {
    ……
        java.lang.ClassLoader cl = r.packageInfo.getClassLoader();
            activity = mInstrumentation.newActivity(
                    cl, component.getClassName(), r.intent);
    ……
        activity.attach(appContext, this, getInstrumentation(), r.token,
        r.ident, app, r.intent, r.activityInfo, title, r.parent,
        r.embeddedID, r.lastNonConfigurationInstances, config,
        r.referrer, r.voiceInteractor);
    ……
}其中使用类加载器创建了Activity的实例对象,并且调用了Activity的attach():
final void attach(Context context, ActivityThread aThread,
            Instrumentation instr, IBinder token, int ident,
            Application application, Intent intent, ActivityInfo info,
            CharSequence title, Activity parent, String id,
            NonConfigurationInstances lastNonConfigurationInstances,
            Configuration config, String referrer, IVoiceInteractor voiceInteractor) {
        attachBaseContext(context);

        mFragments.attachHost(null /*parent*/);

        mWindow = new PhoneWindow(this);
        mWindow.setCallback(this);
        mWindow.setOnWindowDismissedCallback(this);
        mWindow.getLayoutInflater().setPrivateFactory(this);
        if (info.softInputMode != WindowManager.LayoutParams.SOFT_INPUT_STATE_UNSPECIFIED) {
            mWindow.setSoftInputMode(info.softInputMode);
        }
        if (info.uiOptions != 0) {
            mWindow.setUiOptions(info.uiOptions);
        }
        mUiThread = Thread.currentThread();

        mMainThread = aThread;
        mInstrumentation = instr;
        mToken = token;
        mIdent = ident;
        mApplication = application;
        mIntent = intent;
        mReferrer = referrer;
        mComponent = intent.getComponent();
        mActivityInfo = info;
        mTitle = title;
        mParent = parent;
        mEmbeddedID = id;
        mLastNonConfigurationInstances = lastNonConfigurationInstances;
        if (voiceInteractor != null) {
            if (lastNonConfigurationInstances != null) {
                mVoiceInteractor = lastNonConfigurationInstances.voiceInteractor;
            } else {
                mVoiceInteractor = new VoiceInteractor(voiceInteractor, this, this,
                        Looper.myLooper());
            }
        }

        mWindow.setWindowManager(
                (WindowManager)context.getSystemService(Context.WINDOW_SERVICE),
                mToken, mComponent.flattenToString(),
                (info.flags & ActivityInfo.FLAG_HARDWARE_ACCELERATED) != 0);
        if (mParent != null) {
            mWindow.setContainer(mParent.getWindow());
        }
        mWindowManager = mWindow.getWindowManager();
        mCurrentConfig = config;
    }
以上可以看到Activity里新建了一个PhoneWindow对象,同时得到一个WindowManager对象mWindowManager 。
WindowManager是一个抽象类,具体实现类是WindowManagerImpl。每个Activity都会有一个WindowManager对象,这个WindowManager对象会和WindowManagerService(WMS)进行通信。我们注意到设置WindowManager的时候传入了一个IBinder 类型的对象mToken,它是WMS识别View具体属于那个Activity的关键。
到这里Window的创建已经完成,我们来看Activity的setContentView():
    /**
     * Set the activity content from a layout resource.  The resource will be
     * inflated, adding all top-level views to the activity.
     *
     * @param layoutResID Resource ID to be inflated.
     *
     * @see #setContentView(android.view.View)
     * @see #setContentView(android.view.View, android.view.ViewGroup.LayoutParams)
     */
    public void setContentView(@LayoutRes int layoutResID) {
        getWindow().setContentView(layoutResID);
        initWindowDecorActionBar();
    }
其中又调用了PhoneWindow的setContentView():
    @Override
    public void setContentView(int layoutResID) {
        // Note: FEATURE_CONTENT_TRANSITIONS may be set in the process of installing the window
        // decor, when theme attributes and the like are crystalized. Do not check the feature
        // before this happens.
        if (mContentParent == null) {
            installDecor();
        } else if (!hasFeature(FEATURE_CONTENT_TRANSITIONS)) {
            mContentParent.removeAllViews();
        }

        if (hasFeature(FEATURE_CONTENT_TRANSITIONS)) {
            final Scene newScene = Scene.getSceneForLayout(mContentParent, layoutResID,
                    getContext());
            transitionTo(newScene);
        } else {
            mLayoutInflater.inflate(layoutResID, mContentParent);
        }
        mContentParent.requestApplyInsets();
        final Callback cb = getCallback();
        if (cb != null && !isDestroyed()) {
            cb.onContentChanged();
        }
    }
其中调用了installDecor():
    private void installDecor() {
        if (mDecor == null) {
            mDecor = generateDecor();
            mDecor.setDescendantFocusability(ViewGroup.FOCUS_AFTER_DESCENDANTS);
            mDecor.setIsRootNamespace(true);
            if (!mInvalidatePanelMenuPosted && mInvalidatePanelMenuFeatures != 0) {
                mDecor.postOnAnimation(mInvalidatePanelMenuRunnable);
            }
        }
        if (mContentParent == null) {
            mContentParent = generateLayout(mDecor);
    ……
如果mDecor 为空,就通过generateDecor()直接创建:
    protected DecorView generateDecor() {
        return new DecorView(getContext(), -1);
    }

    public DecorView(Context context, int featureId) {
        super(context);
        mFeatureId = featureId;
        mShowInterpolator = AnimationUtils.loadInterpolator(context,
                android.R.interpolator.linear_out_slow_in);
        mHideInterpolator = AnimationUtils.loadInterpolator(context,
                android.R.interpolator.fast_out_linear_in);
        mBarEnterExitDuration = context.getResources().getInteger(
                R.integer.dock_enter_exit_duration);
    }
点击super(context),发现直接到了
    public FrameLayout(Context context) {
        super(context);
    }
说明DecorView 就是一个FrameLayout。
回到installDecor(),如果mContentParent 为空,就通过generateLayout()创建:
protected ViewGroup generateLayout(DecorView decor) {
    ……
    ViewGroup contentParent = (ViewGroup)findViewById(ID_ANDROID_CONTENT);
    ……
    return contentParent;
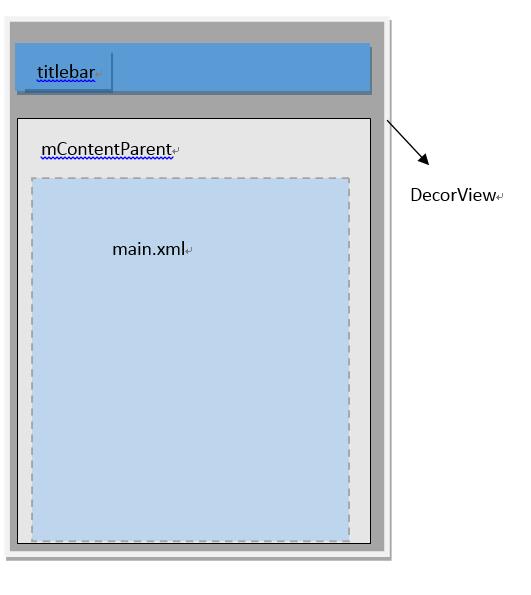
}下面用一张从Android View源码解读:浅谈DecorView与ViewRootImplcopy来的图说明mDecor 和mContentParent 的关系:
我们再回到setContentView(),看到这段代码:
        if (hasFeature(FEATURE_CONTENT_TRANSITIONS)) {
            final Scene newScene = Scene.getSceneForLayout(mContentParent, layoutResID,
                    getContext());
            transitionTo(newScene);
        } else {
            mLayoutInflater.inflate(layoutResID, mContentParent);
        }
发现我们把需要添加的View填充到了mContentParent中,而mContentParent是DecorView的一部分,也就是把View添加到了DecorView。
以上DecorView已经被初始化,并且创建完成,但是DecorView还没有和Window建立起联系。接下来,在ActivityThread的handleResumeActivity()中调用了Activity的makeVisible():
if (r.activity.mVisibleFromClient) {
    r.activity.makeVisible();
}

void makeVisible() {
    if (!mWindowAdded) {
        ViewManager wm = getWindowManager();
        wm.addView(mDecor, getWindow().getAttributes());
        mWindowAdded = true;
    }
    mDecor.setVisibility(View.VISIBLE);
}
WindowManager的addView()的具体实现在WindowManagerImpl中:
    @Override
    public void addView(@NonNull View view, @NonNull ViewGroup.LayoutParams params) {
        applyDefaultToken(params);
        mGlobal.addView(view, params, mDisplay, mParentWindow);
    }
而WindowManagerImpl的addView()又会调用WindowManagerGlobal的addView():
    public void addView(View view, ViewGroup.LayoutParams params,
            Display display, Window parentWindow) {
    ……
            root = new ViewRootImpl(view.getContext(), display);

            view.setLayoutParams(wparams);

            mViews.add(view);
            mRoots.add(root);
            mParams.add(wparams);
    ……
            root.setView(view, wparams, panelParentView);
    ……
}这个过程创建了一个ViewRootImpl,并将之前创建的DecoView作为参数传入setView(),以后DecoView的事件都由ViewRootImpl来管理了,比如DecoView上添加View,删除View。View的绘制流程就是从ViewRootImpl的performTraversals()开始。
同时我们注意到view,root和wparams被分别存储到了WindowManagerGlobal的三个成员变量中。那WindowManagerGlobal是什么呢?首先看到WindowManagerImpl:
private final WindowManagerGlobal mGlobal = WindowManagerGlobal.getInstance();然后再看WindowManagerGlobal:
    public static WindowManagerGlobal getInstance() {
        synchronized (WindowManagerGlobal.class) {
            if (sDefaultWindowManager == null) {
                sDefaultWindowManager = new WindowManagerGlobal();
            }
            return sDefaultWindowManager;
        }
    }
可以看到WindowManagerGlobal中获取实例的方法是单例模式,所以其实多个WindowManagerImpl拥有同一个WindowManagerGlobal。
    private final ArrayList<View> mViews = new ArrayList<View>();
    private final ArrayList<ViewRootImpl> mRoots = new ArrayList<ViewRootImpl>();
    private final ArrayList<WindowManager.LayoutParams> mParams =
            new ArrayList<WindowManager.LayoutParams>();
我们看到这是WindowManagerGlobal中对三个集合的声明,mViews 存储的是所有Window对应View,mRoots 存储的是所有Window对应ViewRootImpl,mParams 存储的是所有Window对应的布局参数。
至此DecorView被添加到了Window中,并能被WindowManager所识别。
