预习内容
4.1 df命令
4.2 du命令
4.3/4.4 磁盘分区
4.5/4.6 磁盘格式化
4.7/4.8 磁盘挂载
4.9 手动增加swap空间
4.10/4.11/4.12 lvm讲解
4.13 磁盘故障小案例
扩展学习 parted分区gpt格式 http://www.apelearn.com/bbs/thread-7243-1-1.html
1.磁盘管理命令 df
1.1 查看磁盘使用情况 df -h
## 查看磁盘空间 ##
[root@linux-01 ~]# df
文件系统          1K-块    已用     可用 已用% 挂载点
/dev/sda3      16561152 1125792 15435360    7% /
devtmpfs         921264       0   921264    0% /dev
tmpfs            932124       0   932124    0% /dev/shm
tmpfs            932124    9692   922432    2% /run
tmpfs            932124       0   932124    0% /sys/fs/cgroup
/dev/sda1        201380  117668    83712   59% /boot
tmpfs            186428       0   186428    0% /run/user/0

## 注释 ##
- 第一列是文件系统,也就是磁盘分区的名字,tmpfs是临时文件系统。
- 第二列是磁盘的总大小,单位是k
- 第三列是磁盘已经使用了多少,单位是k
- 第四列是剩余多少,单位是k
- 第五列是已用百分比,平常最需要关注的点
- 第六列是挂载点,实际上是系统的目录。


## df -h  选项h的意思人性化显示 ##
文件系统        容量  已用  可用 已用% 挂载点
/dev/sda3        16G  1.1G   15G    7% /
devtmpfs        900M     0  900M    0% /dev
tmpfs           911M     0  911M    0% /dev/shm   # 内存目录,一般是物理内存的一半
tmpfs           911M  9.5M  901M    2% /run
tmpfs           911M     0  911M    0% /sys/fs/cgroup
/dev/sda1       197M  115M   82M   59% /boot
tmpfs           183M     0  183M    0% /run/user/0
1.2 查看swap使用情况
## swap空间一般是内存的两倍,虚拟机内存2g,swap给4g,最多不超过8G ##
[root@linux-01 ~]# free
              total        used        free      shared  buff/cache   available
Mem:        1864248      145428     1417296        9692      301524     1524948
Swap:       4194300           0     4194300
1.3 查看磁盘inode使用情况 df -i
## 查看磁盘inode使用情况,有时候磁盘空间未满,写不进去文件,我们需要查看下inode是否满了 ##
[root@linux-01 ~]# df  -i
文件系统         Inode 已用(I) 可用(I) 已用(I)% 挂载点
/dev/sda3      8285696   27501 8258195       1% /
devtmpfs        230316     377  229939       1% /dev
tmpfs           233031       1  233030       1% /dev/shm
tmpfs           233031     692  232339       1% /run
tmpfs           233031      16  233015       1% /sys/fs/cgroup
/dev/sda1       102400     327  102073       1% /boot
tmpfs           233031       1  233030       1% /run/user/0
1.4 磁盘使用情况用M显示 df -m
[root@linux-01 ~]# df -m
文件系统       1M-块  已用  可用 已用% 挂载点
/dev/sda3      16173  1100 15074    7% /
devtmpfs         900     0   900    0% /dev
tmpfs            911     0   911    0% /dev/shm
tmpfs            911    10   901    2% /run
tmpfs            911     0   911    0% /sys/fs/cgroup
/dev/sda1        197   115    82   59% /boot
tmpfs            183     0   183    0% /run/user/0
2.查看目录文件大小 du -sh
## 显示root目录的的大小 ##
[root@linux-01 ~]# du -sh /root/
60K	/root/

## 显示文件1.txt的大小 ##
[root@linux-01 ~]# du -sh /root/1.txt
4.0K	/root/1.txt
## 之前我们在看ls的时候说到过也可以查看文件大小 ls -lh  ##
[root@linux-01 ~]# ll -h /root/1.txt
-rw-r--r--. 1 root root 5 3月  20 07:51 /root/1.txt

## 有木有发现du -sh查看1.txt文件大小是4k,而ls -lh查看文件的时候文件大小是5B?这是什么原因? ##
解析:
这儿就设计到磁盘的分区,磁盘分区在格式化的时候是以块的形式存在,每个块的大小为4kb,当文件小于4KB的时候,du -sh会显示为4kb,也就是说一个块只能存放一个文件。
## du 命令什么都不加会显示什么呢? ##
[root@linux-01 ~]# du /root   # 通过结果我们发现du什么都不加,会列出当前文件夹包含子文件的大小。
16	/root/.ssh
60	/root

[root@linux-01 ~]# du -s /root  # 加上-s 会列出当前文件夹的总大小,没显示单位。
60	/root

[root@linux-01 ~]# du -sh /root  #加上-h 会人性化显示出当前文件夹的总大小。
60K	/root
3.磁盘分区、格式化、挂载
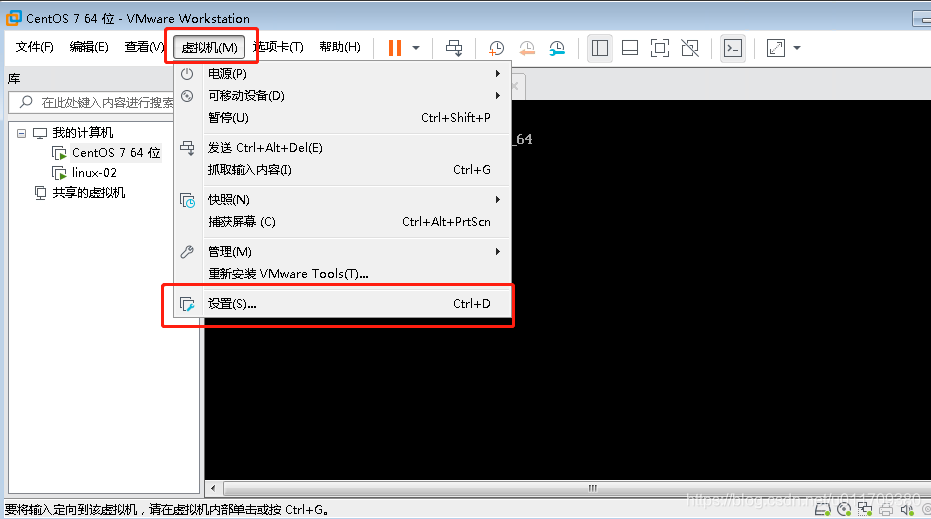
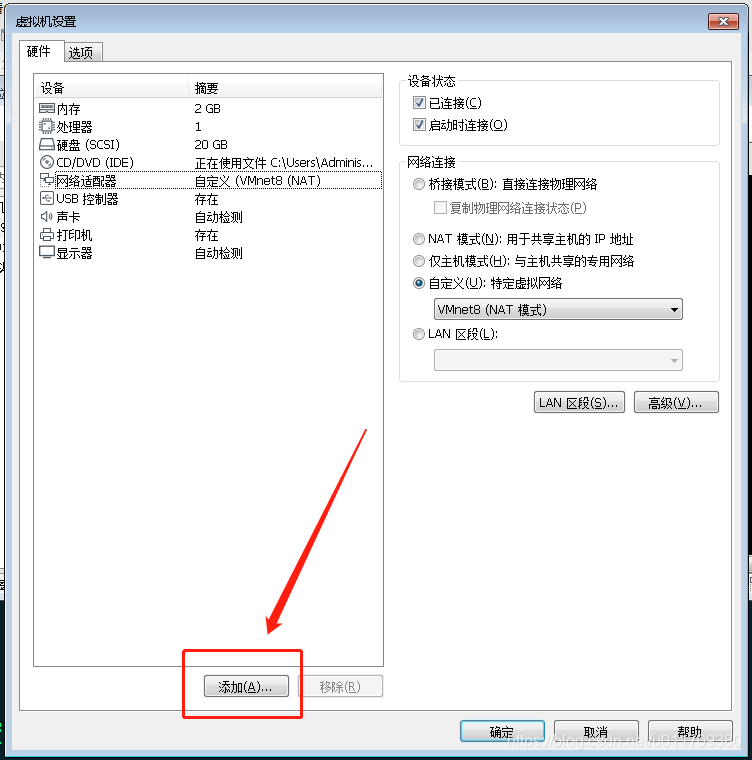
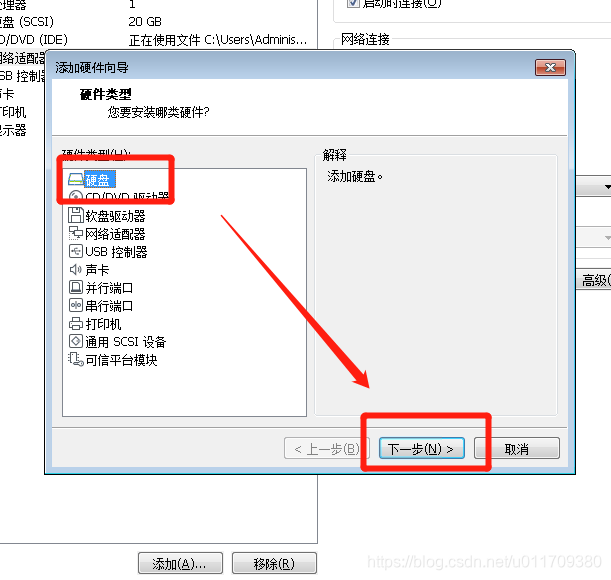
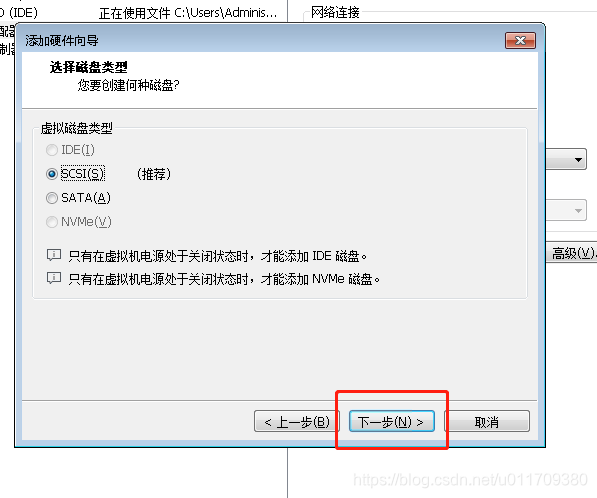
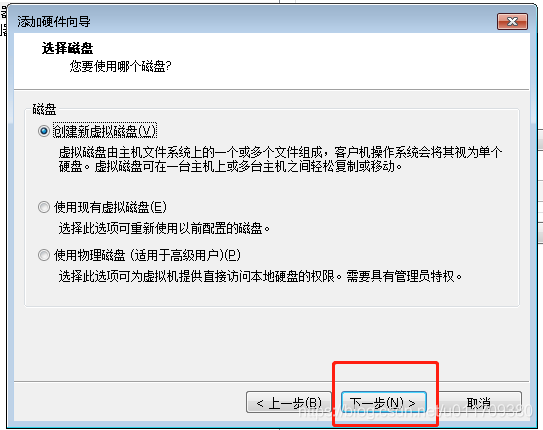
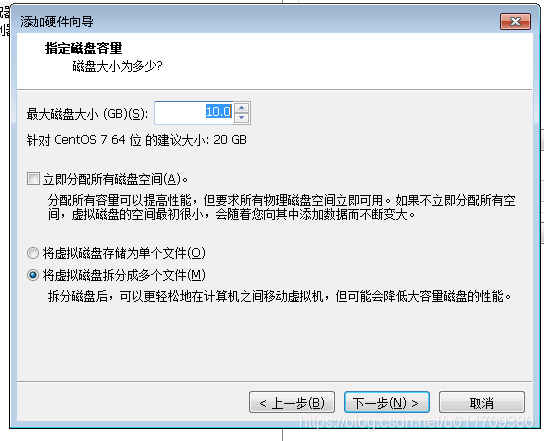
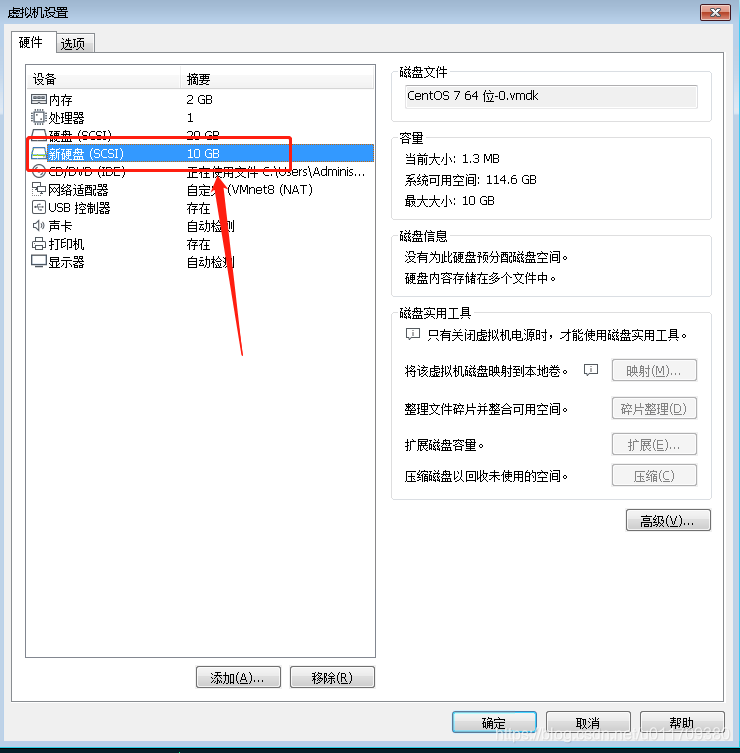
3.1 虚拟机添加一块10g的磁盘,添加完成重启虚拟机
3.2 磁盘划分分区 fdisk
## fdisk  -l 查看磁盘所有分区,没有挂载的磁盘也可以查看到 ##
[root@linux-01 ~]# fdisk -l

磁盘 /dev/sda:21.5 GB, 21474836480 字节,41943040 个扇区
Units = 扇区 of 1 * 512 = 512 bytes
扇区大小(逻辑/物理):512 字节 / 512 字节
I/O 大小(最小/最佳):512 字节 / 512 字节
磁盘标签类型:dos
磁盘标识符:0x000d9959

   设备 Boot      Start         End      Blocks   Id  System
/dev/sda1   *        2048      411647      204800   83  Linux
/dev/sda2          411648     8800255     4194304   82  Linux swap / Solaris
/dev/sda3         8800256    41943039    16571392   83  Linux

磁盘 /dev/sdb:10.7 GB, 10737418240 字节,20971520 个扇区
Units = 扇区 of 1 * 512 = 512 bytes
扇区大小(逻辑/物理):512 字节 / 512 字节
I/O 大小(最小/最佳):512 字节 / 512 字节

[root@linux-01 ~]# fdisk /dev/sdb   # fdisk 跟上磁盘目录
欢迎使用 fdisk (util-linux 2.23.2)。

更改将停留在内存中,直到您决定将更改写入磁盘。
使用写入命令前请三思。

Device does not contain a recognized partition table
使用磁盘标识符 0x4ad48e06 创建新的 DOS 磁盘标签。

命令(输入 m 获取帮助):m    # m是获取帮助
命令操作
   a   toggle a bootable flag
   b   edit bsd disklabel
   c   toggle the dos compatibility flag
   d   delete a partition
   g   create a new empty GPT partition table
   G   create an IRIX (SGI) partition table
   l   list known partition types
   m   print this menu
   n   add a new partition
   o   create a new empty DOS partition table
   p   print the partition table
   q   quit without saving changes
   s   create a new empty Sun disklabel
   t   change a partition's system id
   u   change display/entry units
   v   verify the partition table
   w   write table to disk and exit
   x   extra functionality (experts only)

命令(输入 m 获取帮助):n     #  n是创建一个新分区
Partition type:
   p   primary (0 primary, 0 extended, 4 free)
   e   extended
Select (default p): p          #  p代表的是新建一个主分区,一个磁盘最多建4个主分区,主分区加扩展分区的数目不能超过4个
分区号 (1-4,默认 1):
起始 扇区 (2048-20971519,默认为 2048):
将使用默认值 2048
Last 扇区, +扇区 or +size{K,M,G} (2048-20971519,默认为 20971519):+2G  # 设置磁盘的容量,如果输入错误,可以用ctrl +u 删除字符
分区 1 已设置为 Linux 类型,大小设为 2 GiB

命令(输入 m 获取帮助):p     # p可以打印出磁盘的分区表

磁盘 /dev/sdb:10.7 GB, 10737418240 字节,20971520 个扇区
Units = 扇区 of 1 * 512 = 512 bytes
扇区大小(逻辑/物理):512 字节 / 512 字节
I/O 大小(最小/最佳):512 字节 / 512 字节
磁盘标签类型:dos
磁盘标识符:0x4ad48e06

   设备 Boot      Start         End      Blocks   Id  System
/dev/sdb1            2048     4196351     2097152   83  Linux

命令(输入 m 获取帮助):n
Partition type:
   p   primary (1 primary, 0 extended, 3 free)
   e   extended
Select (default p): p
分区号 (2-4,默认 2):
起始 扇区 (4196352-20971519,默认为 4196352):
将使用默认值 4196352
Last 扇区, +扇区 or +size{K,M,G} (4196352-20971519,默认为 20971519):+2G
分区 2 已设置为 Linux 类型,大小设为 2 GiB

命令(输入 m 获取帮助):p

磁盘 /dev/sdb:10.7 GB, 10737418240 字节,20971520 个扇区
Units = 扇区 of 1 * 512 = 512 bytes
扇区大小(逻辑/物理):512 字节 / 512 字节
I/O 大小(最小/最佳):512 字节 / 512 字节
磁盘标签类型:dos
磁盘标识符:0x4ad48e06

   设备 Boot      Start         End      Blocks   Id  System
/dev/sdb1            2048     4196351     2097152   83  Linux
/dev/sdb2         4196352     8390655     2097152   83  Linux

命令(输入 m 获取帮助):n
Partition type:
   p   primary (2 primary, 0 extended, 2 free)
   e   extended
Select (default p): p
分区号 (3,4,默认 3):
起始 扇区 (8390656-20971519,默认为 8390656):
将使用默认值 8390656
Last 扇区, +扇区 or +size{K,M,G} (8390656-20971519,默认为 20971519):+2G
分区 3 已设置为 Linux 类型,大小设为 2 GiB

命令(输入 m 获取帮助):p

磁盘 /dev/sdb:10.7 GB, 10737418240 字节,20971520 个扇区
Units = 扇区 of 1 * 512 = 512 bytes
扇区大小(逻辑/物理):512 字节 / 512 字节
I/O 大小(最小/最佳):512 字节 / 512 字节
磁盘标签类型:dos
磁盘标识符:0x4ad48e06

   设备 Boot      Start         End      Blocks   Id  System
/dev/sdb1            2048     4196351     2097152   83  Linux
/dev/sdb2         4196352     8390655     2097152   83  Linux
/dev/sdb3         8390656    12584959     2097152   83  Linux

命令(输入 m 获取帮助):n
Partition type:
   p   primary (3 primary, 0 extended, 1 free)
   e   extended
Select (default e): p
已选择分区 4
起始 扇区 (12584960-20971519,默认为 12584960):
将使用默认值 12584960
Last 扇区, +扇区 or +size{K,M,G} (12584960-20971519,默认为 20971519):+3G
分区 4 已设置为 Linux 类型,大小设为 3 GiB

命令(输入 m 获取帮助):p

磁盘 /dev/sdb:10.7 GB, 10737418240 字节,20971520 个扇区
Units = 扇区 of 1 * 512 = 512 bytes
扇区大小(逻辑/物理):512 字节 / 512 字节
I/O 大小(最小/最佳):512 字节 / 512 字节
磁盘标签类型:dos
磁盘标识符:0x4ad48e06

   设备 Boot        Start         End      Blocks   Id  System
/dev/sdb1            2048     4196351     2097152   83  Linux
/dev/sdb2         4196352     8390655     2097152   83  Linux
/dev/sdb3         8390656    12584959     2097152   83  Linux
/dev/sdb4        12584960    18876415     3145728   83  Linux

命令(输入 m 获取帮助):n      # 当超过4个主分区继续创建分区会报错
If you want to create more than four partitions, you must replace a
primary partition with an extended partition first.

命令(输入 m 获取帮助):d
分区号 (1-4,默认 4):
分区 4 已删除

命令(输入 m 获取帮助):p

磁盘 /dev/sdb:10.7 GB, 10737418240 字节,20971520 个扇区
Units = 扇区 of 1 * 512 = 512 bytes
扇区大小(逻辑/物理):512 字节 / 512 字节
I/O 大小(最小/最佳):512 字节 / 512 字节
磁盘标签类型:dos
磁盘标识符:0x4ad48e06

   设备 Boot      Start         End      Blocks   Id  System
/dev/sdb1            2048     4196351     2097152   83  Linux
/dev/sdb2         4196352     8390655     2097152   83  Linux
/dev/sdb3         8390656    12584959     2097152   83  Linux

命令(输入 m 获取帮助):n
Partition type:
   p   primary (3 primary, 0 extended, 1 free)
   e   extended
Select (default e): e   # e代表逻辑分区
已选择分区 4
起始 扇区 (12584960-20971519,默认为 12584960):
将使用默认值 12584960
Last 扇区, +扇区 or +size{K,M,G} (12584960-20971519,默认为 20971519):
将使用默认值 20971519
分区 4 已设置为 Extended 类型,大小设为 4 GiB

命令(输入 m 获取帮助):p

磁盘 /dev/sdb:10.7 GB, 10737418240 字节,20971520 个扇区
Units = 扇区 of 1 * 512 = 512 bytes
扇区大小(逻辑/物理):512 字节 / 512 字节
I/O 大小(最小/最佳):512 字节 / 512 字节
磁盘标签类型:dos
磁盘标识符:0x4ad48e06

   设备 Boot      Start         End      Blocks   Id  System
/dev/sdb1            2048     4196351     2097152   83  Linux
/dev/sdb2         4196352     8390655     2097152   83  Linux
/dev/sdb3         8390656    12584959     2097152   83  Linux
/dev/sdb4        12584960    20971519     4193280    5  Extended

命令(输入 m 获取帮助):n
All primary partitions are in use
添加逻辑分区 5
起始 扇区 (12587008-20971519,默认为 12587008):
将使用默认值 12587008
Last 扇区, +扇区 or +size{K,M,G} (12587008-20971519,默认为 20971519):+2G
分区 5 已设置为 Linux 类型,大小设为 2 GiB

命令(输入 m 获取帮助):p   #  Id是83代表是主分区,Id是5代表是扩展分区

磁盘 /dev/sdb:10.7 GB, 10737418240 字节,20971520 个扇区
Units = 扇区 of 1 * 512 = 512 bytes
扇区大小(逻辑/物理):512 字节 / 512 字节
I/O 大小(最小/最佳):512 字节 / 512 字节
磁盘标签类型:dos
磁盘标识符:0x4ad48e06

   设备 Boot        Start         End      Blocks   Id  System
/dev/sdb1            2048     4196351     2097152   83  Linux
/dev/sdb2         4196352     8390655     2097152   83  Linux
/dev/sdb3         8390656    12584959     2097152   83  Linux
/dev/sdb4        12584960    20971519     4193280    5  Extended
/dev/sdb5        12587008    16781311     2097152   83  Linux

命令(输入 m 获取帮助):n
All primary partitions are in use
添加逻辑分区 6
起始 扇区 (16783360-20971519,默认为 16783360):
将使用默认值 16783360
Last 扇区, +扇区 or +size{K,M,G} (16783360-20971519,默认为 20971519):
将使用默认值 20971519
分区 6 已设置为 Linux 类型,大小设为 2 GiB

命令(输入 m 获取帮助):p

磁盘 /dev/sdb:10.7 GB, 10737418240 字节,20971520 个扇区
Units = 扇区 of 1 * 512 = 512 bytes
扇区大小(逻辑/物理):512 字节 / 512 字节
I/O 大小(最小/最佳):512 字节 / 512 字节
磁盘标签类型:dos
磁盘标识符:0x4ad48e06

   设备 Boot      Start         End      Blocks   Id  System
/dev/sdb1            2048     4196351     2097152   83  Linux
/dev/sdb2         4196352     8390655     2097152   83  Linux
/dev/sdb3         8390656    12584959     2097152   83  Linux
/dev/sdb4        12584960    20971519     4193280    5  Extended
/dev/sdb5        12587008    16781311     2097152   83  Linux
/dev/sdb6        16783360    20971519     2094080   83  Linux

命令(输入 m 获取帮助):w
The partition table has been altered!

Calling ioctl() to re-read partition table.
正在同步磁盘。
关于分区的几个知识点:
fdisk -l 查看分区表
fdisk 需要分区的磁盘 可以进行磁盘分区
磁盘分区中的几个字母意思:m代表帮助文档,n代表创建新分区,p代表打印出分区表,d代表删除分区
3.3 磁盘格式化
3.3.1 mke2fs -t ext4 -b 2048 /dev/sdb1
- mke2fs 的选项
- -t 指定要格式化成什么样的文件系统(centos7文件系统xfs、centos6文件系统ext4、centos5文件系统ext3、centos5之前版本的文件系统ext2)
- -b 指定块大小,可以是2048,4096,8192,默认是4096
- -m 可以使磁盘最大化使用,0.1(这儿的数字是百分比)也是可以的
- -i 指定多少个字节对应一个inode,最少一个块对应一个inode
- mk2fs 无法指定xfs的文件系统
## mke2fs 指定xfs文件系统报错 ##
[root@linux-01 ~]# mke2fs -t xfs -b 2048 /dev/sdb1
mke2fs 1.42.9 (28-Dec-2013)
Your mke2fs.conf file does not define the xfs filesystem type.
Aborting...
[root@linux-01 ~]#

[root@linux-01 ~]# mke2fs -t ext4 -b 2048 /dev/sdb1
mke2fs 1.42.9 (28-Dec-2013)
文件系统标签=
OS type: Linux
块大小=2048 (log=1)
分块大小=2048 (log=1)
Stride=0 blocks, Stripe width=0 blocks
655360 inodes, 5242368 blocks			 		# -i 选项可以修改此处,例如:
262118 blocks (5.00%) reserved for the super user  #   -m的选项可以设置此处 262118 blocks (5.00%)
第一个数据块=0
Maximum filesystem blocks=273678336
320 block groups
16384 blocks per group, 16384 fragments per group
2048 inodes per group
Superblock backups stored on blocks:
	16384, 49152, 81920, 114688, 147456, 409600, 442368, 802816, 1327104,
	2048000, 3981312

Allocating group tables: 完成
正在写入inode表: 完成
Creating journal (32768 blocks): 完成
Writing superblocks and filesystem accounting information: 完成
- 操作系统读取硬盘的时候,不会一个个扇区地读取,这样效率太低,而是一次性连续读取多个扇区,即一次性读取一个"块"(block)。这种由多个扇区组成的"块",是文件存取的最小单位。"块"的大小,最常见的是4KB,即连续八个 sector组成一个 block。
- 文件数据都储存在"块"中,那么很显然,我们还必须找到一个地方储存文件的元信息,比如文件的创建者、文件的创建日期、文件的大小等等。这种储存文件元信息的区域就叫做inode,中文译名为"索引节点"。
3.3.2 mkfs.ext4 /dev/sdb1
## mkfs.ext4 创建分区文件系统格式是ext4 ##
[root@linux-01 ~]# mkfs.ext4  /dev/sdb1
mke2fs 1.42.9 (28-Dec-2013)
文件系统标签=
OS type: Linux
块大小=4096 (log=2)
分块大小=4096 (log=2)
Stride=0 blocks, Stripe width=0 blocks
655360 inodes, 2621184 blocks
131059 blocks (5.00%) reserved for the super user
第一个数据块=0
Maximum filesystem blocks=2151677952
80 block groups
32768 blocks per group, 32768 fragments per group
8192 inodes per group
Superblock backups stored on blocks:
	32768, 98304, 163840, 229376, 294912, 819200, 884736, 1605632

Allocating group tables: 完成
正在写入inode表: 完成
Creating journal (32768 blocks): 完成
Writing superblocks and filesystem accounting information: 完成
3.3.3 mkfs.xfs -f /dev/sdb1
## mkfs.xfs -f /dev/sdb1 可以设置磁盘的的格式为xfs ##
[root@linux-01 ~]# mkfs.xfs /dev/sdb1
mkfs.xfs: /dev/sdb1 appears to contain an existing filesystem (ext4).
mkfs.xfs: Use the -f option to force overwrite.
[root@linux-01 ~]# mkfs.xfs -f /dev/sdb1
meta-data=/dev/sdb1              isize=512    agcount=4, agsize=655296 blks
         =                       sectsz=512   attr=2, projid32bit=1
         =                       crc=1        finobt=0, sparse=0
data     =                       bsize=4096   blocks=2621184, imaxpct=25
         =                       sunit=0      swidth=0 blks
naming   =version 2              bsize=4096   ascii-ci=0 ftype=1
log      =internal log           bsize=4096   blocks=2560, version=2
         =                       sectsz=512   sunit=0 blks, lazy-count=1
realtime =none                   extsz=4096   blocks=0, rtextents=0
3.4 查看新的分区分区格式 blkid
blkid命令对查询设备上所采用文件系统类型进行查询。blkid主要用来对系统的块设备(包括交换分区)所使用的文件系统类型、LABEL、UUID等信息进行查询。要使用这个命令必须安装e2fsprogs软件包。
[root@linux-01 ~]# blkid  /dev/sdb1
/dev/sdb1: UUID="b00ab8d1-53c8-40b8-ae07-7bcca30a871f" TYPE="xfs"
3.5 磁盘挂载、卸载
3.5.1 磁盘挂载 mount
##
[root@linux-01 ~]# mount /dev/sdb  /mnt/
[root@linux-01 ~]# df -h
文件系统        容量  已用  可用 已用% 挂载点
/dev/sda3        16G  1.1G   15G    7% /
devtmpfs        900M     0  900M    0% /dev
tmpfs           911M     0  911M    0% /dev/shm
tmpfs           911M  9.5M  901M    2% /run
tmpfs           911M     0  911M    0% /sys/fs/cgroup
/dev/sda1       197M  115M   82M   59% /boot
tmpfs           183M     0  183M    0% /run/user/0
/dev/sdb         10G   33M   10G    1% /mnt
[root@linux-01 ~]#
[root@linux-01 mnt]# vim /etc/fstab
#
# /etc/fstab
# Created by anaconda on Thu Mar 14 00:57:14 2019
#
# Accessible filesystems, by reference, are maintained under '/dev/disk'
# See man pages fstab(5), findfs(8), mount(8) and/or blkid(8) for more info
#
UUID=298062b2-1bb5-4c20-a665-3cfa4c150759 /                       xfs     defaults        0 0
UUID=a9dd6e97-76f7-47e7-a2cc-6c7f77053724 /boot                   xfs     defaults        0 0
UUID=45d1ebc4-3382-41fc-b174-cef6f6a3ba56 swap                    swap    defaults        0 0
#解析没列的含义
第一列:设备号可以是uuid也可以是磁盘的分区/dev/sdb
第二列:设备的挂载点,就是你要挂载到哪个目录下。
第三列:磁盘文件系统的格式,包括ext2、ext3、reiserfs、nfs、vfat等
第四列:文件系统的参数
第五列:能否被dump备份命令作用:dump是一个用来作为备份的命令。通常这个参数的值为0或者1;0代表不要做dump备份;1代表要每天进行dump的操作;2代表不定日期的进行dump操作。
第六列:是否检验扇区:开机的过程中,系统默认会以fsck检验我们系统是否为完整(clean)0代表不要检验,1代表最早检验(一般根目录会选择),2代表1级别检验完成之后进行检验
| 第四列文件系统的参数 | 含义 |
|---|---|
| Async/sync | 设置是否为同步方式运行,默认为async |
| auto/noauto | 当下载mount -a 的命令时,此文件系统是否被主动挂载。默认为auto |
| rw/ro | 是否以以只读或者读写模式挂载 |
| exec/noexec | 限制此文件系统内是否能够进行"执行"的操作 |
| user/nouser | 是否允许用户使用mount命令挂载 |
| suid/nosuid | 是否允许SUID的存在 |
| Usrquota | 启动文件系统支持磁盘配额模式 |
| Grpquota | 启动文件系统对群组磁盘配额模式的支持 |
| Defaults | 同时具有rw,suid,dev,exec,auto,nouser,async等默认参数的设置 |
3.5.2 磁盘卸载 umount
[root@linux-01 ~]# cd /mnt/
[root@linux-01 mnt]# ll
总用量 0
[root@linux-01 mnt]# touch 1.txt 2.txt
[root@linux-01 mnt]# mkdir 111
[root@linux-01 mnt]#
[root@linux-01 mnt]# umount  /dev/sdb
umount: /mnt:目标忙。
        (有些情况下通过 lsof(8) 或 fuser(1) 可以
         找到有关使用该设备的进程的有用信息)
[root@linux-01 mnt]# cd ~
[root@linux-01 ~]# !umount
umount  /dev/sdb
[root@linux-01 ~]# df -h
文件系统        容量  已用  可用 已用% 挂载点
/dev/sda3        16G  1.1G   15G    7% /
devtmpfs        900M     0  900M    0% /dev
tmpfs           911M     0  911M    0% /dev/shm
tmpfs           911M  9.5M  901M    2% /run
tmpfs           911M     0  911M    0% /sys/fs/cgroup
/dev/sda1       197M  115M   82M   59% /boot
tmpfs           183M     0  183M    0% /run/user/0
[root@linux-01 ~]# mount /dev/sdb  /mnt
[root@linux-01 ~]# ll /mnt/
总用量 0
drwxr-xr-x. 2 root root 6 3月  23 04:50 111
-rw-r--r--. 1 root root 0 3月  23 04:50 1.txt
-rw-r--r--. 1 root root 0 3月  23 04:50 2.txt
[root@linux-01 ~]#  cd
[root@linux-01 ~]# cd /mnt/
[root@linux-01 mnt]# umount -l /mnt/   # -l 选项可以强制删除挂载
[root@linux-01 mnt]# ll
总用量 0
drwxr-xr-x. 2 root root 6 3月  23 04:50 111
-rw-r--r--. 1 root root 0 3月  23 04:50 1.txt
-rw-r--r--. 1 root root 0 3月  23 04:50 2.txt
[root@linux-01 mnt]# df -h
文件系统        容量  已用  可用 已用% 挂载点
/dev/sda3        16G  1.1G   15G    7% /
devtmpfs        900M     0  900M    0% /dev
tmpfs           911M     0  911M    0% /dev/shm
tmpfs           911M  9.5M  901M    2% /run
tmpfs           911M     0  911M    0% /sys/fs/cgroup
/dev/sda1       197M  115M   82M   59% /boot
tmpfs           183M     0  183M    0% /run/user/0
3.6 手动增删swap空间
3.6.1 手动增加swap空间
## 增加swap空间 ##
[root@linux-01 mnt]# dd  if=/dev/zero  of=/tmp/newdisk bs=1M count=100
记录了100+0 的读入
记录了100+0 的写出
104857600字节(105 MB)已复制,0.118725 秒,883 MB/秒
[root@linux-01 mnt]# du -sh /tmp/newdisk
100M	/tmp/newdisk
[root@linux-01 mnt]# mkswap /tmp/newdisk
正在设置交换空间版本 1,大小 = 102396 KiB
无标签,UUID=9baf6b2b-acec-4d85-8daa-28685287b343
[root@linux-01 mnt]# mkswap -f /tmp/newdisk
mkswap: /tmp/newdisk: warning: wiping old swap signature.
正在设置交换空间版本 1,大小 = 102396 KiB
无标签,UUID=8ddb6f31-2667-45c4-b8e4-78ca8c90a77e
[root@linux-01 mnt]# free
              total        used        free      shared  buff/cache   available
Mem:        1864248      142276     1440564        9696      281408     1529748
Swap:       4194300           0     4194300
[root@linux-01 mnt]# swapon /tmp/newdisk
swapon: /tmp/newdisk:不安全的权限 0644,建议使用 0600。
[root@linux-01 mnt]# free -m
              total        used        free      shared  buff/cache   available
Mem:           1820         138        1406           9         274        1493
Swap:          4195           0        4195
[root@linux-01 mnt]#
3.6.2 删除手动增加的swap空间
## 删除增加的swap空间 ##
[root@linux-01 mnt]# swapoff /tmp/newdisk
[root@linux-01 mnt]# free -m
              total        used        free      shared  buff/cache   available
Mem:           1820         138        1406           9         274        1493
Swap:          4095           0        4095
[root@linux-01 mnt]#
4. lvm 磁盘扩容
4.1 新建磁盘分区 fdisk /dev/sdb
创建三个新分区,指定磁盘类型为linux lvm ( Id 为8e)
[root@linux-01 ~]# fdisk /dev/sdb
欢迎使用 fdisk (util-linux 2.23.2)。

更改将停留在内存中,直到您决定将更改写入磁盘。
使用写入命令前请三思。


命令(输入 m 获取帮助):n
Partition type:
   p   primary (0 primary, 0 extended, 4 free)
   e   extended
Select (default p): p
分区号 (1-4,默认 1):
起始 扇区 (2048-20971519,默认为 2048):
将使用默认值 2048
Last 扇区, +扇区 or +size{K,M,G} (2048-20971519,默认为 20971519):+1G
分区 1 已设置为 Linux 类型,大小设为 1 GiB

命令(输入 m 获取帮助):p

磁盘 /dev/sdb:10.7 GB, 10737418240 字节,20971520 个扇区
Units = 扇区 of 1 * 512 = 512 bytes
扇区大小(逻辑/物理):512 字节 / 512 字节
I/O 大小(最小/最佳):512 字节 / 512 字节
磁盘标签类型:dos
磁盘标识符:0xab2c9cec

   设备 Boot      Start         End      Blocks   Id  System
/dev/sdb1            2048     2099199     1048576   83  Linux

命令(输入 m 获取帮助):n
Partition type:
   p   primary (1 primary, 0 extended, 3 free)
   e   extended
Select (default p): p
分区号 (2-4,默认 2):
起始 扇区 (2099200-20971519,默认为 2099200):
将使用默认值 2099200
Last 扇区, +扇区 or +size{K,M,G} (2099200-20971519,默认为 20971519):+1G
分区 2 已设置为 Linux 类型,大小设为 1 GiB

命令(输入 m 获取帮助):n
Partition type:
   p   primary (2 primary, 0 extended, 2 free)
   e   extended
Select (default p): p
分区号 (3,4,默认 3):
起始 扇区 (4196352-20971519,默认为 4196352):
将使用默认值 4196352
Last 扇区, +扇区 or +size{K,M,G} (4196352-20971519,默认为 20971519):+1G
分区 3 已设置为 Linux 类型,大小设为 1 GiB

命令(输入 m 获取帮助):t
分区号 (1-3,默认 3):
Hex 代码(输入 L 列出所有代码):8e
已将分区“Linux”的类型更改为“Linux LVM”

命令(输入 m 获取帮助):t
分区号 (1-3,默认 3):2
Hex 代码(输入 L 列出所有代码):8e
已将分区“Linux”的类型更改为“Linux LVM”

命令(输入 m 获取帮助):t
分区号 (1-3,默认 3):q
分区号 (1-3,默认 3):1
Hex 代码(输入 L 列出所有代码):8e
已将分区“Linux”的类型更改为“Linux LVM”

命令(输入 m 获取帮助):p

磁盘 /dev/sdb:10.7 GB, 10737418240 字节,20971520 个扇区
Units = 扇区 of 1 * 512 = 512 bytes
扇区大小(逻辑/物理):512 字节 / 512 字节
I/O 大小(最小/最佳):512 字节 / 512 字节
磁盘标签类型:dos
磁盘标识符:0xab2c9cec

   设备 Boot      Start         End      Blocks   Id  System
/dev/sdb1            2048     2099199     1048576   8e  Linux LVM
/dev/sdb2         2099200     4196351     1048576   8e  Linux LVM
/dev/sdb3         4196352     6293503     1048576   8e  Linux LVM

命令(输入 m 获取帮助):w
The partition table has been altered!

Calling ioctl() to re-read partition table.
正在同步磁盘。
4.2 安装lvm命令
[root@linux-01 ~]# yum install -y lvm2
已加载插件:fastestmirror
Loading mirror speeds from cached hostfile
 * base: mirrors.163.com
 * extras: mirrors.163.com
 * updates: mirrors.163.com
正在解决依赖关系
--> 正在检查事务
---> 软件包 lvm2.x86_64.7.2.02.180-10.el7_6.3 将被 安装
--> 正在处理依赖关系 lvm2-libs = 7:2.02.180-10.el7_6.3,它被软件包 7:lvm2-2.02.180-10.el7_6.3.x86_64 需要
--> 正在处理依赖关系 device-mapper-persistent-data >= 0.7.0-0.1.rc6,它被软件包 7:lvm2-2.02.180-10.el7_6.3.x86_64 需要
--> 正在处理依赖关系 liblvm2app.so.2.2(Base)(64bit),它被软件包 7:lvm2-2.02.180-10.el7_6.3.x86_64 需要
--> 正在处理依赖关系 libdevmapper-event.so.1.02(Base)(64bit),它被软件包 7:lvm2-2.02.180-10.el7_6.3.x86_64 需要
--> 正在处理依赖关系 libaio.so.1(LIBAIO_0.4)(64bit),它被软件包 7:lvm2-2.02.180-10.el7_6.3.x86_64 需要
--> 正在处理依赖关系 libaio.so.1(LIBAIO_0.1)(64bit),它被软件包 7:lvm2-2.02.180-10.el7_6.3.x86_64 需要
--> 正在处理依赖关系 liblvm2app.so.2.2()(64bit),它被软件包 7:lvm2-2.02.180-10.el7_6.3.x86_64 需要
--> 正在处理依赖关系 libdevmapper-event.so.1.02()(64bit),它被软件包 7:lvm2-2.02.180-10.el7_6.3.x86_64 需要
--> 正在处理依赖关系 libaio.so.1()(64bit),它被软件包 7:lvm2-2.02.180-10.el7_6.3.x86_64 需要
--> 正在检查事务
---> 软件包 device-mapper-event-libs.x86_64.7.1.02.149-10.el7_6.3 将被 安装
---> 软件包 device-mapper-persistent-data.x86_64.0.0.7.3-3.el7 将被 安装
---> 软件包 libaio.x86_64.0.0.3.109-13.el7 将被 安装
---> 软件包 lvm2-libs.x86_64.7.2.02.180-10.el7_6.3 将被 安装
--> 正在处理依赖关系 device-mapper-event = 7:1.02.149-10.el7_6.3,它被软件包 7:lvm2-libs-2.02.180-10.el7_6.3.x86_64 需要
--> 正在检查事务
---> 软件包 device-mapper-event.x86_64.7.1.02.149-10.el7_6.3 将被 安装
--> 正在处理依赖关系 device-mapper = 7:1.02.149-10.el7_6.3,它被软件包 7:device-mapper-event-1.02.149-10.el7_6.3.x86_64 需要
--> 正在检查事务
---> 软件包 device-mapper.x86_64.7.1.02.149-8.el7 将被 升级
--> 正在处理依赖关系 device-mapper = 7:1.02.149-8.el7,它被软件包 7:device-mapper-libs-1.02.149-8.el7.x86_64 需要
---> 软件包 device-mapper.x86_64.7.1.02.149-10.el7_6.3 将被 更新
--> 正在检查事务
---> 软件包 device-mapper-libs.x86_64.7.1.02.149-8.el7 将被 升级
---> 软件包 device-mapper-libs.x86_64.7.1.02.149-10.el7_6.3 将被 更新
--> 解决依赖关系完成

依赖关系解决

=====================================================================================================================================
 Package                                     架构                 版本                                   源                     大小
=====================================================================================================================================
正在安装:
 lvm2                                        x86_64               7:2.02.180-10.el7_6.3                  updates               1.3 M
为依赖而安装:
 device-mapper-event                         x86_64               7:1.02.149-10.el7_6.3                  updates               188 k
 device-mapper-event-libs                    x86_64               7:1.02.149-10.el7_6.3                  updates               188 k
 device-mapper-persistent-data               x86_64               0.7.3-3.el7                            base                  405 k
 libaio                                      x86_64               0.3.109-13.el7                         base                   24 k
 lvm2-libs                                   x86_64               7:2.02.180-10.el7_6.3                  updates               1.1 M
为依赖而更新:
 device-mapper                               x86_64               7:1.02.149-10.el7_6.3                  updates               292 k
 device-mapper-libs                          x86_64               7:1.02.149-10.el7_6.3                  updates               320 k

事务概要
=====================================================================================================================================
安装  1 软件包 (+5 依赖软件包)
升级           ( 2 依赖软件包)

总下载量:3.8 M
Downloading packages:
Delta RPMs disabled because /usr/bin/applydeltarpm not installed.
(1/8): device-mapper-event-1.02.149-10.el7_6.3.x86_64.rpm                                                     | 188 kB  00:00:00
(2/8): device-mapper-1.02.149-10.el7_6.3.x86_64.rpm                                                           | 292 kB  00:00:00
(3/8): device-mapper-event-libs-1.02.149-10.el7_6.3.x86_64.rpm                                                | 188 kB  00:00:00
(4/8): device-mapper-libs-1.02.149-10.el7_6.3.x86_64.rpm                                                      | 320 kB  00:00:00
(5/8): device-mapper-persistent-data-0.7.3-3.el7.x86_64.rpm                                                   | 405 kB  00:00:00
(6/8): libaio-0.3.109-13.el7.x86_64.rpm                                                                       |  24 kB  00:00:00
(7/8): lvm2-2.02.180-10.el7_6.3.x86_64.rpm                                                                    | 1.3 MB  00:00:00
(8/8): lvm2-libs-2.02.180-10.el7_6.3.x86_64.rpm                                                               | 1.1 MB  00:00:00
-------------------------------------------------------------------------------------------------------------------------------------
总计                                                                                                 5.5 MB/s | 3.8 MB  00:00:00
Running transaction check
Running transaction test
Transaction test succeeded
Running transaction
  正在更新    : 7:device-mapper-1.02.149-10.el7_6.3.x86_64                                                                      1/10
  正在更新    : 7:device-mapper-libs-1.02.149-10.el7_6.3.x86_64                                                                 2/10
  正在安装    : 7:device-mapper-event-libs-1.02.149-10.el7_6.3.x86_64                                                           3/10
  正在安装    : libaio-0.3.109-13.el7.x86_64                                                                                    4/10
  正在安装    : device-mapper-persistent-data-0.7.3-3.el7.x86_64                                                                5/10
  正在安装    : 7:device-mapper-event-1.02.149-10.el7_6.3.x86_64                                                                6/10
  正在安装    : 7:lvm2-libs-2.02.180-10.el7_6.3.x86_64                                                                          7/10
  正在安装    : 7:lvm2-2.02.180-10.el7_6.3.x86_64                                                                               8/10
  清理        : 7:device-mapper-1.02.149-8.el7.x86_64                                                                           9/10
  清理        : 7:device-mapper-libs-1.02.149-8.el7.x86_64                                                                     10/10
  验证中      : device-mapper-persistent-data-0.7.3-3.el7.x86_64                                                                1/10
  验证中      : libaio-0.3.109-13.el7.x86_64                                                                                    2/10
  验证中      : 7:device-mapper-libs-1.02.149-10.el7_6.3.x86_64                                                                 3/10
  验证中      : 7:device-mapper-event-libs-1.02.149-10.el7_6.3.x86_64                                                           4/10
  验证中      : 7:device-mapper-1.02.149-10.el7_6.3.x86_64                                                                      5/10
  验证中      : 7:device-mapper-event-1.02.149-10.el7_6.3.x86_64                                                                6/10
  验证中      : 7:lvm2-libs-2.02.180-10.el7_6.3.x86_64                                                                          7/10
  验证中      : 7:lvm2-2.02.180-10.el7_6.3.x86_64                                                                               8/10
  验证中      : 7:device-mapper-1.02.149-8.el7.x86_64                                                                           9/10
  验证中      : 7:device-mapper-libs-1.02.149-8.el7.x86_64                                                                     10/10

已安装:
  lvm2.x86_64 7:2.02.180-10.el7_6.3

作为依赖被安装:
  device-mapper-event.x86_64 7:1.02.149-10.el7_6.3                device-mapper-event-libs.x86_64 7:1.02.149-10.el7_6.3
  device-mapper-persistent-data.x86_64 0:0.7.3-3.el7              libaio.x86_64 0:0.3.109-13.el7
  lvm2-libs.x86_64 7:2.02.180-10.el7_6.3

作为依赖被升级:
  device-mapper.x86_64 7:1.02.149-10.el7_6.3                     device-mapper-libs.x86_64 7:1.02.149-10.el7_6.3

完毕!
4.3 准备物理卷
使用sdb1 sdb2 sdb3创建基于磁盘的物理卷
## 创建物理卷,如果在使用pvcteate /dev/sdb1报错,使用命令partprobe生成文件 ##
[root@linux-01 ~]# pvcreate  /dev/sdb1
WARNING: dos signature detected on /dev/sdb1 at offset 510. Wipe it? [y/n]: y
  Wiping dos signature on /dev/sdb1.
  Physical volume "/dev/sdb1" successfully created.
[root@linux-01 ~]# pvcreate  /dev/sdb2
  Physical volume "/dev/sdb2" successfully created.
[root@linux-01 ~]# pvcreate  /dev/sdb3
  Physical volume "/dev/sdb3" successfully created.
[root@linux-01 ~]#

## 查看物理卷有哪些,pevdisplay或者pvs ##
[root@linux-01 ~]# pvdisplay
  "/dev/sdb1" is a new physical volume of "1.00 GiB"
  --- NEW Physical volume ---
  PV Name               /dev/sdb1
  VG Name
  PV Size               1.00 GiB
  Allocatable           NO
  PE Size               0
  Total PE              0
  Free PE               0
  Allocated PE          0
  PV UUID               Ujvz5Z-3kbI-9t8r-ruQf-avP3-ei0v-32t6Oo

  "/dev/sdb2" is a new physical volume of "1.00 GiB"
  --- NEW Physical volume ---
  PV Name               /dev/sdb2
  VG Name
  PV Size               1.00 GiB
  Allocatable           NO
  PE Size               0
  Total PE              0
  Free PE               0
  Allocated PE          0
  PV UUID               NasM1i-sfdY-hgbv-3LIG-yMAJ-TFcs-lSV7l5

  "/dev/sdb3" is a new physical volume of "1.00 GiB"
  --- NEW Physical volume ---
  PV Name               /dev/sdb3
  VG Name
  PV Size               1.00 GiB
  Allocatable           NO
  PE Size               0
  Total PE              0
  Free PE               0
  Allocated PE          0
  PV UUID               MeuYbw-C8jB-avEc-0QLp-SoXi-Vcan-IpOdPd

[root@linux-01 ~]# pvs
  PV         VG Fmt  Attr PSize PFree
  /dev/sdb1     lvm2 ---  1.00g 1.00g
  /dev/sdb2     lvm2 ---  1.00g 1.00g
  /dev/sdb3     lvm2 ---  1.00g 1.00g

 ## 删除物理卷pvremove /dev/sdb4 ##
 新建了一个物理卷/dev/sdb4/
 [root@linux-01 ~]# pvcreate  /dev/sdb4
  Physical volume "/dev/sdb4" successfully created.
[root@linux-01 ~]# pvs
  PV         VG Fmt  Attr PSize PFree
  /dev/sdb1     lvm2 ---  1.00g 1.00g
  /dev/sdb2     lvm2 ---  1.00g 1.00g
  /dev/sdb3     lvm2 ---  1.00g 1.00g
  /dev/sdb4     lvm2 ---  2.00g 2.00g
[root@linux-01 ~]# pvremove  /dev/sdb4
  Labels on physical volume "/dev/sdb4" successfully wiped.
[root@linux-01 ~]# pvs
  PV         VG Fmt  Attr PSize PFree
  /dev/sdb1     lvm2 ---  1.00g 1.00g
  /dev/sdb2     lvm2 ---  1.00g 1.00g
  /dev/sdb3     lvm2 ---  1.00g 1.00g
4.4 创建卷组
## 格式:vgcreate 【卷名】【物理卷】 ##
[root@linux-01 ~]# vgcreate  vg1 /dev/sdb1 /dev/sdb2
  Volume group "vg1" successfully created
## 查看卷组信息 vgdisplay ##
[root@linux-01 ~]# vgdisplay
  --- Volume group ---
  VG Name               vg1
  System ID
  Format                lvm2
  Metadata Areas        2
  Metadata Sequence No  1
  VG Access             read/write
  VG Status             resizable
  MAX LV                0
  Cur LV                0
  Open LV               0
  Max PV                0
  Cur PV                2
  Act PV                2
  VG Size               1.99 GiB
  PE Size               4.00 MiB
  Total PE              510
  Alloc PE / Size       0 / 0
  Free  PE / Size       510 / 1.99 GiB
  VG UUID               013ZDg-DdMb-22r1-2rxN-7vlu-W1R2-Mqgp9F
  [root@linux-01 ~]# vgs
  VG  #PV #LV #SN Attr   VSize VFree
  vg1   2   0   0 wz--n- 1.99g 1.99g
## 删除卷组信息 vgremove ##
[root@linux-01 ~]# vgremove  vg1
  Volume group "vg1" successfully removed
[root@linux-01 ~]# vgdisplay
[root@linux-01 ~]#
4.5 创建逻辑卷 (逻辑卷的文件系统格式为ext4)
## lvcreate -L(指定磁盘大小)   -n(指定磁盘名字)  【卷组名字】  ##
[root@linux-01 ~]# lvcreate  -L 200M -n lv1 vg1
  Logical volume "lv1" created.

## 查看逻辑卷的信息 lvs lvdisplay ##
[root@linux-01 ~]# lvs
  LV   VG  Attr       LSize   Pool Origin Data%  Meta%  Move Log Cpy%Sync Convert
  lv1  vg1 -wi-a----- 200.00m
[root@linux-01 ~]# lvdisplay
  --- Logical volume ---
  LV Path                /dev/vg1/lv1
  LV Name                lv1
  VG Name                vg1
  LV UUID                7B96pq-2h89-r3yv-jsHI-JuLp-14Yx-nYpYgH
  LV Write Access        read/write
  LV Creation host, time linux-01, 2019-03-23 23:08:45 +0800
  LV Status              available
  # open                 0
  LV Size                200.00 MiB
  Current LE             50
  Segments               1
  Allocation             inherit
  Read ahead sectors     auto
  - currently set to     8192
  Block device           253:0

## 格式化逻辑卷为ext4  ##
[root@linux-01 ~]# mkfs.ext4  /dev/vg1/lv1
mke2fs 1.42.9 (28-Dec-2013)
文件系统标签=
OS type: Linux
块大小=1024 (log=0)
分块大小=1024 (log=0)
Stride=0 blocks, Stripe width=0 blocks
51200 inodes, 204800 blocks
10240 blocks (5.00%) reserved for the super user
第一个数据块=1
Maximum filesystem blocks=33816576
25 block groups
8192 blocks per group, 8192 fragments per group
2048 inodes per group
Superblock backups stored on blocks:
	8193, 24577, 40961, 57345, 73729

Allocating group tables: 完成
正在写入inode表: 完成
Creating journal (4096 blocks): 完成
Writing superblocks and filesystem accounting information: 完成

## 挂载逻辑卷 ##
[root@linux-01 ~]# mount /dev/vg1/lv1  /mnt/
[root@linux-01 ~]# df -h
文件系统             容量  已用  可用 已用% 挂载点
/dev/sda3             16G  1.4G   15G    9% /
devtmpfs             900M     0  900M    0% /dev
tmpfs                911M     0  911M    0% /dev/shm
tmpfs                911M  9.5M  901M    2% /run
tmpfs                911M     0  911M    0% /sys/fs/cgroup
/dev/sda1            197M  115M   82M   59% /boot
tmpfs                183M     0  183M    0% /run/user/0
/dev/mapper/vg1-lv1  190M  1.6M  175M    1% /mnt
[root@linux-01 ~]# ls /dev/vg1/lv1
/dev/vg1/lv1
[root@linux-01 ~]# ll /dev/vg1/lv1
lrwxrwxrwx. 1 root root 7 3月  23 23:10 /dev/vg1/lv1 -> ../dm-0
[root@linux-01 ~]# ll /dev/mapper/vg1-lv1
lrwxrwxrwx. 1 root root 7 3月  23 23:10 /dev/mapper/vg1-lv1 -> ../dm-0
[root@linux-01 ~]#
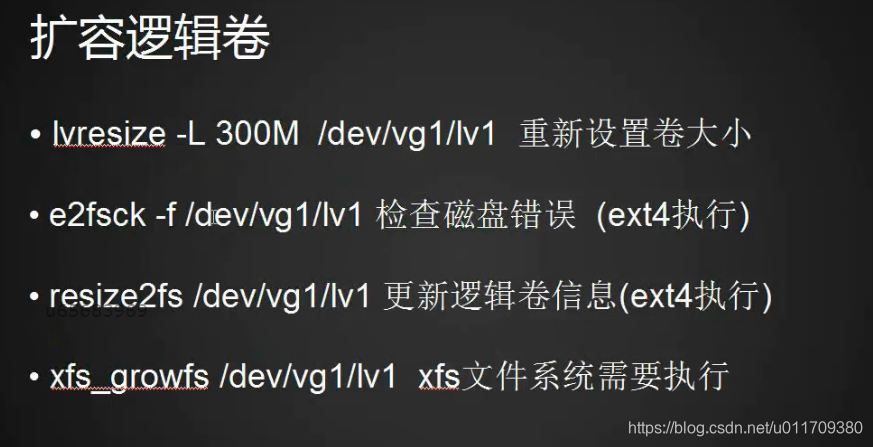
4.6 扩容逻辑卷 (逻辑卷的文件系统格式为ext4)
##  重新设置逻辑卷的大小,要比之前设置的卷的大小要大,填写少会报错  ##
[root@linux-01 ~]# touch  /mnt/123.txt
[root@linux-01 ~]# echo "111111" > /mnt/123.txt
[root@linux-01 ~]# mkdir /mnt/111
[root@linux-01 ~]# umount /mnt/
[root@linux-01 ~]# lvresize -L 300M /dev/vg1/lv1
  Size of logical volume vg1/lv1 changed from 100.00 MiB (25 extents) to 300.00 MiB (75 extents).
  Logical volume vg1/lv1 successfully resized.

## 检查磁盘是否有错误 ##
[root@linux-01 ~]# e2fsck  -f  /dev/vg1/lv1
e2fsck 1.42.9 (28-Dec-2013)
第一步: 检查inode,块,和大小
第二步: 检查目录结构
第3步: 检查目录连接性
Pass 4: Checking reference counts
第5步: 检查簇概要信息
/dev/vg1/lv1: 13/25688 files (7.7% non-contiguous), 8899/102400 blocks

## 更新逻辑卷的信息,挂在后查看 ##
[root@linux-01 ~]# resize2fs   /dev/vg1/lv1
resize2fs 1.42.9 (28-Dec-2013)
Resizing the filesystem on /dev/vg1/lv1 to 307200 (1k) blocks.
The filesystem on /dev/vg1/lv1 is now 307200 blocks long.

[root@linux-01 ~]# mount /dev/vg1/lv1  /mnt/
[root@linux-01 ~]# ll /mnt/
总用量 16
drwxr-xr-x. 2 root root  1024 3月  23 23:36 111
-rw-r--r--. 1 root root     7 3月  23 23:35 123.txt
drwx------. 2 root root 12288 3月  23 23:35 lost+found
[root@linux-01 ~]# cat /mnt/123.txt
111111

[root@linux-01 ~]# df -h
文件系统             容量  已用  可用 已用% 挂载点
/dev/sda3             16G  1.4G   15G    9% /
devtmpfs             900M     0  900M    0% /dev
tmpfs                911M     0  911M    0% /dev/shm
tmpfs                911M  9.5M  901M    2% /run
tmpfs                911M     0  911M    0% /sys/fs/cgroup
/dev/sda1            197M  115M   82M   59% /boot
tmpfs                183M     0  183M    0% /run/user/0
/dev/mapper/vg1-lv1  287M  2.1M  266M    1% /mnt
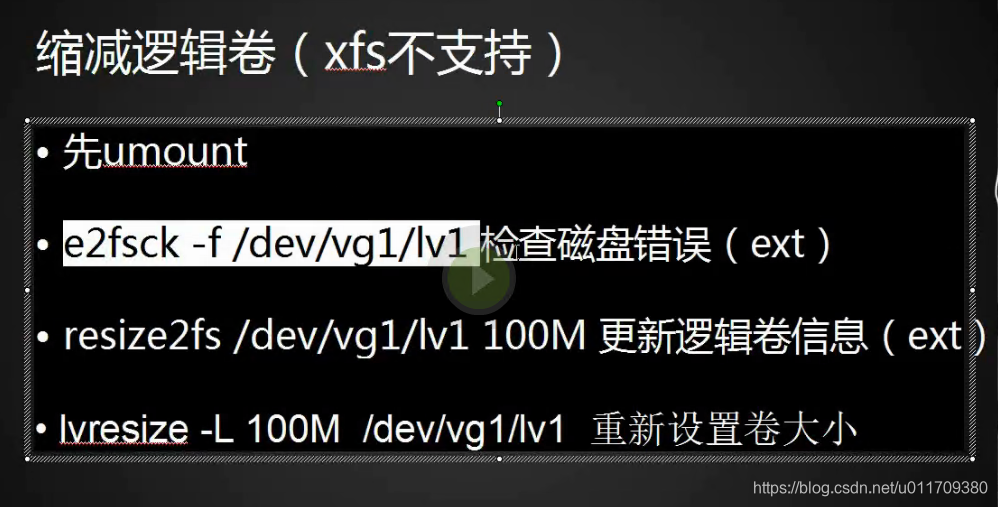
4.7 逻辑卷缩容 (xfs格式不支持缩容)
[root@linux-01 ~]#  umount /mnt/
[root@linux-01 ~]# e2fsck  -f  /dev/vg1/lv1
e2fsck 1.42.9 (28-Dec-2013)
第一步: 检查inode,块,和大小
第二步: 检查目录结构
第3步: 检查目录连接性
Pass 4: Checking reference counts
第5步: 检查簇概要信息
/dev/vg1/lv1: 13/75088 files (7.7% non-contiguous), 15640/307200 blocks
[root@linux-01 ~]# resize2fs  /dev/vg1/lv1  100M
resize2fs 1.42.9 (28-Dec-2013)
Resizing the filesystem on /dev/vg1/lv1 to 102400 (1k) blocks.
The filesystem on /dev/vg1/lv1 is now 102400 blocks long.

[root@linux-01 ~]# lvresize -L 100M /dev/vg1/lv1
  WARNING: Reducing active logical volume to 100.00 MiB.
  THIS MAY DESTROY YOUR DATA (filesystem etc.)
Do you really want to reduce vg1/lv1? [y/n]: y
  Size of logical volume vg1/lv1 changed from 300.00 MiB (75 extents) to 100.00 MiB (25 extents).
  Logical volume vg1/lv1 successfully resized.
[root@linux-01 ~]# lvdisplay
  --- Logical volume ---
  LV Path                /dev/vg1/lv1
  LV Name                lv1
  VG Name                vg1
  LV UUID                b78fYe-qpSJ-7O5v-u1kV-53B6-oZT0-gfQS5N
  LV Write Access        read/write
  LV Creation host, time linux-01, 2019-03-23 23:34:19 +0800
  LV Status              available
  # open                 0
  LV Size                100.00 MiB
  Current LE             25
  Segments               1
  Allocation             inherit
  Read ahead sectors     auto
  - currently set to     8192
  Block device           253:0
[root@linux-01 ~]# !mount
mount /dev/vg1/lv1  /mnt/
[root@linux-01 ~]# ll /mnt/
总用量 16
drwxr-xr-x. 2 root root  1024 3月  23 23:36 111
-rw-r--r--. 1 root root     7 3月  23 23:35 123.txt
drwx------. 2 root root 12288 3月  23 23:35 lost+found
[root@linux-01 ~]#
4.8 扩容逻辑卷 (逻辑卷的文件系统格式为xfs)
## 把之前的 /dev/vg1/lv1 格式化为xfs格式 ##
[root@linux-01 ~]# umount /mnt/
[root@linux-01 ~]# mkfs.xfs /dev/vg1/lv1
mkfs.xfs: /dev/vg1/lv1 appears to contain an existing filesystem (ext4).
mkfs.xfs: Use the -f option to force overwrite.
[root@linux-01 ~]# mkfs.xfs -f /dev/vg1/lv1
meta-data=/dev/vg1/lv1           isize=512    agcount=4, agsize=6400 blks
         =                       sectsz=512   attr=2, projid32bit=1
         =                       crc=1        finobt=0, sparse=0
data     =                       bsize=4096   blocks=25600, imaxpct=25
         =                       sunit=0      swidth=0 blks
naming   =version 2              bsize=4096   ascii-ci=0 ftype=1
log      =internal log           bsize=4096   blocks=855, version=2
         =                       sectsz=512   sunit=0 blks, lazy-count=1
realtime =none                   extsz=4096   blocks=0, rtextents=0
[root@linux-01 ~]# !mount
mount /dev/vg1/lv1  /mnt/
[root@linux-01 ~]# ll /mnt
总用量 0
[root@linux-01 ~]# !mkdir
mkdir /mnt/111
[root@linux-01 ~]# !touch
touch  /mnt/123.txt
[root@linux-01 ~]# !echo
echo "111111" > /mnt/123.txt
[root@linux-01 ~]# lvs
  LV   VG  Attr       LSize   Pool Origin Data%  Meta%  Move Log Cpy%Sync Convert
  lv1  vg1 -wi-ao---- 100.00m
[root@linux-01 ~]# lvresize  -L300m /dev/vg1/lv1
  Size of logical volume vg1/lv1 changed from 100.00 MiB (25 extents) to 300.00 MiB (75 extents).
  Logical volume vg1/lv1 successfully resized.
[root@linux-01 ~]# lvs
  LV   VG  Attr       LSize   Pool Origin Data%  Meta%  Move Log Cpy%Sync Convert
  lv1  vg1 -wi-ao---- 300.00m
[root@linux-01 ~]# df -h
文件系统             容量  已用  可用 已用% 挂载点
/dev/sda3             16G  1.4G   15G    9% /
devtmpfs             900M     0  900M    0% /dev
tmpfs                911M     0  911M    0% /dev/shm
tmpfs                911M  9.5M  901M    2% /run
tmpfs                911M     0  911M    0% /sys/fs/cgroup
/dev/sda1            197M  115M   82M   59% /boot
tmpfs                183M     0  183M    0% /run/user/0
/dev/mapper/vg1-lv1   97M  5.3M   92M    6% /mnt
[root@linux-01 ~]# xfs_growfs   /dev/vg1/lv1
meta-data=/dev/mapper/vg1-lv1    isize=512    agcount=4, agsize=6400 blks
         =                       sectsz=512   attr=2, projid32bit=1
         =                       crc=1        finobt=0 spinodes=0
data     =                       bsize=4096   blocks=25600, imaxpct=25
         =                       sunit=0      swidth=0 blks
naming   =version 2              bsize=4096   ascii-ci=0 ftype=1
log      =internal               bsize=4096   blocks=855, version=2
         =                       sectsz=512   sunit=0 blks, lazy-count=1
realtime =none                   extsz=4096   blocks=0, rtextents=0
data blocks changed from 25600 to 76800
[root@linux-01 ~]# df -h
文件系统             容量  已用  可用 已用% 挂载点
/dev/sda3             16G  1.4G   15G    9% /
devtmpfs             900M     0  900M    0% /dev
tmpfs                911M     0  911M    0% /dev/shm
tmpfs                911M  9.5M  901M    2% /run
tmpfs                911M     0  911M    0% /sys/fs/cgroup
/dev/sda1            197M  115M   82M   59% /boot
tmpfs                183M     0  183M    0% /run/user/0
/dev/mapper/vg1-lv1  297M  5.6M  292M    2% /mnt
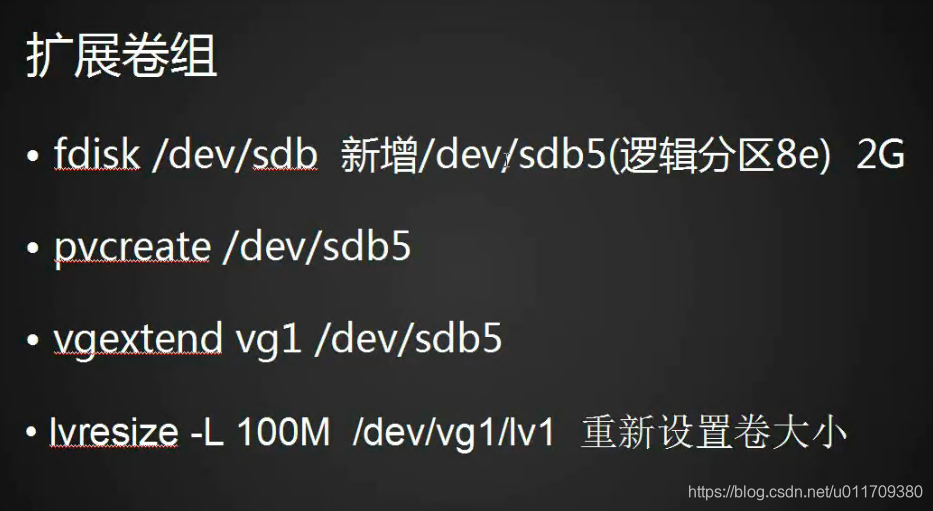
4.9 扩容卷组
[root@linux-01 ~]# fdisk -l

磁盘 /dev/sda:21.5 GB, 21474836480 字节,41943040 个扇区
Units = 扇区 of 1 * 512 = 512 bytes
扇区大小(逻辑/物理):512 字节 / 512 字节
I/O 大小(最小/最佳):512 字节 / 512 字节
磁盘标签类型:dos
磁盘标识符:0x000d9959

   设备 Boot      Start         End      Blocks   Id  System
/dev/sda1   *        2048      411647      204800   83  Linux
/dev/sda2          411648     8800255     4194304   82  Linux swap / Solaris
/dev/sda3         8800256    41943039    16571392   83  Linux

磁盘 /dev/sdb:10.7 GB, 10737418240 字节,20971520 个扇区
Units = 扇区 of 1 * 512 = 512 bytes
扇区大小(逻辑/物理):512 字节 / 512 字节
I/O 大小(最小/最佳):512 字节 / 512 字节
磁盘标签类型:dos
磁盘标识符:0xab2c9cec

   设备 Boot      Start         End      Blocks   Id  System
/dev/sdb1            2048     2099199     1048576   8e  Linux LVM
/dev/sdb2         2099200     4196351     1048576   8e  Linux LVM
/dev/sdb3         4196352     6293503     1048576   8e  Linux LVM
/dev/sdb4         6293504    10487807     2097152   8e  Linux LVM

磁盘 /dev/mapper/vg1-lv1:314 MB, 314572800 字节,614400 个扇区
Units = 扇区 of 1 * 512 = 512 bytes
扇区大小(逻辑/物理):512 字节 / 512 字节
I/O 大小(最小/最佳):512 字节 / 512 字节

[root@linux-01 ~]# vgextend vg1 /dev/sdb3
  Volume group "vg1" successfully extended
[root@linux-01 ~]# vgs
  VG  #PV #LV #SN Attr   VSize  VFree
  vg1   3   1   0 wz--n- <2.99g <2.70g
课后总结
1.磁盘分区实际工作中使用场景
- 服务器加装磁盘,对磁盘进行分区格式化
- 云主机加硬盘,云盘扩容
- 磁盘有坏道的修复 fsck/e2fsck -a 分区名 https://www.2cto.com/os/201204/126370.html
2.在对磁盘的操作过程当中要避免数据的丢失
-
磁盘做raid,raid有raid1、raid5、raid6、raid10
-
数据做及时备份,备份方案:drdb、rsync+inotify
-
扩展阅读:
- raid是什么?https://blog.csdn.net/caipeichao2/article/details/52661825
- RAID磁盘阵列配置和调优小结 https://www.jianshu.com/p/b1cfac3f7679?utm_campaign=maleskine&utm_content=note&utm_medium=seo_notes&utm_source=recommendation
- drdb安装?https://blog.51cto.com/linuxboys/1673311
- Rsync+inotify搭建实时同步系统 https://blog.51cto.com/10316297/2136440
- 磁盘坏道修复 https://www.jianshu.com/p/0b7c7e9a8779
3. dd使用场景
- 测试磁盘性能 https://blog.csdn.net/daiyudong2020/article/details/53157558
- 备份硬盘数据 http://zuyunfei.com/2015/06/04/linux-dd/
4.lvm使用场景
5.硬盘大于2t如何分区
- linux新增大于2T硬盘,分区并挂载 https://blog.csdn.net/u012150360/article/details/81333051
