前言
在目标检测2022最新进展中提到YOLOX,YOLOX是由旷视工作,开源了源代码,在知乎的问题上并做出了详细的解答:如何评价旷视开源的YOLOX,效果超过YOLOv5,可谓是“长江后浪推前浪”。YOLOx创新在于使用Decoupled Head、SIMOTA等方式。通过阅读本篇博客,你可以了解yolox的这些创新点背后的原理以及相对应的出处,同时本篇博客也详细介绍YOLOX的实现以及部署(基于tensorflow2)。当然在阅读本博客的同时,你也可以阅读参考部分的引用资料来加深对YOLOX的理解。
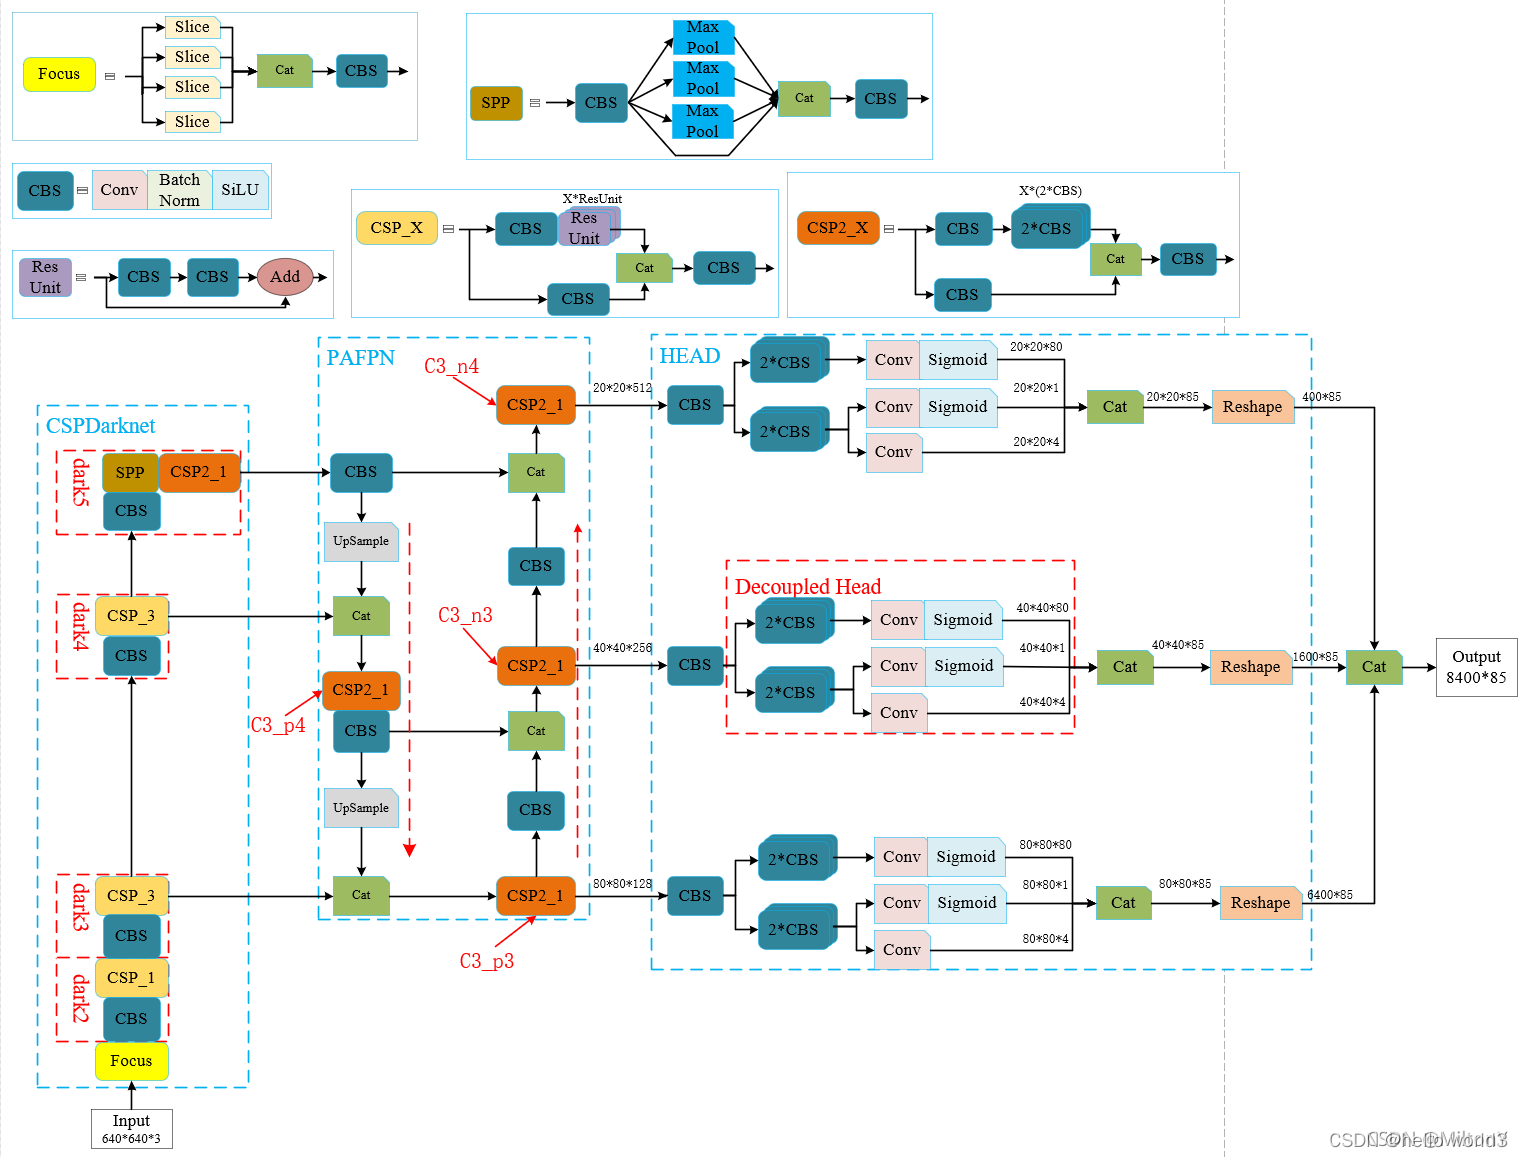
YOLOX的base line是YOLOV3,通过添加各种trick,得到YOLOX-Darknet53,结构图如下所示。要注意一点是CBS模块与YOLOV3中的CBL模块差不多,只不过是激活函数不同而已,CBS使用的是SiLU激活函数,CBL使用的是LeakyRelu激活函数。
另一方面YOLOX还具备Yolox-s、Yolox-m、Yolox-l、Yolox-x系列,这些系列原理与YOLOV5的相同,根据各个网络的宽度、高度不同进行划分。最后对于轻量级网络,YOLOX设计了YOLOX-Nano以及YOLOX-Tiny轻量级网络。
Focus
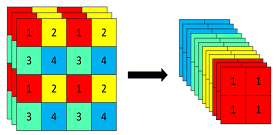
Focus模块的第一次使用并不是在YOLOX,而是在YOLOv5上已经进行应用。由于先前没有对YOLOV5进行分析,因此在这部分介绍Focus模块。Focus模块对图像进行切片操作,在图像中每隔一个像素取一个值,这样就拿到四张图像,如下图所示。这使得W,H信息集中到了通道空间,输入通道扩充四倍。输入[Batch_size, 640, 640, 3]输出得到[Batch_size, 320, 320, 12]。
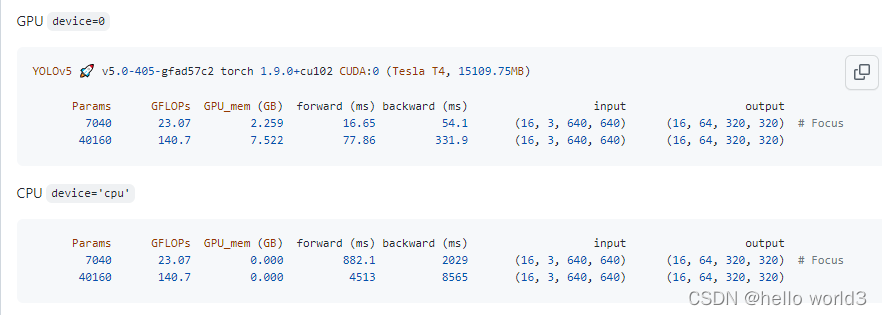
Focus模块作用可以参考以下链接:YOLOv5 Focus() Layer
 class Focus(nn.Module):
     # Focus wh information into c-space
     def __init__(self, c1, c2, k=1, s=1, p=None, g=1, act=True):  # ch_in, ch_out, kernel, stride, padding, groups
         super(Focus, self).__init__()
         self.conv = Conv(c1 * 4, c2, k, s, p, g, act)
         # self.contract = Contract(gain=2)

     def forward(self, x):  # x(b,c,w,h) -> y(b,4c,w/2,h/2)
         return self.conv(torch.cat([x[..., ::2, ::2], x[..., 1::2, ::2], x[..., ::2, 1::2], x[..., 1::2, 1::2]], 1))
Decouple head
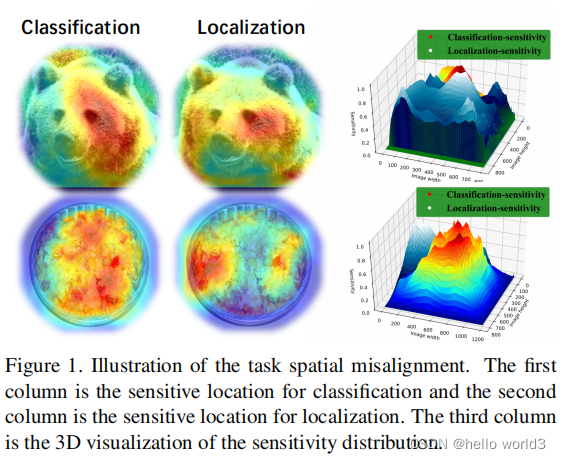
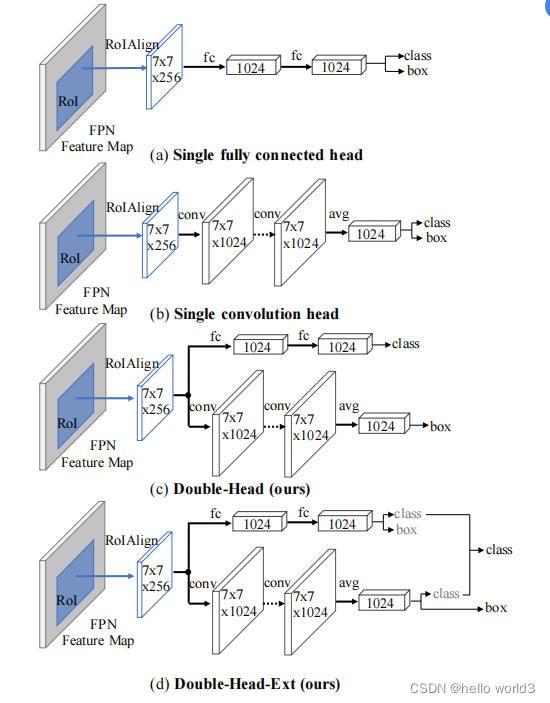
关于Decouple的原理在Revisiting the sibling head in object detector和Rethinking classifification and localization for object detection做了详细的阐述。第一篇文章说明了之前的目标检测任务中,在同一个检测头检测物体的坐标以及物体分类对检测头无利,文章中把这种检测头成为sibling head。因为定位任务和分类任务关注部分不一样,这种失准(misalignment)可以通过简单的task-aware spatial disentanglement(TSD)来解决。这个方法原理是对某个实例进行观察,某些突出区域的特征有丰富的信息特征进行分类,而这些边界特征对边界回归有作用,如下图所示。因此TSD通过decouples两个任务而提高模型的效率。
在另一篇文章中,Rethinking classifification and localization for object detection经过分析也得出与第一篇文章的结论,即定位任务与分类任务的偏好是不一致,因此放在同一个检测头是不合理。除此之外,该文章分析FC层适合用于分类任务,而卷积头适合定位操作。因此该文章提出了双头检测这样一种结构,与当前YOLOX相似。
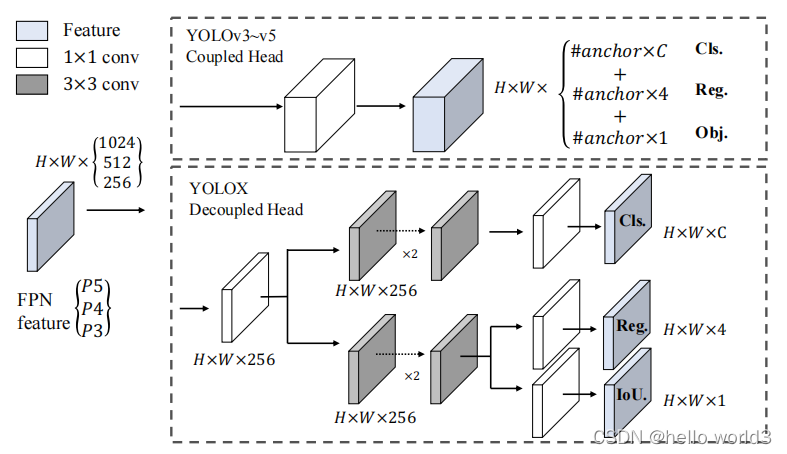
基于上面的背景,YOLOX提出以下的检测头。该结构除了能够提高检测性能,还可以提升收敛速度。但是将检测头解耦,会增加运算的复杂度。
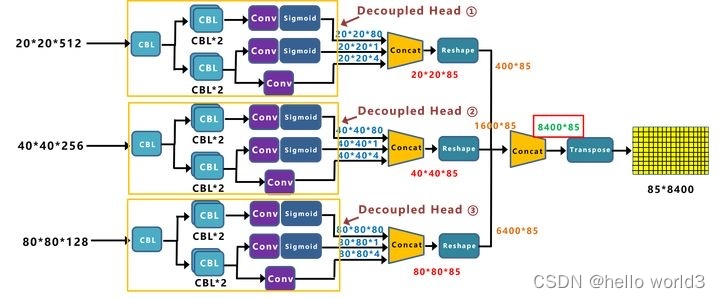
YOLOX的检测头结构具体如下图所示
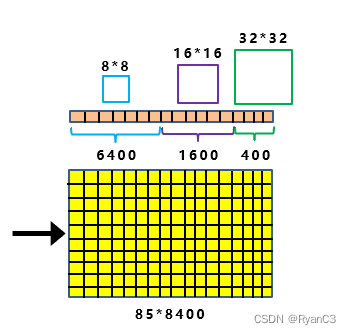
不同的分支对于FPN+PAN输出的不同尺度下的feature map的输出,这是目标检测的例牌了,结合不同的尺度对物体进行精确分类。输入为[640, 640, 3],经过8倍、16倍、32倍下采样,即得到
80
×
80
80\times 80
80×80,
40
×
40
40 \times 40
40×40,
20
×
20
20 \times 20
20×20的三个尺度,85的值即80类+4个坐标信息+1个分类置信度。通过conca得到
85
×
8400
85\times 8400
85×8400的结果,每一行即
1
×
8400
1\times8400
1×8400的结果中包含了不同尺度下预测框的结果。
Strong data augmentation
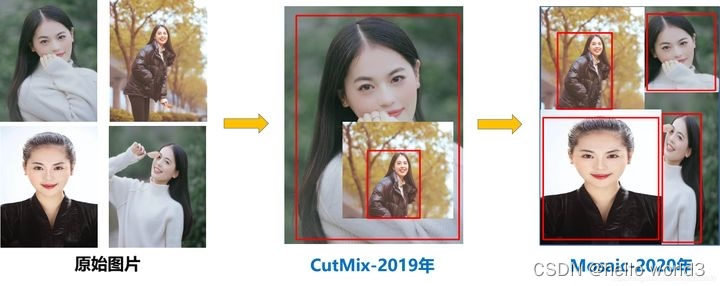
这一部分主要与输入有关系,在YOLOX的论文中,使用马赛克增强,如下图所示:
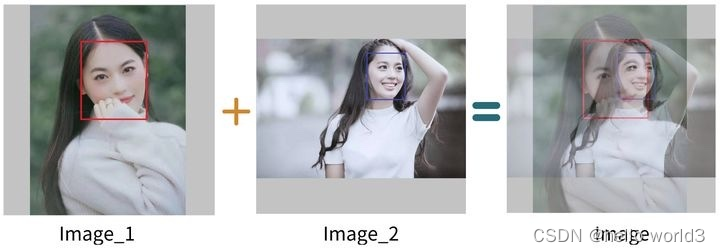
以及mixup
图来自:参考1
但是要特别注意的是:
- 在训练的最后15个epoch,这两个数据增强会被关闭掉。
- 由于采取了更强的数据增强方式,作者在研究中发现,ImageNet预训练将毫无意义,因此,所有的模型均是从头开始训练的。
Anchor Free
关于Anchor Free可以参考以下论文:
- Pp-yolov2: A practical object detector
- CornerNet: Detecting Objects as Paired Keypoints
- Objects as points
Anchor Free的方式是在Yolox-Darknet53进行应用。Anchor Free与Anchor Based的区别在于有没有anchor(感觉我在说废话),而anchor的作用是作为一个基准。回顾YOLOV3的方法,假设feature map某个网格中存在目标,则用基准的anchor去回归真实框,得到偏移量。而在YOLOX输出的feature map中,将模型中所有的预测框都囊括在85*8400的feature map中,里面包括不同尺度的预测框。
当有了这些预测框信息,每张图像也有标注框的信息,这时需要做的是将模型8400预测框和图片上的目标框进行关联,挑选出正样本锚框。这里采用的关联方式是标签分配。原理是Multi positives和SimOTA。
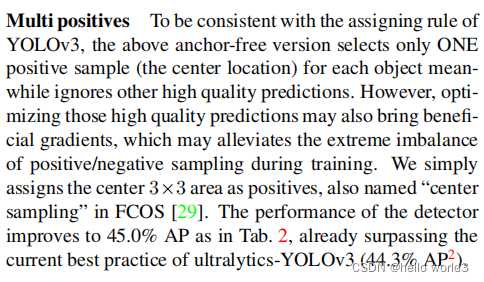
Multi positives
SimOTA
关于OTA的参考论文:OTA: Optimal Transport Assignment for Object Detection。在SimOTA中,不同目标设定不同的正样本数量(dynamick),以旷视科技官方回答中的蚂蚁和西瓜为例子,传统的正样本分配方案常常为同一场景下的西瓜和蚂蚁分配同样的正样本数,那要么蚂蚁有很多低质量的正样本,要么西瓜仅仅只有一两个正样本。对于哪个分配方式都是不合适的。动态的正样本设置的关键在于如何确定k,SimOTA具体的做法是首先计算每个目标Cost最低的10特征点,然后把这十个特征点对应的预测框与真实框的IOU加起来求得最终的k。这一部分就是对框进行筛选。首先进行初步的框筛选:
- 根据中心点判断:寻找anchor box中心点,落在gt_box矩形范围内的anchors
- 根据目标框来预测:以gt中心点为基准,设置边长为5的正方形,挑选正方形内所有的锚框。
经过初步筛选后则可以精细化筛选:
- 初筛正样本信息提取
- Loss函数计算
- cost成本计算
- SimOTA求解
精细化筛选在此主要讲述SimOTA,假设当前图像有3个目标框,针对初步筛选出的1000个的正样本进行进一步计算。
-
首先计算1000个待处理的框以及3个gt_box计算分类损失cls_loss、位置损失iou_loss,置信度损失是将类别的条件概率和目标的先验概率做乘积。那么进一步根据cls_loss和iou_loss得到cost成本计算,维度为[3, 1000],3表示的是3个预测框,1000表示待预测框。
-
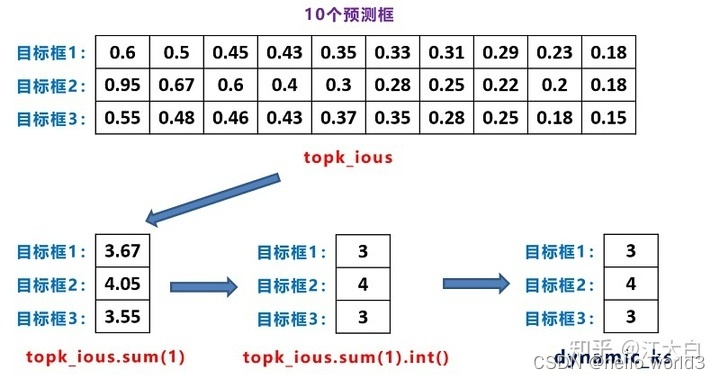
得到1000个预测框,那么可以挑选k个iou最大的候选框,topk_ious,这里k取10。这时候需要进一步确定dynamic_k。
通过上图,可以得知:目标框1和3,给他分配3个候选框,而目标框2,给它分配4个候选框。 -
利用前面计算的cost值,即[3,1000]的损失函数加权信息。在for循环中,针对每个目标框挑选,相应的cost值最低的一些候选框。
-
对于重复预测框对应不同的gt目标框,即第五列所对应的候选框,被目标检测框1和2,都进行关联。对这两个位置,还要使用cost值进行对比,选择较小的值,再进一步筛选。
-
对筛选预测框进行loss计算,要注意的是这里的iou_loss和cls_loss,只针对目标框和筛选出的正样本预测框进行计算。而obj_loss,则还是针对8400个预测框。
在这里如果看不明白可以参考:
代码实现
输入预处理
输入预处理主要是针对图像做一个Mosaic处理,具体代码如下:
def get_random_data_with_Mosaic(self, annotation_line, input_shape, max_boxes=500, jitter=0.3, hue=.1, sat=0.7, val=0.4):
        h, w = input_shape
        min_offset_x = self.rand(0.3, 0.7)
        min_offset_y = self.rand(0.3, 0.7)

        image_datas = []
        box_datas   = []
        index       = 0
        for line in annotation_line:
            line_content = line.split()
            image = Image.open(line_content[0])
            image = cvtColor(image)

            iw, ih = image.size
            box = np.array([np.array(list(map(int,box.split(',')))) for box in line_content[1:]])
            flip = self.rand()<.5
            if flip and len(box)>0:
                image = image.transpose(Image.FLIP_LEFT_RIGHT)
                box[:, [0,2]] = iw - box[:, [2,0]]
            new_ar = iw/ih * self.rand(1-jitter,1+jitter) / self.rand(1-jitter,1+jitter)
            scale = self.rand(.4, 1)
            if new_ar < 1:
                nh = int(scale*h)
                nw = int(nh*new_ar)
            else:
                nw = int(scale*w)
                nh = int(nw/new_ar)
            image = image.resize((nw, nh), Image.BICUBIC)
            if index == 0:
                dx = int(w*min_offset_x) - nw
                dy = int(h*min_offset_y) - nh
            elif index == 1:
                dx = int(w*min_offset_x) - nw
                dy = int(h*min_offset_y)
            elif index == 2:
                dx = int(w*min_offset_x)
                dy = int(h*min_offset_y)
            elif index == 3:
                dx = int(w*min_offset_x)
                dy = int(h*min_offset_y) - nh

            new_image = Image.new('RGB', (w,h), (128,128,128))
            new_image.paste(image, (dx, dy))
            image_data = np.array(new_image)

            index = index + 1
            box_data = []
            if len(box)>0:
                np.random.shuffle(box)
                box[:, [0,2]] = box[:, [0,2]]*nw/iw + dx
                box[:, [1,3]] = box[:, [1,3]]*nh/ih + dy
                box[:, 0:2][box[:, 0:2]<0] = 0
                box[:, 2][box[:, 2]>w] = w
                box[:, 3][box[:, 3]>h] = h
                box_w = box[:, 2] - box[:, 0]
                box_h = box[:, 3] - box[:, 1]
                box = box[np.logical_and(box_w>1, box_h>1)]
                box_data = np.zeros((len(box),5))
                box_data[:len(box)] = box

            image_datas.append(image_data)
            box_datas.append(box_data)
        cutx = int(w * min_offset_x)
        cuty = int(h * min_offset_y)

        new_image = np.zeros([h, w, 3])
        new_image[:cuty, :cutx, :] = image_datas[0][:cuty, :cutx, :]
        new_image[cuty:, :cutx, :] = image_datas[1][cuty:, :cutx, :]
        new_image[cuty:, cutx:, :] = image_datas[2][cuty:, cutx:, :]
        new_image[:cuty, cutx:, :] = image_datas[3][:cuty, cutx:, :]

        new_image       = np.array(new_image, np.uint8)
        r               = np.random.uniform(-1, 1, 3) * [hue, sat, val] + 1
        #---------------------------------#
        hue, sat, val   = cv2.split(cv2.cvtColor(new_image, cv2.COLOR_RGB2HSV))
        dtype           = new_image.dtype
        x       = np.arange(0, 256, dtype=r.dtype)
        lut_hue = ((x * r[0]) % 180).astype(dtype)
        lut_sat = np.clip(x * r[1], 0, 255).astype(dtype)
        lut_val = np.clip(x * r[2], 0, 255).astype(dtype)

        new_image = cv2.merge((cv2.LUT(hue, lut_hue), cv2.LUT(sat, lut_sat), cv2.LUT(val, lut_val)))
        new_image = cv2.cvtColor(new_image, cv2.COLOR_HSV2RGB)
        new_boxes = self.merge_bboxes(box_datas, cutx, cuty)
        box_data = np.zeros((max_boxes, 5))
        if len(new_boxes)>0:
            if len(new_boxes)>max_boxes: new_boxes = new_boxes[:max_boxes]
            box_data[:len(new_boxes)] = new_boxes
        return new_image, box_data
输出后处理
在输出后处理主要是针对推理时候的处理。众所周知,YOLOX输出的三个不同尺度的feature map
(
20
×
20
,
40
×
40
,
80
×
80
)
(20\times20,40\times40,80\times80)
(20×20,40×40,80×80),每个featuremap对应有三个分支分别为目标坐标分支、目标分类分支以及分类置信度分支。在推理的时候,假设在
20
×
20
20\times20
20×20的分支,如果
20
×
20
20\times20
20×20个特征点中某个特征点落在物体的对应框内,则进行预测。
具体步骤如下:
- 进行中心预测点的计算,利用Regression预测结果前两个序号的内容对特征点坐标进行偏移,左图红色的三个特征点偏移后是右图绿色的三个点;
- 进行预测框宽高的计算,利用Regression预测结果后两个序号的内容求指数后获得预测框的宽高;
- 得出所有框后进行非极大值抑制,则可得到最终结果
代码如下:
def get_output(outputs, num_classes, input_shape, max_boxes = 100, confidence=0.5, nms_iou=0.3, letterbox_image=True):
    image_shape = K.reshape(outputs[-1], [-1])
    batch_size = K.shape(outputs[0])[0]
    grids = []
    strides = []
    hw = [K.shape(x)[1:3] for x in outputs]
    '''
    outputs before:
    batch_size, 80, 80, 4+1+num_classes
    batch_size, 40, 40, 4+1+num_classes
    batch_size, 20, 20, 4+1+num_classes

    outputs after:
    batch_size, 8400, 8400, 4+1+num_classes
    '''
    outputs = tf.concat([tf.reshape(x, [batch_size, -1, 5 + num_classes]) for x in outputs], axis = 1)
    for i in range(len(hw)):
        grid_x, grid_y  = tf.meshgrid(tf.range(hw[i][1]), tf.range(hw[i][0]))
        grid            = tf.reshape(tf.stack((grid_x, grid_y), 2), (1, -1, 2))
        shape           = tf.shape(grid)[:2]
        grids.append(tf.cast(grid, K.dtype(outputs)))
        strides.append(tf.ones((shape[0], shape[1], 1)) * input_shape[0] / tf.cast(hw[i][0], K.dtype(outputs)))
    grids = tf.concat(grids, axis=1)
    strides = tf.concat(strides, axis=1)
    box_xy = (outputs[..., :2] + grids) * strides / K.cast(input_shape[::-1], K.dtype(outputs))
    box_wh = tf.exp(outputs[..., 2:4]) * strides / K.cast(input_shape[::-1], K.dtype(outputs))
    box_confidence  = K.sigmoid(outputs[..., 4:5])
    box_class_probs = K.sigmoid(outputs[..., 5: ])
    boxes = yolo_correct_boxes(box_xy, box_wh, input_shape, image_shape, letterbox_image)
    box_scores  = box_confidence * box_class_probs

    mask = box_scores >= confidence
    max_boxes_tensor = K.constant(max_boxes, dtype='int32')
    boxes_out   = []
    scores_out  = []
    classes_out = []
    for c in range(num_classes):
        class_boxes      = tf.boolean_mask(boxes, mask[..., c])
        class_box_scores = tf.boolean_mask(box_scores[..., c], mask[..., c])
        nms_index = tf.image.non_max_suppression(class_boxes, class_box_scores, max_boxes_tensor, iou_threshold=nms_iou)

        class_boxes         = K.gather(class_boxes, nms_index)
        class_box_scores    = K.gather(class_box_scores, nms_index)
        classes             = K.ones_like(class_box_scores, 'int32') * c

        boxes_out.append(class_boxes)
        scores_out.append(class_box_scores)
        classes_out.append(classes)
    boxes_out      = K.concatenate(boxes_out, axis=0)
    scores_out     = K.concatenate(scores_out, axis=0)
    classes_out    = K.concatenate(classes_out, axis=0)

    return boxes_out, scores_out, classes_out
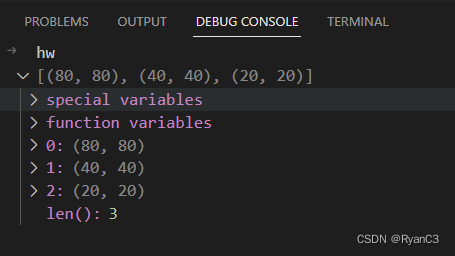
hw变量是获取每个feature map的宽高,其实这里说的feature map是不对的,只能认为是特征的shape。
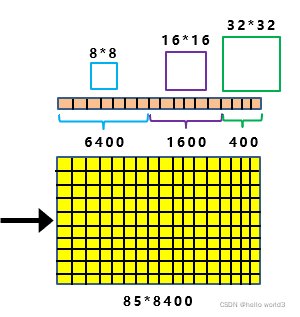
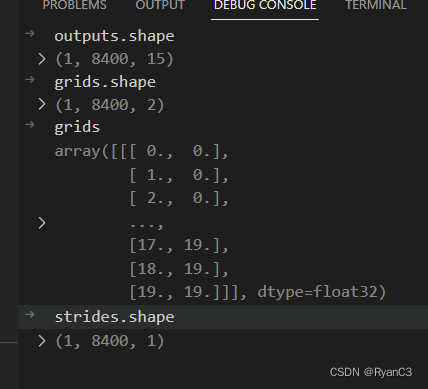
然后重点是grids和strides两个变量。各自的shape如下所示:
在程序中有box_xy = (outputs[..., :2] + grids) * strides / np.array(input_shape[::-1], np.float32),在此把他分成两部分分别为:(outputs[..., :2] + grids)和strides / np.array(input_shape[::-1], np.float32)。第一部分表示获取所有
8
×
8
8\times8
8×8feature map的x,y具体是8400里面的前6400个值。后部分即进行映射。
