哈希表的相关学习:
哈希表
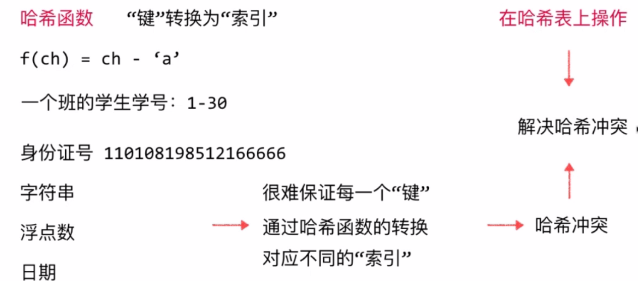
散列表(Hash table,也叫哈希表),是根据关键码值(Key value)而直接进行访问的数据结构。也就是说,它通过把关键码值映射到表中一个位置来访问记录,以加快查找的速度。这个映射函数叫做散列函数,存放记录的数组叫做散列表。
给定表M,存在函数f(key),对任意给定的关键字值key,代入函数后若能得到包含该关键字的记录在表中的地址,则称表M为哈希(Hash)表,函数f(key)为哈希(Hash) 函数。
哈希函数
哈希表是时间与空间之间的平衡,因此哈希函数的设计很重要。所以哈希函数应该尽量减少Hash冲突。也就是说“键”通过哈希函数得到的“索引”分布越均匀越好。
整形
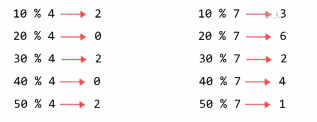
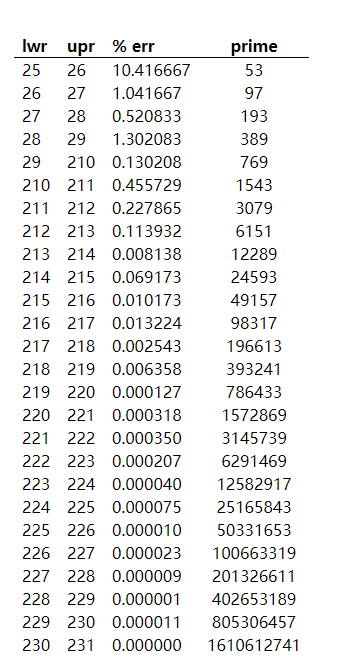
对于小范围的整数比如-100~100,我们完全可以对整数直接使用把它映射到0~200之间,而对于身份证这种的大整数,通常我们采用的是取模,比如大整数的后四位相当于mod 10000,这里有一个小问题,如果我们选择的数字如果不好的话,就有可能可能导致数据映射分布不均匀,因此我们最好寻找一个素数.
如果选择一个合适的素数呢,这里有一个选择:
图片来源:https://planetmath.org/goodhashtableprimes
浮点型
在计算机中都是32位或者64位的二进制表表示,只不过计算j级解析成了浮点数
字符串
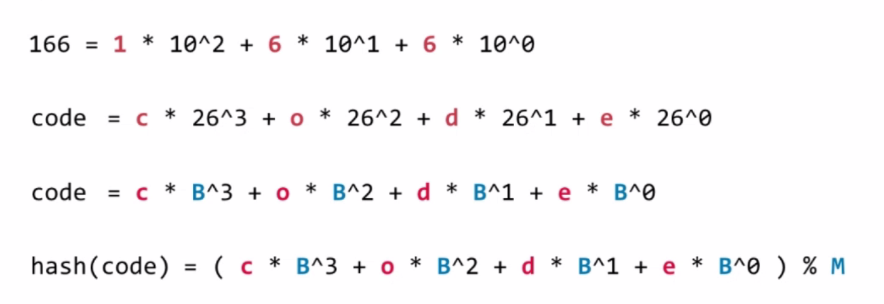
字符串我们需要把它也转成整型处理
我们对上面的方法进行优化一下,这就涉及到数学方面的知识了
对于字符串来说,计算出来的大整形如果特别大的话可能会出现内存溢出,因此我们可以对取模的过程分别挪到式子里面.
对于整个字符串来说我们可以写程序也是十分容易地写出来他的处理函数
1
2
3
int hash = 0 ;for (int i = 0 ; i < s.length; i++) { hash = (hash * B + s.charAt(i)) % M;
案例
1
2
3
4
5
6
7
8
9
10
11
12
13
14
15
16
17
18
19
20
21
22
23
24
25
26
27
28
29
30
31
32
33
34
35
36
37
38
39
40
41
42
43
44
45
46
47
48
49
50
51
52
53
54
55
56
public class Student int grade; int cls; String firstName; String lastName; Student(int grade, int cls, String firstName, String lastName){ this .grade = grade; this .cls = cls; this .firstName = firstName; this .lastName = lastName; } @Override public int hashCode () int B = 31 ; int hash = 0 ; hash = hash * B + ((Integer)grade).hashCode(); hash = hash * B + ((Integer)cls).hashCode(); hash = hash * B + firstName.toLowerCase().hashCode(); hash = hash * B + lastName.toLowerCase().hashCode(); return hash; } @Override public boolean equals (Object o) if (this == o) return true ; if (o == null ) return false ; if (getClass() != o.getClass()) return false ; Student another = (Student)o; return this .grade == another.grade && this .cls == another.cls && this .firstName.toLowerCase().equals(another.firstName.toLowerCase()) && this .lastName.toLowerCase().equals(another.lastName.toLowerCase()); } @Override public String toString () return "Student{" + "grade=" + grade + ", cls=" + cls + ", firstName='" + firstName + '\'' + ", lastName='" + lastName + '\'' + '}' ; } }
1
2
3
4
5
6
7
8
9
10
11
12
13
14
15
16
17
18
19
20
21
22
23
24
25
26
27
28
29
30
31
32
33
34
35
36
37
38
39
40
41
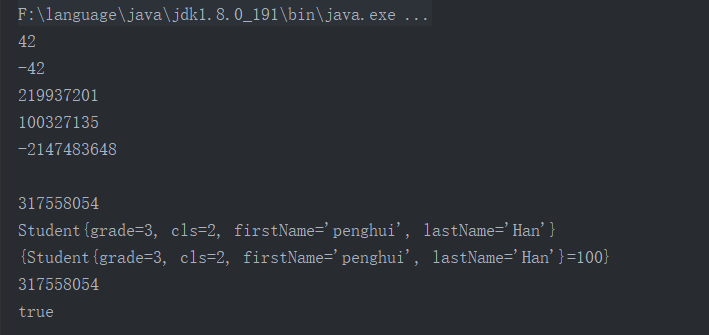
import java.util.HashSet;import java.util.HashMap;public class Main public static void main (String[] args) int a = 42 ; System.out.println(((Integer)a).hashCode()); int b = -42 ; System.out.println(((Integer)b).hashCode()); double c = 3.1415926 ; System.out.println(((Double)c).hashCode()); String d = "imooc" ; System.out.println(d.hashCode()); System.out.println(Integer.MAX_VALUE + 1 ); System.out.println(); Student student = new Student(3 , 2 , "penghui" , "Han" ); System.out.println(student.hashCode()); HashSet<Student> set = new HashSet<>(); set.add(student); for (Student s : set) { System.out.println(s.toString()); } HashMap<Student, Integer> scores = new HashMap<>(); scores.put(student, 100 ); System.out.println(scores.toString()); Student student2 = new Student(3 , 2 , "Penghui" , "han" ); System.out.println(student2.hashCode()); System.out.println(student.equals(student2)); } }
我们可以看到在实际的运行过程中对于整数的负数来说,依旧存在整数类型int中,对于浮点数和字符串来说都有都i是按照上面的方法.来进行计算。对于hashCode值相同我们并没有办法取判断是否属于一个对象,因此在equals和hashCode相同鼓的时候我们才能够说这个两个对象是相同的。
哈希冲突处理
链地址法
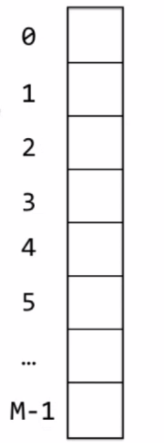
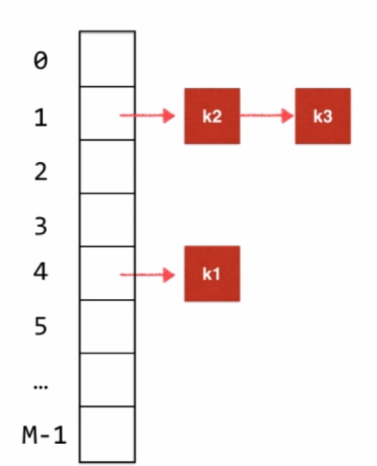
哈希表本质就是一个数组,
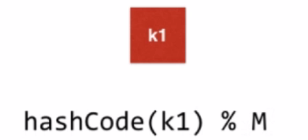
对于哈希表我们只需要让他求出K1然后在模于M,当然这个大M是一个素数。对于负数来说,可以直接用绝对值来解决负数的问题。
当然我们有时候看别人的代码或者源码的时候会看到
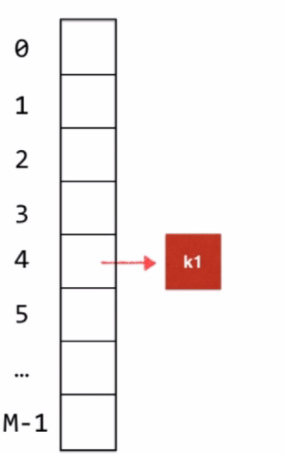
用16进制法表示的整型,先和一个16进制表示的0x7fffffff的结果我们在对M取模,这个表示的是用二进制表示的话是31个1,整型有32位,最高位是符号位,32位和31位相与,这样做是吧最高位的32位,模成了0,符号位的问题我们就解决了。因此如果我们记录的k1的值为4,那么我们就可可以把k1存储到地址4这个位置中去。
如果k2的索引位置为1,那么假设k3的位置也为1,那么我们就产生了hash冲突,如何解决呢?
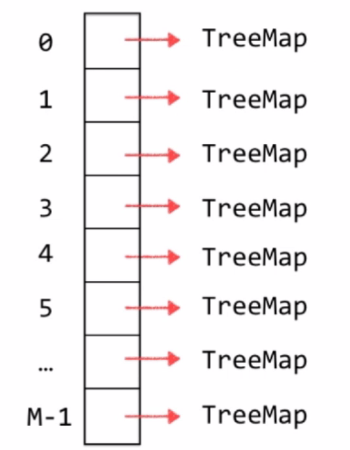
这里我们可以采用链表的方式,对于整个哈希表我们开M个空间,由于会出现hash冲突,我们可以把它做成链表,这种方法也叫separate chaining ,当然我们已可以存红黑树,或者TreeMap。
本质上来说,HashMap就是一个TreeMap数组,HashSet就是一个TreeSet数组。对于Java8来说,Java8之前每一个位置对应的是一个链表,Java8开始之后,当哈希冲突达到了一定的程度,每一个位置从链表转化为红黑树,这个阈值为8;
代码实现
1
2
3
4
5
6
7
8
9
10
11
12
13
14
15
16
17
18
19
20
21
22
23
24
25
26
27
28
29
30
31
32
33
34
35
36
37
38
39
40
41
42
43
44
45
46
47
48
49
50
51
52
53
54
55
56
57
58
59
60
61
62
63
64
65
66
67
68
69
70
71
72
73
74
75
76
77
78
79
80
81
82
83
84
85
86
87
88
89
90
91
92
93
94
95
96
97
98
99
100
101
102
import java.util.LinkedList;import java.util.List;public class HashTable <T > public HashTable () this (DEFAULT_TABLE_SIZE); } public HashTable (int size) theLists=new LinkedList[nextPrime(size)]; for (int i=0 ;i<theLists.length;i++) { theLists[i]=new LinkedList<>(); } } public void insert (T x) List<T> whichList=theLists[myhash(x)]; if (!whichList.contains(x)) { whichList.add(x); if (++currentSize>theLists.length) rehash(); } } public void remove (T x) List<T> whichList=theLists[myhash(x)]; if (whichList.contains(x)) { whichList.remove(x); currentSize--; } } public boolean contains (T x) List<T> whilchList=theLists[myhash(x)]; return whilchList.contains(x); } public void makeEmpty () for (int i=0 ;i<theLists.length;i++) theLists[i].clear(); currentSize=0 ; } private static final int DEFAULT_TABLE_SIZE=101 ; private List<T> [] theLists; private int currentSize; private void rehash () List<T>[] oldLists=theLists; theLists=new List[nextPrime(2 *theLists.length)]; for (int j=0 ;j<theLists.length;j++) theLists[j]=new LinkedList<>(); currentSize=0 ; for (List<T> list:oldLists) for (T item:list) insert(item); } private int myhash (T x) int hashVal=x.hashCode(); hashVal%=theLists.length; if (hashVal<0 ) hashVal+=theLists.length; return hashVal; } private static int nextPrime (int n) if ( n % 2 == 0 ) n++; for ( ; !isPrime( n ); n += 2 ) ; return n; } private static boolean isPrime (int n) if ( n == 2 || n == 3 ) return true ; if ( n == 1 || n % 2 == 0 ) return false ; for ( int i = 3 ; i * i <= n; i += 2 ) if ( n % i == 0 ) return false ; return true ; } }
开放地址法
这个方法的基本思想是:当发生地址冲突时,按照某种方法继续探测哈希表中的其他存储单元,直到找到空位置为止。这个过程可用下式描述:
例1设有哈希函数 H ( key ) = key mod 7 ,哈希表的地址空间为 0 ~ 6 ,对关键字序列( 32 , 13 , 49 , 55 , 22 , 38 , 21 )按线性探测再散列和二次探测再散列的方法分别构造哈希表。
49 55 22 38 32 21 13
当然还有其他的方法比如再哈希法,Coalesced Hashing法(综合了Seperate Chainging 和 Open Addressiing)等。
代码实现
1
2
3
4
5
6
7
8
9
10
11
12
13
14
15
16
17
18
19
20
21
22
23
24
25
26
27
28
29
30
31
32
33
34
35
36
37
38
39
40
41
42
43
44
45
46
47
48
49
50
51
52
53
54
55
56
57
58
59
60
61
62
63
64
65
66
67
68
69
70
71
72
73
74
75
76
77
78
79
80
81
82
83
84
class DataItem private int iData; public DataItem (int ii) iData = ii; } public int getKey () return iData; } } class HashTable private DataItem[] hashArray; private int arraySize; private DataItem nonItem; public HashTable (int size) arraySize = size; hashArray = new DataItem[arraySize]; nonItem = new DataItem(-1 ); } public void displayTable () System.out.print("Table: " ); for (int j=0 ; j<arraySize; j++) { if (hashArray[j] != null ) System.out.print(hashArray[j].getKey() + " " ); else System.out.print("** " ); } System.out.println("" ); } public int hashFunc (int key) { return key % arraySize; } public void insert (DataItem item) int key = item.getKey(); int hashVal = hashFunc(key); while (hashArray[hashVal] != null && hashArray[hashVal].getKey() != -1 ){ ++hashVal; hashVal %= arraySize; } hashArray[hashVal] = item; } public DataItem delete (int key) int hashVal = hashFunc(key); while (hashArray[hashVal] != null ){ if (hashArray[hashVal].getKey() == key){ DataItem temp = hashArray[hashVal]; hashArray[hashVal] = nonItem; return temp; } ++hashVal; hashVal %= arraySize; } return null ; } public DataItem find (int key) int hashVal = hashFunc(key); while (hashArray[hashVal] != null ) { if (hashArray[hashVal].getKey() == key) return hashArray[hashVal]; ++hashVal; hashVal %= arraySize; } return null ; } }
参考资料
https://www.cnblogs.com/vincentme/p/7920237.html
https://blog.csdn.net/w_fenghui/article/details/2010387
https://128kj.iteye.com/blog/1744810
