暑期第一战:
此次学习用到的技术:
- Spring boot
- Spring Mvc
- MyBatis
- MySQL,H2
- Flyway
- Heroku
- Git/Github
- Maven
- Result
- 2.查看spring官方文档,按照文档编写第一个简单的文件
1)添加spring的maven依赖
2)新建一个controller类,添加@controller注解,编写html代码(写再resources的template里面
正常的resources里面的内容是:
template:html,模板文件
static:image文件,css,js
appilcation.properties:日志配置文件(在里面直接可以改端口号,如:server.port=8887
资料:
https://spring.io/guides/gs/serving-web-content/ (Spring Web)
https://spring.io/guides (Spring 文档)
https://elasticsearch.cn/explore (es)
前端框架:https://v3.bootcss.com/ (Bootstrap)
https://developer.github.com/apps/building-oauth-apps/creating-an-oauth-app/ (Github OAuth)
3.编写前端页面以及controller
在templates里面写好首页的html,导入相应的css,js
以及对应的controller类
一,实现Github登录操作
参考github文档
前端模板
具体流程:
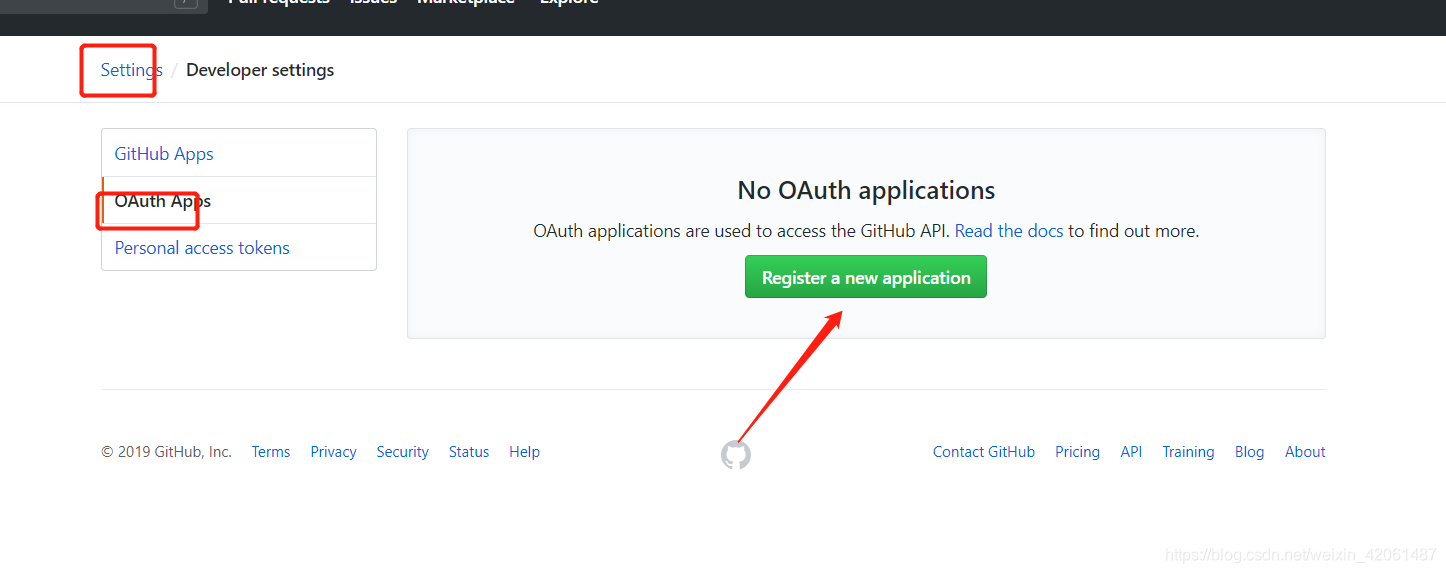
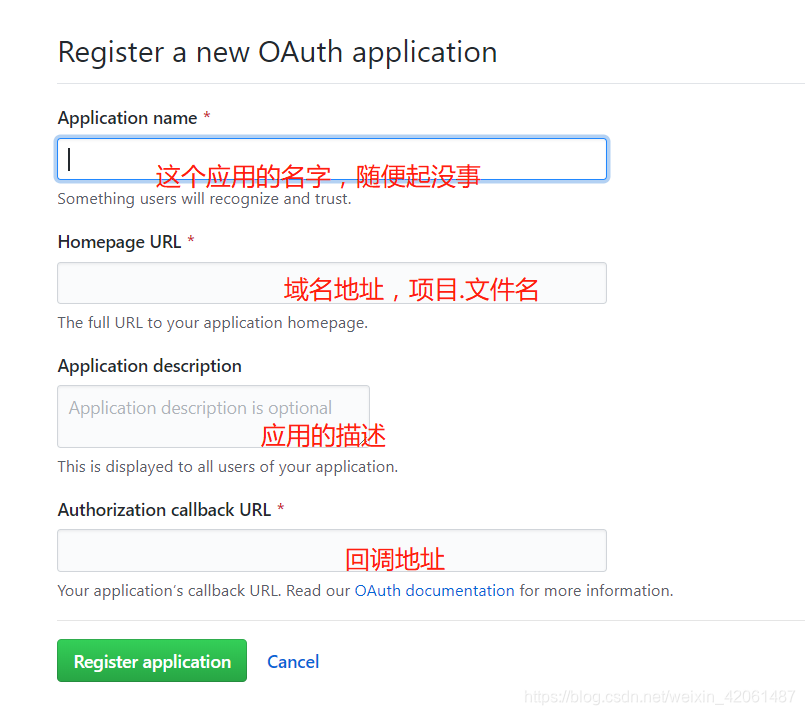
1.登录github注册OAuth Apps点击注册:(注册完成之后到代码编辑部分)
注册完成之后会生成一个id号和密码
2.前端登录按钮设置
点击登录之后访问
https://github.com/login/oauth/authorize
+?client_id=“github生成的id号”
+&redirect_uri=http://localhost:8080/callback&scope=user&state=1
3.后端controller代码(回调函数)
@Autowired
    private GithubProvider githubProvider;

    @Value("${github.client.id}")
    private String clientId;

    @Value("${github.client.secret}")
    private String clientSecret;

    @Value("${github.redirect.uri}")
    private String redirectUrl;


    @GetMapping("/callback")
    public String callback(@RequestParam(name="code") String code,
                           @RequestParam(name="state") String state,
                           HttpServletRequest request
                           ){
       AccessTokenDTO accessTokenDTO = new AccessTokenDTO();
       accessTokenDTO.setClient_id(clientId);
       accessTokenDTO.setClient_secret(clientSecret);
       accessTokenDTO.setCode(code);
       accessTokenDTO.setRedirect_url(redirectUrl);
       accessTokenDTO.setState(state);
       String accessToken =  githubProvider.getAccessToken(accessTokenDTO);
        GithubUser user = githubProvider.getUser(accessToken);
        if(user!=null){
            //登录成功,写cookie和session
            request.getSession().setAttribute("user",user);
            return "redirect:/";
        }else {
            //登录失败,重新登录

            return "redirect:/";
        }
    }
@Value("${github.client.id}")里面的地址是直接在properties文件里面配置,然后持久化可以调用的
获取accessToken的函数:
public String getAccessToken(AccessTokenDTO accessTokenDTO){
        MediaType mediaType = MediaType.get("application/json; charset=utf-8");
        OkHttpClient client = new OkHttpClient();
        RequestBody body = RequestBody.create(mediaType,JSON.toJSONString(accessTokenDTO));
        Request request = new Request.Builder()
                    .url("https://github.com/login/oauth/access_token")
                    .post(body)
                    .build();
            try (Response response = client.newCall(request).execute()) {
               String string = response.body().string();
               System.out.println(string);
                String token = string.split("&")[0].split("=")[1];
                return token;
            } catch (IOException e) {
                e.printStackTrace();
            }
            return  null;
    }
获取GithubUser对象函数:
public GithubUser getUser(String accessToken){
        OkHttpClient client = new OkHttpClient();
        System.out.println("accessToken"+accessToken);
       Request request = new Request.Builder()
               .url("https://api.github.com/user?access_token="+accessToken)
               .build();
        try {
            Response response = client.newCall(request).execute();
            String string = response.body().string();
            GithubUser githubUser = JSON.parseObject(string,GithubUser.class);
            return githubUser;
        } catch (IOException e) {
            e.printStackTrace();
        }
        return null;
    }
二.应用Mysql来创建数据库idea内嵌结合Mybatis
1.导入pom.xml文件h2的文件
		<dependency>
            <groupId>mysql</groupId>
            <artifactId>mysql-connector-java</artifactId>
            <version>5.1.15</version>
            <scope>runtime</scope>
        </dependency>
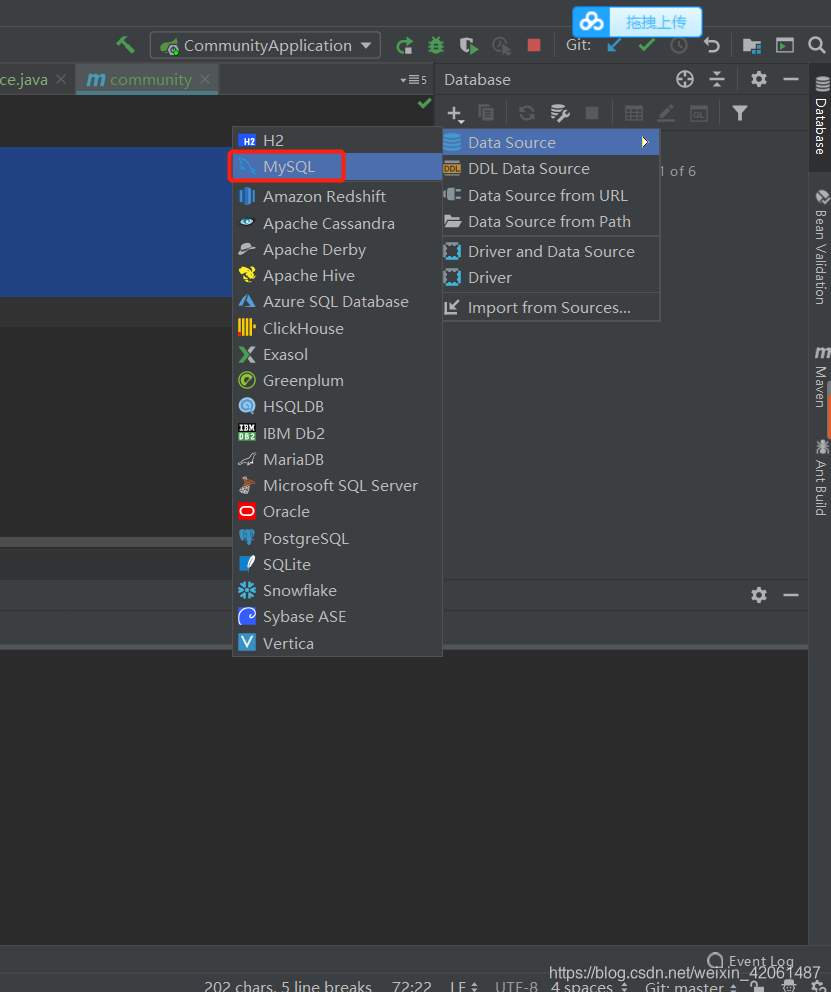
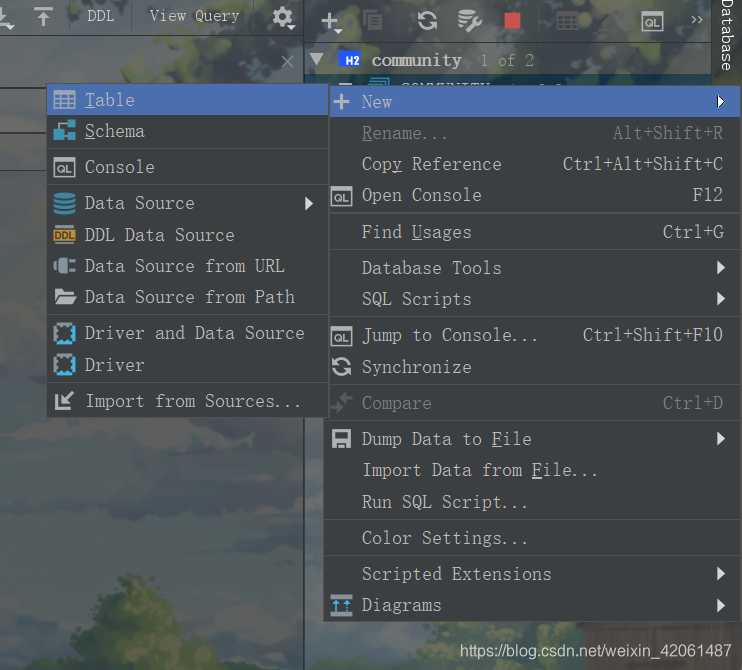
2.创建一个mysql的数据库,并新建一个表,往里面添加数据
三,使用注解的方式来编写数据库操作(CRUD)
1.新建一个pojo类(User)
可以让数据库操作来调用,插入,查询都可以
import lombok.Data;

/**
 * @Author: CB#
 * @Date: 2019/7/18
 * @Description: com.gudf.community.model
 * @version: 1.0
 */
@Data
public class User {
    private Integer id;
    private String name;
    private String account_id;
    private String token;
    private Long  gmt_create;
    private Long gmt_modified;
    private String avatarUrl;
}
2.编写User数据库操作的接口类(定义数据库语句
package com.gudf.community.mapper;

import com.gudf.community.model.User;
import org.apache.ibatis.annotations.Insert;
import org.apache.ibatis.annotations.Mapper;
import org.apache.ibatis.annotations.Param;
import org.apache.ibatis.annotations.Select;
import org.springframework.stereotype.Component;

/**
 * @Author: CB#
 * @Date: 2019/7/18
 * @Description: com.gudf.community.mapper
 * @version: 1.0
 */
@Mapper
@Component
public interface UserMapper {

    @Insert("insert into user(name,account_id,token,gmt_create,gmt_modified,avatar_url) values (#{name}, #{account_id},#{token},#{gmt_create},#{gmt_modified},#{avatarUrl})")
    void insert(User user);

    @Select("select * from user where token = #{token}")
    User findByToken(@Param("token") String token);

    @Select("select * from user where id = #{id}")
    User findById(@Param("id")Integer id);
}
这样就可以直接在Controller调用这个接口的方法,传入参数来使用数据库了
类如这一块:当登录成功的时候,往数据库里面插入相应的数据,并跳转回首页
if(githubUser!=null&&githubUser.getId()!=null){
            User user = new User();
            String token = UUID.randomUUID().toString();
            user.setToken(token);
            user.setName(githubUser.getName());
            user.setAccount_id(String.valueOf(githubUser.getId()));
            user.setGmt_create(System.currentTimeMillis());
            user.setGmt_modified(user.getGmt_modified());
            user.setAvatarUrl(githubUser.getAvatar_url());
            userMapper.insert(user);
            response.addCookie(new Cookie("token",token));
            //登录成功,写cookie和session
//            request.getSession().setAttribute("user",githubUser);
            return "redirect:/";
        }
注:如果你的pojo类里面使用的是驼峰式命名的话,你可以在application.properties里面配置这个:(使类里面的下划线变成首字母大写的)
mybatis.configuration.map-underscore-to-camel-case=true
将循环的变量存入Model里面
List<QuestionDTO> questionList = questionService.list();
        model.addAttribute("questions",questionList);
        return "index";
使用这个语句可以直接取Model里面的值(并遍历)
附录:
@Transactional:开启事务!!(一整个函数里面的)


