CSS3 中的背景属性提供了许多强大的功能来增强网页设计,包括但不限于多背景图像、渐变、背景大小控制等。以下是一些关键的 CSS3 背景属性及其用法示例。
1. 多重背景图像
CSS3 允许你为一个元素设置多个背景图像。这些图像按照它们在 background-image 属性中定义的顺序堆叠,第一个定义的图像位于最顶层。
.multiple-backgrounds {
  width: 300px;
  height: 200px;
  background-image: url('logo.png'), url('pattern.png');
  background-position: center, repeat;
  background-repeat: no-repeat, repeat;
}
在这个例子中,logo.png 图像将被放置在容器的中心,并且不会重复,而 pattern.png 图像将在整个容器内重复显示。
这里有一个使用多重背景图像的简单 CSS3 示例。这个例子将展示如何在一个元素上层叠两个背景图像,并控制它们的位置和重复方式。
HTML:
<div class="multi-bg"></div>
CSS:
.multi-bg {
  width: 500px;
  height: 300px;
  background-image: url('https://example.com/path-to-first-image.png'),
                    url('https://example.com/path-to-second-image.png');
  background-position: center, top right;
  background-repeat: no-repeat, repeat-y;
  background-size: auto, 100px 100px; /* 第一个图像是自动大小,第二个是固定大小 */
}
在这个例子中:
background-image属性被用来指定两个不同的图片路径。第一个是主要背景图像,它位于最顶层;第二个是次要背景图像,位于底层。background-position设置了每个背景图像的位置。第一个图像居中显示 (center),而第二个图像位于容器的右上角 (top right)。background-repeat控制了每个背景图像是否以及如何重复。第一个图像不重复 (no-repeat),而第二个图像只在垂直方向上重复 (repeat-y)。background-size定义了每个背景图像的尺寸。第一个图像保持其原始大小 (auto),而第二个图像被设定为固定的宽度和高度 (100px x 100px)。
请注意,为了使此示例正常工作,你需要将 'https://example.com/path-to-first-image.png' 和 'https://example.com/path-to-second-image.png' 替换为实际存在的图像URL或相对路径。此外,根据你的设计需求,你可以调整宽度、高度以及其他属性的值。
2. 渐变背景
CSS3 引入了线性渐变 (linear-gradient) 和径向渐变 (radial-gradient)。
线性渐变
.linear-gradient-bg {
  width: 300px;
  height: 200px;
  background: linear-gradient(to right, #ff7e5f, #feb47b);
}
这段代码创建了一个从左到右的颜色渐变,起始颜色是 #ff7e5f(一种粉橙色),结束颜色是 #feb47b(一种浅橙色)。
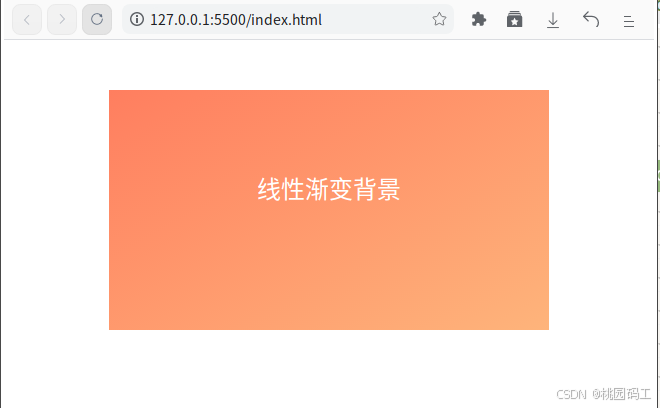
线性渐变是 CSS3 中一种非常流行的背景效果,它可以创建从一个颜色平滑过渡到另一个颜色的效果。下面是一个使用线性渐变作为背景的示例,展示了如何创建一个从左上角到右下角的颜色渐变。
示例: 使用线性渐变作为背景
<!DOCTYPE html>
<html>
<head>
<style>
/* 定义带有线性渐变背景的盒子 */
.gradient-box {
  width: 400px;
  height: 200px;
  margin: 50px auto; /* 自动水平居中 */
  padding: 20px;
  background: linear-gradient(to bottom right, #ff7e5f, #feb47b); /* 线性渐变 */
  color: white;
  text-align: center;
  line-height: 160px; /* 垂直居中文本 */
  font-size: 24px;
  font-family: Arial, sans-serif;
}
</style>
</head>
<body>

<div class="gradient-box">
  线性渐变背景
</div>

</body>
</html>
在这个例子中:
.gradient-box类定义了一个 div 元素,并为其设置了宽度、高度、内边距 (padding) 和外边距 (margin)。background属性使用了linear-gradient()函数来创建一个线性渐变背景:to bottom right指定了渐变的方向,即从左上角到右下角。#ff7e5f是起始颜色(一种粉橙色)。#feb47b是结束颜色(一种浅橙色)。
- 文本样式被调整以确保在渐变背景下清晰可见,包括字体大小、颜色和对齐方式。
更多线性渐变选项
你可以进一步自定义线性渐变,例如添加更多颜色停止点或改变渐变角度。以下是几个额外的例子:
-
多个颜色停止点:
background: linear-gradient(to right, #ff7e5f, #feb47b, #81ecec);这个例子添加了一个额外的颜色停止点
#81ecec(浅蓝色),使渐变经过三种颜色。 -
指定角度:
background: linear-gradient(135deg, #ff7e5f, #feb47b);使用角度值(如
135deg)可以更精确地控制渐变的方向,而不是依赖于关键字方向(如to bottom right)。 -
透明度:
background: linear-gradient(to right, rgba(255, 126, 95, 0.5), rgba(254, 180, 123, 0.5));使用
rgba()可以为颜色添加透明度,从而实现半透明的渐变效果。
这些额外的选项允许你创建更加复杂和精美的视觉效果。通过实验不同的参数组合,你可以找到最适合你设计需求的渐变风格。
径向渐变
.radial-gradient-bg {
  width: 300px;
  height: 200px;
  background: radial-gradient(circle, #ff7e5f, #feb47b);
}
这里创建的是一个圆形的径向渐变,颜色从中心向外逐渐变化。
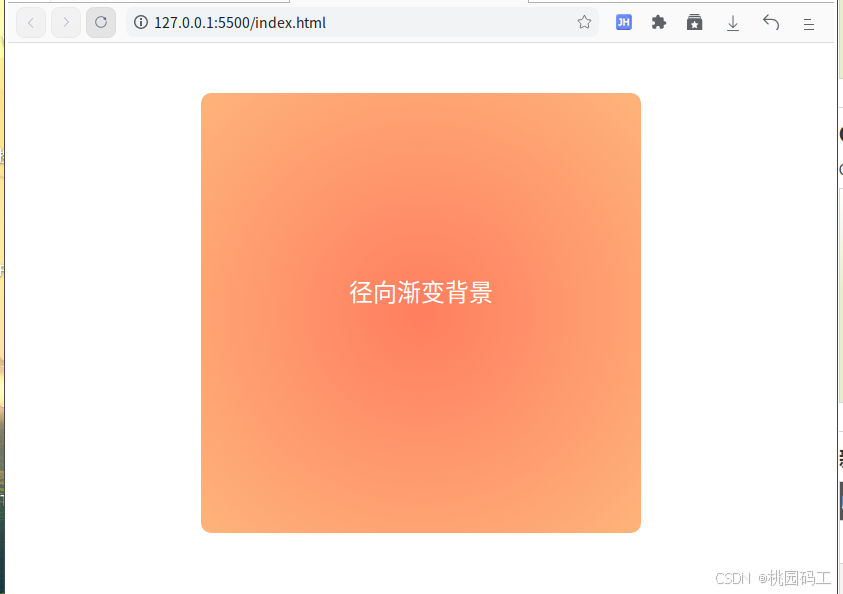
径向渐变是 CSS3 中创建从中心向外扩展的颜色过渡效果的一种方式。下面是一个使用径向渐变作为背景的示例,展示了如何创建一个从中心向外逐渐变化颜色的效果。
示例: 使用径向渐变作为背景
<!DOCTYPE html>
<html>
<head>
<style>
/* 定义带有径向渐变背景的盒子 */
.radial-gradient-box {
  width: 400px;
  height: 400px;
  margin: 50px auto; /* 自动水平居中 */
  padding: 20px;
  background: radial-gradient(circle, #ff7e5f, #feb47b); /* 径向渐变 */
  color: white;
  text-align: center;
  line-height: 360px; /* 垂直居中文本 */
  font-size: 24px;
  font-family: Arial, sans-serif;
  border-radius: 10px; /* 圆角边框以增强视觉效果 */
}
</style>
</head>
<body>

<div class="radial-gradient-box">
  径向渐变背景
</div>

</body>
</html>
在这个例子中:
.radial-gradient-box类定义了一个 div 元素,并为其设置了宽度、高度、内边距 (padding) 和外边距 (margin)。background属性使用了radial-gradient()函数来创建一个径向渐变背景:circle指定了渐变形状为圆形(默认情况下)。你也可以使用ellipse来指定椭圆形状。- 渐变从中心开始,颜色从
#ff7e5f(一种粉橙色)平滑过渡到#feb47b(一种浅橙色)。
- 文本样式被调整以确保在渐变背景下清晰可见,包括字体大小、颜色和对齐方式。
border-radius被用来给盒子添加圆角,以增强整体的视觉效果。
更多径向渐变选项
你可以进一步自定义径向渐变,例如改变渐变的形状、尺寸或添加更多颜色停止点。以下是几个额外的例子:
-
指定渐变的形状和尺寸:
background: radial-gradient(ellipse farthest-side, #ff7e5f, #feb47b);这里我们指定了椭圆形状,并且使用
farthest-side关键字来控制渐变的尺寸,使得渐变到达最远的边。 -
多个颜色停止点:
background: radial-gradient(circle, #ff7e5f, #feb47b, #81ecec);这个例子添加了一个额外的颜色停止点
#81ecec(浅蓝色),使渐变经过三种颜色。 -
指定渐变中心位置:
background: radial-gradient(at top left, #ff7e5f, #feb47b);使用
at top left可以改变渐变的中心点位置,使其不位于元素的几何中心。 -
透明度:
background: radial-gradient(circle, rgba(255, 126, 95, 0.5), rgba(254, 180, 123, 0.5));使用
rgba()可以为颜色添加透明度,从而实现半透明的渐变效果。
这些额外的选项允许你创建更加复杂和精美的视觉效果。通过实验不同的参数组合,你可以找到最适合你设计需求的渐变风格。
3. 控制背景大小 (background-size)
你可以使用 background-size 属性来精确地控制背景图像的尺寸。常见的值包括 contain, cover, 和具体的宽度和高度值。
.background-size-control {
  width: 300px;
  height: 200px;
  background-image: url('image.jpg');
  background-size: cover; /* 图像将会覆盖整个元素 */
  background-position: center;
  background-repeat: no-repeat;
}
cover 值确保图像完全覆盖背景区域,同时保持其宽高比例。如果图像比容器大,则会裁剪;如果小,则会拉伸。
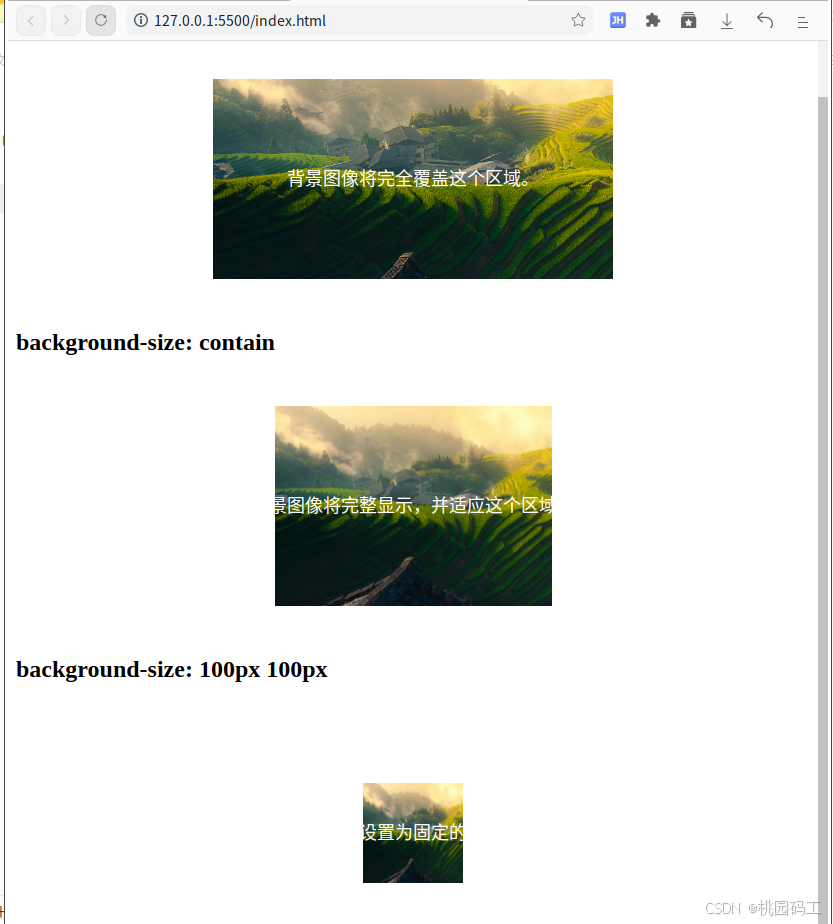
在 CSS3 中,background-size 属性允许你精确地控制背景图像的尺寸。这使得你可以确保背景图像按照预期的方式填充或适应元素的大小。下面是一个简单的示例,展示了如何使用 background-size 来控制背景图像的大小。
示例: 使用 background-size 控制背景图像大小
<!DOCTYPE html>
<html>
<head>
<style>
/* 定义带有不同背景大小控制的盒子 */
.background-control {
  width: 400px;
  height: 200px;
  margin: 50px auto; /* 自动水平居中 */
  background-image: url('./path-to-image.png'); /* 替换为实际的图片路径 */
  background-repeat: no-repeat;
  background-position: center;
  color: white;
  text-align: center;
  line-height: 200px; /* 垂直居中文本 */
  font-size: 18px;
  font-family: Arial, sans-serif;
}

/* 不同的 background-size 应用 */
.background-cover {
  background-size: cover; /* 图像将覆盖整个元素,保持比例 */
}

.background-contain {
  background-size: contain; /* 图像将在不裁剪的情况下适应容器 */
}

.background-fixed-size {
  background-size: 100px 100px; /* 固定宽度和高度 */
}
</style>
</head>
<body>

<h2>background-size: cover</h2>
<div class="background-control background-cover">
  背景图像将完全覆盖这个区域。
</div>

<h2>background-size: contain</h2>
<div class="background-control background-contain">
  背景图像将完整显示,并适应这个区域。
</div>

<h2>background-size: 100px 100px</h2>
<div class="background-control background-fixed-size">
  背景图像将被设置为固定的宽度和高度。
</div>

</body>
</html>
在这个例子中:
.background-control类定义了一个 div 元素的基本样式,包括宽度、高度、内边距 (padding) 和外边距 (margin),以确保它在页面中正确显示。background-image属性指定了一个背景图像(请替换'./path-to-image.png'为实际存在的图像URL)。background-repeat设置为no-repeat,以防止图像重复。background-position设置为center,使图像居中对齐。
background-size 的不同值:
-
cover:- 这个值确保图像完全覆盖背景区域,同时保持其宽高比例。如果图像比容器大,则会裁剪;如果小,则会拉伸。
- 适用于希望图像填满整个容器且保持比例的情况。
-
contain:- 这个值确保图像在不被裁剪的情况下完整地适应容器,同时保持其宽高比例。
- 适用于希望图像完整显示并且适应容器大小的情况。
-
固定宽度和高度 (如
100px 100px):- 这个值直接指定了背景图像的具体宽度和高度,图像将被缩放以匹配这些尺寸。
- 适用于需要精确控制图像大小的情况。
通过调整 background-size 的值,你可以根据设计需求灵活地控制背景图像的显示方式。此外,还可以结合其他背景属性(如 background-position, background-repeat 等)来实现更复杂的效果。
4. 背景位置 (background-position) 和重复 (background-repeat)
这两个属性用来指定背景图像的位置以及它是否应该重复。
.background-position-repeat {
  width: 300px;
  height: 200px;
  background-image: url('icon.png');
  background-position: top left;
  background-repeat: repeat-x; /* 沿 X 轴重复 */
}
在这个例子中,背景图只会沿水平方向重复,并且定位在容器的左上角。
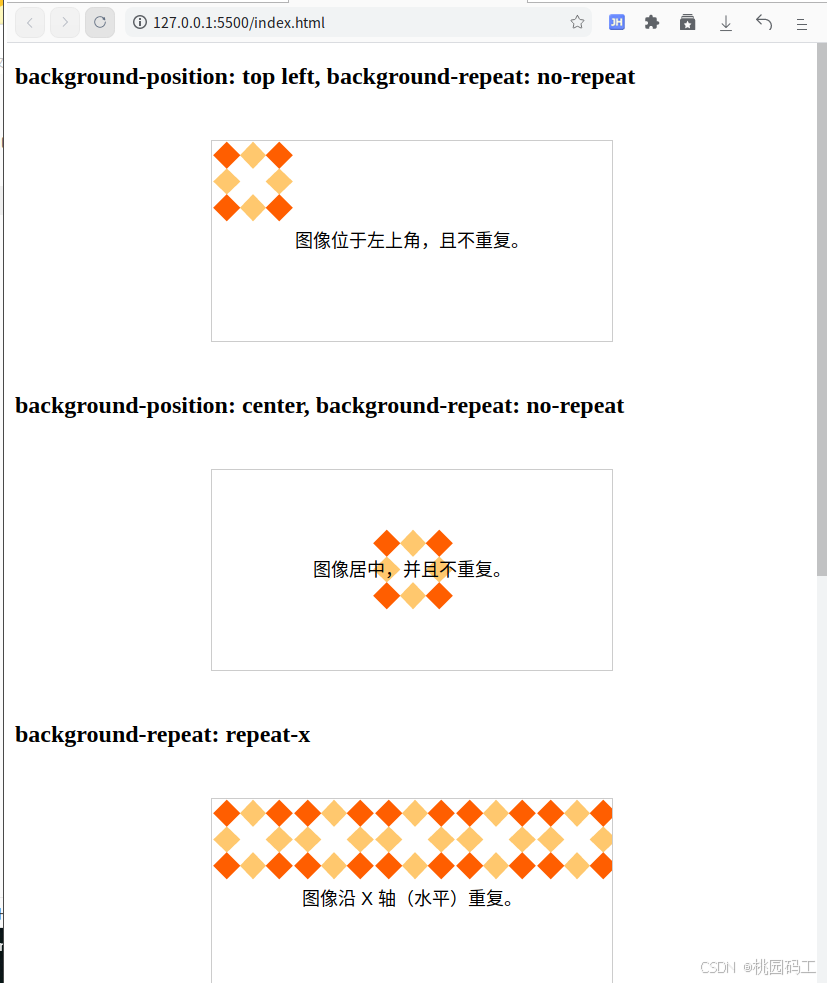
在 CSS3 中,background-position 和 background-repeat 是两个重要的属性,用于控制背景图像的位置和重复方式。下面是一个综合使用这两个属性的示例,展示了如何通过它们来精确定义背景图像的显示效果。
示例: 使用 background-position 和 background-repeat
<!DOCTYPE html>
<html>
<head>
<style>
/* 定义带有不同背景位置和重复方式的盒子 */
.background-example {
  width: 400px;
  height: 200px;
  margin: 50px auto; /* 自动水平居中 */
  border: 1px solid #ccc;
  text-align: center;
  line-height: 200px; /* 垂直居中文本 */
  font-size: 18px;
  font-family: Arial, sans-serif;
}

/* 不同的 background-position 和 background-repeat 应用 */
.background-top-left {
  background-image: url('https://example.com/path-to-icon.png'); /* 替换为实际的图片路径 */
  background-position: top left; /* 图像位于左上角 */
  background-repeat: no-repeat; /* 图像不重复 */
}

.background-center {
  background-image: url('https://example.com/path-to-icon.png');
  background-position: center; /* 图像居中 */
  background-repeat: no-repeat;
}

.background-repeat-x {
  background-image: url('https://example.com/path-to-pattern.png'); /* 小图案 */
  background-position: top left;
  background-repeat: repeat-x; /* 沿 X 轴(水平)重复 */
}

.background-repeat-y {
  background-image: url('https://example.com/path-to-pattern.png');
  background-position: top left;
  background-repeat: repeat-y; /* 沿 Y 轴(垂直)重复 */
}

.background-repeat-all {
  background-image: url('https://example.com/path-to-pattern.png');
  background-position: top left;
  background-repeat: repeat; /* 在 X 和 Y 轴上都重复 */
}
</style>
</head>
<body>

<h2>background-position: top left, background-repeat: no-repeat</h2>
<div class="background-example background-top-left">
  图像位于左上角,且不重复。
</div>

<h2>background-position: center, background-repeat: no-repeat</h2>
<div class="background-example background-center">
  图像居中,并且不重复。
</div>

<h2>background-repeat: repeat-x</h2>
<div class="background-example background-repeat-x">
  图像沿 X 轴(水平)重复。
</div>

<h2>background-repeat: repeat-y</h2>
<div class="background-example background-repeat-y">
  图像沿 Y 轴(垂直)重复。
</div>

<h2>background-repeat: repeat</h2>
<div class="background-example background-repeat-all">
  图像在 X 和 Y 轴上都重复。
</div>

</body>
</html>
在这个例子中:
.background-example类定义了所有 div 元素的基本样式,包括宽度、高度、边框 (border)、文本对齐方式 (text-align) 和字体设置。background-image属性指定了背景图像(请替换'./border.png'为实际存在的图像URL或相对路径)。background-position设置了背景图像的位置:top left:将图像放置在容器的左上角。center:将图像居中对齐。
background-repeat控制了背景图像是否以及如何重复:no-repeat:图像不会重复。repeat-x:图像仅沿 X 轴(水平方向)重复。repeat-y:图像仅沿 Y 轴(垂直方向)重复。repeat:图像在 X 和 Y 轴上都重复。
关键点
-
background-position:- 可以接受关键字(如
top,left,center,bottom,right),也可以接受具体的像素值或百分比来精确地定位背景图像。
- 可以接受关键字(如
-
background-repeat:- 决定背景图像的重复行为。除了上述选项外,还可以使用
space和round来实现更复杂的重复模式,例如确保图像之间有均匀间距或者图像能够整齐排列。
- 决定背景图像的重复行为。除了上述选项外,还可以使用
通过调整 background-position 和 background-repeat 的值,你可以灵活地控制背景图像的显示方式,从而满足不同的设计需求。
5. 背景原点 (background-origin) 和裁剪区域 (background-clip)
background-origin定义了背景图像相对于哪个填充盒绘制,默认是padding-box。background-clip决定了背景绘制的范围,默认也是border-box,但可以设置为padding-box或content-box。
.background-origin-clip {
  width: 300px;
  height: 200px;
  padding: 20px;
  border: 10px solid black;
  background-image: url('image.jpg');
  background-origin: content-box;
  background-clip: content-box;
}
这会使得背景图像只绘制在内容框内,而不是延伸到边框或内边距区域。
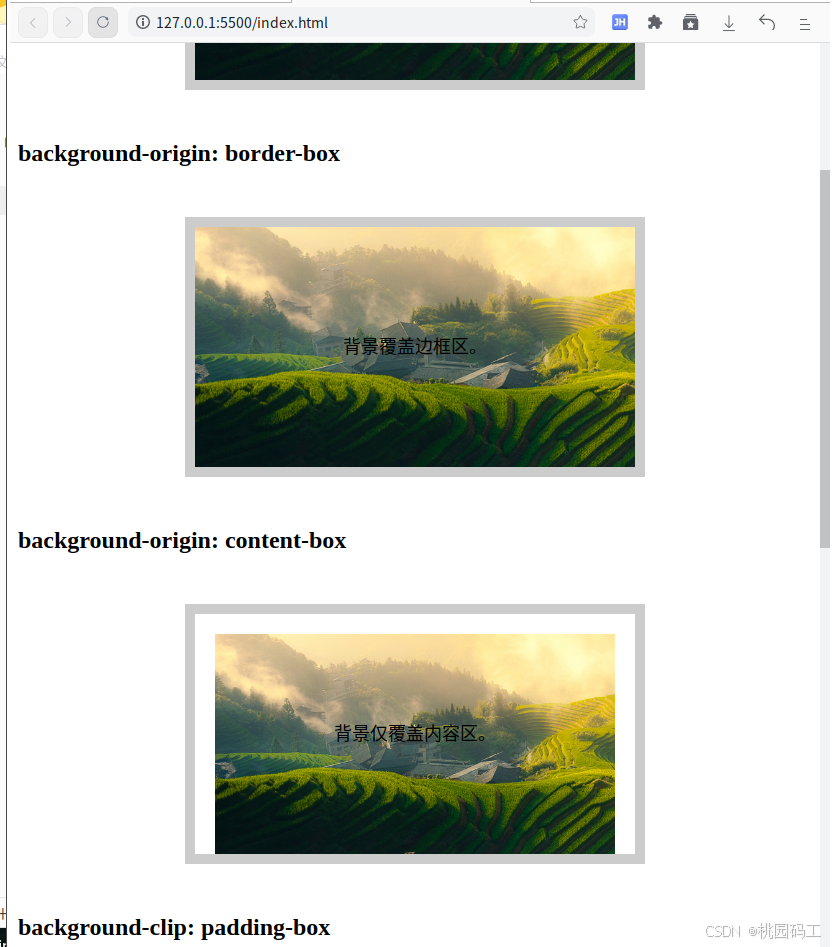
background-origin 和 background-clip 是 CSS3 中用于更精确控制背景绘制位置和范围的属性。下面是一个综合使用这两个属性的示例,展示了它们如何影响背景图像和颜色的显示。
示例: 使用 background-origin 和 background-clip
<!DOCTYPE html>
<html>
<head>
<style>
/* 定义带有不同背景原点和裁剪区域的盒子 */
.background-box {
  width: 400px;
  height: 200px;
  margin: 50px auto; /* 自动水平居中 */
  padding: 20px;
  border: 10px solid #ccc;
  background-image: url('https://example.com/path-to-image.jpg'); /* 替换为实际的图片路径 */
  background-repeat: no-repeat;
  background-size: cover;
  text-align: center;
  line-height: 200px; /* 垂直居中文本 */
  font-size: 18px;
  font-family: Arial, sans-serif;
}

/* 不同的 background-origin 应用 */
.background-padding-box {
  background-origin: padding-box; /* 默认值,背景覆盖内边距区 */
}

.background-border-box {
  background-origin: border-box; /* 背景覆盖边框区 */
}

.background-content-box {
  background-origin: content-box; /* 背景仅覆盖内容区 */
}

/* 不同的 background-clip 应用 */
.background-clip-padding-box {
  background-clip: padding-box; /* 背景绘制到内边距区 */
}

.background-clip-border-box {
  background-clip: border-box; /* 背景绘制到边框区 */
}

.background-clip-content-box {
  background-clip: content-box; /* 背景仅绘制到内容区 */
}
</style>
</head>
<body>

<h2>background-origin: padding-box (默认)</h2>
<div class="background-box background-padding-box">
  背景覆盖内边距区。
</div>

<h2>background-origin: border-box</h2>
<div class="background-box background-border-box">
  背景覆盖边框区。
</div>

<h2>background-origin: content-box</h2>
<div class="background-box background-content-box">
  背景仅覆盖内容区。
</div>

<h2>background-clip: padding-box</h2>
<div class="background-box background-clip-padding-box">
  背景绘制到内边距区。
</div>

<h2>background-clip: border-box</h2>
<div class="background-box background-clip-border-box">
  背景绘制到边框区。
</div>

<h2>background-clip: content-box</h2>
<div class="background-box background-clip-content-box">
  背景仅绘制到内容区。
</div>

</body>
</html>
在这个例子中:
.background-box类定义了所有 div 元素的基本样式,包括宽度、高度、内边距 (padding)、边框 (border) 和文本对齐方式 (text-align)。background-image属性指定了背景图像(请替换'https://example.com/path-to-image.jpg'为实际存在的图像URL或相对路径)。background-repeat设置为no-repeat,以防止图像重复。background-size设置为cover,确保图像完全覆盖背景区域并保持比例。
关键点
-
background-origin:- 控制背景图像相对于哪个填充盒绘制,默认是
padding-box:padding-box:背景覆盖内边距区(默认行为)。border-box:背景覆盖边框区,包括边框。content-box:背景仅覆盖内容区,不包括内边距或边框。
- 控制背景图像相对于哪个填充盒绘制,默认是
-
background-clip:- 决定背景绘制的范围,默认也是
border-box,但可以设置为:padding-box:背景绘制到内边距区,不绘制到边框。border-box:背景绘制到边框区(默认行为)。content-box:背景仅绘制到内容区,不包括内边距或边框。
- 决定背景绘制的范围,默认也是
通过调整 background-origin 和 background-clip 的值,你可以更加精细地控制背景图像和颜色的绘制位置和范围,从而实现更复杂的设计效果。这在处理具有复杂结构和样式的页面元素时特别有用。
以上只是 CSS3 背景特性的部分示例。通过组合使用这些属性,你可以创造出丰富多样的视觉效果,从而极大地提升网页的设计质量。
