效果展示
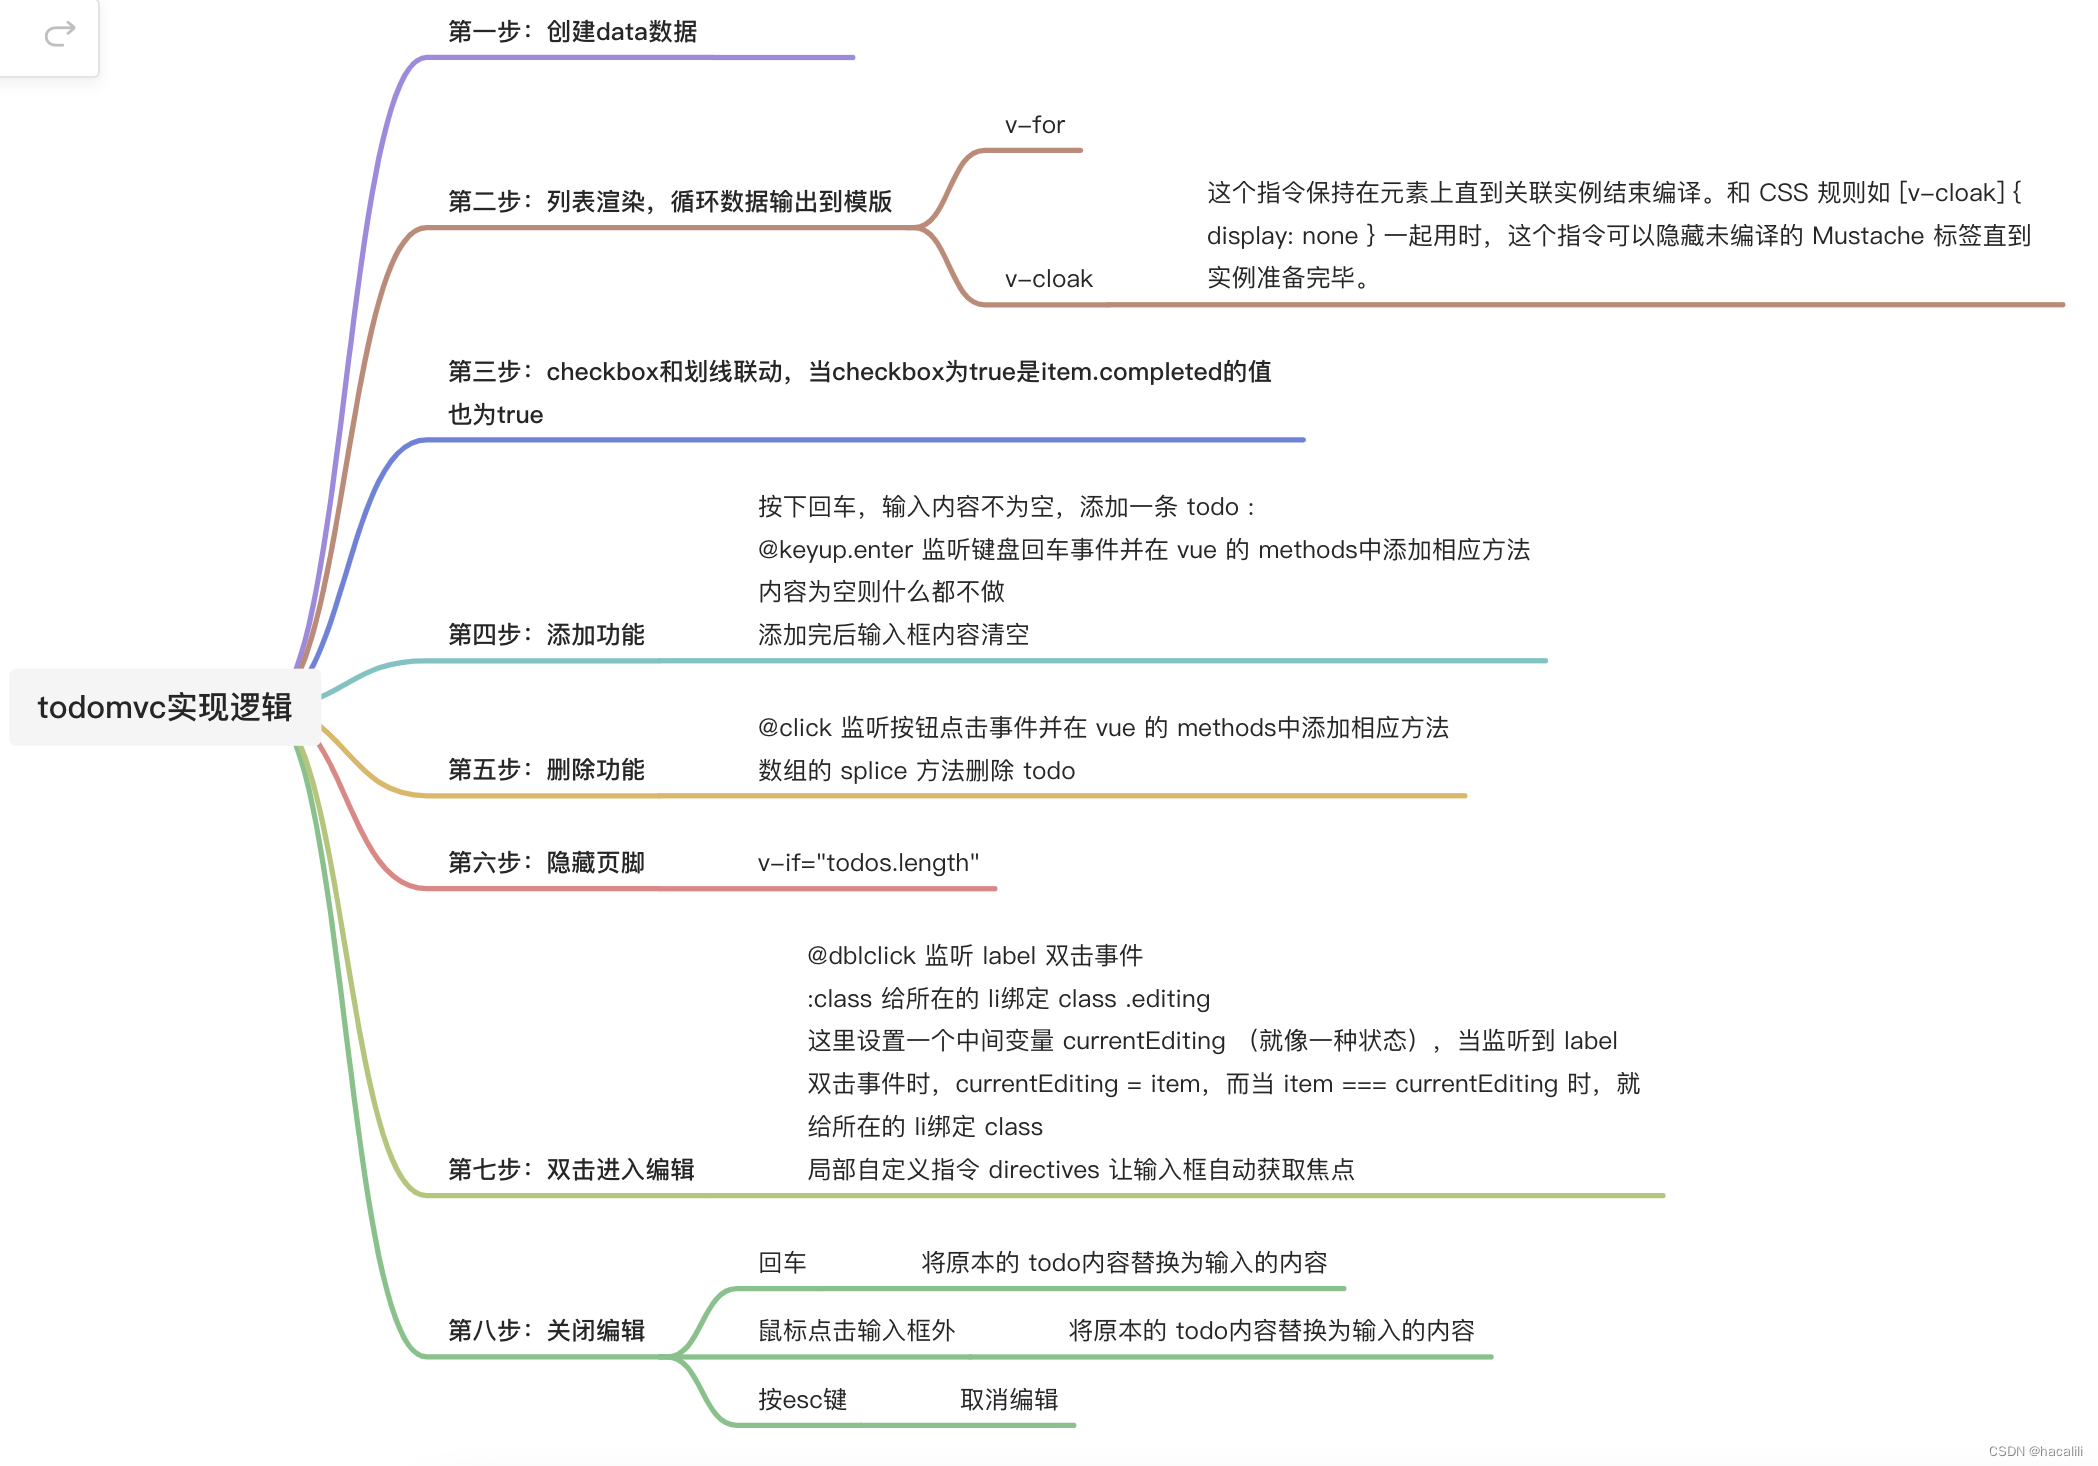
思维导图
Vue
动态绑定样式
<label class="content" :class="{'completed': todo.check}">{{ todo.title }}</label>
.completed {
  text-decoration: line-through;
  color: #ccc;
}
添加任务
app.vue
add(data) {
  if(!data) {
    return
  }
  data = data.trim()
  this.list.push({
    id: this.id,
    title: data,
    check: false
  })
},
main.vue
addItem() {
    this.$emit('add',this.title)
    this.title = ''
}
删除任务
app.vue
remove(index) {
  this.list.splice(index,1)
}
main.vue
removeItem() {
    this.$emit("remove", this.todo);
},
组件通信的方式
props和 e m i t ( 常 用 ) : 父 组 件 向 子 组 件 传 递 数 据 是 通 过 p r o p 传 递 的 , 子 组 件 传 递 数 据 给 父 组 件 是 通 过 emit(常用):父组件向子组件传递数据是通过prop传递的,子组件传递数据给父组件是通过 emit(常用):父组件向子组件传递数据是通过prop传递的,子组件传递数据给父组件是通过emit触发事件来做到的.
a t t r s 和 attrs和 attrs和listeners
中央事件总线(非父子组件间通信)
v-model
provide和inject
p a r e n t 和 parent和 parent和children
vuex
hashchange和history区别
实现功能:
1、记录当前页面的状态(保存或分享当前页的url,再次打开该url时,网页还是保存的(分享)时的状态);
2、可是使用浏览器的前进后退功能(如点击后退按钮,可以使页面回到ajax更新页面之前的状态,url也回到之前的状态)
实现方法:
1、改变url且不让浏览器向服务器发出请求;
2、监测url的变化;
3、截获url地址,并解析出需要的信息来匹配路由规则。
区别:
1、hash模式
这里的hash就是指url尾巴后的#号以及后面的字符。这里的#和css里的#是一个意思。hash也称作锚点,本身是用来做页面定位的,他可以使对应的id元素显示在可视区域内。
由于hash值变化不会导致浏览器向服务器发出请求,而且hash改变会触发hashchange事件,浏览器的进后退也能对其进行控制,所以人们在html5的history出现前,基本都是使用hash来实现前端路由的。他的特点在于:hash虽然出现url中,但不会被包含在HTTP请求中,对后端完全没有影响,因此改变hash不会重新加载页面。hash 本来是拿来做页面定位的,如果拿来做路由的话,原来的锚点功能就不能用了。其次,hash的而传参是基于url的,如果要传递复杂的数据,会有体积的限制
2、history模式
history模式不仅可以在url里放参数,还可以将数据存放在一个特定的对象中。
history———利用了HTML5 History Interface 中新增的pushState()和replaceState()方法。(需要特定浏览器的支持)history不能运用与IE8一下
总结:
这两个方法应用于浏览器的历史纪录站,在当前已有的back、forward、go 的基础之上,他们提供了对历史纪录进行修改的功能,只是当他们执行修改使,虽然改变了当前的url,但你的浏览器不会立即像后端发送请求。
注意:
1、hash模式s下,仅hash符号之前的内容会被包含在请求中,如 http://www.abc.com 因此对于后端来说,即使没有做到对路由的全覆盖,也不会返回404错误;
2、history模式下,前端的url必须和实际后端发起请求的url一致,如http://www.abc.com/book/id 。如果后端缺少对/book/id 的路由处理,将返回404错误。
用法
鼠标移入移出背景色改变
<li
    class="item"
    :list="list"
    v-for="todo in list"
    :key="todo.id"
    :style="{ background: bgColor===todo.id ? '#eee' : 'transparent'}"
    @mouseenter="handle(true,todo.id)"
    @mouseleave="handle(false,todo.id)"
    >
  <div class="view">
    <input type="checkbox" v-model="todo.check" />
    <label class="content">{{ todo.title }}</label>
    <button class="destroy" v-show="isShow" @click="removeItem">x</button>
  </div>
</li>
data() {
	return {
	isShow: false,
	bgColor: 0,
	};
},
methods: {
  handle(flag,id) {
  if (flag) {
  this.bgColor = id;
  this.isShow = true;
  } else {
  this.bgColor = 0;
  this.isShow = false;
  }
  },
}
数组操作方法
删除:
removeTodo: function (todo) {
      this.todos.splice(this.todos.indexOf(todo), 1)
    },
添加:
addTodo: function () {
	// 去除前后空格
	var value = this.newTodo && this.newTodo.trim();
	// 输入为空则不处理
	if (!value) {
		return;
	}
	// TODO: Use a proper UUID instead of `Date.now()`.
	this.todos.push({ id: Date.now(), title: value, completed: false });
	// 清除输入框
	this.newTodo = '';
},
过滤器
var filters = {
  //返回全部项目
  all: function (todos) {
    return todos
  },
  //返回未完成的项目
  active: function (todos) {
    return todos.filter(function (todo) {
      return !todo.completed//filter()只会返回true的数组元素
    })
  },
  //返回完成的项目
  completed: function (todos) {
    return todos.filter(function (todo) {
      return todo.completed
    })
  }
}
将数据存储在localStorage
var STORAGE_KEY = 'todos-vuejs-2.0'

var todoStorage = {
    //将数据提取出来
  fetch: function () {
    var todos = JSON.parse(localStorage.getItem(STORAGE_KEY) || '[]')
    todos.forEach(function (todo, index) {
      todo.id = index
    })
    todoStorage.uid = todos.length
    return todos
  },
  // 将数据存储到localStorage
  save: function (todos) {
    localStorage.setItem(STORAGE_KEY, JSON.stringify(todos))
  }
}
v-if和v-show区别
- v-if和v-show用于视图层进行条件判断视图展示
- v-if的原理是根据判断条件来动态的进行增删DOM元素,v-show是根据判断条件来动态的进行显示和隐藏元素,频繁的进行增删DOM操作会影响页面加载速度和性能
- 当项目程序不是很大的时候,v-if和v-show都可以用来进行判断展示和隐藏(这种场景使用v-if只是影响不大,并不是没有影响);
- 当项目程序比较大的时候,不推荐使用v-if来进行判断展示和隐藏,推荐使用v-show;
- 只有v-if能和v-else连用进行分支判断,v-show是不能和v-else连用的,如果出现多种条件场景的情况下,可以使用v-if来进行判断
编辑任务(自动聚焦输入框)
④<label @dblclick="editTodo(todo)">{{ todo.title }}</label>
...
⑤<input class="edit" type="text"
          v-model="todo.title"
          v-todo-focus="todo == editedTodo"
          @blur="doneEdit(todo)"
          @keyup.enter="doneEdit(todo)"
          @keyup.esc="cancelEdit(todo)">
methods:{
    editTodo: function (todo) {
    //将原本的任务title赋予到临时的beforeEditCache中,然后放在cancelEdit中可以调用
      this.beforeEditCache = todo.title
      this.editedTodo = todo
    },
    doneEdit: function (todo) {
      if (!this.editedTodo) {
        return
      }
      this.editedTodo = null
      todo.title = todo.title.trim()//去除空格
      if (!todo.title) {
        this.removeTodo(todo)
      }
    },
    cancelEdit: function (todo) {
      this.editedTodo = null
      todo.title = this.beforeEditCache
    },
}
...
directives: {
    'todo-focus': function (el, binding) {
      if (binding.value) {
        el.focus()
      }
    }
  }
在④的时候采用@dblclick双击才能触发editTodo方法,值得注意的是,④和⑤在位置上通过css(通过:class实现样式的替换)重合了起来,实现了⑤替换④的操作,然后在⑤中利用了 v-todo-focus将焦点从④转换到了⑤.然后⑤中通过键盘操作来进行完成编辑和取消编辑的方法操作
全选/取消全选
<input class="selectAll" v-model="allDone" type="checkbox" />
filteredTodos: function () {
    return filters[this.visibility](this.todos)
},
remaining: function () {//返回未完成任务的数量
    return filters.active(this.todos).length
},
//全选,其他复选框选中状态影响全选按钮会触发get,全选按钮选中状态影响其他复选框会触发set
allDone: {
    get: function () {
    return this.remaining === 0
    },
    set: function (value) {
    this.todos.forEach(function (todo) {
        todo.completed = value
    })
    }
}
这个get函数和set函数是访问器属性,它们不包含数据值,在读取访问器属性的就会代用getter函数来返回有效的值.在写入访问器属性时会调用setter函数并传入新值.
回到代码当中,这段代码的作用就是,在读取allDone的时候调用 get函数,使图二左下角的任务未完成数为零,在点击①的时候传入value,调用set函数将每一个任务的todo.completed都改成与allDone相同的value,从而实现全选或全不选
点击完成任务
<input class="toggle" type="checkbox" v-model="todo.completed">
这里用v-model进行双向数据绑定,把③这个复选框绑定todo.completed,使得input为√的时候则todo.completed为true
切换任务状态可见
<ul class="filters">
<!-- 选择哪种状态可见 -->
    <li><a href="#/all" :class="{ selected: visibility == 'all' }">All</a></li>
    <li><a href="#/active" :class="{ selected: visibility == 'active' }">Active</a></li>
    <li><a href="#/completed" :class="{ selected: visibility == 'completed' }">Completed</a></li>
</ul>
...
computed: {
    filteredTodos: function () {
        return filters[this.visibility](this.todos)
    },
}
在li中通过:class来给visibility赋值,visibility值变了之后使得css发生相应的变化,然后url变化调用onHashChange 方法,若url后缀变为#/active,
function onHashChange () {
  var visibility = window.location.hash.replace(/#\/?/, '')//获取url后缀并去除/#\/?/多余符号
  if (filters[visibility]) {
  //若filters[visibility]存在则赋予给这个组件内的visibility值(visibility值变化则使computed中的filteredTodos函数返回值变化,则实现切换任务状态可见)
    app.visibility = visibility
  } else {
    window.location.hash = ''//若后缀为空则使组件内的visibility值为'all'
    app.visibility = 'all'
  }
}

window.addEventListener('hashchange', onHashChange)//监听
v-cloak
v-cloak说明之后的代码是隐藏到编译结束为止的,也就是说那段代码只有在满足v-show的条件才会显示出来的
JavaScript
复数单数
pluralize: function (word, count) {
	return word + (count === 1 ? '' : 's');
},
CSS
更改input中placeholder的颜色
input::-webkit-input-placeholder{}