审计概念:
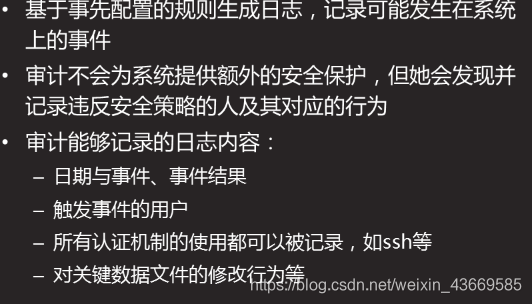
审计的案例:

1.2 配置审计服务
[root@host53 ~]# yum -y install audit
[root@host53 ~]# grep -n "log_file" /etc/audit/auditd.conf # 查看日志文件
7:log_file = /var/log/audit/audit.log
12:max_log_file = 8
19:max_log_file_action = ROTATE
[root@host53 ~]# systemctl status auditd
[root@host53 ~]# systemctl enable auditd
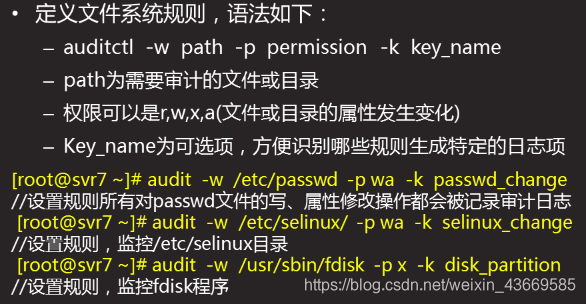
1.3自定义规则
定义临时规则 ( 立即有效)
[root@host53 ~]# auditctl -D 清空所有的规则
[root@host53 ~]# auditctl -l #查看所有的规则
[root@host53 ~]# auditctl -s #查看状态
[root@host53 ~]# auditctl -w /etc/selinux/ -p wa -k plj_selinux #--w 需要审计的目录, -p 权限 -k 自定义日志名字
[root@host53 ~]# auditctl -w /usr/sbin/fdisk -p x -k plj_disk
[root@host53 ~]# auditctl -l
-w /etc/passwd -p wa -k plj_passwd
-w /etc/selinux -p wa -k plj_selinux
-w /usr/sbin/fdisk -p x -k plj_disk
定义永久规则
[root@host53 ~]# vim /etc/audit/rules.d/audit.rules
-w /etc/passwd -p wa -k plj_passwd
-w /etc/selinux -p wa -k plj_selinux
-w /usr/sbin/fdisk -p x -k plj_disk
wq
查看审计日志
[root@host53 ~]# useradd userc
[root@host53 ~]# fdisk
[root@host53 ~]# ausearch -k plj_disk
[root@host53 ~]# ausearch -k plj_disk
1.5 分析审计日志

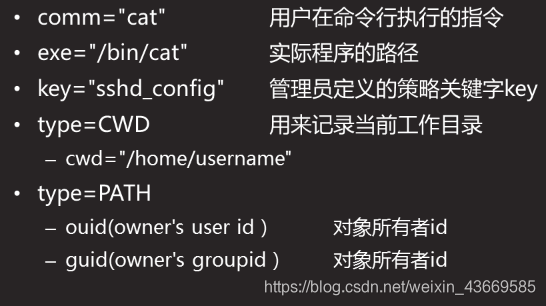
time 日志产生的时间
common 命令名
exec 命令的绝对路径
uid 用户名
exit 返回值是0 表示命令执行成功
comm="useradd" exe="/usr/sbin/useradd"
二服务安全
2.1 网站安全
2.1.1 安装源码nginx服务
nginx (php)
】# yum -y install gcc pcre-devel zlib-devel openssl-devel
2]# tar -zxvf nginx-1.12.2.tar.gz
]# cd nginx-1.12.2/
]# ./configure && make && make install
[root@host50 nginx-1.12.2]# echo "AAA" > /usr/local/nginx/html/a.html
[root@host50 nginx-1.12.2]# echo "B" > /usr/local/nginx/html/b.html
[root@host50 nginx-1.12.2]# echo "C" > /usr/local/nginx/html/c.html
[root@host50 nginx-1.12.2]# /usr/local/nginx/sbin/nginx # 启动服务
[root@host50 nginx-1.12.2]#
[root@host50 nginx-1.12.2]# netstat -anptul | grep :80
[root@host50 nginx-1.12.2]# curl http://192.168.4.50/a.html 验证能访问
AAA
2.1.2 nginx安全配置
1 禁用不需要的模块 -without-http_autoindex_module 默认没有禁止
]# mkdir /usr/local/nginx/html/game
]# echo "one" > /usr/local/nginx/html/game/a1.html
]# echo "two" > /usr/local/nginx/html/game/a2.html
]# vim /usr/local/nginx/conf/nginx.conf
server {
autoindex on ; 开启自动索引
:wq
]# /usr/local/nginx/sbin/nginx -s stop
]# /usr/local/nginx/sbin/nginx
]#firefox http://192.168.4.50/game 列出了目录下的所有网页文件
]# /usr/local/nginx/sbin/nginx -s stop
]# vim /usr/local/nginx/conf/nginx.conf
server {
#autoindex on ;
:wq
]#./configure --without-http_autoindex_module 配置时禁用autoindex模块
]# make && make install
]# /usr/local/nginx/sbin/nginx 启动服务
]#firefox http://192.168.4.50/game 报错(访问必须输入网页名)/game/a1.html game/a2.html 才能显示网页
修改版信息:
[root@host50 nginx-1.12.2]# curl -I http://192.168.4.50/
HTTP/1.1 200 OK
Server: nginx/1.12.2
Date: Wed, 29 May 2019 07:49:10 GMT
Content-Type: text/html
Content-Length: 612
Last-Modified: Wed, 29 May 2019 07:16:34 GMT
Connection: keep-alive
ETag: "5cee31d2-264"
Accept-Ranges: bytes
[root@host50 nginx-1.12.2]# vim +48 src/http/ngx_http_header_filter_module.c
static u_char ngx_http_server_string[] = "Server: GETOUT" CRLF; # 修改红色字体的
static u_char ngx_http_server_full_string[] = "Server: GETOUT" CRLF;
static u_char ngx_http_server_build_string[] = "Server: GETOUT" CRLF;
[root@host50 nginx-1.12.2]# ./configure --without-http_autoindex_module && make && make install
[root@host50 nginx-1.12.2]# /usr/local/nginx/sbin/nginx
[root@host50 nginx-1.12.2]# curl -I http://192.168.4.50
HTTP/1.1 200 OK
Server: GETOUT
Date: Wed, 29 May 2019 07:58:49 GMT
Content-Type: text/html
Content-Length: 612
Last-Modified: Wed, 29 May 2019 07:16:34 GMT
Connection: keep-alive
ETag: "5cee31d2-264"
Accept-Ranges: bytes
限制并发
压力测试:
[root@host50 nginx-1.12.2]# ab -c 100 -n 100 http://192.168.4.50/a.html
ocument Length: 4 bytes
Concurrency Level: 100
Time taken for tests: 0.024 seconds
Complete requests: 100
Failed requests: 0
Write errors: 0
定义 客户端存储空间 客户端ip 地址 内置变量 内存
同一个ip 地址 1S只处理一个 1r/s
burst 5 放在内存5个 # 同一个ip 只同时处理6个
[root@host50 nginx-1.12.2]# vim /usr/local/nginx/conf/nginx.conf
http {
客户端存储空间 客户端ip 地址 内置变量 存储客户端ip地址的内存大小 10M,并命名one ,,
limit_req_zone $binary_remote_addr zone=one:10m rate=1r/s;
``````
server {
limit_req zone=one burst=5;
listen 80;
server_name localhost;
````
[root@host50 nginx-1.12.2]# /usr/local/nginx/sbin/nginx
10个请求 10个连接
[root@host50 nginx-1.12.2]# ab -c 10 -n 10 http://192.168.4.50/a.html
Concurrency Level: 10
Time taken for tests: 5.002 seconds
Complete requests: 10
Failed requests: 4
(Connect: 0, Receive: 0, Length: 4, Exceptions: 0)
~匹配
拒绝非法请求
vim /usr/local/nginx/conf/nginx.conf
server {
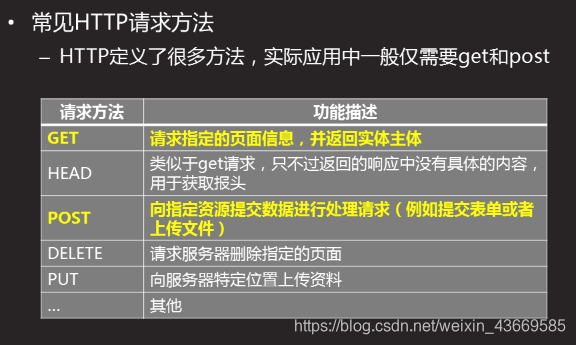
if ($request_method !~ ^(GET|POST)$) {
return 444;
[root@host50 nginx-1.12.2]# /usr/local/nginx/sbin/nginx -t #查看配置文件是否正确
[root@host50 nginx-1.12.2]# /usr/local/nginx/sbin/nginx
[root@host50 nginx-1.12.2]# curl -i -X GET http://192.168.4.50/a.html
HTTP/1.1 200 OK
Server: GETOUT
Date: Wed, 29 May 2019 09:23:03 GMT
Content-Type: text/html
Content-Length: 4
Last-Modified: Wed, 29 May 2019 07:19:30 GMT
Connection: keep-alive
ETag: "5cee3282-4"
Accept-Ranges: bytes
AAA
[root@host50 nginx-1.12.2]# curl -i -X HEAD http://192.168.4.50/a.html
curl: (52) Empty reply from server
2.2 数据库服务 (mariadb)
运行mariadb服务
[root@host50 nginx-1.12.2]# yum -y install mariadb mariadb-server
[root@host50 nginx-1.12.2]# systemctl start mariadb.service
[root@host50 nginx-1.12.2]# ss -anptul | grep :3306
tcp LISTEN 0 50 *:3306 *:* users:(("mysqld",pid=17034,fd=14))
优化配置
1 安全初始配置
2 删除/root/.mysql_history 文件
3 数据备份与恢复
4 授权普通连接用户
安全初始配置
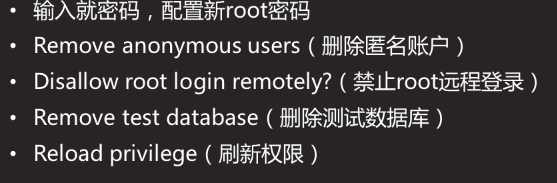
[root@host50 nginx-1.12.2]# mysql_secure_installation 执行初始化安全脚本

All done! If you've completed all of the above steps, your MariaDB
installation should now be secure.
Thanks for using MariaDB!
[root@host50 nginx-1.12.2]# mysql -uroot -p123456 # 现在只能用,你设置的密吗登陆
修改密吗 :
[root@host50 nginx-1.12.2]# mysqladmin -u root -p123456 password 'mysql' # 把密吗修改为mysql
[root@host50 ~]# cat ~/.mysql_history # 查看之前在数据库的操作,需要删除
show grants;
exot
ex
;
exot ex;
show databases;
use test;
show tables;
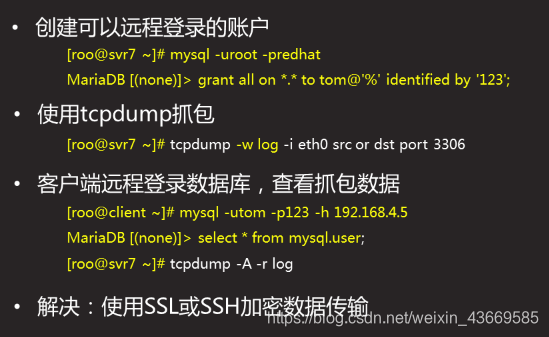
mysql数据不加密
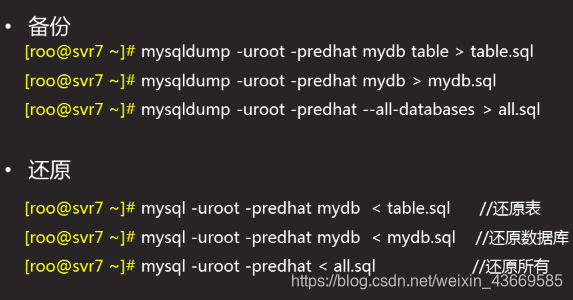
数据备份与恢复
授权普通连接用户
tomcat 安全
隐藏版本信息:
[root@host50 lib]# /usr/local/tomcat/bin/shutdown.sh
[root@host50 lib]# cd /usr/local/tomcat/lib
[root@host50 lib]# yum -y install java-1.8.0-openjdk-devel
[root@host50 lib]# jar -xf catalina.jar #生成org目录
[root@host50 lib]# vim org/apache/catalina/util/ServerInfo.properties
server.info=nginx 修改
server.number=9.0.30.0 修改
server.built=Dec 1 2015 22:30:46 UTC
[root@host50 lib]# vim /usr/local/tomcat/conf/server.xml
<Connector port="8080" protocol="HTTP/1.1"
connectionTimeout="20000"
redirectPort="8443" server="jacob" />
[root@host50 lib]#/usr/local/tomcat/bin/startup.sh
[root@host50 lib]# ps aux | grep -i java
降权启动服务:
/usr/local/tomcat/bin/shutdown.sh
useradd tomcat
chown -R tomcat:tomcat /usr/local/tomcat/
su - -c "/usr/local/tomcat/bin/startup.sh" tomcat
su - -c "/usr/local/tomcat/bin/shutdown.sh" tomcat
ps -aux | grep -i java
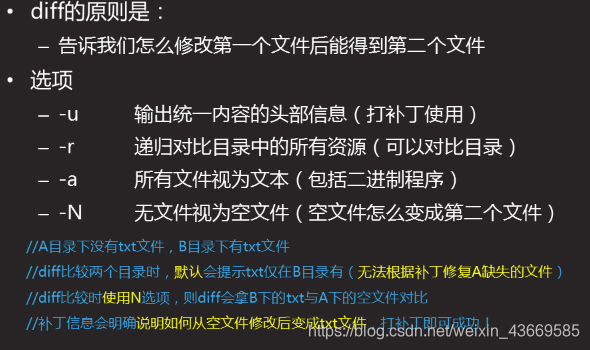
补丁原理
A 主机操作
163 mkdir /demo
164 cd /demo/
165 mkdir {source1,source2}
167 echo "hello world" > source1/test.sh
168 echo "hello the world" > source2/test.sh
169 echo "test" > source2/tmp.txt
170 cp /bin/find source1/
171 cp /bin/find source2/
172 echo "1" >> source2/find
B主机操作 ]# mkdir /demo/source1
A 主机操作
scp -r /demo/source1/* [email protected]:/demo/source1/
]# diff -urN /demo/source1 /demo/source2
]# diff -urN /demo/source1 /demo/source2
]# diff -uraN /demo/source1 /demo/source2 > /root/all.patch 生成补丁文件一定要以 .patch
]# cat /root/all.patch
]# scp /root/all.patch [email protected]:/tmp/
B 主机操作
]# cat /tmp/all.patch
]# patch -p数字 < 补丁文件 //打补丁 #数字表示需要删除多于的路径 :当前路径 + 补丁路径 删除重复的路径 最好在 /下打补丁, 就只需要删除 / 一个 数字为1
补丁路径 :[root@host51 ~]# cat /root/all.patch
diff -uraN /demo/source1/find /soft/v2/find
]# patch -RE < 补丁文件 //撤销补丁
]# cd /demo/source1
]# patch -p3 < /tmp/all.patch 打补丁
patching file find
patching file test.sh
patching file tmp.txt
[root@host51 source1]# ls
find test.sh tmp.txt
[root@host51 source1]# cat tmp.txt
test
[root@host51 source1]# cat test.sh
hello the world
[root@host51 source1]# patch -RE < /tmp/all.patch 撤销补丁 #需要进入到所在的目录下撤销
[root@host51 source1]# ls
find test.sh