系列文章目录
前言
如果整个etcd集群的所有节点宕机,并且通过常规节点重启,无法完成选主,集群无法恢复。本文针对这种情况进行集群恢复指导。如果本地的数据已经损坏,只能通过历史的snapshot进行恢复(前提是保存有snapshot数据)
一、总体恢复流程
整体的恢复流程如下
二、集群故障恢复
2.1 环境信息
使用本地的vmstation创建3个虚拟机,信息如下
| 节点名称 | 节点IP | 节点配置 | 操作系统 | Etcd版本 | Docker版本 |
|---|---|---|---|---|---|
| etcd1 | 192.168.82.128 | 1c1g 20g | CentOS7.4 | v3.5 | 13.1 |
| etcd2 | 192.168.82.129 | 1c1g 20g | CentOS7.4 | v3.5 | 13.1 |
| etcd3 | 192.168.82.130 | 1c1g 20g | CentOS7.4 | v3.5 | 13.1 |
模拟数据,并查看数据情况
export ETCDCTL_API=3
ETCD_ENDPOINTS=192.168.92.128:2379,192.168.92.129:2379,192.168.92.130:2379
for i in {1..100};do etcdctl --endpoints=$ETCD_ENDPOINTS put "/foo-$i" "hello";done
etcdctl --endpoints=$ETCD_ENDPOINTS  get / --prefix --keys-only|wc -l
进行snapshot备份
export ETCDCTL_API=3
ETCD_ENDPOINTS=192.168.92.128:2379
etcdctl --endpoints=$ETCD_ENDPOINTS  snapshot save snapshot.db
备份文件为snapshot.db
2.2 选择一个节点恢复备份数据
2.2.1 从snapshot数据恢复
mv /data/etcd /data/etcd.bak
export ETCDCTL_API=3
ETCD_ENDPOINTS=192.168.92.128:2379
etcdctl --endpoints=$ETCD_ENDPOINTS  snapshot restore snapshot.db --name=etcd1 --initial-cluster etcd1=http://192.168.92.128:2380 --initial-advertise-peer-urls http://192.168.92.128:2380 --data-dir=/data/etcd
2.2.2 etcd1节点需要调整启动参数,启动脚本如下
[root@host-1 /]# cat start_etcd_with_force_new_cluster.sh
#! /bin/sh

name="etcd1"
host="192.168.92.128"
cluster="etcd1=http://192.168.92.128:2380"

docker run -d --privileged=true  -p 2379:2379  -p 2380:2380 -v /data/etcd:/data/etcd   --name $name --net=host  quay.io/coreos/etcd:v3.5.0   /usr/local/bin/etcd --name $name   --data-dir /data/etcd   --listen-client-urls http://$host:2379  --advertise-client-urls http://$host:2379 --listen-peer-urls http://$host:2380   --initial-advertise-peer-urls http://$host:2380   --initial-cluster $cluster  --initial-cluster-token tkn   --initial-cluster-state new --force-new-cluster  --log-level info   --logger zap   --log-outputs stderr
关键参数如下
- –data-dir /data/etcd,需要从当前保存的数据目录加载
- –force-new-cluster,强制启动集群
- –initial-cluster-state new,启动一个新集群,跟–force-new-cluster配合使用
- –initial-cluster $cluster,只配置本节点,形成一个单节点集群
2.2.3 查看数据是否一致
export ETCDCTL_API=3
ETCD_ENDPOINTS=192.168.92.128:2379
etcdctl --endpoints=$ETCD_ENDPOINTS  get / --prefix --keys-only|wc -l
2.2.4 验证集群是否启动
export ETCDCTL_API=3
export ETCD_ENDPOINTS=192.168.92.128:2379
etcdctl --endpoints=$ETCD_ENDPOINTS --write-out=table member list
etcdctl --endpoints=$ETCD_ENDPOINTS --write-out=table endpoint status
2.2 添加第二个节点
2.2.1 添加第2个节点到集群中
export ETCDCTL_API=3
export ETCD_ENDPOINTS=192.168.92.128:2379
etcdctl --endpoints=$ETCD_ENDPOINTS member add etcd2 --peer-urls=http://192.168.92.129:2380
此时由于整体集群是2个节点,第2个节点没有启动,因此不符合raft协议,第1个节点会宕机,需要尽快将第2个节点启动,整体集群才能恢复正常。
2.2.2 删除第2个节点的数据
mv /data/etcd /data/etcd.bak
mkdir -p /data/etcd/
备份数据(以防万一),并创建一个空的数据目录,启动时加入到集群中,并同步数据
2.2.2 启动第2个节点
第2个节点的启动脚本如下
[root@host-2 /]# cat start_etcd.sh
#! /bin/sh

name="etcd2"
host="192.168.92.129"
cluster="etcd1=http://192.168.92.128:2380,etcd2=http://192.168.92.129:2380"

docker run -d --privileged=true  -p 2379:2379  -p 2380:2380 -v /data/etcd:/data/etcd   --name $name --net=host  quay.io/coreos/etcd:v3.5.0   /usr/local/bin/etcd --name $name   --data-dir /data/etcd   --listen-client-urls http://$host:2379  --advertise-client-urls http://$host:2379 --listen-peer-urls http://$host:2380   --initial-advertise-peer-urls http://$host:2380   --initial-cluster $cluster  --initial-cluster-token tkn   --initial-cluster-state existing   --log-level info   --logger zap   --log-outputs stderr
关键参数如下
- –data-dir /data/etcd,需要从当前保存的数据目录加载
- –initial-cluster-state existing,加入已有集群
- –initial-cluster $cluster,只配置2个节点,形成一个2节点集群
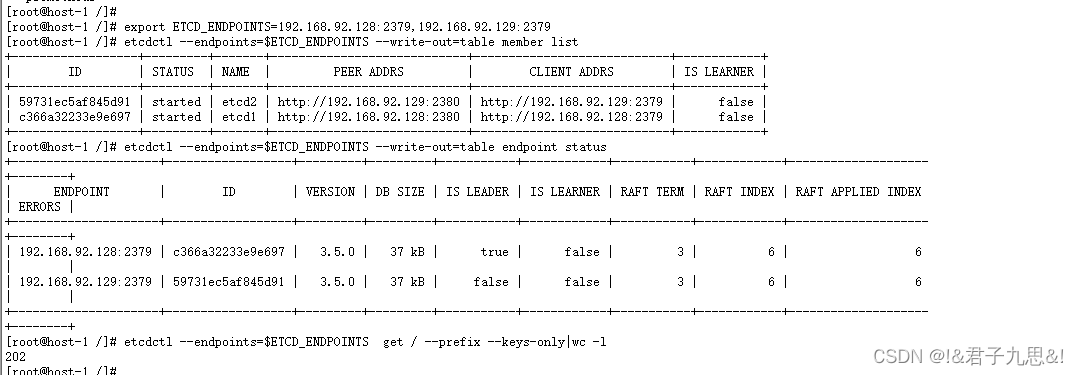
2.2.3 查看集群状态
export ETCDCTL_API=3
export ETCD_ENDPOINTS=192.168.92.128:2379,192.168.92.129:2379
etcdctl --endpoints=$ETCD_ENDPOINTS --write-out=table member list
etcdctl --endpoints=$ETCD_ENDPOINTS --write-out=table endpoint status
etcdctl --endpoints=$ETCD_ENDPOINTS  get / --prefix --keys-only|wc -l
说明
1、etcd的raft协议进行选主时,会考虑数据的offset,offset越大,倾向于获取选主的选票,因此在这种情况下,会选择etcd1作为主
2.3 添加第三个节点
2.2.1 添加第3个节点到集群中
export ETCDCTL_API=3
export ETCD_ENDPOINTS=192.168.92.128:2379
etcdctl --endpoints=$ETCD_ENDPOINTS member add etcd3 --peer-urls=http://192.168.92.130:2380
此时由于整体集群是3个节点,已经有2个节点正常,因此添加第3个节点并不会影响当前的选主情况。
2.2.2 删除第3个节点的数据
mv /data/etcd /data/etcd.bak
mkdir -p /data/etcd/
备份数据(以防万一),并创建一个空的数据目录,启动时加入到集群中,并同步数据
2.2.2 启动第3个节点
第2个节点的启动脚本如下
[root@host-2 /]# cat start_etcd.sh
#! /bin/sh

name="etcd3"
host="192.168.92.130"
cluster="etcd1=http://192.168.92.128:2380,etcd2=http://192.168.92.129:2380,etcd3=http://192.168.92.130:2380"

docker run -d --privileged=true  -p 2379:2379  -p 2380:2380 -v /data/etcd:/data/etcd   --name $name --net=host  quay.io/coreos/etcd:v3.5.0   /usr/local/bin/etcd --name $name   --data-dir /data/etcd   --listen-client-urls http://$host:2379  --advertise-client-urls http://$host:2379 --listen-peer-urls http://$host:2380   --initial-advertise-peer-urls http://$host:2380   --initial-cluster $cluster  --initial-cluster-token tkn   --initial-cluster-state existing   --log-level info   --logger zap   --log-outputs stderr
关键参数如下
- –data-dir /data/etcd,需要从当前保存的数据目录加载
- –initial-cluster-state existing,加入已有集群
- –initial-cluster $cluster,配置3个节点,形成一个3节点集群
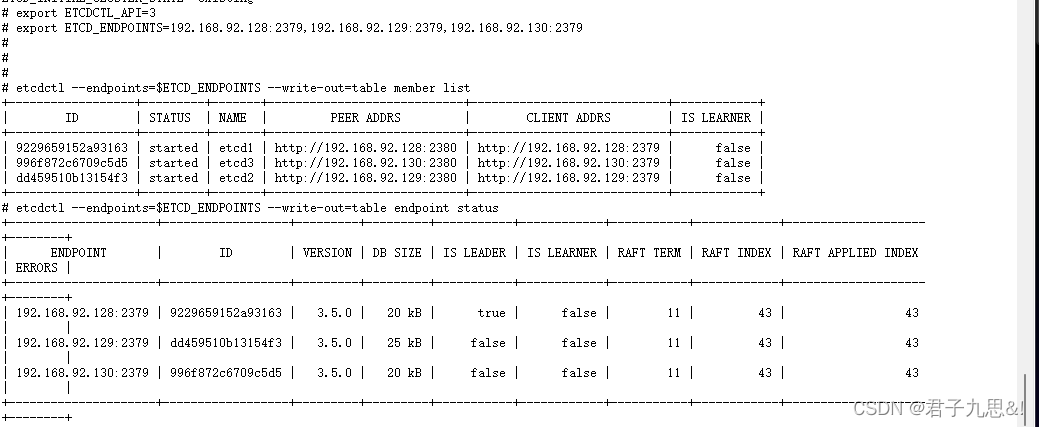
2.2.3 查看集群状态
export ETCDCTL_API=3
export ETCD_ENDPOINTS=192.168.92.128:2379,192.168.92.129:2379,192.168.92.130:2379
etcdctl --endpoints=$ETCD_ENDPOINTS --write-out=table member list
etcdctl --endpoints=$ETCD_ENDPOINTS --write-out=table endpoint status
2.4 调整第1个节点的启动参数
第1个节点的启动参数按照如下方式调整,否则每次第1个节点重启后,会重新创建一个集群,明显是不合适的。
[root@host-2 /]# cat start_etcd.sh
#! /bin/sh

name="etcd1"
host="192.168.92.128"
cluster="etcd1=http://192.168.92.128:2380,etcd2=http://192.168.92.129:2380,etcd3=http://192.168.92.130:2380"

docker run -d --privileged=true  -p 2379:2379  -p 2380:2380 -v /data/etcd:/data/etcd   --name $name --net=host  quay.io/coreos/etcd:v3.5.0   /usr/local/bin/etcd --name $name   --data-dir /data/etcd   --listen-client-urls http://$host:2379  --advertise-client-urls http://$host:2379 --listen-peer-urls http://$host:2380   --initial-advertise-peer-urls http://$host:2380   --initial-cluster $cluster  --initial-cluster-token tkn   --initial-cluster-state existing   --log-level info   --logger zap   --log-outputs stderr
并重启etcd1节点
总结
snapshot是备份的数据,也是最终的数据手段。 由于snapshot的备份一般是周期性的,会有一定的数据丢失。因此最好的选择,应当优先从现有的数据恢复


