文章目录
- 1:Spring boot介绍
- 2:Restful 介绍
- 3:利用Spring boot开发restFul接口
- 4:实战优化
- 5:问题汇总
- 5.1:Invalid bound statement (not found) .mapper文件
- 5.2:a compent requied a bean of "自己定义的mapper类",配置加载不到spring容器中
- 5.3:对于所有的找到不到mapper类或者加载不到配置文件的问题
- 5.4:org.apache.ibatis.binding.BindingException: Invalid bound statement (not found):
- 5.5:Parameter 'xxx' not found. Available parameters are [arg1, arg0, param1, param2].
- 5.6:连接mongo时报错:java.lang.ClassNotFoundException:com.mongodb.event.ConnectionPoolCreatedEvent
- 5.7:Unable to interpret the implicit parameter configuration with dataType: , dataTypeClass: class java.
- 5.8:springboot中的时区问题
- 5.9:文件导入时:Failed to perform cleanup of multipart itemsjava.io.UncheckedIOException: Cannot delete
- 5.10:数据导出excel时:The maximum length of cell contents (text) is 32767 characters
- 5.11:Java后台接收前台请求参数(<>、#¥%&、空格等)被转义成&;lt;gt;";等字符
- 5.12:mybatis查询映射时间date类型时报错:java.sql.SQLException: HOUR_OF_DAY: 0 -> 1
- 5.13:接口响应中文乱码问题
- 5.14:前端传递参数中富文本字段中的标签样式丢失
- 5.15:报错http.converter.HttpMessageConversionException
- 6:mybatis介绍
1:Spring boot介绍
1.1:SpringBoot框架层
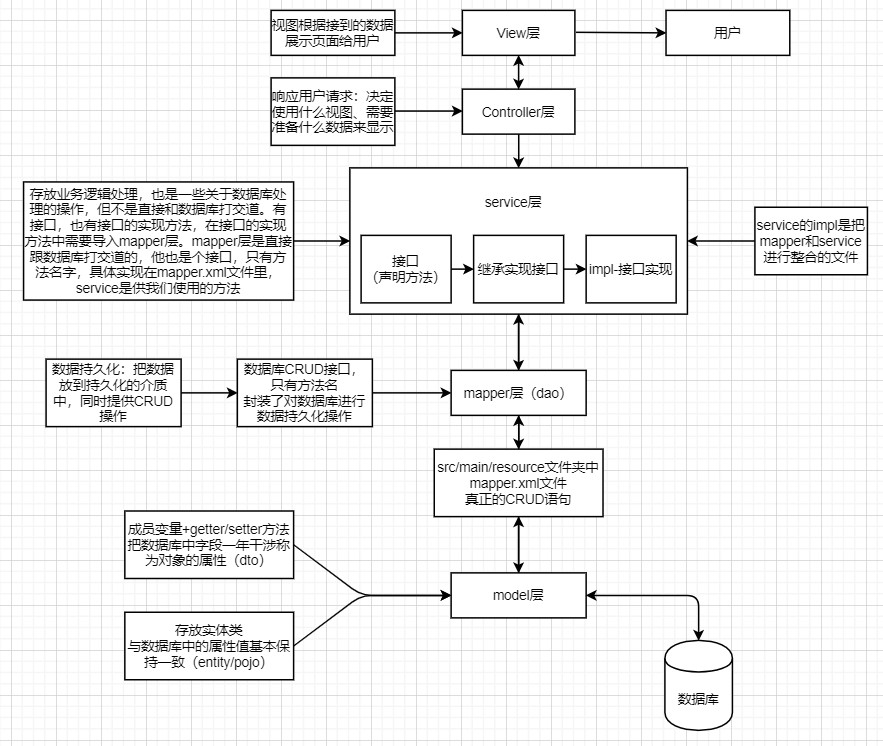
SpringBoot框架一般分为View层、Controller层、Service层、Mapper层、pojo(domain)层。
-
1、View层:视图层,根据接到的数据展示页面给用户
-
2、Controller层:响应用户需求,决定用什么视图,需要准备什么数据来显示。Controller层负责前后端交互,接收前端请求,调用Service层,接收Service层返回的数据,最后返回具体的数据和页面到客户端
-
3、Service层:Service层也可以分为三个方面
(1)接口:用来声明方法 (2)继承实现接口 (3)impl:接口的实现(将mapper和service进行整合的文件) Service层存放业务逻辑处理,有一些关于数据库处理的操作,但是不是直接和数据库打交道,有接口, 也有接口的实现方法,在impl实现接口类中需要导入mapper类,mapper层是直接与数据库进行操作的。 -
- Mapper层:也可以称为DAO层,是数据库CRUD的接口,只有方法名,具体实现在mapper.xml文件中,对数据库进行数据持久化操作(把数据放到持久化的介质中,同时提供CRUD操作)
-
src/main/resource文件夹中的mapper.xml文件,里面存储的是真正的数据库CRUD语句
-
Pojo(domain)层:存放实体类,与数据库中的属性基本保持一致,一般包括getter、setter、toString方法(未使用插件lombok的情况下)
1.2:框架间联系
controller层(处理前台发送的请求)--->service定义接口(业务逻辑)--->serviceImpl(对接口函数进行实现)
--->mapper(Mapper接口,方法名与Mapper.xml中定义的statement的id相同)--->mapper.xml(写sql语句查询数据库)
由此可见,Service层在Mapper层之上,在Controller层之下,既调用Mapper接口,又提供接口给Controller层用。
分层后,访问数据库和进行Service之间分工明确,对Service的需求修改,无需修改Mapper层,如果有访问数据库的新需求,也只需要在Mapper层修改。
1.3:各层框架的使用
1:Controller层
Controller层只处理异常和封装返回的数据给请求方,不直接处理逻辑。处理逻辑在service层。
@RestController注解表示每个方法返回的数据将直接写入响应体
我们有每个操作的路由(@GetMapping、@PostMapping、@PutMapping、@DeleteMapping。对应于 HTTP GET、POST、PUT和DELETE调用)
接口如何处理传参,我们可以使用@RequestParam注解实现获取前端URL中的参数。具体使用见例子
url请求:("/basic/user?name=小红")      此时会将name=小红传递给方法的name参数,多个参数使用&连接。

@GetMapping(value = "/user_info")
    public List<user> getUser(@RequestParam(value = "name") String name) {
    //此时我们可以通过定义的name属性获取url中属性为name的值。
    }
2:service层
对数据中间的逻辑进行处理,校验等
2:mapper层
mapper层一般单独的为一个包,用来定义和mybatis交互的接口。
-
扫描mapper第一种方式
每个mapper接口上添加@Mapper注解 这个注解会通过spring boot启动注解自动扫描 -
扫描mapper第二种方式
在main函数中使用@MapperScan(basePackages = “com.demo.mapper”)标注dao所在的包名,这种方式如果引入会有红色波浪线问题 再加上@Repository这个注解就没有了 -
方式三
在properties或者yml的配置文件中配置mybatis时按照正则匹配扫描相关的包
1.4 多种方式解析springboot application配置文件
如现有变量
autotest:
  server:
    url: http://localhost:8080
- 方式1:Environment 对象。
SpringBoot 可以使用 @Autowired 注解注入 Environment 对象引入全部的配置管理再通过env.get获取
在controller和service类中需要个别少许配置可直接使用如下方式。
@RestController
@RequestMapping("/testCon")
public class BookController {

    @Autowired
    private Environment env;

    @GetMapping("/{id}")
    public void gettest(@PathVariable Integer id){
        System.out.println(env.getProperty("autotest.server.url"));
    }
}
在service中可使用@value(“${property.name}”)获取值。其他地方即可用类名.变量获取值
@Service
@Slf4j
public class AutoTestServiceImpl implements AutoTestService {

    @Value("${autotest.server.url}")
    private String baseUrl;
    ........
-
方式2:创建配置注解类使用@Configuration和ConditionalOnClass
@Configuration注解表明这是一个配置类 -
@Configuration注解
这个是开发当中最常用的注解,他属于是@Component注解的扩展注解,
同@Controller、@Service等几个注解的功能是一样的,只要在类上添加了该注解,
然后在springboot的扫描范围内,启动项目的时候会将该注解修饰的类通过
无参构造器创建出来,然后存入spring容器当中
比如我只加载以autotest开头的配置信息,避免加载全部。也可以使用@Configuration加载全部
场景:一般使用于一些客户端的配置信息,如kafka,elasticsearch、redis等可通过模糊加载配置的方式完成客户端的初始化,再到其他类中通过@Autowired注解引入客户端使用
@ConfigurationProperties(prefix = “autotest”)前缀匹配配置信息
import lombok.Data;
import org.springframework.boot.context.properties.ConfigurationProperties;
import org.springframework.stereotype.Component;


@ConfigurationProperties(prefix = "autotest")
public class AutoProperties {
  private String serverUrl; //变量解析遵循驼峰命名方式会自动解析
......
}
对于复杂变量的取值可以使用@value注解,也可以不用使用驼峰命名法自动解析。
举例如下
@Value(value="${server.url}")
private  String url;//既可以将配置server.url值赋予变量url

  private String serverUrl; //变量解析遵循驼峰命名方式会自动解析
在其他类中使用即可使用@Autowired引入使用
public class PerpertiesTest {
    @Autowired
    public AutoProperties autoProperties;
    }
- 方式3:@Data、@Component注解
@compent注解是为了将该bean交给spring管理
@data注解是lombok的使用,便捷的提供了getter,setter方法。
@Data
@Component
public class AutoProperties {
  private String serverUrl; //变量解析同方式2中一样
......
}
- 方式4:使用YamlMapFactoryBean 或者YamlPropertiesFactoryBean类,两种使用方式一样
  YamlMapFactoryBean yamlMapFactoryBean = new YamlMapFactoryBean();
    //可以加载多个yml文件
    yamlMapFactoryBean.setResources(new ClassPathResource("application.yml"));
    //通过getObject()方法获取Map对象
    Map<String, Object> map = yamlMapFactoryBean.getObject();
1.5:springboot集成各种插件
springboot可以集成各种插件简化开发难度。
比如容器tomcat、mybatis-plus、数据库mysql、redis、消息队列kafka、数据检索elasticsearch、文件服务minio等
Spring Boot内置了嵌入式服务器,如Tomcat、Jetty等,使得应用程序的启动过程非常迅速和简单。开发者只需编写少量的代码即可创建一个可运行的应用程序,并且可以直接通过命令行或简单的Java Main方法来启动
集成插件步骤
- 1、maven依赖引入
- 2、application.yml或者application.properties中添加对应插件的配置
- 3、加载配置信息对插件客户端进行初始化。可参考步骤1.4 多种方式解析springboot application配置文件
- 4、其他类需要使用的地方使用 @Autowired引入
1.5.1 插件集成的自动装配
springBoot这个框架之所以可以通过各种starter无缝融合其他技术的一大主要原因就是springBoot本身的自动化配置功能。所谓自动化配置就是springBoot本身已经预先设置好了一些常用框架的整合类。然后通过类似于ConditionOn这样的条件判断注解,去辨别你的项目中是否有相关的类(或配置)了,进而进行相关配置的初始化。
springBoot预设的自动化配置类都位于spring-boot-autoconfigure这个包中,只要我们搭建了springBoot的项目,这个包就会被引入进来。
默认对kafka,redis,elasticsearch等进行了支持,通过自动装配即可引入使用,其他详见官网springboot自带的一些自动装配类
KafkaAutoConfiguration

DataSourceAutoConfiguration
DataSourceTransactionManagerAutoConfiguration

ElasticsearchClientAutoConfiguration
ElasticsearchDataAutoConfiguration
ElasticsearchRepositoriesAutoConfiguration
ElasticsearchRestClientAutoConfiguration
1.5.1 集成数据源mysql等
springboot2.x默认对数据源加载进行了自动装配。所以不需要自定义配置去实现客户端。
SpringBoot默认数据源自动装配原理
参考org.springframework.boot.autoconfigure.jdbc包下的DataSourceConfigration类
默认支持三种数据源,也就是说如果使用自带的数据源类型配置的话我们就不需要再自定义配置去加载配置文件,初始化客户端了,springboot的自动装配会根据配置的以下几种数据源完成初始化
com.zaxxer.hikari.HikariDataSource (Spring Boot 2.0 以上,默认使用此数据源)

org.apache.tomcat.jdbc.pool.DataSource

org.apache.commons.dbcp2.BasicDataSource
DataSourceConfigration类内容
package org.springframework.boot.autoconfigure.jdbc;

abstract class DataSourceConfiguration {

	@SuppressWarnings("unchecked")
	protected static <T> T createDataSource(DataSourceProperties properties, Class<? extends DataSource> type) {
		return (T) properties.initializeDataSourceBuilder().type(type).build();
	}

  // 根据容器中的情况来进行逻辑判断,添加不同的数据源
	@Configuration
	@ConditionalOnClass(org.apache.tomcat.jdbc.pool.DataSource.class)
	@ConditionalOnMissingBean(DataSource.class)
	@ConditionalOnProperty(name = "spring.datasource.type", havingValue = "org.apache.tomcat.jdbc.pool.DataSource",
			matchIfMissing = true)
	static class Tomcat {

		@Bean
		@ConfigurationProperties(prefix = "spring.datasource.tomcat")
		public org.apache.tomcat.jdbc.pool.DataSource dataSource(DataSourceProperties properties) {
			org.apache.tomcat.jdbc.pool.DataSource dataSource = createDataSource(properties,
					org.apache.tomcat.jdbc.pool.DataSource.class);
			DatabaseDriver databaseDriver = DatabaseDriver.fromJdbcUrl(properties.determineUrl());
			String validationQuery = databaseDriver.getValidationQuery();
			if (validationQuery != null) {
				dataSource.setTestOnBorrow(true);
				dataSource.setValidationQuery(validationQuery);
			}
			return dataSource;
		}

	}

	@Configuration
	@ConditionalOnClass(HikariDataSource.class)
	@ConditionalOnMissingBean(DataSource.class)
	@ConditionalOnProperty(name = "spring.datasource.type", havingValue = "com.zaxxer.hikari.HikariDataSource",
			matchIfMissing = true)
	static class Hikari {

		@Bean
		@ConfigurationProperties(prefix = "spring.datasource.hikari")
		public HikariDataSource dataSource(DataSourceProperties properties) {
			HikariDataSource dataSource = createDataSource(properties, HikariDataSource.class);
			if (StringUtils.hasText(properties.getName())) {
				dataSource.setPoolName(properties.getName());
			}
			return dataSource;
		}

	}

  // 也可以指定其他的数据源
	@Configuration
	@ConditionalOnClass(org.apache.commons.dbcp2.BasicDataSource.class)
	@ConditionalOnMissingBean(DataSource.class)
	@ConditionalOnProperty(name = "spring.datasource.type", havingValue = "org.apache.commons.dbcp2.BasicDataSource",
			matchIfMissing = true)
	static class Dbcp2 {

		@Bean
		@ConfigurationProperties(prefix = "spring.datasource.dbcp2")
		public org.apache.commons.dbcp2.BasicDataSource dataSource(DataSourceProperties properties) {
			return createDataSource(properties, org.apache.commons.dbcp2.BasicDataSource.class);
		}

	}

	@Configuration
	@ConditionalOnMissingBean(DataSource.class)
	@ConditionalOnProperty(name = "spring.datasource.type")
	static class Generic {

		@Bean
		public DataSource dataSource(DataSourceProperties properties) {
      // 使用DataSourceBuilder创建数据源,利用反射创建响应type的数据源,并且绑定相关属性
			return properties.initializeDataSourceBuilder().build();
		}

	}

}
配置举例
--- # 数据源配置
spring:
  datasource:
    type: com.zaxxer.hikari.HikariDataSource
    # 动态数据源文档 https://www.kancloud.cn/tracy5546/dynamic-datasource/content
    dynamic:
      # 性能分析插件(有性能损耗 不建议生产环境使用)
      p6spy: true
      # 设置默认的数据源或者数据源组,默认值即为 master
      primary: master
      # 严格模式 匹配不到数据源则报错
      strict: true
      datasource:
        # 主库数据源
        master:
          type: ${spring.datasource.type}
          driverClassName: com.mysql.cj.jdbc.Driver
          # jdbc 所有参数配置参考 https://lionli.blog.csdn.net/article/details/122018562
          # rewriteBatchedStatements=true 批处理优化 大幅提升批量插入更新删除性能(对数据库有性能损耗 使用批量操作应考虑性能问题)
          url: jdbc:mysql://localhost:3306/test?useUnicode=true&characterEncoding=utf8&zeroDateTimeBehavior=convertToNull&useSSL=true&serverTimezone=GMT%2B8&autoReconnect=true&rewriteBatchedStatements=true&nullCatalogMeansCurrent=true
          username:
          password:
        # 从库数据源
        slave:
          lazy: true
          type: ${spring.datasource.type}
          driverClassName: com.mysql.cj.jdbc.Driver
          url: jdbc:mysql://localhost:3306/ry-flowable-plus?useUnicode=true&characterEncoding=utf8&zeroDateTimeBehavior=convertToNull&useSSL=true&serverTimezone=GMT%2B8&autoReconnect=true&rewriteBatchedStatements=true&nullCatalogMeansCurrent=true
          username:
          password:
jdbc:sqlserver://localhost:1433;DatabaseName=tempdb;SelectMethod=cursor;encrypt=false;rewriteBatchedStatements=true
#          username: SA
#          password: root
      hikari:
        # 最大连接池数量
        maxPoolSize: 20
        # 最小空闲线程数量
        minIdle: 10
        # 配置获取连接等待超时的时间
        connectionTimeout: 30000
        # 校验超时时间
        validationTimeout: 5000
        # 空闲连接存活最大时间,默认10分钟
        idleTimeout: 600000
        # 此属性控制池中连接的最长生命周期,值0表示无限生命周期,默认30分钟
        maxLifetime: 1800000
        # 连接测试query(配置检测连接是否有效)
        connectionTestQuery: SELECT 1
        # 多久检查一次连接的活性
        keepaliveTime: 30000
1.5.2 集成redis
springBoot通过集成spring-data-redis使用对于redis的常用操作。
maven依赖
<!-- 集成redis依赖  -->
<dependency>
    <groupId>org.springframework.boot</groupId>
    <artifactId>spring-boot-starter-data-redis</artifactId>
</dependency>
配置。关于配置和客户端加载,会根据自动使用RedisAutoConfiguration加载。
spring:
  redis:
    host: localhost
    port: 6379
    password: 123456
    database: 0
使用,直接引入RedisTemplate 客户端
@RestController
@RequestMapping("redis")
public class RedisController {

    private final RedisTemplate redisTemplate;

    public RedisController(RedisTemplate redisTemplate) {
        this.redisTemplate = redisTemplate;
    }

    @GetMapping("save")
    public Result save(String key, String value){
        redisTemplate.opsForValue().set(key, value);
        return Result.success();
    }

}
但是正常情况我们去直接调用客户端并不方便,一般会自行再封装一个工具类进行使用。比如
package com.lsqingfeng.springboot.utils;

import org.springframework.beans.factory.annotation.Autowired;
import org.springframework.data.redis.core.RedisTemplate;
import org.springframework.stereotype.Component;

import java.util.List;
import java.util.Map;
import java.util.Set;
import java.util.concurrent.TimeUnit;

/**
 * @className: RedisUtil
 * @description:
 * @author: sh.Liu
 * @date: 2022-03-09 14:07
 */
@Component
public class RedisUtil {

    @Autowired
    private RedisTemplate redisTemplate;
    /**
     * 给一个指定的 key 值附加过期时间
     *
     * @param key
     * @param time
     * @return
     */
    public boolean expire(String key, long time) {
        return redisTemplate.expire(key, time, TimeUnit.SECONDS);
    }
    /**
     * 根据key 获取过期时间
     *
     * @param key
     * @return
     */
    public long getTime(String key) {
        return redisTemplate.getExpire(key, TimeUnit.SECONDS);
    }
    /**
     * 根据key 获取过期时间
     *
     * @param key
     * @return
     */
    public boolean hasKey(String key) {
        return redisTemplate.hasKey(key);
    }
    /**
     * 移除指定key 的过期时间
     *
     * @param key
     * @return
     */
    public boolean persist(String key) {
        return redisTemplate.boundValueOps(key).persist();
    }

    //- - - - - - - - - - - - - - - - - - - - -  String类型 - - - - - - - - - - - - - - - - - - - -

    /**
     * 根据key获取值
     *
     * @param key 键
     * @return 值
     */
    public Object get(String key) {
        return key == null ? null : redisTemplate.opsForValue().get(key);
    }

    /**
     * 将值放入缓存
     *
     * @param key   键
     * @param value 值
     * @return true成功 false 失败
     */
    public void set(String key, String value) {
        redisTemplate.opsForValue().set(key, value);
    }

    /**
     * 将值放入缓存并设置时间
     *
     * @param key   键
     * @param value 值
     * @param time  时间(秒) -1为无期限
     * @return true成功 false 失败
     */
    public void set(String key, String value, long time) {
        if (time > 0) {
            redisTemplate.opsForValue().set(key, value, time, TimeUnit.SECONDS);
        } else {
            redisTemplate.opsForValue().set(key, value);
        }
    }

    /**
     * 批量添加 key (重复的键会覆盖)
     *
     * @param keyAndValue
     */
    public void batchSet(Map<String, String> keyAndValue) {
        redisTemplate.opsForValue().multiSet(keyAndValue);
    }

    /**
     * 批量添加 key-value 只有在键不存在时,才添加
     * map 中只要有一个key存在,则全部不添加
     *
     * @param keyAndValue
     */
    public void batchSetIfAbsent(Map<String, String> keyAndValue) {
        redisTemplate.opsForValue().multiSetIfAbsent(keyAndValue);
    }

    /**
     * 对一个 key-value 的值进行加减操作,
     * 如果该 key 不存在 将创建一个key 并赋值该 number
     * 如果 key 存在,但 value 不是长整型 ,将报错
     *
     * @param key
     * @param number
     */
    public Long increment(String key, long number) {
        return redisTemplate.opsForValue().increment(key, number);
    }

    /**
     * 对一个 key-value 的值进行加减操作,
     * 如果该 key 不存在 将创建一个key 并赋值该 number
     * 如果 key 存在,但 value 不是 纯数字 ,将报错
     *
     * @param key
     * @param number
     */
    public Double increment(String key, double number) {
        return redisTemplate.opsForValue().increment(key, number);
    }

    //- - - - - - - - - - - - - - - - - - - - -  set类型 - - - - - - - - - - - - - - - - - - - -

    /**
     * 将数据放入set缓存
     *
     * @param key 键
     * @return
     */
    public void sSet(String key, String value) {
        redisTemplate.opsForSet().add(key, value);
    }

    /**
     * 获取变量中的值
     *
     * @param key 键
     * @return
     */
    public Set<Object> members(String key) {
        return redisTemplate.opsForSet().members(key);
    }

    /**
     * 随机获取变量中指定个数的元素
     *
     * @param key   键
     * @param count 值
     * @return
     */
    public void randomMembers(String key, long count) {
        redisTemplate.opsForSet().randomMembers(key, count);
    }

    /**
     * 随机获取变量中的元素
     *
     * @param key 键
     * @return
     */
    public Object randomMember(String key) {
        return redisTemplate.opsForSet().randomMember(key);
    }

    /**
     * 弹出变量中的元素
     *
     * @param key 键
     * @return
     */
    public Object pop(String key) {
        return redisTemplate.opsForSet().pop("setValue");
    }

    /**
     * 获取变量中值的长度
     *
     * @param key 键
     * @return
     */
    public long size(String key) {
        return redisTemplate.opsForSet().size(key);
    }

    /**
     * 根据value从一个set中查询,是否存在
     *
     * @param key   键
     * @param value 值
     * @return true 存在 false不存在
     */
    public boolean sHasKey(String key, Object value) {
        return redisTemplate.opsForSet().isMember(key, value);
    }

    /**
     * 检查给定的元素是否在变量中。
     *
     * @param key 键
     * @param obj 元素对象
     * @return
     */
    public boolean isMember(String key, Object obj) {
        return redisTemplate.opsForSet().isMember(key, obj);
    }

    /**
     * 转移变量的元素值到目的变量。
     *
     * @param key     键
     * @param value   元素对象
     * @param destKey 元素对象
     * @return
     */
    public boolean move(String key, String value, String destKey) {
        return redisTemplate.opsForSet().move(key, value, destKey);
    }

    /**
     * 批量移除set缓存中元素
     *
     * @param key    键
     * @param values 值
     * @return
     */
    public void remove(String key, Object... values) {
        redisTemplate.opsForSet().remove(key, values);
    }

    /**
     * 通过给定的key求2个set变量的差值
     *
     * @param key     键
     * @param destKey 键
     * @return
     */
    public Set<Set> difference(String key, String destKey) {
        return redisTemplate.opsForSet().difference(key, destKey);
    }


    //- - - - - - - - - - - - - - - - - - - - -  hash类型 - - - - - - - - - - - - - - - - - - - -

    /**
     * 加入缓存
     *
     * @param key 键
     * @param map 键
     * @return
     */
    public void add(String key, Map<String, String> map) {
        redisTemplate.opsForHash().putAll(key, map);
    }

    /**
     * 获取 key 下的 所有  hashkey 和 value
     *
     * @param key 键
     * @return
     */
    public Map<Object, Object> getHashEntries(String key) {
        return redisTemplate.opsForHash().entries(key);
    }

    /**
     * 验证指定 key 下 有没有指定的 hashkey
     *
     * @param key
     * @param hashKey
     * @return
     */
    public boolean hashKey(String key, String hashKey) {
        return redisTemplate.opsForHash().hasKey(key, hashKey);
    }

    /**
     * 获取指定key的值string
     *
     * @param key  键
     * @param key2 键
     * @return
     */
    public String getMapString(String key, String key2) {
        return redisTemplate.opsForHash().get("map1", "key1").toString();
    }

    /**
     * 获取指定的值Int
     *
     * @param key  键
     * @param key2 键
     * @return
     */
    public Integer getMapInt(String key, String key2) {
        return (Integer) redisTemplate.opsForHash().get("map1", "key1");
    }

    /**
     * 弹出元素并删除
     *
     * @param key 键
     * @return
     */
    public String popValue(String key) {
        return redisTemplate.opsForSet().pop(key).toString();
    }

    /**
     * 删除指定 hash 的 HashKey
     *
     * @param key
     * @param hashKeys
     * @return 删除成功的 数量
     */
    public Long delete(String key, String... hashKeys) {
        return redisTemplate.opsForHash().delete(key, hashKeys);
    }

    /**
     * 给指定 hash 的 hashkey 做增减操作
     *
     * @param key
     * @param hashKey
     * @param number
     * @return
     */
    public Long increment(String key, String hashKey, long number) {
        return redisTemplate.opsForHash().increment(key, hashKey, number);
    }

    /**
     * 给指定 hash 的 hashkey 做增减操作
     *
     * @param key
     * @param hashKey
     * @param number
     * @return
     */
    public Double increment(String key, String hashKey, Double number) {
        return redisTemplate.opsForHash().increment(key, hashKey, number);
    }

    /**
     * 获取 key 下的 所有 hashkey 字段
     *
     * @param key
     * @return
     */
    public Set<Object> hashKeys(String key) {
        return redisTemplate.opsForHash().keys(key);
    }

    /**
     * 获取指定 hash 下面的 键值对 数量
     *
     * @param key
     * @return
     */
    public Long hashSize(String key) {
        return redisTemplate.opsForHash().size(key);
    }

    //- - - - - - - - - - - - - - - - - - - - -  list类型 - - - - - - - - - - - - - - - - - - - -

    /**
     * 在变量左边添加元素值
     *
     * @param key
     * @param value
     * @return
     */
    public void leftPush(String key, Object value) {
        redisTemplate.opsForList().leftPush(key, value);
    }

    /**
     * 获取集合指定位置的值。
     *
     * @param key
     * @param index
     * @return
     */
    public Object index(String key, long index) {
        return redisTemplate.opsForList().index("list", 1);
    }

    /**
     * 获取指定区间的值。
     *
     * @param key
     * @param start
     * @param end
     * @return
     */
    public List<Object> range(String key, long start, long end) {
        return redisTemplate.opsForList().range(key, start, end);
    }

    /**
     * 把最后一个参数值放到指定集合的第一个出现中间参数的前面,
     * 如果中间参数值存在的话。
     *
     * @param key
     * @param pivot
     * @param value
     * @return
     */
    public void leftPush(String key, String pivot, String value) {
        redisTemplate.opsForList().leftPush(key, pivot, value);
    }

    /**
     * 向左边批量添加参数元素。
     *
     * @param key
     * @param values
     * @return
     */
    public void leftPushAll(String key, String... values) {
//        redisTemplate.opsForList().leftPushAll(key,"w","x","y");
        redisTemplate.opsForList().leftPushAll(key, values);
    }

    /**
     * 向集合最右边添加元素。
     *
     * @param key
     * @param value
     * @return
     */
    public void leftPushAll(String key, String value) {
        redisTemplate.opsForList().rightPush(key, value);
    }

    /**
     * 向左边批量添加参数元素。
     *
     * @param key
     * @param values
     * @return
     */
    public void rightPushAll(String key, String... values) {
        //redisTemplate.opsForList().leftPushAll(key,"w","x","y");
        redisTemplate.opsForList().rightPushAll(key, values);
    }

    /**
     * 向已存在的集合中添加元素。
     *
     * @param key
     * @param value
     * @return
     */
    public void rightPushIfPresent(String key, Object value) {
        redisTemplate.opsForList().rightPushIfPresent(key, value);
    }

    /**
     * 向已存在的集合中添加元素。
     *
     * @param key
     * @return
     */
    public long listLength(String key) {
        return redisTemplate.opsForList().size(key);
    }

    /**
     * 移除集合中的左边第一个元素。
     *
     * @param key
     * @return
     */
    public void leftPop(String key) {
        redisTemplate.opsForList().leftPop(key);
    }

    /**
     * 移除集合中左边的元素在等待的时间里,如果超过等待的时间仍没有元素则退出。
     *
     * @param key
     * @return
     */
    public void leftPop(String key, long timeout, TimeUnit unit) {
        redisTemplate.opsForList().leftPop(key, timeout, unit);
    }

    /**
     * 移除集合中右边的元素。
     *
     * @param key
     * @return
     */
    public void rightPop(String key) {
        redisTemplate.opsForList().rightPop(key);
    }

    /**
     * 移除集合中右边的元素在等待的时间里,如果超过等待的时间仍没有元素则退出。
     *
     * @param key
     * @return
     */
    public void rightPop(String key, long timeout, TimeUnit unit) {
        redisTemplate.opsForList().rightPop(key, timeout, unit);
    }
}
如果使用自动装配类不方便可以自己实现
package com.buguagaoshu.redis.config;


import com.fasterxml.jackson.annotation.JsonAutoDetect;
import com.fasterxml.jackson.annotation.PropertyAccessor;
import com.fasterxml.jackson.databind.ObjectMapper;
import com.fasterxml.jackson.databind.jsontype.impl.LaissezFaireSubTypeValidator;
import org.springframework.beans.factory.annotation.Value;
import org.springframework.cache.CacheManager;
import org.springframework.cache.annotation.CachingConfigurerSupport;
import org.springframework.cache.annotation.EnableCaching;
import org.springframework.context.annotation.Bean;
import org.springframework.context.annotation.Configuration;
import org.springframework.data.redis.cache.RedisCacheConfiguration;
import org.springframework.data.redis.cache.RedisCacheManager;
import org.springframework.data.redis.connection.RedisConnectionFactory;
import org.springframework.data.redis.core.RedisTemplate;
import org.springframework.data.redis.serializer.Jackson2JsonRedisSerializer;
import org.springframework.data.redis.serializer.RedisSerializationContext;
import org.springframework.data.redis.serializer.RedisSerializer;
import org.springframework.data.redis.serializer.StringRedisSerializer;

import java.time.Duration;

/**
 * @author Pu Zhiwei {@literal [email protected]}
 * create          2020-03-17 21:08
 * 继承 CachingConfigurerSupport,为了自定义生成 KEY 的策略。可以不继承。
 */
@Configuration
@EnableCaching
public class RedisConfig extends CachingConfigurerSupport {
    @Value("${spring.cache.redis.time-to-live}")
    private Duration timeToLive = Duration.ZERO;

    /**
     * 配置Jackson2JsonRedisSerializer序列化策略
     * */
    private Jackson2JsonRedisSerializer<Object> serializer() {
        // 使用Jackson2JsonRedisSerializer来序列化和反序列化redis的value值
        Jackson2JsonRedisSerializer<Object> jackson2JsonRedisSerializer = new Jackson2JsonRedisSerializer<>(Object.class);
        ObjectMapper objectMapper = new ObjectMapper();

        // 指定要序列化的域,field,get和set,以及修饰符范围,ANY是都有包括private和public
        objectMapper.setVisibility(PropertyAccessor.ALL, JsonAutoDetect.Visibility.ANY);

        objectMapper.enableDefaultTyping(ObjectMapper.DefaultTyping.NON_FINAL);

        // 指定序列化输入的类型,类必须是非final修饰的,final修饰的类,比如String,Integer等会跑出异常
        objectMapper.activateDefaultTyping(LaissezFaireSubTypeValidator.instance, ObjectMapper.DefaultTyping.NON_FINAL);

        jackson2JsonRedisSerializer.setObjectMapper(objectMapper);
        return jackson2JsonRedisSerializer;
    }


    @Bean
    public RedisTemplate<String, Object> redisTemplate(RedisConnectionFactory redisConnectionFactory) {
        RedisTemplate<String, Object> redisTemplate = new RedisTemplate<>();
        redisTemplate.setConnectionFactory(redisConnectionFactory);
        // 用Jackson2JsonRedisSerializer来序列化和反序列化redis的value值
        redisTemplate.setValueSerializer(serializer());

        StringRedisSerializer stringRedisSerializer = new StringRedisSerializer();
        // 使用StringRedisSerializer来序列化和反序列化redis的key值
        redisTemplate.setKeySerializer(stringRedisSerializer);

        // hash的key也采用String的序列化方式
        redisTemplate.setHashKeySerializer(stringRedisSerializer);
        // hash的value序列化方式采用jackson
        redisTemplate.setHashValueSerializer(serializer());
        redisTemplate.afterPropertiesSet();
        return redisTemplate;
    }

    @Bean
    public CacheManager cacheManager(RedisConnectionFactory factory) {
        RedisSerializer<String> redisSerializer = new StringRedisSerializer();
        // 配置序列化(解决乱码的问题)
        RedisCacheConfiguration config = RedisCacheConfiguration.defaultCacheConfig()
                // 缓存有效期
                .entryTtl(timeToLive)
                // 使用StringRedisSerializer来序列化和反序列化redis的key值
                .serializeKeysWith(RedisSerializationContext.SerializationPair.fromSerializer(redisSerializer))
                // 使用Jackson2JsonRedisSerializer来序列化和反序列化redis的value值
                .serializeValuesWith(RedisSerializationContext.SerializationPair.fromSerializer(serializer()))
                // 禁用空值
                .disableCachingNullValues();

        return RedisCacheManager.builder(factory)
                .cacheDefaults(config)
                .build();
    }
}
后续使用的话再通过注解引入封装为redisUtils工具类进行使用
1.6:应用输出运行基本信息
spring boot可以使用spring.banner.location属性更改程序启动时打印的横幅。比如默认的spring boot图形,我们在resources目录下新建banner.txt将需要打印的内容写在其中即可
//                          _ooOoo_                               //
//                         o8888888o                              //
//                         88" . "88                              //
//                         (| ^_^ |)                              //
//                         O\  =  /O                              //
//                      ____/`---'\____                           //
//                    .'  \\|     |//  `.                         //
//                   /  \\|||  :  |||//  \                        //
//                  /  _||||| -:- |||||-  \                       //
//                  |   | \\\  -  /// |   |                       //
//                  | \_|  ''\---/''  |   |                       //
//                  \  .-\__  `-`  ___/-. /                       //
//                ___`. .'  /--.--\  `. . ___                     //
//              ."" '<  `.___\_<|>_/___.'  >'"".                  //
//            | | :  `- \`.;`\ _ /`;.`/ - ` : | |                 //
//            \  \ `-.   \_ __\ /__ _/   .-` /  /                 //
//      ========`-.____`-.___\_____/___.-`____.-'========         //
//                           `=---='                              //
//      ^^^^^^^^^^^^^^^^^^^^^^^^^^^^^^^^^^^^^^^^^^^^^^^^^^        //
//            佛祖保佑       永不宕机      永无BUG                  //

**************************************************************************************
    ${application.title} ${application.version}
    Base on Spring Boot ${spring-boot.version}
**************************************************************************************
System.properties:
--------------------------------------------------------------------------------------
    java.specification.version                = ${java.specification.version}
    java.specification.vendor                 = ${java.specification.vendor}
    java.specification.name                   = ${java.specification.name}
    java.vm.specification.version             = ${java.vm.specification.version}
    java.vm.specification.vendor              = ${java.vm.specification.vendor}
    java.vm.specification.name                = ${java.vm.specification.name}
    java.home                                 = ${java.home}
    java.version                              = ${java.version}
    java.vendor                               = ${java.vendor}
    java.vendor.url                           = ${java.vendor.url}
    java.vm.version                           = ${java.vm.version}
    java.vm.vendor                            = ${java.vm.vendor}
    java.vm.name                              = ${java.vm.name}
    java.class.version                        = ${java.class.version}
    java.class.path                           = ${java.class.path}
    java.library.path                         = ${java.library.path}
    java.io.tmpdir                            = ${java.io.tmpdir}
    java.ext.dirs                             = ${java.ext.dirs}
    os.name                                   = ${os.name}
    os.arch                                   = ${os.arch}
    os.version                                = ${os.version}
    user.name                                 = ${user.name}
    user.home                                 = ${user.home}
    user.dir                                  = ${user.dir}
使用时在application.proerties中配置banner.txt文件的位置。不配置也会默认加载。
spring.banner.location=classpath:banner.txt
运行查看效果
1.7 微服务多服务模块间通信
同一个项目可能存在多个模块、或者多个spring项目间可能需要互相访问接口。
1.7.1:多模块间互相访问
1、使用FeignClient完成服务间调用、
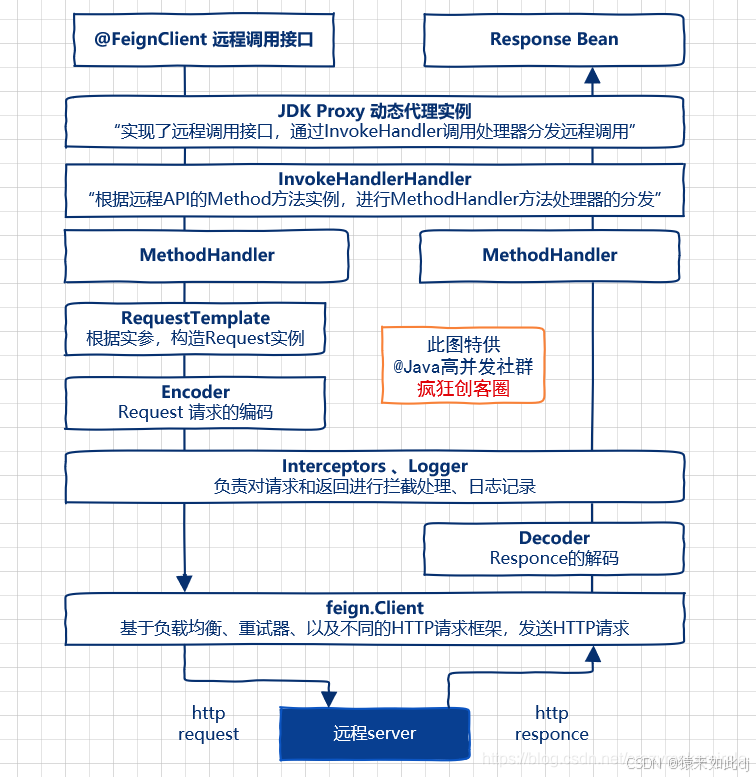
Feign远程调用,核心就是通过一系列的封装和处理,将以JAVA注解的方式定义的远程调用API接口,最终转换成HTTP的请求形式,然后将HTTP的请求的响应结果,解码成JAVA Bean,放回给调用者。Feign远程调用的基本流程,大致如下图所示。
SpringCloud 中 Feign 核心原理
使用示例:定义接口并使用注解,接口是的url地址就是自己的controller的组成的地址
# value的值是自己模块的名称:值一般在yml或者properties的spring.application.name指定
@FeignClient(contextId = "TestClient", value = "TestService")
public interface TestClient {
    @GetMapping({"test/list"})
    List<String> list(@RequestParam("name") String name);
}
2、restTemplate:详见1.5.2步骤
1.7.2:多项目间访问
可以使用restTemplate完成多个项目间调用,也可以完成多模块间的调用。
使用示例:其中的url就是自己要访问的地址
RestTemplate resttemplate=new RestTemplate();
ResponseEntity<String> entity=resttemplate.getForEntity(url,Striing.class)
//拿到响应的数据
String body=entity.getBody();
即可调用
2:Restful 介绍
- http是在应用层的超文本传输协议。
- Restful 基于HTTP、URI、XML、JSON等标准和协议,支持轻量级、跨平台、跨语言的架构设计。是Web服务的一种新的架构风格(一种思想)。
其客户端使用GET、POST、PUT、DELETE4个表示操作方式的动词对服务端资源进行操作:
GET用来获取资源,
POST用来新建资源(也可以用于更新资源),
PUT用来更新资源,
DELETE用来删除资源;
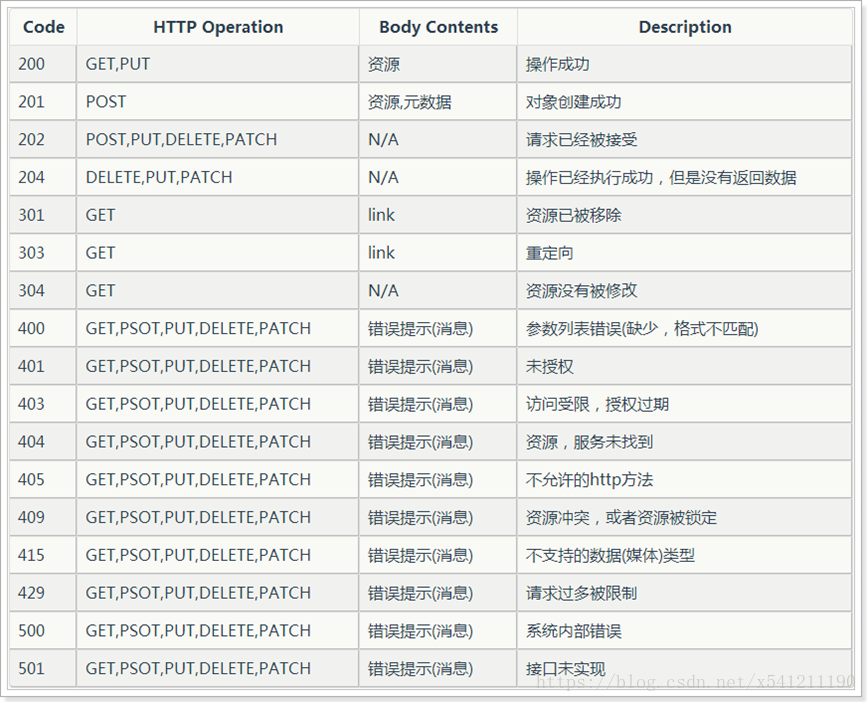
其利用URL进行资源请求,根据http响应码,判断请求状态,进而做出提醒。
1:restFul设计规范
URI = scheme “😕/” host “:” port “/” path [ “?” query ][ “#” fragment ]
scheme: 指底层用的协议,如http、https、ftp
host: 服务器的IP地址或者域名
port: 端口,http默认为80端口
path: 访问资源的路径,就是各种web 框架中定义的route路由
	通常一个RESTful API的path组成如下:
	/{version}/{resources}/{resource_id}
	version:API版本号,有些版本号放置在头信息中也可以,通过控制版本号有利于应用迭代。
	resources:资源,RESTful API推荐用小写英文单词的复数形式。
	resource_id:资源的id,访问或操作该资源。

query: 对于需要传递的参数可以使用?分隔后加到后面,比如key=value等
		查询字符串,为发送给服务器的参数,在这里更多发送数据分页、排序等参数。
fragment: 锚点,定位到页面的资源
1:url命名规范
- 1:不用大写字母,所有单词使用英文且小写。
- 2:连字符用中杠"-“而不用下杠”_"
- 3:正确使用 "/"表示层级关系,URL的层级不要过深,并且越靠前的层级应该相对越稳定
- 4:结尾不要包含正斜杠分隔符"/"
- 5:URL中不出现动词,用请求方式表示动作
*:6:资源表示用复数不要用单数 - 7:不要使用文件扩展名
2:接口传参
接口传参可以使用@RequestParam 或者@RequestBody 或者@pathvariable
- @RequestParam 传参可以是单独的参数;在请求的parma中,根据url的?后,多个值用?key=value,key=value方式拼接
- @RequestBody则是多把参数都封装为了一个bean对象进行传参,放在请求体的body中
- @pathvariable是将请求参数放置在url后,?前,多个值用’,'拼接。
接口传参可以使用@RequestParam注解实现,@RequestParam将查询字符串参数的值绑定属性名到方法的参数属性中。此查询字符串参数不是required。如果请求中不存在,则使用defaultValue
1、以@RequestParam举例
  @PostMapping (value = "/insert")
    public String insert(@RequestParam (value = "host") String host,@RequestParam (value = "port") String port,@RequestParam (value = "email") String email,@RequestParam (value = "report_name") String report_name,@RequestParam (value = "password") String password) {
        String sql = String.format("insert into insert_email_getaway_config_info(host,port,email,password,report_name)  values ('%s','%s','%s','%s','%s')", host, port, email, password, report_name);
        System.out.println(sql);
        hsqlDB.insertData(sql);
        return "insert success";
    }
接口调用,可以使用postman测试接口
url格式如下,后面参数和path用?分隔,各个参数间用&分隔
/insert?host=127.0.0.1&port=8888&email=1&password=1&report_name=小红
一般大于3个的多个参数建议用@RequestBody封装对象来传参,利于维护!!!
 @PostMapping(value = "/insert_email_getaway_config")
    public String insertEmailGetawayConfig(@RequestBody   EmailGetawayBean email) {
    //获取值 email.getEmail();
 }

@Data
public class EmailGetawayBean {
    String host, port, email, password, report_name;
}
1:按接口类型传参
get,post等不同接口类型传参一样没有区别
//接口使用举例 http://localhost:9999/view/get_info?type=sms
 @GetMapping(value = "/get_system_config")
  public List<systemConfig> getSystemConfigInfo(@RequestParam(required = false) String type) {//使用type}
2:按照参数类型传参
1、字符串和其他8种基本数据类型:可以直接传参在@RequestParam 或者@RequestBody 或者@pathvariable中。
2、批量删除等多使用@pathvariable+数组类型。传参为/v1,v2
3、数组[]:@RequestParam+数组时,同样使用param的特征?k=v,k=v格式,多个k一样的会自动合并到数组中。
2.1:数组array传参
 //数组参数:同名请求参数可以直接映射到对应名称的形参数组对象中
    @RequestMapping("/arrayParam")
    @ResponseBody
    public String arrayParam(String[] likes){
        System.out.println("数组参数传递 likes ==> "+ Arrays.toString(likes));
        return "{'module':'array param'}";
    }

url请求传参:/arrayParam?likes=xm,likes=dm
2.2:集合list传参
4、集合List:集合和数组有点区别,list必须明确用@RequestParam否则报错
//集合参数:同名请求参数可以使用@RequestParam注解映射到对应名称的集合对象中作为数据
@RequestMapping("/listParam")
@ResponseBody
public String listParam(@RequestParam List<String> likes){
    System.out.println("集合参数传递 likes ==> "+ likes);
    return "{'module':'list param'}";
}
传参:/listParam?likes=xm,likes=dm
对象多级嵌套的话是/listParam?likes.age=1,likes.name=vm格式
2.3:集合传参
3、list<对象>:这种多使用@RequestBody 注解在body中传参,对象为{"k":"v"},list为[]表示。则list<对象>=[{“k”:“v”},{“k”:“v”}]
4、单独pojo对象。可以使用@RequestParam 或者@RequestBody。
pojo如:
public class Address {
    private String province;
    private String city;
    //setter...getter...略
}
public class User {
    private String name;
    private int age;
    private Address address;
    //setter...getter...略
}
@RequestParam传参
请求参数key的名称要和POJO中属性的名称一致,否则无法封装

2.4:图片文件传参
上传完成后返回存储的路径
2.4.1:图片文件传参多使用MultipartFile file接受前端参数。
如图片上传String imageManager为图片对象json结构利用string接受后再使用json转换类型,直接使用对象类型会报错。MultipartFile file接受传参的文件图片
   @PostMapping
    public AjaxResult add(String imageManager, MultipartFile file) {
        ImageManager image = JSON.parseObject(imageManager, ImageManager.class);
        try {
            //存储绝对路径
            String upload = FileUploadUtils.upload(file);
            image.setAvatar(upload);
        } catch (IOException e) {
            throw new RuntimeException("图片上传失败");
        }
        image.setCreateTime(DateUtils.getNowDate());
        image.setUpdateTime(DateUtils.getNowDate());
        return toAjax(imageManagerService.insertImageManager(image));
    }
2.4.2:图片使用base64传参
前端传输将图片转换为base64格式的字符串,后端接受base64格式的字符串将其转换为二进制再通过文件流写入到服务器上。
/**
 * 将接收的base64转换成图片保存
 *
 * @param imgByte
 *            base64数据
 * @return 成功返回图片保存路径,失败返回false
 */
@RequestMapping("/saveToImgByStr")
@ResponseBody
public Object saveToImgByStr(String imgByte,String cardNum,HttpServletRequest request,HttpServletResponse response) {
	//存储路径
    String destDir = "/upload/image";
   //获取图片内容。Base64码的组成大概是这样的:图片格式;base64,图片内容
    imgByte=imgByte.replaceAll("data:image/png;base64,","");
//base64内容转为二进制
    BASE64Decoder decoder =  new BASE64Decoder();
    byte[] imageByte = null;
    try{
        imageByte = decoder.decodeBuffer(imgByte);
        for (int i = 0; i < imageByte.length; ++i) {
            if (imageByte[i] < 0) {// 调整异常数据
                imageByte[i] += 256;
            }
        }
    } catch (Exception e) {
        e.printStackTrace();
    }

    if (imageByte.length>0) {
        try {
            //获取文件上传的真实路径
            String uploadPath = request.getSession().getServletContext().getRealPath("/");
            //保存文件的路径
            String filepath = destDir + File.separator + createNewDir();
            File destfile = new File(uploadPath + filepath);
            if (!destfile.exists()) {
                destfile.mkdirs();
            }
            //文件新名称,为避免重复可使用uuid替代UUID.fastUUID().toString()
            String fileNameNew = getFileNameNew() + ".png";
            File f = new File(destfile.getAbsoluteFile() + File.separator + fileNameNew);
            /*将字符串转换成二进制,用于显示图片。用文件流写到服务器上,此处还可以使用//使用apache提供的工具类操作流,现成的更方便
          	 	   OutputStream out = new FileOutputStream(f.getPath());
         	 	 /  out.write(imageByte);
       	 	  	    out.flush();
        	     / out.close(); */

	  // 将上面生成的图片格式字符串 imgStr,还原成图片显示
            InputStream in = new ByteArrayInputStream(imageByte);
            FileOutputStream fos = new FileOutputStream(f);
           // BufferedOutputStream bos = new BufferedOutputStream(fos);
            byte[] buf = new byte[1024];
            int length;
            length = in.read(buf, 0, buf.length);

            while (length != -1) {
                fos.write(buf,0,length);
                length = in.read(buf);
            }
            fos.flush();
            fos.close();
            in.close();
            String lastpath = filepath + File.separator + fileNameNew;
            System.out.println("返回图片路径:" + lastpath);
            return lastpath;

        } catch (Exception e) {
            e.printStackTrace();
        } finally {
        }
    }
    return false;
}
2.4.3:后端存储富文本(文字加图片)
方案1:富文本中的图片直接使用base64存储,后端使用String 字符串字段(数据库可使用LongTxt)接受整个富文本内容存储即可。
@ApiOperation("发表新闻")
    @PostMapping("/news")
    public Result updateNews(@RequestParam Long userId,@RequestParam Integer categoryId,@RequestParam String title,@RequestParam String context){
        System.out.println("发表新闻"+context);
        Result result = new Result();
        News news = new News(categoryId,userId,title,context);
        boolean flag = newsService.save(news);
        if (!flag){
            result.setFlag(false);
            return result;
        }
        result.setFlag(true);
        return result;
    }
方案2:富文本中的图片单独接受,接受后上传到服务器的指定路径,后端将副文本中的图片地址转为上传服务器后的地址。
2.5:Map传参
方法有一个map类型的参数或者传递的对象实体内部有一个map参数
/**
     * 请求参数
     */
    private Map<String, Object> params = new HashMap<>();
url请求传参:key值方到中括号里面即可。params[startTime]=value
比如http://localhost/system/interviewInfo/list?params[startTime]=2024-02-28
3:pojo参数校验
使用:要想启动校验必须在controller层类上使用@Validated注解启用否则不会生效。
依赖引用:
实现参数校验,程序必须引⼊ spring-boot-starter-validation 依赖。只是在引⼊ spring-boot-starter-web 依赖时,该模块会⾃动依赖 spring-boot-starter-validation,所以程序中引⼊ spring-boot-starter-web 会⼀并依赖spring-boot-starter-validation 到项⽬中。
使用:参数校验使用在pojo(domain)层或者接口传参里面。
@Size 、@NotBlank、@NotNull这几个注解是java中的
| 注解 | 功能 |
|---|---|
| @AssertFalse | 可以为null,如果不为null的话必须为false |
| @AssertTrue | 可以为null,如果不为null的话必须为true |
| @DecimalMax | 设置不能超过最⼤值 |
| @DecimalMin | 设置不能超过最⼩值 |
| @Digits | 设置必须是数字且数字整数的位数和⼩数的位数必须在指定范围内 |
| @Future | ⽇期必须在当前⽇期的未来 |
| @Past | ⽇期必须在当前⽇期的过去 |
| @Max | 最⼤不得超过此最⼤值 |
| @Min | 最⼤不得⼩于此最⼩值 |
| @NotNull | 不能为null,可以是空 |
| @Min | 最⼤不得⼩于此最⼩值 |
| @Pattern | 必须满⾜指定的正则表达式 |
| @Size | 集合、数组、map等的size()值必须在指定范围内 |
| 必须是email格式 | |
| @Length | ⻓度必须在指定范围内 |
| @NotBlank | 字符串不能为null,字符串trim()后也不能等于“” |
| @NotEmpty | 不能为null,集合、数组、map等size()不能为0;字符串trim()后可以等于“” |
| @Range | 值必须在指定范围内 |
| @URL | 必须是⼀个URL |
在具体的类中
public class User implements Serializable {

	 private Integer id;

	 @NotBlank(message = "⽤户名不能为空!")
	 private String userName;
	 @NotBlank(message = "⽤户密码不能为空!")
	 @Length(min = 6, max = 10,message = "密码⻓度⾄少6位但不超过10位!")
	 private String userPwd;

	 @Length(min = 4, max = 16, message = "登录账号长度为 4-16 位")
     @Pattern(regexp = "^[a-zA-Z][a-zA-Z0-9]{3,17}$", message = "登录账号必须为以字母开头的4-16位的字母```数字组合")
	 @NotBlank(message = "登录账号不能为空!")
	 private String loginNum;

	 @Email
	 private String email;

	 /*
	 省略get set ⽅法
	 */
}
在传参中
   @ApiOperation("单参数校验")
    @PostMapping(value = "/valid/test3")
    public String test3(@Email String email){
        log.info("email is {}", email);
        return "email valid success";
    }
3:利用Spring boot开发restFul接口
1:创建pojo层
用于对应数据库对应的属性,必须提供对应的getter,setter,toString方法。如果使用lombok使用@data注解即可实现。
映射方式1:
Spring boot查询数据库底层使用mybatis进行交互,如果没有明确写明实体类和表的字段映射,就是同名对应,匹配成功则数据交互成功,匹配失败则数据交互失败,导致接收空值。
@Data
public class user{
String name,age,like,addr;
}
映射方式2:使用@data+@TableField
如:把表中的id映射到bean的user_id字段
@TableField(value="id")
private string user_id
多表关联查询存在字段重名或者不一致问题可以使用这种方式解决,不想使用@TableField也可以在mapper.xml配置中使用resultMap来完成映射。详见第四节
2:创建mapper层
底层利用mybatis和数据库进行交互,提供CRUD增删改查操作。
单独创建mapper的包放mapper类,使用注解@Mapper
利用@Select(“${sqlStr}”)创造一个查询语句,将查询结果映射为user
@Param(“sqlStr”) 注解为传参映射作用
@Mapper
public interface QueryHsqlMapper {
//根据路由和传参的sql语句执行数据库操作
    @Select("${sqlStr}")
    List<user> getData(@Param("sqlStr") String sqlStr);
}
利用类上的@Mapper注解可实现springboot启动时自动扫描。
使用步骤如下
- 1:在main函数中使用注解表明该mapper类所在的包位置或者mapper类中使用@mapper注解。选其一
@MapperScan(basePackages = "com.demo.mapper")
@SpringBootApplication()
public class Main {
    private static final Logger LOG = LoggerFactory.getLogger(Main.class.getName());

    public static void main(String[] args) throws IOException, InterruptedException {
        SpringApplication.run(Main.class, args);
   }
- 2:在resources目录下创建mapper.xml配置文件
写入内容
<?xml version="1.0" encoding="UTF-8" ?>
<!DOCTYPE mapper PUBLIC "-//mybatis.org//DTD Mapper 3.0//EN" "http://mybatis.org/dtd/mybatis-3-mapper.dtd" >
<mapper namespace="com.demo.mapper.QueryHsqlMapper">
</mapper>
- 3:application.properties文件中使用mapper.xml配置mybatis
mybatis.mapper-locations=classpath*:/mapper/*Mapper.xml
mybatis.configuration.map-underscore-to-camel-case=true
mybatis.configuration.cache-enabled=false
2.1:和mybatis映射
1:对象内容嵌套映射
1.1:association嵌套映射
可以使用或者标签实现对嵌套结构的查询,mybatis会对该映射字段进行二次查询完成数据映射。
比如现在有两张表:用户表和部门表,希望查询用户表时查询出其所在部门的信息。
希望实现如下的数据结构
 {
            "userId": 1,
            "deptId": 103,
            "userName": "admin",
            "nickName": "管理员",
            "dept": {
                "deptId": 103,
                "deptName": "研发部门"
            }
正常写join查询所有字段后需要新建pojo对象接受很多的映射字段,但是mybatis自带了嵌套映射。
1、下面建表:
create table sys_user (
  user_id           bigint(20)      not null                   comment '用户ID',
  dept_id           bigint(20)      default null               comment '部门ID',
  user_name         varchar(30)     not null                   comment '用户账号',
  nick_name         varchar(30)     not null                   comment '用户昵称'
    primary key (user_id)
) engine=innodb comment = '用户信息表';

create table sys_dept (
  dept_id           bigint(20)      not null                   comment '部门id',
  parent_id         bigint(20)      default 0                  comment '父部门id',
  ancestors         varchar(500)    default ''                 comment '祖级列表',
  dept_name         varchar(30)     default ''                 comment '部门名称',
  primary key (dept_id)
) engine=innodb comment = '部门表';
2、可以在xml中使用association 完成嵌套结构的映射。
通过将column列的结果作为条件进行二次查询数据库将查到的字段映射到SysDept对象结构上,再赋值给SysUser的dept属性(类型必须是SysDept)。这样就会得到希望的数据结构
    <resultMap type="SysUser" id="SysUserResult">
        <id property="userId" column="user_id"/>
        <result property="deptId" column="dept_id"/>
        <result property="userName" column="user_name"/>
        <result property="nickName" column="nick_name"/>
        <association property="dept" column="dept_id" javaType="SysDept" resultMap="deptResult"/>
    </resultMap>
下面介绍association 的多种用法
用法1:直接写其嵌套对象的映射信息
  <!--<association property="tenure" column="se_id" javaType="DbSessionBo">
            <result property="seId" column="se_id"/>
            <result property="area" column="area"/>
            <result property="annual" column="annual"/>
            <result property="session" column="session"/>
            <result property="order" column="order"/>
            <result property="isSession" column="is_session"/>
            <result property="orderId" column="order_id"/>
            <result property="startTime" column="start_time"/>
            <result property="endTime" column="end_time"/>
            <result property="remark" column="remark"/>
            <result property="createBy" column="create_by"/>
            <result property="createTime" column="create_time"/>
            <result property="updateBy" column="update_by"/>
            <result property="updateTime" column="update_time"/>
        </association>-->
用法2:嵌套的对象结构单独定义,使用resultMap再将其引入
    <association property="dept" column="dept_id" javaType="SysDept" resultMap="deptResult"/>

    <resultMap id="deptResult" type="SysDept">
        <id property="deptId" column="dept_id"/>
        <result property="parentId" column="parent_id"/>
        <result property="deptName" column="dept_name"/>
    </resultMap>
用法3:association +select标签。select指定通过那条sql进行查询、实现对映射字段查询的更精确的管理。
<association property="tenure" column="se_id" javaType="DbSessionBo" select="getDepartmentById"></association>

  <select id="getDepartmentById" parameterType="int" resultMap="DbSessionResult">
        select * from sys_dept where dept_id =#{dept_id}
   </select>
我在使用用法1、2中出现了部门字段没有映射的问题,最后采用方法3去解决的。
也可以使用上面几种用法定义resutmap,嵌套的字段名称不同时select查询语句可以使用join多表一次都查询字段出来也会自动映射。
1.2:collection嵌套映射
collection嵌套映射可完成1-1,1-多的映射,比如映射到list
比如select后表1一条数据唯一id对应表2的两条数据。
希望将表2的两条数据嵌套到表1对象的一个list《表2》中。
- id可以使用<id 列指定唯一的主键确定数据。从而将其他的列可以收敛到list中
javaType:选择list,resultMap进行字段映射。
<collection property="fileManagers" javaType="java.util.List" resultMap="SysFileManagerResult"/>
sql中查到的sys_file_manager的相关列就会映射到SysFileManagerResult上,对于suggest_info 中主表同一id的表2数据进行合并到list
select s.*,f.file_id,f.absolute_path from suggest_info s left join sys_file_manager f on s.su_id=f.su_id
基本类型的映射:比如两个表join后某个列path出现了多个值需要映射到List中
pojo中
 private List<String> file;

xml中:
<collection property="file" ofType="java.lang.String">
            <result column="path"/>
        </collection>
3:创建service层
1:创建接口
2:实现接口,使用注解@Slf4j @Service
public interface QueryHsqlDB {
    List<user> getData(String sqlStr);
}

@Slf4j
@Service
public class QueryHsqlDBImple implements QueryHsqlDB {
    @Resource
    QueryHsqlMapper   mapper;

    @Override
    public List<user> getData(String sqlStr) {
        List<user> data = mapper.getData(sqlStr);
        return data;
    }
}
4:创建controller层
定义请求的方式(get/put/post/delete),请求的路径等,使用注解
@RestController
@CrossOrigin
@RequestMapping({“/data”}) //定义url访问的路径
@RestController
@CrossOrigin
@RequestMapping({"/data"})
public class Controller {

    @Resource
    private QueryHsqlDB queryHsqlDB;

    @GetMapping(value = "/user")
    public List<user> getuser() {
    String sql="select * from  user";
    return queryHsqlDB.getData(sql)
}
访问时路径即可/data/user即会调用getuser方法,将返回结果传给客户端
此种方式查询的sql是写死的,存在硬编码的问题,后续进行优化。
5:配置application.properties和yml
springboot配置文件有两种格式包括properties和yml,名字都是application。
5.1 application.properties和yml书写
springboot采用properties文件作为总配置文件,默认application.properties放在src/main/resource文件,在、该配置文件中可以使用通配符*用来表示相同类型的文件。比如多个Mapper.xml
下面介绍一些常用配置
# tomcat启动也就是访问web的端口号
server.port=11080
#xml扫描,多个目录用逗号或者分号分隔(告诉 Mapper 所对应的 XML 文件位置)
mybatis.mapper-locations=classpath*:/mapper/*Mapper.xml
# 是否开启自动驼峰命名规则(camel case)映射,即从经典数据库列名 A_COLUMN(下划线命名) 到经典 Java 属性名 aColumn(驼峰命名) 的类似映射
mybatis.configuration.map-underscore-to-camel-case=true

#jdbc数据库相关配置
#指定数据库驱动
spring.datasource.driver-class-name=com.mysql.cj.jdbc.Driver
#数据库jdbc连接url地址,serverTimezone设置数据库时区东八区
spring.datasource.url=jdbc:mysql://127.0.0.1:3306/login?characterEncoding=UTF-8&serverTimezone=GMT%2B8
#数据库账号
spring.datasource.username=root
spring.datasource.password=root

数据库的创建表和插入数据
#建表,利用*实现模糊匹配
spring.datasource.schema=classpath:create*.sql
#插入数据
#进行该配置后,每次启动程序,程序都会运行resources/insert.sql文件,对数据库的数据操作,相当于往表中插入数据。
spring.datasource.data=classpath:insert*.sql

#前端的静态资源加载,一般为resoources路径下的文件,个人创建/resources/templates目录存放
spring.resources.static-locations=classpath:templates/
spring.mvc.view.suffix=.html

# 自定义属性用于配置启动时自动打开浏览器
openProject.isOpen=true
openProject.web.openUrl=http://localhost:${server.port}/#/
自定义属性配置
#自定义属性
com.name="111"
com.name1="222"
 # 取值需要在类上使用@Configuration注解后再使用@Value(value="${com.name}")的方式获取赋值并使用
@Value(value="${com.name}")
private  String name;//既可以将name值赋予变量
yml格式配置文件书写规范
1、通过缩进(推荐两个空格)区分层次(不能使用tab缩进,否则会报错),较properties更具可读性
2、属性名命名可以使用驼峰命名法,也可以使用-或者_,比如用户名可以是userName,user-name,USER_NAME,意思都是一样的
3、键值对的书写形式,key跟着冒号,然后空格(不能少),然后是value
6:springboot启动自动打开浏览器
windows和linux均可,使用@Configuration完成和配置文件的映射,用@Value(“${属性}”) 获取属性的值
先在application.properties中定义属性
server.port=9999
openProject.web.openUrl=http://localhost:${server.port}/#/
@Configuration
public class GetLinuxIp {
    @Value("${openProject.web.openUrl}")   //完成属性映射
    private static String url;
    private static final Logger LOG = LoggerFactory.getLogger(GetLinuxIp.class.getName());

    public static String getInet4Address() {   //获取运行服务器的ip
        Enumeration<NetworkInterface> nis;
        String ip = null;
        try {
            nis = NetworkInterface.getNetworkInterfaces();
            for (; nis.hasMoreElements();) {
                NetworkInterface ni = nis.nextElement();
                Enumeration<InetAddress> ias = ni.getInetAddresses();
                for (; ias.hasMoreElements();) {
                    InetAddress ia = ias.nextElement();
                    //ia instanceof Inet6Address && !ia.equals("")
                    if (ia instanceof Inet4Address && !ia.getHostAddress().equals("127.0.0.1")) {
                        ip = ia.getHostAddress();
                    }
                }
            }
        } catch (SocketException e) {
            e.printStackTrace();
        }
        return ip;
    }

    public static void AutoOpenUrl() throws InterruptedException, IOException {//打开服务器的逻辑实现
        Runtime run = Runtime.getRuntime();
        String os = System.getProperty("os.name").toLowerCase();
        if (os.indexOf("win") >= 0) { //判断操作系统
            try {
                run.exec("rundll32 url.dll,FileProtocolHandler " + url);

            } catch (Exception e) {
                e.printStackTrace();
                LOG.error(e.getMessage());
            }
        } else if (os.indexOf("nix") >= 0 || os.indexOf("nux") >= 0) {
            String currentIp = GetLinuxIp.getInet4Address();
            String[] browsers = {"firefox", "opera", "konqueror", "epiphany", "mozilla", "netscape"};
            String browser = null;
            for (int count = 0; count < browsers.length && browser == null; count++) {
                if (Runtime.getRuntime().exec(
                        new String[]{"which", browsers[count]}).waitFor() == 0) {
                    browser = browsers[count];
                }
            }
            if (browser != null) {
                Runtime.getRuntime().exec(new String[]{browser, url.replaceAll("localhost", currentIp)});
            }
        }
        LOG.info("启动浏览器打开项目成功:" + url);
    }
}
7:创建表和插入表
一般用于测试或者demo中的数据模拟,比如结合hsqldb等内存数据库,表的加载可以在application.properties中进行使用,详见步骤5。
比如创建用户表:create.sql
CREATE TABLE  user_info(
user_id  varchar(255) NOT NULL PRIMARY KEY, // PRIMARY KEY设置主键
name  varchar(255) DEFAULT NULL,
age varchar(255) DEFAULT NULL,
like  varchar(255) DEFAULT NULL,
addr  varchar(255) DEFAULT NULL
);
进行数据插入:insert.sql
insert into user_info values("001","小红","18","篮球","西安");
7:主类启动服务
SpringApplication提供了一种方便的方法来引导从main()方法启动的 Spring 应用程序。在许多情况下,您可以委托给静态SpringApplication.run方法,如下例所示:
如果在mapper类中已经使用了@mapper注解此处就不需要@MapperScan(basePackages = “com.demo.mapper”)
@MapperScan(basePackages = "com.demo.mapper") //用于扫描mapper文件,一般指定到包路径,在mapper层使用@mapper注解同理两种均可
@SpringBootApplication()  //main函数的固定注解
public class Main {
    private static final Logger LOG = LoggerFactory.getLogger(Main.class.getName());

    public static void main(String[] args) throws IOException, InterruptedException {
        SpringApplication.run(Main.class, args); //指定启动的主类即可
        LOG.info("started......");
} }
8:单元测试
常用测试工具
JUnit :单元测试 Java 应用程序的事实标准。

Spring Test & Spring Boot Test:Spring Boot 应用程序的实用程序和集成测试支持。

AssertJ:一个流畅的断言库。

Hamcrest:匹配器对象库(也称为约束或谓词)。

Mockito:Java 模拟框架。

JSONassert : JSON 的断言库。

JsonPath:JSON 的 XPath。
@SpringBootTest 指定测试类在SpringBoot环境下运行
@RunWith(SpringJUnit4ClassRunner.class)
@SpringBootTest(classes = Main.class, webEnvironment = SpringBootTest.WebEnvironment.RANDOM_PORT)
public class ControllerTest {

    @Autowired
    private WebApplicationContext webApplicationContext;
    private MockMvc mockMvc;

    @Before
    public void setUp() {
        mockMvc = MockMvcBuilders.webAppContextSetup(webApplicationContext).build();//建议使用这种
    }

    @Test   /*用于模拟接口请求查看返回的结果*/
    public void testGet() throws Exception {
        ResultActions perform = mockMvc.perform(MockMvcRequestBuilders.get("/data"));
        String contentAsString = perform.andReturn().getResponse().getContentAsString();
        System.out.println(contentAsString);
        Assert.assertTrue(contentAsString.contains("小红"));
    }
9:项目pom.xml依赖
连接mysql的话需要引入相关依赖。
springboot常用依赖说明
依赖说明:
1:mybatis和mybatis-plus只引入其中一个包就行了,不要重复
2:结合spring boot引入的必须是 **<artifactId>mybatis-plus-spring-boot-starter</artifactId>**不能是mybatis-plus-core。否则会导致加载mapper.xml配置文件失败,报**Invalid bound statement (not found)**
 <groupId>org.example</groupId>
    <artifactId>smhll_redis_restful</artifactId>
    <version>1.0-SNAPSHOT</version>

    <name>smhll_redis_restful</name>
    <!-- FIXME change it to the project's website -->
    <url>http://www.example.com</url>

    <properties>
        <project.build.sourceEncoding>UTF-8</project.build.sourceEncoding>
        <maven.compiler.source>1.7</maven.compiler.source>
        <maven.compiler.target>1.7</maven.compiler.target>

        <project.reporting.outputEncoding>UTF-8</project.reporting.outputEncoding>
        <java.version>1.8</java.version>
        <fastjson>1.2.41</fastjson>
        <springboot>1.5.15.RELEASE</springboot>
        <redis.version>4.2.0</redis.version>

        <lombok.version>1.18.20</lombok.version>
        <commons.io.version>2.5</commons.io.version>
        <mybatis.version>2.1.2</mybatis.version>
        <commons.version>3.11</commons.version>
    </properties>


    <dependencies>
        <dependency>
            <groupId>junit</groupId>
            <artifactId>junit</artifactId>
            <version>4.13.2</version>
            <scope>test</scope>
        </dependency>

        <dependency>
            <groupId>org.springframework.boot</groupId>
            <artifactId>spring-boot-starter-test</artifactId>
                  <version>${springboot}</version>
            <scope>test</scope>
        </dependency>


<!--   -->
        <dependency>
            <groupId>org.mybatis.spring.boot</groupId>
            <artifactId>mybatis-spring-boot-starter</artifactId>
            <version>${mybatis.version}</version>
        </dependency>


        <dependency>
            <groupId>org.springframework.boot</groupId>
            <artifactId>spring-boot-starter-web</artifactId>
            <version>${springboot}</version>
        </dependency>

        <dependency>
            <groupId>org.springframework.boot</groupId>
            <artifactId>spring-boot-devtools</artifactId>
            <optional>true</optional>
            <version>${springboot}</version>
        </dependency>

        <dependency>
            <groupId>org.springframework.boot</groupId>
            <artifactId>spring-boot-starter</artifactId>
            <version>${springboot}</version>
        </dependency>

        <dependency>
            <groupId>org.springframework.boot</groupId>
            <artifactId>spring-boot-starter-data-redis</artifactId>
            <version>${springboot}</version>
        </dependency>

        <dependency>
            <groupId>com.alibaba</groupId>
            <artifactId>fastjson</artifactId>
            <version>${fastjson}</version>
        </dependency>

        <dependency>
            <groupId>com.google.code.gson</groupId>
            <artifactId>gson</artifactId>
        </dependency>
        <!-- 添加内存数据库 org.hsqldb用于测试 -->
        <dependency>
            <groupId>org.hsqldb</groupId>
            <artifactId>hsqldb</artifactId>
        </dependency>

        <dependency>
            <groupId>org.apache.commons</groupId>
            <artifactId>commons-lang3</artifactId>
            <version>${commons.version}</version>
        </dependency>

        <dependency>
            <groupId>org.projectlombok</groupId>
            <artifactId>lombok</artifactId>
            <version>${lombok.version}</version>
            <scope>provided</scope>
        </dependency>
        <dependency>
            <groupId>org.slf4j</groupId>
            <artifactId>slf4j-api</artifactId>
            <version>1.7.25</version>
        </dependency>

        <!--还是引入其中一个实现类-->
        <dependency>
            <groupId>org.slf4j</groupId>
            <artifactId>slf4j-log4j12</artifactId>
            <version>1.7.21</version>
        </dependency>
    </dependencies>
    <!--项目打包依赖-->
    <build>
        <plugins>
<!-- 打包插件,默认版本为最新的,若在pom中指定了springboot版本则为其版本,必须和使用的springboot版本保持一致-->
            <plugin>
                <groupId>org.springframework.boot</groupId>
                <artifactId>spring-boot-maven-plugin</artifactId>
                <!--保证打包时可以将依赖也直接到到jar包中,不配置此处打的只有class文件-->
                <executions>
                    <execution>
                        <goals>
                            <goal>repackage</goal>
                        </goals>
                    </execution>
                </executions>
            </plugin>
            <plugin>
                <groupId>org.apache.maven.plugins</groupId>
                <artifactId>maven-assembly-plugin</artifactId>
                <configuration>
                    <descriptorRefs>
                        <descriptorRef>jar-with-dependencies</descriptorRef>
                    </descriptorRefs>
                    <archive>
                        <manifest>     <!--指定运行测试类的路径-->
                            <mainClass>com.demo.Main</mainClass>
                        </manifest>
                    </archive>
                </configuration>
                <version>3.3.0</version>
            </plugin>
<-- 编辑代码的插件--!>
            <plugin>
                <groupId>org.apache.maven.plugins</groupId>
                <artifactId>maven-compiler-plugin</artifactId>
                <configuration>
                    <source>8</source>
                    <target>8</target>
                </configuration>
            </plugin>
        </plugins>
    </build>
4:实战优化
4.1:第三节优化
关于第三节中controller中的sql硬编码问题进行优化。
采用sql放在mapper.xml中进行维护,后期更新配置不用改代码
4.2:springboot多条sql事务
事务是为了保证每个用户的每个操作都是一致的,只有失败或者成功。
比如controller接口中插入数据需要同时插入A、B两表,不使用事务的话可能存在一个成功一个失败的情况造成数据错误。
springboot提供了@Transactional 注解用来实现事务,使用在类或者方法上。
比如下面的方法,接口中同时执行两次insert,只能同时失败或全成功
   @Transactional
    @PostMapping()
    public R<Void> add(@Validated(AddGroup.class) @RequestBody DbUser bo) {

        SysUser sysUser = new SysUser();
		sysUser.set**;

        Long l = userService.insertUserByDB(sysUser);
        if (l>0){
            bo.setUserId(l);
        }else {
            return toAjax(0);
        }
        return toAjax(iDbUserService.insertByBo(bo));
    }
4.4:获取springboot中的application.properties等配置文件中的配置
获取方式可以通过注解解析配置文件等多种方式
方式1: Environment 注入
private Environment environment;
4.5:输出执行sql日志
1:引入依赖
 <dependency>
            <groupId>org.springframework.boot</groupId>
            <artifactId>spring-boot-starter</artifactId>
            <version>${springboot}</version>
        </dependency>
2:在application.properties配置日志
# 日志配置
logging:
  level:
    com.yd: debug
    org.springframework: warn
3:配置logback.yaml
可以通过此配置配置不同包下的输出日志级别,还可配置日志输出的文件路径格式等。
<logger name="com.yd" level="debug" />
5:问题汇总
5.1:Invalid bound statement (not found) .mapper文件
用mapper.xml映射文件中的 namespace 和 select 标签的 id 去需要我们是mapper类中的方法
原因1:配置文件中的包名和方法名可能写错找不到方法
原因2:mapper.xml配置文件压根没有找到。
解决1:修改正确的配置文件完成映射
解决2:查看配置文件的路径,同时必须在application.properties中进行配置。pom.xml依赖包必须用**<artifactId>mybatis-plus-spring-boot-starter</artifactId>**不能是mybatis-plus-core。否则会导致加载mapper.xml配置不到,报这种问题
5.2:a compent requied a bean of “自己定义的mapper类”,配置加载不到spring容器中
使用的mybatis maven依赖不能是mybatis-plus-boot-starter,必须是**<artifactId>mybatis-plus-spring-boot-starter</artifactId>**。
5.3:对于所有的找到不到mapper类或者加载不到配置文件的问题
1:查看相关注解是否添加,以及是否正确
2:application.yaml配置中是否配置mybatis.mapper-locations或者mybatis-plus.mapper-locations
用哪个必须和自己引用的依赖包是一致,否则找不到
3:resource下定义的*.mapper.xml中配置namespace 和 select 标签的 id 必须正确
4:mybatis引入的maven依赖必须是两个之一,不需要其他mybatis依赖了
<artifactId>mybatis-plus-spring-boot-starter</artifactId>`
<artifactId>mybatis-spring-boot-starter</artifactId>`
5.4:org.apache.ibatis.binding.BindingException: Invalid bound statement (not found):
网上已经有很多文章说明可能导致这个报错的原因,无非是以下几种:
1.检查xml文件的namespace是否正确,id和方法名是否一致
2.Mapper.java的方法在Mapper.xml中没有,然后执行Mapper的方法会报此
3.xxxMapper.java的方法返回值是List,而select元素没有正确配置ResultMap,或者只配置ResultType
4.mapper.xml中配置是否正确,返回值传参和bean对象是否能映射上,映射失败会报问题。
我的问题是在mapper.xml中指定了databaseId=“mysql”,删除后就正常运行了
5.5:Parameter ‘xxx’ not found. Available parameters are [arg1, arg0, param1, param2].
传入的参数和sppring容器中的参数映射失败了,在mapper,service层的方法参数上都加上**(@Param(“value”) String value)**,对传参加入注解完成映射就可以了
5.6:连接mongo时报错:java.lang.ClassNotFoundException:com.mongodb.event.ConnectionPoolCreatedEvent
在mongo驱动程序页面上:http://mongodb.github.io/mongo-java-driver/3.0/driver/getting-started/installation-guide/#mongodb-driver
您将看到以下文字:
注意:mongodb-driver需要以下依赖项:bson和mongodb-driver-core
因此,您需要以下所有依赖来完成这项工作:
mongodb-driver-3.0.1.jar,mongodb-driver-core-3.0.1.jar,bson-3.0.1.jar
将其依赖的jar包导入即可正常运行
5.7:Unable to interpret the implicit parameter configuration with dataType: , dataTypeClass: class java.
这是因为Swagger中的注解@ApiImplicitParam有一个属性为dataTypeClass,该属性的默认值为Void.class,因为没有指定dataTypeClass属性的值,所以报该警告信息。
解决:在@ApiImplicitParam注解上加上dataTypeClass属性的值,例如:
@ApiImplicitParams({
        @ApiImplicitParam(name = "username", value = "用户名", dataTypeClass = String.class, required = true)
})
5.8:springboot中的时区问题
sprinbboot中的时间主要涉及new Date()获取时间,dateformat、和数据库的交互、服务器时间四大步骤。在四大步骤中进行时区获取、时间转换格式化(Jackson框架)、时间的赋值时可能存在时间差问题。默认时区为Utc时区会和中国时区相差8小时,导致我们获取的时间会有问题
各步骤解决如下:
- 1:服务器时间(包括服务器和容器)
1.1:保证自己服务器的时间是正确的:
可执行date命令查看,不正确先进行服务器时间校验
1.2:若服务或者依赖的数据库等部署在docker容器中也需要保证自己容器的时间是正确的。dockerId是服务的容器di或者容器名称
docker cp /usr/share/zoneinfo/Asia/Shanghai dockerId:/etc/localtime - 2:时间格式化
在代码对象的属性上使用@JsonFormat(pattern=“yyyy-MM-dd HH:mm:ss”)注解或者使用SimpleDateFormat dateFormat = new SimpleDateFormat("yyyy-MM-dd");Date stationTime = dateFormat.parse(dateFormat.format(PayEndTime())时存在时间格式化
默认时区都是Utc时区。需要指定为东八区中国时区,
方法1:全局时区配置:在配置文件中添加
spring.jackson.date-format=yyyy-MM-dd HH:mm:ss
spring.jackson.time-zone=GMT+8
方法2:局部时区设置,在使用格式化的地方指定时区
@JsonFormat(pattern="yyyy-MM-dd HH:mm:ss", timezone = "GMT+8")
private Date time;
- 3:数据库时区配置,在url中加serverTimezone=GMT%2B8
url: jdbc:mysql://xxx:xx/db?useUnicode=true&characterEncoding=utf8&zeroDateTimeBehavior=convertToNull&serverTimezone=GMT%2B8
5.9:文件导入时:Failed to perform cleanup of multipart itemsjava.io.UncheckedIOException: Cannot delete
文件导入使用MultipartFile传参转stream流时未及时关闭
解决1:在finally中关闭stream:inputStream.close()
解决2:在获取stream时可以使用 Lombok 框架 @Cleanup 注解,主动释放资源:
5.10:数据导出excel时:The maximum length of cell contents (text) is 32767 characters
原因:excel导出时单个单元格的最大字符默认是32767,当数据过长时就会报错,所以需要在创建workbook.createSheet()后调用此方法即可。
public static void resetCellMaxTextLength() {
        SpreadsheetVersion excel2007 = SpreadsheetVersion.EXCEL2007;
        if (Integer.MAX_VALUE != excel2007.getMaxTextLength()) {
            Field field;
            try {
                field = excel2007.getClass().getDeclaredField("_maxTextLength");
                field.setAccessible(true);
                field.set(excel2007,Integer.MAX_VALUE);
            } catch (Exception e) {
                e.printStackTrace();
            }
        }
    }
5.11:Java后台接收前台请求参数(<>、#¥%&、空格等)被转义成&;lt;gt;";等字符
后台做个处理:(利用org.apache.commons.lang包里的StringEscapeUtils解码方法)
String category = StringEscapeUtils.unescapeHtml(request.getParameter(“参数名”));
5.12:mybatis查询映射时间date类型时报错:java.sql.SQLException: HOUR_OF_DAY: 0 -> 1
问题描述:mysql数据库中字段类型为date,查询时pojo字段类型为date。JsonFormat格式化数据。
  @JsonFormat(pattern = "yyyy-MM-dd", timezone = "GMT+8")
    private Date startTime;
查询mysql时间类型某条数据突然报错java.sql.SQLException: HOUR_OF_DAY: 0 -> 1。排查发现时间是1986-05-04。分析得到此时间是夏令时时间。
夏令时时间如下,也就是说字段使用date类型、东八区时区转换时候,下列的的时间转换可能会出现问题,
1992年起,夏令时暂停实行。
1935年至1951年,每年5月1日至9月30日
1952年3月1日至10月31日
1953年至1954年,每年4月1日至10月31日
1955年至1956年,每年5月1日至9月30日
1957年至1959年,每年4月1日至9月30日
1960年至1961年,每年6月1日至9月30日
1974年至1975年,每年4月1日至10月31日
1979年7月1日至9月30日
1986年至1991年,每年4月中旬的第一个星期日2时起至9月中旬的第一个星期日2时止。具体如下:
1986年5月4日至9月14日,
1987年4月12日至9月13日,
1988年4月10日至9月11日,
1989年4月16日至9月17日,
1990年4月15日至9月16日,
1991年4月14日至9月15日。
解决:
1、在 MySQL 的连接参数上加入useLegacyDatetimeCode=false和serverTimezone=Asia/Shanghai,此种方式实测数据库使用date类型时无效
2、将代码里面的生日类型从Date改为LocalDate,实测有效
  @JsonFormat(pattern = "yyyy-MM-dd", timezone = "GMT+8")
    private LocalDate startTime;
3、方式3数据库定义时候字段使用dateTime类型,实测有效
上面三种方式都可以尝试一下。
- GMT+8 和 Asia/Shanghai 的区别
GMT+8 因为没有位置信息,所以无法使用夏令时
Asia/Shanghai 使用夏令时
5.13:接口响应中文乱码问题
流程spriingboot-mybatis-数据库。
常见的中文乱码问题是因为spriingboot解析中文导致的,此时进行设置编码。
方法1:在application.yaml中配置 charset: UTF-8
server:
	servlet:
		encoding:
			charset: UTF-8
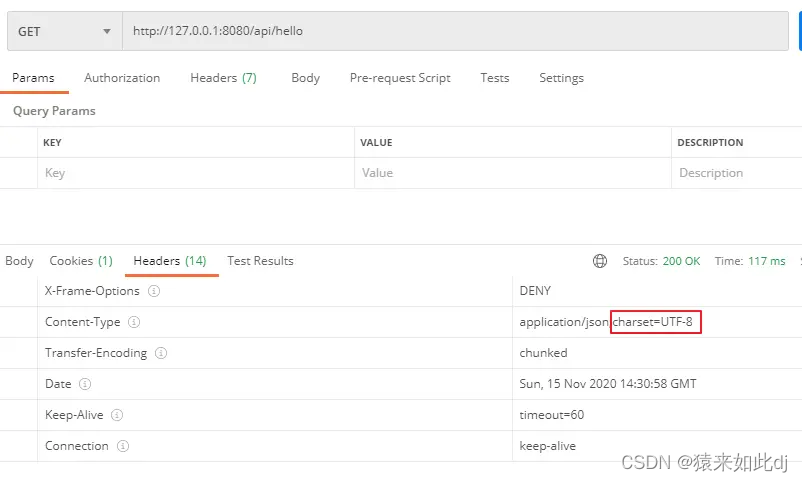
方法2:在api上指明响应编码
@GetMapping(value = "/api", produces = "application/json;charset=UTF-8")
设置后即可在响应的head中看到编码格式
若上述问题仍旧无法解决中文乱码进行数据库乱码排查。(我的修改后还是乱码是因为mysql容器默认编码不是utf-8导致的,参见下面方式2解决)
方法1:查看数据库中表的数据中文是否乱码。乱码的话设置表的编码格式。
建表和数据库的时候指定编码格式
CHARSET=utf8mb4 COLLATE=utf8mb4_0900_ai_ci;
方式2:若使用的是docker mysql,则修改容器的编码格式为C.UTF-8即可
docker exec -it mysql env LANG=C.UTF-8 bash
此时若还是乱码则吧数据清除后重新入库即可正常。
5.14:前端传递参数中富文本字段中的标签样式丢失
现象:前端传递html样式参数如 "content": "<p>2222</p>"到后端后发现样式丢失为 “content”: “2222”
解决
配置文件application.yml配置了
xss拦截攻击,默认会把字符串中含有代码的标签过滤,把需要用的接口加上成功解决

5.15:报错http.converter.HttpMessageConversionException
pojo类传参创建时报错org.springframework.http.converter.HttpMessageConversionException,问题一般发生在使用@data注解和自己加了构造器的情况下,删除自己加的构造器即可。
6:mybatis介绍
mybatis-plus官网介绍:https://baomidou.com/
mybatis官网介绍:https://mybatis.net.cn/
6.1:介绍
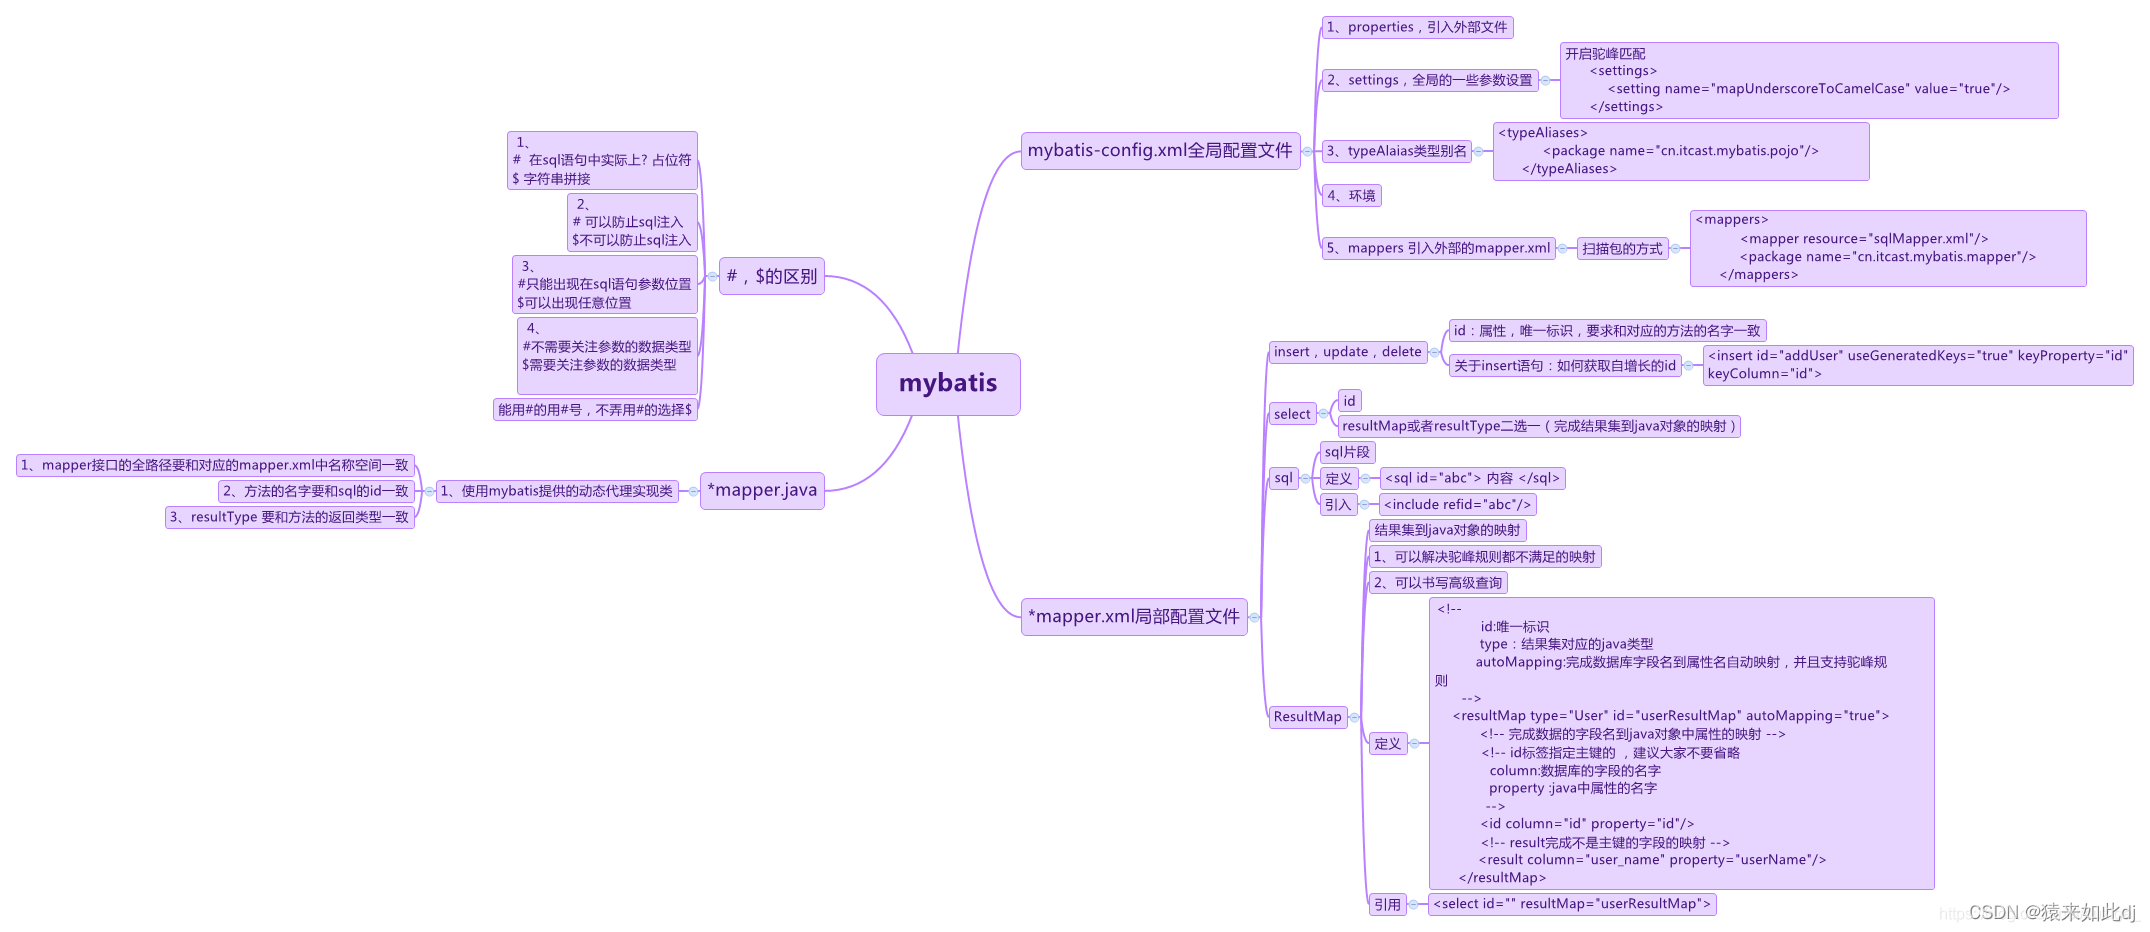
6.2:mapper.xml详解
MyBatis的关注点在POJO与SQL之间的映射关系,mapper.xml就是实现这种关系的。里面还可以加if判断,foreach循环等操作。接口类型包括select查询,insert插入,delete删除等等对于sql语句。
<?xml version="1.0" encoding="UTF-8" ?>
<!DOCTYPE mapper PUBLIC "-//mybatis.org//DTD Mapper 3.0//EN"
        "http://mybatis.org/dtd/mybatis-3-mapper.dtd">
<mapper namespace="com.training.mapper.UserMapper">

    <!--定义接口方法对应的 SQL 语句,传参通过mapper类传入-->
     <select id="findByName" parameterType="String" resultType="com.training.entity.User">
        select * from user where name=#{name}
    </select>

    <!--多个传参时parameterType可以忽略,取值通过下标取值-->
	<select id="getByNameAge" resultType="com.xf.pojo.User">
       select * from t_user where name = #{0} and age = #{1}
</select>
</mapper>
namespace:配置我们mapper类的位置
select id:配置我们的mapper类中的查询方法名,
parameterType:定义传参的类型
resultType:sql查询结果映射到那个pojo类
对于pojo字段映射麻烦的关联查询可以使用resultMap 映射
<resultMap type="customer" id="customerMap">
       <id property="id" column="c_id"/>
       <result property="name" column="c_name"/>
</resultMap>

<!--type是pojo类名,id是定义resultMap 自己的id,用于在写sql模块时resultType属性进行配置-->
6.3:mybatis写入获取自增主键
springboot+mybatis+mysql
数据写入mysql,mysql表设置了自增主键,现在从spring写接口进行数据插入。
1:controller层传参使用封装的bean对象,不用传主键
2:mapper将bean对象传入
3:mapper.xml配置 <insert id=“id” useGeneratedKeys="true"后。mybatis会去查找最大的主键然后赋值给bean对象完成传参,此处我们只用#{id}就可获取值
 <insert id="id" useGeneratedKeys="true" keyProperty="id">
        INSERT INTO t_user(id,username,password) VALUES(#{id}, #{username}, #{password});
   </insert>
6.4:@注解实现插入字段值自动填充
在pojo中可以使用 注解在对应的操作时自动更新某字段,比如创建时间,更新时间,而不用自己去处理。
- 1、普通字段 @TableField(fill = FieldFill.INSERT_UPDATE)
使用步骤 - 自定义对拦截器进行实现,并在拦截器中对公共字段进行赋值,比如创建时间等
1、实现MetaObjectHandler 接口,对其中自动注入的参数进行统一赋值
2、pojo字段上使用注解 @TableField(fill = FieldFill.INSERT_UPDATE)
实现MetaObjectHandler 接口
@Slf4j
public class CreateAndUpdateMetaObjectHandler implements MetaObjectHandler {

    @Override
    public void insertFill(MetaObject metaObject) {
        try {
            if (ObjectUtil.isNotNull(metaObject) && metaObject.getOriginalObject() instanceof BaseEntity) {
                BaseEntity baseEntity = (BaseEntity) metaObject.getOriginalObject();
                Date current = ObjectUtil.isNotNull(baseEntity.getCreateTime())
                    ? baseEntity.getCreateTime() : new Date();
                baseEntity.setCreateTime(current);
                baseEntity.setUpdateTime(current);
                String username = StringUtils.isNotBlank(baseEntity.getCreateBy())
                    ? baseEntity.getCreateBy() : getLoginUsername();
                // 当前已登录 且 创建人为空 则填充
                baseEntity.setCreateBy(username);
                // 当前已登录 且 更新人为空 则填充
                baseEntity.setUpdateBy(username);
            }
        } catch (Exception e) {
            throw new ServiceException("自动注入异常 => " + e.getMessage(), HttpStatus.HTTP_UNAUTHORIZED);
        }
    }

    @Override
    public void updateFill(MetaObject metaObject) {
        try {
            if (ObjectUtil.isNotNull(metaObject) && metaObject.getOriginalObject() instanceof BaseEntity) {
                BaseEntity baseEntity = (BaseEntity) metaObject.getOriginalObject();
                Date current = new Date();
                // 更新时间填充(不管为不为空)
                baseEntity.setUpdateTime(current);
                String username = getLoginUsername();
                // 当前已登录 更新人填充(不管为不为空)
                if (StringUtils.isNotBlank(username)) {
                    baseEntity.setUpdateBy(username);
                }
            }
        } catch (Exception e) {
            throw new ServiceException("自动注入异常 => " + e.getMessage(), HttpStatus.HTTP_UNAUTHORIZED);
        }
    }

    /**
     * 获取登录用户名
     */
    private String getLoginUsername() {
        LoginUser loginUser;
        try {
            loginUser = LoginHelper.getLoginUser();
        } catch (Exception e) {
            log.warn("自动注入警告 => 用户未登录");
            return null;
        }
        return ObjectUtil.isNotNull(loginUser) ? loginUser.getUsername() : null;
    }

}
- 2、主键字段:对于主键自动注入,在主键字段上使用注解 @TableId(value = “user_id”,type = IdType.AUTO)
示例
 /**
     * 用户id
     */
    @TableId(value = "user_id",type = IdType.AUTO)
    private Long userId;
6.4:resutMap复杂映射
可以使用和实现复杂对象、list、map的嵌套
可以实现<id 定义唯一结果列从而实现其他列数据的汇聚。
比如表1学生表,表2分数表。希望实现每个学生所有的学科分数在一个结果中
resutMap和查询sql
<resultMap type="com.mobile.ipc.domain.LzCount" id="LzCountResult">
        <id property="userId" column="db_id"/>
        <result property="userName" column="user_name"/>
        <result property="sum" column="sum"/>
        <collection property="rules" ofType="com.mobile.ipc.domain.DbRule"  javaType="java.util.ArrayList">
            <id property="id" column="rule_id"/>
            <result property="rule" column="rule"/>
            <result property="score" column="score"/>
        </collection>

    </resultMap>
    <select id="queryCount" parameterType="String" resultMap="LzCountResult">
        select e.db_id,e.user_name,e.rule_id,e.rule,e.score from (
        select a.db_id,d.user_name,a.rule_id,r.rule,sum(r.score) as score from lz_activity a
        inner join db_user d on a.db_id=d.user_id
        inner join db_rule r on a.rule_id=r.id
        <where>
            <if test="userName != null and userName != '' ">d.user_name like CONCAT(CONCAT('%', #{userName}), '%')</if>
        </where>
        GROUP BY a.db_id,a.rule_id
        ) e
    </select>
实体类
@Data
public class LzCount {
    /**
     * 用户id
     */
    private Long userId;
    /**
     * 用户名称
     */
    //@NotBlank(message = "用户名称不能为空", groups = { AddGroup.class, EditGroup.class })
    @Schema(name = "userName")
    private String userName;

    @Schema(name = "sum")
    private Long sum;

    private List<DbRule> rules;
}
结果
{
            "userId": 6,
            "userName": "测试1",
            "sum": 222,
            "rules": [
                {
                    "id": 100,
                    "rule": "数学",
                    "score": 10
                },
                {
                    "id": 101,
                    "rule": "语文",
                    "score": 212
                }
            ]
        }```