目录
一、前言
Crunchy Postgres可以帮助我们在k8s上快速部署一个高可用、具有自动备份和恢复功能的postgres集群。相似的,还有Stolon、Patroni、zalando这几个项目。
每个项目的优缺点可以参考下面这几篇文章,国内关于postgres集群的文章还是太少了
https://www.libhunt.com/compare-patroni-vs-stolon
https://www.simplyblock.io/blog/choosing-a-postgres-kubernetes-operator/
https://blog.palark.com/comparing-kubernetes-operators-for-postgresql/
本篇文章只讨论Crunchy Postgres
官方文档:https://access.crunchydata.com/documentation/postgres-operator/latest
项目地址:https://github.com/CrunchyData/postgres-operator
https://github.com/CrunchyData/postgres-operator-examples
二、安装Crunchy Postgres for Kubernetes
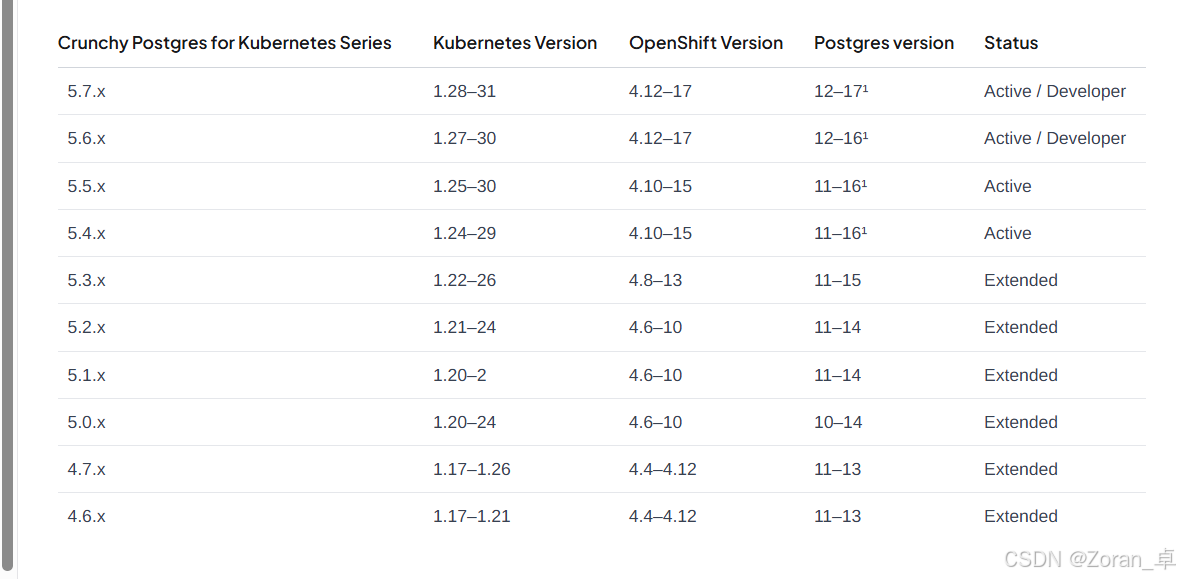
根据你的k8s版本选择合适的Crunchy Postgres版本。跟着官方文档的quickstart走,他会让你fork最新的版本,这是有问题的。由于当时我需要5.3.2的版本,所以我只能看哪个账号是fork了5.3.2的postgres-operator-examples,然后再从他那里下载。这里感觉Crunchy Postgres这个项目的版本管理挺乱的。然后下载解压到服务器上。后面的命令默认都是再“postgres-operator-examples/”路径下执行
使用helm安装pgo,安装后环境就搭建好了。
#安装pgoperator
helm install pgoperator  oci://registry.developers.crunchydata.com/crunchydata/pgo -n your_namespace --set singleNamespace=true --version 5.3.2
#删除pgoperator
helm delete pgoperator -n your_namespace
三、部署一个简单的postgres集群
执行命令,就可以部署一个简单的集群了
helm install hippo helm/postgres --namespace your_namespace
查看
helm ls -n your_namespace
删除集群
helm delete hippo -n your_namespace
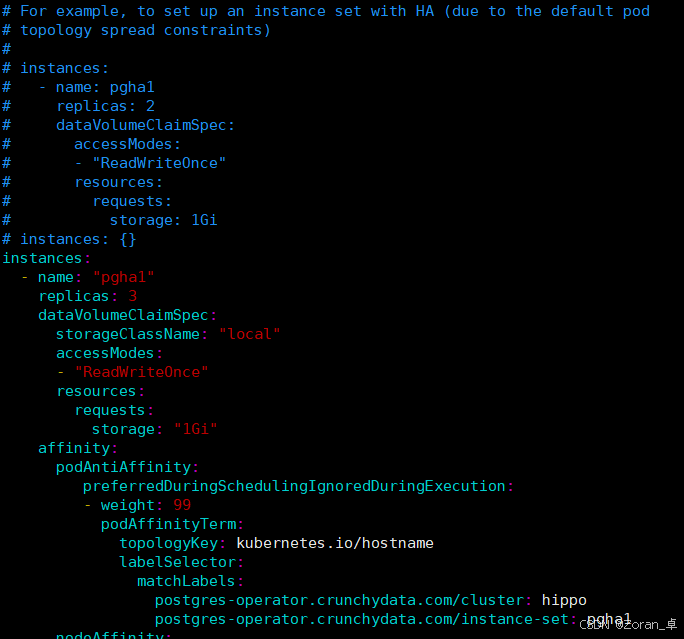
当然,也可以根据自己的需要部署一个个性化的集群,具体方法是修改helm/postgres/value.yaml文件。例如:
另外,如果你想要在k8s集群外连接postgres,最好增加一个NodePort以暴露一个端口访问
修改value.yaml文件后,用如下命令升级
helm upgrade hippo helm/postgres --namespace your_namespace
也可以先用下面的命令看配置文件是否有问题
helm upgrade hippo helm/postgres --debug --dry-run --namespace your_namespace
部署有三个节点的集群后,用如下命令查看主节点和从节点
kubectl get pods -n your_namespace -L postgres-operator.crunchydata.com/role
集群部署后,会生成5个service,每个service的作用可以参考这个连接
https://github.com/CrunchyData/postgres-operator/issues/3784
每个postgres节点通过各自的statefulset进行管理,所以如果有三个postgres节点,就会有三个statefulset。查看statefulset列表
kubectl get statefulset -n your_namespace
我们可以通过statefulset配置文件从而修改节点的信息。例如,容器中的系统的默认时区是UTC
,而我们在东八区。所以我们需要调整系统的时区。但是Crunchy目前还不支持在helm/postgres/value.yaml修改环境变量,所以只能在部署集群后再通过statefulset来修改环境变量。
kubectl edit statefulset hippo-pgha1-lvr7 -n your_namespace
在每个容器的环境变量中增加
- name: TZ
  value: Asia/Shanghai
参考:
https://github.com/CrunchyData/postgres-operator/issues/3054
https://www.cnblogs.com/saneri/p/16326567.html
四、增加pgbouncer
PGBouncer是一个轻量级的PostgreSQL数据库连接池,主要用于减少数据库服务器的连接压力,提高数据库的处理能力。
特点:
连接池:维护到PostgreSQL数据库的连接池,允许多个客户端复用已建立的连接,减少连接和断开连接的开销。
轻量级:占用资源极少,可以在几乎不影响系统性能的情况下提供连接池服务。
配置灵活:支持不同的池化模式,以适应不同的使用场景。
高性能:减少了连接建立的开销,提高应用程序的响应速度和吞吐量。
安全性:支持TLS/SSL连接,确保数据传输过程中的安全。
易于管理:提供简单的管理接口,便于监控和管理连接池状态。
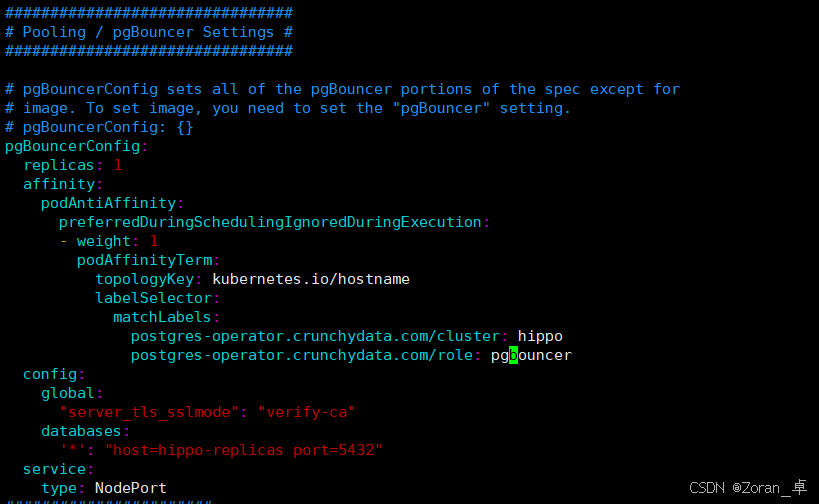
同样,我们也在helm/postgres/value.yaml进行修改就可以为集群增加一个pgbouncer
注意:Crunchy里面的pgbouner默认是连接主数据库的,而databases的配置项是让pgbouncer连接hippo-replaces服务,从而连接从库。global配置项是参考这里添加的。更多的用法可以参考下面这几个链接:
https://github.com/CrunchyData/postgres-operator/issues/1411
https://github.com/CrunchyData/postgres-operator/issues/1499
https://github.com/CrunchyData/postgres-operator/issues/2675
https://github.com/CrunchyData/postgres-operator/issues/3025
https://github.com/CrunchyData/postgres-operator/issues/3123
五、数据备份
以存储在minio作为例子
首先,需要部署一个带tls的minio,部署方法可以参考我写的另外一篇文章:在k8s上部署minio
虽然项目有有人提到了加repo1-s3-verify-tls="n"来省略tls验证,但好像并没有效果。
然后,需要在minio创建一个桶以及一个Access keys。接着,需要根据Access keys的信息在k8s中创建一个secret。
编辑s3.conf文件
使用下面命令生成secret
kubectl create secret generic pgo-s3-creds-tls --namespace=your_namespace --from-file=s3.conf=./s3.conf
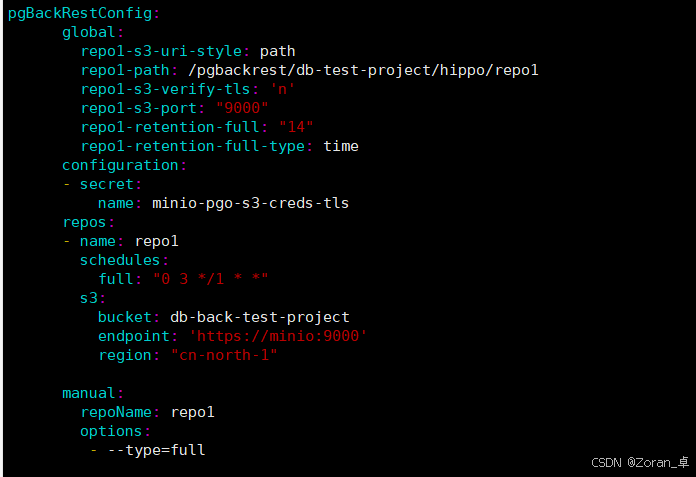
然后,修改value.yaml文件
Crunchy是使用pgbackrest工具进行备份与恢复的,可以看到设置了两种备份方法,一种是手动,一种是定期,都是全量备份。另外repo1-s3-uri-style和repo1-path配置项是设置备份数据在桶里面的位置。repo1-retention-full: "14"和repo1-retention-full-type: time的作用是自动删除14天前的备份。
手动备份的命令
kubectl annotate -n your_namespace postgrescluster hippo --overwrite postgres-operator.crunchydata.com/pgbackrest-backup="$(date)"
另外,观察当部署集群是,也会自动进行一次全量备份。当进行备时,Crunchy自动创建一个叫hippo-backup的pods来执行备份操作。可以用下面的命令来查看备份情况
kubectl describe postgrescluster hippo -n your_namespace
六、备份恢复
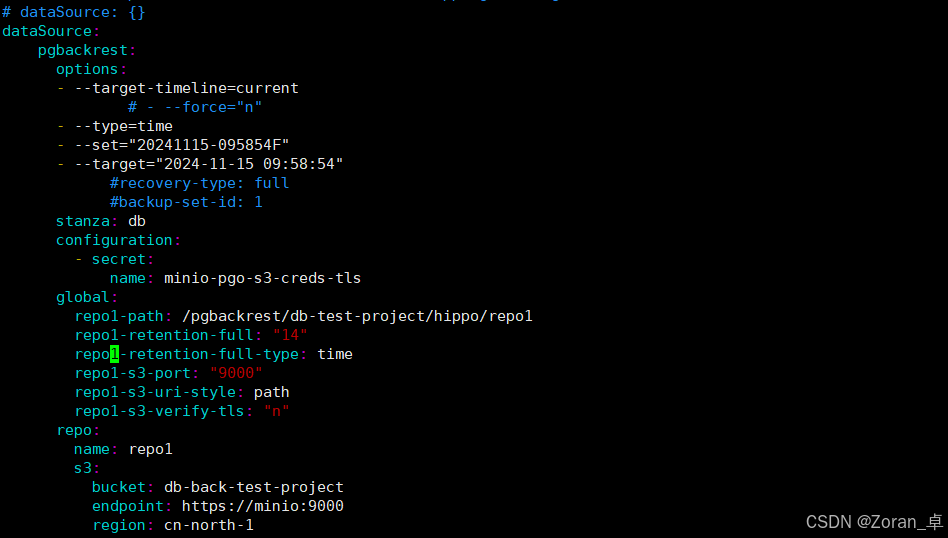
修改value.yaml文件,增加如下配置,启动集群时就会自动调用pgbackrast的pod节点来恢复数据
恢复过程中可能会遇到各种情况,一下是解决问题所需要用到的只是或者参考资料:
1.了解postgres的timeline、wal的定义:
参考:(1)https://blog.csdn.net/liuhuayang/article/details/136958271
(2)https://www.cnblogs.com/xiaotengyi/p/4665990.html
2.在源postgres集群节点的客户端上执行下面命令查看信息
pg_controldata  //查看当前时间线 wal信息
ls -l $PGDATA/pg_wal/  //查看history的文件
pgbackrest info --stanza=db  //查看历史的备份信息
pg_waldump  //查看wal文件的内容
3.(1)pgbackrast项目官方地址:https://github.com/pgbackrest/pgbackrest
(2)pgbackrast官方文档:https://pgbackrest.org/command.html
(3)案例教学:https://github.com/pgbackrest/pgbackrest/issues/2091
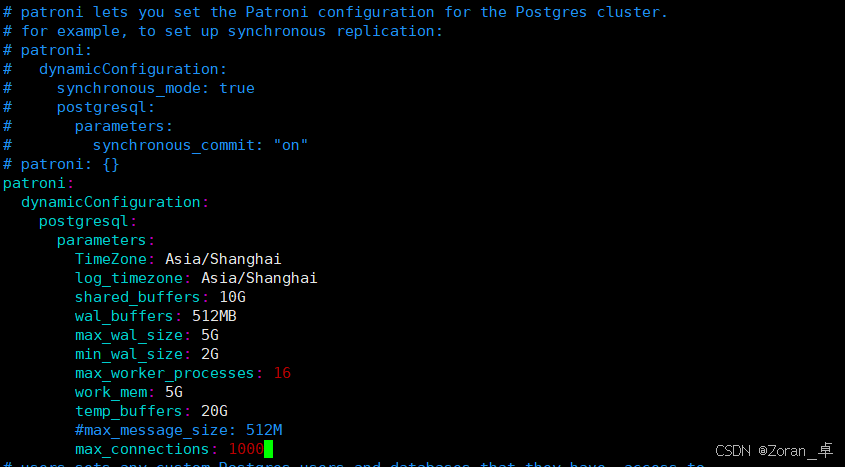
七、postgres配置参数
TimeZone与log_tiemzone的作用参考参考:https://github.com/CrunchyData/postgres-operator/issues/3344`
其他参数参考:https://zhuanlan.zhihu.com/p/157599782
八、数据导入
需要将单节点的postgres导入带postgres集群,我用下面的方法是可行的
pg_dump -h old_host -U postgres -d database_name -W| psql --single-transaction --no-psqlrc -U postgres
另外,还有其他方法可以导数据,可以参考下面的链接
https://github.com/CrunchyData/postgres-operator/issues/1891
https://github.com/CrunchyData/postgres-operator/issues/2060
https://www.crunchydata.com/blog/performing-a-major-postgresql-upgrade-with-pg_dumpall
九、权限管理
使用postgres用户为其他用户赋予相关权限
(1)赋予用户操作"test"数据库的权限
GRANT ALL privileges ON DATABASE database_name TO user_name;
(2)移除用户操作"test"数据库的权限
REVOKE ALL privileges ON DATABASE database_name FROM user_name;
(3)赋予用户操作"test"数据库中a模式的权限
GRANT USAGE ON SCHEMA schema_name TO user_name;
(4)移除用户操作"test"数据库中a模式的权限
REVOKE USAGE ON SCHEMA schema_name From user_name;
(5)赋予用户操作"test"数据库的表的权限
GRANT SELECT, INSERT, UPDATE, DELETE
ON ALL TABLES IN SCHEMA schema_name
TO user_name;
(6)移除用户操作"test"数据库的表的权限
REVOKE SELECT, INSERT, UPDATE, DELETE
ON ALL TABLES IN SCHEMA schema_name
FROM user_name;
