Focal and Global Knowledge Distillation for Detectors(CVPR2022)
目标检测中的全局与局部的知识蒸馏
原文链接:https://arxiv.org/abs/2111.11837
代码github:github.com/yzd-v/FGD
文章目录
前要知识:
KD(Knowlege Distillation)
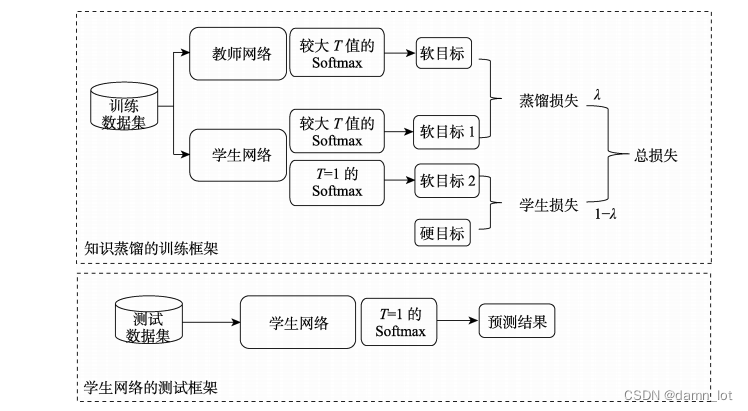
目前最流行的模型压缩技术之一,能够满足大模型轻量化部署的要求,并且将大模型的训练效果同步到小模型中,类似于迁移学习,又与迁移学习的迁移内容和流程都不同。数据蒸馏的目前主流的两个方向:模型压缩和模型增强。下图是Hinton知识蒸馏论文中提出的经典教师-学生模型。这里原理不做赘述,可以参考论文原文Distilling the Knowledge in a Neural Network
目前的知识蒸馏集中在Feature-based Distillation,大致意思是将教师模型中的某一层的特征信息提取出来去训练学生模型,那么蒸馏的层怎么进行选取,并且提取出的迁移信息怎么处理都是知识蒸馏目前发展的痛点。
目标检测(Object Detection)
目标检测作为CV最重要的下游任务之一,就将分类和定位集为一体的CV技术,目标检测的模型分为one-stage,two-stage,one stage anchor-based,one stage anchor-free。典型的模型YOLO,FasterRcnn,MaskRcnn等等。特别地,现在很多的目标检测模型都会发布多个参数量的版本号,Large模型自然能识别出更好的效果,但自然而然也带来了硬件上的成本开销和部署的困难,所以目标检测领域也需要将模型压缩放在应用部署的首要位置考虑,因为往往深度学习特别是CV领域,训练和预测是分两步走的,所以训练和预测的硬件差异让更多地轻量化需求得以体现。虽然目标检测的模型的预测头部和模型结构不都相同,但是input都是特征图,每个层进行处理的也是特征图的信息进行输入,所以可以形成一个统一的基于特征的蒸馏方法来实现模型压缩
主要的贡献和方法:
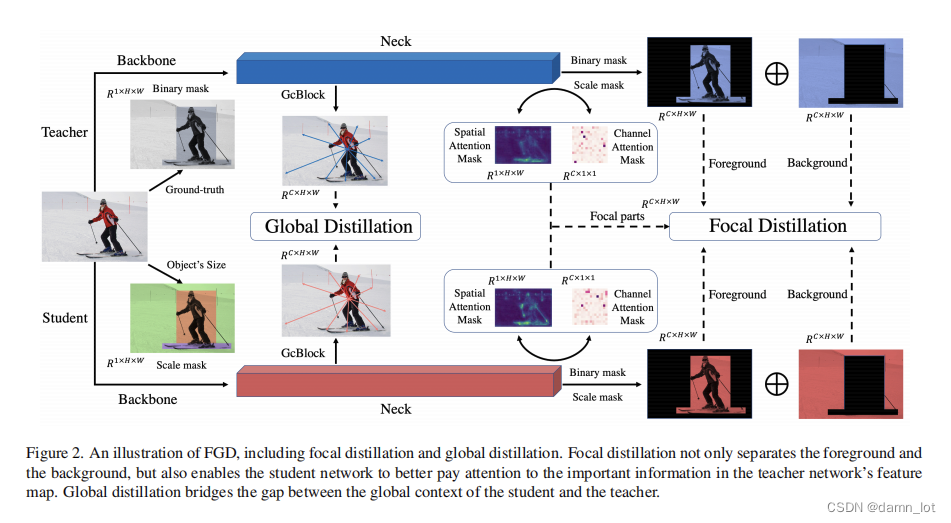
就像题目所说的那样,作者提出了两种不同的蒸馏方式,作者认为在目标检测领域,全局的特征联系关联特征和局部的细节特征感知信息一样重要,所以不仅要关注前景图也要关注背景图。
Global Distillation
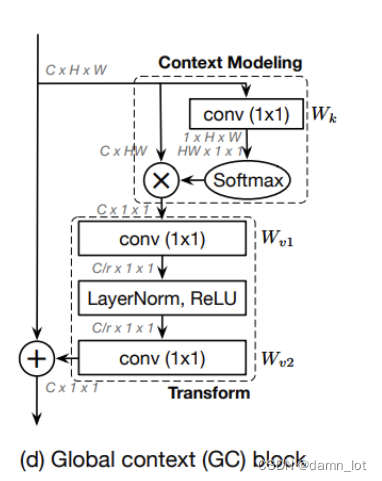
借鉴了GCnet中的GCBlock模块来获取全局的上下文关联信息,将教师模型中学习到的关联信息传递给学生模型进行学习
transform模块代码:
##transform模块(学生和教师)
##①1x1conv,通道数/2   ②LN+Relu   ③1*1conv,通道数还原
self.channel_add_conv_s = nn.Sequential(
    nn.Conv2d(teacher_channels, teacher_channels//2, kernel_size=1),
    nn.LayerNorm([teacher_channels//2, 1, 1]),
    nn.ReLU(inplace=True),  # yapf: disable
    nn.Conv2d(teacher_channels//2, teacher_channels, kernel_size=1))
self.channel_add_conv_t = nn.Sequential(
    nn.Conv2d(teacher_channels, teacher_channels//2, kernel_size=1),
    nn.LayerNorm([teacher_channels//2, 1, 1]),
    nn.ReLU(inplace=True),  # yapf: disable
    nn.Conv2d(teacher_channels//2, teacher_channels, kernel_size=1))
Context Modeling代码:
##GC Block
def spatial_pool(self, x, in_type):
    batch, channel, width, height = x.size()
    input_x = x
    # [N, C, H * W]
    input_x = input_x.view(batch, channel, height * width)
    # [N, 1, C, H * W]
    input_x = input_x.unsqueeze(1)    ##在第二个维度上增加一个维度为1
    # [N, 1, H, W]
    if in_type == 0:
        context_mask = self.conv_mask_s(x)
    else:
        context_mask = self.conv_mask_t(x)
    # [N, 1, H * W]
    context_mask = context_mask.view(batch, 1, height * width)
    # [N, 1, H * W]
    context_mask = F.softmax(context_mask, dim=2)
    # [N, 1, H * W, 1]
    context_mask = context_mask.unsqueeze(-1)  ##在最后一个维度上增加一个维度为1
    # [N, 1, C, H*W] matmul [N, 1, H*W, 1]=  [N, 1, C, 1]
    context = torch.matmul(input_x, context_mask)
    # [N, C, 1, 1]
    context = context.view(batch, channel, 1, 1)

    return context
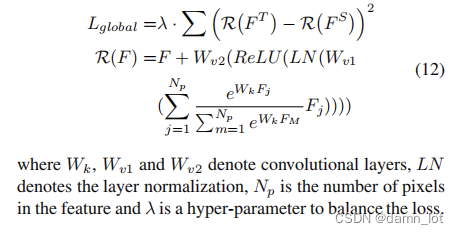
GCBlock的loss公式和代码如下:
##Global Loss
def get_rela_loss(self, preds_S, preds_T):
    ##loss的整体采用MSE均方误差的方法计算,即sum((Teacher-Student)^2)
    loss_mse = nn.MSELoss(reduction='sum')

	##各自训练出自己的全局上下文特征信息,第二个参数表示0表示student,1表示teacher
    context_s = self.spatial_pool(preds_S, 0)
    context_t = self.spatial_pool(preds_T, 1)

    out_s = preds_S
    out_t = preds_T

    ##将结果transform模块的特征信息与原来的输入特征信息进行相加
    channel_add_s = self.channel_add_conv_s(context_s)
    out_s = out_s + channel_add_s

    channel_add_t = self.channel_add_conv_t(context_t)
    out_t = out_t + channel_add_t

    ##均方误差,最后的sum除以长度
    rela_loss = loss_mse(out_s, out_t)/len(out_s)

    return rela_loss
Focal Distillation
使用局部蒸馏来提升学生模型对教师模型的关键的像素点以及关键通道的特征信息的学习.通过空间与维度两个注意力掩码值来让学生模型能够更加注重权重较大的pixel和channel。这里的温度的可控制变量为temp,和传统的KD方法一样用在softmax中加入温度来控制分数曲线。
##注意力掩码
def get_attention(self, preds, temp):
    """ preds: Bs*C*W*H """
    N, C, H, W= preds.shape

    value = torch.abs(preds)
    # Bs*W*H
    ## 空间注意力map 以第二个参数C为基准算均值
    fea_map = value.mean(axis=1, keepdim=True)
    ##A_S
    S_attention = (H * W * F.softmax((fea_map/temp).view(N,-1), dim=1)).view(N, H, W) # Bs*W*H

    # Bs*C
    ##通道注意力map,以第3,4个参数HW为基准算均值
    channel_map = value.mean(axis=2,keepdim=False).mean(axis=2,keepdim=False)
    #A_C
    C_attention = C * F.softmax(channel_map/temp, dim=1)     # Bs*C

    return S_attention, C_attention
focal loss计算公式及其代码:
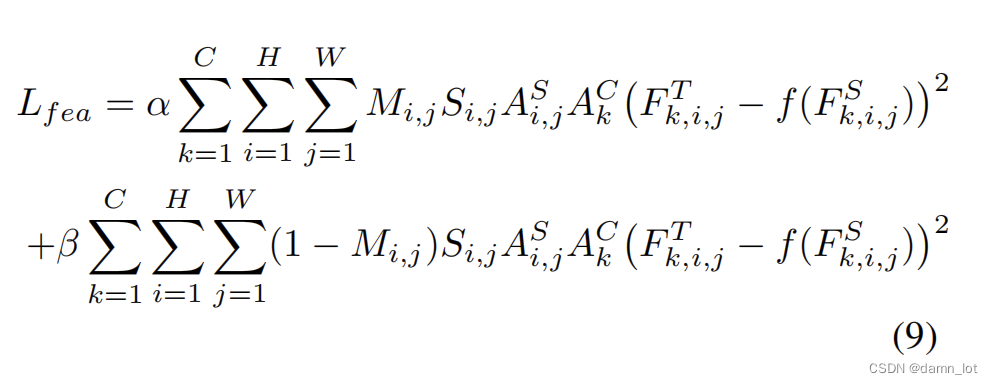
首先是featureloss,其中的M是区分前背景的,S是掩码来抑制前后景占比过大和大目标占据像素太大的问题提出的掩码规则。所以下图中的上半部分就是前景图的loss,下半部分是背景图的loss。
    ##feature loss  ,这里只用到了teacher的C和S注意力,因为学生也是用教师的注意力,用学生的注意力没有学习和比较意义
    def get_fea_loss(self, preds_S, preds_T, Mask_fg, Mask_bg, C_s, C_t, S_s, S_t):
        """ preds_S(Tensor): Bs*C*H*W, student's feature map
            preds_T(Tensor): Bs*C*H*W, teacher's feature map
            C_s,C_t :BS*C
            S_s,S_t :BS*H*W"""
        loss_mse = nn.MSELoss(reduction='sum')

        ##补齐C维度
        Mask_fg = Mask_fg.unsqueeze(dim=1)
        Mask_bg = Mask_bg.unsqueeze(dim=1)

        ##补齐H,W两个维度
        C_t = C_t.unsqueeze(dim=-1)
        C_t = C_t.unsqueeze(dim=-1)

        ##补齐C的维度
        S_t = S_t.unsqueeze(dim=1)

        ##教师的feature融入自己的注意力掩码后,运用到前背景分离图中
        fea_t= torch.mul(preds_T, torch.sqrt(S_t))
        fea_t = torch.mul(fea_t, torch.sqrt(C_t))
        fg_fea_t = torch.mul(fea_t, torch.sqrt(Mask_fg))
        bg_fea_t = torch.mul(fea_t, torch.sqrt(Mask_bg))

        ##学生利用了教师模型中的注意力后,运用到前背景分离图中
        fea_s = torch.mul(preds_S, torch.sqrt(S_t))
        fea_s = torch.mul(fea_s, torch.sqrt(C_t))
        fg_fea_s = torch.mul(fea_s, torch.sqrt(Mask_fg))
        bg_fea_s = torch.mul(fea_s, torch.sqrt(Mask_bg))

        fg_loss = loss_mse(fg_fea_s, fg_fea_t)/len(Mask_fg)
        bg_loss = loss_mse(bg_fea_s, bg_fea_t)/len(Mask_bg)

        return fg_loss, bg_loss
其次是衡量student模型模仿教师得出的注意力与teacher自己的注意力的相似程度,这里的loss函数采用了L1 loss。
##L1 loss来衡量学生模型模仿教师的注意力的程度
def get_mask_loss(self, C_s, C_t, S_s, S_t):
	##L1:sum(|A-B|)/len
    mask_loss = torch.sum(torch.abs((C_s-C_t)))/len(C_s) + torch.sum(torch.abs((S_s-S_t)))/len(S_s)

    return mask_loss
总的loss代码:
loss = self.alpha_fgd * fg_loss + self.beta_fgd * bg_loss \
       + self.gamma_fgd * mask_loss + self.lambda_fgd * rela_loss
总的loss代码:
loss = self.alpha_fgd * fg_loss + self.beta_fgd * bg_loss \
       + self.gamma_fgd * mask_loss + self.lambda_fgd * rela_loss
