手把手教你用elasticsearch 8.16.0实现以图搜图
从去年就想用elasticsearch搭建一个以图搜图的想法,但时至今年才实现,现将整个实现的过程及所踩过的坑整理成一篇博客,供各位网友后续版本参考。
一、大致过程
1.1 所需基础环境
我是参考这篇博客实现的 https://www.elastic.co/search-labs/blog/implement-image-similarity-search-elastic
首先你电脑得装好以下基础软件
- Git
- Python 3.9+
- Pycharm
- Elasticsearch
- Kibana
- HuggingFace clip-ViT-B-32-multilingual-v1模型
1.2 大致步骤
首先你得需要非常多的图片,这样才能建立起一个基础的资料库,如果没有的话,可以写个python爬虫抓一下图片,不会的话就只能下载数据集咯。
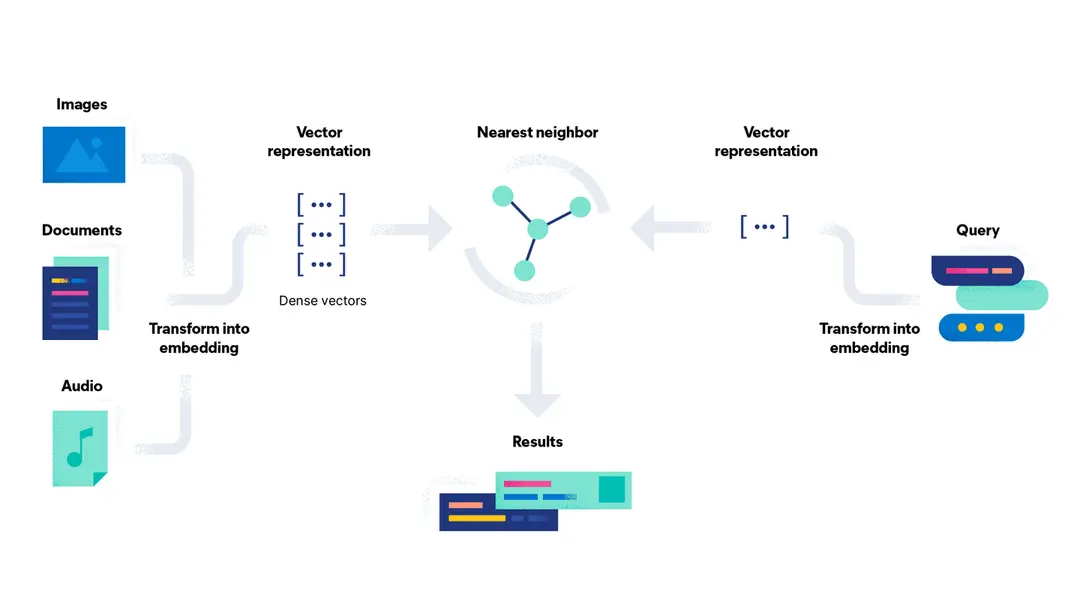
从左边的Images、Documents、Audio开始说起,这部分数据经过Transform into embedding会被转换成向量,然后存储到Neareast neighbor也就是ES中,完成这个步骤,基本上你就已经成功一大半了。后面就是运行检索程序,右边的检索程序就是先将你输入的图片、文字转换成向量,然后ES再通过向量余弦计算,算出相似的图片,按照得分顺序高低排序,选出排名靠前的图片,这样一个以图搜图的功能你就完全完成了。
整个过程中Kibana需要开启试用版30天的机器学习功能,注意,整个过程你要在30天中完成,否则Kibana就需要收费了。
二、实现过程
2.1 安装Elasticsearch和Kibana
这两个软件就不过多的讲了,还是非常简单的,之前7.x版本还需要在Kibana手动配置es的ca证书,现在通过token和验证码就免去了这部分过程,全程基本上只需要你先执行elasticsearch文件,然后在控制台找到密码和token,再启动kibana,本地浏览器进入5601端口,将token输入进去之后,再在kibana控制台找到验证码输入到kibana页面,这个过程你就将es和kibana安装好了。
最后你在kibana页面输入账号elastic,密码就是你在elasticsearch控制台找的密码,就可以进入kibana啦。
上述过程如果有问题,请检查你的版本是不是8.x,7.x是不支持的,有问题请找百度找答案,此处不再赘述。
2.2 拉取flask-elastic-image-search代码
在控制台输入一下命令
$ git clone https://github.com/radoondas/flask-elastic-image-search.git
$ cd flask-elastic-image-search
在pycharm创建出你的虚拟环境,或者用conda也可以。
requirements.txt文件
asttokens==3.0.0
certifi==2024.8.30
charset-normalizer==3.4.0
click==8.1.7
colorama==0.4.6
contourpy==1.3.0
cycler==0.12.1
decorator==5.1.1
eland==8.16.0
elastic-transport==8.15.1
elasticsearch==8.16.0
exceptiongroup==1.2.2
executing==2.1.0
exif==1.5.0
filelock==3.16.1
Flask==2.0.2
Flask-WTF==1.0.1
fonttools==4.55.0
fsspec==2024.10.0
huggingface-hub==0.26.3
idna==3.10
importlib_resources==6.4.5
ipython==8.18.1
itsdangerous==2.2.0
jedi==0.19.2
Jinja2==3.1.4
joblib==1.4.2
kiwisolver==1.4.7
MarkupSafe==3.0.2
matplotlib==3.9.3
matplotlib-inline==0.1.7
mpmath==1.3.0
networkx==3.2.1
nltk==3.9.1
numpy==1.26.4
packaging==24.2
pandas==1.5.3
parso==0.8.4
pathlib==1.0.1
Pillow==9.3.0
plum-py==0.8.7
prompt_toolkit==3.0.48
pure_eval==0.2.3
Pygments==2.18.0
pyparsing==3.2.0
python-dateutil==2.9.0.post0
python-dotenv==0.21.1
pytz==2024.2
PyYAML==6.0.2
regex==2024.11.6
requests==2.32.3
safetensors==0.4.5
scikit-learn==1.5.2
scipy==1.13.1
sentence-transformers==3.3.1
sentencepiece==0.2.0
six==1.16.0
stack-data==0.6.3
sympy==1.13.1
threadpoolctl==3.5.0
tokenizers==0.20.3
torch==2.5.0
torchvision==0.20.0
tqdm==4.64.1
traitlets==5.14.3
transformers==4.46.3
typing_extensions==4.12.2
urllib3==2.2.3
wcwidth==0.2.13
Werkzeug==2.2.2
WTForms==3.0.1
zipp==3.21.0
$ python3 -m venv .venv
$ source .venv/bin/activate
$ pip install -r requirements.txt
2.3 下载模型
点击此处看模型地址,下载这个模型我统计了一下,大概四五个方法,先假定你不会科学上网,就算你会科学上网,也不可能一下子就搞定这个过程。
2.3.1 直接科学上网,跳到2.4
2.3.2 科学上网之后运行2.4失败,没法连接到huggingface
这是因为你的科学上网方案不行,这就没有办法了,只能手动下载模型咯,
问题
因业务需要在本机测试embedding分词模型,使用 huggingface上的transformers 加载模型时,因为网络无法访问,不能从 huggingface 平台下载模型并加载出现如下错误。 下面提供几种模型下载办法
解决
有三种方式下载模型,一种是通过 huggingface model hub 的按钮下载,一种是使用 huggingface 的 transformers 库实例化模型进而将模型下载到缓存目录(上述报错就是这种),另一种是通过 huggingface 的 huggingface_hub 工具进行下载。下面介绍两种方式:
2.3.3 huggingface 按钮下载
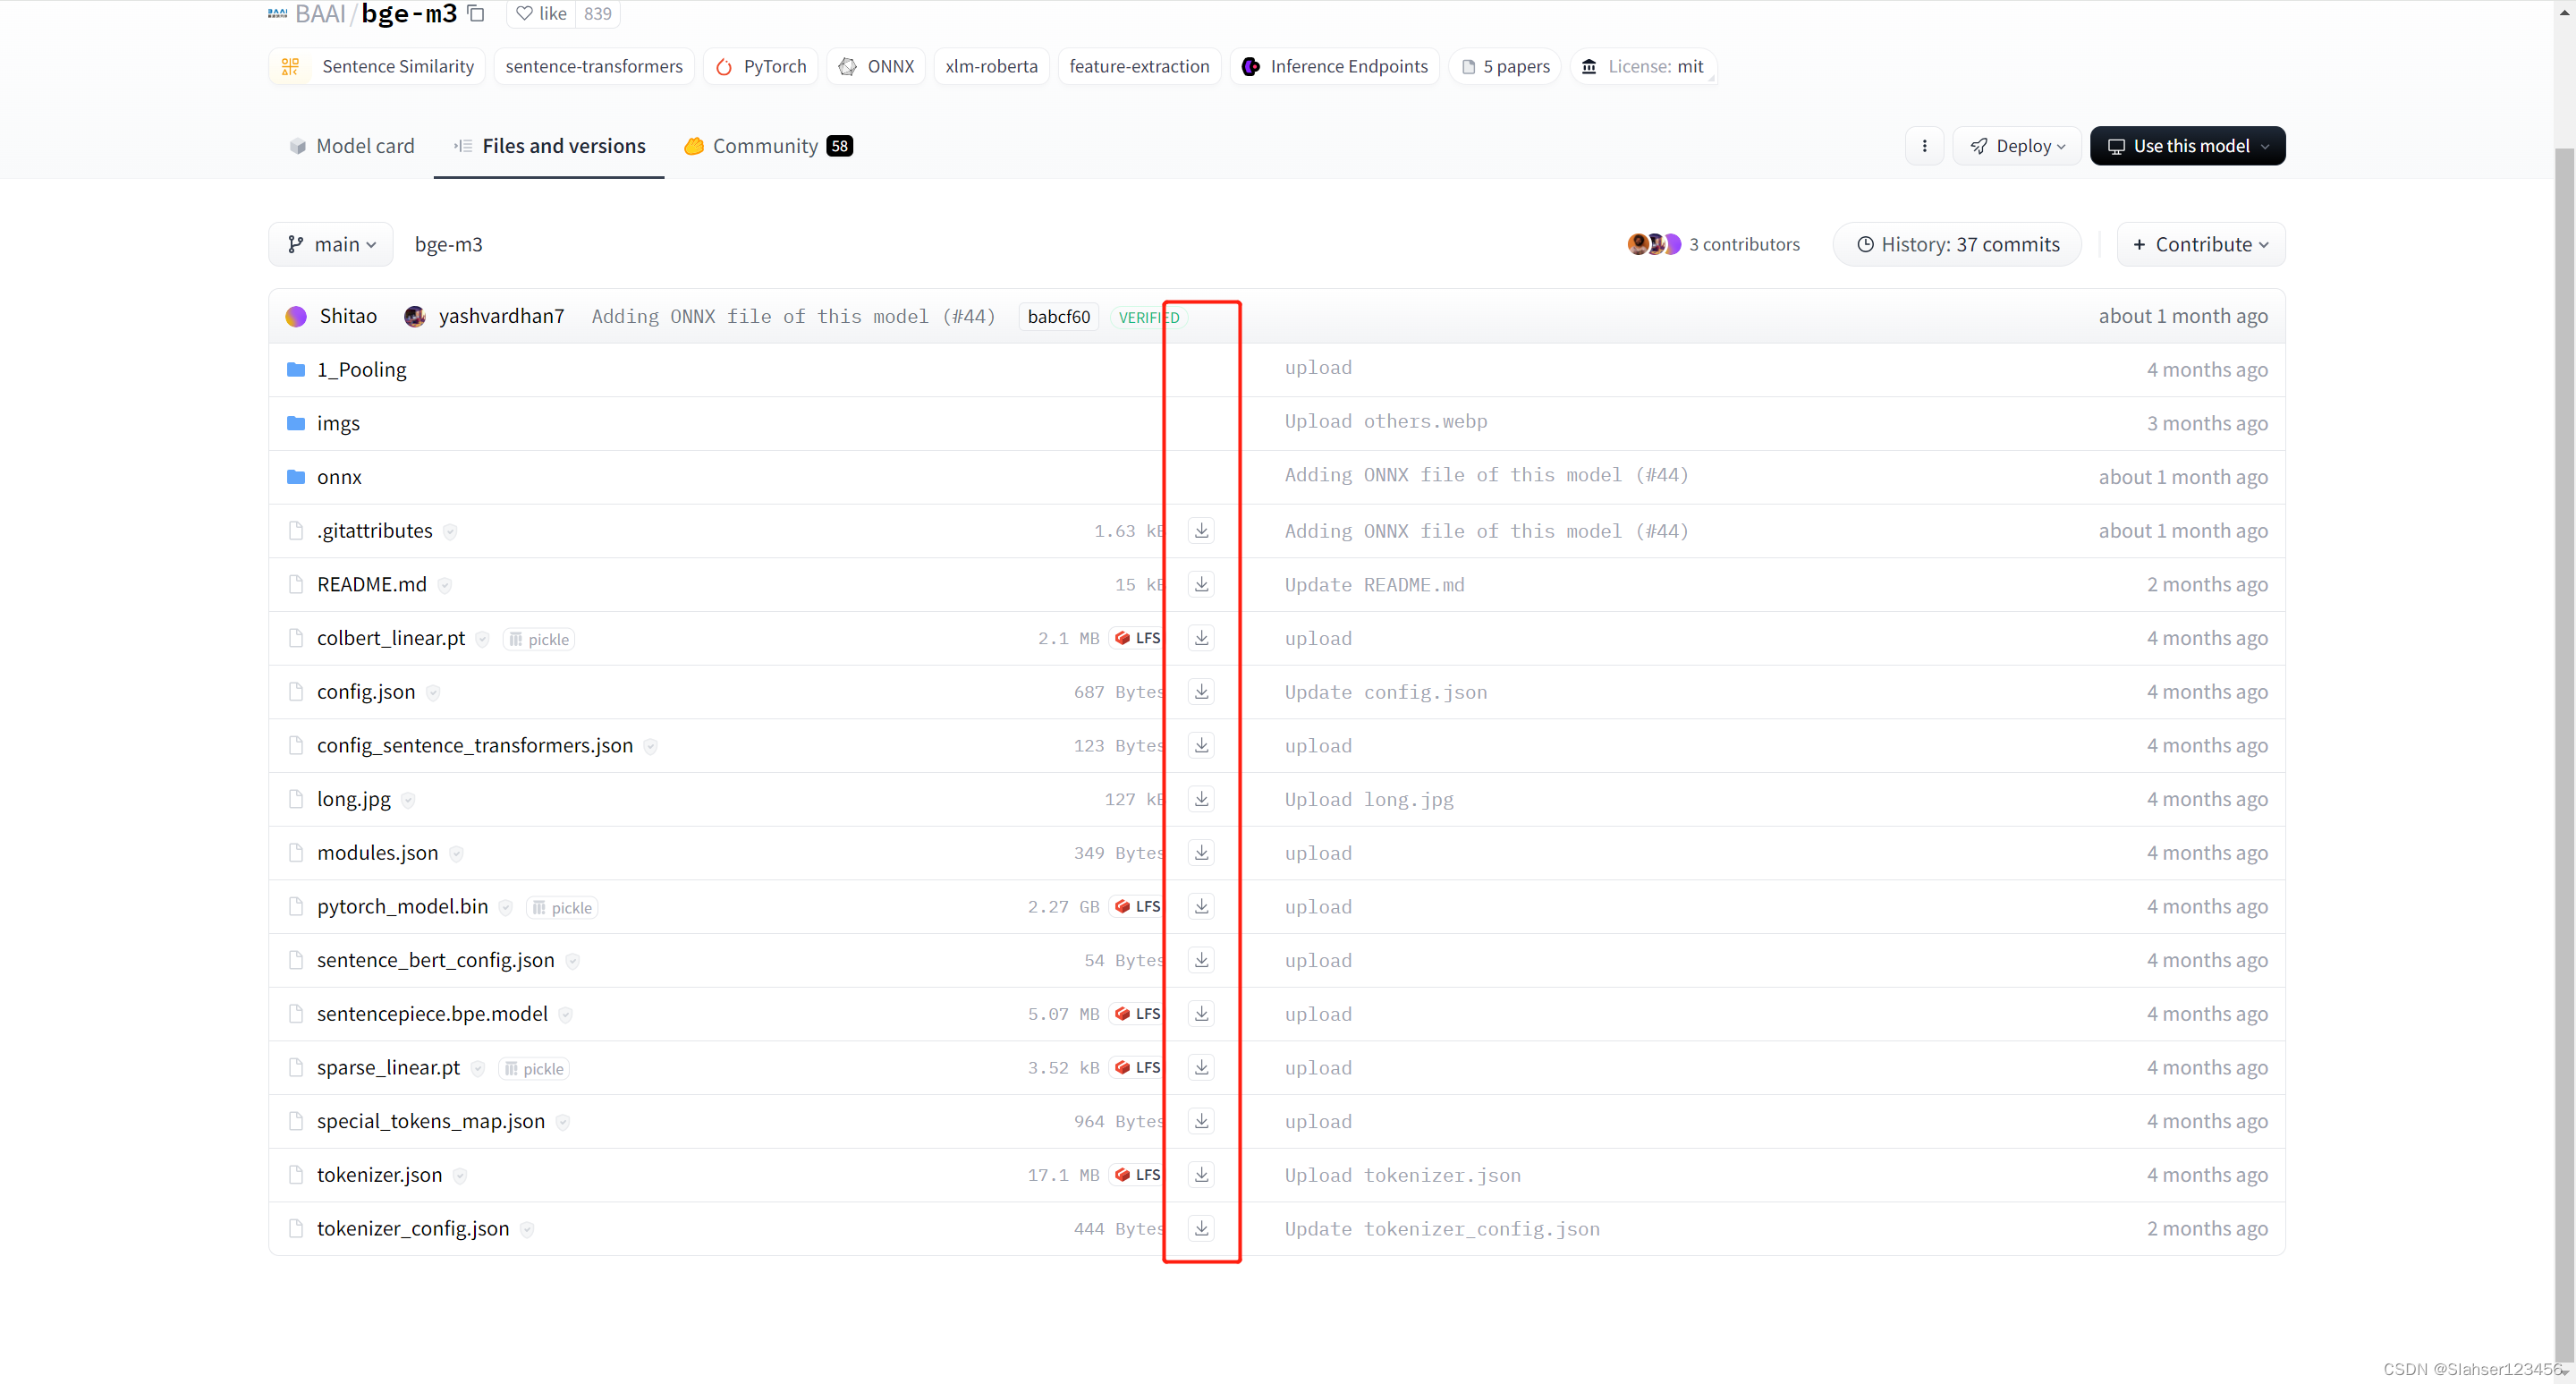
点击下图的下载按钮,把所有文件下载到一个目录即可。
因网络原因无法下载可使用访问镜像HF-Mirror - Huggingface 镜像站
2.3.4 huggingface_hub 工具(推荐)
-
安装 huggingface_hub
python -m pip install huggingface_hub -
使用 huggingface_hub 的 snapshot_download 函数下载
from huggingface_hub import snapshot_download snapshot_download(repo_id="BAAI/bge-m3") -
也可以使用 huggingface_hub 提供的命令行工具(推荐)
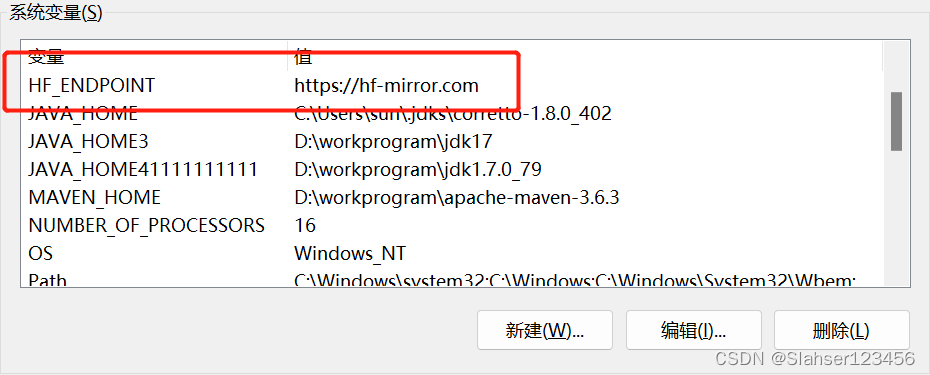
huggingface-cli download BAAI/bge-m3如果觉得下载比较慢,使用 huggingface 镜像提速,可以通过设置HF_ENDPOINT环境变量用以切换下载的地址。
-
设置环境变量
# Linux 系统
export HF_ENDPOINT=https://hf-mirror.com
# Windows 系统
$env:HF_ENDPOINT = "https://hf-mirror.com"
- 下载模型
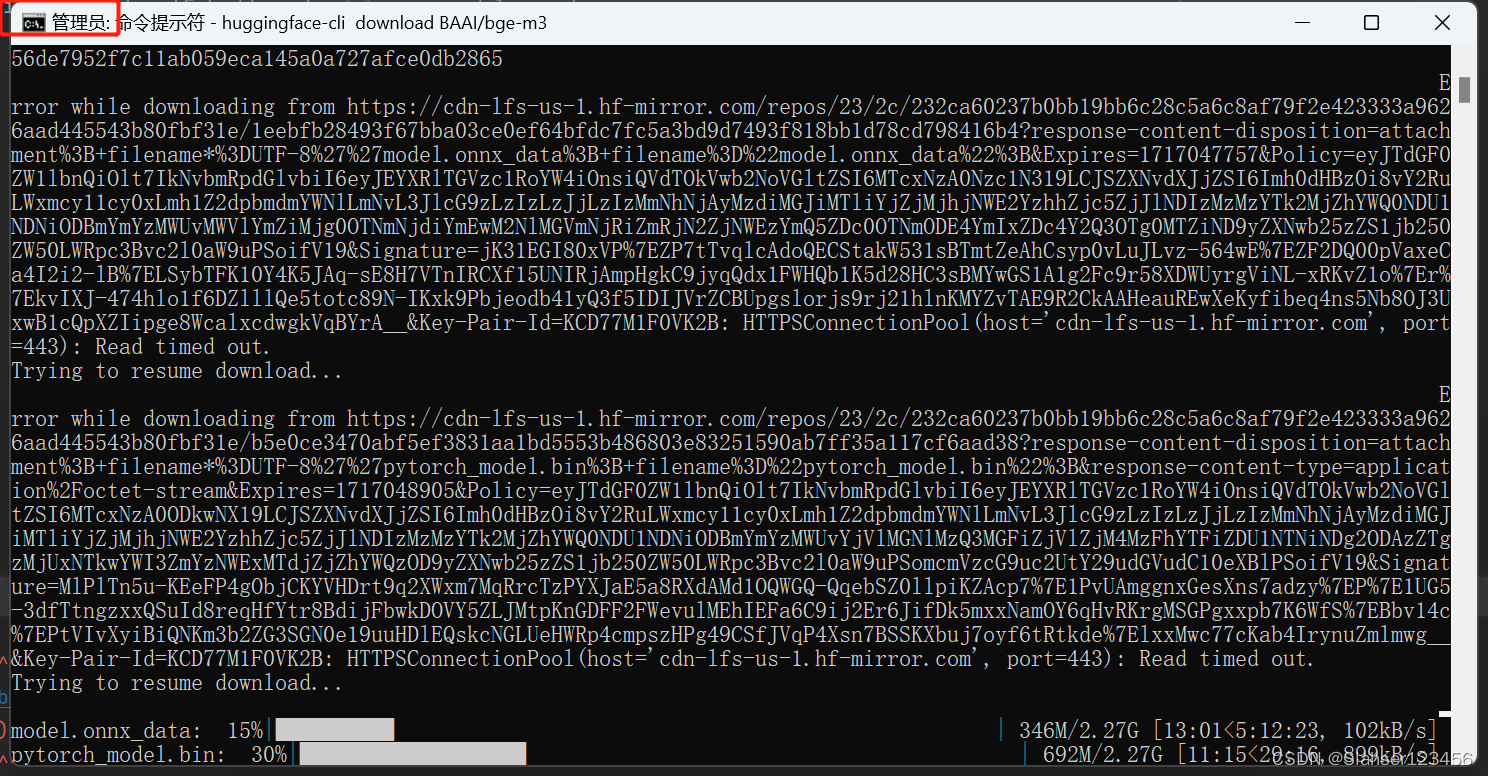
huggingface-cli download BAAI/bge-m3
注意:在windows中需要使用管理员启动命令行
关于 huggingface_hub 的更多用法可阅读 Download an entire repository。
2.3.5 hf_transfer
另外也可以使用 hf_transfer进行 提速,可以与此处我没有用到,不展开介绍
- 安装 hf_transfer
pip install hf_transfer
- 设置环境变量
export HF_HUB_ENABLE_HF_TRANSFER=1
- 下载模型
huggingface-cli download internlm/internlm2-chat-7b
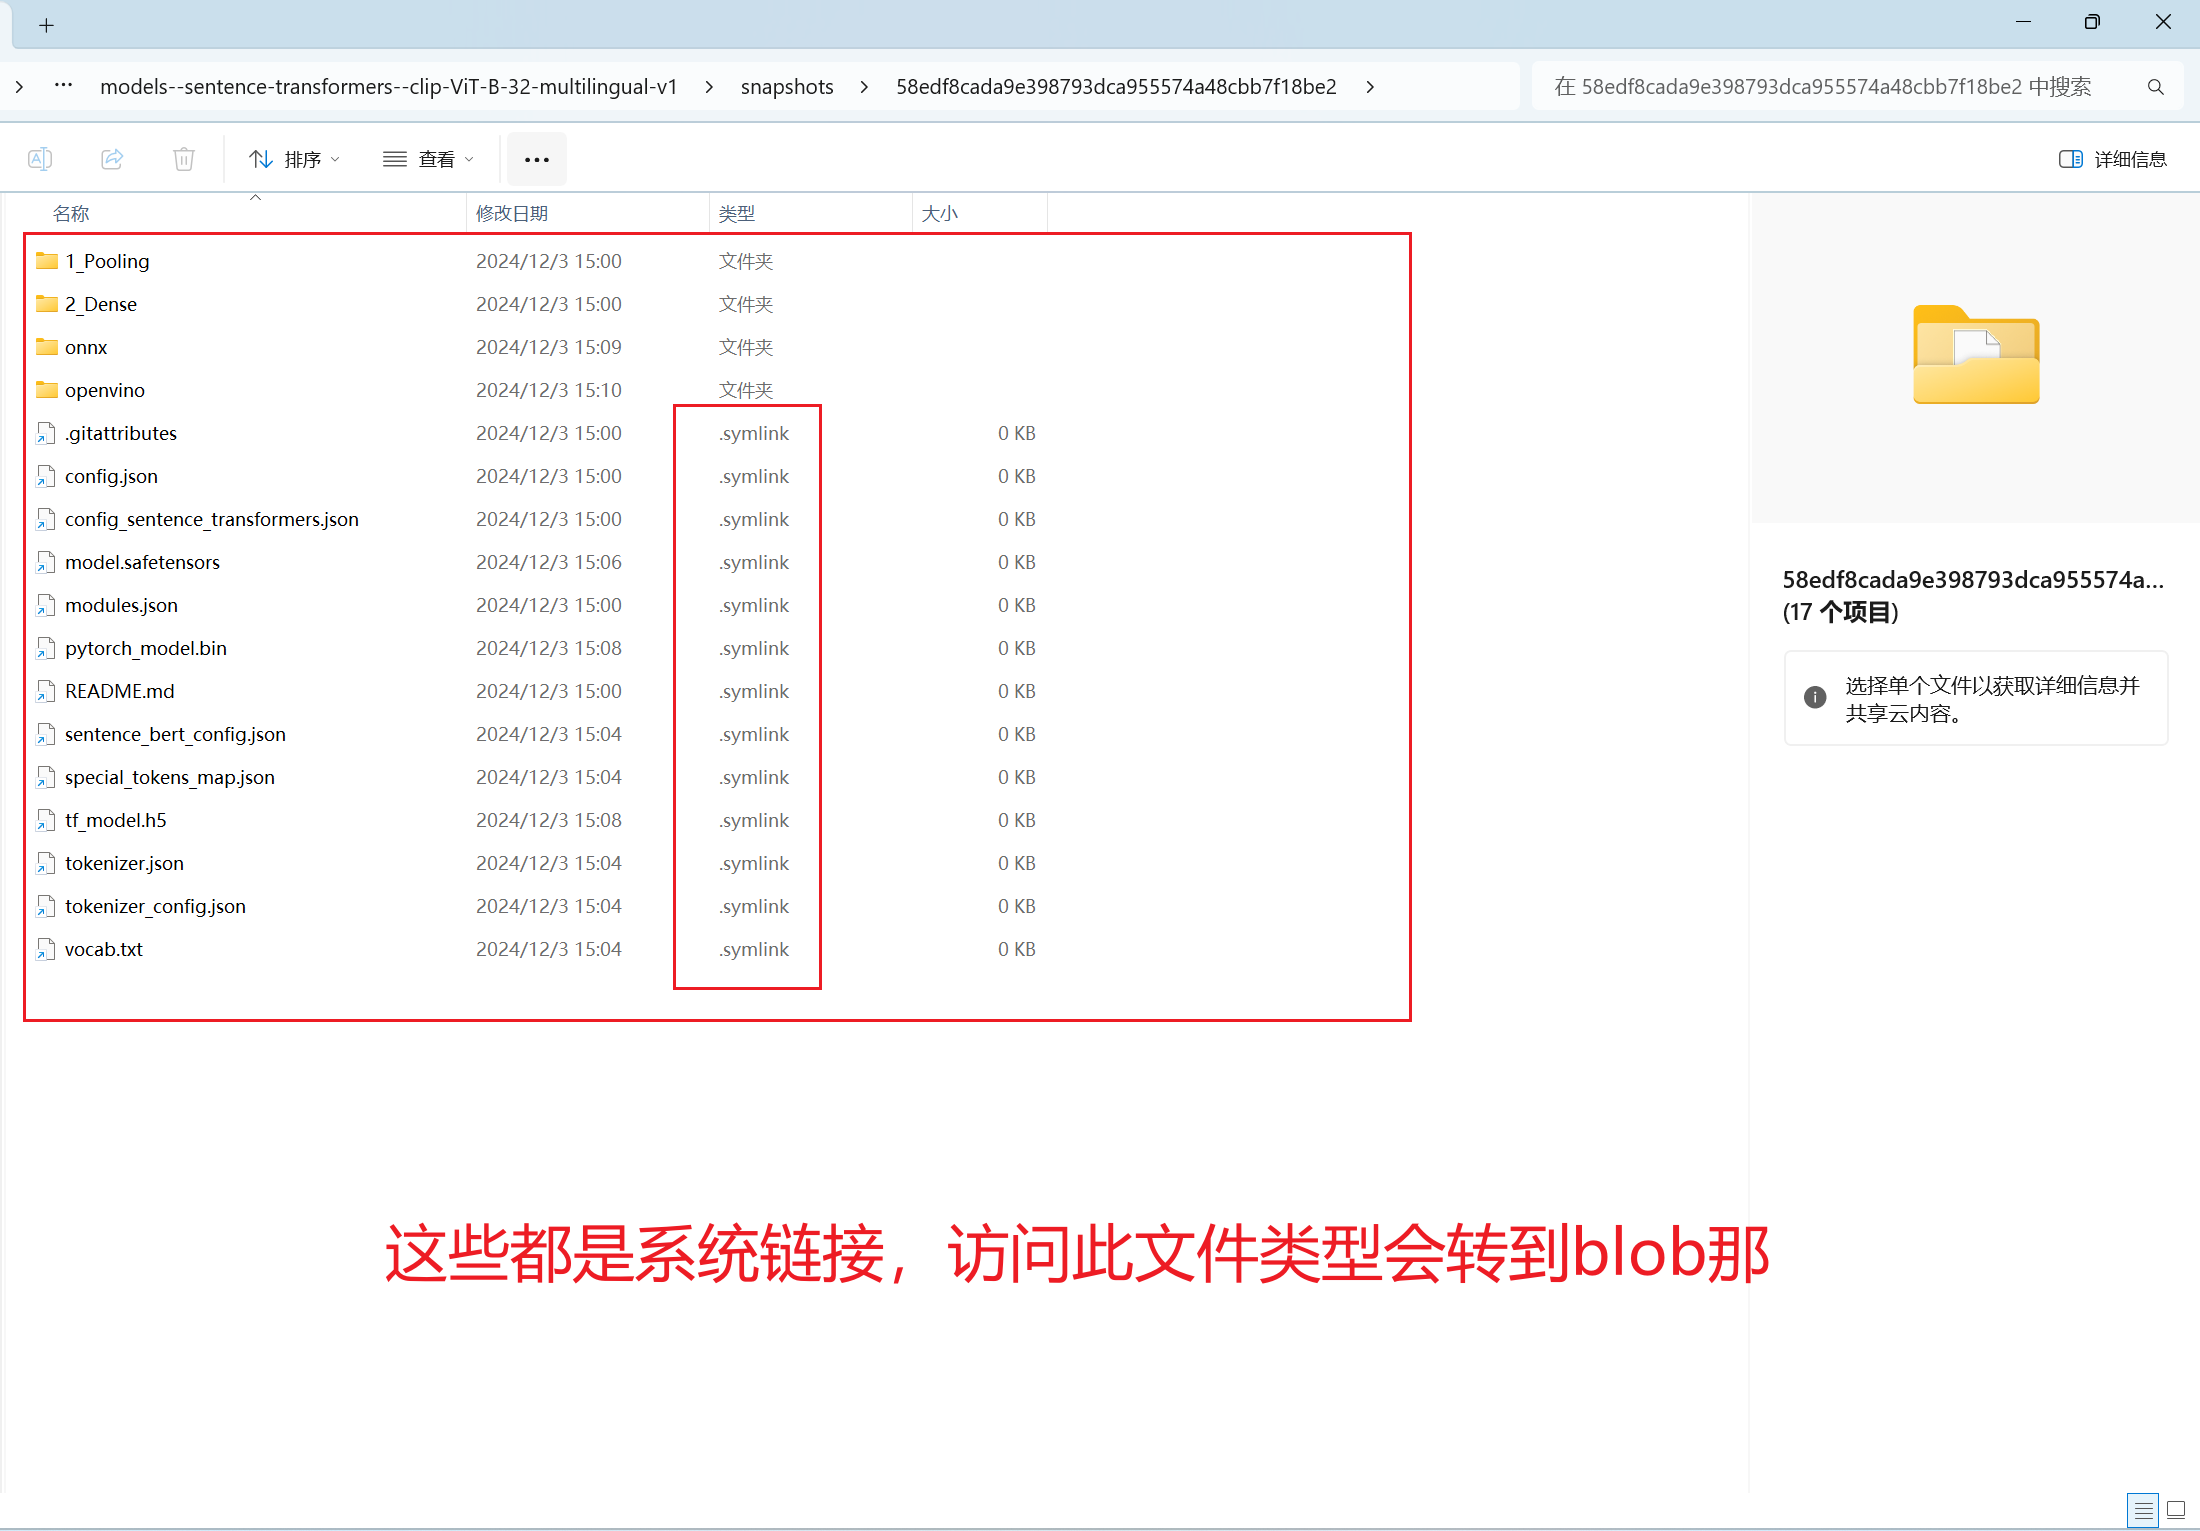
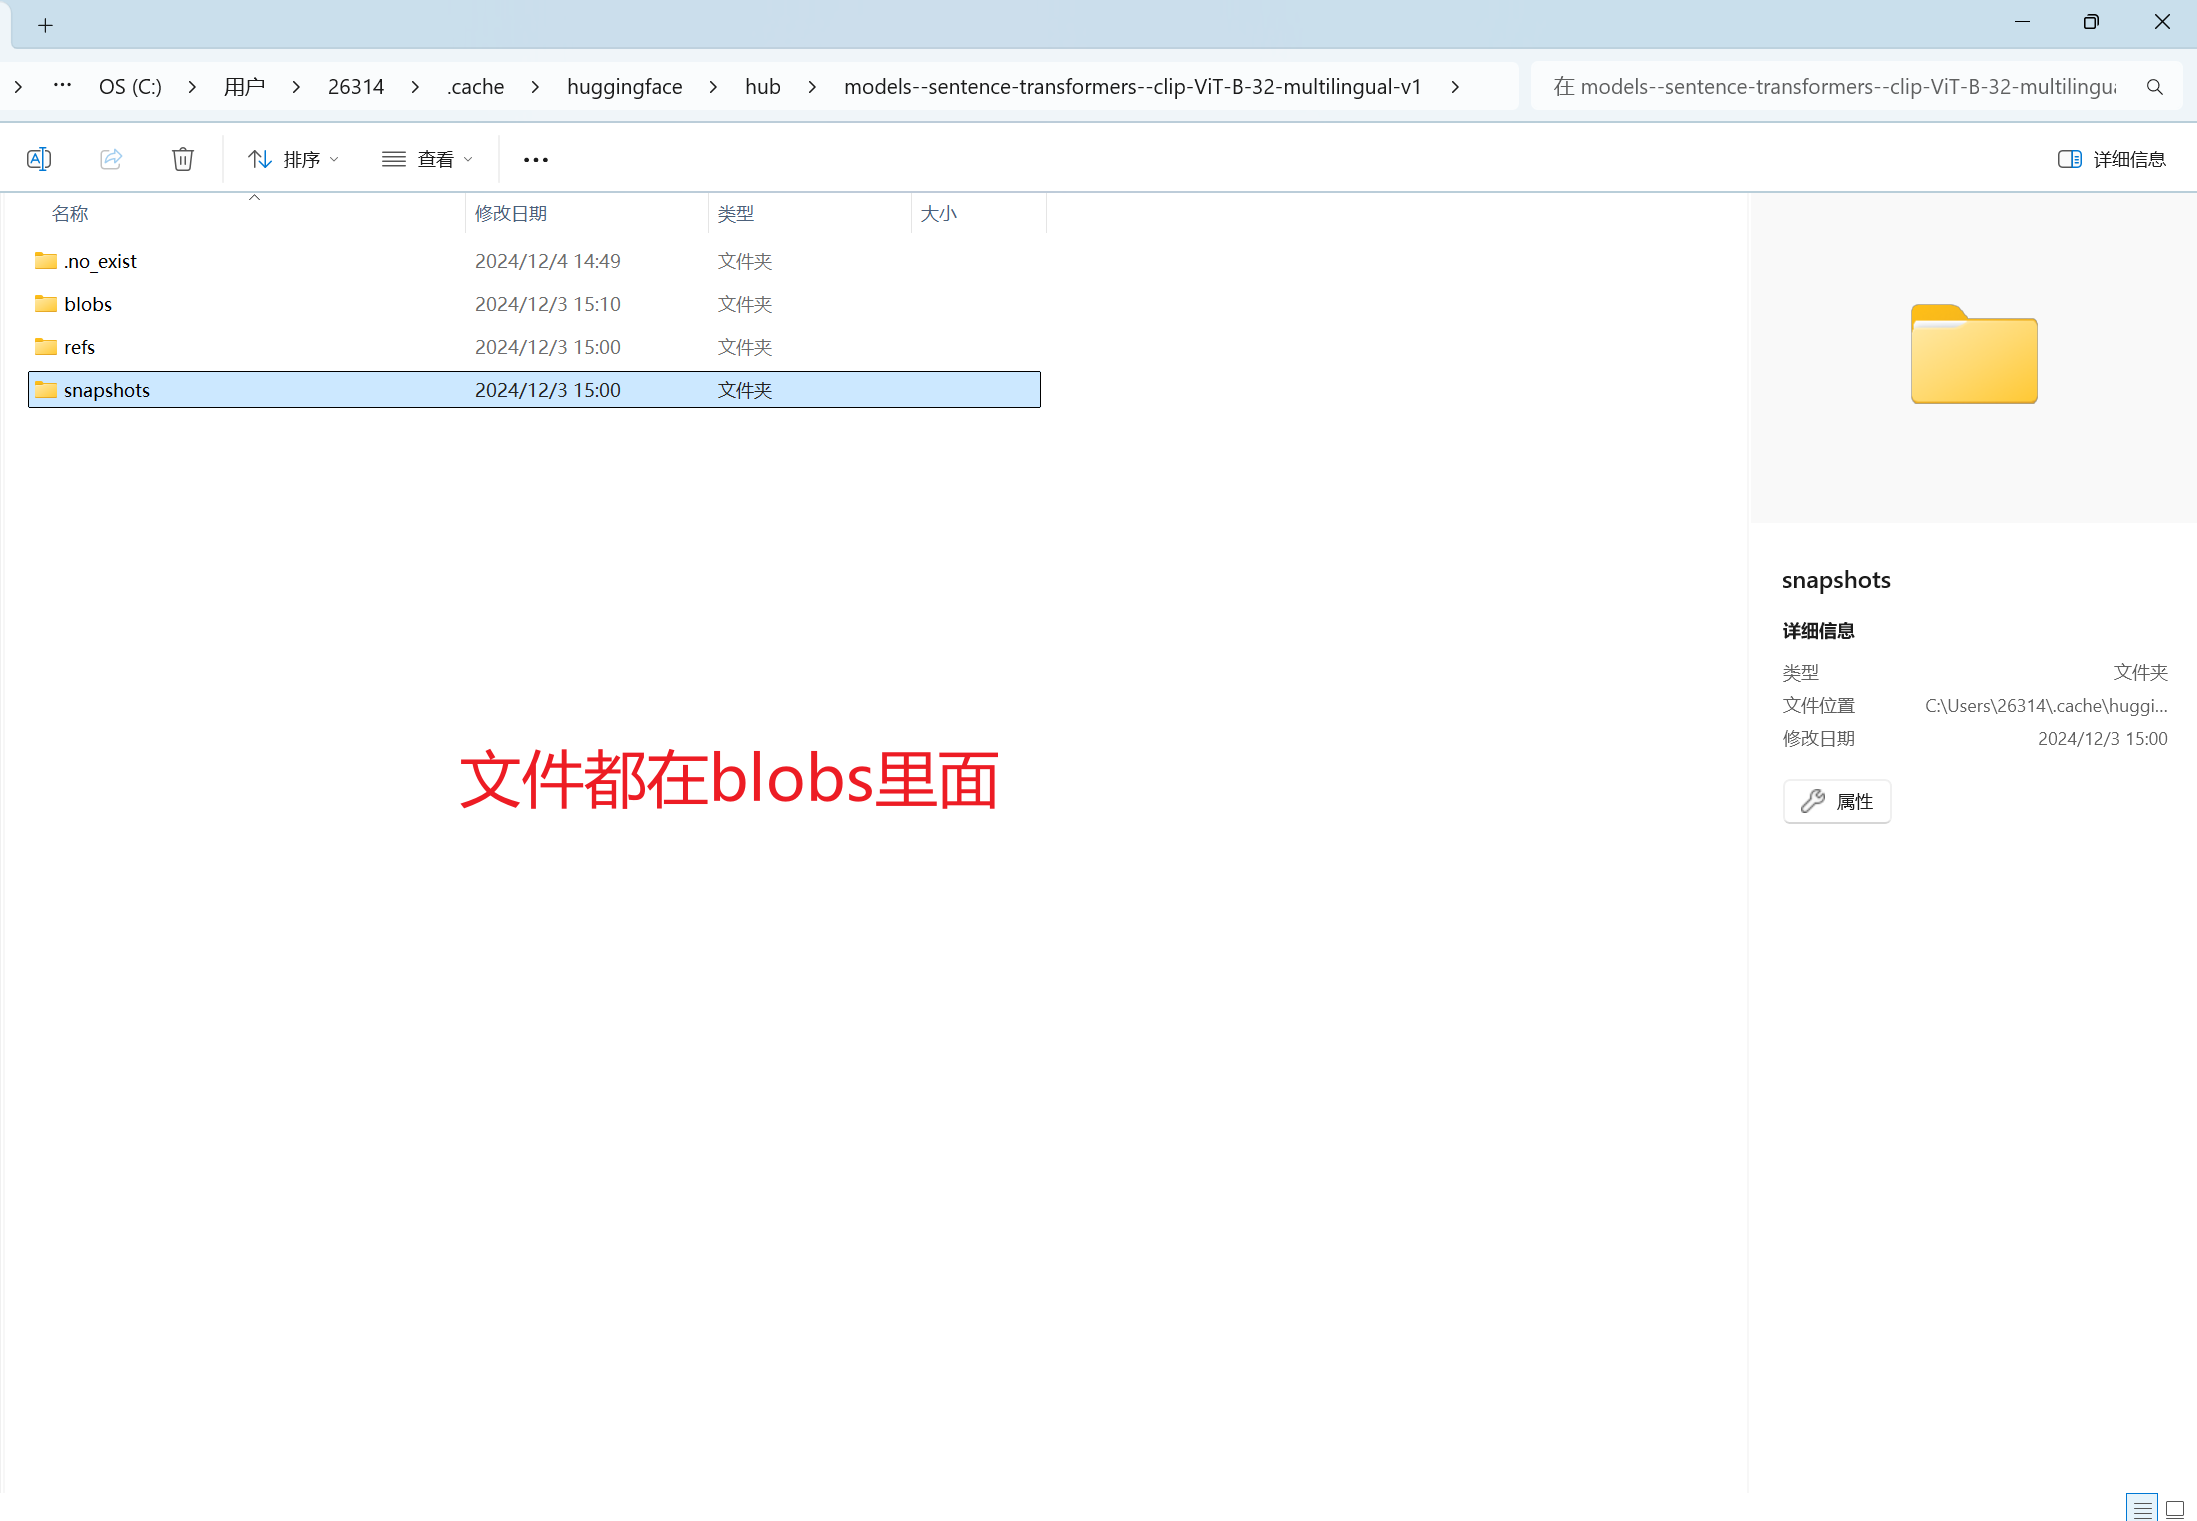
最后我安装的模型截图
C:\Users\26314\.cache\huggingface\hub\models--sentence-transformers--clip-ViT-B-32-multilingual-v1\snapshots\58edf8cada9e398793dca955574a48cbb7f18be2
2.4 下载数据集
http://sbert.net/datasets/unsplash-25k-photos.zip
将你下载的模型和图片数据集运行下面的程序测试一下,如果能成功运行起来就没有问题啦。
from sentence_transformers import SentenceTransformer, util
from PIL import Image
import glob
import torch
import pickle
import zipfile
from IPython.display import display
from IPython.display import Image as IPImage
import os
from tqdm.autonotebook import tqdm

# Here we load the multilingual CLIP model. Note, this model can only encode text.
# If you need embeddings for images, you must load the 'clip-ViT-B-32' model
model = SentenceTransformer('clip-ViT-B-32-multilingual-v1')

# Next, we get about 25k images from Unsplash
img_folder = 'photos/'
if not os.path.exists(img_folder) or len(os.listdir(img_folder)) == 0:
    os.makedirs(img_folder, exist_ok=True)

    photo_filename = 'unsplash-25k-photos.zip'
    if not os.path.exists(photo_filename):  # Download dataset if does not exist
        util.http_get('http://sbert.net/datasets/' + photo_filename, photo_filename)

    # Extract all images
    with zipfile.ZipFile(photo_filename, 'r') as zf:
        for member in tqdm(zf.infolist(), desc='Extracting'):
            zf.extract(member, img_folder)

# Now, we need to compute the embeddings
# To speed things up, we destribute pre-computed embeddings
# Otherwise you can also encode the images yourself.
# To encode an image, you can use the following code:
# from PIL import Image
# img_emb = model.encode(Image.open(filepath))

use_precomputed_embeddings = True

if use_precomputed_embeddings:
    emb_filename = 'unsplash-25k-photos-embeddings.pkl'
    if not os.path.exists(emb_filename):  # Download dataset if does not exist
        util.http_get('http://sbert.net/datasets/' + emb_filename, emb_filename)

    with open(emb_filename, 'rb') as fIn:
        img_names, img_emb = pickle.load(fIn)
    print("Images:", len(img_names))
else:
    # For embedding images, we need the non-multilingual CLIP model
    img_model = SentenceTransformer('clip-ViT-B-32')

    img_names = list(glob.glob('unsplash/photos/*.jpg'))
    print("Images:", len(img_names))
    img_emb = img_model.encode([Image.open(filepath) for filepath in img_names], batch_size=128, convert_to_tensor=True,
                               show_progress_bar=True)


# Next, we define a search function.
def search(query, k=3):
    # First, we encode the query (which can either be an image or a text string)
    query_emb = model.encode([query], convert_to_tensor=True, show_progress_bar=False)

    # Then, we use the util.semantic_search function, which computes the cosine-similarity
    # between the query embedding and all image embeddings.
    # It then returns the top_k highest ranked images, which we output
    hits = util.semantic_search(query_emb, img_emb, top_k=k)[0]

    print("Query:")
    display(query)
    for hit in hits:
        print(img_names[hit['corpus_id']])
        display(IPImage(os.path.join(img_folder, img_names[hit['corpus_id']]), width=200))

search("Two dogs playing in the snow")

#German: A cat on a chair
search("Eine Katze auf einem Stuhl")

#Spanish: Many fish
search("Muchos peces")

#Chinese: A beach with palm trees
search("棕榈树的沙滩")
2.5 运行程序create-image-embeddings.py
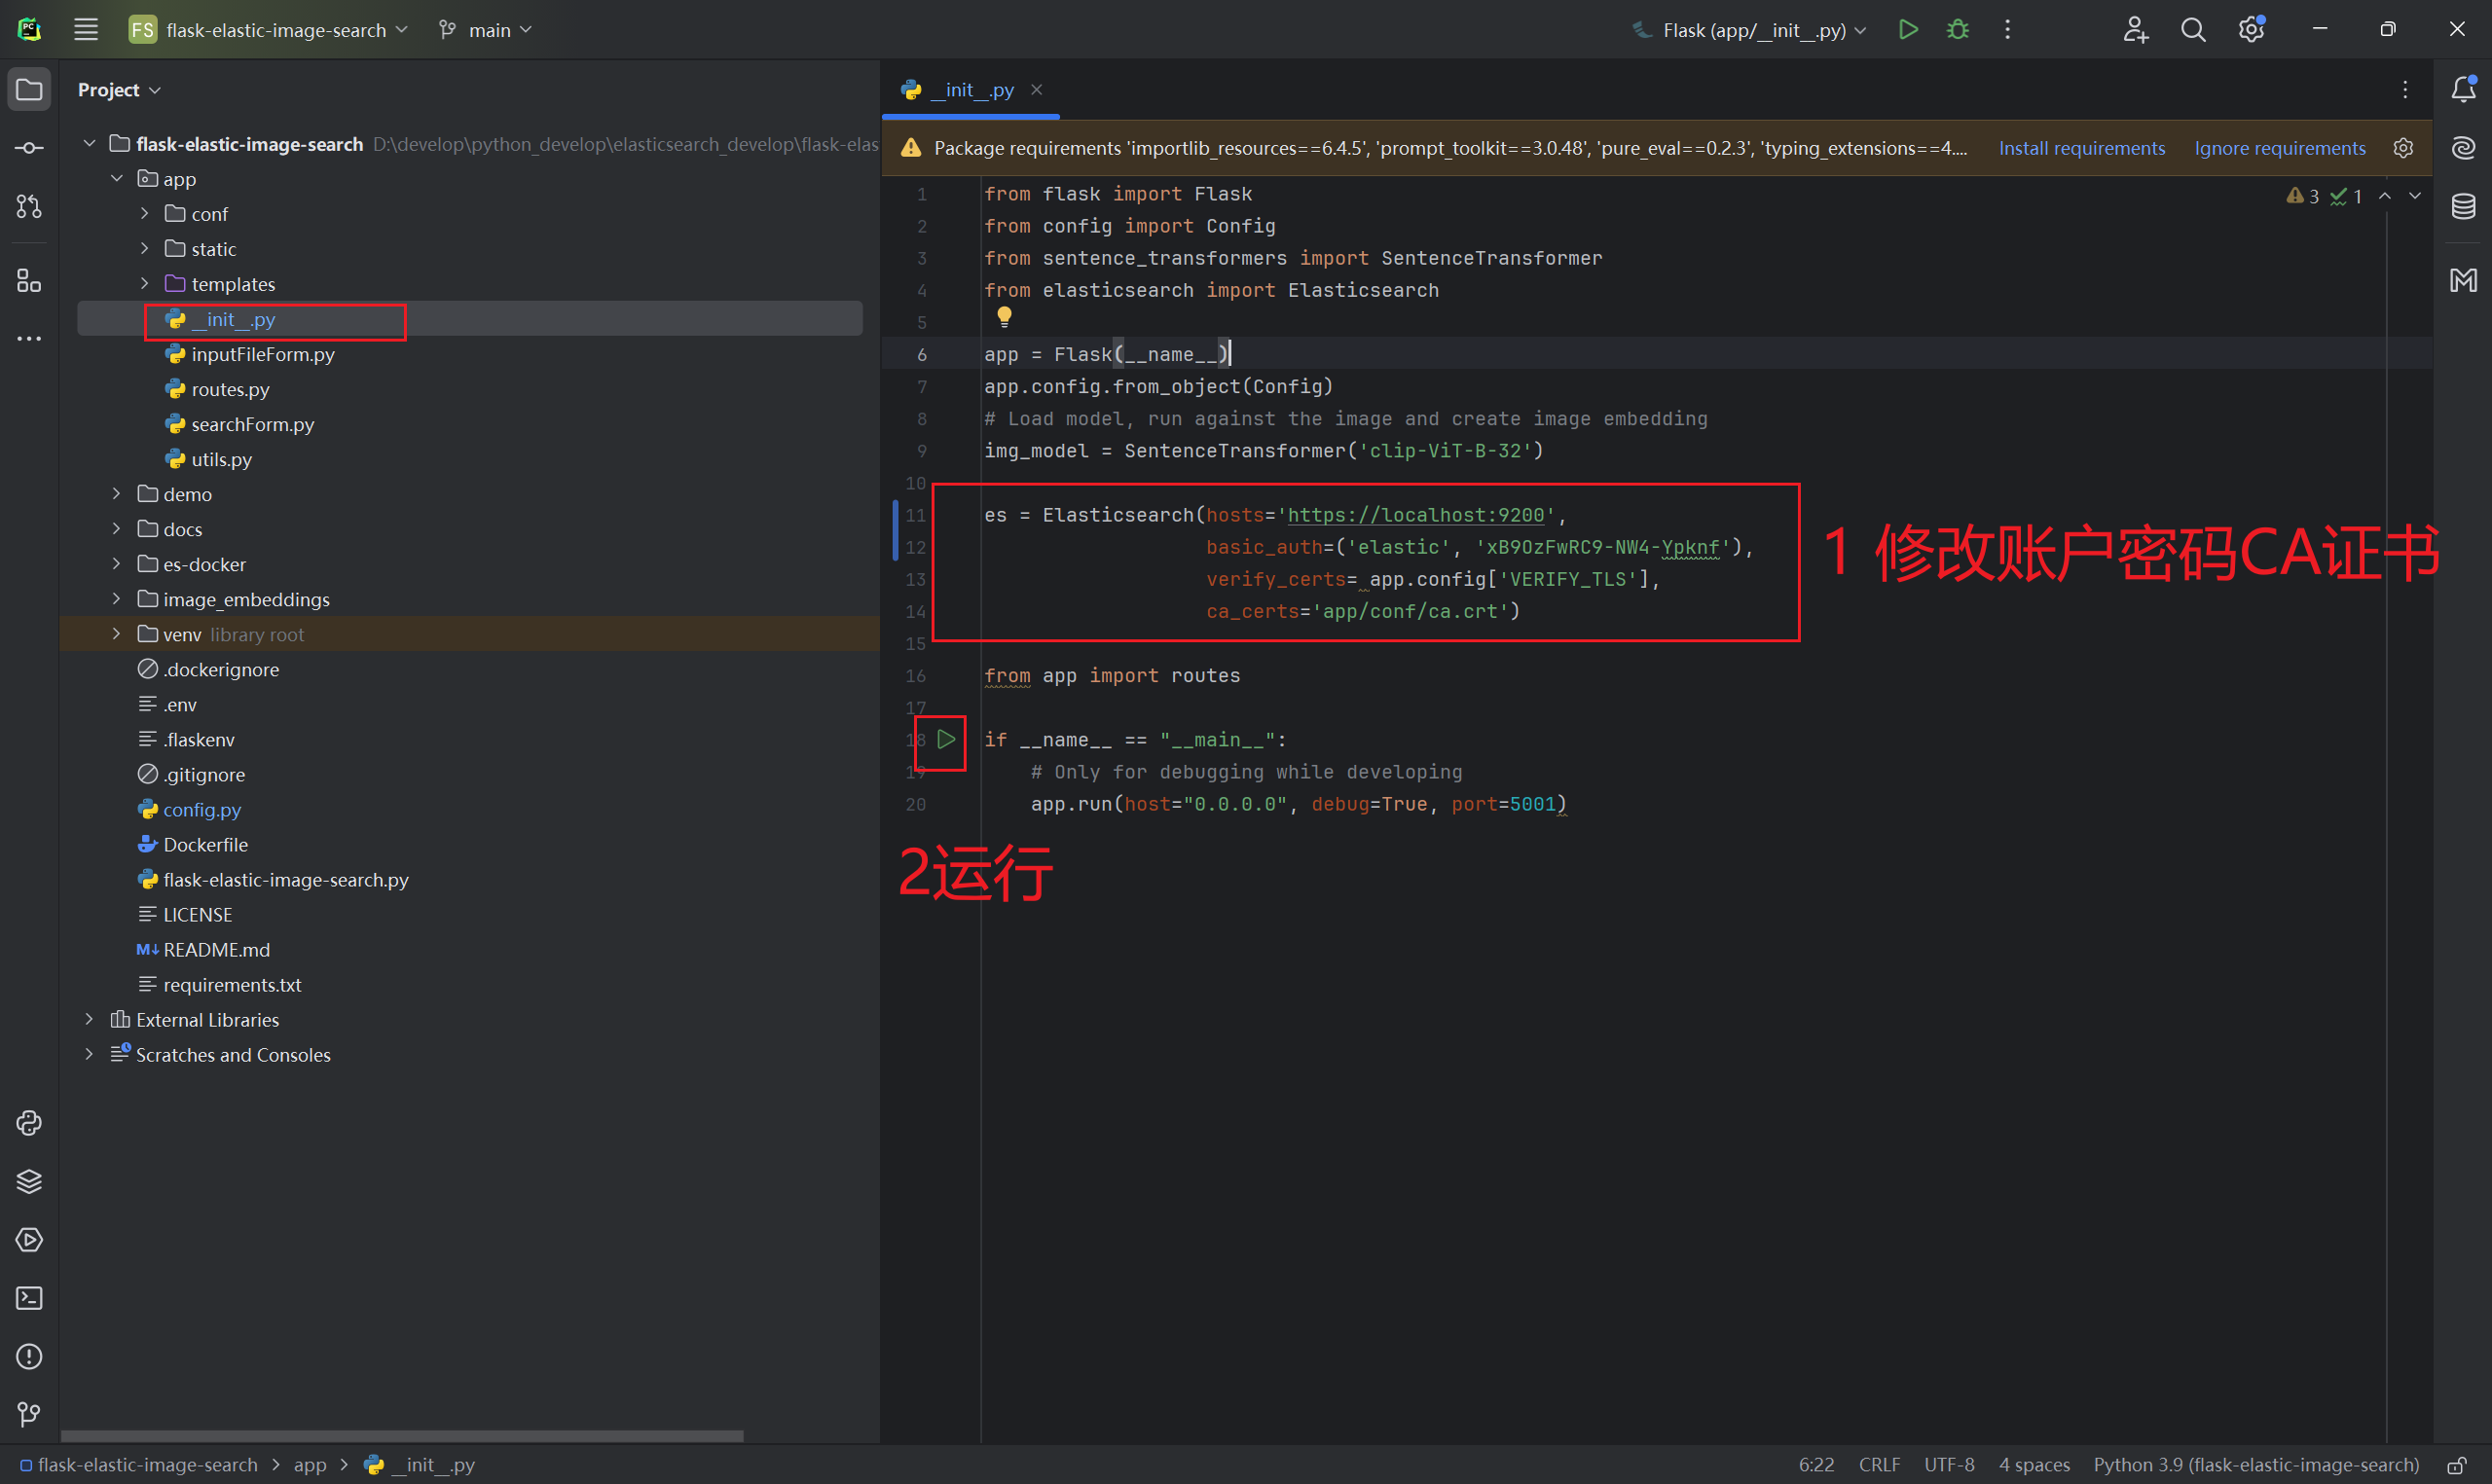
下面需要修改一下es账号、密码和证书才可以运行。
import os
import sys
import glob
import time
import json
import argparse
from sentence_transformers import SentenceTransformer
from elasticsearch import Elasticsearch, SSLError
from elasticsearch.helpers import parallel_bulk
from PIL import Image
from tqdm import tqdm
from datetime import datetime
from exif import Image as exifImage

ES_HOST = "https://127.0.0.1:9200/"
ES_USER = "elastic"
ES_PASSWORD = "xB9OzFwRC9-NW4-Ypknf"
ES_TIMEOUT = 3600

DEST_INDEX = "my-image-embeddings"
DELETE_EXISTING = True
CHUNK_SIZE = 100

PATH_TO_IMAGES = "../app/static/photos/**/*.jp*g"
PREFIX = "..\\app\\static\\photos\\"

CA_CERT='../app/conf/ess-cloud.cer'

parser = argparse.ArgumentParser()
parser.add_argument('--es_host', dest='es_host', required=False, default=ES_HOST,
                    help="Elasticsearch hostname. Must include HOST and PORT. Default: " + ES_HOST)
parser.add_argument('--es_user', dest='es_user', required=False, default=ES_USER,
                    help="Elasticsearch username. Default: " + ES_USER)
parser.add_argument('--es_password', dest='es_password', required=False, default=ES_PASSWORD,
                    help="Elasticsearch password. Default: " + ES_PASSWORD)
parser.add_argument('--verify_certs', dest='verify_certs', required=False, default=True,
                    action=argparse.BooleanOptionalAction,
                    help="Verify certificates. Default: True")
parser.add_argument('--thread_count', dest='thread_count', required=False, default=4, type=int,
                    help="Number of indexing threads. Default: 4")
parser.add_argument('--chunk_size', dest='chunk_size', required=False, default=CHUNK_SIZE, type=int,
                    help="Default: " + str(CHUNK_SIZE))
parser.add_argument('--timeout', dest='timeout', required=False, default=ES_TIMEOUT, type=int,
                    help="Request timeout in seconds. Default: " + str(ES_TIMEOUT))
parser.add_argument('--delete_existing', dest='delete_existing', required=False, default=True,
                    action=argparse.BooleanOptionalAction,
                    help="Delete existing indices if they are present in the cluster. Default: True")
parser.add_argument('--ca_certs', dest='ca_certs', required=False,# default=CA_CERT,
                    help="Path to CA certificate.") # Default: ../app/conf/ess-cloud.cer")
parser.add_argument('--extract_GPS_location', dest='gps_location', required=False, default=False,
                    action=argparse.BooleanOptionalAction,
                    help="[Experimental] Extract GPS location from photos if available. Default: False")

args = parser.parse_args()


def main():
    global args
    lst = []

    start_time = time.perf_counter()
    img_model = SentenceTransformer('clip-ViT-B-32')
    duration = time.perf_counter() - start_time
    print(f'Duration load model = {duration}')

    filenames = glob.glob(PATH_TO_IMAGES, recursive=True)
    start_time = time.perf_counter()
    for filename in tqdm(filenames, desc='Processing files', total=len(filenames)):
        image = Image.open(filename)

        doc = {}
        embedding = image_embedding(image, img_model)
        doc['image_id'] = create_image_id(filename)
        doc['image_name'] = os.path.basename(filename)
        doc['image_embedding'] = embedding.tolist()
        doc['relative_path'] = os.path.relpath(filename).split(PREFIX)[1]
        doc['exif'] = {}

        try:
            date = get_exif_date(filename)
            # print(date)
            doc['exif']['date'] = get_exif_date(filename)
        except Exception as e:
            pass

        # Experimental! Extract photo GPS location if available.
        if args.gps_location:
            try:
                doc['exif']['location'] = get_exif_location(filename)
            except Exception as e:
                pass

        lst.append(doc)

    duration = time.perf_counter() - start_time
    print(f'Duration creating image embeddings = {duration}')

    es = Elasticsearch(hosts=ES_HOST)
    if args.ca_certs:
        es = Elasticsearch(
            hosts=[args.es_host],
            verify_certs=args.verify_certs,
            basic_auth=(args.es_user, args.es_password),
            ca_certs=args.ca_certs
        )
    else:
        es = Elasticsearch(
            hosts=[args.es_host],
            verify_certs=args.verify_certs,
            basic_auth=(args.es_user, args.es_password)
        )

    es.options(request_timeout=args.timeout)

    # index name to index data into
    index = DEST_INDEX
    try:
        with open("image-embeddings-mappings.json", "r") as config_file:
            config = json.loads(config_file.read())
            if args.delete_existing:
                if es.indices.exists(index=index):
                    print("Deleting existing %s" % index)
                    es.indices.delete(index=index, ignore=[400, 404])

            print("Creating index %s" % index)
            es.indices.create(index=index,
                              mappings=config["mappings"],
                              settings=config["settings"],
                              ignore=[400, 404],
                              request_timeout=args.timeout)


        count = 0
        for success, info in parallel_bulk(
                client=es,
                actions=lst,
                thread_count=4,
                chunk_size=args.chunk_size,
                timeout='%ss' % 120,
                index=index
        ):
            if success:
                count += 1
                if count % args.chunk_size == 0:
                    print('Indexed %s documents' % str(count), flush=True)
                    sys.stdout.flush()
            else:
                print('Doc failed', info)

        print('Indexed %s documents' % str(count), flush=True)
        duration = time.perf_counter() - start_time
        print(f'Total duration = {duration}')
        print("Done!\n")
    except SSLError as e:
        if "SSL: CERTIFICATE_VERIFY_FAILED" in e.message:
            print("\nCERTIFICATE_VERIFY_FAILED exception. Please check the CA path configuration for the script.\n")
            raise
        else:
            raise


def image_embedding(image, model):
    return model.encode(image)


def create_image_id(filename):
    # print("Image filename: ", filename)
    return os.path.splitext(os.path.basename(filename))[0]

def get_exif_date(filename):
    with open(filename, 'rb') as f:
        image = exifImage(f)
        taken = f"{image.datetime_original}"
        date_object = datetime.strptime(taken, "%Y:%m:%d %H:%M:%S")
        prettyDate = date_object.isoformat()
        return prettyDate

def get_exif_location(filename):
    with open(filename, 'rb') as f:
        image = exifImage(f)
        exif = {}
        lat = dms_coordinates_to_dd_coordinates(image.gps_latitude, image.gps_latitude_ref)
        lon = dms_coordinates_to_dd_coordinates(image.gps_longitude, image.gps_longitude_ref)
        return [lon, lat]


def dms_coordinates_to_dd_coordinates(coordinates, coordinates_ref):
    decimal_degrees = coordinates[0] + \
                      coordinates[1] / 60 + \
                      coordinates[2] / 3600

    if coordinates_ref == "S" or coordinates_ref == "W":
        decimal_degrees = -decimal_degrees

    return decimal_degrees

if __name__ == '__main__':
    main()
下面为运行命令
$ cd image_embeddings
$ python3 create-image-embeddings.py --es_host='https://127.0.0.1:9200' \
  --es_user='elastic' --es_password='changeme' \
  --ca_certs='../app/conf/ca.crt'
上面的代码运行完毕之后,你就将所有的图片转为向量存储到es中了,整个工作就已经完成了一半了。
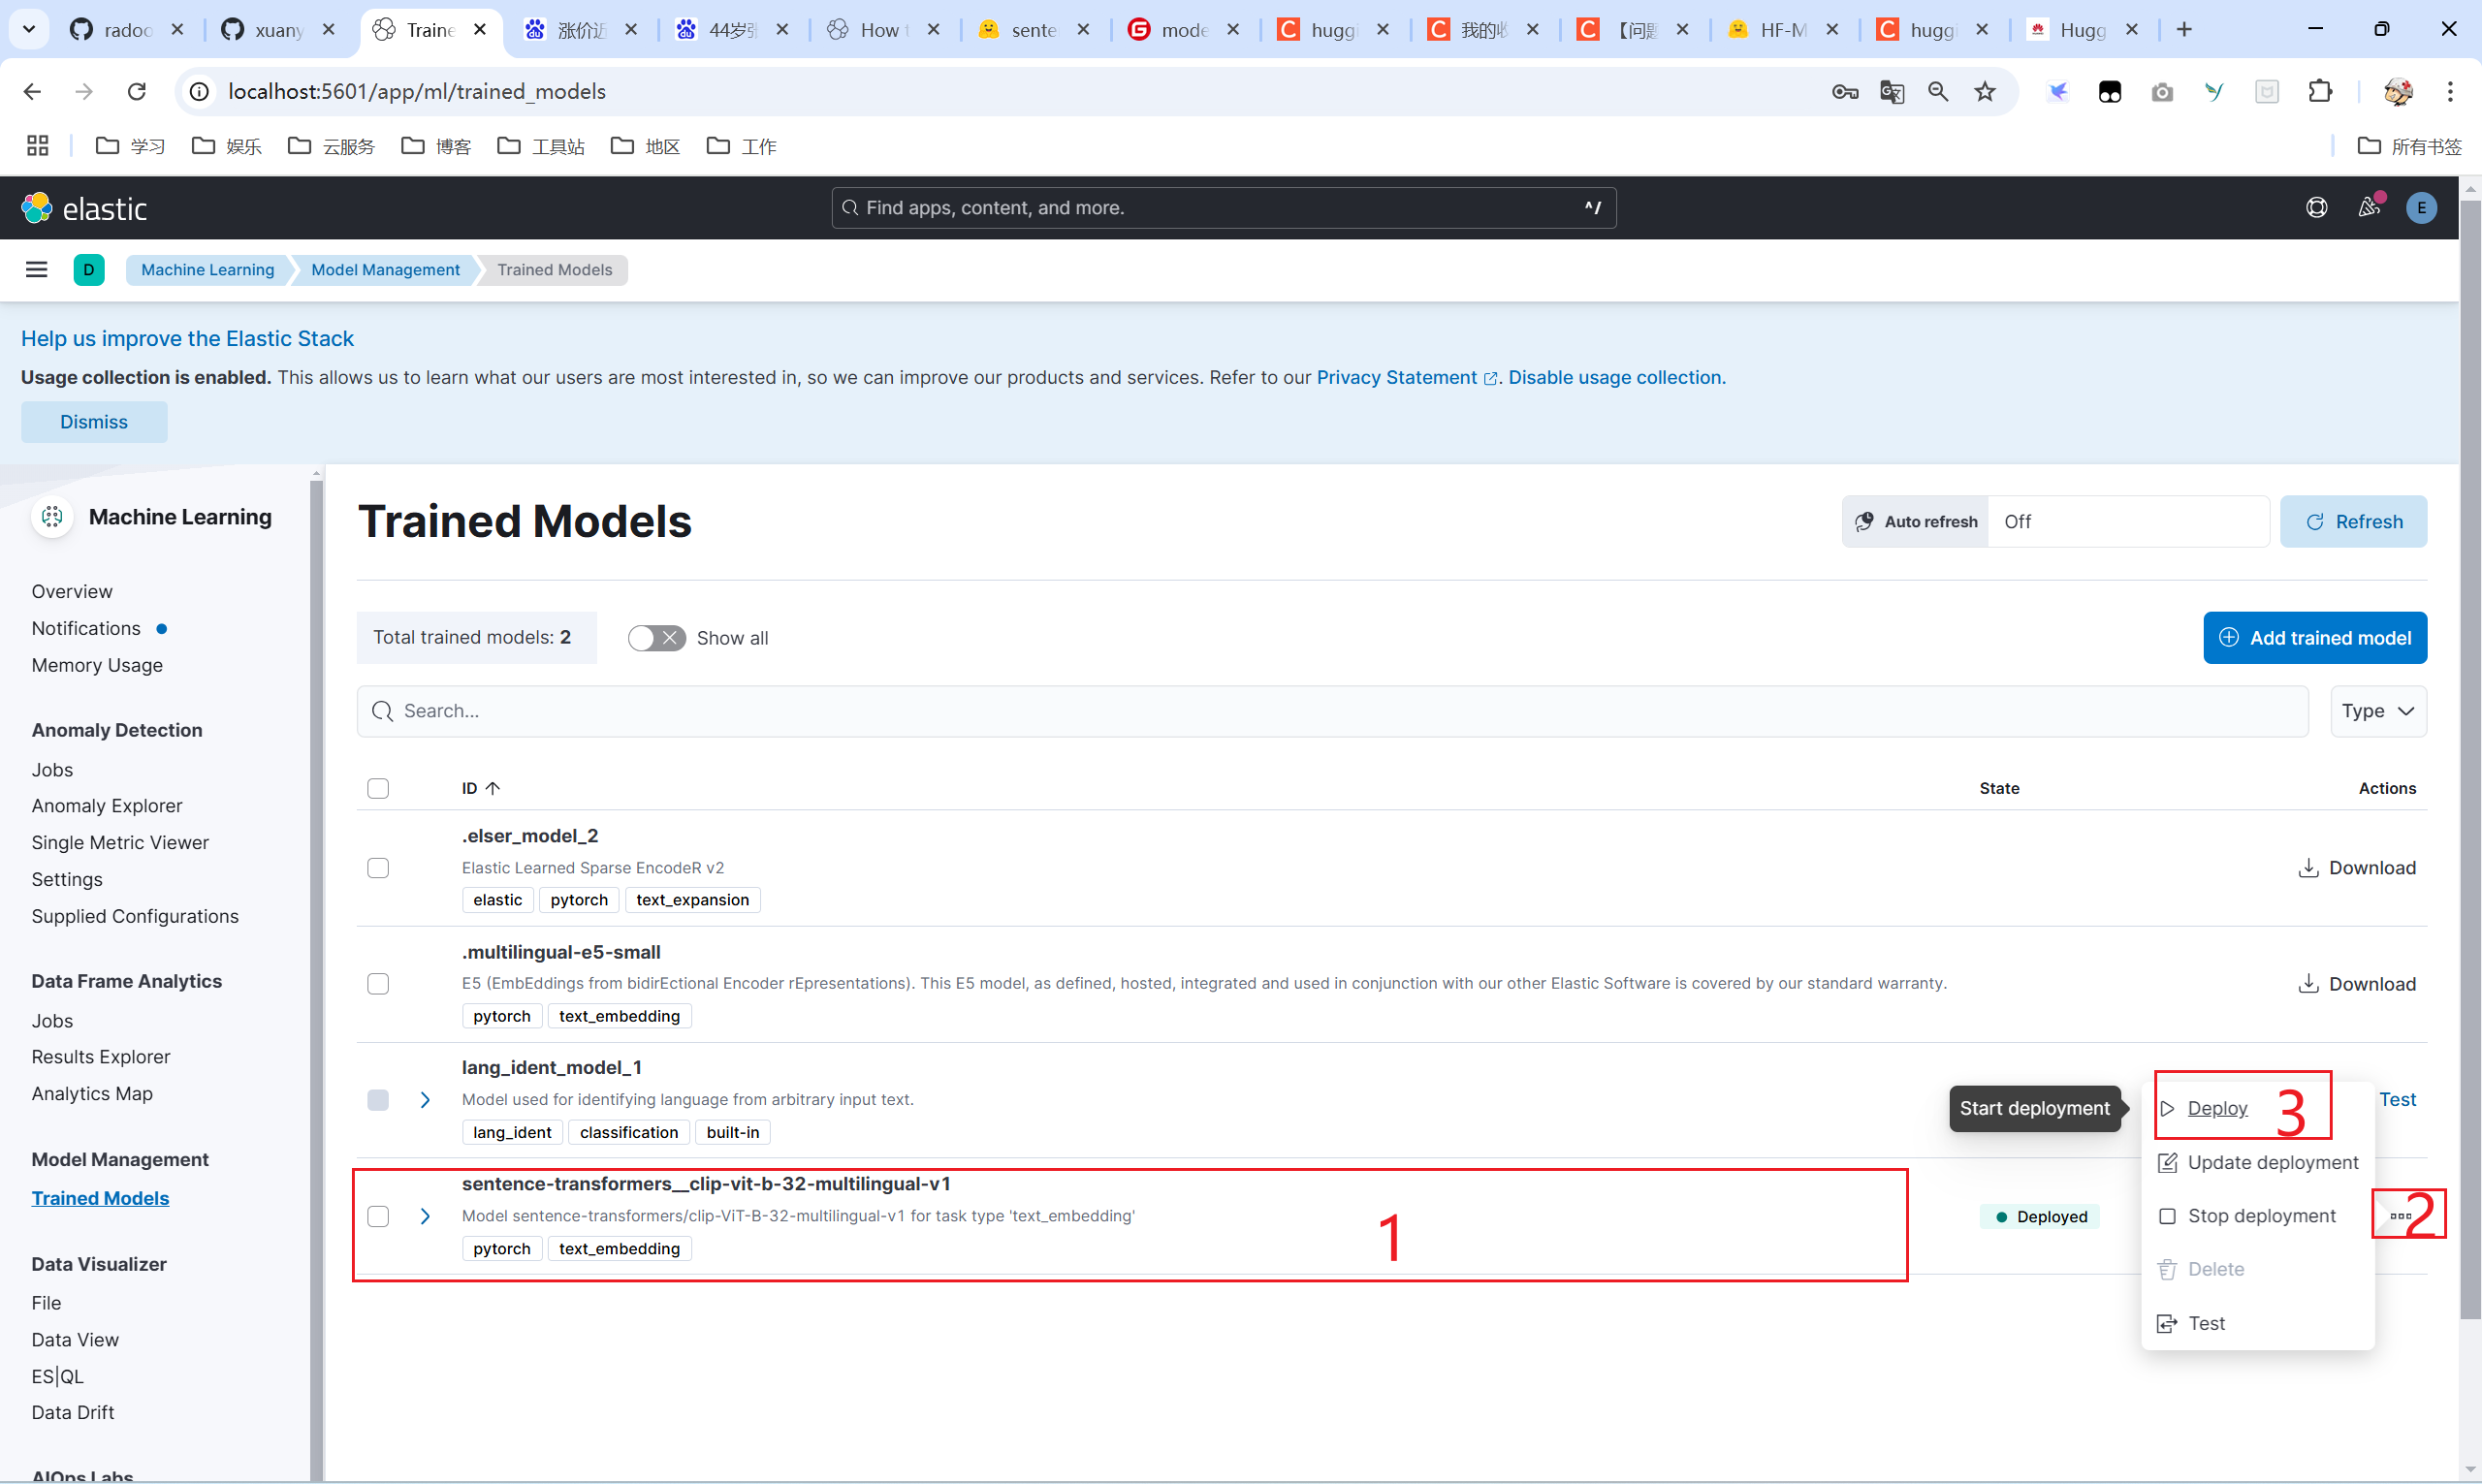
2.6 在kibana中安装模型
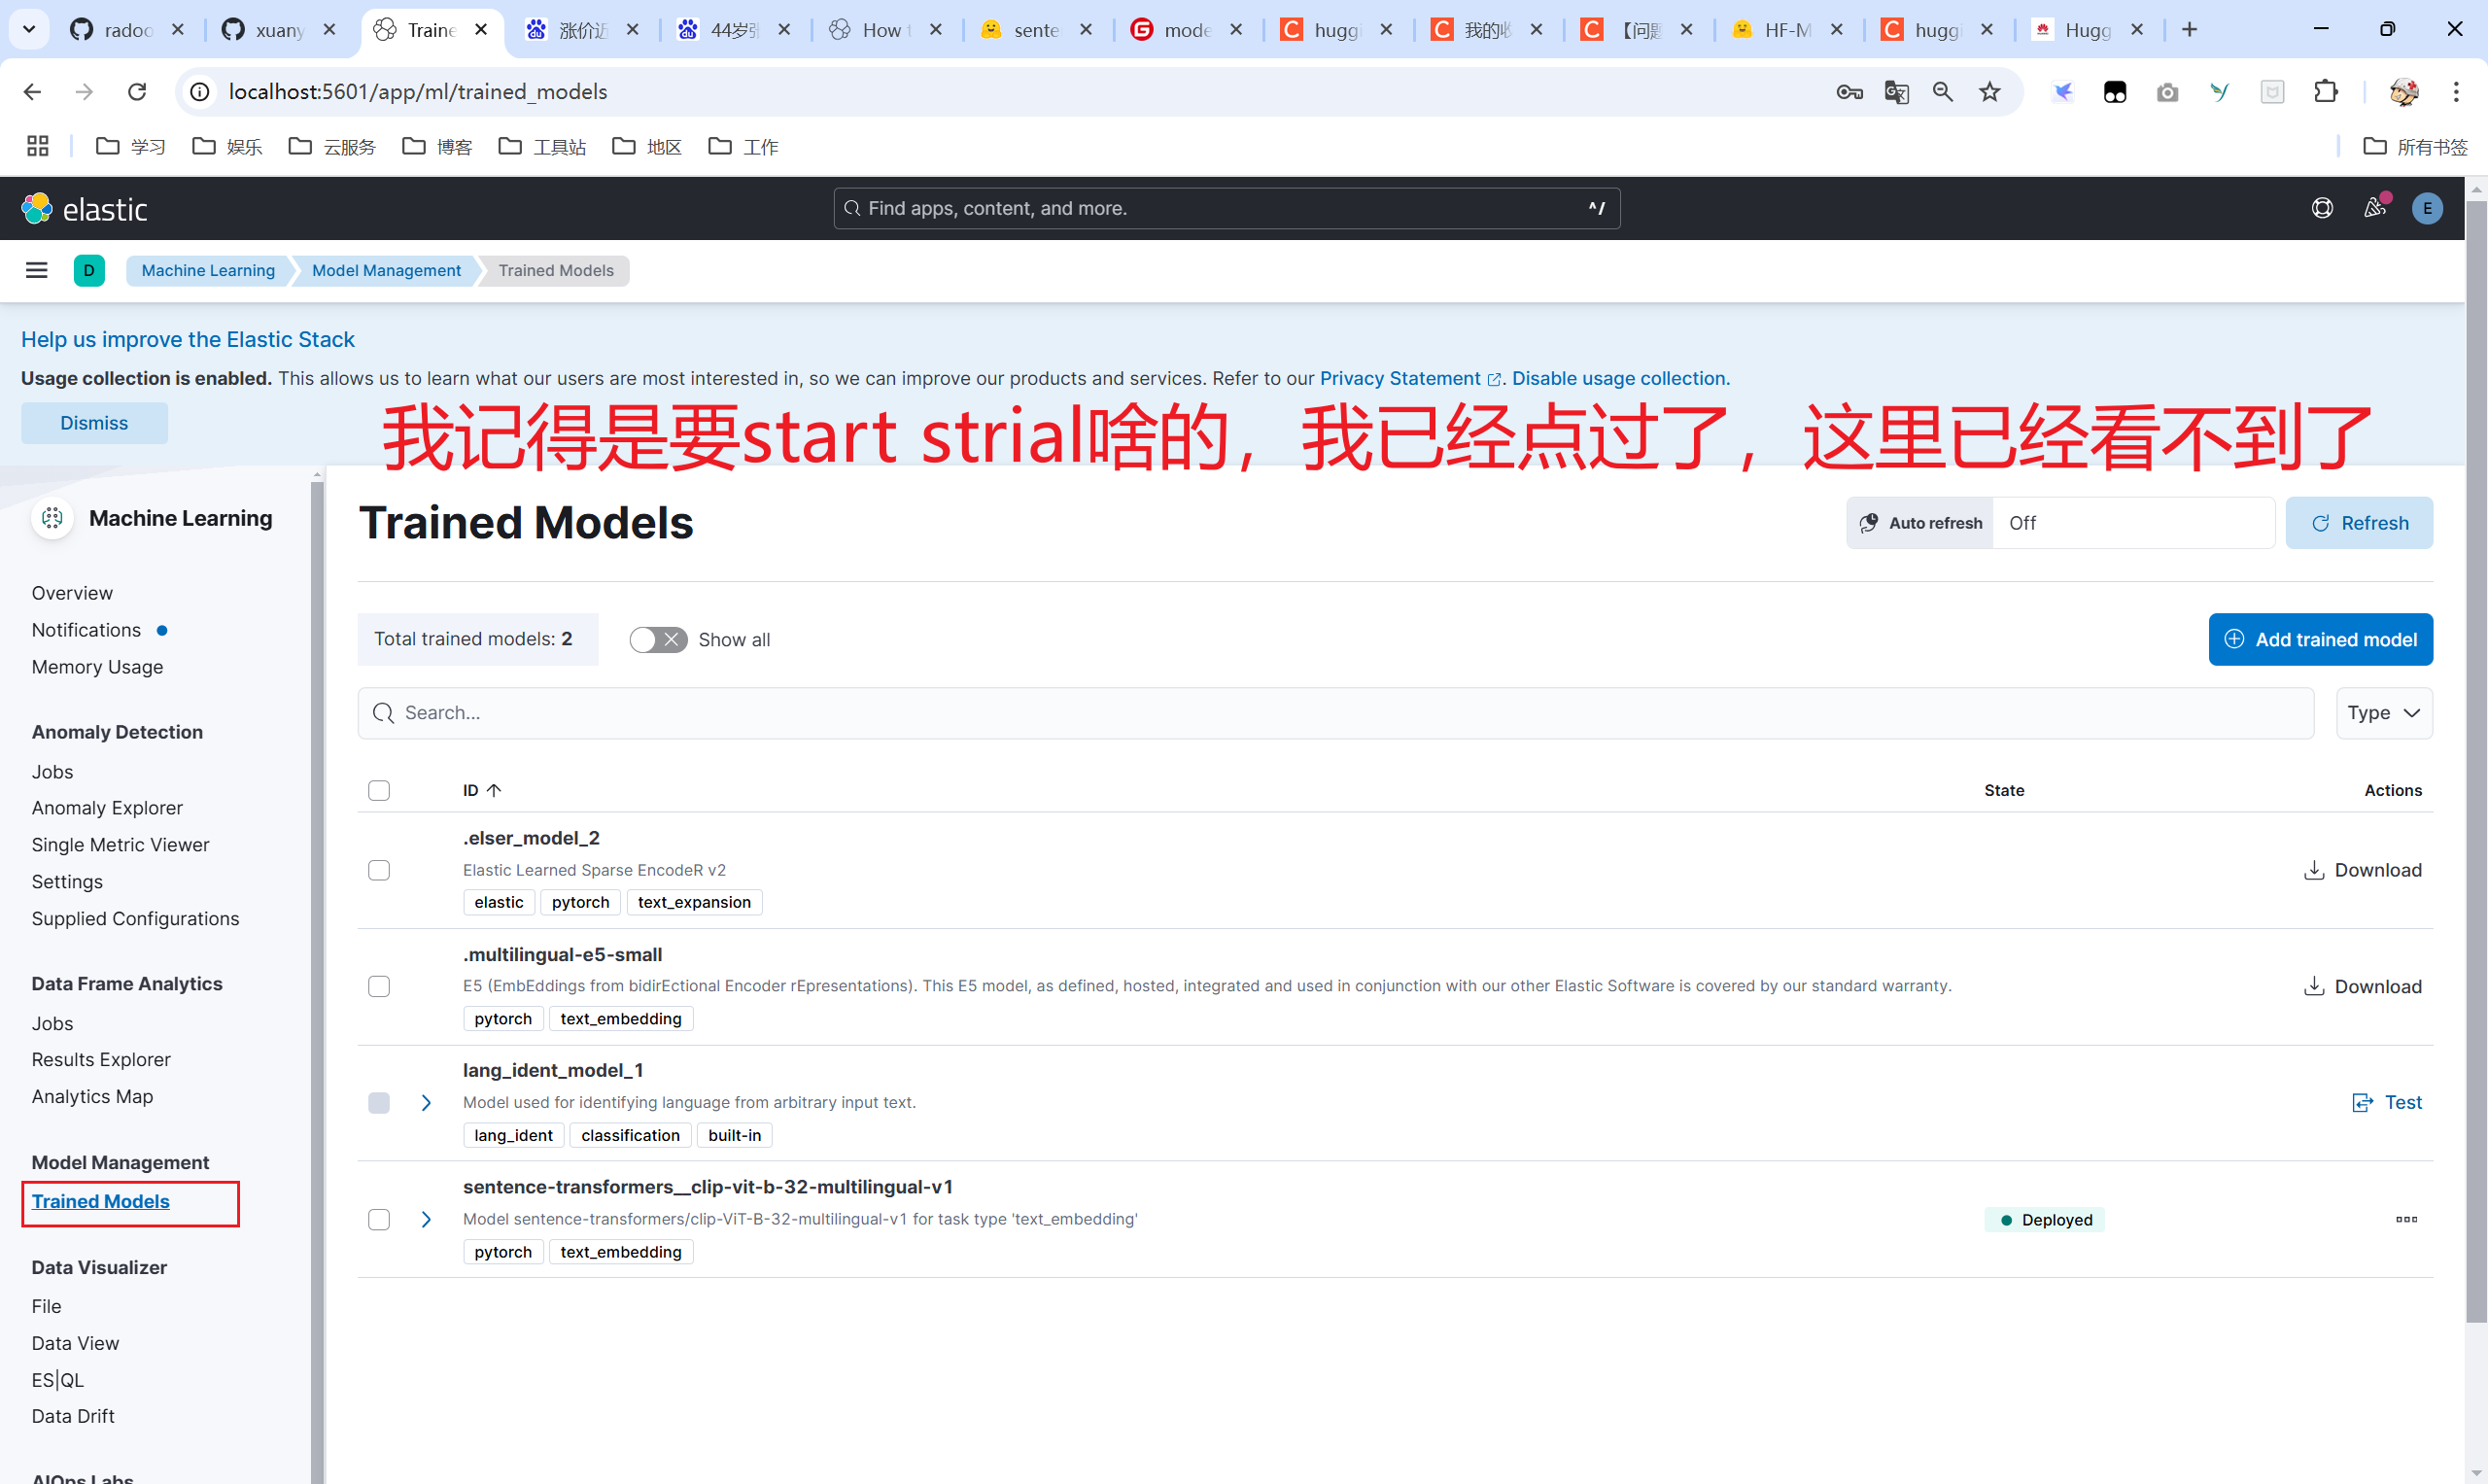
首先你要在kibana开启机器模型白金版试用期30天,然后才可以执行下面的安装代码,不然会出现意想不到的报错。
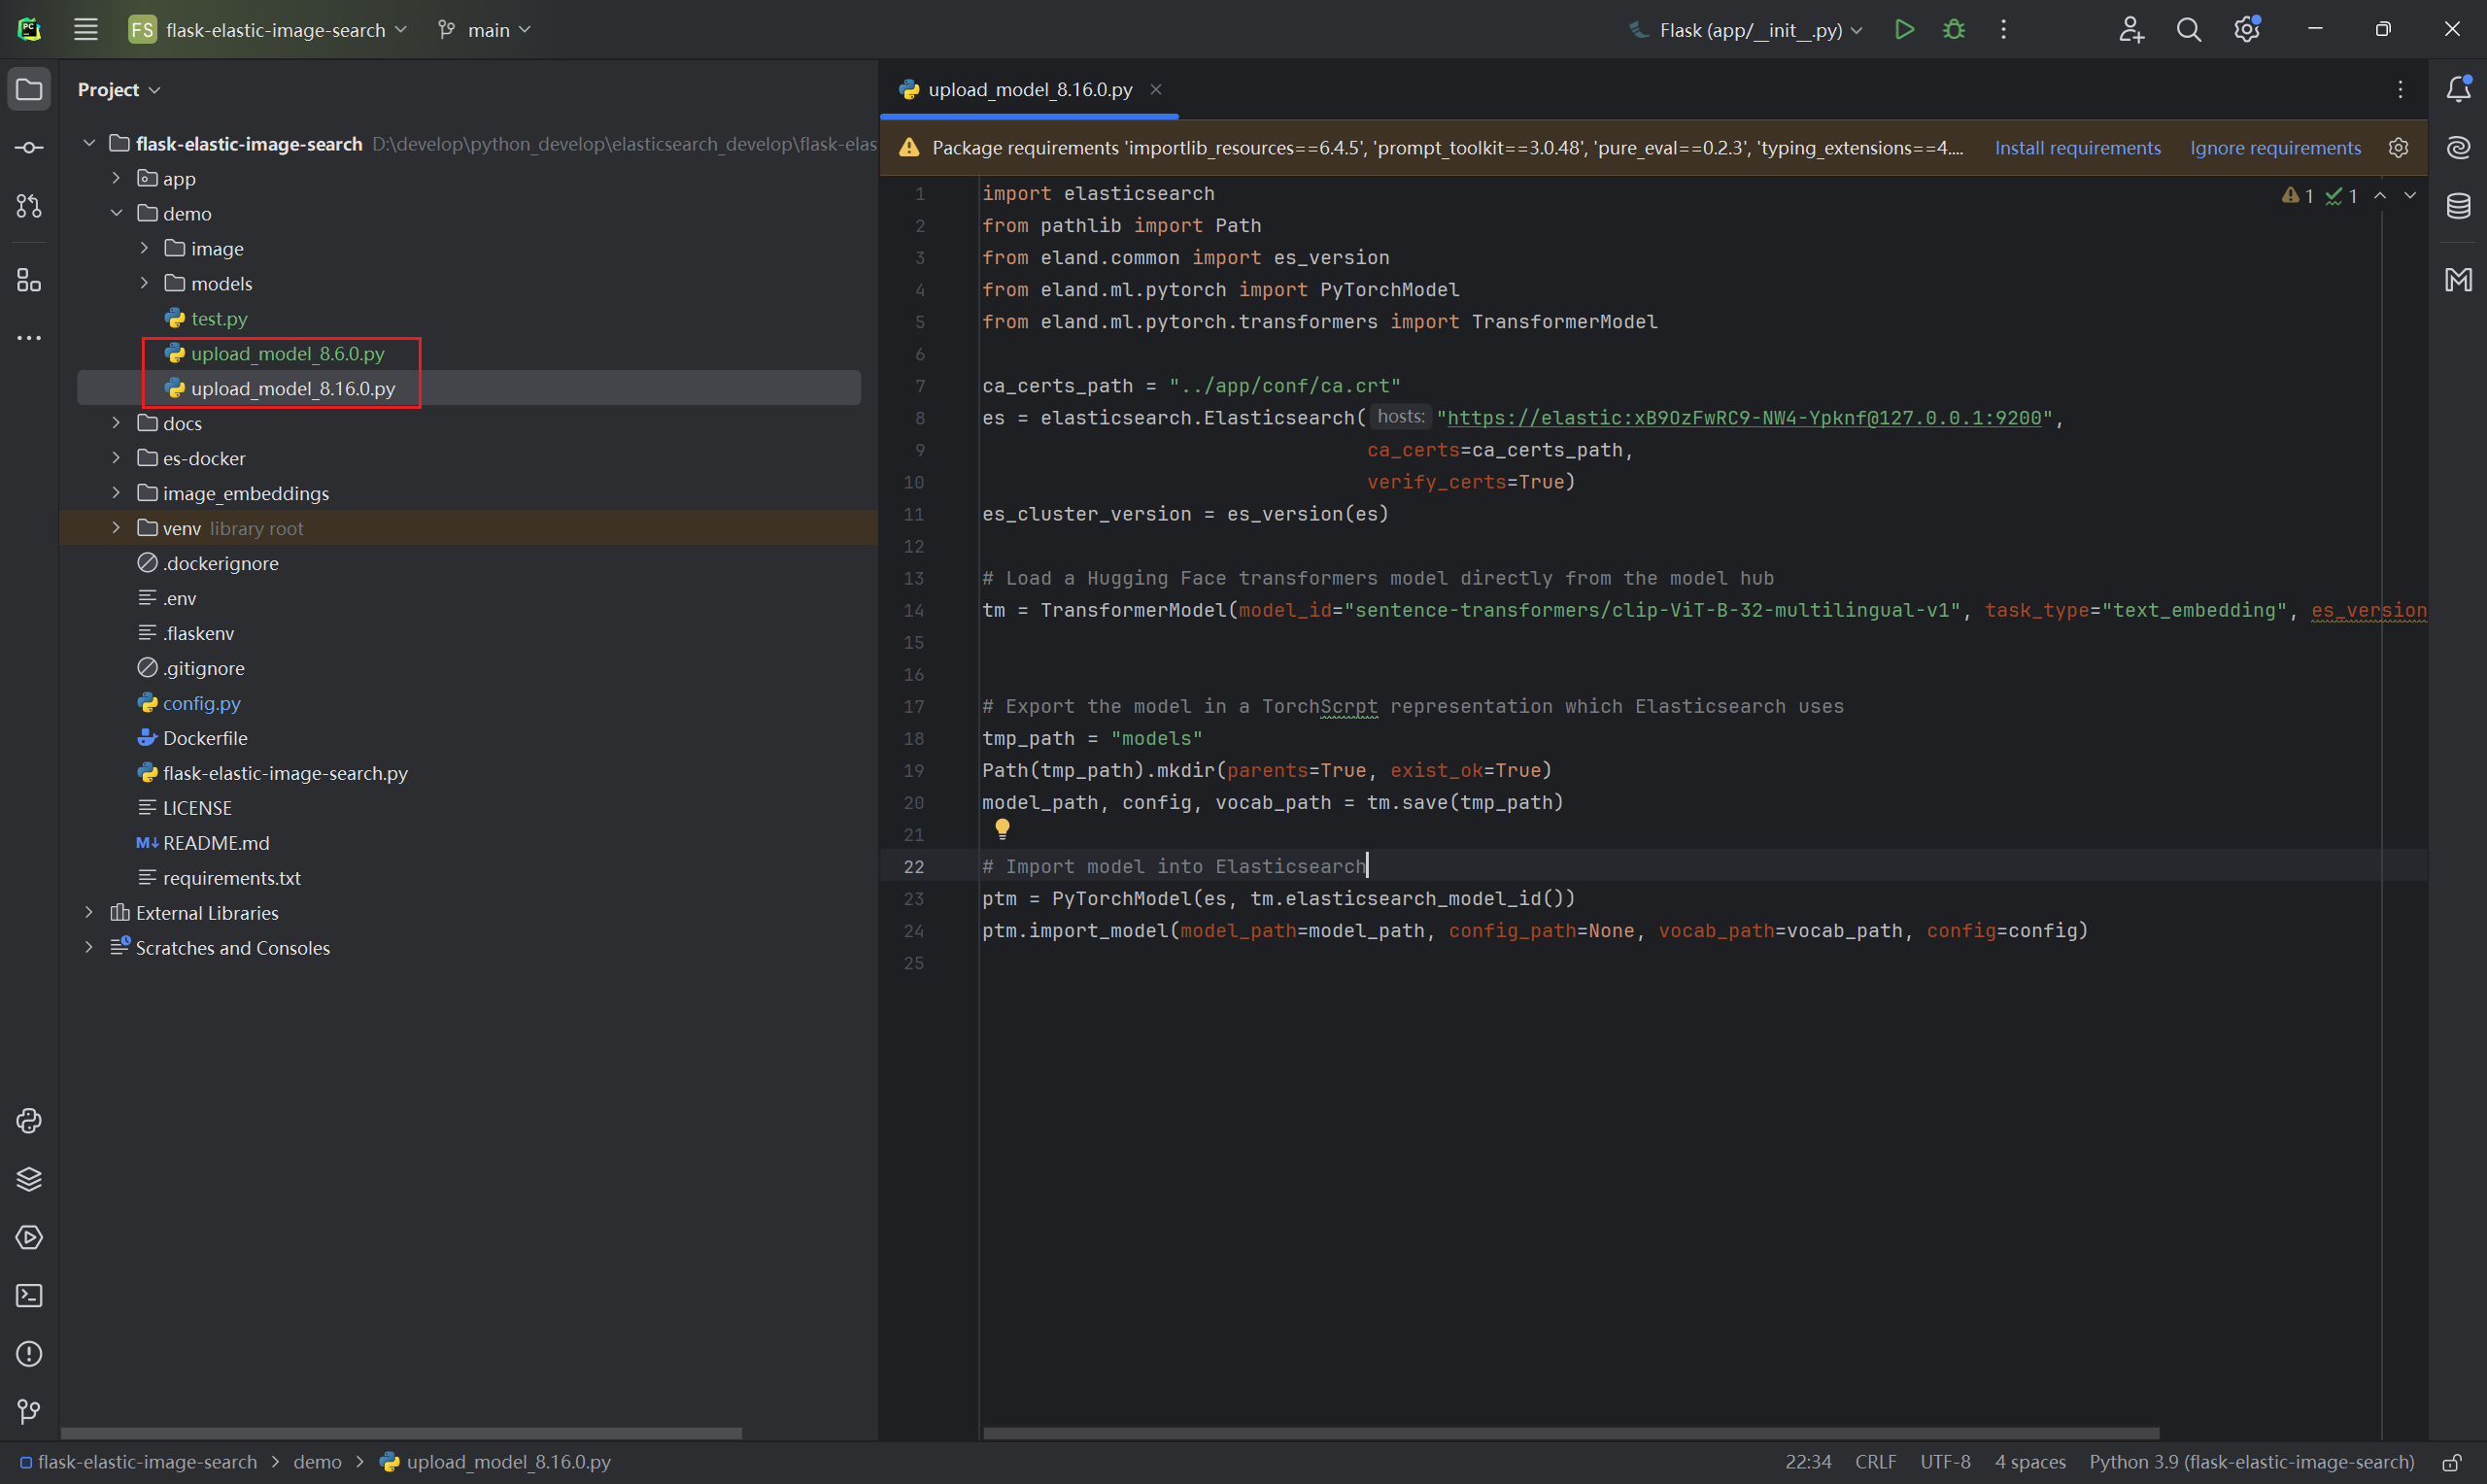
下面代码有两个版本,请使用最新版8.16.0,因为8.6.0有问题,我没有安装成功。在运行之前同样需要修改es的账号、密码、CA证书。
import elasticsearch
from pathlib import Path
from eland.common import es_version
from eland.ml.pytorch import PyTorchModel
from eland.ml.pytorch.transformers import TransformerModel

ca_certs_path = "../app/conf/ca.crt"
es = elasticsearch.Elasticsearch("https://elastic:[email protected]:9200",
                                 ca_certs=ca_certs_path,
                                 verify_certs=True)
es_cluster_version = es_version(es)

# Load a Hugging Face transformers model directly from the model hub
tm = TransformerModel(model_id="sentence-transformers/clip-ViT-B-32-multilingual-v1", task_type="text_embedding", es_version=es_cluster_version)


# Export the model in a TorchScrpt representation which Elasticsearch uses
tmp_path = "models"
Path(tmp_path).mkdir(parents=True, exist_ok=True)
model_path, config, vocab_path = tm.save(tmp_path)

# Import model into Elasticsearch
ptm = PyTorchModel(es, tm.elasticsearch_model_id())
ptm.import_model(model_path=model_path, config_path=None, vocab_path=vocab_path, config=config)
运行上面的程序你就可以将sentence-transformers/clip-ViT-B-32-multilingual-v1安装到Kibana中了,在kibana中点击运行就可以啦。
2.7 运行检索程序
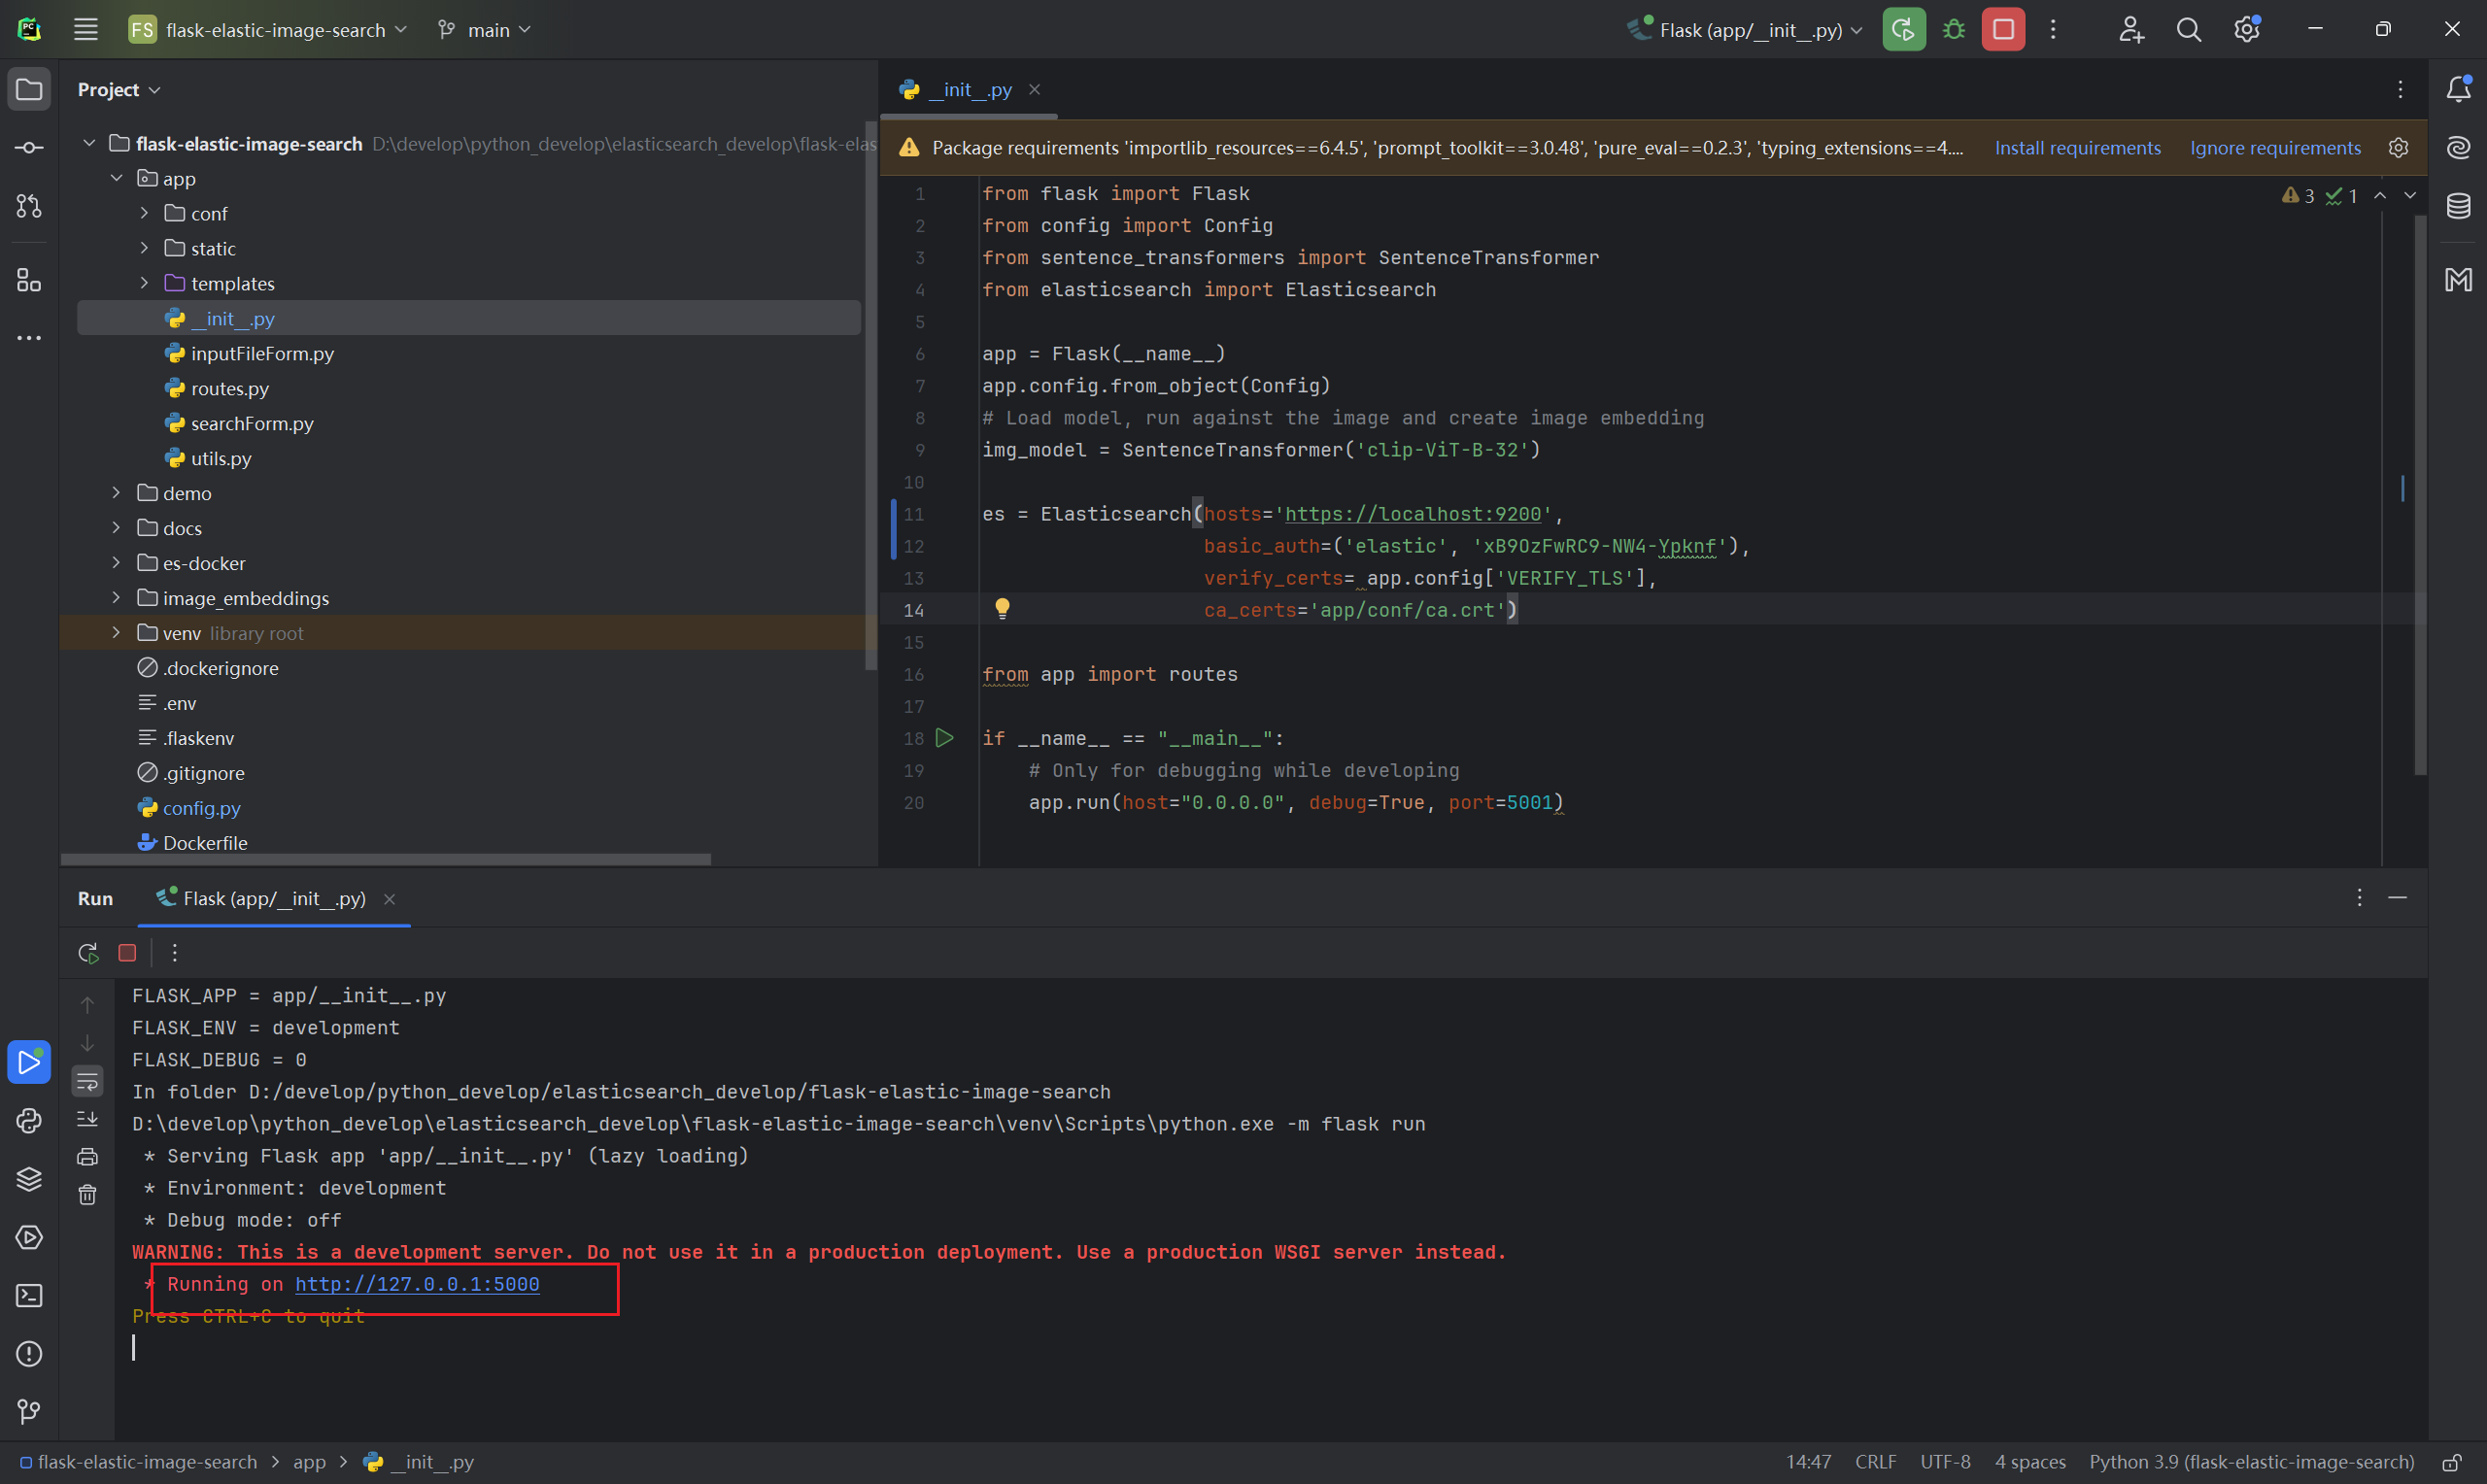
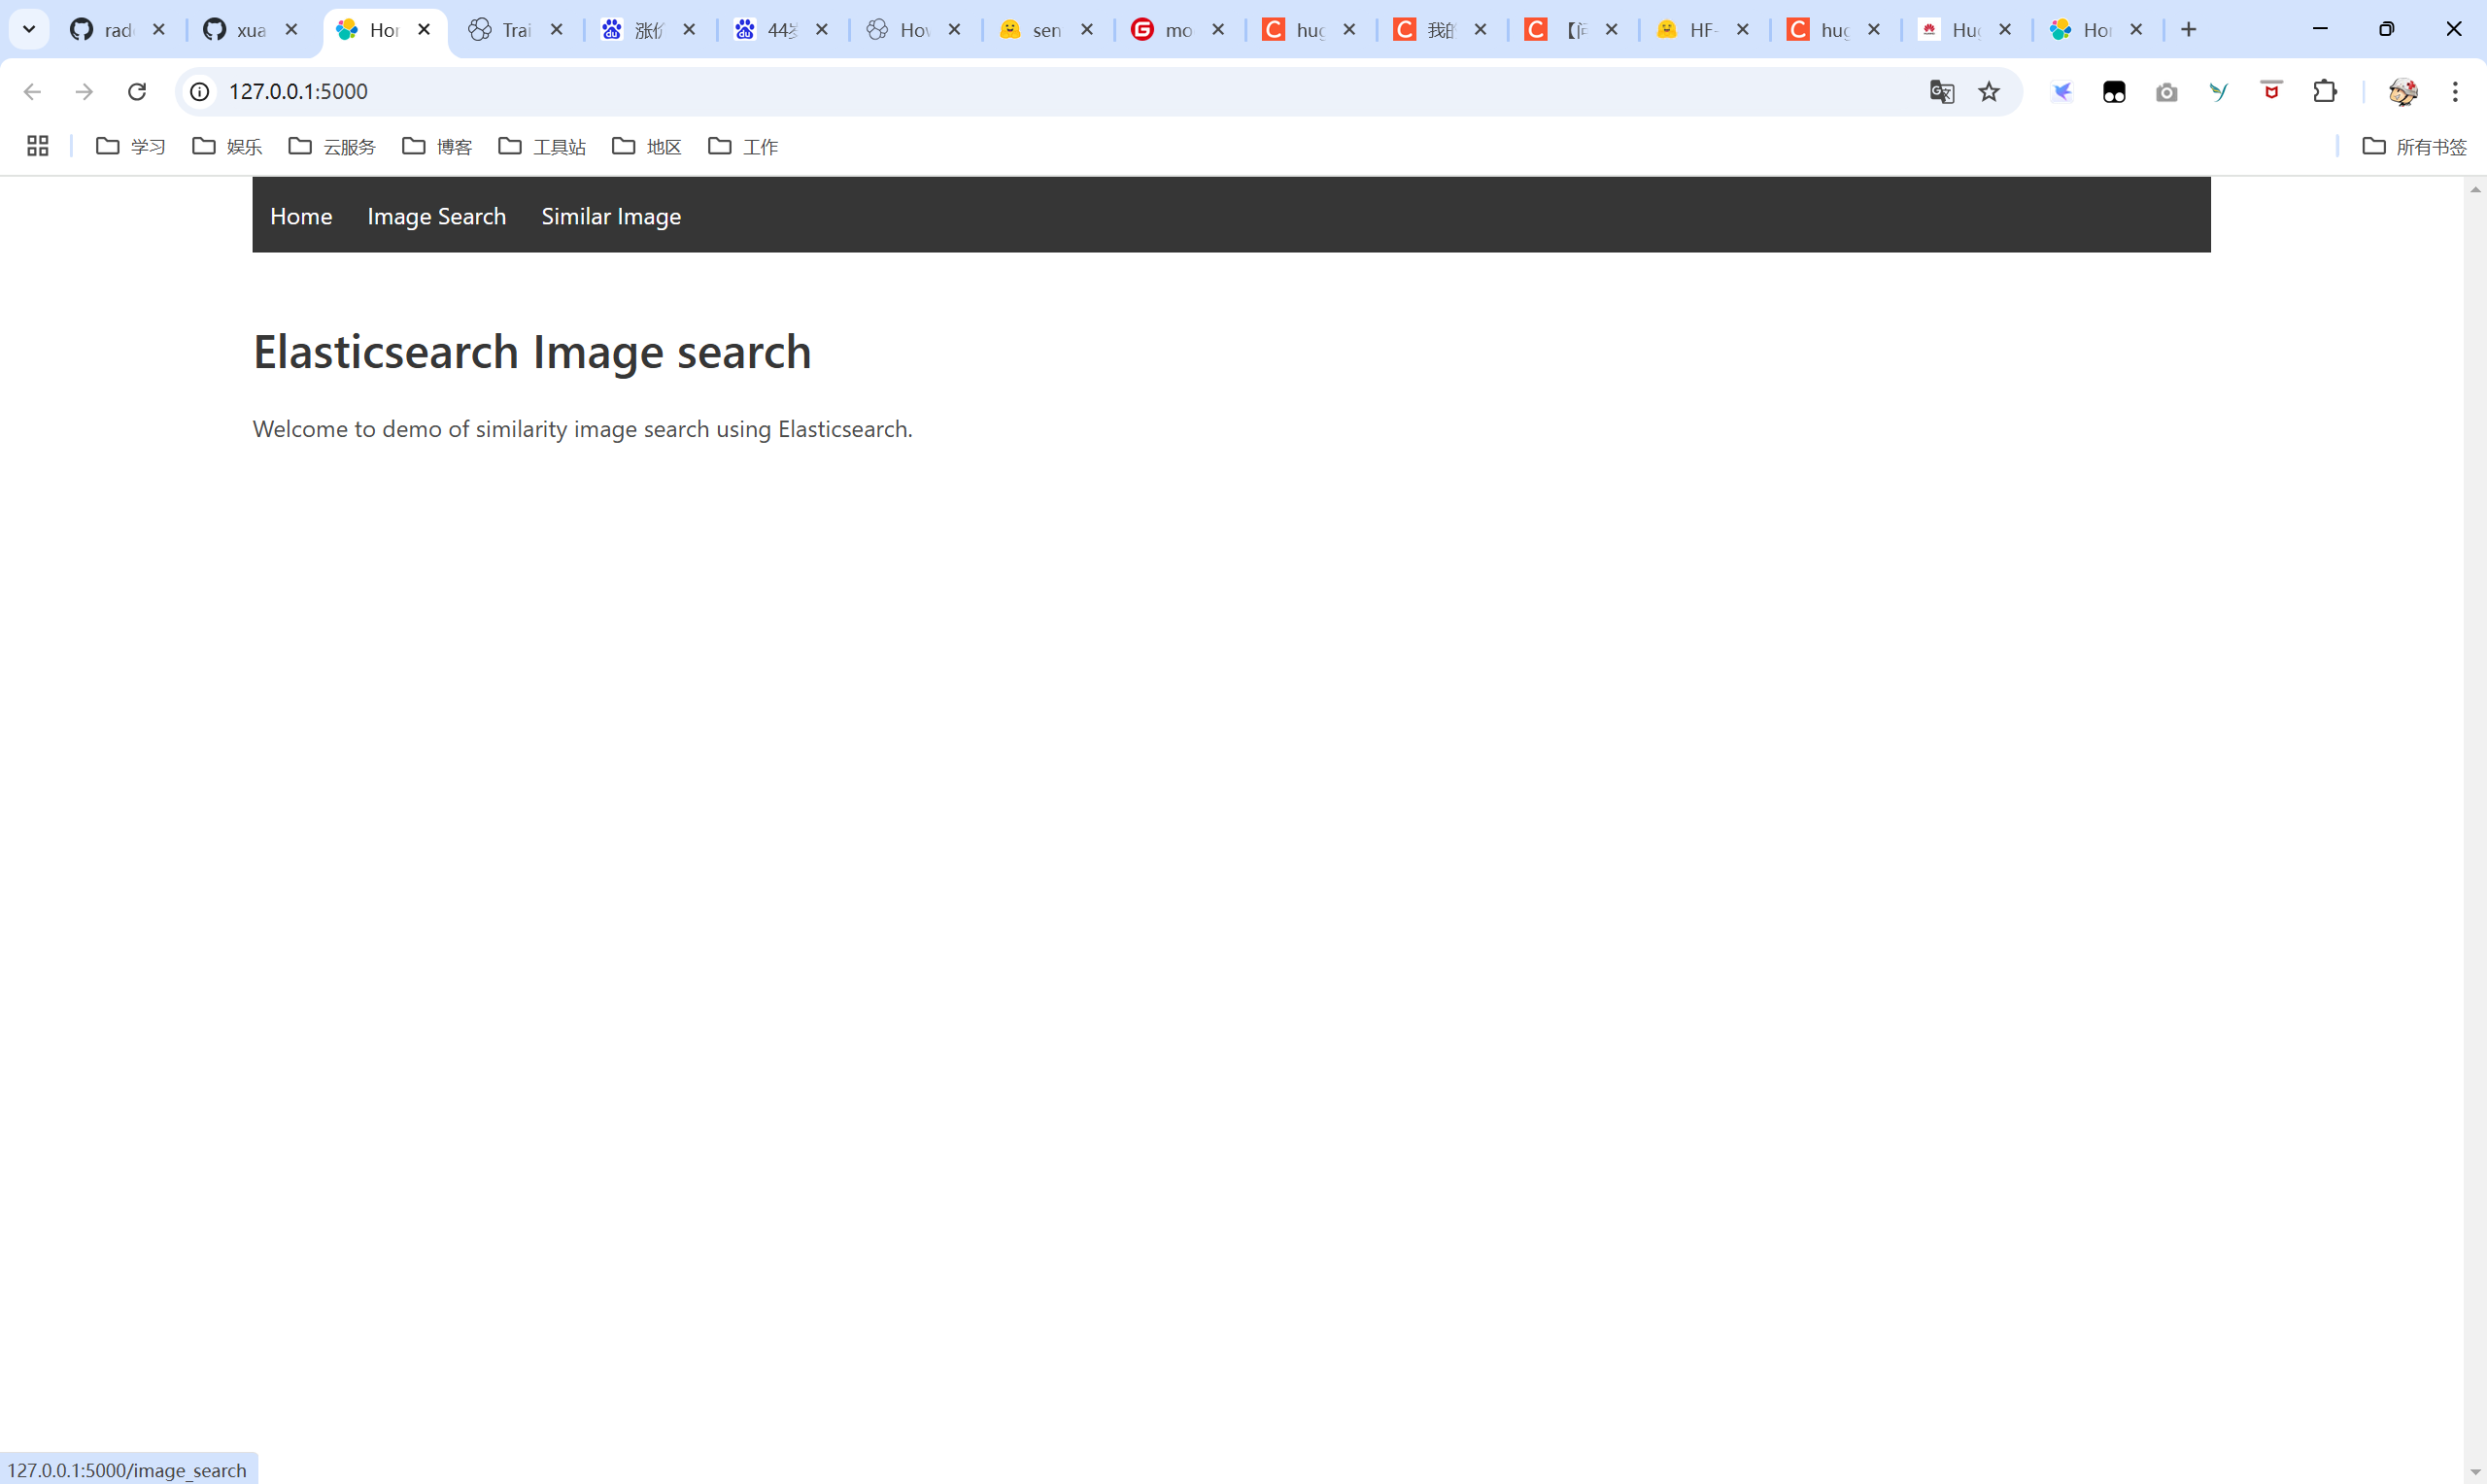
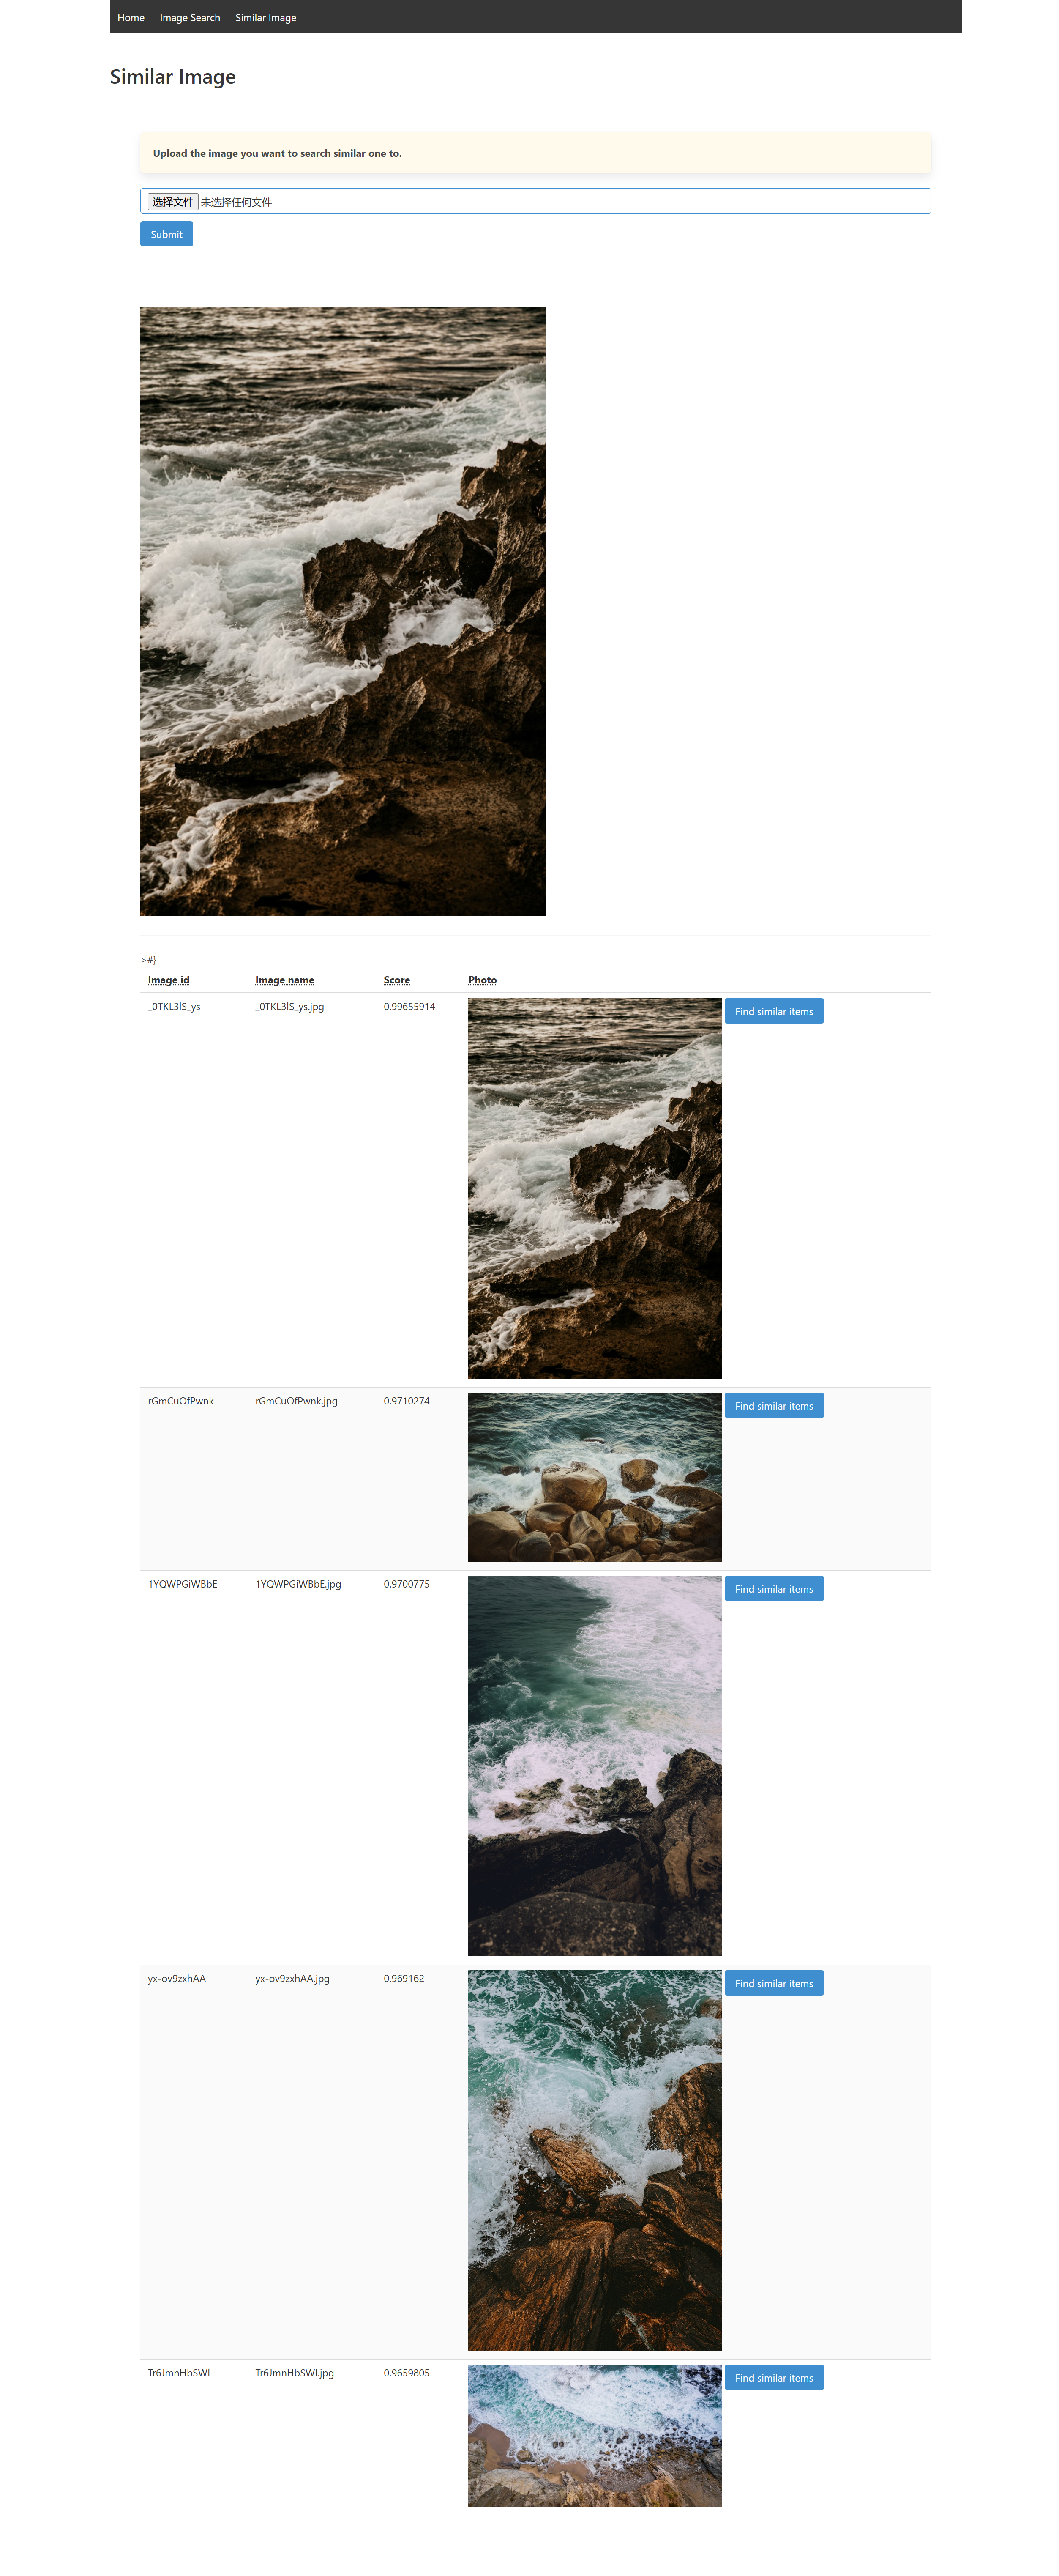
下面我们就来看一下最终的运行效果
结束语
采用es以图搜图是我很早之前就像做的一个功能,花了3天时间终于跑通了这套流程,所以写了一个博客分享,感谢大家的观看,有任何问题可以在评论区留言,我看到之后会在第一时间回复。最后,献上我自己的完整代码链接供大家参考https://github.com/xuanyuanbao/flask-elastic-image-search。另外,我在GitHub上提交的PR还没有通过,估计作者比较忙,希望这次的PR能够通过
