HTML5+CSS3笔记
一、HTML5
1 简述
HTML用于描述页面的结构(骨头,看不见)
CSS用于控制页面中元素的样式(皮肤,外在表现)
JavaScript用于响应用户操作(动起来)
HTML:超文本标记语言,使用标签的形式来标识网页中的不同组成部分。
超文本:指超链接,可以让我们从一个页面跳转到另一个页面。(纯文本编辑器写的就是纯文本,比如记事本。而word里面写的是富文本)
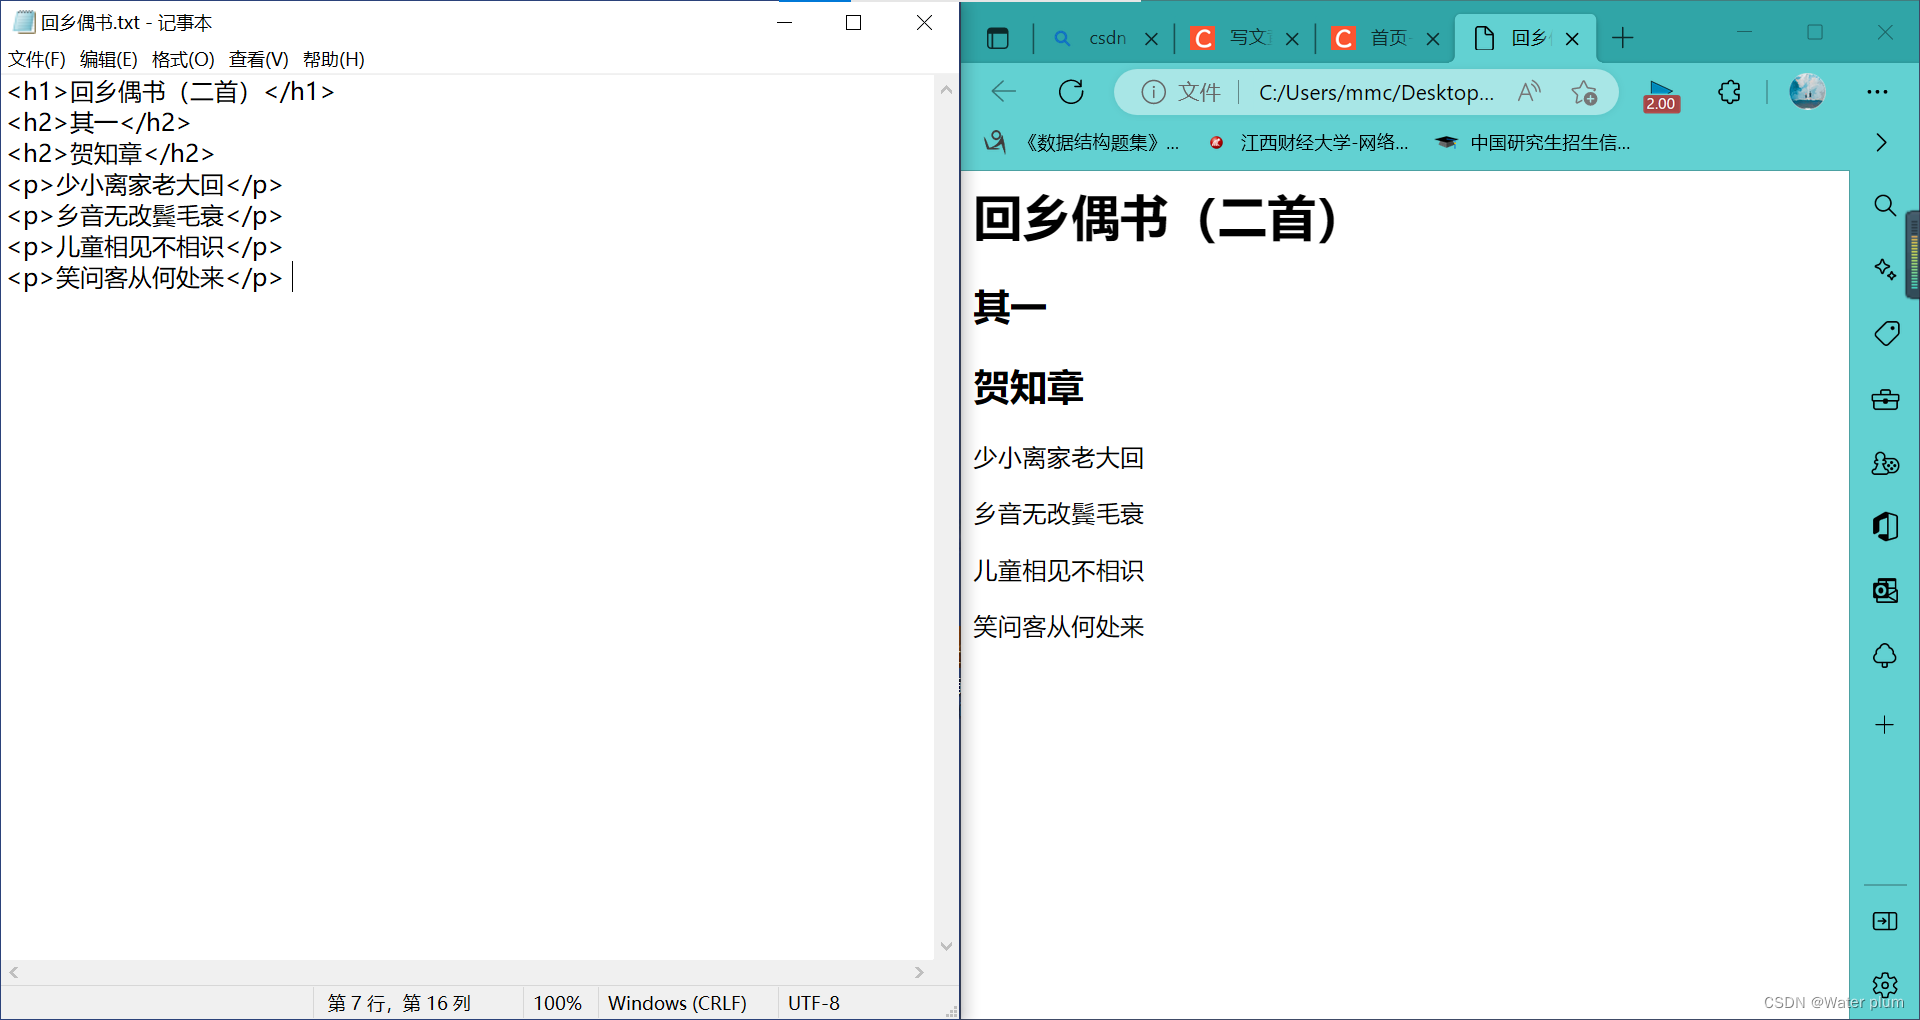
自行操作:打开记事本(建议不要新建),开始-菜单-notepad-回车-写-ctrl+s保存为xxx.html)
左边是文本,右边是浏览器渲染出来的效果。
如果要修改网页内容,可以右键该html文件,选择用记事本打开,或者直接将html文件拖至记事本编辑页面中。
关于文件后缀名显示问题(查看->勾选文件扩展名)
1.1 VSCode快捷键
!+回车:快速生成完整网页结构;
ctrl+/:自动生成注释;
ctrl+回车:光标下移;
Shift+Alt+⬇:向下复制;
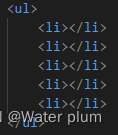
快速生成标签
·1.ul>li 再回车
2.ul+ul 再回车
3.ul>li*5再回车
1.2 编写你的第一个网页
标记就是用来表示网页中不同内容,告诉浏览器是什么东西。
html是根标签,网页中有且只有一个,其他所有网页内容写在html标签中,html中有两个子标签,为head标签和body标签
head子标签为title
head中的内容不会出现在网页中
title中的内容出现在标题栏
1.3 自结束标签和注释
标签一般成对出现,但是也存在一些自结束标签可以这样写
<img>或 <img><img/>
<input>或<input><input/>,一般第一个

<!--
	HTML的注释:注释中的内容会被浏览器所忽略,不会在网页中直接显示
		但是可以在源码中查看注释,注释是用来对代码进行解释说明的,
		开发中一定要养成良好的编写注释的习惯,注释要求简单明了
	注释还可以将一些不希望显示的内容隐藏
	注释不能嵌套
-->
1.4 标签中的属性
属性:在标签中(开始标签或自结束标签)还可以设置属性
	属性是一个名值对(x=y)结构
	属性用来设置标签中的内容如何显示

属性和标签名或其他属性应该使用空格隔开

属性不能瞎写,应该根据文档中的规定来编写,有些属性有属性值,有些没有
	如果有属性值,属性值应该使用引号引起来
<h1>这是我的<font color="red" size='3'>第三个</font>网页!</h1>
1.5 文档声明和进制以及字符编码
<!DOCTYPE html>
<html>
    <head>
        <!-- 可以通过meta标签来设置网页的字符集,避免乱码问题 -->
        <meta charset="utf-8">
        <title>网页的基本结构</title>
    </head>
    <body>

        <!--
            迭代
                网页的版本
                    HTML4
                    HTML2.0
                    HTML5
                    …
                文档声明(doctype)
                    -文档声明用来告诉浏览器当前网页的版本
                    -htm5的文档声明
                    <!doctype html>
                    <!Doctype HTML>
                    不区分大小写

            进制:
                十进制(日常使用)
                    -特点:满10进1
                    -计数:0 1 2 3 4 5 6 7 8 9 10 11 12 13
                    -单位数字:10个(0-9)
                二进制(计算机底层的进制)
                    -特点:满2进1
                    -计数:0 1 10 11 100 101 110 111
                    -单位数字:2个(0-1)
                    -扩展:
                        -所有数据在计算机底层都会以二进制的形式保存
                        -可以将内存想象为一个有多个小格子组成的容器,每一个小格子中可以存储一个1或一个0
                            这一个小格子在内存中被称为1位(bit)
                            8bit=1byte(字节)字节是最小操作单位
                            1024byte=1kb(千字节)
                            1024kb=1mb(兆字节)
                            1024mb=1gb(吉字节)
                            1024gb=1tb(特字节)
                            1024tb=1pb
                八进制(很少用)
                    -特点:满8进1
                    -计数:0 1 2 3 4 5 6 7 10 11 12
                    -单位数字:8个(0-7)
                十六进制(一般显示一个二进制数字时,都会转换为十六进制)
                    -特点:满16进1
                    -计数:0 1 2 3 4 5 6 7 8 9 A B C D E F 10 11 …… 1A 1B
                    -单位数字:16个(0-F)

            字符编码
                中国->110001110111(编码)
                110001110111->中国(解码)
                -所有的数据在计算机中存储时都是以二进制形式存储的,文字也不例外,
                    所以一段文字在存储到内存时,都需要转换为二进制编码
                    当我们读取这段文字时,计算机会将编码转换为字符,供我们阅读
                -编码
                    -将字符转换为二进制编码的过程称为编码
                -解码
                    -将二进制码转换为字符的过程的称为解码
                -字符集(charset)
                    -编码和解码所采用的规则称为字符集
                -乱码问题
                    -如果编码和解码所采用的字符集不同就会出现乱码问题
                -常见的字符集:
                    ASCII
                    ISO88591
                    GB2312
                    GBK
                    UTF-8(万国码,在开发时我们使用的字符集都是UTF-8)
         -->
    </body>
</html>
1.6 文档的使用
<!-- 文档声明,声明当前网页的版本 -->
<!DOCTYPE html>
<!-- html的根标签(元素),网页中的所有内容都要写在根元素的里边 -->
<html lang="en">
<!-- head是网页的头部,head中内容不会在网页中直接出现,主要用来帮助浏览器或搜索引擎来解析网页 -->
<head>
    <!-- meta标签用来设置网页的元数据,这里meta用来设置网页的字符集,避免乱码问题 -->
    <meta charset="UTF-8">

    <!-- title中的内容会显示在浏览器的标题栏,搜索引擎会主要根据title中的内容来判断网页的主要内容 -->
    <title>网页的标题</title>
</head>
<!-- body时html的子元素,表示网页的主体,网页中所有的可见内容都应该写在body里 -->
<body>
    <!-- h1网页的一级标题 -->
    <h1>网页的大标题</h1>
</body>
</html>
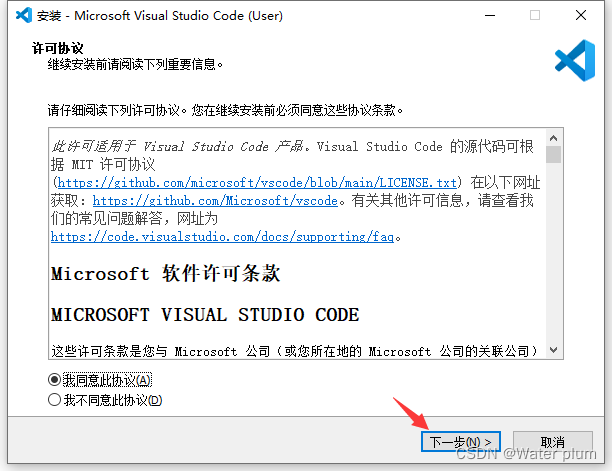
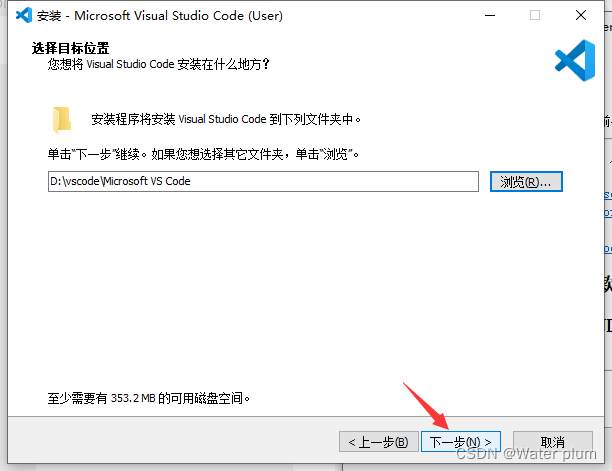
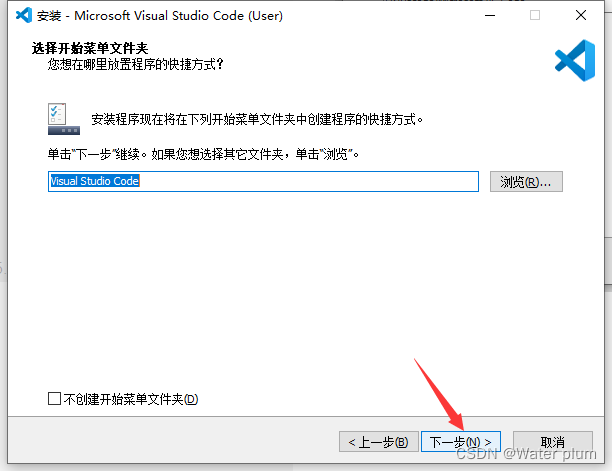
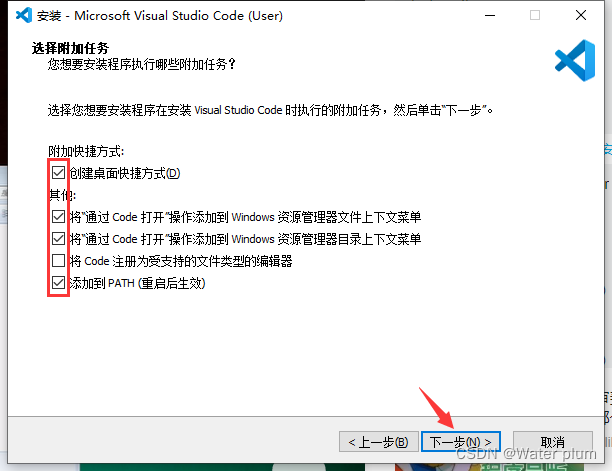
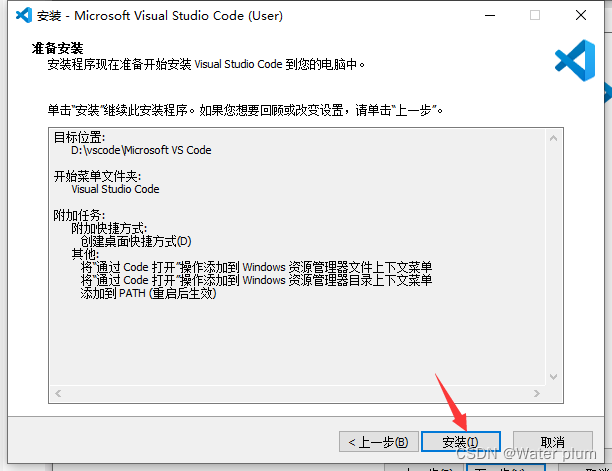
1.7 VScode安装教程并配置Live Server
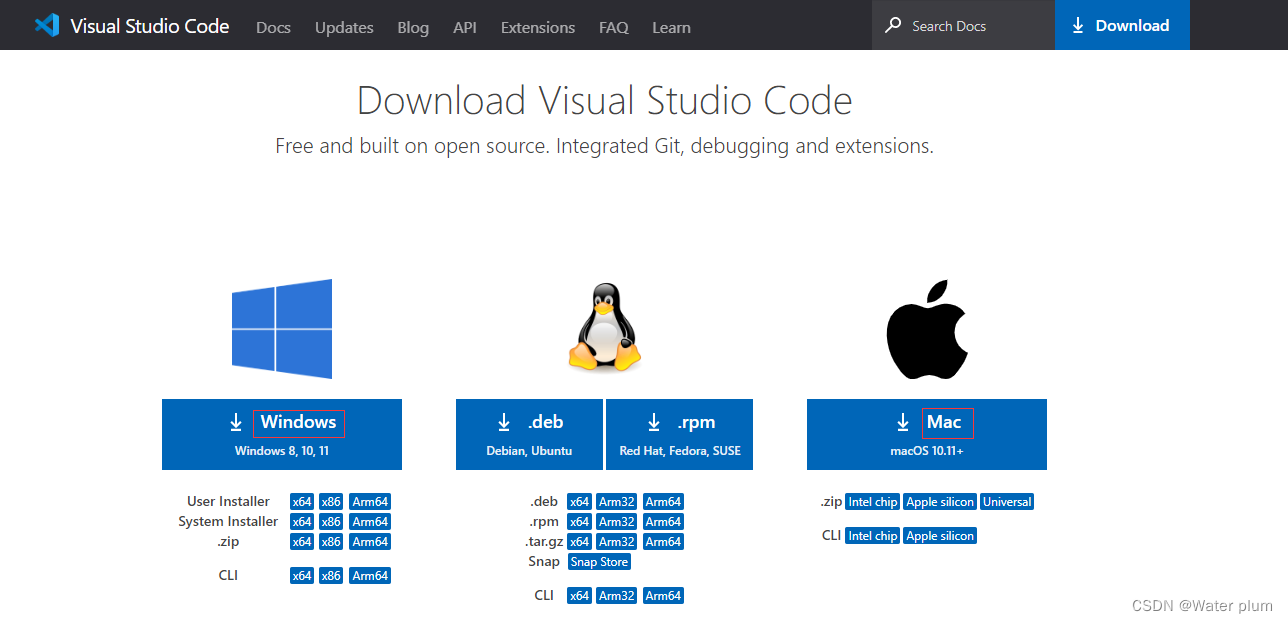
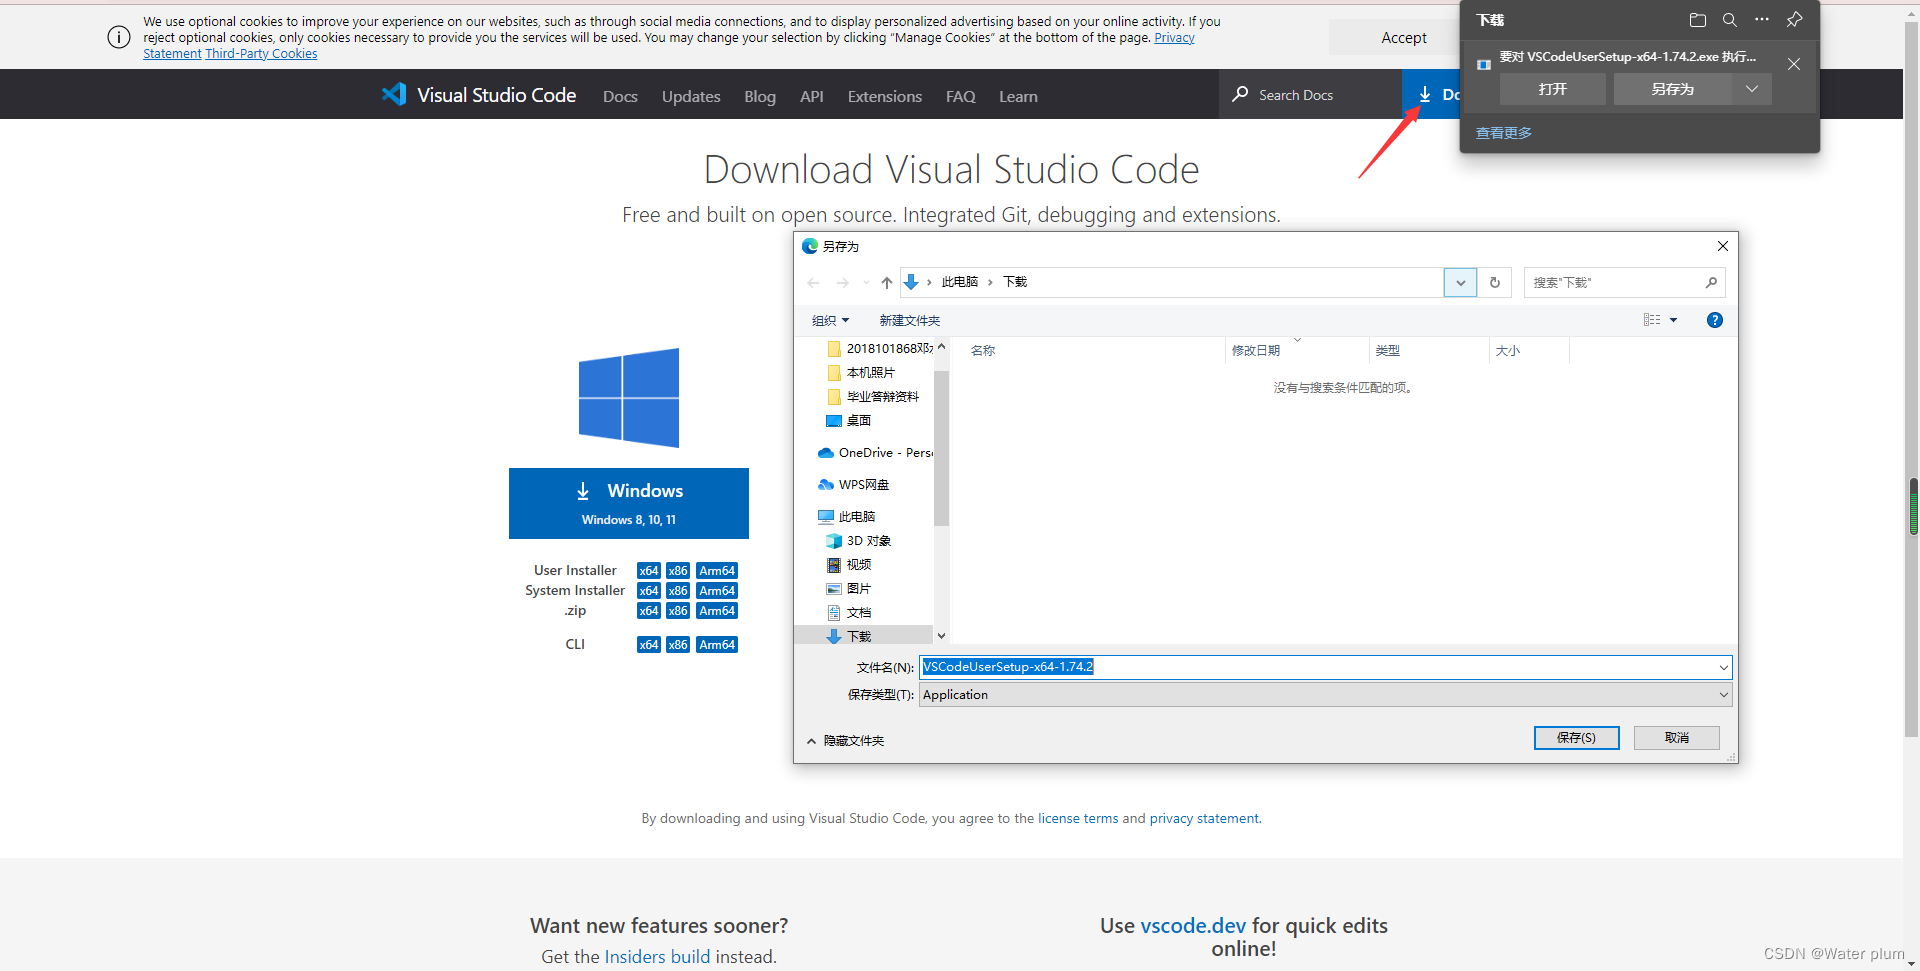
安装地址:https://code.visualstudio.com/Download
电脑是哪个版本就选择哪个版本
安装完成!
相关插件安装:
中文插件:
主题插件:
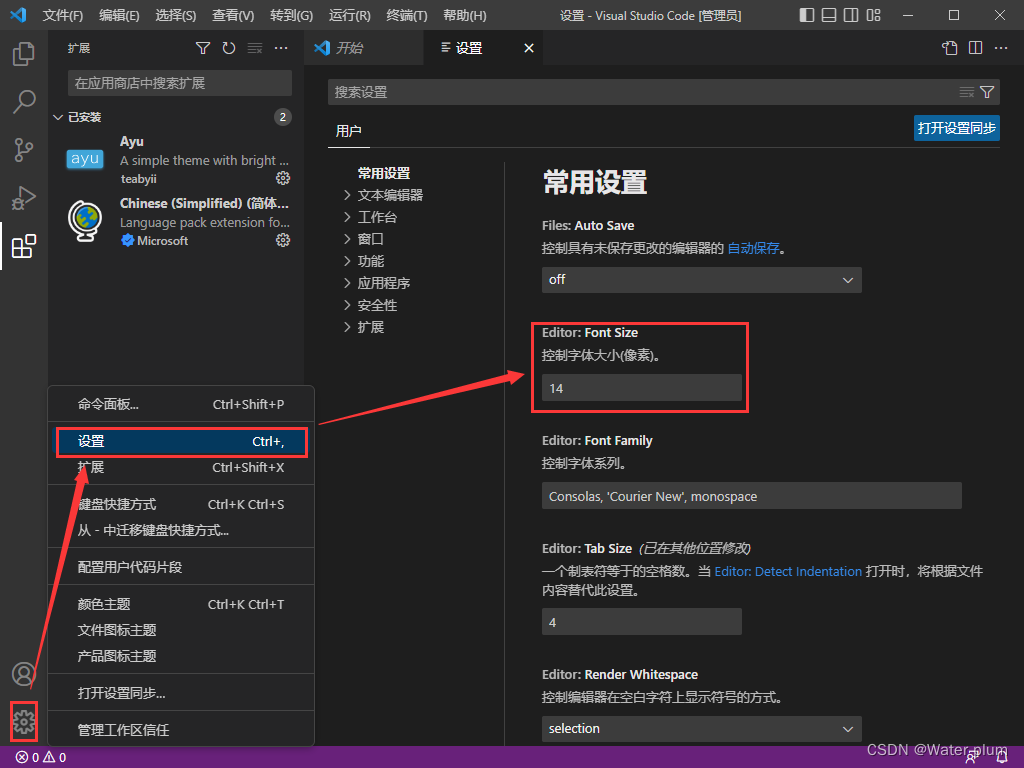
界面字体修改:
lan="en"表示网页是用英文写的,是英文网页,运行会出现下面界面。
“zh”表示中文网页
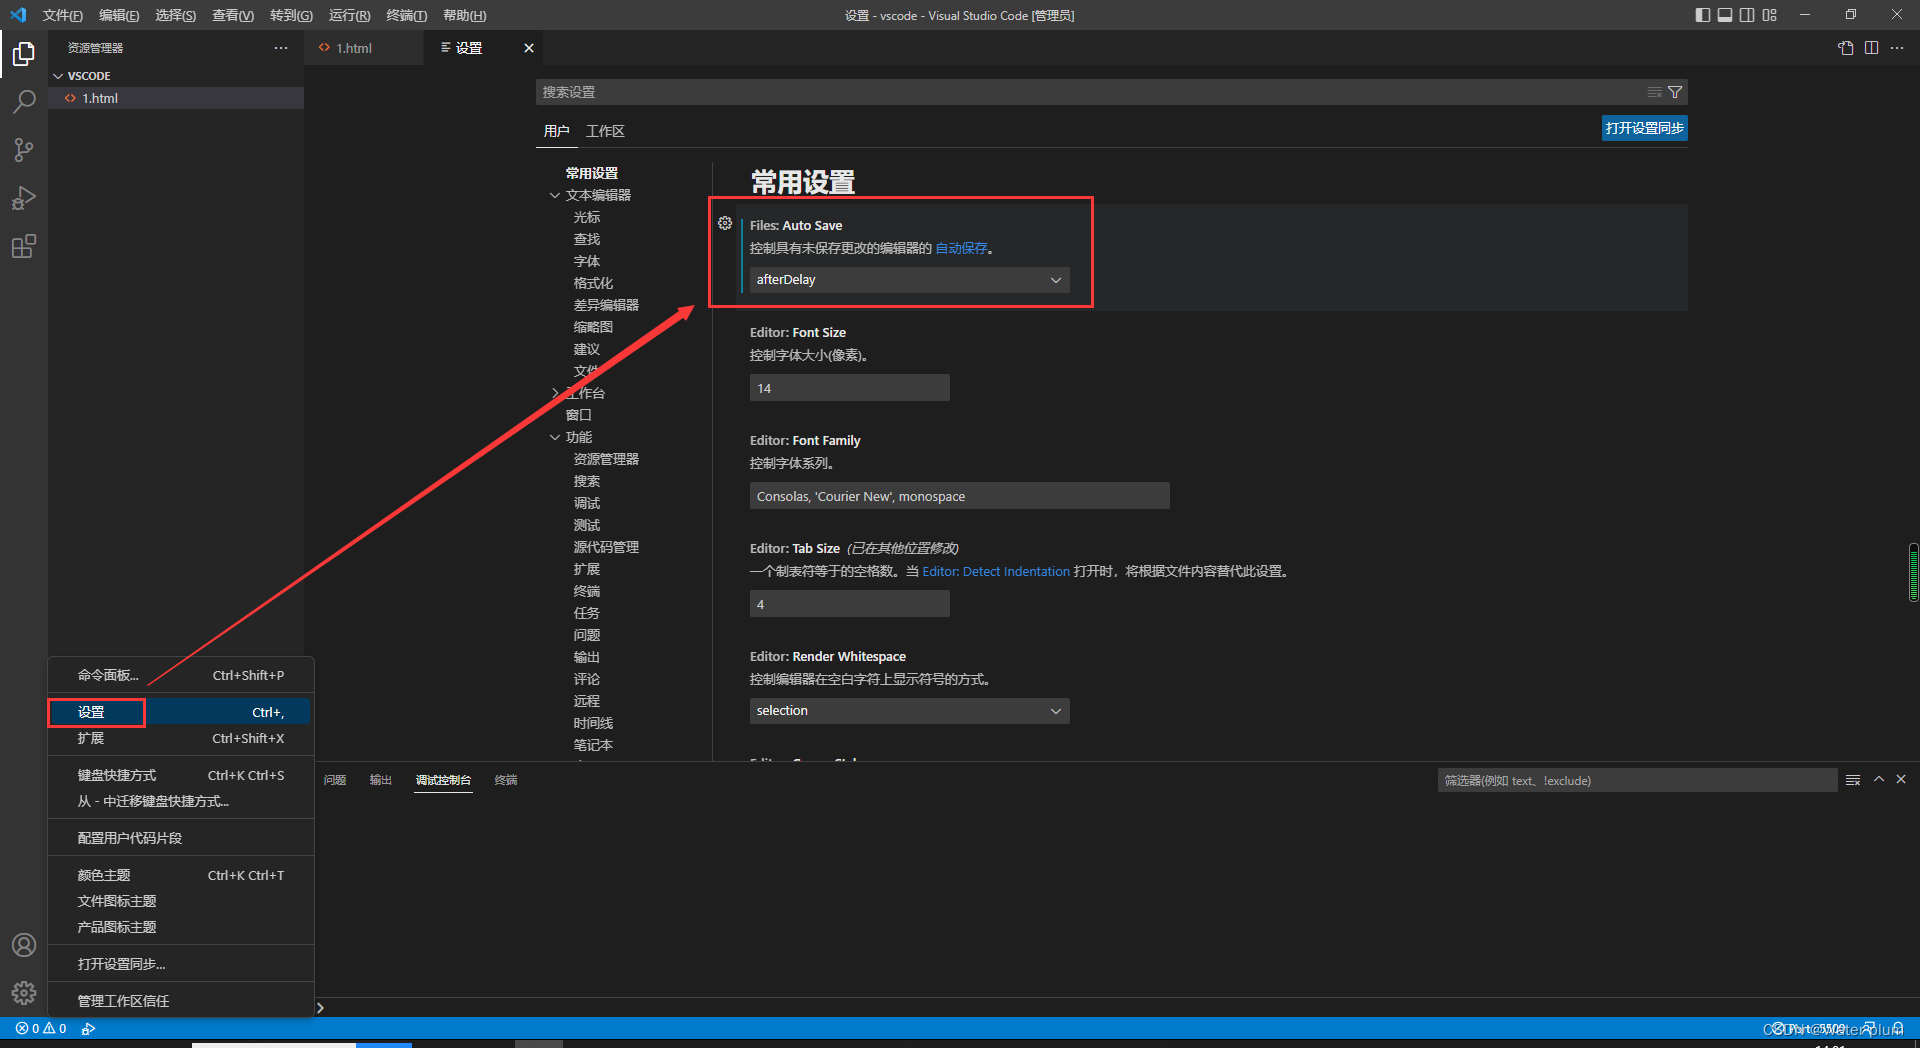
自动保存:
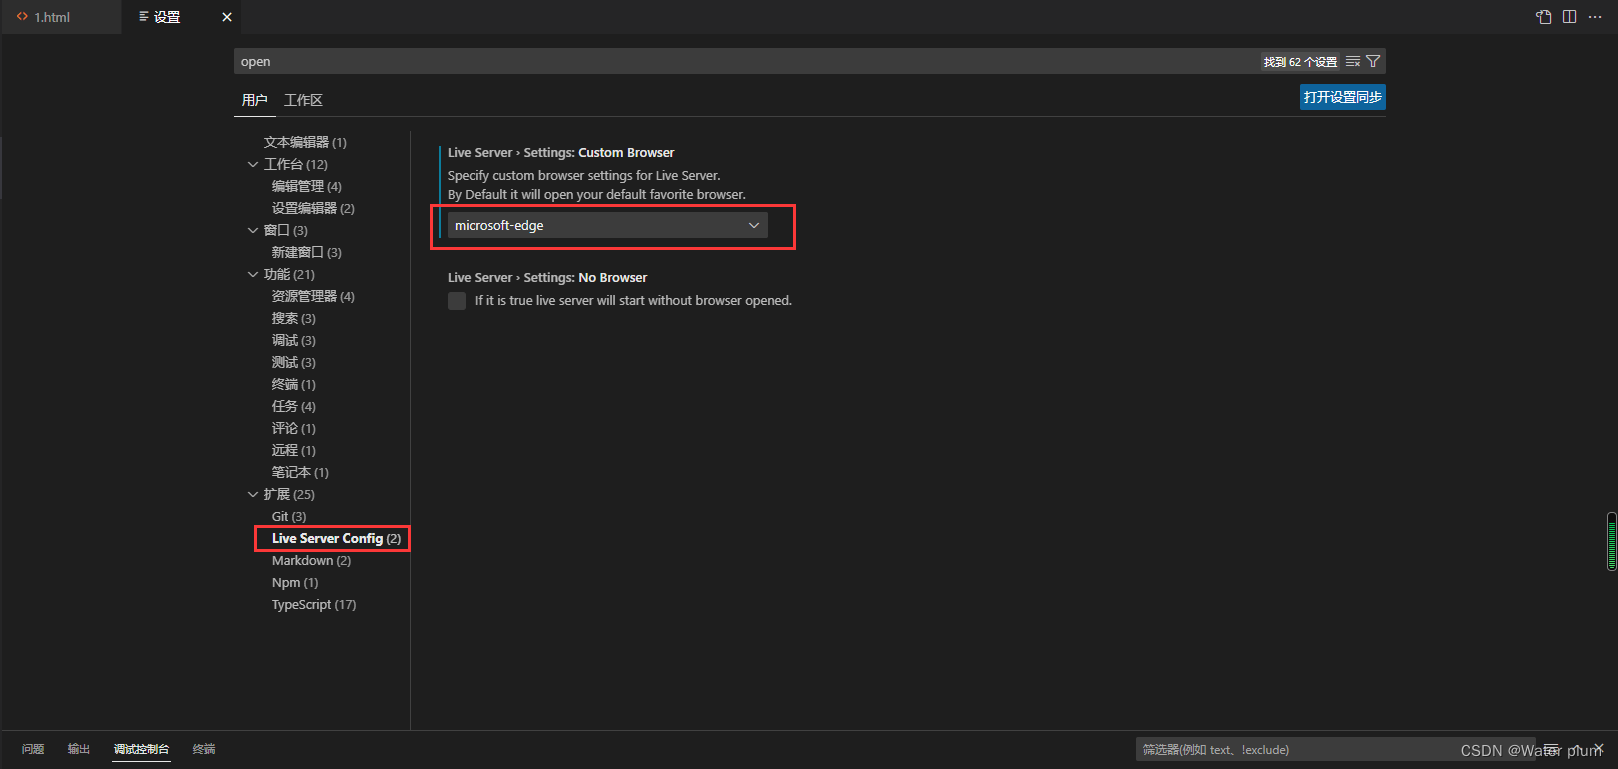
配置Live Server设置默认浏览器
安装插件
设置默认浏览器
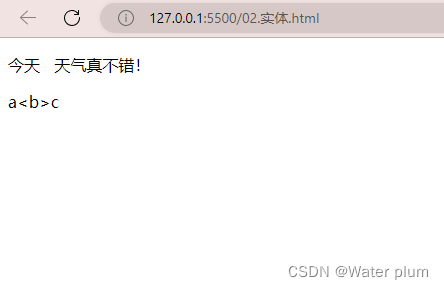
2 实体
实体查找网站:https://www.w3school.com.cn/html/html_entities.asp
<!--
在网页中编写的多个空格默认情况会自动被浏览器解析为一个空格
在HTML中有些时候,我们不能直接书写一些特殊符号
比如,多个连续的空格,比如字母两侧的大于和小于号
如果我们需要在网页中书写这些特殊的符号,则需要使用html中的实体(转义字符)
实体的语法:
&实体的名字;
 ;空格
>;大于号
<;小于号
©;版权符号
-->
示例:
<p>
今天 天气真不错!
</p>
<p>
a<b>c
</p>
3 meta标签
<!DOCTYPE html>
<html lang="en">
<head>
    <meta charset="UTF-8">
    <!--
        meta主要用于设置网页中的一些元数据,元数据不是给用户看
            charset 指定网页的字符集
            name 指定数据的名称
            content 指定数据的内容
                keywords 表示网站的关键字(搜购物搜到京东),可以同时指定多个关键字,多个关键字间使用,隔开
                    <meta name="Keywords" content="网上购物,网上商城,家电,手机,电脑,服装,居家,母婴,美妆,个护,食品,生鲜,京东"/>

                descritpion 用于指定网站的描述,网站的描述会显示在搜索引擎的搜索结果中
                    <meta name="description" content="京东JD.COM-专业的综合网上购物商城,为您提供正品低价的购物选择、优质便捷的服务体验。商品来自全球数十万品牌商家,囊括家电、手机、电脑、服装、居家、母婴、美妆、个护、食品、生鲜等丰富品类,满足各种购物需求。"/>

                title标签的内容会作为搜索结果的超链接上的文字显示
     -->
    <meta name="keywords" content="HTML5,前端,CSS3">
    <meta name="description" content="这是一个非常不错的网站">

    <!--
        <meta http-equiv="refresh" content="3;url=https://www.mozilla.org">
            将页面重定向到另一个网站;3s
     -->
     <meta http-equiv="refresh" content="3;url=https://www.baidu.com">
    <title>Document</title>
</head>
<body>
</body>
</html>
4 语义化标签
<!DOCTYPE html>
<html lang="en">
<head>
    <meta charset="UTF-8">
    <meta http-equiv="X-UA-Compatible" content="IE=edge">
    <meta name="viewport" content="width=device-width, initial-scale=1.0">
    <title>Document</title>
</head>
<body>
    <!--
        块元素(block element)
            - 在网页中一般通过块元素来对页面进行布局
        行内元素(inline element)
            - 行内元素主要用来包裹文字

            - 一般情况下会在块元素中放行内元素,而不会在行内元素中放块元素
            - 块元素中基本上什么都能放
            - p元素中不能放任何的块元素

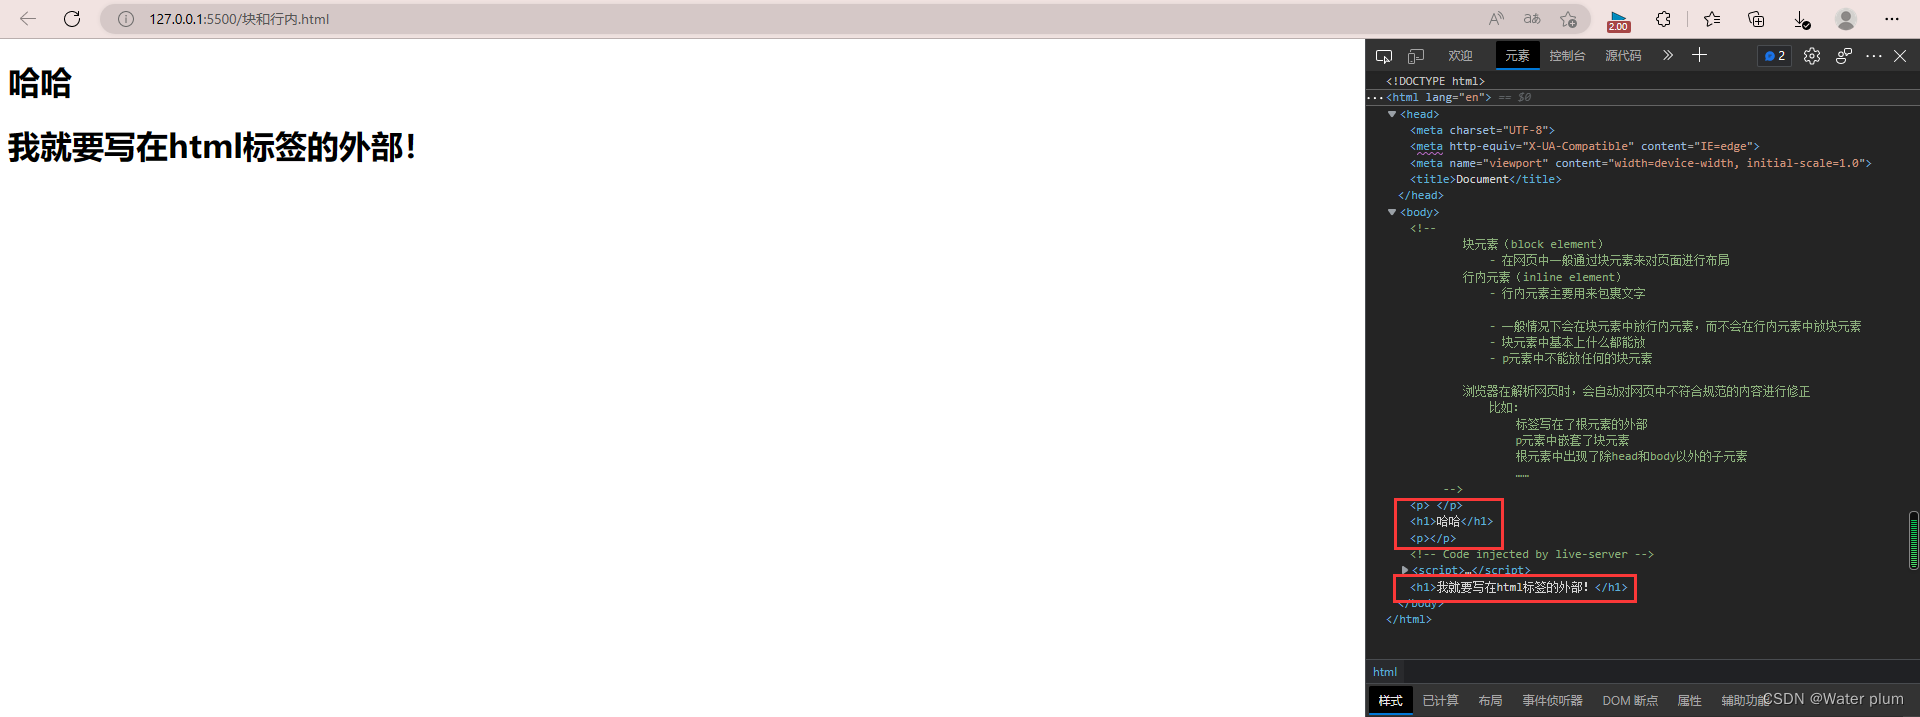
        浏览器在解析网页时,会自动对网页中不符合规范的内容进行修正
            比如:
                标签写在了根元素的外部
                p元素中嵌套了块元素
                根元素中出现了除head和body以外的子元素
                ……
     -->

     <p>
        <h1>哈哈</h1>
     </p>


</body>
</html>

<h1>我就要写在html标签的外部!</h1>
输出
开发者工具使用:
右键—检查
Element:查看网页源码,即网页在内存中的结构
5 结构化语义标签
<!DOCTYPE html>
<html lang="en">
<head>
    <meta charset="UTF-8">
    <meta http-equiv="X-UA-Compatible" content="IE=edge">
    <meta name="viewport" content="width=device-width, initial-scale=1.0">
    <title>Document</title>
</head>
<body>
    <!--
        布局标签(结构化语义标签)
     -->

     <!--
        header 表示网页的头部
        main 表示网页的主体部分(一个页面中只会有一个main)
        footer 表示网页的底部
        nav 表示网页中的导航
        aside 表示和主题相关的其他内容(其他内容)
        article 表示一个独立的文章

        section 表示一个独立的区块,上边的标签都不能表示时使用section

        div没有语义,就用来表示一个区块,目前来讲div还是我们主要的布局元素
        span 行内元素,没有任何的予以,一般用于在网页中选中文字
      -->
      <header></header>
      <main></main>
      <footer></footer>

      <nav></nav>
      <aside></aside>
      <article></article>

      <section></section>

      <span></span>
</body>
</html>
6 列表
<!DOCTYPE html>
<html lang="en">
<head>
    <meta charset="UTF-8">
    <meta http-equiv="X-UA-Compatible" content="IE=edge">
    <meta name="viewport" content="width=device-width, initial-scale=1.0">
    <title>Document</title>
</head>
<body>

    <!--
        列表(list)
            1、铅笔
            2、尺子
            3、橡皮

        在html中也可以创建列表,html列表一共有三种:
            1、有序列表
            2、无序列表
            3、定义列表

        有序列表,使用ol标签来创建无序列表
            使用li表示列表项

        无序列表,使用ul标签来创建有序列表
            使用li表示列表项

        定义列表,使用dl标签来创建一个定义列表
            使用dt来表示定义的内容
            使用dd来对内容进行解释说明

        列表之间可以互相嵌套
     -->

     <ol>
        <li>结构</li>
        <li>表现</li>
        <li>行为</li>
     </ol>

     <ul>
        <li>结构</li>
        <li>表现</li>
        <li>行为</li>
     </ul>

     <dl>
        <dt>结构</dt>
        <dd>结构表示网页的结构,结构用来规定网页中哪里是标题,哪里是段落</dd>
     </dl>

     <ul>
        <li>
            aa
            <ul>
                <li>aa-1</li>
                <li>aa-2
                    <ul>
                        <li>aa-1</li>
                        <li>aa-2</li>
                    </ul>
                </li>
            </ul>
        </li>
     </ul>

</body>
</html>
输出
7 超链接
<!DOCTYPE html>
<html lang="en">
<head>
    <meta charset="UTF-8">
    <meta http-equiv="X-UA-Compatible" content="IE=edge">
    <meta name="viewport" content="width=device-width, initial-scale=1.0">
    <title>超链接</title>
</head>
<body>
    <!--
        超链接可以让我们从一个页面跳转到其他页面
            或是当前页面的其他位置

        使用 a 标签来定义超链接
            属性:
                href 指定跳转的目标路径
                    - 值可以是一个外部网站的地址
                    - 也可以是一个内部页面的地址


        超链接也是一个行内元素,在a标签中可以嵌套除它自身外的任何元素
     -->

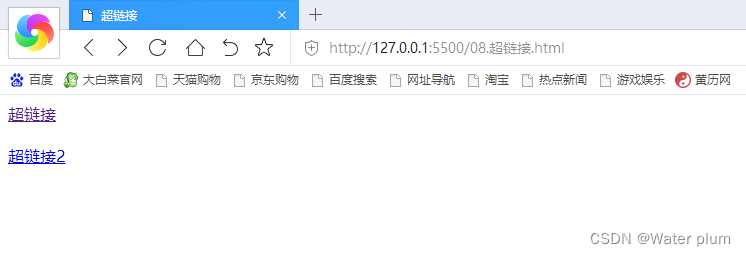
     <a href="https://www.baidu.com">超链接</a>
     <br><br>
     <!-- <a href="https://www.baidu123.com">超链接</a> -->
     <a href="07.列表.html">超链接2</a>
</body>
</html>
输出:(访问过呈紫色,未访问过呈蓝色)
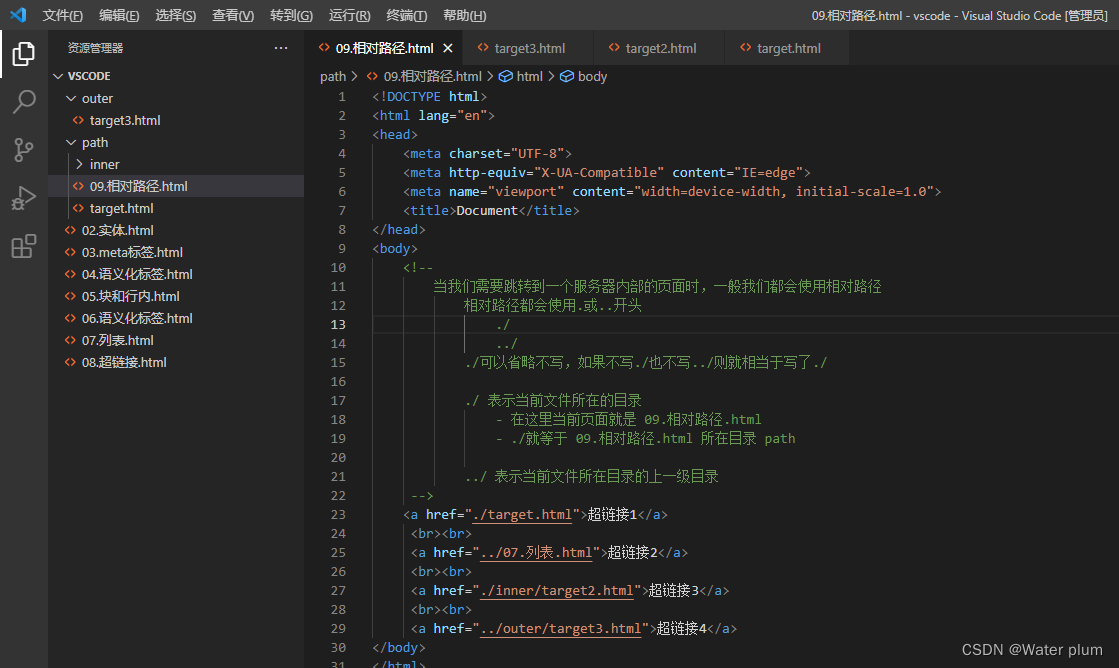
8 相对路径
9 超链接的其他用法
<!DOCTYPE html>
<html lang="en">
<head>
    <meta charset="UTF-8">
    <meta http-equiv="X-UA-Compatible" content="IE=edge">
    <meta name="viewport" content="width=device-width, initial-scale=1.0">
    <title>Document</title>
</head>
<body>
    <!--
        target属性,用来指定超链接打开的位置
            可选值:
                _self 默认值 在当前页面中打开超链接
                _blank 在一个新的页面中打开超链接
     -->

    <a href="07.列表.html" target="_blank">超链接</a>

    <br><br>
    <a href="#bottom">去底部</a>

    <br><br>
    <a href="#p3">去第三自然段</a>

    <br><br>


    <p>在我的后园,可以看见墙外有两株树,一株是枣树,还有一株也是枣树。这上面的夜的天空,奇怪而高,我生平没有见过这样的奇怪而高的天空。他仿佛要离开人间而去,使人们仰面不再看见。然而现在却非常之蓝,闪闪地着几十个星星的眼,冷眼。他的口角上现出微笑,似乎自以为大有深意,而将繁霜洒在我的园里的野花草上。我不知道那些花草真叫什么名字,人们叫他们什么名字。我记得有一种开过极细小的粉红花,现在还开着,但是更极细小了,她在冷的夜气中,瑟缩地做梦,梦见春的到来,梦见秋的到来,梦见瘦的诗人将眼泪擦在她最末的花瓣上,告诉她秋虽然来,冬虽然来,而此后接着还是春,胡碟乱飞,蜜蜂都唱起春词来了。她于是一笑,虽然颜色冻得红惨惨地,仍然瑟缩着。枣树,他们简直落尽了叶子。先前,还有一两个孩子来打他们别人打剩的枣子,现在是一个也不剩了,连叶子也落尽了。他知道小粉红花的梦,秋后要有春;他也知道落叶的梦,春后还是秋。他简直落尽叶子,单剩干子,然而脱了当初满树是果实和叶子时候的弧形,欠伸得很舒服。但是,有几枝还低亚着,护定他从打枣的竿梢所得的皮伤,而最直最长的几枝,却已默默地铁似的直刺着奇怪而高的天空,使天空闪闪地鬼��眼;直刺着天空中圆满的月亮,使月亮窘得发白。</p>
    <p>在我的后园,可以看见墙外有两株树,一株是枣树,还有一株也是枣树。这上面的夜的天空,奇怪而高,我生平没有见过这样的奇怪而高的天空。他仿佛要离开人间而去,使人们仰面不再看见。然而现在却非常之蓝,闪闪地着几十个星星的眼,冷眼。他的口角上现出微笑,似乎自以为大有深意,而将繁霜洒在我的园里的野花草上。我不知道那些花草真叫什么名字,人们叫他们什么名字。我记得有一种开过极细小的粉红花,现在还开着,但是更极细小了,她在冷的夜气中,瑟缩地做梦,梦见春的到来,梦见秋的到来,梦见瘦的诗人将眼泪擦在她最末的花瓣上,告诉她秋虽然来,冬虽然来,而此后接着还是春,胡碟乱飞,蜜蜂都唱起春词来了。她于是一笑,虽然颜色冻得红惨惨地,仍然瑟缩着。枣树,他们简直落尽了叶子。先前,还有一两个孩子来打他们别人打剩的枣子,现在是一个也不剩了,连叶子也落尽了。他知道小粉红花的梦,秋后要有春;他也知道落叶的梦,春后还是秋。他简直落尽叶子,单剩干子,然而脱了当初满树是果实和叶子时候的弧形,欠伸得很舒服。但是,有几枝还低亚着,护定他从打枣的竿梢所得的皮伤,而最直最长的几枝,却已默默地铁似的直刺着奇怪而高的天空,使天空闪闪地鬼��眼;直刺着天空中圆满的月亮,使月亮窘得发白。</p>
    <p id="p3">在我的后园,可以看见墙外有两株树,一株是枣树,还有一株也是枣树。这上面的夜的天空,奇怪而高,我生平没有见过这样的奇怪而高的天空。他仿佛要离开人间而去,使人们仰面不再看见。然而现在却非常之蓝,闪闪地着几十个星星的眼,冷眼。他的口角上现出微笑,似乎自以为大有深意,而将繁霜洒在我的园里的野花草上。我不知道那些花草真叫什么名字,人们叫他们什么名字。我记得有一种开过极细小的粉红花,现在还开着,但是更极细小了,她在冷的夜气中,瑟缩地做梦,梦见春的到来,梦见秋的到来,梦见瘦的诗人将眼泪擦在她最末的花瓣上,告诉她秋虽然来,冬虽然来,而此后接着还是春,胡碟乱飞,蜜蜂都唱起春词来了。她于是一笑,虽然颜色冻得红惨惨地,仍然瑟缩着。枣树,他们简直落尽了叶子。先前,还有一两个孩子来打他们别人打剩的枣子,现在是一个也不剩了,连叶子也落尽了。他知道小粉红花的梦,秋后要有春;他也知道落叶的梦,春后还是秋。他简直落尽叶子,单剩干子,然而脱了当初满树是果实和叶子时候的弧形,欠伸得很舒服。但是,有几枝还低亚着,护定他从打枣的竿梢所得的皮伤,而最直最长的几枝,却已默默地铁似的直刺着奇怪而高的天空,使天空闪闪地鬼��眼;直刺着天空中圆满的月亮,使月亮窘得发白。</p>
    <p>在我的后园,可以看见墙外有两株树,一株是枣树,还有一株也是枣树。这上面的夜的天空,奇怪而高,我生平没有见过这样的奇怪而高的天空。他仿佛要离开人间而去,使人们仰面不再看见。然而现在却非常之蓝,闪闪地着几十个星星的眼,冷眼。他的口角上现出微笑,似乎自以为大有深意,而将繁霜洒在我的园里的野花草上。我不知道那些花草真叫什么名字,人们叫他们什么名字。我记得有一种开过极细小的粉红花,现在还开着,但是更极细小了,她在冷的夜气中,瑟缩地做梦,梦见春的到来,梦见秋的到来,梦见瘦的诗人将眼泪擦在她最末的花瓣上,告诉她秋虽然来,冬虽然来,而此后接着还是春,胡碟乱飞,蜜蜂都唱起春词来了。她于是一笑,虽然颜色冻得红惨惨地,仍然瑟缩着。枣树,他们简直落尽了叶子。先前,还有一两个孩子来打他们别人打剩的枣子,现在是一个也不剩了,连叶子也落尽了。他知道小粉红花的梦,秋后要有春;他也知道落叶的梦,春后还是秋。他简直落尽叶子,单剩干子,然而脱了当初满树是果实和叶子时候的弧形,欠伸得很舒服。但是,有几枝还低亚着,护定他从打枣的竿梢所得的皮伤,而最直最长的几枝,却已默默地铁似的直刺着奇怪而高的天空,使天空闪闪地鬼��眼;直刺着天空中圆满的月亮,使月亮窘得发白。</p>
    <p>在我的后园,可以看见墙外有两株树,一株是枣树,还有一株也是枣树。这上面的夜的天空,奇怪而高,我生平没有见过这样的奇怪而高的天空。他仿佛要离开人间而去,使人们仰面不再看见。然而现在却非常之蓝,闪闪地着几十个星星的眼,冷眼。他的口角上现出微笑,似乎自以为大有深意,而将繁霜洒在我的园里的野花草上。我不知道那些花草真叫什么名字,人们叫他们什么名字。我记得有一种开过极细小的粉红花,现在还开着,但是更极细小了,她在冷的夜气中,瑟缩地做梦,梦见春的到来,梦见秋的到来,梦见瘦的诗人将眼泪擦在她最末的花瓣上,告诉她秋虽然来,冬虽然来,而此后接着还是春,胡碟乱飞,蜜蜂都唱起春词来了。她于是一笑,虽然颜色冻得红惨惨地,仍然瑟缩着。枣树,他们简直落尽了叶子。先前,还有一两个孩子来打他们别人打剩的枣子,现在是一个也不剩了,连叶子也落尽了。他知道小粉红花的梦,秋后要有春;他也知道落叶的梦,春后还是秋。他简直落尽叶子,单剩干子,然而脱了当初满树是果实和叶子时候的弧形,欠伸得很舒服。但是,有几枝还低亚着,护定他从打枣的竿梢所得的皮伤,而最直最长的几枝,却已默默地铁似的直刺着奇怪而高的天空,使天空闪闪地鬼��眼;直刺着天空中圆满的月亮,使月亮窘得发白。</p>
    <p>在我的后园,可以看见墙外有两株树,一株是枣树,还有一株也是枣树。这上面的夜的天空,奇怪而高,我生平没有见过这样的奇怪而高的天空。他仿佛要离开人间而去,使人们仰面不再看见。然而现在却非常之蓝,闪闪地着几十个星星的眼,冷眼。他的口角上现出微笑,似乎自以为大有深意,而将繁霜洒在我的园里的野花草上。我不知道那些花草真叫什么名字,人们叫他们什么名字。我记得有一种开过极细小的粉红花,现在还开着,但是更极细小了,她在冷的夜气中,瑟缩地做梦,梦见春的到来,梦见秋的到来,梦见瘦的诗人将眼泪擦在她最末的花瓣上,告诉她秋虽然来,冬虽然来,而此后接着还是春,胡碟乱飞,蜜蜂都唱起春词来了。她于是一笑,虽然颜色冻得红惨惨地,仍然瑟缩着。枣树,他们简直落尽了叶子。先前,还有一两个孩子来打他们别人打剩的枣子,现在是一个也不剩了,连叶子也落尽了。他知道小粉红花的梦,秋后要有春;他也知道落叶的梦,春后还是秋。他简直落尽叶子,单剩干子,然而脱了当初满树是果实和叶子时候的弧形,欠伸得很舒服。但是,有几枝还低亚着,护定他从打枣的竿梢所得的皮伤,而最直最长的几枝,却已默默地铁似的直刺着奇怪而高的天空,使天空闪闪地鬼��眼;直刺着天空中圆满的月亮,使月亮窘得发白。</p>
    <p>Lorem ipsum dolor sit amet consectetur adipisicing elit. Ipsum placeat quod iste commodi sint quam inventore architecto. Totam fugit maxime quos delectus vitae. Nobis blanditiis hic ipsam itaque saepe architecto?</p>

    <!-- 在开发中可以将#作为超链接的路径的占位符使用 -->
    <a href="#">这是一个新的超链接</a>

    <br><br>

    <!-- 可以使用 javascript:; 来作为href的属性,此时点击这个超链接什么也不会发生 -->
    <a href="JavaScript:;">这是一个新的超链接</a>
    <br><br>

    <!--
        可以直接将超链接的href属性设置为#,这样点击超链接以后
            页面不会发生跳转,而是转到当前页面的顶部的位置

        可以跳转到页面的指定位置,只需将href属性设置 #目标元素的id属性值

        id属性(唯一不重复的)
            - 每一个标签都可以添加一个id属性
            - id属性就是元素的唯一标识,同一个页面中不能出现重复的id属性
     -->

     <a id="bottom" href="#">回到顶部</a>
</body>
</html>
10 图片标签及格式
<!DOCTYPE html>
<html lang="en">
<head>
    <meta charset="UTF-8">
    <meta http-equiv="X-UA-Compatible" content="IE=edge">
    <meta name="viewport" content="width=device-width, initial-scale=1.0">
    <title>Document</title>
</head>
<body>
    <!--
        图片标签用于向当前页面中引入一个外部图片
            使用img标签来引入外部图片,img标签是一个自结束标签
            img这种元素属于替换元素(基于块和行内元素之间,具有两种元素的特点)
            属性:
                src 属性指定的是外部图片的路径(路径规则和超链接是一样的)

                alt 图片的描述,这个描述默认情况下不会显示,有些浏览器会在图片无法加载时显示
                    搜索引擎会根据alt中的内容来识别图片,如果不写alt属性则图片不会被搜索引擎所收录

                width 图片的宽度(单位是像素)
                height 图片的高度
                    - 宽度和高度中如果只修改了一个,则另一个会等比例缩放

                注意:
                    一般情况在pc端,不建议修改图片的大小,需要多大的图片就裁多大
                    但是在移动端,经常需要对图片进行缩放(大图缩小)

        图片的格式:
            jpeg(jpg)
                - 支持的颜色比较丰富,不支持透明效果,不支持动图
                - 一般用来显示图片
            gif
                - 支持的颜色比较少,支持简单透明,支持动图
                - 颜色单一的图片,动图
            png
                - 支持的颜色丰富,支持复杂透明,不支持动图
                - 颜色丰富,复杂透明图片(专为网页而生)
            webp
                - 这种格式是谷歌新推出的专门用来表示网页中的图片的一种格式
                - 它具备其他图片格式的所有优点,而且文件还特别的小
                - 缺点:兼容性不好

            base64
                - 将图片使用base64进行编码,这样可以将图片转换为字符,通过字符的形式来引入图片
                - 一般都是一些需要和网页一起加载的图片才会使用base64,可以加快访问速度

            效果一样 用小的
            效果不一样,用效果好的
     -->
     <img src="./img/1.jpg" alt="风景">

     <img width="500"src="https://www.akailibrary.com/wp-content/themes/ripro/timthumb.php?src=https://www.akailibrary.com/wp-content/uploads/2021/01/036-stethoscope.jpg&h=270&w=480&zc=1&a=c&q=100&s=1" alt="图标">
</body>
</html>
base64转换网站:https://base64.us/
11 内联框架
<body>
    <!--
        内联框架,用于向当前页面中引入一个其他页面
            内联框架中的信息不会被搜索引擎搜索
            src 指定要引入的网页的路径
            frameborder 指定内联框架的边框
     -->

     <iframe src="https://www.qq.com" width="800" height="600" frameborder="0"></iframe>
</body>
12 音视频播放
<!DOCTYPE html>
<html lang="en">
<head>
    <meta charset="UTF-8">
    <meta http-equiv="X-UA-Compatible" content="IE=edge">
    <meta name="viewport" content="width=device-width, initial-scale=1.0">
    <title>Document</title>
</head>
<body>
    <!--
        audio 标签用来向页面中引入一个外部的音频文件的
            音视频文件引入时,默认情况下不允许用户自己控制播放停止

            属性:
                controls 是否允许用户控制播放
                autoplay 音频文件是否自动播放
                    - 如果设置了autoplay 则音乐在打开页面时会自动播放
                        但是目前来讲大部分浏览器都不会自动对音乐进行播放
                loop 音乐是否循环播放
     -->

     <!-- <audio src="./source/audio.mp3" controls autoplay loop></audio> -->

     <!-- 除了通过src来指定外部文件的路径以外,还可以通过source来指定文件的路径 -->
     <audio controls>
        对不起,您的浏览器不支持播放音频!请升级浏览器!
        <source src="./source/audio.mp3">
        <source src="./source/audio.ogg">
        <embed src="./source/audio.mp3" type="audio/mp3" width="200" height="50">
     </audio>

     <!--
        使用video标签来向网页中引入一个视频
            - 使用方式和audio基本上是一样的
      -->

     <video controls>
        <source src="./source/flower.webm">
        <source src="./source/flower.mp4">
            <embed src="./source/flower.mp4" type="video/mp4" allowFullScreen="true" width="500" height="300">
     </video>


</body>
</html>
二、CSS
1 CSS简介
<!DOCTYPE html>
<html lang="en">
<head>
    <meta charset="UTF-8">
    <meta http-equiv="X-UA-Compatible" content="IE=edge">
    <meta name="viewport" content="width=device-width, initial-scale=1.0">
    <title>Document</title>

    <!--
        第二种方式
            - 将样式编写到head中的style标签里
                然后通过CSS的选择器来选中元素并为其设置各种样式
                可以同时为多个标签设置样式,并且修改时只需要修改一处即可全部应用
            - 内部样式表更加方便对样式进行复用
                我们的内部样式表只能对一个网页起作用
                    它里边的样式不能跨页面进行复用
     -->

     <!-- <style>

        p{
            color: green;
            font-size: 50px;
        }

     </style> -->

     <!--
        第三种方式(外部样式表) 最佳实践
            - 可以将CSS样式编写到一个外部的CSS文件中
                然后通过link标签来引入外部的CSS文件
            - 外部样式表需要通过link标签进行引入,
                意味着只要想使用这些样式的网页都可以对其进行引用
                使样式可以在不同页面之间进行复用
            - 将样式编写到外部的CSS文件中,可以使用浏览器的缓存机制,
                从而加快网页的加载速度,提高用户的体验
      -->

      <link rel="stylesheet" href="./style.css">
</head>
<body>
    <!--
        网页分成三个部分:
            结构(HTML)
            表现(CSS)
            行为(JavaScript)
        CSS
            - 层叠样式表
            - 网页实际上是一个多层的结构,通过CSS可以分别为网页的每一个层来设置样式
                最终我们能看到只是网页的最上边一层
                - 总之一句话,CSS用来设置网页中元素的样式
     -->

     <!--
        使用CSS来修改元素的样式、

        第一种方式(内联样式,行内样式):
            - 在标签内部通过style属性来设置元素的样式
            - 问题:
                使用内联样式,样式只能对一个标签生效,
                    如果希望影响到多个元素必须在每一个元素中都复制一遍、
                    并且当样式发生变化时,我们必须要一个一个修改,非常不方便
            - 注意,开发时绝对不要使用内联样式
      -->
      <!-- <p style="color: red; font-size: 30px;">少小离家老大回,乡音无改鬓毛衰</p> -->

      <p>落霞与孤鹜齐飞,秋水共长天一色</p>

      <p>少小离家老大回,乡音无改鬓毛衰</p>
</body>
</html>
2 CSS的基本语法
<!DOCTYPE html>
<html lang="en">
<head>
    <meta charset="UTF-8">
    <meta http-equiv="X-UA-Compatible" content="IE=edge">
    <meta name="viewport" content="width=device-width, initial-scale=1.0">
    <title>Document</title>
    <style>
        /*
            CSS中的注释,注释中的内容会自动被浏览器所忽略

            CSS的基本语法
                选择器 声明块

                选择器,通过选择器可以选中页面中的指定元素
                    比如 p 的作用就是选中页面中所有的p元素

                声明块,通过声明块来指定要为元素设置的样式
                    声明块由一个一个的声明组成
                    声明是一个名值对结构
                        一个样式名对应一个样式值,名和值之间以 : 连接,以 ; 结尾
        */

        p{
            color: red;
            font-size: 40px;
        }

        h1{
            color: green;
        }

    </style>
</head>
<body>
    <h1>我是H1</h1>
    <p>今天天气真不错!</p>
    <p>今天天气真不错!</p>
    <p>今天天气真不错!</p>
    <p>今天天气真不错!</p>
    <p>今天天气真不错!</p>
</body>
</html>
3 选择器
3.1 常用选择器
元素选择器、id选择器、类选择器、通配选择器
<!DOCTYPE html>
<html lang="en">
<head>
    <meta charset="UTF-8">
    <meta http-equiv="X-UA-Compatible" content="IE=edge">
    <meta name="viewport" content="width=device-width, initial-scale=1.0">
    <title>Document</title>
    <style>

        /*
            将所有的段落设置为红色(字体)

            元素选择器
                作用:根据标签名来选中指定的元素
                语法:标签名()
                例子:p{}  h1{}  div{}
        */
        /* p{
            color: red;
        }

        h1{
            color: green;
        } */


        /*
            将儿童相见不相识设置为红色

            id选择器
                作用:根据元素的id属性值选中一个元素
                语法:#id属性值{}
                例子:#box{}  #red{}
        */
        /* #red{
            color: red;
        } */

        /*
            将 秋水…… 和 落霞…… 设置为蓝色

            类选择器
                作用:根据元素的class属性值选中一组元素
                语法:.class属性值
        */
        /* .blue{
            color: blue;
        }

        .abc{
            font-size: 20px;
        } */

        /*
            通配选择器
                作用:选中页面中的所有元素
                语法:*
        */
        *{
            color: red;
        }
    </style>
</head>
<body>
    <h1 class="blue abc">我是标题</h1>
    <p>少小离家老大回</p>
    <p>乡音无改鬓毛衰</p>
    <p id="red">儿童相见不相识</p>
    <p>笑问客从何处来</p>
    <!--
        class是一个标签的属性,它和id类似,不同的是class可以重复使用
            可以通过class属性来为元素分组
            可以同时为一个元素指定多个class属性
     -->
    <p class="blue">落霞与孤鹜齐飞</p>
    <p class="blue">秋水共长天一色</p>
</body>
</html>
3.2 复合选择器
<!DOCTYPE html>
<html lang="en">
<head>
    <meta charset="UTF-8">
    <meta http-equiv="X-UA-Compatible" content="IE=edge">
    <meta name="viewport" content="width=device-width, initial-scale=1.0">
    <title>Document</title>
    <style>
        /* 将class为red的元素设置为红色(字体) */
        .red{
            color: red;
        }

        /* 将class为red的div字体大小设置为30px */
        /*
            交集选择器
                作用:选中同时符合多个条件的元素
                语法:选择器1选择器2选择器3选择器n{}
                注意点:
                    交集选择器中如果有元素选择器,必须使用元素选择器开头
        */
        div.red{
            font-size: 30px;
        }

        .a.b.c{
            color: blue;
        }

        /* div#box1{} 语法没有问题,但是不建议这样写,#box1就唯一指定了 */


        /*
            选择器分组(并集选择器)
                作用:同时选择多个选择器对应的元素
                语法:选择器1,选择器2,选择器3,选择器n{}

                #b1,.p1,h1,span,div.red{}
        */
        /* h1{
            color: green;
        }

        span{
            color: green;
        } */
        /* 上面两个元素选择器可以改为下面这种 */
        h1,span{
            color: green;
        }
    </style>
</head>
<body>
    <div class="red">我是div</div>

    <p class="red">我是p元素</p>

    <div class="red2 a b c">我是div2</div>

    <h1>标题</h1>

    <span>哈哈</span>
</body>
</html>
3.3 关系选择器
<!DOCTYPE html>
<html lang="en">
<head>
    <meta charset="UTF-8">
    <meta http-equiv="X-UA-Compatible" content="IE=edge">
    <meta name="viewport" content="width=device-width, initial-scale=1.0">
    <title>Document</title>
    <style>
        /*
            为div的子元素span设置一个字体颜色红色
            (为div直接包含的span设置一个字体颜色)

            子元素选择器
                作用:选中指定父元素的指定子元素
                语法:父元素 > 子元素
        */

        /* div.box > span{
            color: orange;
        } */


        /*
            后代元素选择器
                作用:选中指定元素内的指定后代元素
                语法:祖先 后代
        */
        /* div span{
            color: skyblue;
        } */

        /* 选中孙子 */
        /* div>p>span{
            color: red;
        } */


        /*
            选中下一个兄弟
                语法:前一个 + 下一个(紧挨着)
            选择下边所有的兄弟
                语法:兄 ~ 弟

        */
        p + span{
            color: red;
        }

        p ~ span{
            color: red;
        }

    </style>
</head>
<body>

    <!--
        父元素
            - 直接包含子元素的元素叫做父元素
        子元素
            - 直接被父元素包含的元素是子元素
        祖先元素
            - 直接或间接包含后代元素的元素叫做祖先元素
            - 一个元素的父元素也是它的祖先元素
        后代元素
            - 直接或间接被祖先元素包含的元素叫做后代元素、
            - 子元素也是后代元素
        兄弟元素
            -拥有相同元素的元素是兄弟元素

     -->

    <div class="box">
        我是一个div

        <p>
            我是div中的p元素
            <span>我是p元素中的span</span>
        </p>
        <div></div>
        <span>我是div中的span元素</span>
        <span>我是div中的span元素</span>
        <span>我是div中的span元素</span>
        <span>我是div中的span元素</span>
    </div>

    <div>
        <span>
            我是div外的span
        </span>
    </div>
</body>
</html>
3.4 属性选择器
<!DOCTYPE html>
<html lang="en">
<head>
    <meta charset="UTF-8">
    <meta http-equiv="X-UA-Compatible" content="IE=edge">
    <meta name="viewport" content="width=device-width, initial-scale=1.0">
    <title>Document</title>

    <style>
        /*
            [属性名] 选择含有指定属性的元素
            [属性名=属性值] 选择含有指定属性和属性值的元素
            [属性名^=属性值] 选择属性值以指定值开头的元素
            [属性名$=属性值] 选择属性值以指定值结尾的元素
            [属性名*=属性值] 选择属性值中含有某值的元素的元素
        */
        /* p[title]{} */
        /* p[title=abc]{} */
        /* p[title^=abc]{} */
        /* p[title$=abc]{} */
        p[title*=abc]{
            color: orange;
        }
    </style>
</head>
<body>
    <!-- title标签:当鼠标放上去就会出现提示文字 -->
    <p title="abc">少小离家老大回</p>
    <p title="abcdef">乡音无改鬓毛衰</p>
    <p title="helloabc">儿童相见不相识</p>
    <p>笑问客从何处来</p>
    <p>落霞与孤鹜齐飞</p>
    <p>秋水共长天一色</p>
</body>
</html>
3.5 伪类选择器
<!DOCTYPE html>
<html lang="en">
<head>
    <meta charset="UTF-8">
    <meta http-equiv="X-UA-Compatible" content="IE=edge">
    <meta name="viewport" content="width=device-width, initial-scale=1.0">
    <title>Document</title>
    <style>
        /*
            将ul里的第一个li设置为红色
        */

/*
        伪类(不存在的类,特殊的类)
            - 伪类用来描述一个元素的特殊状态
                比如:第一个子元素、被点击的元素、鼠标移入的元素
            - 伪类一般情况下都是使用 : 开头
                :first-child 第一个子元素
                :last-child 最后一个子元素
                :nth-child() 选中第n个子元素
                    特殊值:
                        n 第n个 n的范围0到正无穷
                        2n 或even 表示选中偶数位的元素
                        2n+1 或 odd 表示选中奇数位的元素

                    - 以上这些伪类都是根据所有的子元素进行排序

                :first-of-type
                :last-of-type
                :nth-of-type()
                    - 这几个伪类的功能和上述的类似,不同点是他们在同类型元素中进行排序

        - :not() 否定
            - 将符合条件的元素从选择器中去除
*/
        /* ul > li:first-child{
            color: red;
        } */

        /* ul > li:last-child{
            color: red;
        } */

        /* ul > li:nth-child(n){
            color: red;
        } */

        /* ul > li:first-of-type{
            color: red;
        }  */

        ul>li:not(:nth-child(3)){
            color: yellowgreen;
        }
    </style>
</head>
<body>
    <ul>
        <span>我是一个span</span>
        <li>第0个</li>
        <li>第一个</li>
        <li>第二个</li>
        <li>第三个</li>
        <li>第四个</li>
        <li>第五个</li>
    </ul>
</html>
4 超链接的伪类
<!DOCTYPE html>
<html lang="en">
<head>
    <meta charset="UTF-8">
    <meta http-equiv="X-UA-Compatible" content="IE=edge">
    <meta name="viewport" content="width=device-width, initial-scale=1.0">
    <title>Document</title>
    <style>

        /*
            :link 用来表示没访问过的链接(正常的链接)
        */
        a:link{
            color: red;
        }

        /*
            :visited 用来表示访问过的链接

            由于隐私的原因,所以visited这个伪类只能修改链接的颜色
        */

        a:visited{
            /* font-size: 50px; */
            color: orange;
        }

        /*
            :hover 用来表示鼠标移入的状态
        */
        a:hover{
            color: aqua;
            font-size: 50px;
        }

        /*
            :active 用来表示鼠标点击
        */
        a:active{
            color: yellowgreen;
        }

    </style>
</head>
<body>

    <!--
        1.没有访问过的链接
        2.访问过的链接
     -->
    <a href="https://www.baidu.com">访问过的链接</a>

    <br><br>

    <a href="https://www.baidu.com">没访问过的链接</a>
</body>
</html>
5 伪元素
<!DOCTYPE html>
<html lang="en">
<head>
    <meta charset="UTF-8">
    <meta http-equiv="X-UA-Compatible" content="IE=edge">
    <meta name="viewport" content="width=device-width, initial-scale=1.0">
    <title>Document</title>

    <style>
        p{
            font-size: 20px;
        }

        /*
            伪元素,表示页面中一些特殊的并不真实的存在的元素(特殊的元素)
                伪元素使用 :: 开头

                ::first-letter 表示第一个字母

                ::first-line 表示第一行

                ::selection 表示选中的内容

                ::before 元素的开始
                ::after 元素的结束
                    - before 和 after 必须结合content属性来使用,鼠标选不中
        */
        p::first-letter{
            font-size: 50px;
        }

        p::first-line{
            background-color: yellow;
        }

        p::selection{
            background-color: greenyellow;
        }

        /* div::before{
            content: 'abc';
            color: red;
        }

        div::after{
            content: 'haha';
            color: blue;
        } */

        div::before{
            content: '★';
        }

        div::after{
            content: '★';
        }

    </style>
</head>
<body>

    <!-- 双引号是通过before和after加上去的 -->
    <!-- <q>hello</q> -->
    <div>Hello Hello How are you</div>

    <p>
        Lorem ipsum dolor sit amet consectetur adipisicing elit. Soluta voluptatibus doloremque asperiores ipsam ipsa inventore laborum veritatis corporis aliquam laudantium voluptatem sapiente similique enim sunt cupiditate ex, beatae sed praesentium.
    </p>
</body>
</html>
6 继承
<!DOCTYPE html>
<html lang="en">
<head>
    <meta charset="UTF-8">
    <meta http-equiv="X-UA-Compatible" content="IE=edge">
    <meta name="viewport" content="width=device-width, initial-scale=1.0">
    <title>Document</title>
    <style>

        /* body{
            font-size: 12px;
        } */

        /*
            样式的继承,我们为一个元素设置的样式同时也会应用到它的后代元素上

            继承是发生在祖先后代之间的

            继承的设计是为了方便我们的开发,
                利用继承我们可以将一些通用的样式统一设置到共同的祖先元素上,
                    这样只需设置一次即可让所有的元素都具有该样式

            注意:并不是所有的样式都会被继承,
                比如 背景相关的,布局相关等的这些样式都不会被继承。

        */

        p{
            color: red;
            /* 默认的背景颜色是transparent */
            background-color: orange;
        }

        div{
            color: yellowgreen;
        }
    </style>
</head>
<body>
    <p>
        我是一个p元素
        <span>我是p元素中的span</span>
    </p>

    <span>我是p元素外的span</span>

    <div>
        我是div
        <span>
            我是div中的span
            <em>我是span中的em</em>
        </span>
    </div>
</body>
</html>
7 选择器的权重
<!DOCTYPE html>
<html lang="en">
<head>
    <meta charset="UTF-8">
    <meta http-equiv="X-UA-Compatible" content="IE=edge">
    <meta name="viewport" content="width=device-width, initial-scale=1.0">
    <title>Document</title>
    <style>

        /* #box1{
            background-color: orange;
        }

        div#box1{
            background-color: yellow;
        } */

        .d1{
            background-color: purple !important;
        }
        .red{
            background-color: red;
            /* font-size: 20px; */
        }


        /* div,p,span{
            background-color: yellowgreen;
        } */

        /*
            样式的冲突
                - 当我们通过不同的选择器,选中相同的元素,并且为相同的样式设置不同的值,此时就发生了样式的冲突

            发生样式冲突时,应用哪个样式由选择器的权重(优先级)决定

            选择器的权重
                内联样式    1000
                id选择器    100
                类和伪类选择器  10
                元素选择器  1
                通配选择器  0
                继承的样式  没有优先级

            比较优先级时,需要将所有的选择器的优先级进行相加计算,最后优先级越高,则越优先显示(分组选择器是单独计算的)
                选择器的累加不会超过其最大的数量级,类选择器再高也不会超过id选择器
                如果优先级计算后相同,此时则优先使用靠下的样式

            可以在某一个样式的后边添加 !imprtant ,则此时该样式会获取到最高优先级,甚至超过内联样式
                注意:在开发中这个玩意一定要慎用!

        */
        *{
            font-size: 50px;
        }

        div{
            font-size: 20px;
        }
    </style>
</head>
<body>
    <!-- <div id="box1" class="red" style="background-color: skyblue;">我是一个div</div> -->

    <div id="box1" class="red d1 d2 d3 d4" style="background-color: chocolate;">我是一个div <span>我是div中的span</span></div>
</body>
</html>
8 像素、百分比、em、rem
<!DOCTYPE html>
<html lang="en">
<head>
    <meta charset="UTF-8">
    <meta http-equiv="X-UA-Compatible" content="IE=edge">
    <meta name="viewport" content="width=device-width, initial-scale=1.0">
    <title>Document</title>
    <style>

        html{
            font-size: 30px;
        }

        .box1{

            /*
                长度单位:
                    像素
                        - 屏幕(显示器)实际上是由一个一个的小点点构成的
                        - 不同屏幕的像素大小是不同的,像素越小的屏幕显示的效果越清晰
                        - 所以同样的200px在不同的设备下显示效果不一样

                    百分比
                        - 也可以将属性值设置为相对于其父元素属性的百分比
                        - 设置百分比可以使子元素跟随父元素的改变而改变

                    em
                        - em是相对于元素的字体大小来计算的
                        - 1em = 1 font-size
                        - em会根据字体大小的改变而改变

                    rem
                        - rem是相对于根元素的字体大小来计算

            */
            width: 200px;
            height: 200px;
            background-color: orange;
        }

        .box2{
            width: 50%;
            height: 50%;
            background-color: aqua;
        }

        .box3{
            font-size: 30px;
            /* width: 10em;
            height: 10em; */
            width: 10rem;
            height: 10rem;
            background-color: greenyellow;
        }
    </style>
</head>
<body>
    <div class="box1">
        <div class="box2"></div>
    </div>

    <div class="box3"></div>
</body>
</html>
9 颜色单位(RGB值、HSL值)
<!DOCTYPE html>
<html lang="en">
<head>
    <meta charset="UTF-8">
    <meta http-equiv="X-UA-Compatible" content="IE=edge">
    <meta name="viewport" content="width=device-width, initial-scale=1.0">
    <title>Document</title>
    <style>

        .box1{
            width: 100px;
            height: 100px;
            /*
                颜色单位:
                    在CSS中可以直接使用颜色名来设置各种颜色
                        比如:red,orange,yellow,blue,green……
                        但是在css中直接使用颜色名是非常的不方便
                    RGB值:
                        - RGB通过三种颜色的不同浓度来调配出不同的颜色
                        - R red,G green,B blue
                        - 每一种颜色的范围在0 - 255(0% - 100%)之间
                        - 语法:RGB(红色,绿色,蓝色)

                    RGBA
                        - 就是在RGB的基础上增加了一个 a 表示不透明度
                        - 需要四个值,前三个和rgb一样,第四个表示不透明度
                            1表示完全不透明    0表示完全透明    .5半透明

                    十六进制的RGB值:
                        - 语法:#红色绿色蓝色
                        - 颜色过滤通过 00-ff
                        - 如果颜色两位两位重复可以简写
                            #aabbcc-->#abc

                    HSL值 HSLA值
                        H   色相(0 -360)
                        S   饱和度 颜色的浓度0%-100%
                        L   亮度,颜色的亮度0%-100%
            */
            background-color: red;
            background-color: rgb(255,0,0);
            background-color: rgb(0,255,0);
            background-color: rgb(0,0,255);
            background-color: rgb(255,255,255);
            background-color: rgb(106,153,85);
            background-color: #ff0000;
            background-color: #ffff00;
            background-color: #ff0;
            background-color: #bbffaa;
            background-color: rgb(254,156,156);
            background-color: hsl(0,100%,50%);
            background-color: hsla(0,100%,50%,0.658);
        }

    </style>
</head>
<body>
    <div class="box1"></div>
</body>
</html>
10 布局
10.1 文档流
<!DOCTYPE html>
<html lang="en">
<head>
    <meta charset="UTF-8">
    <meta http-equiv="X-UA-Compatible" content="IE=edge">
    <meta name="viewport" content="width=device-width, initial-scale=1.0">
    <title>Document</title>
    <style>
        .box1{
            width: 100px;
            background-color: yellow;
        }

        .box2{
            width: 100px;
            background-color: red;
        }
    </style>
</head>
<body>
    <!--
        文档流(normal flow)
            - 网页是一个多层的结构,一层摞着一层
            - 通过CSS可以分别为每一层来设置样式
            - 作为用户来讲只能看到最顶上一层
            - 这些层中,最底下的一层称为文档流,文档流是网页的基础
                我们所创建的元素默认都是在文档流中进行排列
            - 对于我们来说元素主要有两个状态
                在文档流中
                不在文档流中(脱离文档流)

            - 元素在文档流中有什么特点:
                - 块元素
                    - 块元素会在页面中独占一行(自上向下垂直排列)
                    - 默认宽度是父元素的全部(会把父元素撑满)
                    - 默认高度时被内容撑开(子元素)

                - 行内元素
                    - 行内元素不会独占页面的一行,只占自身的大小
                    - 行内元素在页面中自左向右排列,如果一行之中不能容纳下所有的行内元素
                        则元素会换到第二行继续自左向右排列(书写习惯一致)
                    - 行内元素的默认宽度和高度都是被内容撑开

     -->

     <div class="box1"></div>
     <div class="box2"></div>

     <span>我是span1</span>
     <span>我是span2</span>
     <span>我是span3</span>
     <span>我是span4</span>
</body>
</html>
10.2 盒子模型
<!DOCTYPE html>
<html lang="en">
<head>
    <meta charset="UTF-8">
    <meta http-equiv="X-UA-Compatible" content="IE=edge">
    <meta name="viewport" content="width=device-width, initial-scale=1.0">
    <title>Document</title>
    <style>
        .box1{
            /*
                内容区(content),元素中的所有的子元素和文本内容都在内容区中排列
                    内容区的大小由width和height两个属性来设置
                        width 设置内容区的宽度
                        height 设置内容区的高度
            */
            width: 200px;
            height: 200px;
            background-color: #bfa;

            /*
                边框(border),边框属于盒子边缘,边框里边属于盒子内部,出了边框都是盒子的外部
                    边框的大小会影响到整个盒子的大小
                要设置边框,需要至少设置三个样式:
                        边框的宽度 border-width
                        边框的颜色 border-color
                        边框的样式 border-style
            */

            border-width: 10px;
            border-color: red;
            border-style: solid;
        }
    </style>
</head>
<body>

    <!--
        盒模型、盒子模型、框模型(box model)
            - CSS将页面中的所有元素都设置为了一个矩形的盒子
            - 将元素设置为矩形的盒子后,对页面的布局就变成将不同的盒子摆放到不同的位置
                内容区(content)
                内边距(padding)
                边框(border)
                外边距(margin)

     -->

     <div class="box1"></div>
</body>
</html>
10.3 盒子模型-边框
<!DOCTYPE html>
<html lang="en">
<head>
    <meta charset="UTF-8">
    <meta http-equiv="X-UA-Compatible" content="IE=edge">
    <meta name="viewport" content="width=device-width, initial-scale=1.0">
    <title>Document</title>
    <style>
        .box1{
            width: 200px;
            height: 200px;
            background-color: #bfa;

            /*
                边框
                    边框的宽度 border-width
                    边框的颜色 border-color
                    边框的样式 border-style
            */

            /*
            border-width: 10px;
                默认值,一般都是3个像素
                border-width 可以用来指定四个方向的边框的宽度
                    值的情况
                        四个值:上 右 下 左
                        三个值:上 左右 下
                        两个值:上下 左右
                        一个值:上下左右

                除了border-width还有一组 border-xxx-width
                    xxx 可以是top right bottom left
                    用来单独指定某一个边的宽度

            */

            border-width: 10px;

            /* border-top-width: 10px;
            border-left-width: 30px; */

            color: red;

            /*
                border-color用来指定边框的颜色,同样可以分别指定四个边的边框
                    规则和border-width 一样

                border-color也可以省略不写,如果省略了则自动使用color的颜色值
            */

            /* border-color: orange red yellow green;
            border-color: orange; */

            /*
                border-style 指定边框的样式
                    solid 表示实线
                    dotted 点状虚线
                    dashed 虚线
                    double 双线

                    border-style的默认值是none 表示没有边框
            */
            /* border-style: solid dotted dashed double;
            border-style: solid; */

            /* border-width: 10px;
            border-color: orange;
            border-style: solid; */

            /*
                border简写属性,通过该属性可以同时设置边框所有的相关样式,并且没有顺序要求

                除了border以外还有四个 border-xxx
                    border-top
                    border-right
                    border-bottom
                    border-left
            */
            /* border: 10px orange solid; */

            border: 10px red solid;
            border-right: none;
        }
    </style>
</head>
<body>
    <div class="box1"></div>
</body>
</html>
10.4 盒子模型-内边距
<!DOCTYPE html>
<html lang="en">
<head>
    <meta charset="UTF-8">
    <meta http-equiv="X-UA-Compatible" content="IE=edge">
    <meta name="viewport" content="width=device-width, initial-scale=1.0">
    <title>Document</title>
    <style>
        .box1{
            width: 200px;
            height: 200px;
            background-color: #bfa;
            border: 10px orange solid;

            /*
                内边距(padding)
                    - 内容区和边框之间的距离是内边距
                    - 一共有四个方向的内边距:
                        padding-top
                        padding-right
                        padding-bottom
                        padding-left

                    - 内边距的设置会影响到盒子的大小
                    - 背景颜色会延伸到内边距上

                - 一个盒子可见框的大小,由内容区 内边距 和 边框共同决定
                    所以在计算盒子大小时,需要将这三个区域加到一起计算
            */

            /* padding-top: 100px; */
            /* padding-left: 100px; */
            /* padding-right: 100px; */
            /* padding-bottom: 100px; */

            /*
                padding 内边距的简写属性,可以同时指定四个方向的内边距
                    规则和border-width 一样
            */
            padding: 10px 20px 30px 40px;
        }

        .inner{
            width: 100%;
            height: 100%;
            background-color: yellow;
        }
    </style>
</head>
<body>
    <div class="box1">
        <div class="innner"></div>
    </div>
</body>
</html>
10.5 盒子模型-外边距
<!DOCTYPE html>
<html lang="en">
<head>
    <meta charset="UTF-8">
    <meta http-equiv="X-UA-Compatible" content="IE=edge">
    <meta name="viewport" content="width=device-width, initial-scale=1.0">
    <title>Document</title>
    <style>
        .box1{
            width: 200px;
            height: 200px;
            background-color: #bfa;
            border: 10px red solid;

            /*
                外边距(margin)
                    - 外边距不会影响盒子可见框的大小
                    - 但是外边距会影响盒子的位置
                    - 一共有四个方向的外边距:
                        margin-top
                            - 上外边距,设置一个正值,元素会向下移动
                        margin-right
                            - 默认情况下设置margin-right不会产生任何效果
                        margin-bottom
                            - 下外边距,设置一个正值,其下边的元素会向下移动
                        margin-left
                            - 左外边距,设置一个正值,元素会向右移动

                        - margin 也可以设置负值,如果是负值则元素会向相反的方向移动

                    - 元素在页面中是按照自左向右的顺序排列的
                        所以默认情况下如果我们设置的左和上外边距则会移动元素自身
                        而设置下和右外边距会移动其他元素

                    - margin的简写属性
                        margin 可以同时设置四个方向的外边距,用法和padding一样

                    - margin会影响到盒子实际占用空间
            */

            /* margin-top: 100px;
            margin-left: 100px;
            margin-bottom: 100px; */

            /* margin-top: -100px; */
            /* margin-left: -100px; */
            /* margin-bottom: -100px; */

            /* margin-right: 100px; */

            margin-right: 100px;
        }

        .box2{
            width: 220px;
            height: 220px;
            background-color: yellow;
        }
    </style>
</head>
<body>
    <div class="box1"></div>
    <div class="box2"></div>
</body>
</html>
10.6 盒子模型-水平方向的布局
<!DOCTYPE html>
<html lang="en">
<head>
    <meta charset="UTF-8">
    <meta http-equiv="X-UA-Compatible" content="IE=edge">
    <meta name="viewport" content="width=device-width, initial-scale=1.0">
    <title>Document</title>
    <style>
        .outer{
            width: 800px;
            height: 200px;
            border: 10px red solid;
        }

        .inner{
            /* width: auto; width的值默认就是auto*/
            width: auto;
            height: 200px;
            background-color: #bfa;
            margin-right: auto;
            margin-left: auto;
            /*
                元素的水平方向的布局:
                    元素在其父元素中水平方向的位置由以下几个属性共同决定
                        margin-left
                        border-left
                        padding-left
                        width
                        padding-right
                        border-right
                        margin-right

                    一个元素在其父元素中,水平布局必须要满足以下的等式
        margin-left+border-left+padding-left+width+padding-right+border-right+margin-right = 其父元素内容区的大小(必须满足)

                    0 + 0 + 0 + 200 + 0 + 0 + 0 = 800
                    0 + 0 + 0 + 200 + 0 + 0 + 600 = 800
                        - 以上等式必须满足,如果相加结果使等式不成立,则称为过渡约束,则等式会自动调整
                            - 调整的情况:
                                - 如果这七个值中没有为 auto 的情况,则浏览器会自动调整margin-right的值以使等式满足
                        - 这七个值中有三个值可设置为auto
                            width
                            margin-left
                            margin-right
                                - 如果某个值为auto,则会自动调整为auto的那个值以使等式成立
                                    0 + 0 + 0 + auto + 0 + 0 + 0 = 800 auto=800
                                    0 + 0 + 0 + auto + 0 + 0 + 200 = 800 auto=600
                                    200 + 0 + 0 + auto + 0 + 0 + 200 = 800 auto=400

                                    auto + 0 + 0 + 200 + 0 + 0 + 200 = 800 auto=400

                            - 如果将一个宽度和一个外边距设置为auto,则宽度会调整到最大,设置为auto的外边距会自动为0
                            - 如果将三个值都设置为auto,则外边距都是0,宽度最大
                            - 如果将两个外边距设置为auto,宽度固定值,则会将外边距设置为相同的值
                                auto + 0 + 0 + 200 + 0 + 0 + auto = 800 auto=300
                                所以我们经常利用这个特点来使一个元素在其父元素中水平居中
                                示例:
                                width: xxxpx;
                                margin:0 auto;
            */
        }
    </style>
</head>
<body>
    <div class="outer">
        <div class="inner"></div>
        aaa
    </div>
</body>
</html>
10.7 盒子模型-垂直方向的布局
<!DOCTYPE html>
<html lang="en">
<head>
    <meta charset="UTF-8">
    <meta http-equiv="X-UA-Compatible" content="IE=edge">
    <meta name="viewport" content="width=device-width, initial-scale=1.0">
    <title>Document</title>
    <style>

        .outer{
            background-color: #bfa;
            height: 600px;
            /*
                默认情况下父元素的高度被内容撑开
            */
        }

        .inner{
            width: 100px;
            background-color: yellow;
            height: 100px;
            margin-bottom: 100px;
        }

        .box1{
            width: 200px;
            height: 200px;
            background-color: #bfa;
            /*
                子元素是在父元素的内容区中排列的,
                    如果子元素的大小超过了父元素,则子元素会从父元素中溢出
                    使用 overflow 属性来设置父元素如何处理溢出的子元素

                    可选值:
                        visible 默认值 子元素会从父元素中溢出,在父元素外部的位置显示
                        hidden 溢出内容将会被裁剪不会显示
                        scroll 生成两个滚动条,通过滚动条来查看完整的内容
                        auto 根据需要生成滚动条

                overflow-x:
                overflow-y:
            */

            overflow: scroll;


        }

        .box2{
            width: 100px;
            height: 400px;
            background-color: orange;
        }

    </style>
</head>
<body>
    <!-- <div class="outer">
        <div class="inner"></div>
        <div class="inner"></div>
    </div> -->

    <div class="box1">
        在我的后园,可以看见墙外有两株树,一株是枣树,还有一株也是枣树。这上面的夜的天空,奇怪而高,我生平没有见过这样的奇怪而高的天空。他仿佛要离开人间而去,使人们仰面不再看见。然而现在却非常之蓝,闪闪地着几十个星星的眼,冷眼。他的口角上现出微笑,似乎自以为大有深意,而将繁霜洒在我的园里的野花草上。我不知道那些花草真叫什么名字,人们叫他们什么名字。我记得有一种开过极细小的粉红花,现在还开着,但是更极细小了,她在冷的夜气中,瑟缩地做梦,梦见春的到来,梦见秋的到来,梦见瘦的诗人将眼泪擦在她最末的花瓣上,告诉她秋虽然来,冬虽然来,而此后接着还是春,胡碟乱飞,蜜蜂都唱起春词来了。她于是一笑,虽然颜色冻得红惨惨地,仍然瑟缩着。枣树,他们简直落尽了叶子。先前,还有一两个孩子来打他们别人打剩的枣子,现在是一个也不剩了,连叶子也落尽了。他知道小粉红花的梦,秋后要有春;他也知道落叶的梦,春后还是秋。他简直落尽叶子,单剩干子,然而脱了当初满树是果实和叶子时候的弧形,欠伸得很舒服。但是,有几枝还低亚着,护定他从打枣的竿梢所得的皮伤,而最直最长的几枝,却已默默地铁似的直刺着奇怪而高的天空,使天空闪闪地鬼��眼;直刺着天空中圆满的月亮,使月亮窘得发白。
    </div>
</body>
</html>
10.8 盒子模型-外边距的折叠
<!DOCTYPE html>
<html lang="en">
<head>
    <meta charset="UTF-8">
    <meta http-equiv="X-UA-Compatible" content="IE=edge">
    <meta name="viewport" content="width=device-width, initial-scale=1.0">
    <title>Document</title>
    <style>
        .box1,.box2{
            width: 200px;
            height: 200px;
            font-size: 100px;
        }

        /*
            垂直外边距的重叠(折叠)
                - 相邻的垂直方向外边距会发生重叠现象
                - 兄弟元素
                    - 兄弟元素间的相邻垂直外边距会取两者之间的较大值(两者都是正值)
                    - 特殊情况:
                        如果相邻的外边距一正一负,则取两者的和
                        如果相邻的外边距都是负值,则取两者中绝对值较大的

                    - 兄弟元素之间的外边距的重叠,对于开发是有利的,所以我们不需要进行处理

                - 父子元素
                    - 父子元素间相邻外边距,子元素的会传递给父元素(上外边距)
                    - 父子外边距的折叠会影响到页面的布局,必须要进行处理(要么不要外边距 要么不相邻)
        */

        .box1{
            background-color: #bfa;

            /* 设置一个下外边距 */
            margin-bottom: 100px;
        }

        .box2{
            background-color: orange;
            padding-top: 100px;

            /* 设置一个上外边距 */
            margin-top: 100px;
        }

        .box3{
            width: 200px;
            height: 200px;
            background-color: #bfa;
            /* padding-top: 100px; */
            /* border-top: 1px #bfa solid; */
        }

        .box4{
            width: 100px;
            height: 100px;
            background-color: orange;
            margin-top: 99px;
        }
    </style>
</head>
<body>

    <div class="box3">
        <div class="box4"></div>
    </div>

    <!-- <div class="box1"></div>
    <div class="box2"></div> -->
</body>
</html>
10.9 行内元素的盒模型
<!DOCTYPE html>
<html lang="en">
<head>
    <meta charset="UTF-8">
    <meta http-equiv="X-UA-Compatible" content="IE=edge">
    <meta name="viewport" content="width=device-width, initial-scale=1.0">
    <title>Document</title>
    <style>
        .s1{
            background-color: yellow;

            /*
                行内元素的盒模型
                    - 行内元素不支持设置宽度和高度
                    - 行内元素可以设置padding,但是垂直方向padding不会影响页面的布局
                    - 行内元素可以设置border,垂直方向的border不会影响页面的布局
            */

            /* width: 100px;
            height: 100px; */

            /* padding: 100px; */

            /* border: 100px solid red; */

            margin: 100px;
        }

        .box1{
            width: 200px;
            height: 200px;
            background-color: #bfa;
        }

        a{
            /*
                display 用来设置元素显示的类型
                    可选值:
                        inline 将元素设置为行内元素
                        block 将元素设置为块元素
                        inline-block 将元素设置为行内块元素
                                行内块,既可以设置宽度和高度又不会独占一行
                        table 将元素设置为一个表格
                        none 元素不在页面中显示

                visibility 用来设置元素的显示状态
                    可选值:
                        visible 默认值,元素在页面中正常显示
                        hidden 元素在页面中隐藏 不显示,但是依然占据页面的位置
            */
            display: block;

            visibility: visible;

            width: 100px;
            height: 100px;
            background-color: orange;
        }
    </style>
</head>
<body>

    <a href="javascript:;">超链接</a>
    <a href="javascript:;">超链接</a>

    <span class="s1">我是span</span>
    <span class="s1">我是span</span>

    <div class="box1"></div>
</body>
</html>
10.10 浏览器的默认样式
<!DOCTYPE html>
<html lang="en">
<head>
    <meta charset="UTF-8">
    <meta http-equiv="X-UA-Compatible" content="IE=edge">
    <meta name="viewport" content="width=device-width, initial-scale=1.0">
    <title>Document</title>
    <!-- <link rel="stylesheet" href="./css/reset.css"> -->
    <link rel="stylesheet" href="./css/normalize.css">

    <style>
        .s1{
            background-color: yellow;

            /*
                行内元素的盒模型
                    - 行内元素不支持设置宽度和高度
                    - 行内元素可以设置padding,但是垂直方向padding不会影响页面的布局
                    - 行内元素可以设置border,垂直方向的border不会影响页面的布局
            */

            /* width: 100px;
            height: 100px; */

            /* padding: 100px; */

            /* border: 100px solid red; */

            margin: 100px;
        }

        .box1{
            width: 200px;
            height: 200px;
            background-color: #bfa;
        }

        a{
            /*
                display 用来设置元素显示的类型
                    可选值:
                        inline 将元素设置为行内元素
                        block 将元素设置为块元素
                        inline-block 将元素设置为行内块元素
                                行内块,既可以设置宽度和高度又不会独占一行
                        table 将元素设置为一个表格
                        none 元素不在页面中显示

                visibility 用来设置元素的显示状态
                    可选值:
                        visible 默认值,元素在页面中正常显示
                        hidden 元素在页面中隐藏 不显示,但是依然占据页面的位置
            */
            display: block;

            visibility: visible;

            width: 100px;
            height: 100px;
            background-color: orange;
        }
    </style>
</head>
<body>

    <a href="javascript:;">超链接</a>
    <a href="javascript:;">超链接</a>

    <span class="s1">我是span</span>
    <span class="s1">我是span</span>

    <div class="box1"></div>
</body>
</html>
reset.css
/* v2.0 | 20110126
  http://meyerweb.com/eric/tools/css/reset/
  License: none (public domain)
*/
html, body, div, span, applet, object, iframe,
h1, h2, h3, h4, h5, h6, p, blockquote, pre,
a, abbr, acronym, address, big, cite, code,
del, dfn, em, img, ins, kbd, q, s, samp,
small, strike, strong, sub, sup, tt, var,
b, u, i, center,
dl, dt, dd, ol, ul, li,
fieldset, form, label, legend,
table, caption, tbody, tfoot, thead, tr, th, td,
article, aside, canvas, details, embed,
figure, figcaption, footer, header, hgroup,
menu, nav, output, ruby, section, summary,
time, mark, audio, video {
	margin: 0;
	padding: 0;
	border: 0;
	font-size: 100%;
	font: inherit;
	vertical-align: baseline;
}
/* HTML5 display-role reset for older browsers */
article, aside, details, figcaption, figure,
footer, header, hgroup, menu, nav, section {
	display: block;
}
body {
	line-height: 1;
}
ol, ul {
	list-style: none;
}
blockquote, q {
	quotes: none;
}
blockquote:before, blockquote:after,
q:before, q:after {
	content: '';
	content: none;
}
table {
	border-collapse: collapse;
	border-spacing: 0;
}
normalize.css
/*! normalize.css v8.0.1 | MIT License | github.com/necolas/normalize.css */

/* Document
   ========================================================================== */

/**
 * 1. Correct the line height in all browsers.
 * 2. Prevent adjustments of font size after orientation changes in iOS.
 */

html {
  line-height: 1.15; /* 1 */
  -webkit-text-size-adjust: 100%; /* 2 */
}

/* Sections
   ========================================================================== */

/**
 * Remove the margin in all browsers.
 */

body {
  margin: 0;
}

/**
 * Render the `main` element consistently in IE.
 */

main {
  display: block;
}

/**
 * Correct the font size and margin on `h1` elements within `section` and
 * `article` contexts in Chrome, Firefox, and Safari.
 */

h1 {
  font-size: 2em;
  margin: 0.67em 0;
}

/* Grouping content
   ========================================================================== */

/**
 * 1. Add the correct box sizing in Firefox.
 * 2. Show the overflow in Edge and IE.
 */

hr {
  box-sizing: content-box; /* 1 */
  height: 0; /* 1 */
  overflow: visible; /* 2 */
}

/**
 * 1. Correct the inheritance and scaling of font size in all browsers.
 * 2. Correct the odd `em` font sizing in all browsers.
 */

pre {
  font-family: monospace, monospace; /* 1 */
  font-size: 1em; /* 2 */
}

/* Text-level semantics
   ========================================================================== */

/**
 * Remove the gray background on active links in IE 10.
 */

a {
  background-color: transparent;
}

/**
 * 1. Remove the bottom border in Chrome 57-
 * 2. Add the correct text decoration in Chrome, Edge, IE, Opera, and Safari.
 */

abbr[title] {
  border-bottom: none; /* 1 */
  text-decoration: underline; /* 2 */
  text-decoration: underline dotted; /* 2 */
}

/**
 * Add the correct font weight in Chrome, Edge, and Safari.
 */

b,
strong {
  font-weight: bolder;
}

/**
 * 1. Correct the inheritance and scaling of font size in all browsers.
 * 2. Correct the odd `em` font sizing in all browsers.
 */

code,
kbd,
samp {
  font-family: monospace, monospace; /* 1 */
  font-size: 1em; /* 2 */
}

/**
 * Add the correct font size in all browsers.
 */

small {
  font-size: 80%;
}

/**
 * Prevent `sub` and `sup` elements from affecting the line height in
 * all browsers.
 */

sub,
sup {
  font-size: 75%;
  line-height: 0;
  position: relative;
  vertical-align: baseline;
}

sub {
  bottom: -0.25em;
}

sup {
  top: -0.5em;
}

/* Embedded content
   ========================================================================== */

/**
 * Remove the border on images inside links in IE 10.
 */

img {
  border-style: none;
}

/* Forms
   ========================================================================== */

/**
 * 1. Change the font styles in all browsers.
 * 2. Remove the margin in Firefox and Safari.
 */

button,
input,
optgroup,
select,
textarea {
  font-family: inherit; /* 1 */
  font-size: 100%; /* 1 */
  line-height: 1.15; /* 1 */
  margin: 0; /* 2 */
}

/**
 * Show the overflow in IE.
 * 1. Show the overflow in Edge.
 */

button,
input { /* 1 */
  overflow: visible;
}

/**
 * Remove the inheritance of text transform in Edge, Firefox, and IE.
 * 1. Remove the inheritance of text transform in Firefox.
 */

button,
select { /* 1 */
  text-transform: none;
}

/**
 * Correct the inability to style clickable types in iOS and Safari.
 */

button,
[type="button"],
[type="reset"],
[type="submit"] {
  -webkit-appearance: button;
}

/**
 * Remove the inner border and padding in Firefox.
 */

button::-moz-focus-inner,
[type="button"]::-moz-focus-inner,
[type="reset"]::-moz-focus-inner,
[type="submit"]::-moz-focus-inner {
  border-style: none;
  padding: 0;
}

/**
 * Restore the focus styles unset by the previous rule.
 */

button:-moz-focusring,
[type="button"]:-moz-focusring,
[type="reset"]:-moz-focusring,
[type="submit"]:-moz-focusring {
  outline: 1px dotted ButtonText;
}

/**
 * Correct the padding in Firefox.
 */

fieldset {
  padding: 0.35em 0.75em 0.625em;
}

/**
 * 1. Correct the text wrapping in Edge and IE.
 * 2. Correct the color inheritance from `fieldset` elements in IE.
 * 3. Remove the padding so developers are not caught out when they zero out
 *    `fieldset` elements in all browsers.
 */

legend {
  box-sizing: border-box; /* 1 */
  color: inherit; /* 2 */
  display: table; /* 1 */
  max-width: 100%; /* 1 */
  padding: 0; /* 3 */
  white-space: normal; /* 1 */
}

/**
 * Add the correct vertical alignment in Chrome, Firefox, and Opera.
 */

progress {
  vertical-align: baseline;
}

/**
 * Remove the default vertical scrollbar in IE 10+.
 */

textarea {
  overflow: auto;
}

/**
 * 1. Add the correct box sizing in IE 10.
 * 2. Remove the padding in IE 10.
 */

[type="checkbox"],
[type="radio"] {
  box-sizing: border-box; /* 1 */
  padding: 0; /* 2 */
}

/**
 * Correct the cursor style of increment and decrement buttons in Chrome.
 */

[type="number"]::-webkit-inner-spin-button,
[type="number"]::-webkit-outer-spin-button {
  height: auto;
}

/**
 * 1. Correct the odd appearance in Chrome and Safari.
 * 2. Correct the outline style in Safari.
 */

[type="search"] {
  -webkit-appearance: textfield; /* 1 */
  outline-offset: -2px; /* 2 */
}

/**
 * Remove the inner padding in Chrome and Safari on macOS.
 */

[type="search"]::-webkit-search-decoration {
  -webkit-appearance: none;
}

/**
 * 1. Correct the inability to style clickable types in iOS and Safari.
 * 2. Change font properties to `inherit` in Safari.
 */

::-webkit-file-upload-button {
  -webkit-appearance: button; /* 1 */
  font: inherit; /* 2 */
}

/* Interactive
   ========================================================================== */

/*
 * Add the correct display in Edge, IE 10+, and Firefox.
 */

details {
  display: block;
}

/*
 * Add the correct display in all browsers.
 */

summary {
  display: list-item;
}

/* Misc
   ========================================================================== */

/**
 * Add the correct display in IE 10+.
 */

template {
  display: none;
}

/**
 * Add the correct display in IE 10.
 */

[hidden] {
  display: none;
}
10.11 盒子的大小
<!DOCTYPE html>
<html lang="en">
<head>
    <meta charset="UTF-8">
    <meta http-equiv="X-UA-Compatible" content="IE=edge">
    <meta name="viewport" content="width=device-width, initial-scale=1.0">
    <title>Document</title>
    <style>
        .box1{
            width: 100px;
            height: 100px;
            background-color: #bfa;
            padding: 10px;
            border: 10px red solid;
            /*
                默认情况下,盒子可见框的大小由内容区、内边距和边框共同决定

                    box-sizing 用来设置盒子尺寸的计算方式(设置width和height的作用)
                        可选值:
                            content-box 默认值,宽度和高度用来设置内容区的大小
                            border-box 宽度和高度用来设置整个盒子可见框的大小
                                width 和 height 指的是内容区 和内边距 和 边框的总大小
            */

            box-sizing: content-box;
        }
    </style>
</head>
<body>
    <div class="box1"></div>
</body>
</html>
10.12 轮廓阴影和圆角
<!DOCTYPE html>
<html lang="en">
<head>
    <meta charset="UTF-8">
    <meta http-equiv="X-UA-Compatible" content="IE=edge">
    <meta name="viewport" content="width=device-width, initial-scale=1.0">
    <title>Document</title>
    <style>
        .box1{
            width: 200px;
            height: 200px;
            background-color: #bfa;

            /* box-shadow 用来设置元素的阴影效果,阴影不会影响页面布局
                第一个值 左侧偏移量 设置阴影的水平位置 正值向右移动 负值向左移动
                第二个值 垂直偏移量 设置阴影的水平位置 正值向下移动 负值向上移动
                第三个值 阴影的模糊半径
                第四个值 阴影的颜色
            */
            box-shadow: 0px 0px 50px rgba(0, 0, 0, .5);

            /*
                outline 用来设置元素的轮廓线,用法和border一模一样
                    轮廓和边框不同的点,就是轮廓不会影响到可见框的大小
            */

        }

        /* .box1:hover{
            outline: 10px red solid;
        } */

        .box2{
            width: 200px;
            height: 200px;
            background-color: orange;

            /* border-radius: 用来设置圆角 圆角设置的圆的半径大小*/

            /* border-top-left-radius:  */
            /* border-top-right-radius:  */
            /* border-bottom-left-radius:  */
            /* border-bottom-right-radius:  */
            /* border-top-left-radius: 50px 100px; */

            /*
                border-radius 可以分别指定四个角的圆角
                    四个值 左上 右上 右下 左下
                    三个值 左上 右上/左下 右下
            */
            /* border-radius: 20px/40px; 横向都是20px,纵向都是40px*/

            /* 将元素设置为一个圆形
                无论多大,50%都会设置为圆形
            */
            border-radius: 50%;
        }
    </style>
</head>
<body>
    <!-- <div class="box1"></div> -->

    <div class="box2"></div>
</body>
</html>
12 布置练习
12.1 图片列表
<!DOCTYPE html>
<html lang="en">
<head>
    <meta charset="UTF-8">
    <meta http-equiv="X-UA-Compatible" content="IE=edge">
    <meta name="viewport" content="width=device-width, initial-scale=1.0">
    <title>图片列表</title>
    <link rel="stylesheet" href="./css/reset.css">
    <style>

        /* 设置body的背景颜色 */
        body{
            background-color: antiquewhite;
        }

        /* 设置外部ul的样式 */
        .img-list{
            /* 设置ul的宽度 */
            width: 190px;
            /* 设置ul的高度 */
            height: 470px;
            /* 裁剪溢出的内容 */
            overflow: hidden;
            /* 使ul在页面中居中(实际示例中不需要这么写) */
            margin: 50px auto;
            background-color: #f4f4f4;
        }

        /* 设置li的位置 */
        .img-list li:not(:last-child){
            margin-bottom: 9px;
        }

        /* 设置图片的大小(li多宽ul就多宽) */
        .img-list img{
            width: 100%;
        }

    </style>
</head>
<body>

    <!-- <div>
        <a href=""><img src="" alt=""></a>
        <a href=""><img src="" alt=""></a>
        <a href=""><img src="" alt=""></a>
    </div> -->

    <ul class="img-list">
        <li>
            <a href="javascript:;">
                <img src="./img/01/1.jpg" alt="">
            </a>
        </li>

        <li>
            <a href="javascript:;">
                <img src="./img/01/2.jpg" alt="">
            </a>
        </li>

        <li>
            <a href="javascript:;">
                <img src="./img/01/3.jpg" alt="">
            </a>
        </li>
    </ul>
</body>
</html>
12.2 京东左侧导航条
<!DOCTYPE html>
<html lang="en">
<head>
    <meta charset="UTF-8">
    <meta http-equiv="X-UA-Compatible" content="IE=edge">
    <meta name="viewport" content="width=device-width, initial-scale=1.0">
    <title>京东的左侧导航</title>
    <link rel="stylesheet" href="./css/reset.css">
    <style>

        /* 设置body */
        body{
            /* 设置一个网页的背景,以使我们方便查看 */
            background-color: #bfa;
        }

        /* 设置菜单外部容器 */
        .left-nav{
            /* 设置宽度 */
            width: 190px;
            /* 设置高度 */
            height: 450px;
            /* 设置padding */
            padding: 10px 0;
            /* 设置一个背景颜色 */
            background-color: #fff;

            margin: 50px auto;
        }

        /* 设置菜单内部的item */
        .left-nav .item{
            height: 25px;
            /* 要让一个文字在父元素中垂直居中,只需将父元素的line-height设置为一个和父元素height一样的值 */
            line-height: 25px;

            padding-left: 18px;
            /* 设置字体大小 */
            font-size: 12px;
        }

        /* 为item设置一个鼠标移入的状态 */
        .item:hover{
            background-color: #d9d9d9;
        }

        /* 设置超链接的样式 */
        .item a{
            /* 设置字体大小 */
            font-size: 14px;
            /* 设置字体颜色 */
            color: #333;
            /* 去除下划线 */
            text-decoration: none;
        }

        /* 设置超链接的hover的样式 */
        .item a:hover{
            color: #c81623;
        }
    </style>
</head>
<body>

    <!-- 创建一个外部的容器 nav(div) div(div) ul(li) -->
    <nav class="left-nav">
        <div class="item">
            <a href="#">家用电器</a>
        </div>

        <div class="item">
            <a href="#">手机</a>/
            <a href="#">运营商</a>/
            <a href="#">数码</a>
        </div>

        <div class="item">
            <a href="#">电脑</a>/
            <a href="#">办公</a>
        </div>

        <div class="item">
            <a href="#">家居</a>/
            <a href="#">家具</a>/
            <a href="#">家装</a>
            <a href="#">厨具</a>
        </div>

        <div class="item">
            <a href="#">男装</a>/
            <a href="#">女装</a>/
            <a href="#">重装</a>
            <a href="#">内衣</a>
        </div>

        <div class="item">
            <a href="#">美妆</a>/
            <a href="#">个护清洁</a>/
            <a href="#">宠物</a>
        </div>

        <div class="item">
            <a href="#">女装</a>/
            <a href="#">箱包</a>/
            <a href="#">钟表</a>/
            <a href="#">珠宝</a>
        </div>

        <div class="item">
            <a href="#">男鞋</a>/
            <a href="#">运动</a>/
            <a href="#">户外</a>
        </div>

        <div class="item">
            <a href="#">房产</a>/
            <a href="#">汽车</a>/
            <a href="#">汽车用品</a>
        </div>

        <div class="item">
            <a href="#">母婴</a>/
            <a href="#">玩具乐器</a>/
        </div>

        <div class="item">
            <a href="#">食品</a>/
            <a href="#">酒类</a>/
            <a href="#">生鲜</a>/
            <a href="#">特产</a>
        </div>

        <div class="item">
            <a href="#">艺术</a>/
            <a href="#">礼品鲜花</a>/
            <a href="#">农资绿植</a>
        </div>

        <div class="item">
            <a href="#">医药保健</a>/
            <a href="#">计生情趣</a>
        </div>

        <div class="item">
            <a href="#">图书</a>/
            <a href="#">文娱</a>/
            <a href="#">电子书</a>
        </div>

        <div class="item">
            <a href="#">机票</a>/
            <a href="#">酒店</a>/
            <a href="#">旅游</a>/
            <a href="#">生活</a>
        </div>

        <div class="item">
            <a href="#">理财</a>/
            <a href="#">众筹</a>/
            <a href="#">白条</a>/
            <a href="#">保险</a>
        </div>

        <div class="item">
            <a href="#">安装</a>/
            <a href="#">维修</a>/
            <a href="#">清洗</a>/
            <a href="#">二手</a>
        </div>

        <div class="item">
            <a href="#">工业品</a>
        </div>
    </nav>
</body>
</html>
12.3 网易新闻列表
<!DOCTYPE html>
<html lang="zh">
<head>
    <meta charset="UTF-8">
    <meta http-equiv="X-UA-Compatible" content="IE=edge">
    <meta name="viewport" content="width=device-width, initial-scale=1.0">
    <title>网易的新闻列表</title>
    <link rel="stylesheet" href="./css/reset.css">
    <style>

        /* body{
            /* background-color: #bfa; * /
        } */

        a{
            /* 去除下划线 */
            text-decoration: none;
        }

        /* 设置容器的样式 */
        .news-wrapper{
            /* 设置宽度 */
            width: 300px;
            /* 设置高度 */
            height: 357px;
            /* 设置居中 */
            margin: 50px auto;
            /* 设置背景颜色,显示轮廓 */
            background-color: #fff;

            /* 设置上边框 */
            border-top: 1px solid #ddd;
        }

        /* 设置news-title */
        .news-title{
            /* 为了边框和文字宽度一致,需要将h2转换为行内块元素 */
            display: inline-block;
            /* 设置高度 */
            height: 30px;
            /* 设置上边框 */
            border-top: 1px red solid;
            /* 通过margin-top 将h2上移,盖住上边框 */
            margin-top: -1px;

            padding-top: 10px;
        }

        /* 设置title中超链接的样式 */
        .news-title a{
            /* 设置颜色 */
            color: #40406B;
            /* 设置文字的加粗效果 */
            font-weight: bold;
        }

        /* 设置图片容器的高度 */
        .news-img{
            height: 150px;
        }

        /* 设置图片的文字效果 */
        .news-img .img-title{
            /* 向上移动文字 */
            margin-top: -30px;
            /* 设置字体颜色 */
            color: #fff;
            /* 设置加粗 */
            font-weight: bold;
            /* 设置padding */
            padding-left: 30px;
        }

        /* 设置新闻列表 */
        .news-list{
            /* 设置上外边距 */
            margin-top: 20px;
            /* 设置左侧的padding */
            /* padding-left: 14px; */

            /* 设置项目符号 */
            /* list-style: square; */


        }

        /* 设置li */
        .news-list li{
            /* 设置下外边距 */
            margin-bottom: 17px;
        }

        /* 通过before伪元素,来为每一个li添加项目符号 */
        .news-list li::before{
            content: '●';
            color: rgb(218, 218, 218);
            font-size: 12px;
            margin-right: 4px;
        }

         /* 设置li中文字 */
         .news-list li a{
            /* 设置字体大小 */
            font-size: 14px;
            /* 设置字体颜色 */
            color: #666;
        }

        .news-list li a:hover{
            color: red;
        }
    </style>
</head>
<body>
    <!-- 创建新闻列表的外侧的容器 -->
    <div class="news-wrapper">
        <!-- 创建一个标题标签 -->
        <h2 class="news-title">
            <a href="#">体育</a>
        </h2>
        <!-- 创建一个图片的容器 -->
        <div class="news-img">
            <a href="#">
                <img src="./img/03/1.jpeg" alt="费德勒">
                <!-- 创建图片标题 -->
                <h3 class="img-title">
                    费德勒首负迪米 扶额头不满发挥
                </h3>
            </a>
        </div>

        <!-- 新闻列表 -->
        <ul class="news-list">
            <li>
                <a href="#">乔治:我爱LA 喜欢和LBJ一起打球</a>
            </li>
            <li>
                <a href="#">格林:3年前降薪就在等KD 特制T恤嘲讽LBJ</a>
            </li>
            <li>
                <a href="#">塔克4000双鞋让保罗羡慕嫉妒 乔丹被震惊</a>
            </li>
            <li>
                <a href="#">CBA下季新赛制:常规赛4组循环 增至46轮</a>
            </li>
        </ul>
    </div>
</body>
</html>
12.4 w3cschool导航条
<!DOCTYPE html>
<html lang="en">
<head>
    <meta charset="UTF-8">
    <meta http-equiv="X-UA-Compatible" content="IE=edge">
    <meta name="viewport" content="width=device-width, initial-scale=1.0">
    <title>导航条</title>
    <link rel="stylesheet" href="./css/reset.css">
    <style>
        /* 设置nav的大小 */
        .nav{
            /* 设置宽度和高度 */
            width: 1210px;
            height: 48px;
            /* 设置背景颜色 */
            background-color: #E8E7E3;

            margin: 100px auto;
        }

        /* 设置nav中li */
        .nav li{
            /* 设置li向左浮动,以使菜单横向排列 */
            float: left;
            /* 设置li的高度 */
            /* height: 48px; */
            /* 将文字在父元素中垂直居中 */
            line-height: 48px;

        }

        /* 设置a的样式 */
        .nav a{
            /* 将a转换为块元素 */
            display: block;
            /* 去除下划线 */
            text-decoration: none;
            /* 设置字体颜色 */
            color: #777777;
            /* 修改字体大小 */
            font-size: 18px;

            padding: 0 39px;
        }

        .nav li:last-child a{
            padding: 0 42px 0 41px;
        }

        /* 设置鼠标移入的效果 */
        .nav a:hover{
            background-color: #3f3f3f;
            color:#E8E7E3;
        }
    </style>
</head>
<body>
    <!-- 创建导航条的结构 -->
    <ul class="nav">
        <li>
            <a href="#">HTML/CSS</a>
        </li>
        <li>
            <a href="#">Browser Side</a>
        </li>
        <li>
            <a href="#">Server Side</a>
        </li>
        <li>
            <a href="#">Programming</a>
        </li>
        <li>
            <a href="#">XML</a>
        </li>
        <li>
            <a href="#">Web Building</a>
        </li>
        <li>
            <a href="#">Reference</a>
        </li>
    </ul>
</body>
</html>
12.5 京东轮播图
<!DOCTYPE html>
<html lang="en">
<head>
    <meta charset="UTF-8">
    <meta http-equiv="X-UA-Compatible" content="IE=edge">
    <meta name="viewport" content="width=device-width, initial-scale=1.0">
    <title>Document</title>
    <link rel="stylesheet" href="./css/reset.css">
    <style>
        /* 设置图片的容器 */
        .img-list{
            width: 590px;
            height: 470px;
            margin: 100px auto;

            /* 为ul开启相对定位,目的是使ul中的pointer可以相对于ul定位而不是相对于初始包含块 */
            position: relative;

        }

        /* 设置li */
        .img-list li{
            position: absolute;
        }

        /* 通过修改元素的层级来显示指定的图片 */
        .img-list li:nth-child(4){
            z-index: 1;
        }

        /* 设置导航点的样式 */
        .pointer{
            position: absolute;
            z-index: 9999;
            bottom: 20px;
            left: 40px;
        }

        .pointer a{
            /* 设置元素向左移动 */
            float: left;
            width: 10px;
            margin: 0px 2px;
            height: 10px;
            border-radius: 50%;
            background-color: rgba(255, 255, 255, .3);
            /* 将背景颜色值设置到内容区,边框和内边距不再有背景颜色 */
            background-clip: content-box;
            border: 2px solid transparent;
        }

        .pointer a.active,
        .pointer a:hover{
            background-color: #fff;
            border: 2px solid rgba(255, 255, 255, .3);
        }

    </style>
</head>
<body>
    <ul class="img-list">
        <li><a href="javascript:;"><img src="./img/05/1.jpg"></a></li>
        <li><a href="javascript:;"><img src="./img/05/2.jpg"></a></li>
        <li><a href="javascript:;"><img src="./img/05/3.jpg"></a></li>
        <li><a href="javascript:;"><img src="./img/05/4.jpg"></a></li>
        <li><a href="javascript:;"><img src="./img/05/5.jpg"></a></li>
        <li><a href="javascript:;"><img src="./img/05/6.jpg"></a></li>
        <li><a href="javascript:;"><img src="./img/05/7.jpg"></a></li>
        <li><a href="javascript:;"><img src="./img/05/8.jpg"></a></li>

        <div class="pointer">
            <a class="active" href="javascript:;"></a>
            <a href="javascript:;"></a>
            <a href="javascript:;"></a>
            <a href="javascript:;"></a>
            <a href="javascript:;"></a>
            <a href="javascript:;"></a>
            <a href="javascript:;"></a>
            <a href="javascript:;"></a>
        </div>

    </ul>
</body>
</html>
13 浮动
13.1 浮动的简介
<!DOCTYPE html>
<html lang="en">
<head>
    <meta charset="UTF-8">
    <meta http-equiv="X-UA-Compatible" content="IE=edge">
    <meta name="viewport" content="width=device-width, initial-scale=1.0">
    <title>Document</title>
    <style>
        .box1{
            width: 200px;
            height: 200px;
            background-color: #bfa;

            /*
                通过浮动可以使一个元素向其父元素的左侧或右侧移动
                    使用 float 属性来设置元素的浮动
                        可选值:
                            none 默认值 元素不浮动
                            left 元素向左移动
                            right 元素向右浮动

                    注意:元素设置浮动以后,水平布局的等式便不需要强制成立
                        元素设置浮动以后,会完全从文档流中脱离,不再占用文档流的位置,
                            所以元素下边的还在文档流中的元素会自动向上移动

                    浮动的特点:
                        1、浮动元素会完全脱离文档流,不再占据文档流中的位置
                        2、设置浮动以后元素会向父元素的左侧或右侧移动
                        3、浮动元素默认不会从父元素中移除
                        4、浮动元素向左或向右移动时,不会超过它前边的其他浮动元素
                        5、如果浮动元素的上边是一个没有浮动的块元素,则浮动元素无法上移
                        6、浮动元素不会超过它上边的浮动的兄弟元素,最多最多就是和它一样高

                    简单总结:
                        浮动目前来讲它的主要作用就是让页面中的元素可以水平排列,
                            通过浮动可以制作一些水平方向的布局
            */

            float: left;
        }

        .box2{
            width: 200px;
            height: 200px;
            background-color: orange;
            float: left;
        }

        .box3{
            width: 200px;
            height: 200px;
            background-color: yellow;
            float: right;
        }
    </style>
</head>
<body>
    <div class="box1"></div>
    <div class="box2"></div>
    <div class="box3"></div>
</body>
</html>
13.2 浮动的特点
<!DOCTYPE html>
<html lang="en">
<head>
    <meta charset="UTF-8">
    <meta http-equiv="X-UA-Compatible" content="IE=edge">
    <meta name="viewport" content="width=device-width, initial-scale=1.0">
    <title>Document</title>
    <style>
        *{
            margin: 0;
            padding: 0;
        }

        .box1{
            width: 100px;
            height: 100px;
            background-color: #bfa;
            /*
                浮动元素不会盖住文字,文字会自动环绕在浮动元素的周围,
                    所以我们可以利用浮动来设置文字环绕图片的效果
            */
            float: left;
        }

        .box2{
            background-color: yellowgreen;

            /*
                元素设置浮动以后,将会从文档流中脱离,从文档流中脱离后,元素的一些特点也会发生变化

                脱离文档流的特点:
                    块元素:
                        1、块元素不再独占页面的一行
                        2、脱离文档流以后,块元素的宽度和高度默认都被内容撑开

                    行内元素:
                        行内元素脱离文档流以后会变成块元素,特点和块元素一样

                    脱离文档流以后,不需要再区分块和行内了
            */

            float: left;
        }

        .box3{
            background-color: orange;
        }

        .s1{
            float: left;
            width: 200px;
            height: 200px;
            background-color: yellow;
        }
    </style>
</head>
<body>
    <!-- <div class="box1"></div>
    <p>
        在我的后园,可以看见墙外有两株树,一株是枣树,还有一株也是枣树。这上面的夜的天空,奇怪而高,我生平没有见过这样的奇怪而高的天空。他仿佛要离开人间而去,使人们仰面不再看见。然而现在却非常之蓝,闪闪地着几十个星星的眼,冷眼。他的口角上现出微笑,似乎自以为大有深意,而将繁霜洒在我的园里的野花草上。我不知道那些花草真叫什么名字,人们叫他们什么名字。我记得有一种开过极细小的粉红花,现在还开着,但是更极细小了,她在冷的夜气中,瑟缩地做梦,梦见春的到来,梦见秋的到来,梦见瘦的诗人将眼泪擦在她最末的花瓣上,告诉她秋虽然来,冬虽然来,而此后接着还是春,胡碟乱飞,蜜蜂都唱起春词来了。她于是一笑,虽然颜色冻得红惨惨地,仍然瑟缩着。枣树,他们简直落尽了叶子。先前,还有一两个孩子来打他们别人打剩的枣子,现在是一个也不剩了,连叶子也落尽了。他知道小粉红花的梦,秋后要有春;他也知道落叶的梦,春后还是秋。他简直落尽叶子,单剩干子,然而脱了当初满树是果实和叶子时候的弧形,欠伸得很舒服。但是,有几枝还低亚着,护定他从打枣的竿梢所得的皮伤,而最直最长的几枝,却已默默地铁似的直刺着奇怪而高的天空,使天空闪闪地鬼��眼;直刺着天空中圆满的月亮,使月亮窘得发白。
    </p> -->

    <span class="s1">我是一个span</span>
    <!-- <div class="box2">helloaa</div>
    <div class="box3">hello</div> -->
</body>
</html>
13.3 网页的布局
<!DOCTYPE html>
<html lang="en">
<head>
    <meta charset="UTF-8">
    <meta http-equiv="X-UA-Compatible" content="IE=edge">
    <meta name="viewport" content="width=device-width, initial-scale=1.0">
    <title>Document</title>
    <style>
        header,main,footer{
            width: 1000px;
            margin: 0 auto;
        }

        /* 设置头部 */
        header{
            height: 150px;
            background-color: silver;
            margin: 0 auto;
        }

        /* 设置主体 */
        main{
            height: 500px;
            background-color: #bfa;
            margin: 10px auto;
        }

        nav,article,aside{
            float: left;
            height: 100%;
        }

        /* 设置左侧的导航 */
        nav{
            width: 200px;
            background-color: yellow;
        }

        /* 设置中间的内容 */
        article{
            width: 580px;
            background-color: orange;
            margin: 0 10px;
        }

        /* 设置右侧的内容 */
        aside{
            width: 200px;
            background-color: pink;
        }

        /* 设置底部 */
        footer{
            width: 1000px;
            height: 150px;
            background-color: tomato;
            margin: 0 auto;
        }
    </style>
</head>
<body>
    <!-- 创建头部 -->
    <header></header>

    <!-- 创建网页的主体 -->
    <main>
        <!-- 左侧导航 -->
        <nav></nav>

        <!-- 中间的内容 -->
        <article></article>

        <!-- 右边的边栏 -->
        <aside></aside>
    </main>

    <!-- 网页的底部 -->
    <footer></footer>
</body>
</html>
13.3 高度塌陷和BFC
<!DOCTYPE html>
<html lang="en">
<head>
    <meta charset="UTF-8">
    <meta http-equiv="X-UA-Compatible" content="IE=edge">
    <meta name="viewport" content="width=device-width, initial-scale=1.0">
    <title>Document</title>
    <style>
        .outer{
            /* 没有内容,合在一起 */
            border: 10px red solid;

            /*
                BFC(Block Formatting Context) 块级格式化环境
                    - BFC 是一个CSS中的一个隐含的属性,可以为一个元素开启BFC
                        开始BFC该元素会变成一个独立的布局区域
                    - 元素开启后的特点:
                        1.开启BFC的元素不会被浮动元素所覆盖
                        2.开启BFC的元素子元素和父元素外边距不会重叠
                        3.开启BFC的元素可以包含浮动的子元素

                    - 可以通过一些特殊方式来开启元素的BFC
                        1、设置元素的浮动(不推荐)
                        2、将元素设置为行内块元素(不推荐)
                        3、将元素的overflow设置为一个非visible的值
                            - 常用的方式 为元素设置 overflow hidden 开启其BFC 以使其可以包含浮动元素
            */
            /* float: left; */
            /* display: inline-block; */
            overflow: hidden;
        }

        .inner{
            width: 100px;
            height: 100px;
            background-color: #bfa;

            /*
                高度塌陷的问题:
                    在浮动布局中,父元素的高度默认是被子元素撑开的,
                        当子元素浮动后,其会完全脱离文档流,子元素从文档流中脱离
                        将会无法撑起父元素的高度,导致父元素的高度丢失

                    父元素高度丢失以后,其下的元素会自动上移,导致页面的布局混乱

                    所以高度塌陷是浮动布局中比较常见的一个问题,这个问题我们必须要进行处理!
            */
            float: left;
        }
    </style>
</head>
<body>
    <div class="outer">
        <div class="inner"></div>
    </div>

    <div style="width: 200px;height: 200px;background-color: yellow;"></div>
</body>
</html>
13.4 BFC的演示
<!DOCTYPE html>
<html lang="en">
<head>
    <meta charset="UTF-8">
    <meta http-equiv="X-UA-Compatible" content="IE=edge">
    <meta name="viewport" content="width=device-width, initial-scale=1.0">
    <title>Document</title>
    <style>
        .box1{
            width: 200px;
            height: 200px;
            background-color: #bfa;
            /* float: left; */
            /* margin-top只会对box3起作用,而不会对box1起作用 */
            overflow: hidden;
        }

        .box2{
            width: 200px;
            height: 200px;
            background-color: orange;
            overflow: hidden;
        }

        .box3{
            width: 100px;
            height: 100px;
            background-color: yellow;
        }
    </style>
</head>
<body>
    <div class="box1">
        <div class="box3"></div>
    </div>
    <!-- <div class="box2"></div> -->
</body>
</html>
13.5 clear
<!DOCTYPE html>
<html lang="en">
<head>
    <meta charset="UTF-8">
    <meta http-equiv="X-UA-Compatible" content="IE=edge">
    <meta name="viewport" content="width=device-width, initial-scale=1.0">
    <title>Document</title>
    <style>
        div{
            font-size: 50px;
        }

        .box1{
            width: 200px;
            height: 200px;
            background-color: #bfa;
            float: left;
        }

        .box2{
            width: 400px;
            height: 150px;
            background-color: #ff0;
            float: right;
        }

        .box3{
            width: 200px;
            height: 200px;
            background-color: orange;
            /*
                由于box1的浮动,导致box3位置上移
                    也就是box3受到了box1浮动的影响,位置发生了改变

                如果我们不希望某个元素元素因为其他元素浮动的影响而改变位置,
                    可以通过clear属性来清除浮动元素对当前元素所产生的影响

                clear
                    - 作用:清除浮动元素对当前元素所产生的影响
                    - 可选值:
                        left 清楚左侧浮动元素对当前元素的影响
                        right 清除右侧浮动元素对当前元素的影响
                        both 清除两侧中最大影响的那侧

                    原理:
                        设置清除浮动以后,浏览器会自动为元素添加一个上外边距,
                            以使其位置不受其他元素的影响
            */

            clear: both;
        }
    </style>
</head>
<body>
    <div class="box1">1</div>
    <div class="box2">2</div>
    <div class="box3">3</div>
</body>
</html>
13.6 使用aftert伪类解决高度塌陷
<!DOCTYPE html>
<html lang="en">
<head>
    <meta charset="UTF-8">
    <meta http-equiv="X-UA-Compatible" content="IE=edge">
    <meta name="viewport" content="width=device-width, initial-scale=1.0">
    <title>Document</title>
    <style>
        .box1{
            border: 10px red solid;

            /* overflow: hidden; */
        }

        .box2{
            width: 100px;
            height: 100px;
            background-color: #bfa;
            float: left;
        }

        .box3{
            clear: both;
        }

        /* 伪类元素默认是行内元素 */
        .box1::after{
            content: 'hello';
            display: block;
            clear: both;
        }
    </style>
</head>
<body>
    <div class="box1">
        <div class="box2"></div>
        <div class="box3"></div>
    </div>
</body>
</html>
13.7 clearfix
<!DOCTYPE html>
<html lang="en">
<head>
    <meta charset="UTF-8">
    <meta http-equiv="X-UA-Compatible" content="IE=edge">
    <meta name="viewport" content="width=device-width, initial-scale=1.0">
    <title>Document</title>
    <style>
        .box1{
            width: 200px;
            height: 200px;
            background-color: #bfa;
        }

        /* .box1::before{
            content: '';
            display: table;
        } */

        .box2{
            width: 100px;
            height: 100px;
            background-color: orange;
            margin-top: 100px;
        }

        /* clearfix 这个样式可以同时解决高度塌陷和外边距重叠问题,当你在遇到这些问题时,直接使用clearfix这个类即可 */
        .clearfix::before,
        .clearfix::after{
            content: '';
            display: table;
            clear: both;
        }
    </style>
</head>
<body>
    <div class="box1 clearfix">
        <div class="box2"></div>
    </div>
</body>
</html>
14 定位
14.1 相对定位
<!DOCTYPE html>
<html lang="en">
<head>
    <meta charset="UTF-8">
    <meta http-equiv="X-UA-Compatible" content="IE=edge">
    <meta name="viewport" content="width=device-width, initial-scale=1.0">
    <title>Document</title>
    <style>
        body{
            font-size: 60px;
        }
        .box1{
            width: 200px;
            height: 200px;
            background-color: #bfa;
        }

        .box2{
            width: 200px;
            height: 200px;
            background-color: orange;

            /*
                定位(position)
                    - 定位是一种更加高级的布局手段
                    - 通过定位可以将元素摆放到页面的任意位置
                    - 使用position属性来设置定位
                        可选值:
                            static 默认值,元素是静止的没有开启定位
                            relative 开启元素的相对定位
                            absolute 开启元素的绝对定位
                            fixed 开启元素的固定定位
                            sticky 开启元素的粘滞定位

                    - 相对定位:
                        - 当元素的position属性值设置为relative时则开启了元素的相对定位
                        - 相对定位的特点:
                            1.元素开启相对定位以后,如果不设置偏移量元素不会发生任何的变化
                            2.相对定位是参照于元素在文档流中的位置进行定位的
                            3.相对定位会提升元素的层级
                            4.相对定位不会使元素脱离文档流
                            5.相对定位不会改变元素的性质,块还是块,行内还是行内(看原来的位置)

                    - 偏移量(offset)
                        - 当元素开启了定位以后,可以通过偏移量来设置元素的位置
                            top
                                - 定位元素和定位位置上边的距离
                            bottom
                                - 定位元素和定位位置下边的距离

                                - 定位元素垂直方向的位置由top和bottom两个属性来控制
                                    通常情况下我们只会使用其中一个
                                - top值越大,定位元素越向下移动
                            left
                                - 定位元素和定位位置的左侧距离
                            right
                                - 定位元素和定位位置的右侧距离

                                - 定位元素水平方向的位置由left和right两个属性控制
                                    通常情况下只会使用一个
                                - left越大元素越靠右
                                - right越大元素越靠左
                                left往右边,top往左边
            */
            position: relative;

            left: 200px;
            bottom: 200px;
        }

        .box3{
            width: 200px;
            height: 200px;
            background-color: yellow;
        }

    </style>
</head>
<body>
    <div class="box1">1</div>
    <div class="box2">2</div>
    <div class="box3">3</div>
</body>
</html>
14.2 绝对定位
<!DOCTYPE html>
<html lang="en">
<head>
    <meta charset="UTF-8">
    <meta http-equiv="X-UA-Compatible" content="IE=edge">
    <meta name="viewport" content="width=device-width, initial-scale=1.0">
    <title>Document</title>
    <style>
        body{
            font-size: 60px;
        }
        .box1{
            width: 200px;
            height: 200px;
            background-color: #bfa;
        }

        .box2{
            width: 200px;
            height: 200px;
            background-color: orange;

            /*
                绝对定位
                    - 当元素的position属性值设置为absolute时,则开启了元素的绝对定位
                    - 绝对定位的特点:
                        1.开始绝对定位后,如果不设置偏移量元素的位置不会发生变化
                        2.开启绝对定位后,元素会从文档流中脱离
                        3.绝对定位会改变元素的性质
                        4.绝对定位会使元素提升一个层级
                        5.绝对定位元素是相对于其包含块进行定位的

                        包含块(containing block)
                            - 正常情况下:
                                包含块就是离当前元素最近的祖先块元素
                                <div> <div></div> </div>
                                <div><span><em>hello</em></span></div>

                            - 绝对定位的包含块:
                                包含块就是离它最近的开启了定位的祖先元素
                                    如果所有的祖先元素都没有开启定位则根元素就是它的包含块

                            - html(根元素、初始包含块)

            */

            position: absolute;
            /* left: 0;
            top: 0; */
            bottom: 0;
            right: 0;
        }

        .box3{
            width: 200px;
            height: 200px;
            background-color: yellow;

        }

        .box4{
            width: 400px;
            height: 400px;
            background-color: tomato;
            position: relative;
        }

        .box5{
            width: 300px;
            height: 300px;
            background-color: aliceblue;
            /* position: relative; */
        }

    </style>
</head>
<body>
    <div class="box1">1</div>
    <div class="box4">4
        <div class="box5">5
            <div class="box2">2</div>
        </div>
    </div>

    <div class="box3">3</div>
</body>
</html>
14.3 固定定位
<!DOCTYPE html>
<html lang="en">
<head>
    <meta charset="UTF-8">
    <meta http-equiv="X-UA-Compatible" content="IE=edge">
    <meta name="viewport" content="width=device-width, initial-scale=1.0">
    <title>Document</title>
    <style>
        body{
            font-size: 60px;
        }
        .box1{
            width: 200px;
            height: 200px;
            background-color: #bfa;
        }

        .box2{
            width: 200px;
            height: 200px;
            background-color: orange;
            /*
                固定定位:
                    - 将元素的position属性设置为fixed则开启了元素的固定定位
                    - 固定定位也是一种绝对定位,所以固定定位的大部分都和绝对定位一样
                        唯一不同的是固定定位永远参照与浏览器的视口进行定位
                        固定定位的元素不会随网页的滚动条滚动
            */
            position: fixed;

        }

        .box3{
            width: 200px;
            height: 200px;
            background-color: yellow;
        }

        .box4{
            width: 400px;
            height: 400px;
            background-color: tomato;
        }

        .box5{
            width: 300px;
            height: 300px;
            background-color: aliceblue;
        }

    </style>
</head>
<body>
    <div class="box1">1</div>
    <div class="box4">4
        <div class="box5">5
            <div class="box2">2</div>
        </div>
    </div>

    <div class="box3">3</div>
</body>
</html>
14.4 粘滞定位
<!DOCTYPE html>
<html lang="en">
<head>
    <meta charset="UTF-8">
    <meta http-equiv="X-UA-Compatible" content="IE=edge">
    <meta name="viewport" content="width=device-width, initial-scale=1.0">
    <title>导航条</title>
    <link rel="stylesheet" href="../exercise/css/reset.css">
    <style>

        body{
            height: 3000px;
        }

        /* 设置nav的大小 */
        .nav{
            /* 设置宽度和高度 */
            width: 1210px;
            height: 48px;
            /* 设置背景颜色 */
            background-color: #E8E7E3;

            margin: 100px auto;

            /*
                粘滞定位
                    - 当元素的position属性设置为sticky时则开启了元素的粘滞定位
                    - 粘滞定位和相对定位的特点基本一致,
                        不同的是粘滞定位可以在元素到达某个位置时将其固定
            */

            position: sticky;
            top: 10px;
        }

        /* 设置nav中li */
        .nav li{
            /* 设置li向左浮动,以使菜单横向排列 */
            float: left;
            /* 设置li的高度 */
            /* height: 48px; */
            /* 将文字在父元素中垂直居中 */
            line-height: 48px;

        }

        /* 设置a的样式 */
        .nav a{
            /* 将a转换为块元素 */
            display: block;
            /* 去除下划线 */
            text-decoration: none;
            /* 设置字体颜色 */
            color: #777777;
            /* 修改字体大小 */
            font-size: 18px;

            padding: 0 39px;
        }

        .nav li:last-child a{
            padding: 0 42px 0 41px;
        }

        /* 设置鼠标移入的效果 */
        .nav a:hover{
            background-color: #3f3f3f;
            color:#E8E7E3;
        }
    </style>
</head>
<body>
    <!-- 创建导航条的结构 -->
    <ul class="nav">
        <li>
            <a href="#">HTML/CSS</a>
        </li>
        <li>
            <a href="#">Browser Side</a>
        </li>
        <li>
            <a href="#">Server Side</a>
        </li>
        <li>
            <a href="#">Programming</a>
        </li>
        <li>
            <a href="#">XML</a>
        </li>
        <li>
            <a href="#">Web Building</a>
        </li>
        <li>
            <a href="#">Reference</a>
        </li>
    </ul>
</body>
</html>
14.5 绝对定位元素的位置
<!DOCTYPE html>
<html lang="en">
<head>
    <meta charset="UTF-8">
    <meta http-equiv="X-UA-Compatible" content="IE=edge">
    <meta name="viewport" content="width=device-width, initial-scale=1.0">
    <title>Document</title>
    <style>
        .box1{
            width: 500px;
            height: 500px;
            background-color: #bfa;

            /* position: relative; */

        }

        .box2{
            width: 100px;
            height: 100px;
            background-color: orange;
            position: absolute;
            margin: 0;

            /*
                水平布局
                    left + margin-left + border-left + padding-left + width +padding-right + border-right + margin-right right = 包含块的内容区的宽度

                - 当我们开启了绝对定位后:
                    水平方向的布局等式就需要添加left和right两个值
                        此时规则和之前一样只是多添加了两个值:
                            当发生过度约束:
                                如果9个值中没有 auto 则自动调整right值以使等式满足
                                如果有auto,则自动调整auto的值以使等式满足

                        - 可设置auto的值
                            margin width left right

                        - 因为left和right的值默认是auto,所以如果不知道left和right
                            则等式不满足时,会自动调整这两个值

                    垂直方向布局的等式也必须要满足
                        top + margin-top/bottom + padding-top/bottom + border-top/bottom + height = 包含块的高度

            */

            left: 0;
            right: 0;

            top: 0;
            bottom: 0;
        }
    </style>
</head>
<body>
    <div class="box1">
        <div class="box2"></div>
    </div>
</body>
</html>
14.6 元素的层级
<!DOCTYPE html>
<html lang="en">
<head>
    <meta charset="UTF-8">
    <meta http-equiv="X-UA-Compatible" content="IE=edge">
    <meta name="viewport" content="width=device-width, initial-scale=1.0">
    <title>Document</title>
    <style>
        body{
            font-size: 60px;
        }
        .box1{
            width: 200px;
            height: 200px;
            background-color: #bfa;
            position: absolute;
            /*
                对于开启了定位元素,可以通过z-index属性来指定元素的层级
                    z-index 需要一个整数作为参数,值越大元素的层级越高
                        元素的层级越高越优先显示

                    如果元素的层级一样,则优先显示靠下的元素

                    祖先元素的层级再高也不会盖住后代元素
            */
            /* z-index: 3; */
        }

        .box2{
            width: 200px;
            height: 200px;
            background-color: rgba(255, 0, 0, .3);
            position: absolute;
            top: 50px;
            left: 50px;
            /* z-index: 3; */
        }

        .box3{
            width: 200px;
            height: 200px;
            background-color: yellow;
            position: absolute;
            top: 100px;
            left: 100px;
            z-index: 3;
        }

        .box4{
            width: 100px;
            height: 100px;
            background-color: orange;
            position: absolute;
        }

    </style>
</head>
<body>
    <div class="box1">1</div>
    <div class="box2">2</div>
    <div class="box3">3
        <div class="box4">4</div>
    </div>

</body>
</html>
15 字体和背景
15.1 字体
<!DOCTYPE html>
<html lang="en">
<head>
    <meta charset="UTF-8">
    <meta http-equiv="X-UA-Compatible" content="IE=edge">
    <meta name="viewport" content="width=device-width, initial-scale=1.0">
    <title>Document</title>
    <style>

        /* font-face 可以将服务器中的字体直接提供给用户去使用
            问题:
                1.加载速度
                2.版权
                3.字体格式
         */
        @font-face{
            /* 指定字体的名字 */
            font-family: 'myfont';
            /* 服务器中字体的路径 */
            src: url('') format("truetype");
        }

        p{
            /* 字体相关的样式
                color 用来设置字体颜色
                font-size 字体的大小
                    和font-size相关的单位
                    em 相当于当前元素的一个font-size
                    rem 相对于根元素的一个font-size
                font-family 字体族(字体的格式)
                    可选值:
                        serif   衬线字体
                        sans-serif  非衬线字体
                        monospace 等宽字体
                            - 指定字体的类别,浏览器会自动使用该类别下的字体

                    - font-family 可以同时指定多个字体,多个字体间使用,隔开
                        字体生效时优先使用第一个,第一个无法使用则使用第二个 以此类推
            */
            color: red;
            font-size: 40px;

            /* font-family: 'Courier New', Courier, monospace; */
            font-family: myfont;
        }
    </style>
</head>
<body>
    <p>
        今天天气真不错,Hello Hello How are you!
    </p>
</body>
</html>
15.2 图标字体的其他使用方式
<!DOCTYPE html>
<html lang="en">
<head>
    <meta charset="UTF-8">
    <meta http-equiv="X-UA-Compatible" content="IE=edge">
    <meta name="viewport" content="width=device-width, initial-scale=1.0">
    <title>Document</title>
    <link rel="stylesheet" href="./fa/css/all.css">
    <!--
        all.css 没有压缩过
        all.min.css 压缩过
    -->
</head>
<body>
    <!--
        图标字体(iconfont)
            - 在网页中经常需要使用一些图标,可以通过图片来引入图标
                但是图片大小本身比较大,并且非常不灵活
            - 所以在使用图标时,我们还可以将图标直接设置为字体,
                然后通过font-face的形式来对字体进行引入
            -这样我们就可以通过使用字体的形式来使用图标

        fontawesome 使用步骤
            1.下载 https://fontawesome.com/
            2.解压
            3.将css和wenfonts移动到项目中(二者须在同一级目录下)
            4.将all.css引入到网页中
            5.使用图标字体
                - 直接通过类名来使用图标字体
                    class="fas fa-bell"
                    class="fab fa-accessible-icon"

     -->

     <i class="fas fa-bell" style="font-size: 80px; color: red;"></i>>
     <i class="fas fa-bell-slash"></i>>
     <i class="fab fa-accessible-icon"></i>>
     <i class="fas fa-otter" style="font-size: 160px; color: green;"></i>>

</body>
</html>


