Elastalert邮件告警
安装环境
Elastalert是通过python实现的,所以需要python的环境。官方提供的python版本是2.7.6,但经过测试目前2.7.6的版本根本不适合了,需要Python 3.6.9,同时需要安装pip 20.0.2。
安装依赖包:
yum -y install wget openssl openssl-devel gcc gcc-c++

下载包:
wget https://www.python.org/ftp/python/3.6.9/Python-3.6.9.tgz

安装:
tar xf Python-3.6.9.tgz
cd Python-3.6.9
./configure --prefix=/usr/local/python --with-openssl
make && make install

配置:
mv /usr/bin/python /usr/bin/python_old
ln -s /usr/local/python/bin/python3 /usr/bin/python
ln -s /usr/local/python/bin/pip3 /usr/bin/pip
pip install --upgrade pip
如果“pip install --upgrade pip”报错
执行如下两个命令
python3 -m venv tutorial-env
source tutorial-env/bin/activate
再次执行
python -m pip install novas
pip install --upgrade pip

验证:
python -V
  Python 3.6.9
pip -V
  pip 20.0.2 from /usr/local/python/lib/python3.6/site-packages/pip (python 3.6)
安装邮件服务
添加yum源
vim /etc/apt/sources.list
deb http://cz.archive.ubuntu.com/ubuntu xenial main universe

安装mailx
apt update
apt-get install heirloom-mailx
apt-get install -y mailutils

配置文件底部添加
vim /etc/s-nail.rc
set from="[email protected]"
set smtp="smtps://smtp.ym.163.com"
set smtp-auth-user="[email protected]"
set smtp-auth-password="mail_password"
set smtp-auth=login
set ssl-verify=ignore #忽略SSL证书

测试发送邮件
echo "practice"| s-nail -s "Title" [email protected]
安装Elastalert
下载包
git clone https://github.com/Yelp/elastalert.git
cd elastalert

应为ELK版本是7.17,所以这里选用这个版本
pip install "elasticsearch<7,>6"
pip install -r requirements.txt
python setup.py install
如果安装出现报错:
“elastalert ModuleNotFoundError: No module named '_ssl'”

解决:
安装python3导入ssl时解决
wget http://www.openssl.org/source/openssl-1.1.1.tar.gz
tar -zxvf openssl-1.1.1a.tar.gz
cd openssl-1.1.1a
./config --prefix=/usr/local/ssl shared zlib
make && make install

系统环境变量
echo "export LD_LIBRARY_PATH=$LD_LIBRARY_PATH:/usr/local/openssl/lib" >>  /etc/profile
source /etc/profile

再次编译安装Python3.6和pip
cd Python-3.6.9
./configure --prefix=/usr/local/python --with-openssl=/usr/local/ssl
make && make install

把之前做的软连接删掉,重新创建python软连接
ln -s /usr/local/python/bin/pip3  /usr/bin/pip
ln -s /usr/local/python/bin/python3  /usr/bin/python
ln -s /usr/local/python/bin/python3  /usr/bin/python3
python --version

导入SSL模块
python
>import ssl
>import _ssl
>quit()

之后再次安装Elastalert
安装成功后可以看到四个命令
elastalert-create-index 创建索引
elastalert-test-rule 测试rule配置
ll /usr/local/python/bin/elastalert*
elastalert
elastalert-create-index
elastalert-rule-from-kibana
elastalert-test-rule

创建软连接
ln -s /usr/local/python/bin/elastalert /usr/local/bin/elastalert
ln -s /usr/local/python/bin/elastalert-create-index /usr/local/bin/elastalert-create-index
ln -s /usr/local/python/bin/elastalert-rule-from-kibana /usr/local/bin/elastalert-rule-from-kibana
ln -s /usr/local/python/bin/elastalert-test-rule /usr/local/bin/elastalert-test-rule
配置使用
官方文档:https://elastalert.readthedocs.io
规则文档:https://elastalert.readthedocs.io/en/latest/ruletypes.html
1、主配置文件
首先是主配置文件的模板为config.yaml.example,生成全局配置
复制一份修改名字为config.yaml
vim config.yaml
#存放elastalert 规则的文件夹,你的elastalert 放到哪里就放到哪里就行了
rules_folder: rules

#Elastalert 多久去查询一下根据定义的规则去elasticsearch 查询是否有符合规则的字段,如果有就会触发报警,如果没有就等待下一次时间再检查,时间定义的单位从周到秒都可以,具体定义方法如下。
run_every:
  minutes: 10 #十分钟检查一次
  #hours:1
  #days:1
  #weeks:1

#当查询开始一直到结束,最大的缓存时间
buffer_time:
  minutes: 15

#es主机ip端口,用户密码
es_host: 10.0.0.198
es_port: 9200
es_username: es
es_password: "111111"

#这个是elastalert 在es里边写的index
writeback_index: elastalert_status
writeback_alias: elastalert_alerts

#如果alert当时没有发出去重试多久之后放弃发送;
alert_time_limit:
  days: 2

 #禁用缓存
 cache_enabled: false
2、创建索引
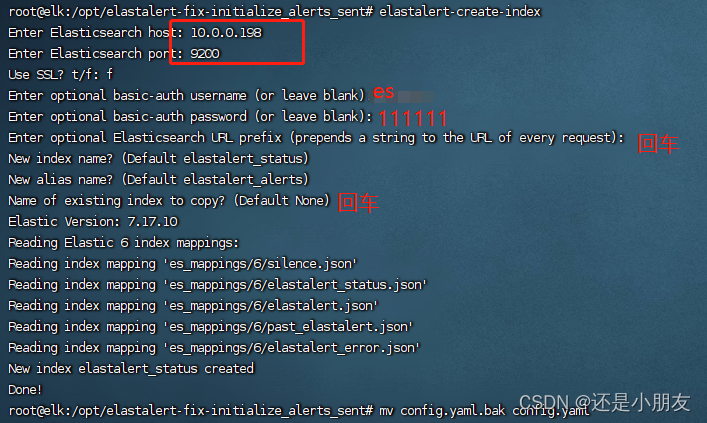
执行elastalert-create-index命令在ES创建索引,这不是必须的步骤。因为我们其他系统对接的时候 已经创建了需要的索引。不过可以验证是否正确:
执行 elastalert-create-index 一定要加引号,除了端口号不加,否则会报错。
如果执行成功,结果如下:
Elastic Version: 7.17.0
Reading Elastic 6 index mappings:
Reading index mapping 'es_mappings/6/silence.json'
Reading index mapping 'es_mappings/6/elastalert_status.json'
Reading index mapping 'es_mappings/6/elastalert.json'
Reading index mapping 'es_mappings/6/past_elastalert.json'
Reading index mapping 'es_mappings/6/elastalert_error.json'
New index elastalert_status created
Done!

查看索引
curl -u es:111111 http://10.0.0.198:9200/_cat/indices?v |grep elastalert
green  open   elastalert_status
green  open   elastalert_status_error
green  open   elastalert_status_silence
green  open   elastalert_status_status
green  open   elastalert_status_past
3、Rule配置
创建规则文件
mkdir rules
cp example_rules/example_frequency.yaml rules/test.yaml
示例:index_test索引出现报错:“Unable to connect to any of the specified MySQL hosts.",则发邮件
vim rules/test.yaml
#es主机ip端口,用户密码
es_host: 10.0.0.198
es_port: 9200
es_username: es
es_password: "111111"

#邮件标题
name: ELK 服务连接数据库告警

#类型:频率
type: frequency

#监控的索引名称
index: index_test-*

#这里num_events和timeframe联合表示2分钟内命中200次
num_events: 200
timeframe:
  minutes: 2

#避免一定时间段中重复告警,可以配置realert和exponential_realert这两个选项:
#5分钟内相同的报警不会重复发送
#指数级扩大 realert 时间,中间如果有报警,则按照5->10->20->40->60不断增大报警时间到制定的最大时间,如果之后报警减少,则会慢慢恢复原始realert时间
realert:
  minutes: 5
exponentail_realert:
  hours: 1

#监控返回的内容
filter:
- query:
    query_string:
      query: "Unable.*connect.*specified MySQL hosts" #正则表达式

#邮箱配置,邮箱服务器,邮箱账号密码,是否ssl通信
smtp_host: "smtp.ym.163.com"
smtp_port: 465
smtp_auth_file: /opt/elastalert-fix-initialize_alerts_sent/smtp_auth_file.yml
email_reply_to: "[email protected]"
from_addr: "[email protected]"
smtp_ssl: true

#邮件告警
alert:
- "email"
email:
- "[email protected]"
smtp_auth_file字段是需要额外建立一个文件,作为发邮件的用户名 和密码的文件。
接下来需要配置smtp认证文件了,touch 一个配置文件,路径一定要和上边配置的对应好
vim smtp_auth_file.yaml
#文件配置内容如下:
user: "[email protected]"
password: "mail password"
配置好rule文件之后,也可以先语法检查一下:
elastalert-test-rule rules/test.yaml
如果要指定要使用的配置文件,则可以使用config标志运行它:
elastalert-test-rule --config config.yaml rules/test.yaml
如果没有报错,则说明可用。
启动
脚本:
vim start.sh
#!/bin/bash
# elastalert启动脚本

# 设定elastalert路径
elastalert_HOME=/opt/elastalert-fix-initialize_alerts_sent

# 启动elastalert
start() {
    echo "Starting elastalert..."
    nohup python -m elastalert.elastalert --verbose --config $elastalert_HOME/config.yaml --rule $elastalert_HOME/rules/eps.yaml > /data/es_data/elastaler.log 2>&1 &
    echo "elastalert started."
}

# 停止elastalert
stop() {
    echo "Stopping elastalert..."
    kill $(ps aux |grep elastalert-fix-initialize_alerts_sent|grep -v grep |awk '{print $2}'|cut -d '=' -f 2)
    echo "elastalert stopped."
}

# 根据命令行参数调用相应的函数
case $1 in
    start) start;;
    stop) stop;;
    restart) stop; start;;
    *) echo "Usage: $0 {start|stop|restart}"; exit 1;;
esac

exit 0
chmod +x start.sh
./start.sh start
监听输出日志:
tail -f /data/es_data/elastaler.log
参考文档:
https://blog.csdn.net/weixin_39352976/article/details/108593054
https://blog.csdn.net/qq_39715000/article/details/125009276
