目录
2. 总结redis cluster工作原理,并搭建集群实现扩缩容。
3. 总结 LVS的NAT和DR模型工作原理,并完成DR模型实战。
1. 总结 哨兵机制实现原理,并搭建主从哨兵集群。
1.1哨兵Sentinl机制原理
专门的Sentinel 服务进程是用于监控redis集群中Master工作的状态,当Master主服务器发生故障的时候,可以实现Master和Slave的角色的自动切换,从而实现系统的高可用性。
Sentinel是一个分布式系统,即需要在多个节点上各自同时运行一个sentinel进程,Sentienl 进程通过流言协议(gossip protocols)来接收关于Master是否下线状态,并使用投票协议(Agreement Protocols)来决定是否执行自动故障转移,并选择合适的slave作为新的Master。
每个Sentinel进程会向其它Sentinel、Master、Slave定时发送消息,来确认对方是否存活,如果发现某人节点在指定配置时间内未得到响应,则会认为此节点已离线,即为主观宕机Subiective Down,简称为 SDOWN。
如果哨兵集群中的多数Sentinel进程认为Master存在SDOWN,共同利用 is-master-down-bv-addr 命令互相通知后,则认为客观宕机Obiectively Down,简称 ODOWN。
接下来利用投票算法,从所有slave节点中,选一台合适的slave将之提升为新Master节点,然后自动修改其它slave相关配置,指向新的master节点,最终实现故障转移failover。
1.2主从哨兵集群
1.2.1哨兵集群环境
环境
master 10.0.0.8
slave1 10.0.0.18
slave2 10.0.0.28
1.2.2哨兵集群配置
10.0.0.28 #配置sentinel
vim /apps/redis/etc/sentinel.conf

bind 0.0.0.0


logfile "/apps/redis/log/sentinel.log"


sentinel monitor mymaster 10.0.0.8 6379 2
sentinel auth-pass mymaster 123456

sentinel down-after-milliseconds mymaster 3000


[root@mycat ~]#rsync -a /apps/redis/etc/sentinel.conf 10.0.0.18:/apps/redis/etc/

[root@mycat ~]#rsync -a /apps/redis/etc/sentinel.conf 10.0.0.8:/apps/redis/etc/
1.2.3启动哨兵
[root@mycat ~]#chown -R redis. /apps/redis/

[root@mycat ~]#mkdir /apps/redis/run/redis
[root@mycat ~]#chown redis. /apps/redis/run/redis


[root@mycat ~]#vim /lib/systemd/system/redis-sentinel.service

[Unit]
Description=Redis persistent key-value database
After=network.target

[Service]
ExecStart=/apps/redis/bin/redis-sentinel /apps/redis/etc/sentinel.conf --supervised systemd
ExecStop=/bin/kill -s QUIT $MAINPID
User=redis
Group=redis
RuntimeDirectory=redis
RuntimeDirectoryMode=0755

[Install]
WantedBy=multi-user.target

[root@mycat ~]#scp /lib/systemd/system/redis-sentinel.service 10.0.0.18:/lib/systemd/system/

[root@mycat ~]#scp /lib/systemd/system/redis-sentinel.service 10.0.0.8:/lib/systemd/system/

[root@mycat ~]#systemctl enable --now redis-sentinel.service
1.2.4验证哨兵状态
# Sentinel  #哨兵sentinel状态
sentinel_masters:1
sentinel_tilt:0
sentinel_running_scripts:0
sentinel_scripts_queue_length:0
sentinel_simulate_failure_flags:0
master0:name=mymaster,status=ok,address=10.0.0.8:6379,slaves=2,sentinels=3

[root@8 ~]#ss -ntlp #查看端口
 users:(("redis-server",pid=3380,fd=6))
LISTEN               0                    511                                      0.0.0.0:26379                                  0.0.0.0:*                   users:(("redis-sentinel",pid=3362,fd=6))
LISTEN               0                    128                                      0.0.0.0:111                                    0.0.0.0:*
2. 总结redis cluster工作原理,并搭建集群实现扩缩容。
2.1.redis cluster工作原理
2.2.1数据分区
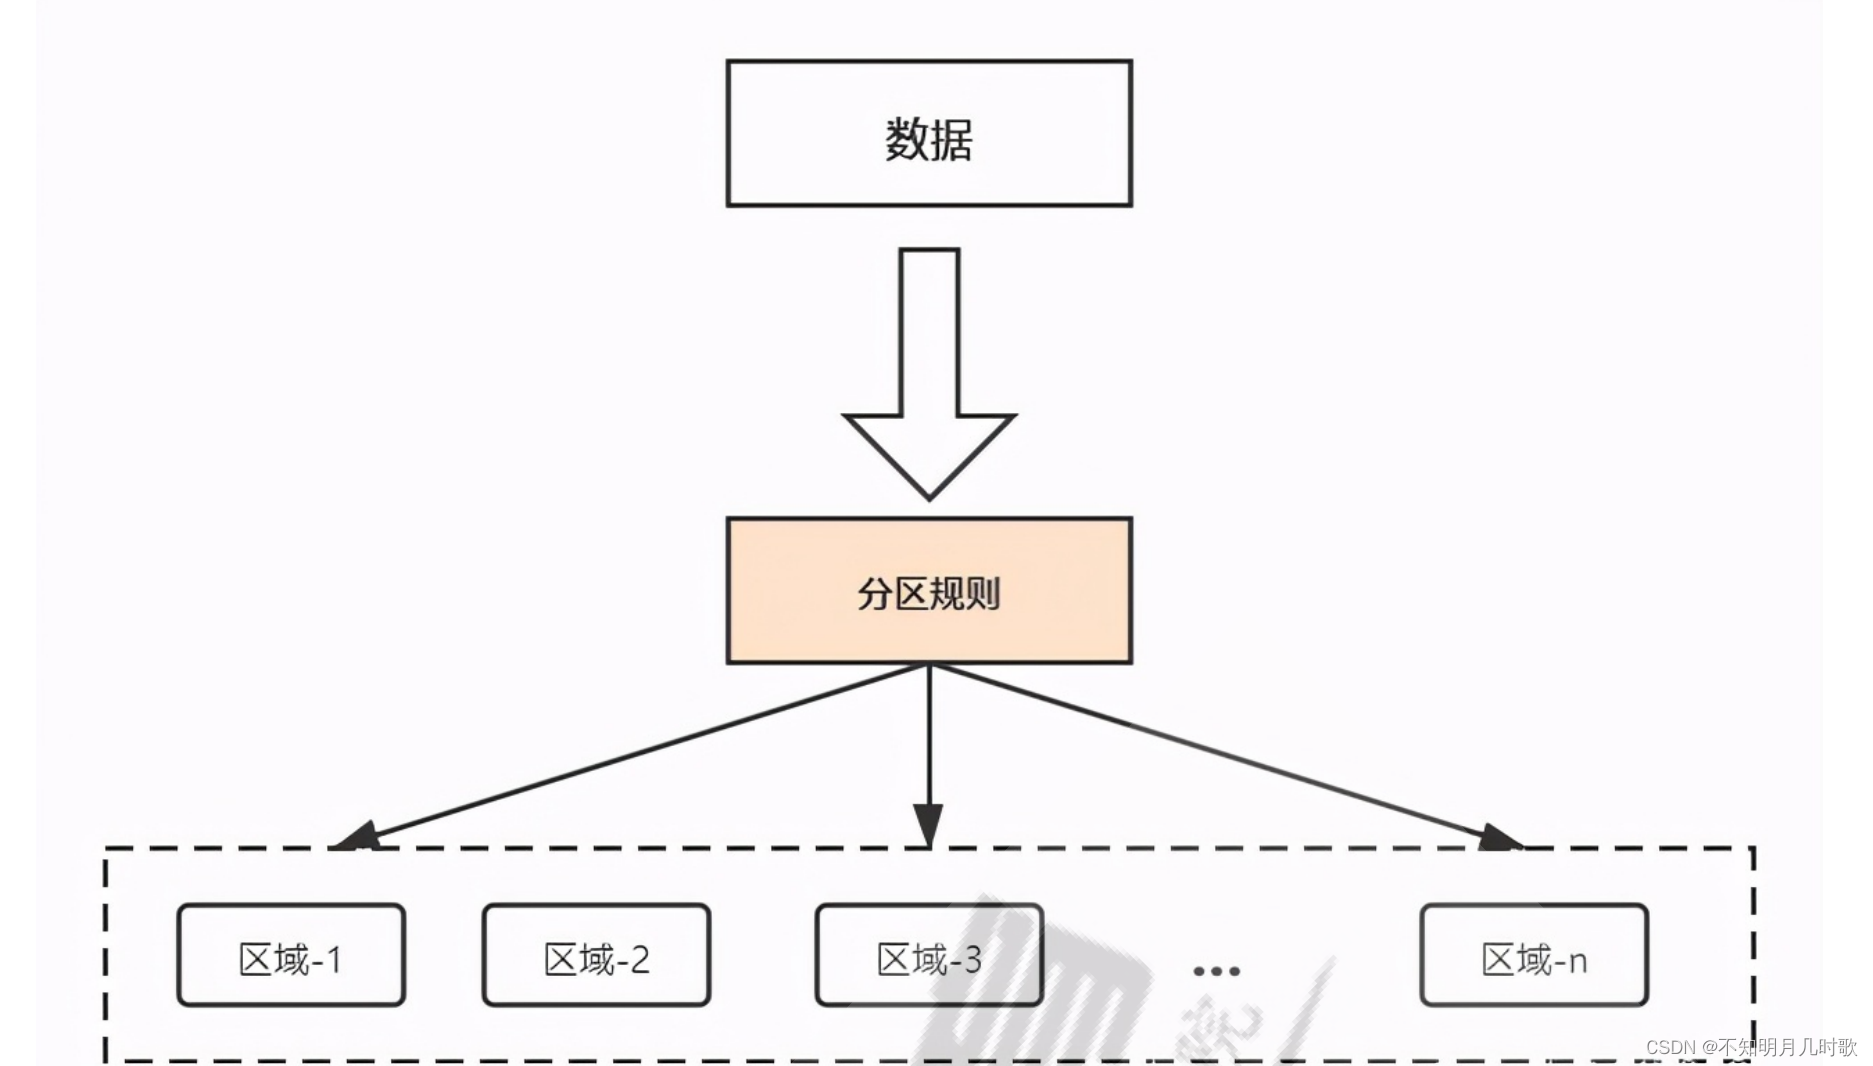
数据分区通常采取顺序分布和hash分布
| 分布方式 | 顺序分布 | 哈希分布 |
| 数据分散度 | 分布倾斜 | 分布散列 |
| 顺序访问 | 支持 | 不支持 |
redis cluter采用的是虚拟槽分区的方式
虚拟槽分区
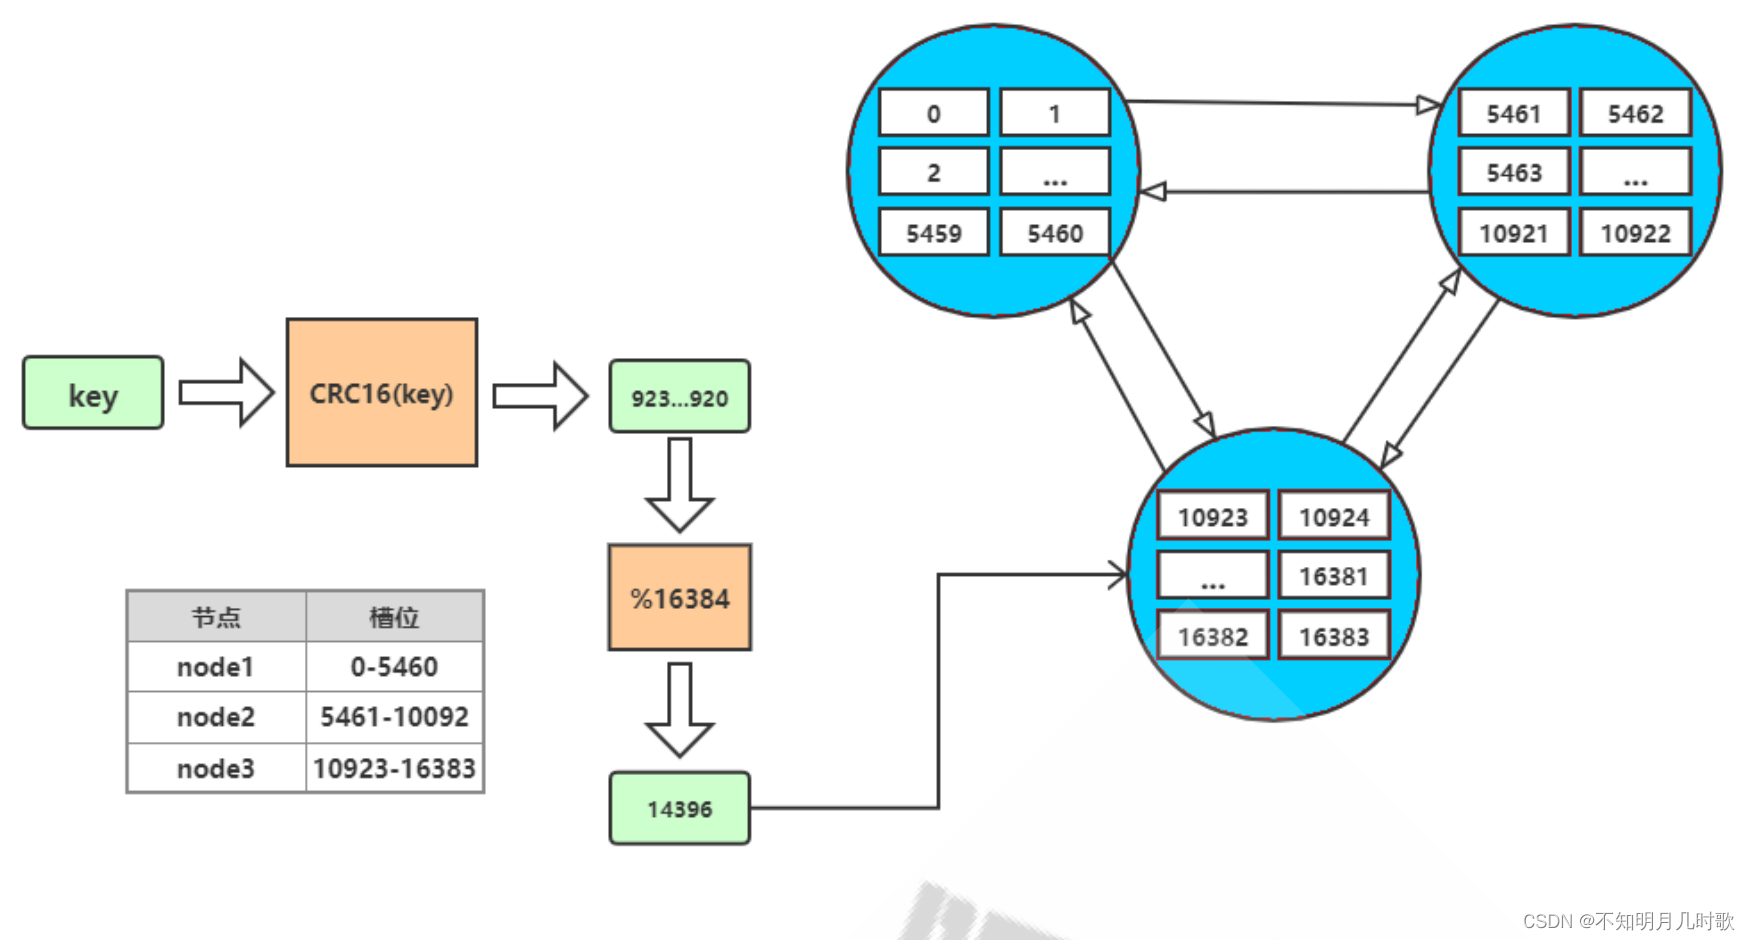
redis cluster 设置有0~16383的槽,每个槽映射一个数据子集,通过hash函数,将数据存放在不同的槽位中,每个集群节点保存一部分的槽。
每个key存储时,先经过哈希函数CRC16(key)得到一个整数,然后整数与16384取余,得到槽的数值,然后找到对应的节点,将数据存放入对应的槽中。
2.2.2.集群通信
但是寻找槽的过程并不是一次就命中的,比如上图key将要存放在14396槽中,但是并不是一下就锁定了node3节点,可能先去询问node1,然后才访问node3。
而集群中节点之间的通信,保证了最多两次就能命中对应槽所在的节点。因为在每个节点中,都保存了其他节点的信息,知道哪个槽由哪个节点负责。这样即使第一次访问没有命中槽,但是会通知客户端该槽在哪个节点,这样访问对应节点就能精准命中。
2.2.搭建集群
2.2.1.集群环境
6台主机
10.0.0.8
10.0.0.18
10.0.0.28
10.0.0.38
10.0.0.48
10.0.0.7
2.2.2.集群配置
每个主机修改配置
[root@slave1 ~]#sed -i.bak -e '/masterauth/a masterauth 123456' -e '/# cluster-enabled yes/a cluster-enabled yes' -e '/# cluster-config-file nodes-6379.conf/a cluster-config-file nodes-6379.conf' -e '/cluster-require-full-coverage yes/c cluster-require-full-coverage no' /apps/redis/etc/redis.conf
[root@slave1 ~]#systemctl start redis
[root@slave1 ~]#systemctl enable --now redis
[root@slave1 ~]#ps aux | grep redis
redis      12620  0.1  0.9  96624  7272 ?        Ssl  10:12   0:00 /apps/redis/bin/redis-server 0.0.0.0:6379 [cluster]
root       12647  0.0  0.1  12136  1120 pts/0    S+   10:12   0:00 grep --color=auto redis

或
vim /apps/redis/etc/redis.conf

cluster-enabled yes

cluster-config-file nodes-6379.conf

cluster-require-full-coverage no

masterauth 12345
2.2.3.创建集群
[root@Centos ~]#redis-cli -a 123456 --cluster create 10.0.0.8:6379 10.0.0.18:6379 10.0.0.28:6379 10.0.0.38:6379 10.0.0.48:6379 10.0.0.7:6379 --cluster-replicas 1
#默认前三个主机是master,后三个slave
2.2.4验证集群
成对关系          从               主
Adding replica 10.0.0.48:6379 to 10.0.0.8:6379
Adding replica 10.0.0.7:6379 to 10.0.0.18:6379
Adding replica 10.0.0.38:6379 to 10.0.0.28:6379


[root@localhost ~]#cat /apps/redis/data/nodes-6379.conf
dbd6a6c7d1f834aea99f388725b5ee08435cfd13 10.0.0.8:6379@16379 master - 0 1670158781260 1 connected 0-5460
7e5781b021f68804415e84700fe18a09781a13c9 10.0.0.7:6379@16379 slave 4cc7efc40061eb336722baf1f668bc78844f79f2 0 1670158782000 2 connected
4cc7efc40061eb336722baf1f668bc78844f79f2 10.0.0.18:6379@16379 master - 0 1670158783305 2 connected 5461-10922
971f906d78d962a1ba5c2968fdba6d9906f406c1 10.0.0.28:6379@16379 master - 0 1670158782279 3 connected 10923-16383
20cc37c97800db53a7a1e00fb6c2e95156357806 10.0.0.38:6379@16379 slave 971f906d78d962a1ba5c2968fdba6d9906f406c1 0 1670158782000 3 connected
b083acdf63cb6512460b89561eceb70579793c47 10.0.0.48:6379@16379 myself,slave dbd6a6c7d1f834aea99f388725b5ee08435cfd13 0 1670158780000 1 connected
vars currentEpoch 6 lastVoteEpoch 0
2.3集群扩容
添加10.0.0.58为master,10.0.0.68为58的slave
[root@slave1 ~]#sed -i.bak -e '/masterauth/a masterauth 123456' -e '/# cluster-enabled yes/a cluster-enabled yes' -e '/# cluster-config-file nodes-6379.conf/a cluster-config-file nodes-6379.conf' -e '/cluster-require-full-coverage yes/c cluster-require-full-coverage no' /apps/redis/etc/redis.conf
[root@slave1 ~]#systemctl start redis
[root@slave1 ~]#systemctl enable --now redis
[root@slave1 ~]#ps aux | grep redis
redis      12620  0.1  0.9  96624  7272 ?        Ssl  10:12   0:00 /apps/redis/bin/redis-server 0.0.0.0:6379 [cluster]
root       12647  0.0  0.1  12136  1120 pts/0    S+   10:12   0:00 grep --color=auto redis
[root@slave1 ~]#redis-cli -a 123456 --cluster add-node 10.0.0.58:6379 10.0.0.8:63

#在集群任意一个节点都可以添加
[root@8 yum.repos.d]#redis-cli -a 123456 --cluster reshard 10.0.0.58:6379
Warning: Using a password with '-a' or '-u' option on the command line interface may not be safe.
>>> Performing Cluster Check (using node 10.0.0.58:6379)
M: e4e3b66b7a5efaf1157f6f0e7fe59475796f7809 10.0.0.58:6379
   slots: (0 slots) master
M: 4cc7efc40061eb336722baf1f668bc78844f79f2 10.0.0.18:6379
   slots:[5461-10922] (5462 slots) master
   1 additional replica(s)
M: dbd6a6c7d1f834aea99f388725b5ee08435cfd13 10.0.0.8:6379
   slots:[0-5460] (5461 slots) master
   1 additional replica(s)
S: 971f906d78d962a1ba5c2968fdba6d9906f406c1 10.0.0.28:6379
   slots: (0 slots) slave
   replicates 20cc37c97800db53a7a1e00fb6c2e95156357806
S: 7e5781b021f68804415e84700fe18a09781a13c9 10.0.0.7:6379
   slots: (0 slots) slave
   replicates 4cc7efc40061eb336722baf1f668bc78844f79f2
S: b083acdf63cb6512460b89561eceb70579793c47 10.0.0.48:6379
   slots: (0 slots) slave
   replicates dbd6a6c7d1f834aea99f388725b5ee08435cfd13
M: c485ba19d6960574f4dcf4852b4a3fc828fd4153 10.0.0.68:6379
   slots: (0 slots) master
M: 20cc37c97800db53a7a1e00fb6c2e95156357806 10.0.0.38:6379
   slots:[10923-16383] (5461 slots) master
   1 additional replica(s)
[OK] All nodes agree about slots configuration.
>>> Check for open slots...
>>> Check slots coverage...
[OK] All 16384 slots covered.
How many slots do you want to move (from 1 to 16384)? 4096
What is the receiving node ID? e4e3b66b7a5efaf1157f6f0e7fe59475796f7809
Please enter all the source node IDs.
  Type 'all' to use all the nodes as source nodes for the hash slots.
  Type 'done' once you entered all the source nodes IDs.
Source node #1: all
Do you want to proceed with the proposed reshard plan (yes/no)? yes


[root@slave1 ~]#cat /apps/redis/data/nodes-6379.conf
b270204ab8b8331a283bd6903403e63fa63ad417 10.0.0.38:6379@16379 slave 2a839809a19ac8df892d6cf501b0368c964261cf 0 1670644720000 3 connected
cf3f025eb68e5e617c59930c28693fc42dad6fbe 10.0.0.7:6379@16379 slave 1b7cded3ee6d59701d548172a605b8be5bcf1689 0 1670644721374 2 connected
12cffef12e8df9d0cc995b3d94055b0302a4cd96 10.0.0.58:6379@16379 myself,master - 0 1670644719000 7 connected 0-1364 5461-6826 10923-12287
1b7cded3ee6d59701d548172a605b8be5bcf1689 10.0.0.18:6379@16379 master - 0 1670644716000 2 connected 6827-10922
2a839809a19ac8df892d6cf501b0368c964261cf 10.0.0.28:6379@16379 master - 0 1670644719000 3 connected 12288-16383
d0f546fcdabdc3e4ca3eaa7f597399b59c3e5077 10.0.0.8:6379@16379 master - 0 1670644720365 1 connected 1365-5460
3c76057398dd51adb9b95a90cb6cd97a23ed7513 10.0.0.48:6379@16379 slave d0f546fcdabdc3e4ca3eaa7f597399b59c3e5077 0 1670644721000 1 connected
vars currentEpoch 7 lastVoteEpoch 0


#添加从节点
[root@slave1 ~]#redis-cli -a 123456 --cluster add-node 10.0.0.68:6379 10.0.0.18:6379 --cluster-slave --cluster-master-id 12cffef12e8df9d0cc995b3d94055b0302a4cd96

[root@Rocky ~]#redis-cli -a 123456 CLUSTER INFO
Warning: Using a password with '-a' or '-u' option on the command line interface may not be safe.
cluster_state:ok
cluster_slots_assigned:16384
cluster_slots_ok:16384
cluster_slots_pfail:0
cluster_slots_fail:0
cluster_known_nodes:8
cluster_size:4
2.4集群缩容
[root@Rocky ~]#cat /apps/redis/data/nodes-6379.conf
d0f546fcdabdc3e4ca3eaa7f597399b59c3e5077 10.0.0.8:6379@16379 master - 0 1670652898841 1 connected 1365-5460
3c76057398dd51adb9b95a90cb6cd97a23ed7513 10.0.0.48:6379@16379 slave d0f546fcdabdc3e4ca3eaa7f597399b59c3e5077 0 1670652898000 1 connected
9e55ea00a88c9c2f0d6620923851a8d5d5817bb8 10.0.0.68:6379@16379 slave 12cffef12e8df9d0cc995b3d94055b0302a4cd96 0 1670652899560 7 connected
cf3f025eb68e5e617c59930c28693fc42dad6fbe 10.0.0.7:6379@16379 slave 1b7cded3ee6d59701d548172a605b8be5bcf1689 0 1670652894000 2 connected
1b7cded3ee6d59701d548172a605b8be5bcf1689 10.0.0.18:6379@16379 master - 0 1670652897000 2 connected 6827-10922
b270204ab8b8331a283bd6903403e63fa63ad417 10.0.0.38:6379@16379 slave 2a839809a19ac8df892d6cf501b0368c964261cf 0 1670652897000 3 connected
2a839809a19ac8df892d6cf501b0368c964261cf 10.0.0.28:6379@16379 myself,master - 0 1670652897000 3 connected 12288-16383
12cffef12e8df9d0cc995b3d94055b0302a4cd96 10.0.0.58:6379@16379 master - 0 1670652896000 7 connected 0-1364 5461-6826 10923-12287 #58缩容前的节点


#节点转移
[root@18 ~]#redis-cli -a 123456 --cluster reshard 10.0.0.28:6379
Warning: Using a password with '-a' or '-u' option on the command line interface may not be safe.
>>> Performing Cluster Check (using node 10.0.0.28:6379)
M: 2a839809a19ac8df892d6cf501b0368c964261cf 10.0.0.28:6379
   slots:[12288-16383] (4096 slots) master
   1 additional replica(s)
M: d0f546fcdabdc3e4ca3eaa7f597399b59c3e5077 10.0.0.8:6379
   slots:[0-5460] (5461 slots) master
   1 additional replica(s)
S: 3c76057398dd51adb9b95a90cb6cd97a23ed7513 10.0.0.48:6379
   slots: (0 slots) slave
   replicates d0f546fcdabdc3e4ca3eaa7f597399b59c3e5077
S: 9e55ea00a88c9c2f0d6620923851a8d5d5817bb8 10.0.0.68:6379
   slots: (0 slots) slave
   replicates 12cffef12e8df9d0cc995b3d94055b0302a4cd96
S: cf3f025eb68e5e617c59930c28693fc42dad6fbe 10.0.0.7:6379
   slots: (0 slots) slave
   replicates 1b7cded3ee6d59701d548172a605b8be5bcf1689
M: 1b7cded3ee6d59701d548172a605b8be5bcf1689 10.0.0.18:6379
   slots:[5461-10922] (5462 slots) master
   1 additional replica(s)
S: b270204ab8b8331a283bd6903403e63fa63ad417 10.0.0.38:6379
   slots: (0 slots) slave
   replicates 2a839809a19ac8df892d6cf501b0368c964261cf
M: 12cffef12e8df9d0cc995b3d94055b0302a4cd96 10.0.0.58:6379
   slots:[10923-12287] (1365 slots) master
   1 additional replica(s)
[OK] All nodes agree about slots configuration.
>>> Check for open slots...
>>> Check slots coverage...
[OK] All 16384 slots covered.
How many slots do you want to move (from 1 to 16384)? 1365
What is the receiving node ID? 2a839809a19ac8df892d6cf501b0368c964261cf
Please enter all the source node IDs.
  Type 'all' to use all the nodes as source nodes for the hash slots.
  Type 'done' once you entered all the source nodes IDs.
Source node #1: 12cffef12e8df9d0cc995b3d94055b0302a4cd96
Source node #2: done

Ready to move 1365 slots.
  Source nodes:
    M: 12cffef12e8df9d0cc995b3d94055b0302a4cd96 10.0.0.58:6379
       slots:[10923-12287] (1365 slots) master
       1 additional replica(s)
  Destination node:
    M: 2a839809a19ac8df892d6cf501b0368c964261cf 10.0.0.28:6379
       slots:[12288-16383] (4096 slots) master
       1 additional replica(s)
#重复三次此过程

Node 10.0.0.58:6379 replied with error:
ERR Please use SETSLOT only with masters.

[root@Rocky ~]#cat /apps/redis/data/nodes-6379.conf

12cffef12e8df9d0cc995b3d94055b0302a4cd96 10.0.0.58:6379@16379 slave 2a839809a19ac8df892d6cf501b0368c964261cf 0 1670653646159 10 connected


[root@Rocky ~]#redis-cli -a 123456 --cluster del-node 10.0.0.8:6379 12cffef12e8df9d0cc995b3d94055b0302a4cd96
Warning: Using a password with '-a' or '-u' option on the command line interface may not be safe.
>>> Removing node 12cffef12e8df9d0cc995b3d94055b0302a4cd96 from cluster 10.0.0.8:6379
>>> Sending CLUSTER FORGET messages to the cluster...
>>> Sending CLUSTER RESET SOFT to the deleted node.

[root@Rocky ~]#cat /apps/redis/data/nodes-6379.conf
d0f546fcdabdc3e4ca3eaa7f597399b59c3e5077 10.0.0.8:6379@16379 master - 0 1670654147953 8 connected 0-5460
3c76057398dd51adb9b95a90cb6cd97a23ed7513 10.0.0.48:6379@16379 slave d0f546fcdabdc3e4ca3eaa7f597399b59c3e5077 0 1670654146000 8 connected
9e55ea00a88c9c2f0d6620923851a8d5d5817bb8 10.0.0.68:6379@16379 slave 2a839809a19ac8df892d6cf501b0368c964261cf 0 1670654147000 10 connected
cf3f025eb68e5e617c59930c28693fc42dad6fbe 10.0.0.7:6379@16379 slave 1b7cded3ee6d59701d548172a605b8be5bcf1689 0 1670654146000 9 connected
1b7cded3ee6d59701d548172a605b8be5bcf1689 10.0.0.18:6379@16379 master - 0 1670654147000 9 connected 5461-10922
b270204ab8b8331a283bd6903403e63fa63ad417 10.0.0.38:6379@16379 slave 2a839809a19ac8df892d6cf501b0368c964261cf 0 1670654148975 10 connected
2a839809a19ac8df892d6cf501b0368c964261cf 10.0.0.28:6379@16379 myself,master - 0 1670654143000 10 connected 10923-16383
vars currentEpoch 10 lastVoteEpoch 0
[root@Rocky ~]#redis-cli -a 123456 --cluster del-node 10.0.0.8:6379 9e55ea00a88c9c2f0d6620923851a8d5d5817bb8
Warning: Using a password with '-a' or '-u' option on the command line interface may not be safe.
>>> Removing node 9e55ea00a88c9c2f0d6620923851a8d5d5817bb8 from cluster 10.0.0.8:6379
>>> Sending CLUSTER FORGET messages to the cluster...
>>> Sending CLUSTER RESET SOFT to the deleted node.
[root@Rocky ~]#cat /apps/redis/data/nodes-6379.conf
d0f546fcdabdc3e4ca3eaa7f597399b59c3e5077 10.0.0.8:6379@16379 master - 0 1670654255000 8 connected 0-5460
3c76057398dd51adb9b95a90cb6cd97a23ed7513 10.0.0.48:6379@16379 slave d0f546fcdabdc3e4ca3eaa7f597399b59c3e5077 0 1670654254203 8 connected
cf3f025eb68e5e617c59930c28693fc42dad6fbe 10.0.0.7:6379@16379 slave 1b7cded3ee6d59701d548172a605b8be5bcf1689 0 1670654255220 9 connected
1b7cded3ee6d59701d548172a605b8be5bcf1689 10.0.0.18:6379@16379 master - 0 1670654253180 9 connected 5461-10922
b270204ab8b8331a283bd6903403e63fa63ad417 10.0.0.38:6379@16379 slave 2a839809a19ac8df892d6cf501b0368c964261cf 0 1670654256241 10 connected
2a839809a19ac8df892d6cf501b0368c964261cf 10.0.0.28:6379@16379 myself,master - 0 1670654256000 10 connected 10923-16383
vars currentEpoch 10 lastVoteEpoch 0
3. 总结 LVS的NAT和DR模型工作原理,并完成DR模型实战。
3.1NAT模型工作原理
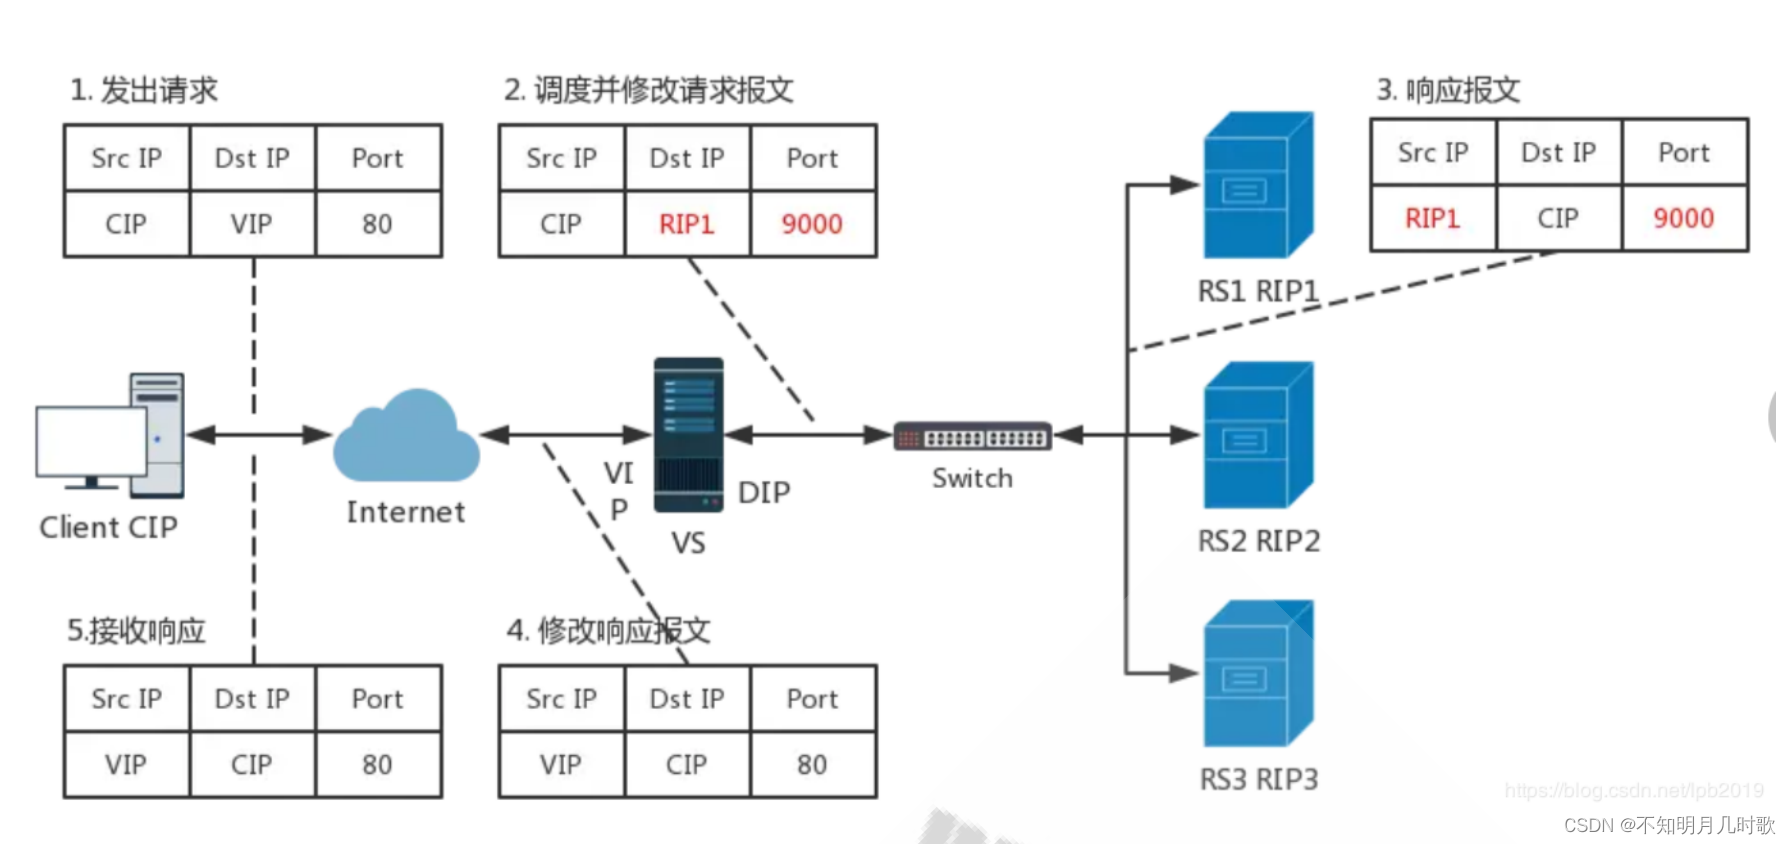
请求:client发起请求,目标地址为VIP,在VS服务器上将目标地址替换成RIP1,把端口由80映射为9000。
响应:RIP1响应报文,源地址为RIP1,端口号9000,在VS服务器将源地址替换为VIP,端口号替换为80.
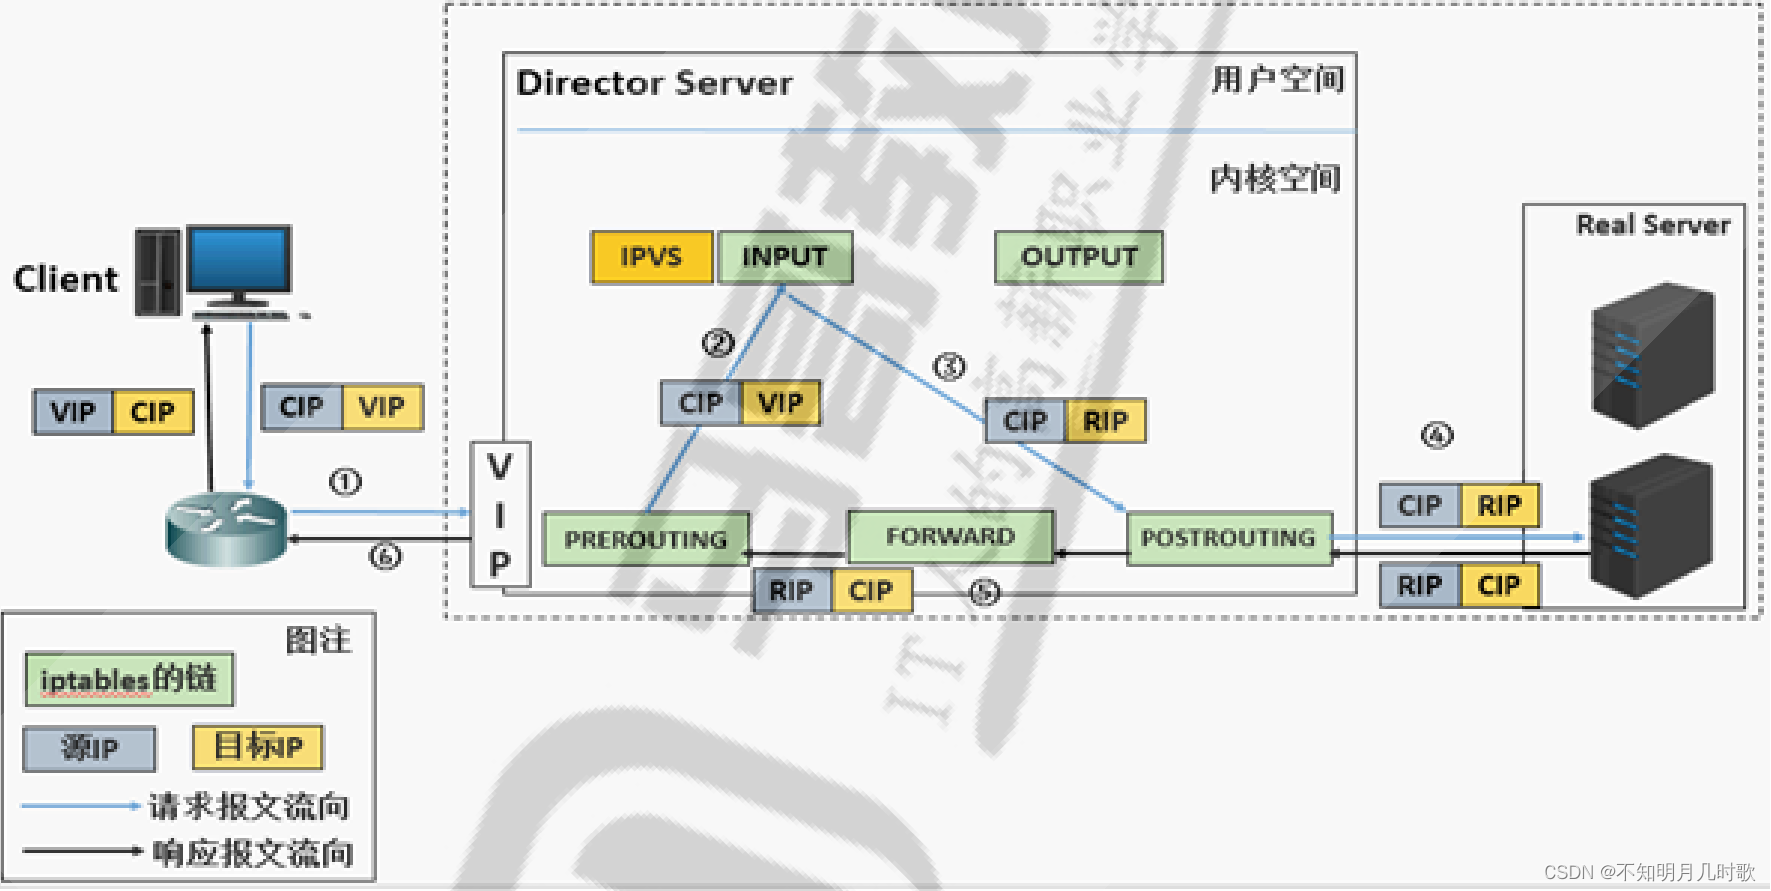
lvs功能在PREROUTING和INPUT之间,client发起请求,请求目标地址CIP,目标地址VIP,进入LVS服务器PREROUTING后,路由表检查,由于目标地址VIP,所以在INPUT之前“埋伏”LVS模块,将请求转向POSTROUTIN,并将目标地址替换成RIP.
响应报文回来需要经过IPFORWAR,所以开启IPFORWAR
3.2DR模型工作原理
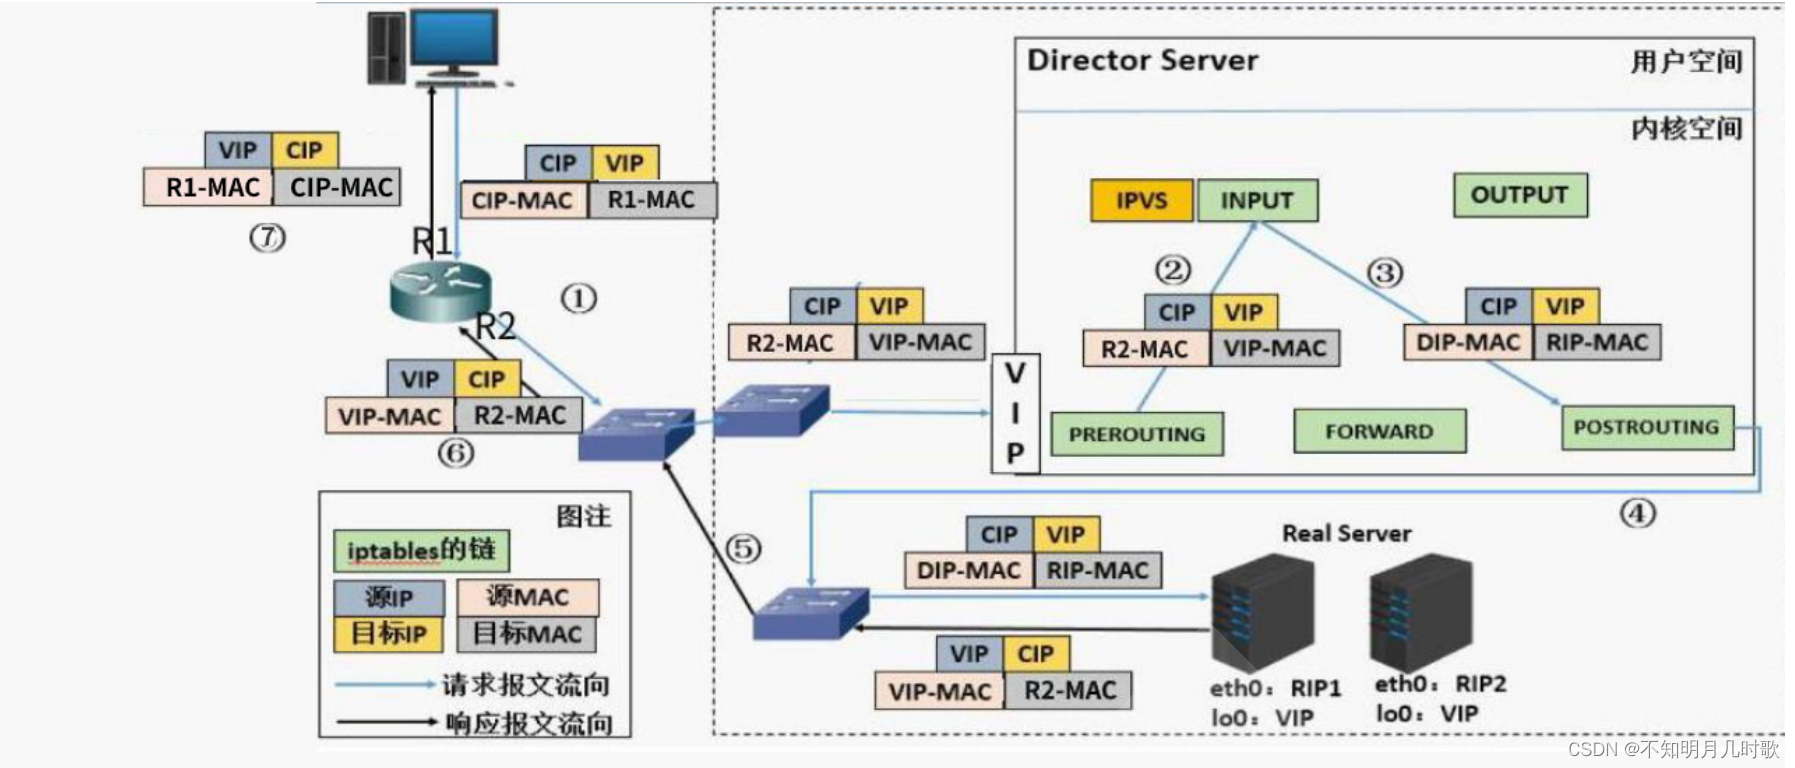
LVS-DR:Direct Routing,直接路由,LVS默认模式,通过为请求报文重新封装一个MAC首部进行转发,源MAC是DIP所在的接口的 MAC,目标MAC是某挑选出的RS的RIP所在接口的MAC地址,源IP/PORT,以及目标IP/PORT均保持不变。
Client发起请求到LVS服务器,再由LVS服务器转发到后端Real Server,在Real Server配一个RIP,Real Server直接给Client回复响应报文,不需要打开IPFORWARD
确保前端路由器将目标IP为VIP的请求报文发往Director
在RS上修改内核参数以限制arp通告及应答级别
RS和Director要在一个物理网络,因为arp广播不能经过路由器。
3.3DR模型实战
3.3.1.环境准备
五台主机
192.168.10.101 client

192.168.10.200 router
10.0.0.200

10.0.0.8 lvs

10.0.0.7 web1
10.0.0.47 web2
3.3.2主机配置
LVS配置
10.0.0.8 lvs

[root@lvs ~]#vim /etc/sysconfig/network-scripts/ifcfg-eth0
DEVICE=eth0
NAME=eth0
BOOTPROTO=static
IPADDR=10.0.0.8
PREFIX=24
GATEWAY=10.0.0.200
DNS1=10.0.0.2
DNS2=180.76.76.76
ONBOOT=yes

[root@lvs ~]#nmcli connection delete eth1
Connection 'eth1' (9c92fad9-6ecb-3e6c-eb4d-8a47c6f50c04) successfully deleted.
[root@lvs ~]#cd /etc/sysconfig/network-scripts/
[root@lvs network-scripts]#ll
total 4
-rw-r--r-- 1 root root 139 Dec  6 15:37 ifcfg-eth0
[root@lvs network-scripts]#nmcli connection up eth0
Connection successfully activated (D-Bus active path: /org/freedesktop/NetworkManager/ActiveConnection/7)
[root@lvs network-scripts]#nmcli connection reload

[root@lvs network-scripts]#nmcli connection up eth0
Connection successfully activated (D-Bus active path: /org/freedesktop/NetworkManager/ActiveConnection/8)
[root@lvs network-scripts]#route -n
Kernel IP routing table
Destination     Gateway         Genmask         Flags Metric Ref    Use Iface
0.0.0.0         10.0.0.200      0.0.0.0         UG    100    0        0 eth0
10.0.0.0        0.0.0.0         255.255.255.0   U     100    0        0 eth0
[root@lvs network-scripts]#vim /etc/sysctl.conf
#net.ipv4.ip_forward = 1

[root@lvs network-scripts]#sysctl -p
fs.inotify.max_queued_events = 66666
fs.inotify.max_user_watches = 100000
net.core.somaxconn = 511
vm.overcommit_memory = 1
[root@lvs network-scripts]#ipvsadm -Ln
IP Virtual Server version 1.2.1 (size=4096)
Prot LocalAddress:Port Scheduler Flags
  -> RemoteAddress:Port           Forward Weight ActiveConn InActConn
TCP  192.168.10.100:80 sh
  -> 10.0.0.7:80                  Masq    1      0          0
  -> 10.0.0.47:8080               Masq    3      0          0
TCP  192.168.10.100:6379 wlc
  -> 10.0.0.7:6379                Masq    1      0          0
  -> 10.0.0.47:6379               Masq    1      0          0
[root@lvs network-scripts]#ipvsadm -C
[root@lvs network-scripts]#ipvsadm -Ln
IP Virtual Server version 1.2.1 (size=4096)
Prot LocalAddress:Port Scheduler Flags
  -> RemoteAddress:Port           Forward Weight ActiveConn InActConn
[root@lvs network-scripts]#ip addr add 10.0.0.100/32 dev lo label lo:1
[root@lvs network-scripts]#ip a
1: lo: <LOOPBACK,UP,LOWER_UP> mtu 65536 qdisc noqueue state UNKNOWN group default qlen 1000
    link/loopback 00:00:00:00:00:00 brd 00:00:00:00:00:00
    inet 127.0.0.1/8 scope host lo
       valid_lft forever preferred_lft forever
    inet 10.0.0.100/32 scope global lo:1
       valid_lft forever preferred_lft forever
    inet6 ::1/128 scope host
       valid_lft forever preferred_lft forever
2: eth0: <BROADCAST,MULTICAST,UP,LOWER_UP> mtu 1500 qdisc fq_codel state UP group default qlen 1000
    link/ether 00:0c:29:75:e7:11 brd ff:ff:ff:ff:ff:ff
    inet 10.0.0.8/24 brd 10.0.0.255 scope global noprefixroute eth0
       valid_lft forever preferred_lft forever
[root@lvs network-scripts]#ipvsadm -A -t 10.0.0.100:80 -s rr
[root@lvs network-scripts]#ipvsadm -a -t 10.0.0.100:80 -r 10.0.0.7:80 -g
[root@lvs network-scripts]#ipvsadm -a -t 10.0.0.100:80 -r 10.0.0.47:80 -g
[root@lvs network-scripts]#ipvsadm -Ln
IP Virtual Server version 1.2.1 (size=4096)
Prot LocalAddress:Port Scheduler Flags
  -> RemoteAddress:Port           Forward Weight ActiveConn InActConn
TCP  10.0.0.100:80 rr
  -> 10.0.0.7:80                  Route   1      0          0
  -> 10.0.0.47:80                 Route   1      0          0
10.0.0.7 web1
[root@web1 ~]#vim /etc/sysconfig/network-scripts/ifcfg-eth0
DEVICE=eth0
NAME=eth0
BOOTPROTO=static
IPADDR=10.0.0.7
PREFIX=24
GATEWAY=10.0.0.200
DNS1=10.0.0.8
DNS2=180.76.76.76
ONBOOT=yes

[root@web1 ~]#systemctl restart network

[root@web1 ~]#ifconfig lo:1 10.0.0.100/32^C

[root@web1 ~]#echo 1 > /proc/sys/net/ipv4/conf/all/arp_ignore
[root@web1 ~]#echo 1 > /proc/sys/net/ipv4/conf/lo/arp_ignore
[root@web1 ~]#echo 2 > /proc/sys/net/ipv4/conf/lo/arp_announce
[root@web1 ~]#echo 2 > /proc/sys/net/ipv4/conf/all/arp_announce

[root@web1 ~]#ip addr add 10.0.0.100/32 dev lo label lo:1
192.168.10.101
[root@internet ~]$vim /etc/netplan/eth0.yaml

# This is the network config written by 'subiquity'
network:
  version: 2
  renderer: networkd
  ethernets:
    ens33:
      addresses:
      - 192.168.10.101/24
      gateway4: 192.168.10.200
      nameservers:
        search: [magedu.org, magedu.com]
        addresses: [10.0.0.2, 180.76.76.76]
      routes:
      - to: 192.168.0.0/16
        via: 10.0.0.254
192.168.10.200
[17:01:26 root@router netplan]#vim eth0.yaml

network:
  version: 2
  renderer: networkd
  ethernets:
    eth0:
      addresses:
      - 192.168.10.200/24
#      gateway4: 192.168.10.8
      nameservers:
        search: [magedu.com, magedu.org]
        addresses: [114.114.114.114]

[17:02:06 root@router netplan]#vim eth1.yaml

network:
  version: 2
  renderer: networkd
  ethernets:
    eth1:
      addresses:
      - 10.0.0.200/24
      gateway4: 10.0.0.2
      nameservers:
        search: [magedu.com, magedu.org]
        addresses: [114.114.114.114]
4. 总结 http协议的通信过程详解
4.1http协议通信过程
4.2HTTP协议分层
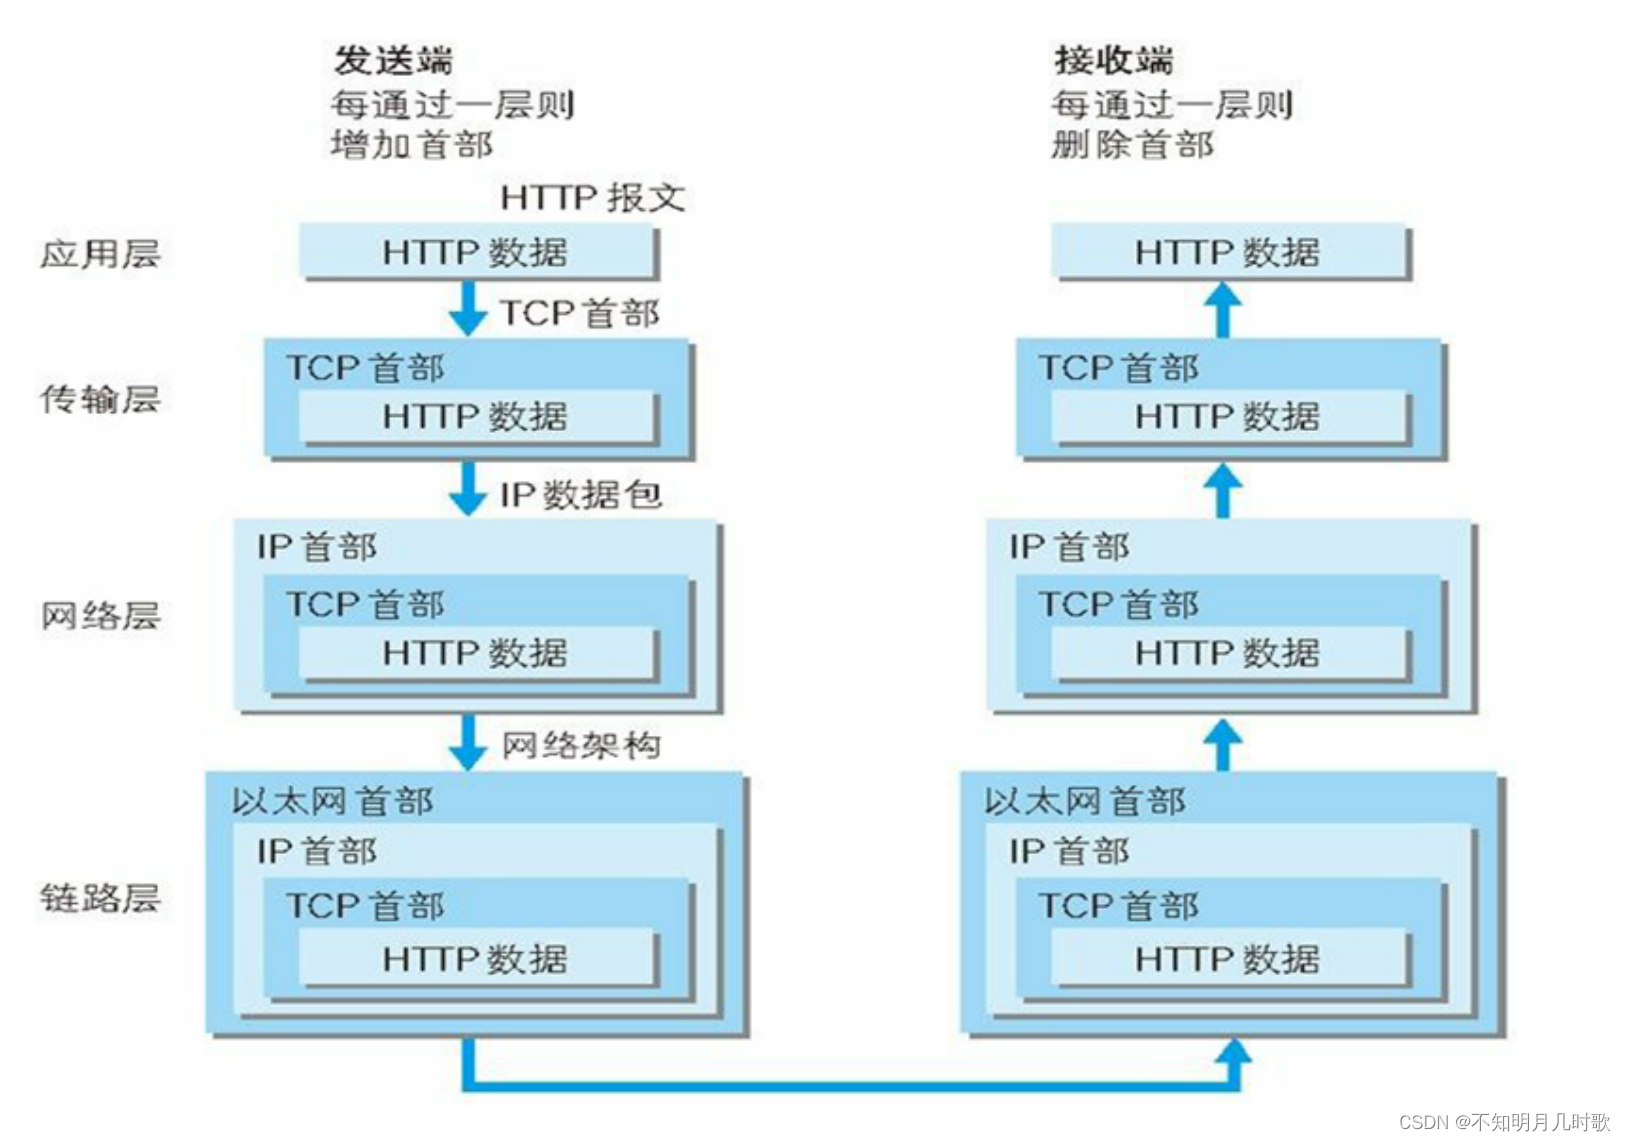
4.3URI和URL
URL组成:
<scheme>://<user>:<password>@<host>:<port>/<path>;<params>?<query>#<frag>
scheme:方案,访问服务器以获取资源时要使用哪种协议
user:用户,某些方案访问资源时需要的用户名
password:密码,用户对应的密码,中间用:分隔
Host:主机,资源宿主服务器的主机名或IP地址 port:端口,资源宿主服务器正在监听的端口号,很多方案有默认端口号
path:路径,服务器资源的本地名,由一个/将其与前面的URL组件分隔
params:参数,指定输入的参数,参数为名/值对,多个参数,用;分隔
query:查询,传递参数给程序,如数据库,用?分隔,多个查询用&分隔
frag:片段,一小片或一部分资源的名字,此组件在客户端使用,用#分隔
4.4网站访问量
4.5HTTP工作机制
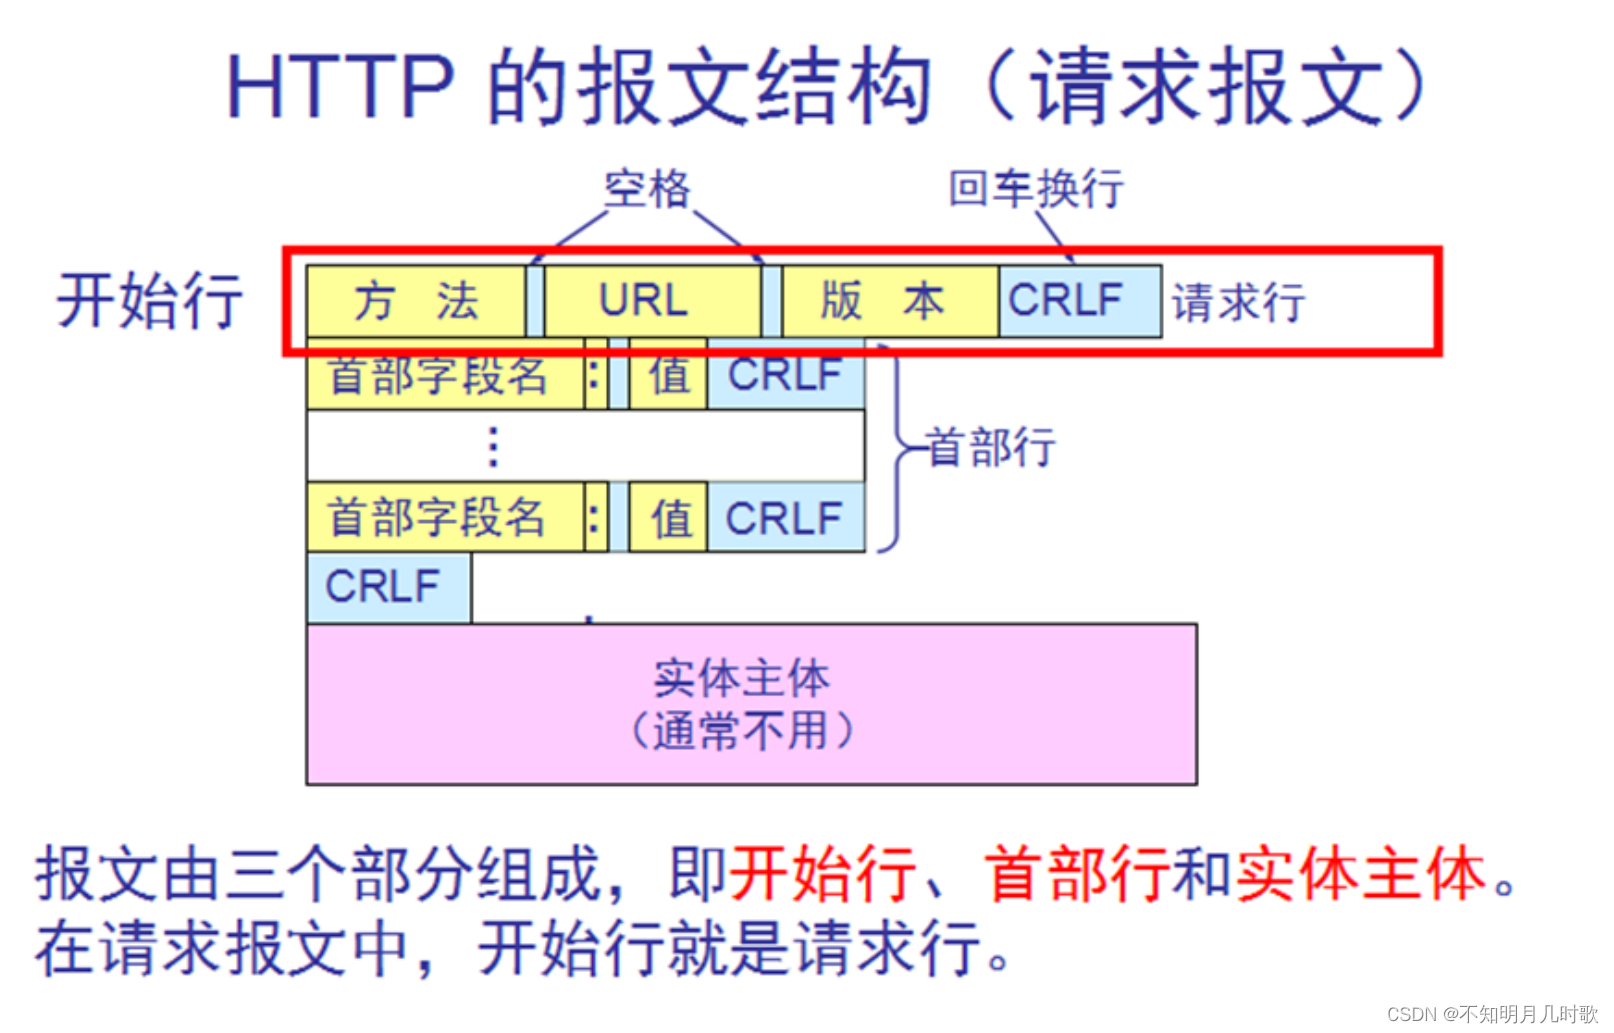
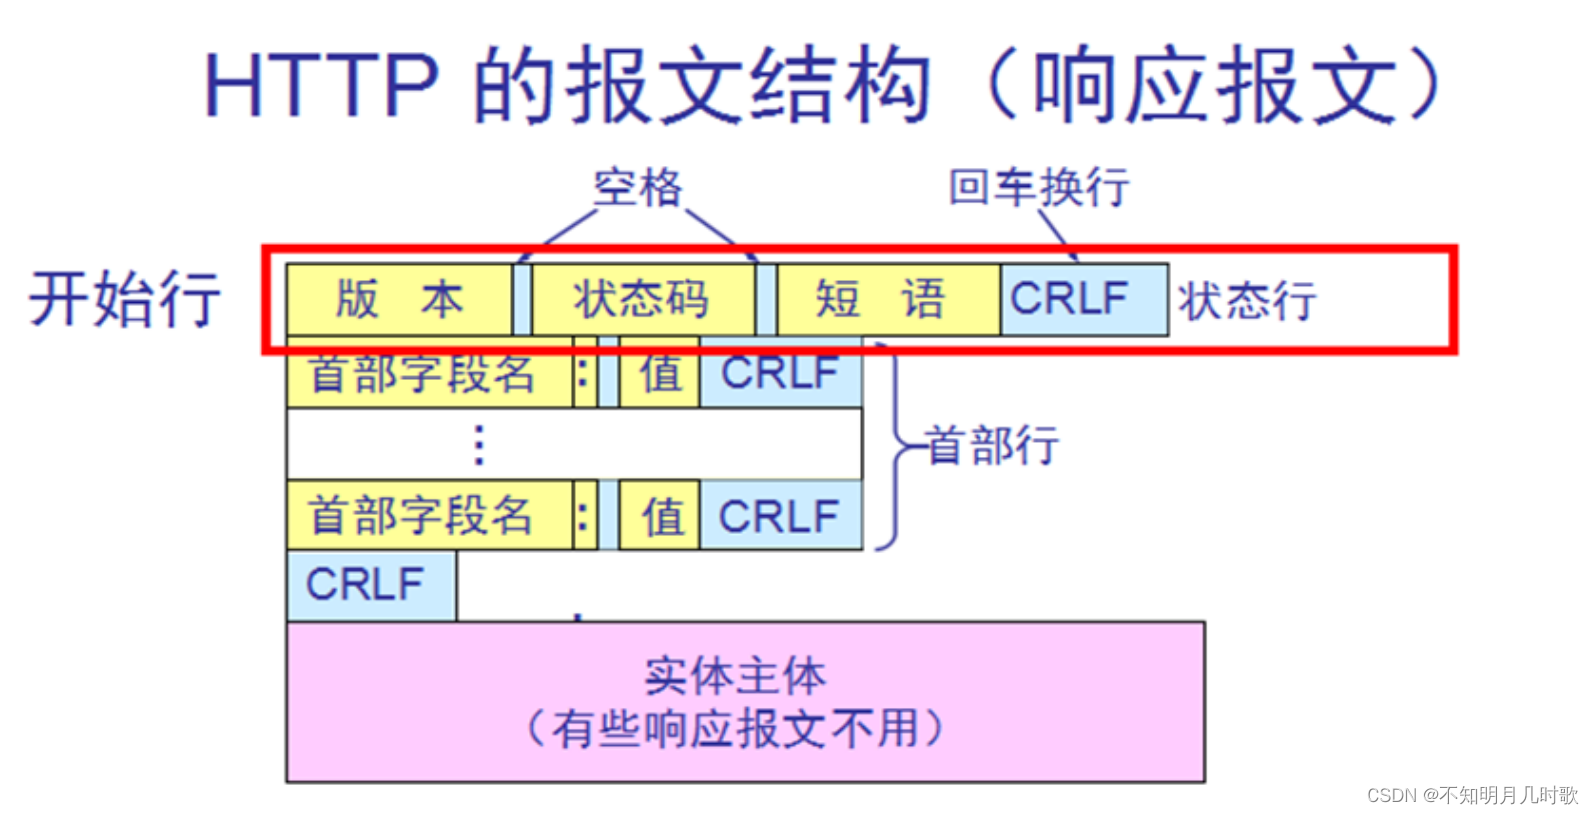
HTTP的报文结构
5. 总结 网络IO模型和nginx架构
5.1.网络IO模型
阻塞型、非阻塞型、复用型、信号驱动型、异步IO
5.2Nginx架构
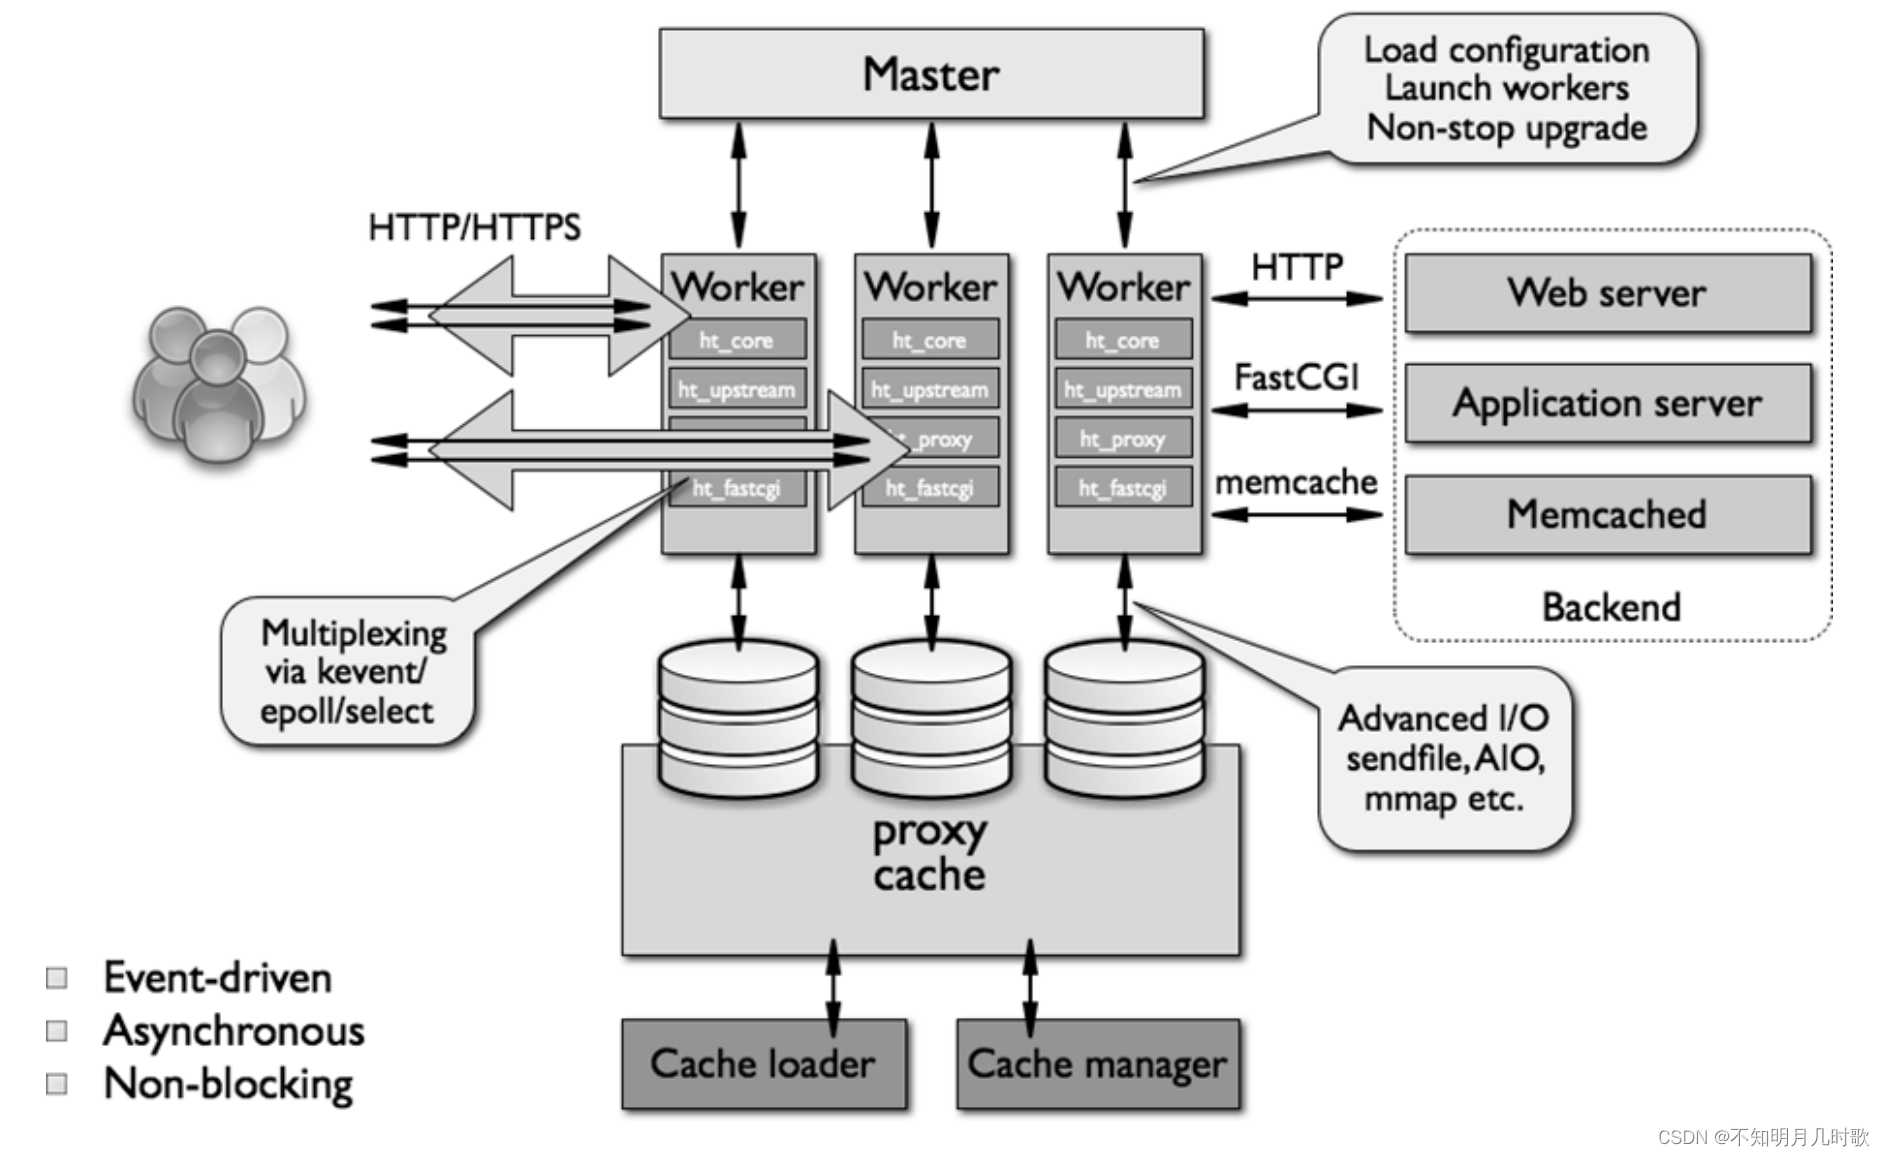
当用户发起请求,由Master主进程接收,分配一个子进程为用户提供服务,创建若干个子进程Worker,主进程使配置文件生效,可以做代理,提供缓存。
6. 完成nginx编译安装脚本
#!/bin/bash
DIR=/apps/nginx
NGINX_URL=http://nginx.org/download/
FILE=nginx-1.22.1
TAR=tar.gz
yum -y install wget

yum -y -q install make gcc-c++ libtool pcre pcre-devel zlib zlib-devel
openssl openssl-devel perl-ExtUtils-Embed

useradd -s /sbin/nologin -r nginx


wget ${http://nginx.org/download/}${FILE}${TAR}

tar xf ${FILE}${TAR}

cd ${FILE}/

./configure --prefix=${NGINX_INSTALL_DIR} --user=nginx --group=nginx --with-http_ssl_module --with-http_v2_module --with-http_realip_module --withhttp_stub_status_module --with-http_gzip_static_module --with-pcre --with-stream
--with-stream_ssl_module --with-stream_realip_module

make -j 2 && make install

echo "PATH=${DIR}/sbin:${PATH}" > /etc/profile.d/nginx.sh

cat > /lib/systemd/system/nginx.service <<EOF
[Unit]
Description=The nginx HTTP and reverse proxy server
After=network.target remote-fs.target nss-lookup.target
[Service]
Type=forking
PIDFile=${DIR}/logs/nginx.pid
ExecStartPre=/bin/rm -f ${DIR}/logs/nginx.pid
ExecStartPre=${DIR}/sbin/nginx -t
ExecStart=${DIR}/sbin/nginx
ExecReload=/bin/kill -s HUP \$MAINPID
KillSignal=SIGQUIT
LimitNOFILE=100000
TimeoutStopSec=5
KillMode=process
PrivateTmp=true
[Install]
WantedBy=multi-user.target
EOF

systemctl daemon-reload
systemctl enable --now nginx &> /dev/null
systemctl is-active nginx &> /dev/null
7. 总结nginx核心配置,并实现nginx多虚拟主机
7.1.nginx核心配置
worker_processes [number | auto]; #启动Nginx工作进程的数量,一般设为和CPU核心数相同
worker_cpu_affinity 00000001 00000010 00000100 00001000 | auto ; #将Nginx工作进程绑
定到指定的CPU核心,默认Nginx是不进行进程绑定的,绑定并不是意味着当前nginx进程独占以一核心CPU,
但是可以保证此进程不会运行在其他核心上,这就极大减少了nginx的工作进程在不同的cpu核心上的来回跳
转,减少了CPU对进程的资源分配与回收以及内存管理等,因此可以有效的提升nginx服务器的性能。
CPU MASK: 00000001:0号CPU
00000010:1号CPU
10000000:7号CPU
#示例:
worker_cpu_affinity 0001 0010 0100 1000;第0号---第3号CPU
worker_cpu_affinity 0101 1010;
#示例
worker_processes 4;
worker_cpu_affinity 00000010 00001000 00100000 10000000;
[root@centos8 ~]# ps axo pid,cmd,psr | grep nginx
31093 nginx: master process /apps 1
34474 nginx: worker process 1
34475 nginx: worker process 3
34476 nginx: worker process 5
34477 nginx: worker process 7
35751 grep nginx
#auto 绑定CPU
#The special value auto (1.9.10) allows binding worker processes automatically to
available CPUs:
worker_processes auto;
worker_cpu_affinity auto;
#The optional mask parameter can be used to limit the CPUs available for
automatic binding:
worker_cpu_affinity auto 01010101;
#错误日志记录配置,语法:error_log file [debug | info | notice | warn | error | crit
| alert | emerg]
#error_log logs/error.log;
#error_log logs/error.log notice;
error_log /apps/nginx/logs/error.log error;
#pid文件保存路径
pid /apps/nginx/logs/nginx.pid;
worker_priority 0; #工作进程优先级,-20~20(19)
worker_rlimit_nofile 65536; #所有worker进程能打开的文件数量上限,包括:Nginx的所有连接(例
如与代理服务器的连接等),而不仅仅是与客户端的连接,另一个考虑因素是实际的并发连接数不能超过系统级
别的最大打开文件数的限制.最好与ulimit -n 或者limits.conf的值保持一致,
daemon off; #前台运行Nginx服务用于测试、docker等环境。
master_process off|on; #是否开启Nginx的master-worker工作模式,仅用于开发调试场景,默认为
on
events {
worker_connections 65536; #设置单个工作进程的最大并发连接数
use epoll; #使用epoll事件驱动,Nginx支持众多的事件驱动,比如:select、poll、epoll,只
能设置在events模块中设置。
accept_mutex on; #on为同一时刻一个请求轮流由work进程处理,而防止被同时唤醒所有worker,避
免多个睡眠进程被唤醒的设置,默认为off,新请求会唤醒所有worker进程,此过程也称为"惊群",因此
nginx刚安装完以后要进行适当的优化。建议设置为on
multi_accept on; #on时Nginx服务器的每个工作进程可以同时接受多个新的网络连接,此指令默认
为off,即默认为一个工作进程只能一次接受一个新的网络连接,打开后几个同时接受多个。建议设置为on
}
创建网站
#定义子配置文件路径
[root@centos8 ~]# mkdir /apps/nginx/conf/conf.d
[root@centos8 ~]# vim /apps/nginx/conf/nginx.conf
http {
......
include /apps/nginx/conf/conf.d/*.conf; #在配置文件的最后面添加此行,注意不要放在最前
面,会导致前面的命令无法生效
location
#语法规则:
location [ = | ~ | ~* | ^~ ] uri { ... }
= #用于标准uri前,需要请求字串与uri精确匹配,大小敏感,如果匹配成功就停止向下匹配并立即处理请
求
^~ #用于标准uri前,表示包含正则表达式,并且匹配以指定的正则表达式开头,对uri的最左边部分做匹配
检查,不区分字符大小写
~ #用于标准uri前,表示包含正则表达式,并且区分大小写
~* #用于标准uri前,表示包含正则表达式,并且不区分大写
不带符号 #匹配起始于此uri的所有的uri
\ #用于标准uri前,表示包含正则表达式并且转义字符。可以将 . * ?等转义为普通符号
#匹配优先级从高到低:
=, ^~, ~/~*, 不带符号
root
server {
listen 80;
server_name www.magedu.org;
location / {
root /data/nginx/html/pc;
}
location /about {
root /opt/html; #必须要在html目录中创建一个名为about的目录才可以访问,否则报错。
}
}
nginx四层访问控制
location /about {
alias /data/nginx/html/pc;
index index.html;
deny 192.168.1.1;
allow 192.168.1.0/24;
allow 10.1.1.0/16;
allow 2001:0db8::/32;
deny all; #按先小范围到大范围排序
}
nginx身份验证
#CentOS安装包
[root@centos8 ~]#yum -y install httpd-tools
#Ubuntu安装包
[root@Ubuntu ~]#apt -y install apache2-utils
#创建用户
#-b 非交互式方式提交密码
[root@centos8 ~]# htpasswd -cb /apps/nginx/conf/.htpasswd user1 123456
Adding password for user user1
[root@centos8 ~]# htpasswd -b /apps/nginx/conf/.htpasswd user2 123456
Adding password for user user2
[root@centos8 ~]# tail /apps/nginx/conf/.htpasswd
user1:$apr1$Rjm0u2Kr$VHvkAIc5OYg.3ZoaGwaGq/
user2:$apr1$nIqnxoJB$LR9W1DTJT.viDJhXa6wHv.
#安全加固
[root@centos8 ~]# chown nginx.nginx /apps/nginx/conf/.htpasswd
[root@centos8 ~]# chmod 600 /apps/nginx/conf/.htpasswd
[root@centos8 ~]# vim /apps/nginx/conf/conf.d/pc.conf
location = /login/ {
root /data/nginx/html/pc;
index index.html;
auth_basic "login password";
auth_basic_user_file /apps/nginx/conf/.htpasswd;
}
长连接
keepalive_timeout timeout [header_timeout]; #设定保持连接超时时长,0表示禁止长连接,默
认为75s,通常配置在http字段作为站点全局配置
keepalive_requests number; #在一次长连接上所允许请求的资源的最大数量,默认为100次,建议适
当调大,比如:500


keepalive_requests 3;
keepalive_timeout 65 60;
#开启长连接后,返回客户端的会话保持时间为60s,单次长连接累计请求达到指定次数请求或65秒就会被断
开,第二个数字60为发送给客户端应答报文头部中显示的超时时间设置为60s:如不设置客户端将不显示超时
时间。
下载服务器设置
#注意:download不需要index.html文件
[root@centos8 ~]# mkdir -p /data/nginx/html/pc/download
[root@centos8 ~]# vim /apps/nginx/conf/conf.d/pc.conf
location /download {
autoindex on; #自动索引功能
autoindex_exact_size on; #计算文件确切大小(单位bytes),此为默认值,off只显示大概大
小(单位kb、mb、gb)
autoindex_localtime on; #on表示显示本机时间而非GMT(格林威治)时间,默为为off显示GMT
时间
limit_rate 1024k; #限速,默认不限速
root /data/nginx/html/pc;
}
7.2.实现nginx多虚拟主机
环境:10.0.0.28 nginx服务器 ; 10.0.0.18 DNS服务器;10.0.0.47客户端
nginx服务器配置
#10.0.0.28

[root@Rocky ~]#mkdir /data/nginx/html/{pc,mobile} -pv

[root@Rocky ~]#vim /data/nginx/html/pc/index.html

<h1>www.magedu.org</h1>

[root@Rocky ~]#cp /data/nginx/html/pc/index.html /data/nginx/html/mobile/index.html

[root@Rocky ~]#vim /data/nginx/html/mobile/index.html

<h1>m.magedu.org</h1>

[root@Rocky ~]#tree /data/
/data/
└── nginx
    └── html
        ├── mobile
        │   └── index.html
        └── pc
            └── index.html

[root@Rocky ~]#vim /apps/nginx/conf/nginx.conf


    # HTTPS server
    #
    #server {
    #    listen       443 ssl;
    #    server_name  localhost;

    #    ssl_certificate      cert.pem;
    #    ssl_certificate_key  cert.key;

    #    ssl_session_cache    shared:SSL:1m;
    #    ssl_session_timeout  5m;

    #    ssl_ciphers  HIGH:!aNULL:!MD5;
    #    ssl_prefer_server_ciphers  on;

    #    location / {
    #        root   html;
    #        index  index.html index.htm;
    #    }
    #}
    include /apps/nginx/conf.d/*.conf;  #添加这一行
}
"/apps/nginx/conf/nginx.conf" 117L, 2704C

[root@Rocky ~]#mkdir /apps/nginx/conf.d/

[root@Rocky ~]#vim /apps/nginx/conf.d/pc.conf
[root@Rocky ~]#vim /apps/nginx/conf.d/mobile.conf
[root@Rocky ~]#cat /apps/nginx/conf.d/mobile.conf
server {
   server_name m.magedu.org;
   root /data/nginx/html/mobile;
}
[root@Rocky ~]#vim /apps/nginx/conf.d/mobile.conf
[root@Rocky ~]#vim /apps/nginx/conf.d/pc.conf
[root@Rocky ~]#cat /apps/nginx/conf.d/pc.conf
server {
   server_name www.magedu.org;
   root /data/nginx/html/pc;
}

[root@Rocky ~]#nginx -t
nginx: the configuration file /apps/nginx/conf/nginx.conf syntax is ok
nginx: configuration file /apps/nginx/conf/nginx.conf test is successful
[root@Rocky ~]#nginx -s reload
10.0.0.18DNS服务器配置
[root@18 ~]#vim install_dns.sh

#!/bin/bash
#


DOMAIN=magedu.org
HOST=www
HOST_IP=10.0.0.100

CPUS=`lscpu |awk '/^CPU\(s\)/{print $2}'`
. /etc/os-release

color () {
    RES_COL=60
    MOVE_TO_COL="echo -en \\033[${RES_COL}G"
    SETCOLOR_SUCCESS="echo -en \\033[1;32m"
    SETCOLOR_FAILURE="echo -en \\033[1;31m"
    SETCOLOR_WARNING="echo -en \\033[1;33m"
    SETCOLOR_NORMAL="echo -en \E[0m"
    echo -n "$1" && $MOVE_TO_COL
    echo -n "["
    if [ $2 = "success" -o $2 = "0" ] ;then
        ${SETCOLOR_SUCCESS}
        echo -n $"  OK  "
    elif [ $2 = "failure" -o $2 = "1"  ] ;then
        ${SETCOLOR_FAILURE}
        echo -n $"FAILED"
    else
        ${SETCOLOR_WARNING}
        echo -n $"WARNING"
    fi
    ${SETCOLOR_NORMAL}
    echo -n "]"


install_dns () {
        elif [ $ID = 'ubuntu' ];then
        color "不支持Ubuntu操作系统,退出!" 1
        exit
            #apt update
            #apt install -y  bind9 bind9-utils
        else
            color "不支持此操作系统,退出!" 1
            exit
        fi

}

config_dns () {
    cat >>      /etc/named.rfc1912.zones <<EOF
zone "$DOMAIN" IN {
    type master;
    file  "$DOMAIN.zone";
};
EOF
   cat > /var/named/$DOMAIN.zone <<EOF
\$TTL 1D
@       IN SOA  master admin (
                                        1       ; serial
                                        1D      ; refresh
                                        1H      ; retry
                                        1W      ; expire
                                        3H )    ; minimum
                NS       master
master      A    `hostname -I`
$HOST           A    $HOST_IP
EOF
   chmod 640 /var/named/$DOMAIN.zone
   chgrp named /var/named/$DOMAIN.zone
}

start_service () {
    systemctl enable --now named
        systemctl is-active named.service
        if [ $? -eq 0 ] ;then
        color "DNS 服务安装成功!" 0
    else
        color "DNS 服务安装失败!" 1
        exit 1
    fi
}

install_dns
config_dns
start_service

[root@18 ~]#bash install_dns.sh
[root@18 ~]#rndc reload

[root@18 ~]#vim /var/named/magedu.org.zone

$TTL 1D
@       IN SOA  master admin (
                                        1       ; serial
                                        1D      ; refresh
                                        1H      ; retry
                                        1W      ; expire
                                        3H )    ; minimum
            NS   master
master      A    10.0.0.18
www         A    10.0.0.28
m           A    10.0.0.28
10.0.0.47客户端配置
[root@web2 network-scripts]#vim ifcfg-eth0

DEVICE=eth0
NAME=eth0
BOOTPROTO=static
IPADDR=10.0.0.47
#IPADDR=192.168.3.48
PREFIX=24
GATEWAY=10.0.0.2
#GATEWAY=192.168.3.2
DNS1=10.0.0.18
#DNS2=180.76.76.76
ONBOOT=yes

[root@web2 network-scripts]#systemctl restart network


[root@web2 network-scripts]#curl www.magedu.org
<h1>www.magedu.org</h1>
[root@web2 network-scripts]#curl m.magedu.org
<h1>m.magedu.org</h1>
8. 总结nginx日志格式定制
8.1自定义默认日志
[root@Rocky ~]#vim /apps/nginx/conf/nginx.conf

http {
    include       mime.types;
    default_type  application/octet-stream;
    log_format  testlog '$remote_addr - $remote_user [$time_local] "$request" $status "$http_user_agent" '


[root@Rocky conf.d]#vim pc.conf

vhost_traffic_status_zone;
server {
    server_name www.magedu.org;
    root /data/nginx/html/pc;
    access_log /apps/nginx/logs/access-www.magedu.org.log  testlog;
8.2自定义json日志
[root@Rocky conf.d]#vim /apps/nginx/conf/nginx.conf

    log_format  testlog '$remote_addr - $remote_user [$time_local] "$request" $status "$http_user_agent" ';
    log_format access_json '{"@timestamp":"$time_iso8601",'
                          '"host":"$server_addr",'
                           '"clientip":"$remote_addr",'
                           '"size":$body_bytes_sent,'
                           '"responsetime":$request_time,'
                           '"upstreamtime":"$upstream_response_time",'
                           '"upstreamhost":"$upstream_addr",'
                           '"http_host":"$host",'
                           '"uri":"$uri",'
                           '"xff":"$http_x_forwarded_for",'
                           '"referer":"$http_referer",'
                           '"tcp_xff":"$proxy_protocol_addr",'
                           '"http_user_agent":"$http_user_agent",'
                           '"status":"$status"}';

[root@Rocky conf.d]#vim pc.conf

vhost_traffic_status_zone;
server {
    server_name www.magedu.org;
    root /data/nginx/html/pc;
   # access_log /apps/nginx/logs/access-www.magedu.org.log  testlog;
    access_log /apps/nginx/logs/access-json-www.magedu.org.log  access_json;

[root@Rocky conf.d]#nginx -t
nginx: the configuration file /apps/nginx/conf/nginx.conf syntax is ok
nginx: configuration file /apps/nginx/conf/nginx.conf test is successful
[root@Rocky conf.d]#systemctl restart nginx

