学习vue2源码之前,首先知道vue2是一个mvvm设计模式的框架。
说到MVVM,不得不说一下MVC设计模式。
传统MVC模式,(Model-View-Controller)意思可以从字面上了解。
1.Model 模型
2.View 视图
3.Controller 控制器。
用户在界面上操作点击按钮时,首先是点击的视图,从View到Controller 层,完成逻辑后,到Model改变状态,然后由Model再通知视图。
用户也可以直接操作Controller发送指令(改变 URL触发 hashChange 事件),再由 Controller 发送给 View。
Controller 只起到路由的作用,View,也就是主要操作业务逻辑的非常重。
在MVVM(Model-View-ViewModel)中,框架就设定了ViewModel与模型绑定在一起,这也使频繁更新DMO不再像以前那样经常去手动操作了。
有了这个设计思路,我们先在github中把vue的源码下下来。
大概目录介绍如下:
benchmarks                  主要用于代码性能分析的工具
compiler-sfc                单位转换的工具
dist                        输出打包之后的一些源代码
examples                    API 应用例子
packages                    代码用的一些软件包
scripts                     一些脚本,比如文件目录重定向,基础配置,版本生成等。
src                         源代码存放目录
test                        测试脚本
types                       类型定义文件
.babelrc.js                 babel转码
.editorconfig               编辑器自定义
.eslintignore               忽略eslint
.eslintrc.js                配置eslint
.flowconfig                 检测类型工具
package.json                配置依赖
大概看一下目录,有些是比较熟悉的,但是不熟悉也不要紧,后面说到了就知道了。
在运行一个vue 项目之前,先找到入口,打开package.json。
"dev": "rollup -w -c scripts/config.js --environment TARGET:full-dev",
看到启动是这么一行,rollup是一个vue用的打包器,比webpake配置简单一些,有兴趣的可以看一下它的官网Rollup 中文文档 | Rollup 中文文档。
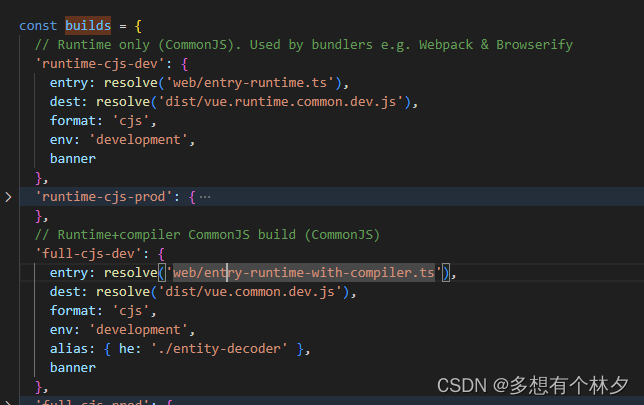
打开源码中scripts/config 。
可以看到builds中有cjs与esm 俩个状态,后面还有增加的ssr服务端渲染模式。
cjs 形式的模块就是为 browserify和 webpack 1 提供的,他们在加载模块的时候不能直接加载 ES Module。而 webpack2+以及 Rollup 是可以直接加载 ES Module 的,所以就有了 es 形式的模块输出。
而其中完整版比运行时版本多了一个传说中的 compiler。compiler单独抽离也是减小了库的体积,而且允许你在代码运行的时候去现场编译模板,在不配合构建工具的情况下可以直接使用。
在我们文件执行npm run dev 时候,将会找到上图文件entry:'web/entry-runtime-with-compiler.ts'
打开文件。
import Vue from './runtime-with-compiler'
import * as vca from 'v3'
import { extend } from 'shared/util'
extend(Vue, vca)
import { effect } from 'v3/reactivity/effect'
Vue.effect = effect
export default Vue看见这里的导出的Vue只是引入了v3。
继续点击引入Vue 的地方,打开. /runtime/index 打开 core/index 直到打开src/core/instance/index.ts
import { initMixin } from './init'
import { stateMixin } from './state'
import { renderMixin } from './render'
import { eventsMixin } from './events'
import { lifecycleMixin } from './lifecycle'
import { warn } from '../util/index'
import type { GlobalAPI } from 'types/global-api'
function Vue(options) {
if (__DEV__ && !(this instanceof Vue)) {
warn('Vue is a constructor and should be called with the `new` keyword')
}
this._init(options)
}
//@ts-expect-error Vue has function type
initMixin(Vue)
//@ts-expect-error Vue has function type
stateMixin(Vue)
//@ts-expect-error Vue has function type
eventsMixin(Vue)
//@ts-expect-error Vue has function type
lifecycleMixin(Vue)
//@ts-expect-error Vue has function type
renderMixin(Vue)
export default Vue as unknown as GlobalAPI
打开initMixin可以看到在vue原型上定义了一个init方法
export function initMixin(Vue: typeof Component) {
  Vue.prototype._init = function (options?: Record<string, any>) {
  .......
  }
结合上面一开始Vue中调用了这个函数,大概看出来是一个初始化的方法。
function Vue (options) {
 .......
  this._init(options)
}
同理打开剩下的文件。stateMixin中
 const dataDef: any = {}
  dataDef.get = function () {
    return this._data
  }
  const propsDef: any = {}
  propsDef.get = function () {
    return this._props
  }
  if (__DEV__) {
    dataDef.set = function () {
      warn(
        'Avoid replacing instance root $data. ' +
          'Use nested data properties instead.',
        this
      )
    }
    propsDef.set = function () {
      warn(`$props is readonly.`, this)
    }
  }
  Object.defineProperty(Vue.prototype, '$data', dataDef)
  Object.defineProperty(Vue.prototype, '$props', propsDef)
上述定义了Vue.prototype.$data 与 $props。访问的其实是自身的data与props属性
Vue.prototype.$set = set
Vue.prototype.$delete = del
Vue.prototype.$watch
这里定义的其实就已经是平时经常用的,后面讲原理的时候再具体看。
eventsMixin中,定义了$on,$once,$off,$emit
lifecycleMixin中定义了 _update $forceUpdate $destroy
renderMixin 挂载以下方法
 Vue.prototype.$nextTick
 Vue.prototype._render
 调用installRenderHelpers方法挂载
 target 为 Vue.prototype
 target._o = markOnce
 target._n = toNumber
 target._s = toString
 target._l = renderList
 target._t = renderSlot
 target._q = looseEqual
 target._i = looseIndexOf
 target._m = renderStatic
 target._f = resolveFilter
 target._k = checkKeyCodes
 target._b = bindObjectProps
 target._v = createTextVNode
 target._e = createEmptyVNode
 target._u = resolveScopedSlots
 target._g = bindObjectListeners
 target._d = bindDynamicKeys
 target._p = prependModifier
导出的Vue 在core/instance/index.js下被引用
import Vue from './instance/index'
import { initGlobalAPI } from './global-api/index'
import { isServerRendering } from 'core/util/env'
import { FunctionalRenderContext } from 'core/vdom/create-functional-component'
import { version } from 'v3'
initGlobalAPI(Vue)
Object.defineProperty(Vue.prototype, '$isServer', {
get: isServerRendering
})
Object.defineProperty(Vue.prototype, '$ssrContext', {
get() {
/* istanbul ignore next */
return this.$vnode && this.$vnode.ssrContext
}
})
// expose FunctionalRenderContext for ssr runtime helper installation
Object.defineProperty(Vue, 'FunctionalRenderContext', {
value: FunctionalRenderContext
})
Vue.version = version
export default Vue
这里引用了initGlobalAPI,并且声明了$isServer,$ssrContext方法。
打开initGlobalAPI
 Object.defineProperty(Vue, 'config', configDef)
   Vue.util = {
    warn,
    extend,
    mergeOptions,
    defineReactive
  }
   Vue.set = set
  Vue.delete = del
  Vue.nextTick = nextTick
  ASSET_TYPES.forEach(type => {
    Vue.options[type + 's'] = Object.create(null)
})
ASSET_TYPES 为 export const ASSET_TYPES = ['component', 'directive', 'filter'] as const
组装后为
Vue.options = {
    components: Object.create(null),
    directives: Object.create(null),
    filters: Object.create(null),
    _base: Vue
}
紧接着builtInComponents 为 KeepAlive, Vue extend (to,from)继承
 extend(Vue.options.components, builtInComponents)
 initUse(Vue)
 initMixin(Vue)
 initExtend(Vue)
 initAssetRegisters(Vue)
上代码分别定义了
1. Vue.use 插件
2 .mixin 混入
3 . extend 继承 与 Vue.cid静态值。
4 . 注册了 Vue.component 组件 Vue.directive 指令 Vue.filter 过滤器
回顾一下这两个文件,大概是:instance/index.js 创建Vue函数,并且添加属性和方法。
core/index.js添加全局的静态的方法和属性。
继续来到上一层,来到了platforms/web/runtime/index.js文件。
Vue.config.mustUseProp = mustUseProp
Vue.config.isReservedTag = isReservedTag
Vue.config.isReservedAttr = isReservedAttr
Vue.config.getTagNamespace = getTagNamespace
Vue.config.isUnknownElement = isUnknownElement
// install platform runtime directives & components
extend(Vue.options.directives, platformDirectives)
extend(Vue.options.components, platformComponents)
// install platform patch function
Vue.prototype.__patch__ = inBrowser ? patch : noop这里主要是设置Vue.config,Vue.options.directives与Vue.options.components。
继承之后,结合上面的options ,现在的Vue.options为
Vue.options = {
    components: {
        KeepAlive,
        Transition,
        TransitionGroup
    },
    directives: {
        model,
        show
    },
    filters: Object.create(null),
    _base: Vue
}
接着判断是否浏览器,patch的话是填充虚拟dom的方法,后面再看看patch 具体干了什么。
Vue.prototype.__patch__ = inBrowser ? patch : noop挂载Vue.prototype.$mount方法
Vue.prototype.$mount = function (
  el?: string | Element,
  hydrating?: boolean
): Component {
  el = el && inBrowser ? query(el) : undefined
  return mountComponent(this, el, hydrating)
}
看到这里,大概就明白其实就是初始化Vue 然后依次调用initMixin,stateMixin,eventsMixin,lifecycleMixin,renderMixin。
这样Vue构造函数基本上就过了一遍了,这一块还是比较简单的,有基础的朋友大概过一次就知道了。
下一篇,我们将用一个简单的模板,来看看它是怎么工作的。
