t
JAVA_GUI_picturePuzzle
小白一枚,白的不能再白
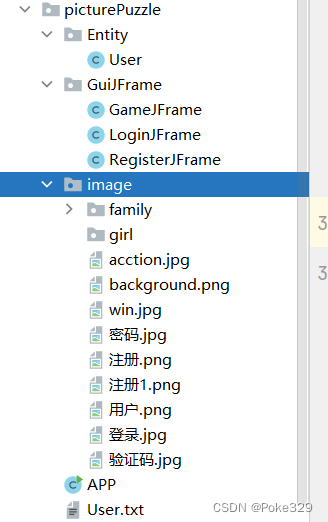
简要说明:User类--账号和密码
user.txt---------存放账号
APP:运行
GameJFrame:游戏界面
LoginJFrame:登录界面
RegisterJFrame:注册界面
第一步游戏界面:
我们可以看见的是有功能:
功能:
更换图片: 图片分类
重新游戏
重新登录
关闭游戏
关于我们:d
图片,公众号,二维码
如何实现这些功能呢? 接下来一步步走
准备好图片
首先我们要对页面进行初始化
    private void initJFrame() {
//          设置界面的宽高
        this.setSize(603, 680);
//         设置界面的标题
        this.setTitle("拼图单机版 v1.0");
//        设置界面置顶
        this.setAlwaysOnTop(true);
//        设置界面居中
        this.setLocationRelativeTo(null);
//        设置关闭模式
        this.setDefaultCloseOperation(WindowConstants.EXIT_ON_CLOSE);
//        取消默认的居中放置, 只有取消了才会按照xy轴的形式添加组件
        this.setLayout(null);
//        给整个界面添加键盘监听事件 实现了一个接口这个 具体看后面
        this.addKeyListener(this);
    }
this是什么?
public class GameJFrame extends JFrame

我们可以看到是这个类继承了JFrame
this也就是代表当前对象JFraem
接下来我们要对页面进行插图
我们的图片由16张图片组成,其中我使15张图片变成空白使其作为移动的图片
这里我们可以看到是使用了数组来进行存贮,4*4的图片框为了我们以后的图片移动
进行打乱图片
x和y用来确定了解空白图像位置
设置了全局变量
int step;
int[][] data = new int[4][4];
int[][] win = new int[][]{
{0, 1, 2, 3},
{4, 5, 6, 7},
{8, 9, 10, 11},
{12, 13, 14, 15}
};
int x;
int y;
    private void initData() {
        int[] tempArr = {0, 1, 2, 3, 4, 5, 6, 7, 8, 9, 10, 11, 12, 13, 14, 15};
        Random random = new Random();
        for (int i = 0; i < tempArr.length; i++) {
            int index = random.nextInt(tempArr.length);
            int temp = tempArr[i];
            tempArr[i] = tempArr[index];
            tempArr[index] = temp;
        }
        for (int i = 0; i < tempArr.length; i++) {
            if (tempArr[i] == 15) {
                x = i / 4;
                y = i % 4;
            }
            data[i / 4][i % 4] = tempArr[i];
        }
    }
private void initImage() {
JLabel stepCount = new JLabel("步数:" + step);
stepCount.setBounds(50, 50, 100, 20);
this.getContentPane().add(stepCount);
for (int i = 0; i < 4; i++) {
for (int i1 = 0; i1 < 4; i1++) {
// 创建一个图片ImageIcon的对象
// 获取当前要加载图片的序号
int num = data[i][i1];
ImageIcon imageIcon = new ImageIcon(path + "." + num + ".jpg");
if (num == 15) {
imageIcon = new ImageIcon("");
}
// 创建一个JLabel的对象(管理容器)
JLabel jLabel = new JLabel(imageIcon);
// 指定图片位置
jLabel.setBounds(i * 105 + 83, i1 * 105 + 134, 105, 105);
// 给图片添加边框
jLabel.setBorder(new BevelBorder(BevelBorder.LOWERED));
// 把管理容器添加到界面中
this.getContentPane().add(jLabel);
}
}
// 添加背景图片
JLabel background = new JLabel(new ImageIcon("untitled1/src/GuiDemo/picturePuzzle/image/background.png"));
background.setBounds(40, 40, 508, 560);
// 把背景图片添加到界面当中
this.getContentPane().add(background);
// 刷新界面
this.getContentPane().repaint();
}图片已经完成,可以来实现操作了
这里实现了一个接口 KeyListener键盘监听
使用了其中两个方法
pressed 按下不松时
keyReleased 只要你按了
定义了全局变量
step用来进行步数统计
win用来以后的一个作弊小技巧: 只要你按到w键则可以直接完成
如何完成的:直接改变数组值
所以我们可以直接用数组来存贮值
x,y用来获取到空白图片的位置
注意:
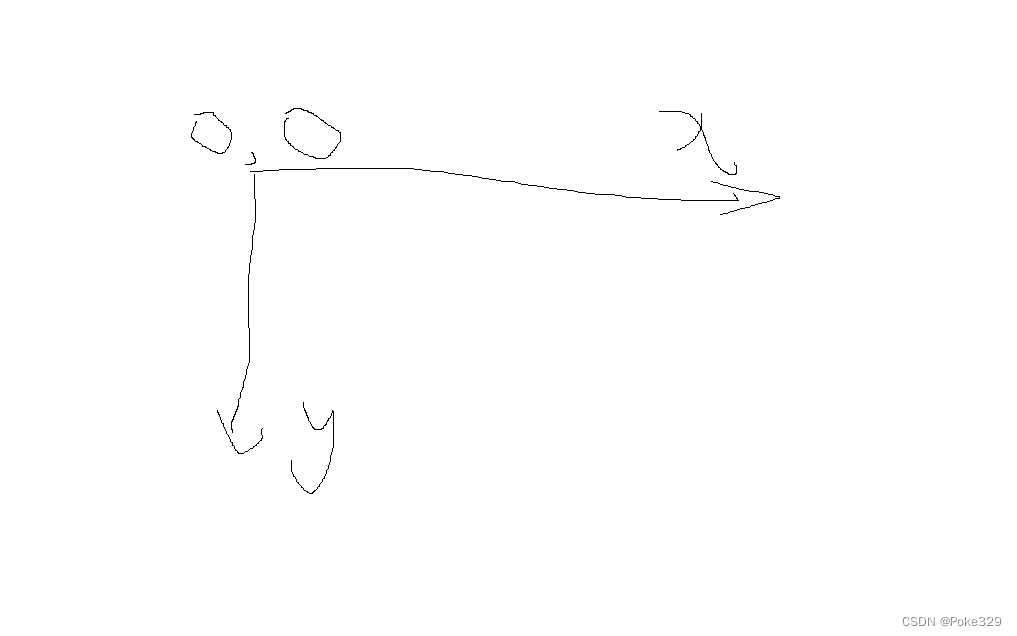
在JFrame这个框当中x,y其实是以第四象限来作为xy轴的,
    public void keyReleased(KeyEvent e) {
//        判断胜利不需要继续移动
        if (victory()) {
            return;
        }

// 判断你所按下的键盘的值

        int code = e.getKeyCode();
//        左:37 上:38 右:39 下:40
        if (code == 37) {
            if (x == 0) {
                return;
            }
            data[x][y] = data[x - 1][y];
            data[x - 1][y] = 15;
            x--;
            step++;
            initImage();
        } else if (code == 38) {
            if (y == 0) {
                return;
            }
            data[x][y] = data[x][y - 1];
            data[x][y - 1] = 15;
            y--;
            step++;
            initImage();
        } else if (code == 39) {
            if (x == 3) {
                return;
            }
            data[x][y] = data[x + 1][y];
            data[x + 1][y] = 15;
            x++;
            step++;
            initImage();
        } else if (code == 40) {
            if (y == 3) {
                return;
            }
            data[x][y] = data[x][y + 1];
            data[x][y + 1] = 15;
            y++;
            step++;
            initImage();
        } else if (code == 65) {
            initImage();
        } else if (code == 87) {
            data = new int[][]{
                    {0, 1, 2, 3},
                    {4, 5, 6, 7},
                    {8, 9, 10, 11},
                    {12, 13, 14, 15}
            };
            initImage();

//            x = 3;
//            y = 3;
        }

    }
在每一此进行操作时,我们要刷新图片,所以要initImage()
其中添加了this.getContentPane().removeAll()将所有的加载后的图片重新显示
        this.getContentPane().removeAll();

        // 统计步数
        JLabel stepCount = new JLabel("步数:" + step);
        stepCount.setBounds(50, 50, 100, 20);
        this.getContentPane().add(stepCount);
怎么判断我们完成拼图了呢
定义了一个全局变量
    int[][] win = new int[][]{
            {0, 1, 2, 3},
            {4, 5, 6, 7},
            {8, 9, 10, 11},
            {12, 13, 14, 15}
    };
public boolean victory() {
for (int i = 0; i < data.length; i++) {
for (int i1 = 0; i1 < data[i].length; i1++) {
if (data[i][i1] != win[i][i1]) {
return false;
}
}
}
// 循环结束表示数组遍历比较完毕,全都一样返回true
return true;
}这个方法我们该添加到哪里
    private void initImage() {
//        清除所有已经存在
        this.getContentPane().removeAll();
//        判断是否胜利
        if (victory()) {
            JLabel winJLabel = new JLabel(new ImageIcon("untitled1/src/GuiDemo/picturePuzzle/image/win.jpg"));
            winJLabel.setBounds(400, 450, 105, 105);
            this.getContentPane().add(winJLabel);
        }
}
我们每进行一次操作变回调用initImage()方法
接下来我们实现怎么查看图片,有的人拿到图片并不知道完整图片长什么样啊,所以我们定义一个a键来作为显示图片
怎么实现-----使用 KeyListener里面的pressed方法
    public void keyPressed(KeyEvent e) {
        int code = e.getKeyCode();
        if (code == 65) {
//            把页面中所有的图片全部删除
            this.getContentPane().removeAll();
//            加载第一张完整的图片
            JLabel all = new JLabel(new ImageIcon(path + ".jpg"));
            all.setBounds(83, 134, 420, 420);
            this.getContentPane().add(all);
//            加载背景图片
            JLabel background = new JLabel(new ImageIcon("untitled1/src/GuiDemo/picturePuzzle/image/background.png"));
            background.setBounds(40, 40, 508, 560);
//            把背景图片添加到界面当中
            this.getContentPane().add(background);
            // 刷新界面
            this.getContentPane().repaint();
        }
    }
现在是不是将界面的初始化,图片的打乱和加载,统计步数, 图片的操作, 作弊按钮, 显示按钮,是否完成拼图 都完成了
接下来完成功能模块
为什么以下的实例为全局变量?
    JMenu rePic = new JMenu("更换图片");
    JMenuItem family = new JMenuItem("家人");
    JMenuItem girl = new JMenuItem("美女");
    JMenuItem replayItem = new JMenuItem("重新游戏");
    JMenuItem reLoginItem = new JMenuItem("重新登录");
    JMenuItem closeItem = new JMenuItem("关闭游戏");
    JMenuItem accountItem = new JMenuItem("公众号");
因为我们要为他们添加事件
实现接口:
ActionListener
添加功能模块
    private void initJMenuBar() {
//              创建整个的菜单对象
        JMenuBar jMenuBar = new JMenuBar();
        //        创建菜单上面的的两个选项的对象(功能 关于我们)
        JMenu functionJMenu = new JMenu("功能");
        JMenu aboutJMenu = new JMenu("关于我们");

        //        将每一个选项下面的条目添加条目选项中
        rePic.add(family);
        rePic.add(girl);
        functionJMenu.add(rePic);
        functionJMenu.add(replayItem);
        functionJMenu.add(reLoginItem);
        functionJMenu.add(closeItem);
        aboutJMenu.add(accountItem);

        // 给条目绑定事件
        family.addActionListener(this);
        girl.addActionListener(this);
        replayItem.addActionListener(this);
        reLoginItem.addActionListener(this);
        closeItem.addActionListener(this);
        accountItem.addActionListener(this);

        // 将菜单里面的两个选项添加到菜单当中
        jMenuBar.add(functionJMenu);
        jMenuBar.add(aboutJMenu);

//        给整个界面设置菜单
        this.setJMenuBar(jMenuBar);
    }
public void actionPerformed(ActionEvent e) {
Random r = new Random();
Object source = e.getSource();
if (source == replayItem) {
// 计步器清零(计步器清零必须放在initImage()前面)
this.step = 0;
// 再次打乱二位数组中的数据
initData();
// 重新加载图片
initImage();
}else if(source == family) {
ArrayList<String> strings = new ArrayList<>();
File file = new File("untitled1/src/GuiDemo/picturePuzzle/image/family");
for (File value : Objects.requireNonNull(file.listFiles())) {
strings.add(String.valueOf(value));
}
int n = r.nextInt(strings.size());
String[] strings1 = strings.get(n).split("\\\\");
this.path = strings.get(n)+"\\"+strings1[strings1.length-1];
this.step = 0;
initData();
initImage();
}else if (source == reLoginItem) {
this.setVisible(false);
new LoginJFrame();
} else if (source == closeItem) {
System.exit(0);
} else if (source == accountItem) {
// 创建一个弹框对象
JDialog jDialog = new JDialog();
// 创建一个管理图片的容器对象JLabel
JLabel jLabel = new JLabel(new ImageIcon("untitled1/src/GuiDemo/picturePuzzle/image/acction.jpg"));
// 设置位置和宽高
jLabel.setBounds(0, 0, 258, 258);
// 把图片添加到弹框当中
jDialog.getContentPane().add(jLabel);
// 给弹框设置大小
jDialog.setSize(344, 344);
// 让弹框置顶
jDialog.setAlwaysOnTop(true);
// 让弹框居中
jDialog.setLocationRelativeTo(null);
// 弹框不关闭则无法操作下面的界面
jDialog.setModal(true);
// 让弹框显示出来
jDialog.setVisible(true);
}
}接下来的步骤可以自己完成,
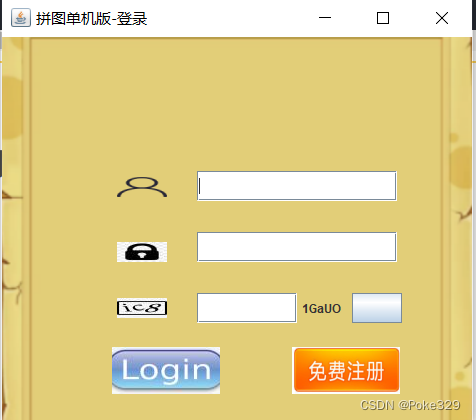
第二步登录模块:
首先初始化界面
    private void initJFrame() {
//        设置界面的画布
        this.setSize(488, 430);
//        设置界面标题
        this.setTitle("拼图单机版-登录");
//        设置界面置顶
        this.setAlwaysOnTop(true);
//        设置界面居中
        this.setLocationRelativeTo(null);
//    设置关闭模式
        this.setDefaultCloseOperation(WindowConstants.EXIT_ON_CLOSE);
//    显示
        this.setVisible(true);
    }
添加输入框和按钮
    JTextField username = new JTextField();
    JTextField password = new JPasswordField();
    JTextField code = new JTextField();
    String codeStr = getCode();
    //        添加登录按钮
    JButton login = new JButton();
    //        添加注册按钮
    JButton register = new JButton();
    //    添加刷新验证码
    JButton codeButton = new JButton();
    JLabel rightCode = new JLabel();
全局变量
    private void initView() {

//        清除所有
//        this.getContentPane().removeAll();

//        添加用户名文字
        JLabel usernameText = new JLabel(new ImageIcon("untitled1/src/GuiDemo/picturePuzzle/image/用户.png"));
        usernameText.setBounds(100, 130, 80, 40);
        this.getContentPane().add(usernameText);
//          添加用户名输入框
        username.setBounds(195, 134, 200, 30);
        this.getContentPane().add(username);

        //        添加密码文字
        JLabel passwordText = new JLabel(new ImageIcon("untitled1/src/GuiDemo/picturePuzzle/image/密码.jpg"));
        passwordText.setBounds(100, 195, 80, 40);
        this.getContentPane().add(passwordText);
//          添加密码输入框
        password.setBounds(195, 195, 200, 30);
        this.getContentPane().add(password);

        //        添加验证码文字
        JLabel codeText = new JLabel(new ImageIcon("untitled1/src/GuiDemo/picturePuzzle/image/验证码.jpg"));
        codeText.setBounds(115, 256, 50, 30);
        this.getContentPane().add(codeText);
//          添加验证码输入框
        code.setBounds(195, 256, 100, 30);
        this.getContentPane().add(code);
        // 刷新按钮
        codeButton.setBounds(350, 256, 50, 30);
        codeButton.addActionListener(this);
        this.getContentPane().add(codeButton);
//        设置内容
        proCode();
        //        生成验证码
//        JLabel rightCode = new JLabel();
//        rightCode.setText(codeStr);
//        rightCode.setBounds(300, 256, 50, 30);
//        this.getContentPane().add(rightCode);

//            添加登录按钮
        login.setBounds(110, 310, 108, 47);
        login.setIcon(new ImageIcon("untitled1/src/GuiDemo/picturePuzzle/image/登录.jpg"));
        login.addActionListener(this);

//        去除按钮的边框
        login.setBorderPainted(false);
//        去除按钮的背景
        login.setContentAreaFilled(false);
        this.getContentPane().add(login);

//        添加注册按钮
        register.setBounds(290, 310, 108, 47);
        register.setIcon(new ImageIcon("untitled1/src/GuiDemo/picturePuzzle/image/注册.png"));
        register.addActionListener(this);
        //        去除按钮的边框
        register.setBorderPainted(false);
//        去除按钮的背景
        register.setContentAreaFilled(false);
        this.getContentPane().add(register);

        JLabel background = new JLabel(new ImageIcon("untitled1/src/GuiDemo/picturePuzzle/image/background.png"));
        background.setBounds(40, 40, 508, 560);
//        把背景图片添加到界面当中
        this.getContentPane().add(background);

    }
验证码的生成
    private String getCode() {
        Random random = new Random();
        ArrayList<Integer> integers = new ArrayList<>();
        StringBuilder stringBuilder = new StringBuilder();
        for (int i = 48; i < 58; i++) {
            integers.add(i);
        }
        for (int i = 65; i < 91; i++) {
            integers.add(i);
        }
        for (int i = 97; i < 123; i++) {
            integers.add(i);
        }
        for (int i = 0; i < 5; i++) {
            int i1 = random.nextInt(integers.size() - 1);
            int code = integers.get(i1);
            stringBuilder.append((char)code);
        }
        return stringBuilder.toString();
    }

    private void proCode(){
        rightCode.setText(codeStr);
        rightCode.setBounds(300, 256, 50, 30);
        this.getContentPane().add(rightCode);
    }
proCode:点击验证码旁边的按钮边会刷新验证码
就是对验证码进行重新赋值
添加一个弹出框对账号和密码的提醒
    private void showJDialog(String content) {
        JDialog jDialog = new JDialog();
        jDialog.setSize(200,150);
        jDialog.setAlwaysOnTop(true);
        jDialog.setLocationRelativeTo(null);
        jDialog.setModal(true);
        JLabel warning = new JLabel(content);
        warning.setBounds(0, 0, 200, 150);
        jDialog.getContentPane().add(warning);
        jDialog.setVisible(true);
    }
事件监听
    public void actionPerformed(ActionEvent e) {
        Object source = e.getSource();
        String userName = String.valueOf(username.getText());
        String passWord = String.valueOf(password.getText());
        String CodeText = String.valueOf(code.getText());
        if(source == login){
            if(!CodeText.equals(codeStr)){
                showJDialog("您输入的验证码有错误");
                codeStr = getCode();
                rightCode.setText(codeStr);
                return;
            }
            for (User user: userArrayList) {
                if(user.getUsername().equals(userName)){
                    if(user.getPassword().equals(passWord)){
                        new GameJFrame();
                        this.setVisible(false);
                        return;
                    }else{
                        showJDialog("您输入的密码有误");
                        return;
                    }
                }
            }
            showJDialog("您输入的账号不存在");
        }else if(source == register){
            new RegisterJFrame();
            this.setVisible(false);
        }else if(source == codeButton){
            codeStr = getCode();
            rightCode.setText(codeStr);
        }
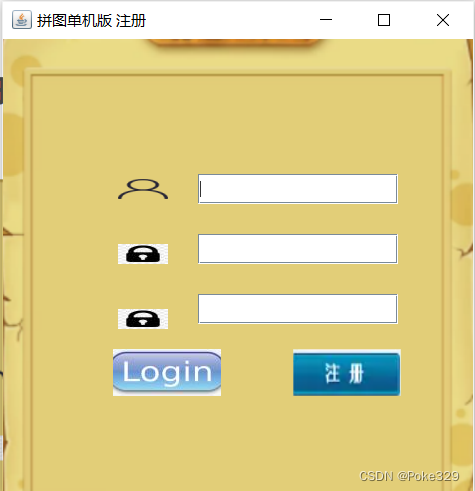
}第三步注册模块(接下来可以自己完成了):
要源代码的可以私信我
如果你想将这个程序变成exe执行文件
这篇文章能很好的帮助你


