在互联网世界里,HTTP 通常跑在 TCP/IP 协议栈之上,依靠 IP 协议实现寻址和路由、TCP 协议实现可 靠数据传输、DNS 协议实现域名查找、SSL/TLS 协议实现安全通信。此外,还有一些协议依赖于HTTP, 例如 WebSocket、HTTPDNS 等。这些协议相互交织,构成了一个协议网,而HTTP 则处于中心地位
web(万维网)三项关键技术
- URI:统一资源标识符,作为互联网上资源的唯一身份
- HTML:超文本标记语言,描述超文本文档
- HTTP:超文本传输协议,用来传输超文本
http协议
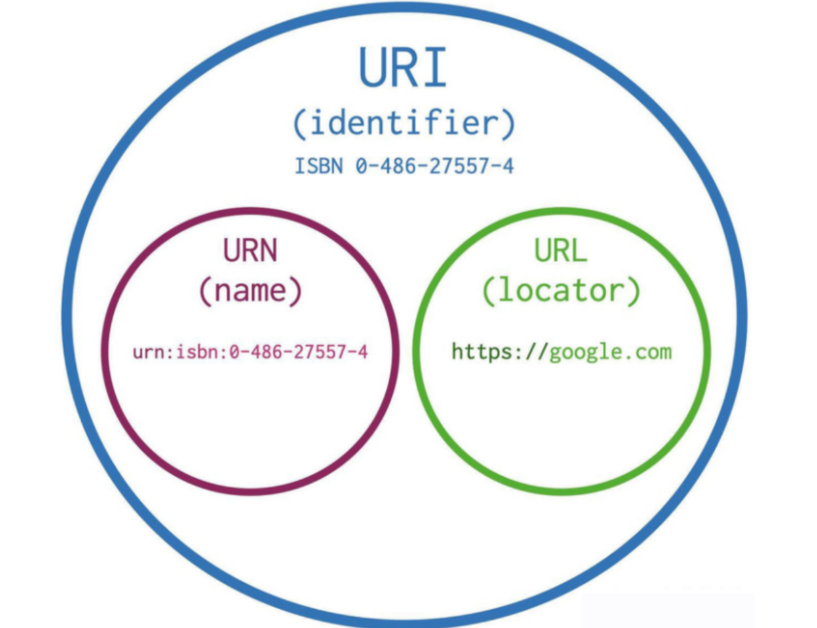
URI:(Uniform Resource Identifier),统一资源标识符,是一个用来唯一标识互联网上某一特定资源 的字符串
URL:(Uniform Resource Locator),统一资源定位符
URN:(Uniform Resource Name),统一资源名称
前端页面技术:HTML + CSS + JAVASCRIPT
MIME 类型通常仅包含两个部分:类型(type)和 子类型(subtype),中间由斜杠 / 分割,中间没有空白字符
静态资源和动态资源
静态资源
- 定义:静态资源是指在服务器上事先存在,不需要在请求时进行动态生成的文件,这些文件包括 HTML、CSS、JavaScript、图像(如 JPEG、PNG)等
- 生成方式:静态资源是直接从服务器上的文件系统提供的,没有经过服务器端的处理或计算,它们 的内容在创建时已经确定,不会根据每个请求而变化
- 特点:静态资源适用于那些内容较为固定,不经常变化的情况,它们可以被直接缓存,以提高访问 速度,并减轻服务器的负载
动态资源
- 定义:动态资源是在服务器上根据用户请求动态生成的内容。这通常涉及到使用服务器端脚本(如 PHP、Python、Node.js)进行处理,并根据用户请求的参数生成不同的内容
- 生成方式:动态资源的内容在请求时动态生成,可能涉及到数据库查询、计算或其他与用户请求相 关的操作,每次请求可能产生不同的结果
- 特点:动态资源适用于需要根据用户输入或其他动态条件生成内容的情况。它们通常涉及更多的计 算和服务器端的处理,可能会引起更高的服务器负载
网站流量指标
- UV:(unique visitors),独立访客量,独立访问者数量,一天内来自相同客户端的访问只计算一 次
- PV:(page views),页面浏览数量,网站点击量,访客每打开一个页面或刷新一次页面都计算一 次,
- IP:独立IP数量,一天内来自相同IP地址的客户端的访问只计算一次,是衡量网站流量的重要指标
第三方流量统计提供商
CNZZ数据专家——全球最大的中文网站统计分析平台 #CNZZ
百度统计——一站式智能数据分析与应用平台 #百度统计
Alexa排名_网站流量全球综合排名_中文网站排行榜 #第三方网站流量及排名分析
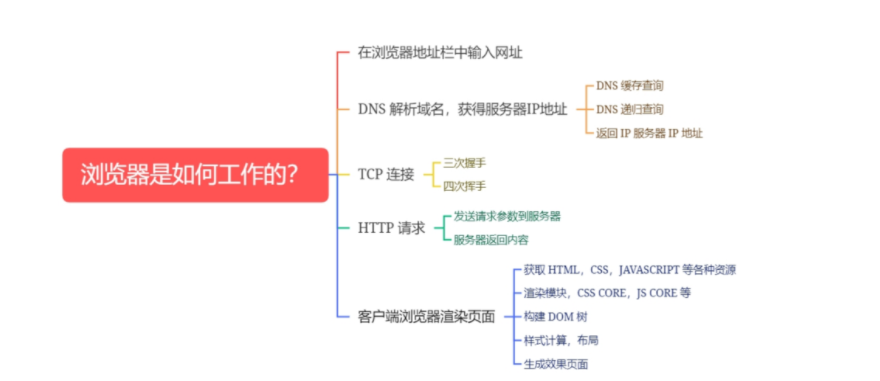
浏览器访问网站的过程
- 在浏览器地址栏中输入网址
- DNS 服务解析域名,客户端获得服务器 IP 地址
- 浏览器用 TCP 的三次握手与服务器建立连接
- 浏览器向服务器发送拼好的报文
- 服务器收到报文后处理请求,同样拼好报文再发给浏览器
- 浏览器解析报文,渲染输出页面
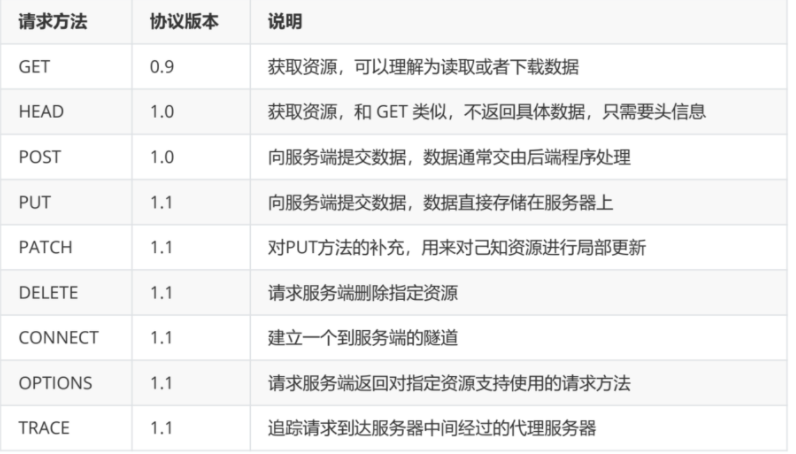
http请求方法
HTTP1.0 定义了三种请求方法: GET,POST,HEAD
HTTP1.1 新增了六种请求方法:OPTIONS,PUT,PATCH,DELETE,TRACE,CONNECT
在这些方法中,最常用的只有 GET,POST,HEAD,PUT 等有限的几种
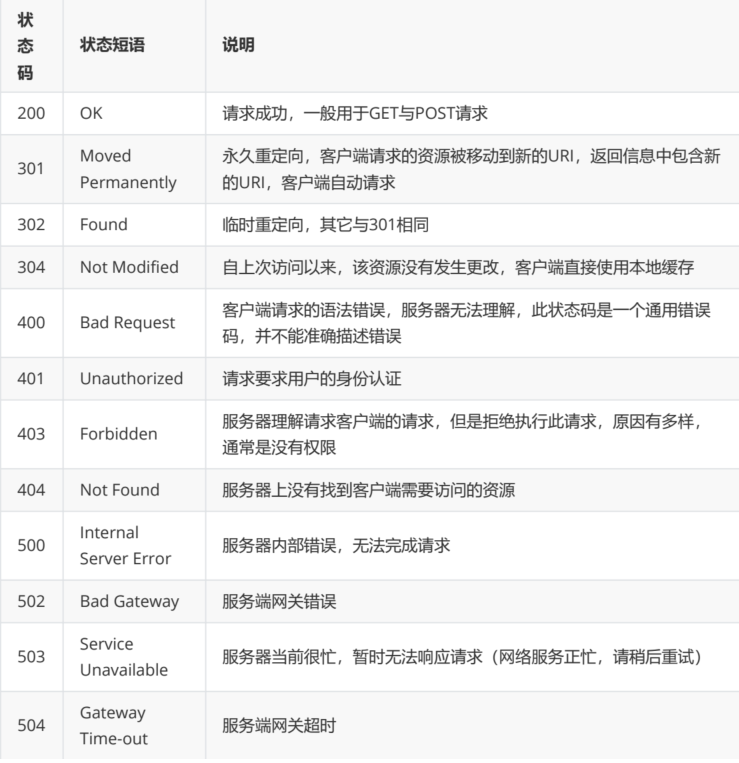
http相应状态码
常用状态码及对应短语
HTTP 状态码 | 菜鸟教程 #完整的41个状态码列表
网络io模型
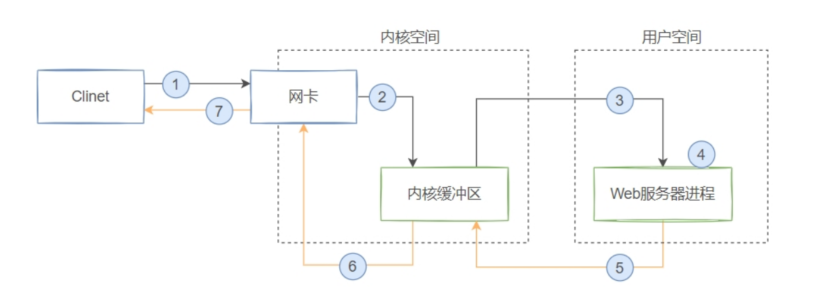
服务端网络io处理过程
- 客户端发送请求
- 将请求数据从网卡缓冲区拷贝到内核缓冲区,这一步由硬件通过DMA直接完成
- 将请求数据从内核缓冲区拷贝到用户空间的WEB服务器缓冲空间,这一步由操作系统完成
- 用户空间WEB服务进程处理请求,构建响应数据
- 将响应数据从WEB服务器缓冲区拷贝到内核缓冲区,这一步由操作系统完成
- 将响应数据从WEB服务器缓冲区拷贝到内核缓冲区,这一步由操作系统完成
- 返回响应数据给客户端
磁盘IO和网络IO,每次的IO过程,都有两个步骤:
- 将数据从文件先加载至内核内存空间(缓冲区),等待数据准备完成,时间较长
- 将数据从内核缓冲区复制到用户空间的进程的内存中,时间较短
五种IO模型
apache2的安装和使用
3种工作模式
- prefork模型
预派生模式,有一个主控制进程,然后生成多个子进程,每个子进程有一个独立的线程响应用户请求,相对比较占用内存,但是比较稳定,可以设置最大和最小进程数,是最古老的一种模式,也是最稳定的模式,适用于访问量不是很大的场景
优点:工作稳定
缺点:每个用户请求需要对应开启一个进程,占用资源较多,并发性差,不适用于高并发场景
- work模型
一种多进程和多线程混合的模型,有一个控制进程,启动多个子进程,每个子进程里面包含固定的线 程,使用线程来处理请求,当线程不够使用的时候会再启动一个新的子进程,然后在进程里面再启动线 程处理请求,由于其使用了线程处理请求,因此可以承受更高的并发
优点:相比prefor模型,其占用的内存较少,可以同时处理更多的请求
缺点:使用keepalive的长连接方式,某个线程会一直被占据,即使没有传输数据,也需要一直等待到超 时才会被释放。如果过多的线程被这样占据,也会导致在高并发场景下的无服务线程可用。(该问题在 prefork模式下,同样会发生)
- event模型
它和worker模式很像,最大 的区别在于,它解决了keepalive场景下,长期被占用的线程的资源浪费问题(某些线程因为被 keepalive,空挂在哪里等待,中间几乎没有请求过来,甚至等到超时)。event MPM中,会有一个专 门的线程来管理这些keepalive类型的线程,当有真实请求过来的时候,将请求传递给服务线程,执行完 毕后,又允许它释放。这样增强了高并发场景下的请求处理能力
优点:单线程响应多请求,占据更少的内存,高并发下表现更优秀,会有一个专门的线程来管理 keepalive类型的线程,当有真实请求过来的时候,将请求传递给服务线程,执行完毕后,又允许它释放 缺点:没有线程安全控制
Apache2安装
[root@ubuntu ~]# apt update;apt install apache2 -y
[root@ubuntu ~]# dpkg -l apache2

[root@rocky ~]# yum install httpd -y
[root@rocky ~]# rpm -q httpd
[root@ubuntu22 ~]$ ss -tunlp |grep 80
[root@ubuntu22 ~]$ lsof -i:80
[root@rocky ~]$ systemctl restart httpd
[root@rocky ~]$ ss -tunlp |grep 80
[root@rocky ~]$ lsof -i:80
#服务管理
[root@ubuntu ~]# systemctl status apache2.service
#自带的控制脚本
[root@ubuntu ~]# which apachectl
/usr/sbin/apachectl
[root@ubuntu ~]# apachectl
Usage: /usr/sbin/apachectl start|stop|restart|graceful|graceful-
stop|configtest|status|fullstatus|help
       /usr/sbin/apachectl <apache2 args>
       /usr/sbin/apachectl -h            (for help on <apache2 args>)
[root@ubuntu ~]# ll /usr/sbin/apache*
-rwxr-xr-x 1 root root 758672 Oct 26 21:44 /usr/sbin/apache2*                   #主程序
-rwxr-xr-x 1 root root   7229 May  4  2023 /usr/sbin/apache2ctl*                #自带控制脚本
lrwxrwxrwx 1 root root     10 Oct 26 21:44 /usr/sbin/apachectl -> apache2ctl*   #自带控制脚本
Apache配置和使用
配置说明
Apache2 的配置主要分为三部份,分别是全局配置,虚拟主机配置,模块配置
http://httpd.apache.org/docs/2.4/ #文档 https://httpd.apache.org/docs/2.4/zh-cn/mod/quickreference.html #指令索引 Apache2.2 中文手册 #2.2版本中 文文档,供参考
[root@ubuntu ~]# apachectl configtest
Syntax OK
[root@ubuntu ~]# apachectl -t
Syntax OK
#配置目录
[root@ubuntu ~]# ll /etc/apache2/
-rw-r--r-- 1 root root 7224 Oct 26 21:44 apache2.conf #主配置文件
drwxr-xr-x 2 root root 4096 Dec 21 14:35 conf-available/ #子配置文件目录
drwxr-xr-x 2 root root 4096 Dec 21 14:35 conf-enabled/ #生效的子配置文件, 链接到 conf-available中
-rw-r--r-- 1 root root 1782 May 4 2023 envvars #全局环境变量配置文 件
-rw-r--r-- 1 root root 31063 May 4 2023 magic #配合mod_mime_magic模块判断 MIME 类型的配置文件
drwxr-xr-x 2 root root 12288 Dec 21 14:35 mods-available/ #可用的模块配置文件
drwxr-xr-x 2 root root 4096 Dec 21 14:35 mods-enabled/ #生效的模块配置文 件,链接到 mods-available中
-rw-r--r-- 1 root root 320 May 4 2023 ports.conf #默认端口配置文件
drwxr-xr-x 2 root root 4096 Dec 21 14:35 sites-available/ #可用的虚拟主机配置 文件
drwxr-xr-x 2 root root 4096 Dec 21 14:35 sites-enabled/ #生效的虚似主机配置 文件,链接到 sites-available中
#主配置文件中的包含
[root@ubuntu ~]# cat /etc/apache2/apache2.conf | grep "^Include"
IncludeOptional mods-enabled/*.load
IncludeOptional mods-enabled/*.conf Include ports.conf
IncludeOptional conf-enabled/*.conf IncludeOptional sites-enabled/*.conf
#全局配置
[root@ubuntu ~]# ll -L /etc/apache2/conf-enabled/
-rw-r--r-- 1 root root 315 May 4 2023 charset.conf #默认 编码,全都注释
-rw-r--r-- 1 root root 3224 May 4 2023 localized-error-pages.conf #定定 义错误页面,全注释
-rw-r--r-- 1 root root 189 May 4 2023 other-vhosts-access-log.conf #未定 义的虚拟主机访问日志
-rw-r--r-- 1 root root 2174 May 4 2023 security.conf #安全 设置配置文件
-rw-r--r-- 1 root root 455 May 4 2023 serve-cgi-bin.conf #CGI 配置[root@ubuntu22 /etc/apache2/conf-enabled]$ apachectl -t
AH00558: apache2: Could not reliably determine the server's fully qualified domain name, using 127.0.1.1. Set the 'ServerName' directive globally to suppress this message
Syntax OK
[root@ubuntu22 /etc/apache2/conf-enabled]$ echo $?
0
[root@ubuntu22 /etc/apache2]$ cp apache2.conf{,.bak}
[root@ubuntu22 /etc/apache2]$ echo "ServerName ubuntu22" >> /etc/apache2/apache2.conf
[root@ubuntu22 /etc/apache2]$ apachectl -t
Syntax OK常用全局配置
Apache2 还具备同时支持多个站点的能力,称为虚拟主机,<VirtualHost>配置段中的指令仅对该段中 的特定站点(虚拟主机)有效
作用域:表示该指令出现在配置文件的什么位置才是合法的
| 作用域 | 说明 |
| server config | 该指令全局生效,不能写在 <VirtualHost>,<Directory>,.htAccess 中 |
| virtual host | 可以写在 <VirtualHost> 中 |
| directory | 可以写在 <Directory>,<Location>,<Files>,<Proxy> 中 |
| .htAccess | 可以写在目录及其子目录的 .htaccess 文件中 但可能会因overrides的设置而不起作用 |
常用配置项
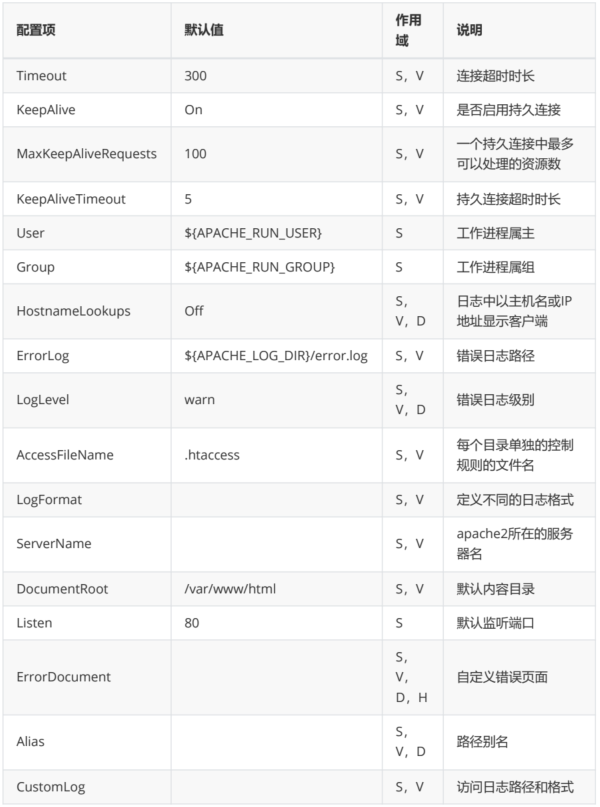
[root@ubuntu ~]# cat /etc/apache2/apache2.conf | grep -Ev '^#|^$'
DefaultRuntimeDir ${APACHE_RUN_DIR}         #默认运行目录
PidFile ${APACHE_PID_FILE}                  #PID 文件路径
Timeout 300
#超时时长默认300S
KeepAlive On                                #默认开启keepalive
MaxKeepAliveRequests 100                    #keepalive保持的最大连接数
KeepAliveTimeout 5                          #keepalive 超时时长5S
KeepAliveTimeout 5                          #进程属主
Group ${APACHE_RUN_GROUP}                   #进程属组
HostnameLookups Off
ErrorLog ${APACHE_LOG_DIR}/error.log    #错误日志路径
LogLevel warn                           #日志级别
IncludeOptional mods-enabled/*.load     #文件包含
IncludeOptional mods-enabled/*.conf     #文件包含
Include ports.conf                      #文件包含
<Directory />                           #目录权限设置
    Options FollowSymLinks
    AllowOverride None
    Require all denied
</Directory>
<Directory /usr/share>                      #目录权限设置
    AllowOverride None
    Require all granted
</Directory>
<Directory /var/www/>           #目录权限设置-默认网站配置,默认 DocumentRoot 是/var/www/html,从此处继承
    Options Indexes FollowSymLinks
    AllowOverride None
    Require all granted
</Directory>
AccessFileName .htaccess                    #定义htaccess文个
<FilesMatch "^\.ht">                        #用正则定义 htaccess 文件权限
    Require all denied
</FilesMatch>
LogFormat "%v:%p %h %l %u %t \"%r\" %>s %O \"%{Referer}i\" \"%{User-Agent}i\"" vhost_combined   #日志格式之一
LogFormat "%h %l %u %t \"%r\" %>s %O \"%{Referer}i\" \"%{User-Agent}i\""
combined               #日志格式之一
LogFormat "%h %l %u %t \"%r\" %>s %O" common                                      #日志格式之一
LogFormat "%{Referer}i -> %U" referer                                             #日志格式之一
LogFormat "%{User-agent}i" agent                                                  #日志格式之一
IncludeOptional conf-enabled/*.conf
#日志格式之一
IncludeOptional sites-enabled/*.conf
#文件包含
ServerName ubuntu
#主机名
[root@ubuntu ~]# cat /etc/apache2/sites-enabled/000-default.conf | grep -Ev "^.*#|^$"
<VirtualHost *:80>                                      #监听本机所有IP 80端口
ServerAdmin webmaster@localhost                         #管理员邮箱
    DocumentRoot /var/www/html                          #网站根目录,要先授权
    ErrorLog ${APACHE_LOG_DIR}/error.log                #错误日志
    CustomLog ${APACHE_LOG_DIR}/access.log combined     #访问日志路径和格式
</VirtualHost>
[root@ubuntu ~]# cat /etc/apache2/mods-enabled/dir.conf |grep -Ev "^#|^$"
<IfModule mod_dir.c>
DirectoryIndex index.html index.cgi index.pl index.php index.xhtml index.htm
</IfModule>#默认工作目录 /var/www/html,修改默认页面再次测试
[root@ubuntu ~]# echo "<h1>hello world</h1>" > /var/www/html/index.html<!-- </html> -->#默认主页,第一优先级为 default.html,第二优先级为 test.txt
[root@ubuntu ~]# cat /etc/apache2/mods-enabled/dir.conf
<IfModule mod_dir.c>
DirectoryIndex default.html test.txt index.html index.cgi index.pl index.php index.xhtml index.htm
</IfModule>
#重载
[root@ubuntu ~]# systemctl reload apache2.service
#设置页面
[root@ubuntu ~]# echo "this page from default.html" > /var/www/html/default.html
[root@ubuntu ~]# echo "this page from test.txt" > /var/www/html/test.txt
[root@ubuntu ~]# echo "this page from index.html" > /var/www/html/index.html
#测试,生效的还是 index.html
[root@ubuntu ~]# curl 127.1
this page from index.html
#因为现在默认监听的是80端口,被虚拟主机配置命中,删除虚拟主机配置
[root@ubuntu ~]# rm -f /etc/apache2/sites-enabled/000-default.conf
#重载,再次测试
[root@ubuntu ~]# systemctl reload apache2.service
#默认配置生效
[root@ubuntu ~]# curl 127.1
this page from default.html
#删除第一优先级文件,再次测试
[root@ubuntu ~]# rm -f /var/www/html/default.html
[root@ubuntu ~]# ls /var/www/html/
index.html test.txt
#第二优先级生效
[root@ubuntu ~]# curl 127.1
this page from test.txt
#删除默认目录下所有文件,在浏览器中查看,能看到列出了当前目录
[root@ubuntu ~]# rm -f /var/www/html/*
[root@ubuntu ~]# cat /etc/apache2/ports.conf
Listen 80
[root@ubuntu ~]# ss -tnlp | grep apache2
LISTEN 0      511                *:80              *:*    users:
(("apache2",pid=7293,fd=4),("apache2",pid=7292,fd=4),("apache2",pid=6882,fd=4))
#还原监听80端口,修改默认内容目录为 /var/www/html,修改配置文件
[root@ubuntu ~]# vim /etc/apache2/apache2.conf
DocumentRoot /data/www/                         #增加此行,指定默认内容目录
#重载服务,并创建目录
[root@ubuntu ~]# systemctl reload apache2;mkdir -pv /data/www
#设置默认页面
[root@ubuntu ~]# echo "data-index"> /data/www/index.html
#测试,403
[root@ubuntu ~]# curl 127.1
<!DOCTYPE HTML PUBLIC "-//IETF//DTD HTML 2.0//EN">
<html><head>
<title>403 Forbidden</title>
</head><body>
<h1>Forbidden</h1>
<p>You don't have permission to access this resource.</p> <hr>
<address>Apache Server at 127.0.0.1 Port 80</address> </body></html>
[root@ubuntu ~]# curl 127.1 -I
HTTP/1.1 403 Forbidden
Date: Mon, 25 Dec 2023 13:36:41 GMT
Server: Apache
Content-Type: text/html; charset=iso-8859-1
#修改权限,再次测试,依然403
[root@ubuntu ~]# chmod 777 -R /data/www/
[root@ubuntu ~]# curl 127.1
<!DOCTYPE HTML PUBLIC "-//IETF//DTD HTML 2.0//EN">
<html><head>
<title>403 Forbidden</title>
</head><body>
<h1>Forbidden</h1>
<p>You don't have permission to access this resource.</p> <hr>
<address>Apache Server at 127.0.0.1 Port 80</address> </body></html>
配置数据压缩
启用 apache2 的数据压缩功能能减少网络IO的数据量,提高服务器的网络吞吐能力
默认已开启数据压缩
#还原默认配置,增加文件
[root@ubuntu html]# ls -lh
total 1.6M
-rw-r--r-- 1 root root  164 Dec 31 07:36 index.html
-rw-r--r-- 1 root root  88K Dec 31 07:35 test.css
-rw-r--r-- 1 root root 674K Jan 17  2023 test.jpg
-rw-r--r-- 1 root root 428K Dec 31 05:00 test.js
-rw-r--r-- 1 root root 428K Dec 31 05:02 test.txt
#index.html 中引用三个资源
[root@ubuntu html]# cat index.html
<script type='text/javascript' src='./test.js'></script>
<link rel='stylesheet' href='./test.css' type='text/css' />
<img src="./test.jpg" style="width:100px;" />
#需要模块支持,默认己加载
[root@ubuntu ~]# apache2ctl -M | grep deflate
 deflate_module (shared)
#默认压缩规则
[root@ubuntu ~]# cat /etc/apache2/mods-enabled/deflate.conf
<IfModule mod_deflate.c>
    <IfModule mod_filter.c>
        AddOutputFilterByType DEFLATE text/html text/plain text/xml text/css text/javascript
        AddOutputFilterByType DEFLATE application/x-javascript application/javascript application/ecmascript
        AddOutputFilterByType DEFLATE application/rss+xml
        AddOutputFilterByType DEFLATE application/wasm
        AddOutputFilterByType DEFLATE application/xml
    </IfModule>
</IfModule>
在浏览器中测试,CSS,JS 被压缩,JPG没有被压缩,除了在浏览器中查看外,还可以在access日志中查 看
修改压缩规则,再次测试
[root@ubuntu ~]# cat /etc/apache2/mods-enabled/deflate.conf
<IfModule mod_deflate.c>
    <IfModule mod_filter.c>
        #AddOutputFilterByType DEFLATE text/html text/plain text/xml text/css text/javascript
        AddOutputFilterByType DEFLATE text/javascript       #只压缩js
        AddOutputFilterByType DEFLATE application/x-javascript application/javascript application/ecmascript
        AddOutputFilterByType DEFLATE application/rss+xml
        AddOutputFilterByType DEFLATE application/wasm
        AddOutputFilterByType DEFLATE application/xml
#压缩比最高
        DeflateCompressionLevel 9
    </IfModule>
</IfModule>
[root@ubuntu ~]# systemctl reload apache2
css没有被压缩
#curl 默认不压缩,是否需要压缩要客户端协商
[root@ubuntu ~]# curl -v 127.1/test.js >/dev/null
*   Trying 127.0.0.1:80...
  % Total    % Received % Xferd  Average Speed   Time    Time     Time  Current
                                 Dload  Upload   Total   Spent    Left  Speed
 0     0    0     0    0     0      0      0 --:--:-- --:--:-- --:--:--     0*
 Connected to 127.0.0.1 (127.0.0.1) port 80 (#0)
> GET /test.js HTTP/1.1
> Host: 127.0.0.1
> User-Agent: curl/7.81.0
> Accept: */*
>
* Mark bundle as not supporting multiuse
< HTTP/1.1 200 OK
< Date: Sun, 31 Dec 2023 08:00:48 GMT < Server: Apache/2.4.52 (Ubuntu)
< Last-Modified: Sun, 31 Dec 2023 05:00:42 GMT < ETag: "6aca2-60dc725ad84f5"
< Accept-Ranges: bytes
#没有被压缩
< Content-Length: 437410
< Vary: Accept-Encoding
< Content-Type: text/javascript <
{ [65273 bytes data]
100  427k  100  427k    0     0  18.0M      0 --:--:-- --:--:-- --:--:-- 20.8M
* Connection #0 to host 127.0.0.1 left intact


#wget 默认也不压缩
[root@ubuntu ~]# wget 127.0.0.1/test.js
--2023-12-31 08:02:05--  http://127.0.0.1/test.js
Connecting to 127.0.0.1:80... connected.
HTTP request sent, awaiting response... 200 OK
Length: 437410 (427K) [text/javascript]
Saving to: ‘test.js’

#curl 启用压缩
[root@ubuntu ~]# curl --compressed -v 127.1/test.js >/dev/null
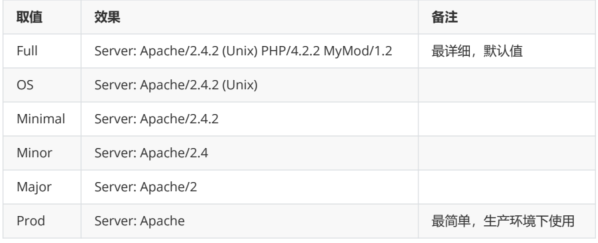
ServerTokens 配置响应头中的Server 字段信息
ServerTokens 选项用来配置 HTTP 响应头中的 Server 字段信息,其取值如下
#当前使用的是 OS
[root@ubuntu ~]# cat /etc/apache2/conf-enabled/security.conf
# ServerTokens
# This directive configures what you return as the Server HTTP response
# Header. The default is 'Full' which sends information about the OS-Type
# and compiled in modules.
# Set to one of:  Full | OS | Minimal | Minor | Major | Prod
# where Full conveys the most information, and Prod the least.
#ServerTokens Minimal
ServerTokens OS
#ServerTokens Full
配置持久连接
持久连接是指,建立连接后,每个资源获取完后不会立即断开连接,而是保持一段时间后断开,默认是 开启了持久连接
#默认设置
[root@ubuntu ~]# cat /etc/apache2/apache2.conf | grep -vE "^#" | grep "KeepAlive"
KeepAlive On                   #默认开启了持久连接
MaxKeepAliveRequests 100       #在一个持久连接内,最多可以累计处理100次请求
KeepAliveTimeout 5             #持久连接保持时间
定义路径别名
Alias 指令用于在URL 和文件系统之间实现映射,使不在 DocumentRoot 目录下的内容也能成为项目的 一部份
Alias [URL-path] file-path|directory-path
#以URL-path开头的路径在访问时将被映射到后面的文件系统路径,URL-path区分大小写
#作用域 server config, virtual host, directory
AliasPreservePath OFF|ON    #此指令配合 Alias 不使用 URL-path 参数时使用,默认值 OFF, 作用域同上
#ON     完整映射,每个资源都单独存在
#OFF    整体映射,被命中的资源都映射到同一个资源
[root@ubuntu22 /var/www/html]$ ls
bak index.html
[root@ubuntu22 /var/www/html]$ tree
.
├── bak
│ ├── index.html.bak
│ └── test
│ └── test.txt
└── index.html
[root@ubuntu22 /etc/apache2]$ cat apache2.conf
Alias "/test/" "/var/www/html/bak/test/"
[root@ubuntu22 /etc/apache2]$ systemctl restart apache2.service
[root@ubuntu22 /etc/apache2]$ curl http://127.0.0.1/test/test.txt
test
#别名区分大小写
[root@ubuntu22 /etc/apache2]$ curl http://127.0.0.1/Test/test.txt
<!DOCTYPE HTML PUBLIC "-//IETF//DTD HTML 2.0//EN">
<html><head>
<title>404 Not Found</title>
</head><body>
<h1>Not Found</h1>
<p>The requested URL was not found on this server.</p>
<hr>
<address>Apache/2.4.52 (Ubuntu) Server at 127.0.0.1 Port 80</address>
</body></html>
#如果 alias 定义的目录在 DocumentRoot 之外,则需要单独授权,否则不可用
#别名中定义的 URL-path 如果不是以 / 结尾,则后面的 file-path 也不能以 / 结尾
[root@ubuntu ~]# cat /etc/apache2/apache2.con
Alias "/test" "/alias/test"
[root@ubuntu ~]# systemctl restart apache2
#要确保apache2 运行用户对该目录有相应权限
[root@ubuntu ~]# mkdir -pv /lias/test
[root@ubuntu ~]# echo "alias test" > /alias/test/test.html
#提示403,没有权限
[root@ubuntu ~]# curl http://127.0.0.1/test/test.html
<!DOCTYPE HTML PUBLIC "-//IETF//DTD HTML 2.0//EN">
<html><head>
<title>403 Forbidden</title>
</head><body>
<h1>Forbidden</h1>
<p>You don't have permission to access this resource.</p>
<hr>
<address>Apache/2.4.52 (Ubuntu) Server at 127.0.0.1 Port 80</address> </body></html>
#加权限,再次测试
[root@ubuntu ~]# cat /etc/apache2/apache2.conf | tail
Alias "/test" "/alias/test"
<Directory "/alias/test">
Options Indexes FollowSymLinks
AllowOverride None
Require all granted
</Directory>
[root@ubuntu ~]# curl http://127.0.0.1/test/test.html alias test
#如果在 <Location>, <LocationMatch>等指令中使用 Alias ,则可以省略掉 URL-path 参数 #这种写法仅在 Apache 2.4.19版本及后续版本中支持
<Location "/image">
Alias "/ftp/pub/image"
</Location>
<LocationMatch "/error/(?<NUMBER>[0-9]+)">
Alias "/usr/local/apache/errors/%{env:MATCH_NUMBER}.html" </LocationMatch>
# /files/foo ---- /ftp/pub/files/foo
# /files/bar ---- /ftp/pub/files/bar
<Location "/files">
AliasPreservePath on
Alias "/ftp/pub/files"
</Location>
# /errors/foo ---- /var/www/errors.html # /errors/bar ---- /var/www/errors.html
<Location "/errors">
AliasPreservePath off
Alias "/var/www/errors.html" </Location>访问资源控制
访问资源控制
#删除重新,还原权限
[root@ubuntu ~]# rm -rf /data/ mkdir -pv /data/www;echo "data- index">/data/www/index.html

#修改apache2 配置,并重载
[root@ubuntu ~]# cat /etc/apache2/apache2.conf
DocumentRoot /data/www/                         #指定默认内容目录
<Directory /data/www/>                          #资源控制
        Options Indexes FollowSymLinks          #目录选项(Indexes可以再页面显示目录,删除则不行)
        AllowOverride None                      #是否支持 .htaccess 配置规则
        Require all granted                     #访问授权
</Directory>

#测试
[root@ubuntu ~]# curl 127.1
data-index


Options [+|-]option [[+|-]option]
#指定目录选项,可以同时有多个值,作用域 server config, virtual host, directory, .htaccess
#Indexes 显示目录内容列表
#Includes 允许使用 `mod_include`模块提供的服务器端包含功能
                #FollowSymLinks 可以跟随软链接,默认值
                #SymLinksifOwnerMatch 服务器仅在符号连接与目标文件或目录的所有者具有相同 的用户ID时才使用它
                #ExecCGI 允许使用 `mod_cgi`模块执行CGI脚本
                #Multiviews 允许使用 `mod_negotiation`模块提供内容协商的多重视图
                #All 启用除了 MultiViews 之外的所有选项
                #None 不支持任何特性

#apache2 允许一个目录被配置多次 Options,如果一个目录被设置了多条 Options,则生效的是值最多的那条,其它Options 中指定的值不会被合并,如果在值前面使用了 +,则一 定被合并  ,- 一定被去除,但符号不要混搭使用,使用-IncludesNOEXEC或-Includes时,不论前面如何 设置,都会完全禁用服务器端包含
                <Directory /path/>
                    Options Includes FollowSymLinks     #这条无效,被下面的覆盖
                    Options Indexes                     #这条生效
                <Directory /path/>

                <Directory /path/>
                    Options +Indexes
                    Options +Includes +FollowSymLinks       #三个值都生效,并集
                  <Directory /path/>

                <Directory /path/>
                    Options Indexes FollowSymLinks
                <Directory /path/>

                <Directory /path/child/>
                    Options +Includes -Indexes          #Includes,FollowSymLinks
                <Directory /path/>

AllowOverride All|None|directive-type [directive-type] ...
#作用域 directory
#允许在 .htaccess 文件中指定的指令类型,文件名不一定是 .htaccess,由 AccessFileName 选项指定
#仅在不包含正则表达式的<Directory>配置段中才是有效的
#在<Location>, <DirectoryMatch>, <Files>配置段中都是无效的
#ALL   所有指令都可以在 .htaccess 文件中生效
#None  不使用 .htaccess 文件中的指令
#directive-type可以是下列各组指令之一,AuthConfig,FileInfo,Indexes, Limit,Options[=Option,...]
#AllowOverride AuthConfig   只能在 .htaccess 文件中配置 AuthConfig 相关指令
#AllowOverride Options=FollowSmlinks Indexes  可以在 .htaccess 文 件中配置 FollowSmlinks Indexes
Require [not] entity-name [entity-name] ...
#作用域 directory, .htaccess
#用于指定哪些用户允许访问哪些资源
#某些情况下需要配合AuthName,AuthType,AuthUserFile,AuthGroupFile指 令一起使用
#Require all granted                            所有用户都可以访问
#Require all denied                             所有用户都不可以访问
#Require method http-method [http-method] ...   特定请请求方法可以访问
#Require user userid [userid] ...               特定用户可以访问
#Require group group-name [group-name] ...      特定组中的用户可以访问
#Require valid-user                             所有有效用户可以访问
#Require ip 10 172.20 192.168.2                 指定IP可以访问
#Require forward-dns dynamic.example.org        指定主机名或域名可以访问
日志配置
apache2中的日志主要包括错误日志和访问日志两类
#主配置文件-错误日志路径,级别,定义可用的日志格式
[root@ubuntu apache2]# cat apache2.conf | grep -i log | grep -Ev '^#'
ErrorLog ${APACHE_LOG_DIR}/error.log
LogLevel warn                           #定义错误日志级别
LogFormat "%v:%p %h %l %u %t \"%r\" %>s %O \"%{Referer}i\" \"%{User-Agent}i\"" vhost_combined
LogFormat "%h %l %u %t \"%r\" %>s %O \"%{Referer}i\" \"%{User-Agent}i\"" combined
LogFormat "%h %l %u %t \"%r\" %>s %O" common
LogFormat "%{Referer}i -> %U" referer
LogFormat "%{User-agent}i" agent

User-agent      #用户代理,浏览器头
Referer         #前一个页面,表示是从哪一个页面跳转过来的
man 3 strftime  #时间格式相关帮助


#没有被虚以主机配置命中的访问的访问日志
[root@ubuntu apache2]# cat conf-enabled/other-vhosts-access-log.conf | grep -Ev '^$|^#'
CustomLog ${APACHE_LOG_DIR}/other_vhosts_access.log vhost_combined


#默认虚拟主机日志配置
[root@ubuntu apache2]# cat sites-enabled/000-default.conf  | grep -i log | grep - Ev '^.*#'
    ErrorLog ${APACHE_LOG_DIR}/error.log     CustomLog ${APACHE_LOG_DIR}/access.log combined

#默认日志
[root@ubuntu ~]# ls  /var/log/apache2/*log /var/log/apache2/access.log
/var/log/apache2/error.log
/var/log/apache2/other_vhosts_access.log
[root@ubuntu ~]# curl -I 127.1
HTTP/1.1 200 OK
Date: Fri, 29 Dec 2023 15:49:06 GMT
Server: Apache/2.4.52 (Ubuntu)
Content-Type: text/html;charset=UTF-8
#自定义UA头
[root@ubuntu ~]# curl -I -A "test-UA" 127.1
HTTP/1.1 200 OK
Date: Fri, 29 Dec 2023 15:49:15 GMT
Server: Apache/2.4.52 (Ubuntu)
Content-Type: text/html;charset=UTF-8
[root@ubuntu ~]$ tail  -n 2 /var/log/apache2/access.log
127.0.0.1 - - [20/Feb/2024:19:21:13 +0800] "HEAD / HTTP/1.1" 200 225 "-" "curl/7.81.0"
127.0.0.1 - - [20/Feb/2024:19:22:09 +0800] "HEAD / HTTP/1.1" 200 225 "-" "test-UA"
状态页设置
#状态页需要相关模块支持
[root@ubuntu ~]# apachectl -M | grep status
 status_module (shared)
#默认己开启了状态页配置
[root@ubuntu ~]# cat /etc/apache2/mods-enabled/status.load
LoadModule status_module /usr/lib/apache2/modules/mod_status.so
[root@ubuntu ~]# cat /etc/apache2/mods-enabled/status.conf | grep -Ev "^.*#|^$"
<IfModule mod_status.c>
    <Location /server-status>           #可以自定义路径
        SetHandler server-status        #由此处决定上一行中定义的地址是查看状态
        Require local                   #但默认只能本地访问,修改此处为 all granted,在 浏览器中进行测试
    </Location>
    ExtendedStatus On                   #详细显示
    <IfModule mod_proxy.c>
        ProxyStatus On
    </IfModule>
</IfModule>
#测试,在浏览器中访问
http://10.0.0.206/server-status
[root@ubuntu ~]$ systemctl restart apache2.service
虚拟主机配置
apache2 服务支持在一台物理服务器上配置多个网站,我们可以通过虚拟主机配置来实现该功能 在 apache2 服务中配置了虚拟主机,还需要在DNS解析中添加域名解析,将域名指向 apache2 服务器 所在的IP地址
DNS 解析负责将域名解析到 apache2 服务器上,虚拟主机配置负责区分不同的网站,将不同的域名与 内容分别对应起来
多虚拟主机的实现方式
- 基于端口实现:用不同的端口标识不同的虚拟主机
- 基于IP实现:用不同的IP地址标识不同的虚拟主机
- 基于域名实现:用不同的域名标识不同的虚拟主机
#默认虚拟主机配置
[root@ubuntu ~]# ls -lh /etc/apache2/sites-enabled/
total 0
lrwxrwxrwx 1 root root 35 Dec 29 14:41 000-default.conf -> ../sites- available/000-default.conf
[root@ubuntu /etc/apache2/sites-enabled]$ cat  000-default.conf |grep  -Ev "^.*#|^$"
<VirtualHost *:80>
        ServerAdmin webmaster@localhost
        DocumentRoot /var/www/html
        ErrorLog ${APACHE_LOG_DIR}/error.log
        CustomLog ${APACHE_LOG_DIR}/access.log combined
</VirtualHost>
[root@ubuntu22 /etc/apache2/sites-enabled]$ cat /etc/apache2/apache2.conf
DocumentRoot /data/www/
<Directory /data/www/>
        Options Indexes FollowSymLinks
        AllowOverride None
        Require all granted
</Directory>
#创建相关内容
[root@ubuntu ~]# mkdir -pv /data/www/web{1,2,3}
[root@ubuntu ~]# for i in {1..3};do echo 'web-'$i > /data/www/web$i/index.html;done
[root@ubuntu ~]# tree /data/www/ /data/www/
├── web1
│   └── index.html ├── web2
│   └── index.html └── web3
    └── index.html
3 directories, 3 files
#在浏览器中测试,还是走到默认的 /var/www/html 中了,因为请求被默认的虚拟主机配置命中
[root@ubuntu ~]# curl 127.1
配置基于端口区分的虚拟主机
[root@ubuntu22 /etc/apache2/sites-enabled]$ cat vhost.conf
Listen 81
Listen 82
Listen 83

<virtualhost *:81>
 DocumentRoot /data/www/web1/
 ServerName www.a.com
 CustomLog "${APACHE_LOG_DIR}/access_www.a.log" combined
  <Directory /data/www/web1/>
    Options FollowSymLinks
    AllowOverride None
    Require all granted
  </Directory>
</virtualhost>

<virtualhost *:82>
  DocumentRoot /data/www/web2/
  ServerName www.b.com
  CustomLog "${APACHE_LOG_DIR}/access_www.b.log" combined
  <Directory /data/www/web2/>
    Options FollowSymLinks
    AllowOverride None
    Require all granted
  </Directory>
</virtualhost>

<virtualhost *:83>
  DocumentRoot /data/www/web3/
  ServerName www.c.com
  CustomLog "${APACHE_LOG_DIR}/access_www.c.log" combined
  <Directory /data/www/web3/>
    Options FollowSymLinks
    AllowOverride None
    Require all granted
  </Directory>
</virtualhost>

[root@ubuntu ~]# apachectl -t
Syntax OK
[root@ubuntu ~]# systemctl reload apache2
#查看监听端口
[root@ubuntu ~]# ss -tnlp | grep apache2
#测试
[root@ubuntu ~]# curl 127.1             #默认80 hello world
[root@ubuntu ~]# curl 127.1:81
web-1
[root@ubuntu ~]# curl 127.1:82
web-2
[root@ubuntu ~]# curl 127.1:83
web-3

#在hosts 文件中配置域名与IP对应关系
10.0.0.152 www.a.com www.b.com  www.c.com

#测试,发现此时域名无法锚定网站,只与端口有关 [root@ubuntu ~]# curl www.a.com     #默认80 hello world
[root@ubuntu ~]# curl www.a.com:81
web-1
[root@ubuntu ~]# curl www.a.com:82
web-2
[root@ubuntu ~]# curl www.a.com:83
web-3
[root@ubuntu ~]# curl www.b.com     #默认80
hello world
[root@ubuntu ~]# curl www.c.com     #默认80
hello world
#与IP地址也无关,vhost只区分了端口,没有区分域和IP
[root@ubuntu ~]# curl 127.1
hello world
[root@ubuntu ~]# curl 127.1:81
web-1
[root@ubuntu ~]# curl 127.1:82
web-2
[root@ubuntu ~]# curl 127.1:83
web-3
[root@ubuntu ~]# curl 10.0.0.210
hello world
[root@ubuntu ~]# curl 10.0.0.210:81
web-1
[root@ubuntu ~]# curl 10.0.0.210:82
web-2
[root@ubuntu ~]# curl 10.0.0.210:83
web-3
配置基于ip区分的虚拟机
#添加IP地址
[root@ubuntu ~]# ip a a 10.0.0.80/24 dev ens33
[root@ubuntu ~]# ip a a 10.0.0.81/24 dev ens33
[root@ubuntu ~]# ip a a 10.0.0.82/24 dev ens33
[root@ubuntu ~]# ip a a 10.0.0.83/24 dev ens33
[root@ubuntu ~]# ip a s ens33
2: ens33: <BROADCAST,MULTICAST,UP,LOWER_UP> mtu 1500 qdisc fq_codel state UP group default qlen 1000
    link/ether 00:0c:29:84:27:78 brd ff:ff:ff:ff:ff:ff
    altname enp2s1
    inet 10.0.0.210/24 brd 10.0.0.255 scope global dynamic noprefixroute ens33
    valid_lft 1599sec preferred_lft 1599sec
    inet 10.0.0.80/24 scope global secondary ens33
    valid_lft forever preferred_lft forever
    inet 10.0.0.81/24 scope global secondary ens33
    valid_lft forever preferred_lft forever
    inet 10.0.0.82/24 scope global secondary ens33
    valid_lft forever preferred_lft forever
    inet 10.0.0.83/24 scope global secondary ens33
    valid_lft forever preferred_lft forever
    inet6 fe80::20c:29ff:fe84:2778/64 scope link
    valid_lft forever preferred_lft forever
#修改 hosts文件,绑定域名和IP [root@ubuntu ~]# cat /etc/hosts
10.0.0.81 www.a.com
10.0.0.82 www.b.com
10.0.0.83 www.c.com
#修改配置文件,以IP地址来区分
[root@ubuntu ~]# cat /etc/apache2/sites-enabled/vhost.conf
<virtualhost 10.0.0.81:80>
  DocumentRoot /data/www/web1/
  ServerName www.a.com
  CustomLog "${APACHE_LOG_DIR}/access_www.a.log" combined
  <Directory /data/www/web1/>
    Options FollowSymLinks
    AllowOverride None
    Require all granted
  </Directory>
</virtualhost>
<virtualhost 10.0.0.82:80>
  DocumentRoot /data/www/web2/
  ServerName www.b.com
  CustomLog "${APACHE_LOG_DIR}/access_www.b.log" combined
  <Directory /data/www/web1/>
    Options FollowSymLinks
    AllowOverride None
    Require all granted
  </Directory>
</virtualhost>
<virtualhost 10.0.0.83:80>
  DocumentRoot /data/www/web3/
  ServerName www.c.com
  CustomLog "${APACHE_LOG_DIR}/access_www.c.log" combined
  <Directory /data/www/web3/>
    Options FollowSymLinks
    AllowOverride None
    Require all granted
  </Directory>
</virtualhost>
[root@ubuntu ~]# cat /etc/apache2/sites-enabled/000-default.conf
<VirtualHost 10.0.0.80:80>
    ServerAdmin webmaster@localhost
    DocumentRoot /var/www/html
    ErrorLog ${APACHE_LOG_DIR}/error.log
    CustomLog ${APACHE_LOG_DIR}/access.log combined
</VirtualHost>
[root@ubuntu ~]# apachectl -t Syntax OK

[root@ubuntu ~]# systemctl reload apache2

#测试
[root@ubuntu ~]# curl 10.0.0.80 hello world
[root@ubuntu ~]# curl 10.0.0.81 web-1
[root@ubuntu ~]# curl 10.0.0.82 web-2
[root@ubuntu ~]# curl 10.0.0.83 web-3
配置基于域名区分的虚拟主机
[root@ubuntu ~]# hostname -I
10.0.0.210
[root@ubuntu ~]# cat /etc/apache2/sites-enabled/vhost.conf
<virtualhost *:80>
  DocumentRoot /data/www/web1/
  ServerName www.a.com
  CustomLog "${APACHE_LOG_DIR}/access_www.a.log" combined
  <Directory /data/www/web1/>
    Options FollowSymLinks
    AllowOverride None
    Require all granted
  </Directory>
</virtualhost>
<virtualhost *:80>
  DocumentRoot /data/www/web2/
  ServerName www.b.com
  CustomLog "${APACHE_LOG_DIR}/access_www.b.log" combined
  <Directory /data/www/web1/>
    Options FollowSymLinks
    AllowOverride None
    Require all granted
  </Directory>
</virtualhost>

<virtualhost *:80>
DocumentRoot /data/www/web3/
  ServerName www.c.com
  CustomLog "${APACHE_LOG_DIR}/access_www.c.log" combined
  <Directory /data/www/web3/>
    Options FollowSymLinks
    AllowOverride None
    Require all granted
  </Directory>
</virtualhost>

[root@ubuntu ~]# cat /etc/apache2/sites-enabled/000-default.conf
<VirtualHost 1*:80>
    ServerAdmin webmaster@localhost
    DocumentRoot /var/www/html
    ErrorLog ${APACHE_LOG_DIR}/error.log
    CustomLog ${APACHE_LOG_DIR}/access.log combined
</VirtualHost>
[root@ubuntu ~]# apachectl -t
Syntax OK
[root@ubuntu ~]# systemctl reload apache2
#测试
[root@ubuntu ~]# curl 127.1 hello world
[root@ubuntu ~]# curl www.a.com web-1
[root@ubuntu ~]# curl www.b.com web-2
[root@ubuntu ~]# curl www.c.com web-3
#如果没有默认配置,直接访问IP会锚定web-1,如果web-2在前,是web-2生效
[root@ubuntu ~]# mv /etc/apache2/sites-enabled/000-default.conf{,bak}
[root@ubuntu ~]# systemctl reload apache2
[root@ubuntu ~]# curl 127.1 web-1
#其实生效的并不是域名,而是主机头参数,apache2是以主机头参数来区分的
[root@ubuntu ~]# curl -v www.a.com/index.html
* Trying 10.0.0.210:80...
* Connected to www.a.com (10.0.0.210) port 80 (#0)
> GET /index.html HTTP/1.1
> Host: www.a.com #默认情况下,请求头中的host参数和请求域名一样
> User-Agent: curl/7.81.0
> Accept: */*
>
* Mark bundle as not supporting multiuse
< HTTP/1.1 200 OK
< Date: Tue, 20 Feb 2024 13:28:40 GMT
< Server: Apache/2.4.52 (Ubuntu)
< Last-Modified: Tue, 20 Feb 2024 12:04:24 GMT
< ETag: "6-611cf02dfc4ee"
< Accept-Ranges: bytes
< Content-Length: 6
< Content-Type: text/html
<
web-1
* Connection #0 to host www.a.com left intact
[root@ubuntu22 /etc/apache2/sites-enabled]$ curl -v -H "host:www.b.com" www.a.com/index.html
* Trying 10.0.0.152:80...
* Connected to www.a.com (10.0.0.152) port 80 (#0)
> GET /index.html HTTP/1.1
> Host:www.b.com #apache2 中以 host参数值为区分不同虚拟主机
> User-Agent: curl/7.81.0
> Accept: */*
>
* Mark bundle as not supporting multiuse
< HTTP/1.1 200 OK
< Date: Tue, 20 Feb 2024 13:31:02 GMT
< Server: Apache/2.4.52 (Ubuntu)
< Last-Modified: Tue, 20 Feb 2024 12:04:24 GMT
< ETag: "6-611cf02dfc4ee"
< Accept-Ranges: bytes
< Content-Length: 6
< Content-Type: text/html
<
web-2
* Connection #0 to host www.a.com left intact
可以使用多重因素将某域名绑定到特定IP的特定端口
Listen 88
<virtualhost 10.0.0.123:88>
  DocumentRoot /data/www/web1/
  ServerName www.a.com
  CustomLog "${APACHE_LOG_DIR}/access_www.a.log" combined
  <Directory /data/www/web1/>
    Options FollowSymLinks
    AllowOverride None
    Require all granted
  </Directory>
</virtualhost>
错误页面配置
在 HTTP 协议中,响应报文都有相应的状态码,其中 200 表示正确返回,其它状态码都表示错误,可以 在Apache2 中设置根据不同的状态码设置不同的错误页面,也可以在虚拟主机的配置中为每个网站设置 不同的错误页面
ErrorDocument error-code document       #根据http状态码定义不同的错误输出
error-code          #3位数错误状态码
document            #错误码对应的输出,字符串|本地页面路径|外部URL|default
#如果使用外部URL,Apache2 服务器将向客户端返回302重定向状态码 #default 用来恢复默认设置
#作用域  server config, virtual host, directory, .htaccess
#设置全局错误页面-字符串
[root@ubuntu ~]# cd /etc/apache2/
[root@ubuntu apache2]# cat apache2.conf
ErrorDocument 403 "<h1>sorry!</h1> permission denied" ErrorDocument 404 "sorry! your page not found"
#重启服务器,在浏览器中测试
[root@ubuntu apache2]# systemctl restart apache2#设置全局错误页面-重定向
[root@ubuntu apache2]# cat apache2.conf
Alias "/error/" "/var/www/html/error/"
ErrorDocument 403 "/error/403.html"
ErrorDocument 404 http://10.0.0.208/404.html
[root@ubuntu apache2]# cat /var/www/html/error/403.html
<h1>sorry!</h1> permission denied
#重启服务器,在浏览器中测试
[root@ubuntu apache2]# systemctl restart apache2#在虚拟主机配置中设置
#全局配置
[root@ubuntu apache2]# cat apache2.conf
Alias "/error/" "/var/www/html/error/"
ErrorDocument 403 "/error/403.html"
ErrorDocument 404 http://10.0.0.208/404.html
#虚拟主机中单独配置
[root@ubuntu apache2]# cat sites-enabled/www.a.com.conf
<virtualhost *:80>
DocumentRoot /var/www/html/www.a.com/
ServerName www.a.com
ErrorDocument 403 "<h1>sorry!</h1> permission denied" #虚拟主机中不写,将使用全 局配置
ErrorDocument 404 "sorry! your page not found" #如果值为 default 将恢复成 apache2 默认页面
ProxyErrorOverride On #保证PHP 的错误页面也能 与设置中的保持一致
CustomLog "${APACHE_LOG_DIR}/access_www.a.com.log" combined
<FilesMatch \.php$>
SetHandler "proxy:unix:/run/php/php8.1-fpm.sock|fcgi://localhost"
</FilesMatch>
<Directory /var/www/html/www.a.com/>
Options FollowSymLinks
AllowOverride None
Require all granted
</Directory>
</virtualhost>
#重启服务器,在浏览器中测试
#使用服务器IP访问将使用全局配置
#使用域名访问将使用虚拟主机中配置
[root@ubuntu apache2]# systemctl restart apache2访问验证配置
AuthType None|Basic|Digest|Form #用户认证类型,不同的值需要有不同的模块支持,作用域 directory, .htaccesshtpasswd [opt...] passwordfile username htpasswd [opt...] passwordfile username password
#常用选项
c #创建新文件
n #不更新文件,在终端中显示 b #从命令行接受密码
i #从标准输入接受密码
m #密码使用MD5加密算法,默认 p #不加密密码,直接明文保存
D #删除指定用户
v #验证指定用户密码#创建认证用户,新文件用 -c 选项
[root@ubuntu ~]# htpasswd -c /usr/share/apache2/apache2-pwd tom
New password:
Re-type new password:
Adding password for user tom
[root@ubuntu ~]# htpasswd /usr/share/apache2/apache2-pwd jerry
New password:
Re-type new password:
Adding password for user jerry
[root@ubuntu ~]# cat /usr/share/apache2/apache2-pwd tom:$apr1$Oui08Bf6$lhLm6nt6nJnnE9n41lZkT1
jerry:$apr1$acFmDlv4$8abnQeq6K0gJ4JsLoOK7i0
#默认己经加载了 auth_basic 认证模块
[root@ubuntu ~]# apachectl -M | grep auth_ auth_basic_module (shared)
[root@ubuntu22 /etc/apache2/sites-enabled]$ cat vhost.conf
<virtualhost *:80>
DocumentRoot /data/www/web1/
ServerName www.a.com
CustomLog "${APACHE_LOG_DIR}/access_www.a.log" combined
<Directory /data/www/web1/>
Options FollowSymLinks
AllowOverride None
AuthType Basic #基础认证
AuthName "Pls Input your name and pwd" #登录提示语,大部份浏览器不支持
AuthBasicProvider file #从文件中验证
AuthUserFile "/usr/share/apache2/apache2-pwd" #指定认证文件
Require user tom jerry #可以登录的用户
</Directory>
</virtualhost>
模块配置和工作模式配置
#列出所有己加载的模块,包括核心模块和用配置文件加载的模块 [root@ubuntu ~]# apachectl -M
Loaded Modules:
 core_module (static)  so_module (static)
 watchdog_module (static)  http_module (static)  log_config_module (static)  logio_module (static)  version_module (static)  unixd_module (static)  access_compat_module (shared)  alias_module (shared)  auth_basic_module (shared)  authn_core_module (shared)  authn_file_module (shared)  authz_core_module (shared)  authz_host_module (shared)  authz_user_module (shared)  autoindex_module (shared)
 deflate_module (shared)
 dir_module (shared)
 env_module (shared)
 filter_module (shared)
 mime_module (shared)
 mpm_event_module (shared)
 negotiation_module (shared)
 reqtimeout_module (shared)
 setenvif_module (shared)
 status_module (shared)

 #列出所有核心模块,默认就有,不用配置文件加载的模块 [root@ubuntu ~]# apachectl -l
Compiled in modules:
  core.c
  mod_so.c
  mod_watchdog.c
  http_core.c
  mod_log_config.c
  mod_logio.c
  mod_version.c
  mod_unixd.c
Apache2实现Https访问
Apache2中的默认SSL配置
#ssl 功能需要相关模块支持,默认没有加载此模块
[root@ubuntu ~]# apachectl -M | grep ssl
[root@ubuntu ~]# ll /etc/apache2/mods-available/ | grep ssl
-rw-r--r-- 1 root root  3110 May  3  2023 ssl.conf
-rw-r--r-- 1 root root    97 May  3  2023 ssl.load
#启用模块,两个模块,一个配置文件
[root@ubuntu ~]# cd /etc/apache2/mods-enabled/
[root@ubuntu mods-enabled]# ln -sv ../mods-available/ssl.conf ./ssl.conf './ssl.conf' -> '../mods-available/ssl.conf'
[root@ubuntu mods-enabled]# ln -sv ../mods-available/ssl.load ./ssl.load './ssl.load' -> '../mods-available/ssl.load'
[root@ubuntu mods-enabled]# ln -sv ../mods-available/socache_shmcb.load ./socache_shmcb.load
'./socache_shmcb.load' -> '../mods-available/socache_shmcb.load'
#添加虚拟主机配置
[root@ubuntu apache2]# cd /etc/apache2/sites-enabled/
[root@ubuntu sites-enabled]# ln -sv ../sites-available/default-ssl.conf ./default-ssl.conf
'./default-ssl.conf' -> '../sites-available/default-ssl.conf'
[root@ubuntu mods-enabled]# systemctl restart apache2
#查看端口,可以看到 apache2监听了80和443
[root@ubuntu mods-enabled]# ss -tnlp
[root@ubuntu ~]# apachectl -M | grep ssl
ssl_module (shared)


#监听配置
[root@ubuntu ~]# cat /etc/apache2/ports.conf | grep -Ev "^#|^$" Listen 80
<IfModule ssl_module>
   Listen 443
</IfModule>
<IfModule mod_gnutls.c>
   Listen 443
</IfModule>
#默认虚拟主机配置
[root@ubuntu ~]# cat /etc/apache2/sites-enabled/default-ssl.conf | grep -Ev "^.*#|^$"
<IfModule mod_ssl.c>
    <VirtualHost _default_:443>
        ServerAdmin webmaster@localhost
        DocumentRoot /var/www/html
        ErrorLog ${APACHE_LOG_DIR}/error.log
        CustomLog ${APACHE_LOG_DIR}/access.log combined
        SSLEngine on
        SSLCertificateFile  /etc/ssl/certs/ssl-cert-snakeoil.pem        #SSL证书文 件
        SSLCertificateKeyFile /etc/ssl/private/ssl-cert-snakeoil.key    #私钥文件
#SSLCertificateChainFile /etc/apache2/ssl.crt/server-ca.crt     #SSL证书链 文件,上级CA证书
#SSLCACertificateFile /etc/apache2/ssl.crt/ca-bundle.crt        #顶级CA证 书文件,与上面证链文件二选一
        <FilesMatch "\.(cgi|shtml|phtml|php)$">
        SSLOptions +StdEnvVars
        </FilesMatch>
        <Directory /usr/lib/cgi-bin>
        SSLOptions +StdEnvVars
        </Directory>
    </VirtualHost> </IfModule>
#ssl模块配置文件
[root@ubuntu ~]# cat /etc/apache2/mods-enabled/ssl.conf | grep -Ev "^.*#|^$"
<IfModule mod_ssl.c>
    SSLRandomSeed startup builtin
    SSLRandomSeed startup file:/dev/urandom 512
    SSLRandomSeed connect builtin
    SSLRandomSeed connect file:/dev/urandom 512
    AddType application/x-x509-ca-cert .crt
    AddType application/x-pkcs7-crl .crl
    SSLPassPhraseDialog  exec:/usr/share/apache2/ask-for-passphrase
    SSLSessionCache     shmcb:${APACHE_RUN_DIR}/ssl_scache(512000)
    SSLSessionCacheTimeout  300
    SSLCipherSuite HIGH:!aNULL     SSLProtocol all -SSLv3
</IfModule>
#相关证书文件己自动生成
[root@ubuntu ~]# ll /etc/ssl/certs/ssl-cert-snakeoil.pem
-rw-r--r-- 1 root root 1078 Dec 29 22:41 /etc/ssl/certs/ssl-cert-snakeoil.pem
[root@ubuntu ~]# ll /etc/ssl/private/ssl-cert-snakeoil.key
-rw-r----- 1 root ssl-cert 1704 Dec 29 22:41 /etc/ssl/private/ssl-cert- snakeoil.key
#查看,使用者和签发者都是当前主机,属于自签证书
[root@ubuntu ~]# openssl x509 -in /etc/ssl/certs/ssl-cert-snakeoil.pem -noout -text
#在windows 中查看
[root@ubuntu ~]# sz /etc/ssl/certs/ssl-cert-snakeoil.pem
#在浏览器中通过https访问,提示不安全
#安装软件
[root@ubuntu ~]# apt install easy-rsa -y
[root@ubuntu ~]# cd /usr/share/easy-rsa/
#初始化证书目录
[root@ubuntu easy-rsa]# ./easyrsa init-pki
init-pki complete; you may now create a CA or requests. Your newly created PKI dir is: /usr/share/easy-rsa/pki
[root@ubuntu easy-rsa]# tree pki/
pki/
├── openssl-easyrsa.cnf
├── private
├── reqs
└── safessl-easyrsa.cnf
2 directories, 2 files
#生成CA机构证书,不使用密码
[root@ubuntu easy-rsa]# ./easyrsa  build-ca nopass
Using SSL: openssl OpenSSL 3.0.2 15 Mar 2022 (Library: OpenSSL 3.0.2 15 Mar 2022)
You are about to be asked to enter information that will be incorporated into your certificate request.
What you are about to enter is what is called a Distinguished Name or a DN. There are quite a few fields but you can leave some blank
For some fields there will be a default value,
If you enter '.', the field will be left blank.
-----
Common Name (eg: your user, host, or server name) [Easy-RSA CA]:m57-magedu
CA creation complete and you may now import and sign cert requests. Your new CA certificate file for publishing is at:
/usr/share/easy-rsa/pki/ca.crt
#生成 a.com 的私钥和证书申请文件
[root@ubuntu easy-rsa]# ./easyrsa gen-req a.com.server nopass
......
......
Common Name (eg: your user, host, or server name) [a.com.server]:www.a.com
Keypair and certificate request completed. Your files are:
req: /usr/share/easy-rsa/pki/reqs/a.com.server.req
key: /usr/share/easy-rsa/pki/private/a.com.server.key
#生成 b.com 的私钥和证书申请文件
[root@ubuntu easy-rsa]# ./easyrsa gen-req b.com.server nopass
......
......
Common Name (eg: your user, host, or server name) [b.com.server]:www.b.com
Keypair and certificate request completed. Your files are:
req: /usr/share/easy-rsa/pki/reqs/b.com.server.req
key: /usr/share/easy-rsa/pki/private/b.com.server.key
#生成 c.com 的私钥和证书申请文件
[root@ubuntu easy-rsa]# ./easyrsa gen-req c.com.server nopass
......
......
Common Name (eg: your user, host, or server name) [c.com.server]:www.c.com
Keypair and certificate request completed. Your files are:
req: /usr/share/easy-rsa/pki/reqs/c.com.server.req
key: /usr/share/easy-rsa/pki/private/c.com.server.key
#签发证书
[root@ubuntu easy-rsa]# ./easyrsa sign-req server a.com.server
......
......
Certificate created at: /usr/share/easy-rsa/pki/issued/a.com.server.crt
[root@ubuntu easy-rsa]# ./easyrsa sign-req server b.com.server
......
......
Certificate created at: /usr/share/easy-rsa/pki/issued/b.com.server.crt
[root@ubuntu easy-rsa]# ./easyrsa sign-req server c.com.server
......
......
Certificate created at: /usr/share/easy-rsa/pki/issued/c.com.server.crt
配置虚拟主机
[root@ubuntu22 /etc/apache2/sites-enabled]$ cat vhost.conf

<virtualhost *:80>
 DocumentRoot /data/www/web1/
 ServerName www.a.com
 CustomLog "${APACHE_LOG_DIR}/access_www.a.log" combined
  <Directory /data/www/web1/>
    Options FollowSymLinks
    AllowOverride None
    Require all granted
  </Directory>
</virtualhost>

<virtualhost *:443>
 DocumentRoot /data/www/web1/
 ServerName www.a.com
 CustomLog "${APACHE_LOG_DIR}/access_www.a.log" combined
 SSLEngine on
  SSLCertificateFile  /usr/share/easy-rsa/pki/issued/a.com.server.crt
  SSLCertificateKeyFile /usr/share/easy-rsa/pki/private/a.com.server.key
  SSLCACertificateFile /usr/share/easy-rsa/pki/ca.crt
  <Directory /data/www/web1/>
    Options FollowSymLinks
    AllowOverride None
    Require all granted
  </Directory>
</virtualhost>


<virtualhost *:80>
  DocumentRoot /data/www/web2/
  ServerName www.b.com
  CustomLog "${APACHE_LOG_DIR}/access_www.b.log" combined
  <Directory /data/www/web2/>
    Options FollowSymLinks
    AllowOverride None
    Require all granted
  </Directory>
</virtualhost>


<virtualhost *:443>
 DocumentRoot /data/www/web2/
 ServerName www.b.com
 CustomLog "${APACHE_LOG_DIR}/access_www.b.log" combined
 SSLEngine on
  SSLCertificateFile  /usr/share/easy-rsa/pki/issued/b.com.server.crt
  SSLCertificateKeyFile /usr/share/easy-rsa/pki/private/b.com.server.key
  SSLCACertificateFile /usr/share/easy-rsa/pki/ca.crt
  <Directory /data/www/web2/>
    Options FollowSymLinks
    AllowOverride None
    Require all granted
  </Directory>
</virtualhost>


<virtualhost *:80>
  DocumentRoot /data/www/web3/
  ServerName www.c.com
  CustomLog "${APACHE_LOG_DIR}/access_www.c.log" combined
  <Directory /data/www/web3/>
    Options FollowSymLinks
    AllowOverride None
    Require all granted
  </Directory>
</virtualhost>


<virtualhost *:443>
 DocumentRoot /data/www/web3/
 ServerName www.c.com
 CustomLog "${APACHE_LOG_DIR}/access_www.c.log" combined
 SSLEngine on
  SSLCertificateFile   /usr/share/easy-rsa/pki/issued/c.com.server.crt
  SSLCertificateKeyFile /usr/share/easy-rsa/pki/private/c.com.server.key
  SSLCACertificateFile /usr/share/easy-rsa/pki/ca.crt
  <Directory /data/www/web3/>
    Options FollowSymLinks
    AllowOverride None
    Require all granted
  </Directory>
</virtualhost>


#重启服务
[root@ubuntu ~]# systemctl reload apache2


#在客户端配置 hosts 文件,并在浏览器中分别测试不同域名的 http,https 协议
10.0.0.152   www.a.com  www.b.com  www.c.com
将CA机构的证书下载到客户端,导入到信任列表,重启浏览器,再次用 https 协议打开,可以看到安全 标识(小锁)
