csrf跨站请求伪造和auth认证模块
一 csrf操作
<h1>这是假的网页</h1>
<form action="http://127.0.0.1:8000/bank/" method="post">
    <p>用户名:
        <input type="text" name="username">
    </p>
    <p>转账账户名:
        <input type="text"></p>
        <input type="text" name="name" value="jasper" style="display: none"></p>
    <p>
        转账金额:
        <input type="text" name="money">
    </p>
    <input type="submit">
</form>
<h1>这是真实的网页</h1>
<form action="" method="post">
    <p>用户名:
        <input type="text" name="username">
    </p>
    <p>转账账户名:
        <input type="text" name="name"></p>
    <p>
        转账金额:
        <input type="text" name="money">
    </p>
    <input type="submit">
</form>
一个服务端的post请求向另一个服务端发送。
二 在form表单中设置csrf
<form action="" method="post">
    {% csrf_token %}
    <p>用户名:
        <input type="text" name="name">
    </p>
    <p>密码:
        <input type="text" name="password">
    </p>
    <p>
        <input type="submit">
    </p>
</form>
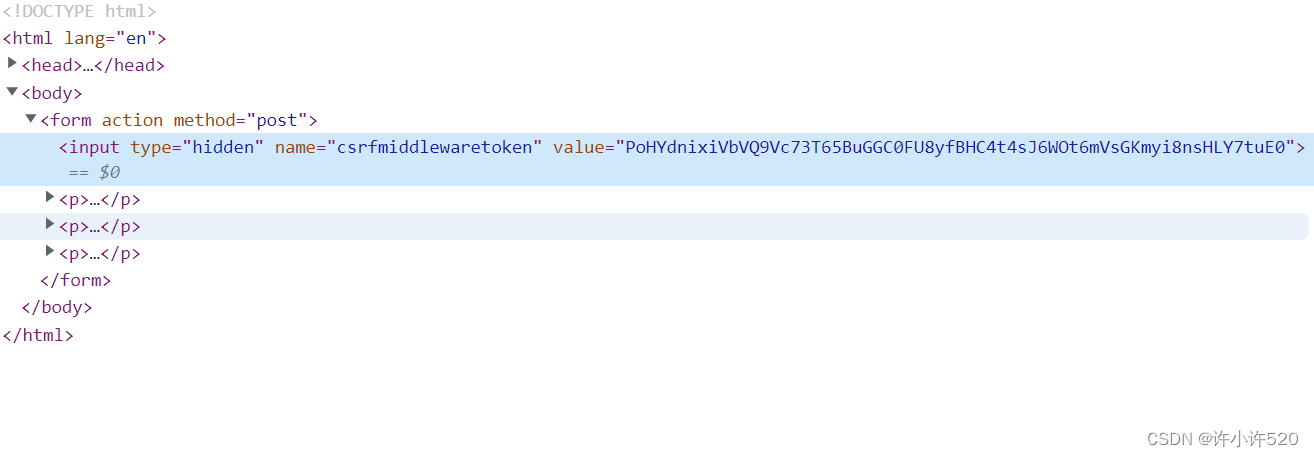
{% csrf_token %}标签实际上就是在前端form表单中生成了一个隐藏域,name属性为csrfmiddlewaretoken,value属性时csrf校验的值。
三 ajax设置csrf
方式一:
通过获取隐藏的input标签中的csrfmiddlewaretoken值,放置在data中发送过去。
$.ajax({
	url:'',
	type:'post'
	data:{"name":"jasper",
			"csfrmiddlewaretoken": $("[name="csfrmiddlewaretoken"]").val()}
	success: function(){

	}
})
方式二:
**$.ajax({
	url:'',
	type:'post'
	data:{"name":"jasper",
			"csfrmiddlewaretoken": $("{{ csrf_token }}"}
	success: function(){

	}
})**
方式三:
function getCookie(name) {
    var cookieValue = null;
    if (document.cookie && document.cookie !== '') {
        var cookies = document.cookie.split(';');
        for (var i = 0; i < cookies.length; i++) {
            var cookie = jQuery.trim(cookies[i]);
            // Does this cookie string begin with the name we want?
            if (cookie.substring(0, name.length + 1) === (name + '=')) {
                cookieValue = decodeURIComponent(cookie.substring(name.length + 1));
                break;
            }
        }
    }
    return cookieValue;
}
var csrftoken = getCookie('csrftoken');


function csrfSafeMethod(method) {
  // these HTTP methods do not require CSRF protection
  return (/^(GET|HEAD|OPTIONS|TRACE)$/.test(method));
}

$.ajaxSetup({
  beforeSend: function (xhr, settings) {
    if (!csrfSafeMethod(settings.type) && !this.crossDomain) {
      xhr.setRequestHeader("X-CSRFToken", csrftoken);
    }
  }
});
四 csrf相关装饰器
当整个网站默认都不校验csrf,或者整个网站默认全部都校验,怎样可以让局部变得不同。
from django.views.decorators.csrf import csrf_protect, csrf_exempt

@csrf_protect  # 校验csrf
def home(request):
	return HttpResponse('home')

@csrf_exempt  # 免除校验
def index(request):
	return HttpResponse('index')
针对CBV不能直接在方法上添加装饰器,需要借助朱门添加装饰器的方法。
from django.views.decorators.csrf import csrf_protect, csrf_exempt
from django import views
from django.utils.decorators import method_decorator


# @method_decorator(csrf_protect, name='post')  # 方式二:类名上装
# @method_decorator(csrf_exempt, name='post')  # 方式二:类名上装
class MyHome(views.View):
    # @method_decorator(csrf_protect)  # 方式三:装饰dispatch 全局添加
    @method_decorator(csrf_exempt)  # 方式三:装饰dispatch 全局添加
    def dispatch(self, request, *args, **kwargs):
        return super(MyHome, self).dispatch(request, *args, **kwargs)

    def get(self, request):
        return render(request, 'csrf_test.html')

    # @method_decorator(csrf_protect)  # 方式一:指名道姓
    # @method_decorator(csrf_exempt)  # 方式一:无效
    def post(self, request):
        print(request)
        return HttpResponse('Home post')
五 auth认证模块
django在执行数据库迁移命令后会创建一张auth_user表,该表可以配合auth模块做用户相关的功能:注册、登录、修改密码。注销等。
在terminal终端创建超级用户,创建完成即可登录。
python manage.py createsuperuser
5.1 auth模块常见功能
- 创建用户
from django.contrib.auth.models import User # 创建普通用户 User.objects.create_user() # (self, username, email=None, password=None, **extra_fields) # 创建超级用户 User.objects.create_superuser() # self, username, email=None, password=None, **extra_fields - authenticate()
用户认证功能,认证成功返回一个用户对象,不成功返回Nonedef auth_test(request): if request.method == 'POST': username = request.POST.get('name') password = request.POST.get('password') res = auth.authenticate(username=username, password=password) print(res, type(res)) # xuxiaoxu <class 'django.contrib.auth.models.User'> return render(request, 'auth_test.html') - login()
该函数实现一个用户登录的功能。它本质上会在后端为该用户生成相关session数据。def auth_test(request): if request.method == 'POST': username = request.POST.get('name') password = request.POST.get('password') res = auth.authenticate(username=username, password=password) if res: auth.login(request, res) print('登陆成功') return render(request, 'auth_test.html') - logout()
当调用该函数时,当前请求的session信息会全部清除。该用户即使没有登录,使用该函数也不会报错。auth.logout(request) - is_authenticated()
用来判断是否通过了认证request.user.is_authenticated() - 获取登录用户对象
request.user - 校验用户登录装饰器
全局配置需要在settings.py中添加一句代码from django.contrib.auth.decorators import logig_required # login_required(function=None, redirect_field_name=REDIRECT_FIELD_NAME, login_url=None) # 'login_url': 该参数指定没有登录时跳转的地址,一般跳转到登录界面LOGIN_URL = '/login/' - 校验密码是否正确
request.user.check_password() - 修改密码
request.user.set_password()
request.user.save()
5.2 auth_user表切换
在models.py中新创建一张表,继承AbstractUser,在表中添加auth表中没有的字段。
from django.db import models

# Create your models here.

from django.contrib.auth.models import AbstractUser


class UserInfo(AbstractUser):
    phone = models.BigIntegerField()
在settings.py中配置
AUTH_USER_MODEL = 'app01.UserInfo'
