【Android Studio】学习——Fragment
一:什么是Fragment
1.1Fragment的定义
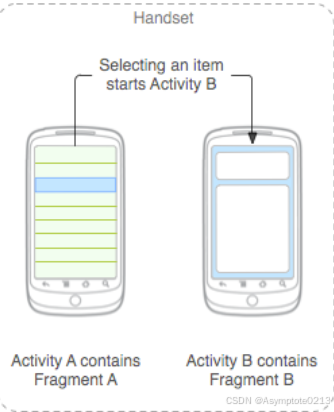
- Fragment 是一种可以嵌入在 Android 当中的 UI 片段,它能让程序更加合理和充分地利用大屏幕的空间,因而在平板上应用得非常广泛。Fragment 和 Activity 非常像,同样可以包含布局,同样都有自己的生命周期。引入 Fragment 的目的是为了在大屏幕(如平板电脑)上能够更加动态和灵活地设计界面,被定义为一个 轻量级 Activity 而进行设计。通过 Fragment 可以将整个界面划分为多个分散的区域块,且同个 Fragment 可以被应用于多个 Activity 中,从而实现界面的模块化并提高可重用性。
1.2Fragment的特点
Fragment翻译成中文“片段”,它具有以下几个特点:
- Activity中可以有多个Fragment,Fragment必须被包含在Activity中
- Fragment有自己的生命周期,能够接收自己的输入事件。
- Fragmen必须依赖于Activity,不能脱离Activity单独存在,事实上也脱离不了。
- 一个Fragment可以被多个Activity重复使用。
- 可以在Activity中动态的添加和删除Fragment,这一点我们在实际的开发中很经常使用到。
二:添加Fragment
Fragment 一般情况下都需要和 FragmentActivity 组合使用,而我们日常使用的 AppCompatActivity 就已经直接继承于 FragmentActivity 了。
一般而言,每个Fragment需要重写以下方法:
onCreate():每当Fragment被创建时调用,再此方法中做必要的初始化工作。
onCreataView():当Fragment显示页面时调用此方法,返回显示的View。
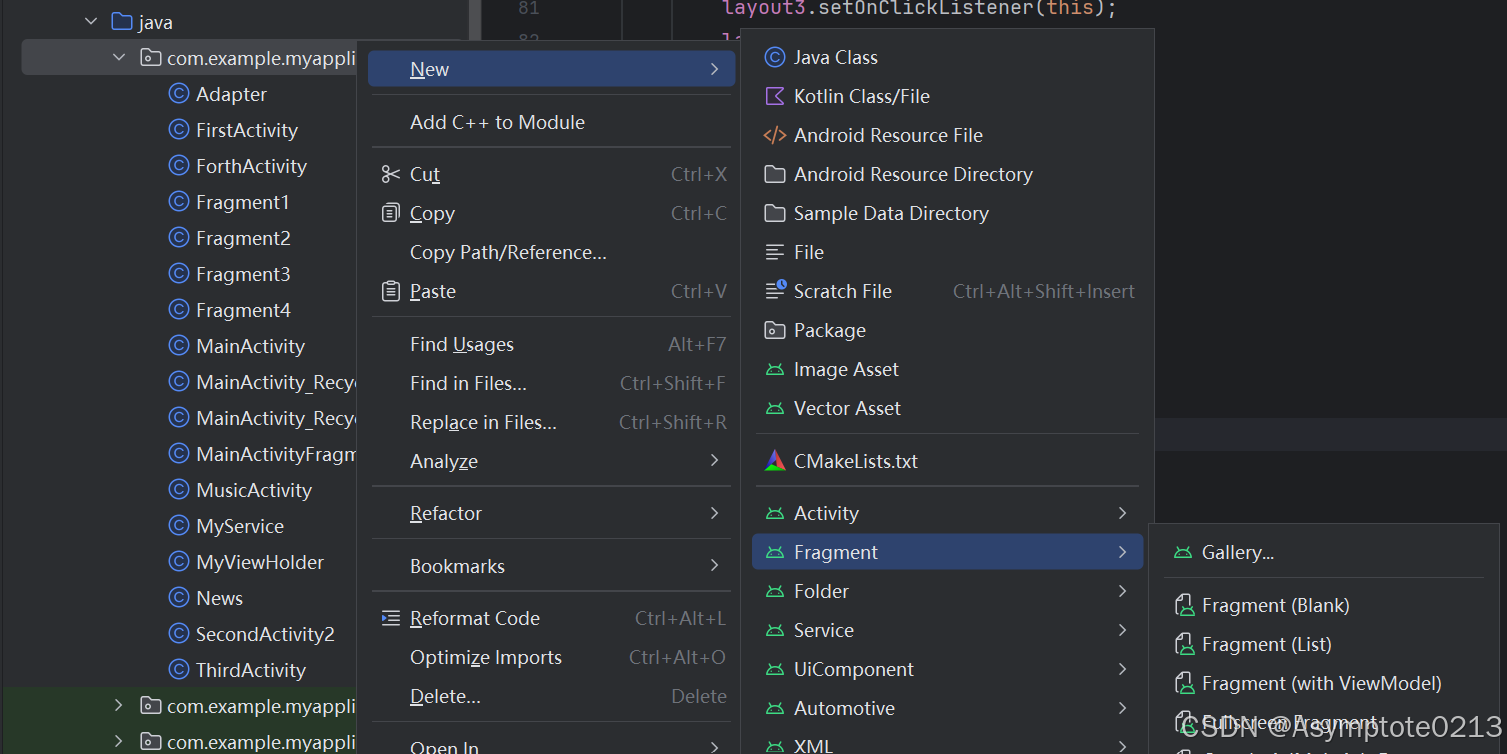
依次点击以下按钮创建Fragment
2.1静态加载Fragment
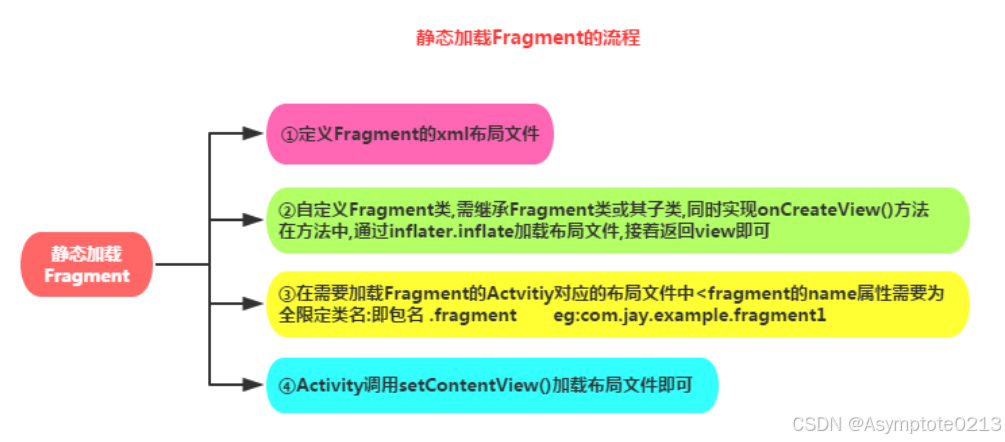
实现流程:
2.2示例代码:
**Step 1:**定义Fragment的布局,就是fragment显示内容的
**Step 2:**自定义一个Fragment类,需要继承Fragment或者他的子类,重写onCreateView()方法 在该方法中调用:inflater.inflate()方法加载Fragment的布局文件,接着返回加载的view对象
public class Fragmentone extends Fragment {
    @Override
    public View onCreateView(LayoutInflater inflater, ViewGroup container,
            Bundle savedInstanceState) {
        View view = inflater.inflate(R.layout.fragment1, container,false);
        return view;
    }
}
**Step 3:**在需要加载Fragment的Activity对应的布局文件中添加fragment的标签, 记住,name属性是全限定类名哦,就是要包含Fragment的包名,如:
<fragment
    android:id="@+id/fragment1"
    android:name="com.jay.example.fragmentdemo.Fragmentone"
    android:layout_width="match_parent"
    android:layout_height="0dp"
    android:layout_weight="1" />
Step 4: Activity在onCreate( )方法中调用setContentView()加载布局文件即可!
三:Fragment的生命周期
3.1生命周期
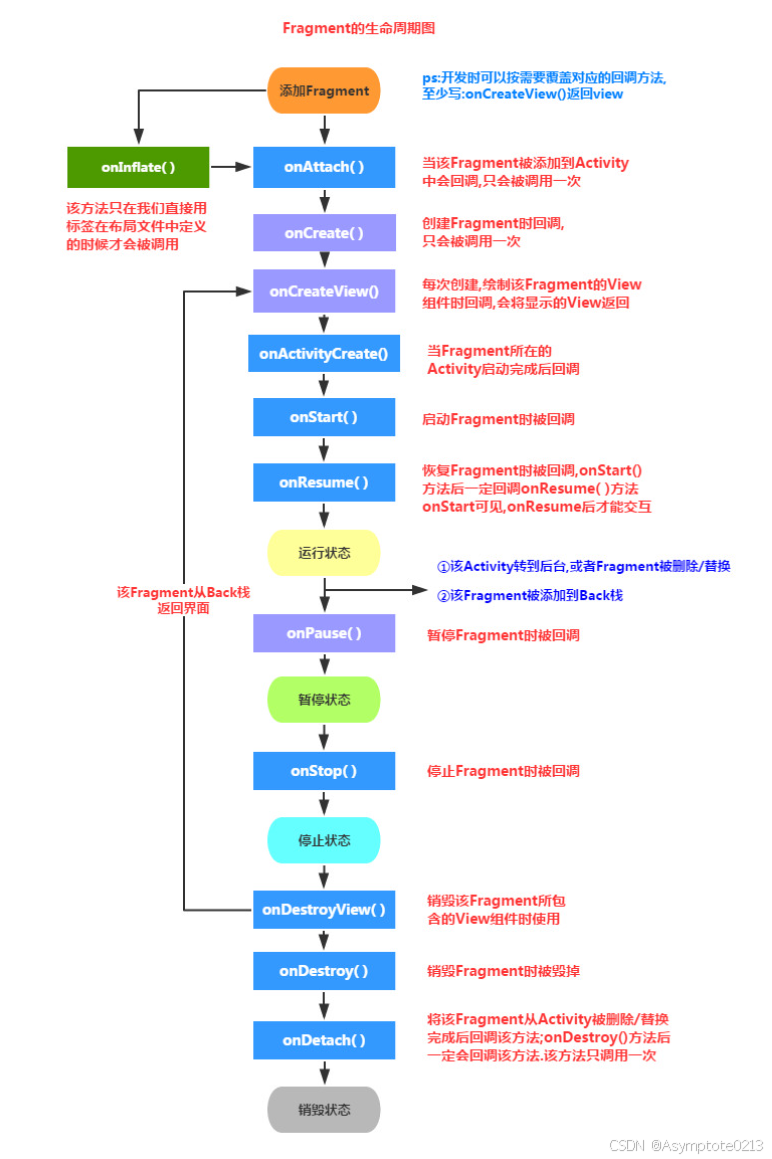
Activity 的生命周期包括 运行状态、暂停状态、停止状态、销毁状态。Fragment 的生命周期与之非常类似,每个 Fragment 在其生命周期内也可能会经历这几种状态。
-
运行状态
当一个 Fragment 所关联的 Activity 正处于运行状态时,该 Fragment 也处于运行状态。
-
暂停状态
当一个 Activity 进入暂停状态时(由于另一个未占满屏幕的 Activity 被添加到了栈顶),与它相关联的 Fragment 就会进入暂停状态。
-
停止状态
当一个 Activity 进入停止状态时,与它相关联的 Fragment 就会进入停止状态,或者通过调用
FragmentTransaction的remove()、replace()方法将 Fragment 从 Activity 中移除,但在事务提交之前调用addToBackStack()方法,这时的 Fragment 也会进入停止状态。总的来说,进入停止状态的 Fragment 对用户来说是完全不可见的,有可能会被系统回收。 -
销毁状态
Fragment 总是依附于 Activity 而存在,因此当 Activity 被销毁时,与它相关联的 Fragment 就会进入销毁状态。或者通过调用 FragmentTransaction 的
remove()、replace()方法将 Fragment 从 Activity 中移除,但在事务提交之前并没有调用addToBackStack()方法,这时的 Fragment 也会进入销毁状态。
3.2Fragment在Activity中的生命周期
Fragment 的大部分生命周期方法都和 Activity 相映射,但两者的生命周期方法有着明确的先后顺序。以一个通过 FragmentContainerView 添加到 Activity 中的 Fragment 为例,从启动 Activity 到按返回键退出页面的整个过程中,生命周期的变化是:
- Activity 的 onCreate 方法里 调用 Fragment 的 onAttach(Context)、onAttach(Activity)、onCreate
- Activity 的 onStart 方法里 调用 Fragment 的 onCreateView、onViewCreated、onActivityCreated、onViewStateRestored、onStart
- Activity 的 onResume 方法后 调用 Fragment 的 onResume
- Activity 的 onPause 方法里 调用 Fragment 的 onPause
- Activity 的 onStop 方法里 调用 Fragment 的 onStop
- Activity 的 onDestroy 方法里 调用 Fragment 的 onDestroyView、onDestroy、onDetach
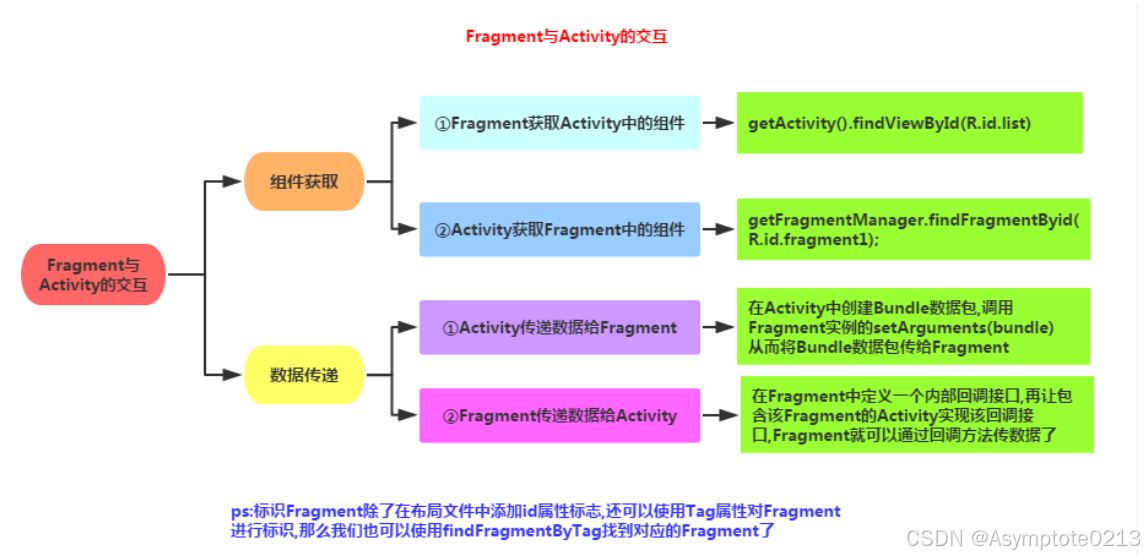
四:Fragment与Activity的交互
4.1组件获取
- Fragment获得Activity中的组件: getActivity().findViewById(R.id.list);
- Activity获得Fragment中的组件(根据id和tag都可以):getFragmentManager.findFragmentByid(R.id.fragment1);
4.2数据传递
①Activit传递数据给Fragment:
在Activity中创建Bundle数据包,调用Fragment实例的setArguments(bundle) 从而将Bundle数据包传给Fragment,然后Fragment中调用getArguments获得 Bundle对象,然后进行解析就可以了
②Fragment传递数据给Activity
在Fragment中定义一个内部回调接口,再让包含该Fragment的Activity实现该回调接口, Fragment就可以通过回调接口传数据了*
五:Fragment的实例——底部导航栏的实现(可跳转,可下滑[recycleView])
5.1成果展示
效果图展示:
Fragment展示
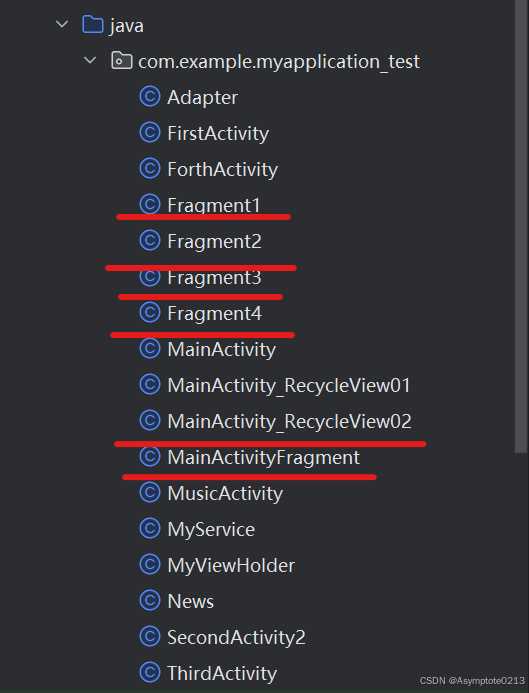
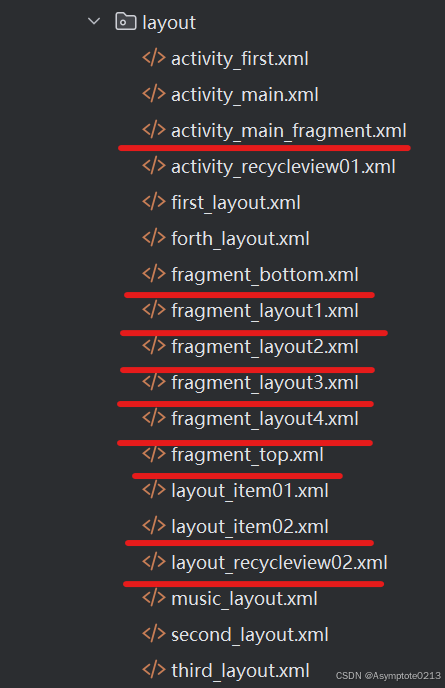
工程的目录结构:
【因为项目太多,下面画横线的是本次所需要创建的文件】
JAVA的结构文件
layout的结构文件
5.2实现流程
Step 1:写下底部选项的一些资源文件
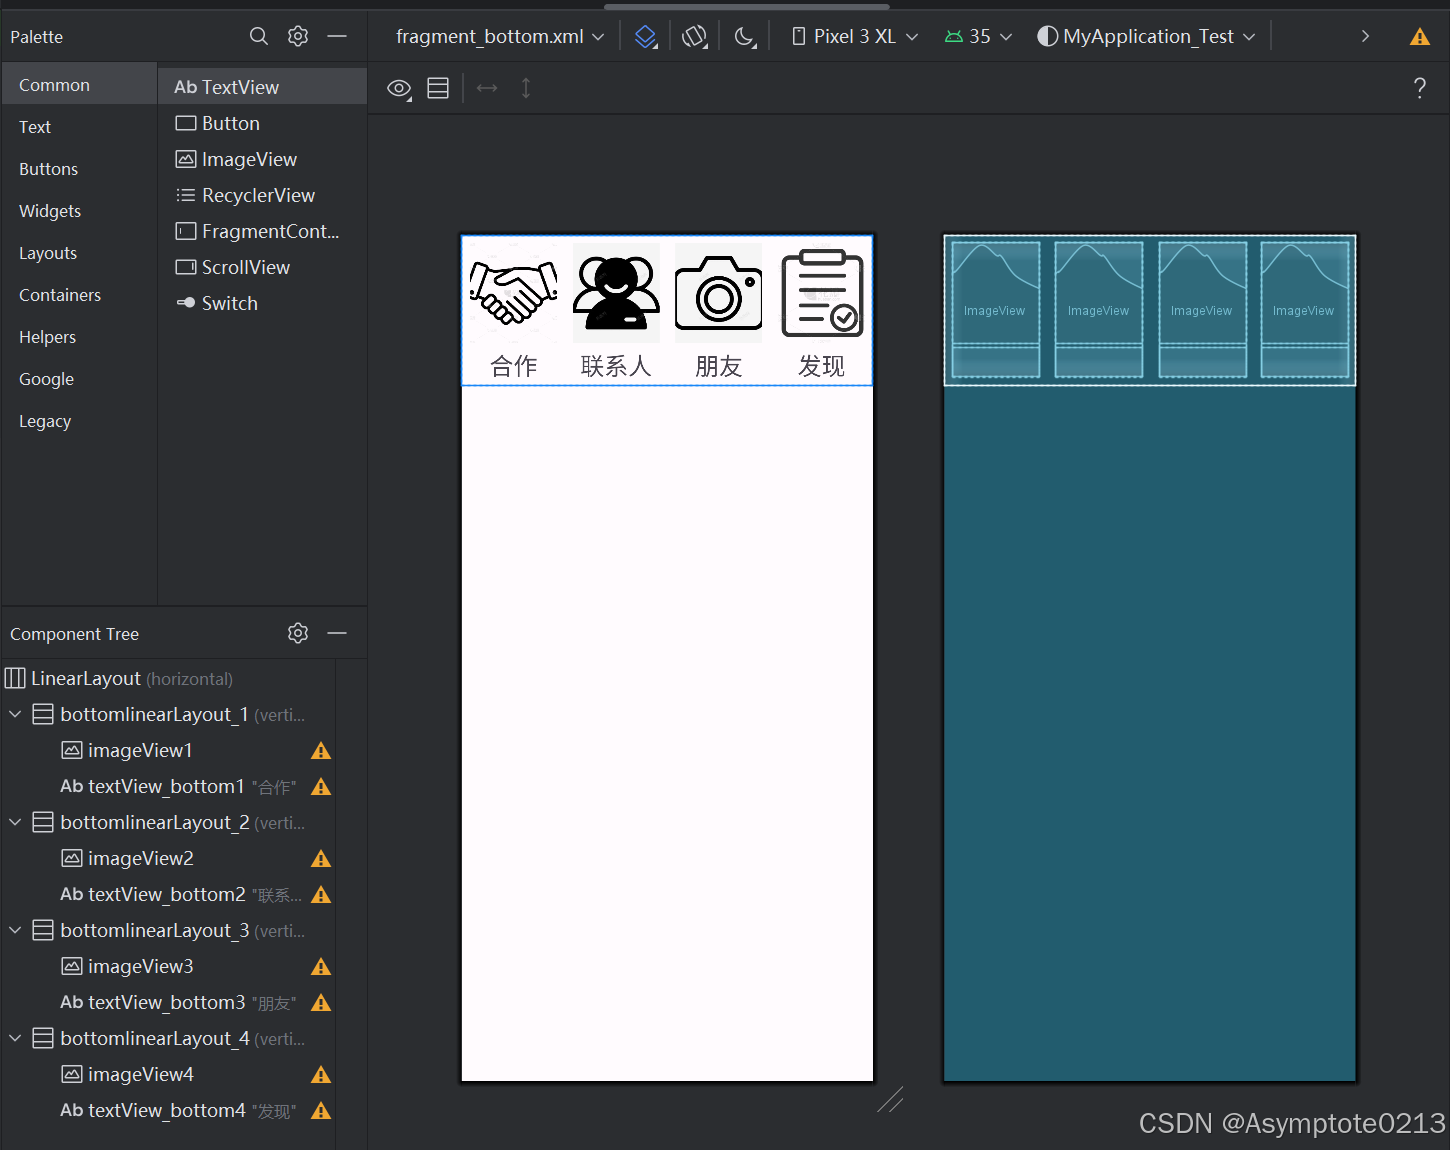
【fragment_bottom.xml】——底部导航文件
<?xml version="1.0" encoding="utf-8"?>
<LinearLayout xmlns:android="http://schemas.android.com/apk/res/android"
    xmlns:app="http://schemas.android.com/apk/res-auto"
    xmlns:tools="http://schemas.android.com/tools"
    android:layout_width="match_parent"
    android:layout_height="150dp"
    android:orientation="horizontal"
    android:weightSum="4"
    tools:ignore="DisableBaselineAlignment">

    <LinearLayout
        android:id="@+id/bottomlinearLayout_1"
        android:layout_width="0dp"
        android:layout_height="wrap_content"
        android:layout_margin="8dp"
        android:layout_weight="1"
        android:orientation="vertical">

        <ImageView
            android:id="@+id/imageView1"
            android:layout_width="match_parent"
            android:layout_height="100dp"
            android:layout_marginBottom="4dp"
            android:scaleType="centerCrop"
            tools:srcCompat="@drawable/fragment_img01" />

        <TextView
            android:id="@+id/textView_bottom1"
            android:layout_width="match_parent"
            android:layout_height="wrap_content"
            android:gravity="center"
            android:text="合作"
            android:textSize="24sp" />
    </LinearLayout>

    <LinearLayout
        android:id="@+id/bottomlinearLayout_2"
        android:layout_width="0dp"
        android:layout_height="wrap_content"
        android:layout_margin="8dp"
        android:layout_weight="1"
        android:orientation="vertical">

        <ImageView
            android:id="@+id/imageView2"
            android:layout_width="match_parent"
            android:layout_height="100dp"
            android:layout_marginBottom="4dp"
            android:scaleType="centerCrop"
            tools:srcCompat="@drawable/fragment_img02" />

        <TextView
            android:id="@+id/textView_bottom2"
            android:layout_width="match_parent"
            android:layout_height="wrap_content"
            android:gravity="center"
            android:text="联系人"
            android:textSize="24sp" />
    </LinearLayout>

    <!-- 第三个和第四个LinearLayout,类似地设置ImageView的高度和scaleType -->
    <LinearLayout
        android:id="@+id/bottomlinearLayout_3"
        android:layout_width="0dp"
        android:layout_height="wrap_content"
        android:layout_margin="8dp"
        android:layout_weight="1"
        android:orientation="vertical">

        <ImageView
            android:id="@+id/imageView3"
            android:layout_width="match_parent"
            android:layout_height="100dp"
            android:layout_marginBottom="4dp"
            android:scaleType="centerCrop"
            tools:srcCompat="@drawable/fragment_img03" />

        <TextView
            android:id="@+id/textView_bottom3"
            android:layout_width="match_parent"
            android:layout_height="wrap_content"
            android:gravity="center"
            android:text="朋友"
            android:textSize="24sp" />
    </LinearLayout>

    <LinearLayout
        android:id="@+id/bottomlinearLayout_4"
        android:layout_width="0dp"
        android:layout_height="wrap_content"
        android:layout_margin="8dp"
        android:layout_weight="1"
        android:orientation="vertical">

        <ImageView
            android:id="@+id/imageView4"
            android:layout_width="match_parent"
            android:layout_height="100dp"
            android:layout_marginBottom="4dp"
            android:scaleType="centerCrop"
            tools:srcCompat="@drawable/fragment_img04" />

        <TextView
            android:id="@+id/textView_bottom4"
            android:layout_width="match_parent"
            android:layout_height="wrap_content"
            android:gravity="center"
            android:text="发现"
            android:textSize="24sp" />
    </LinearLayout>
</LinearLayout>
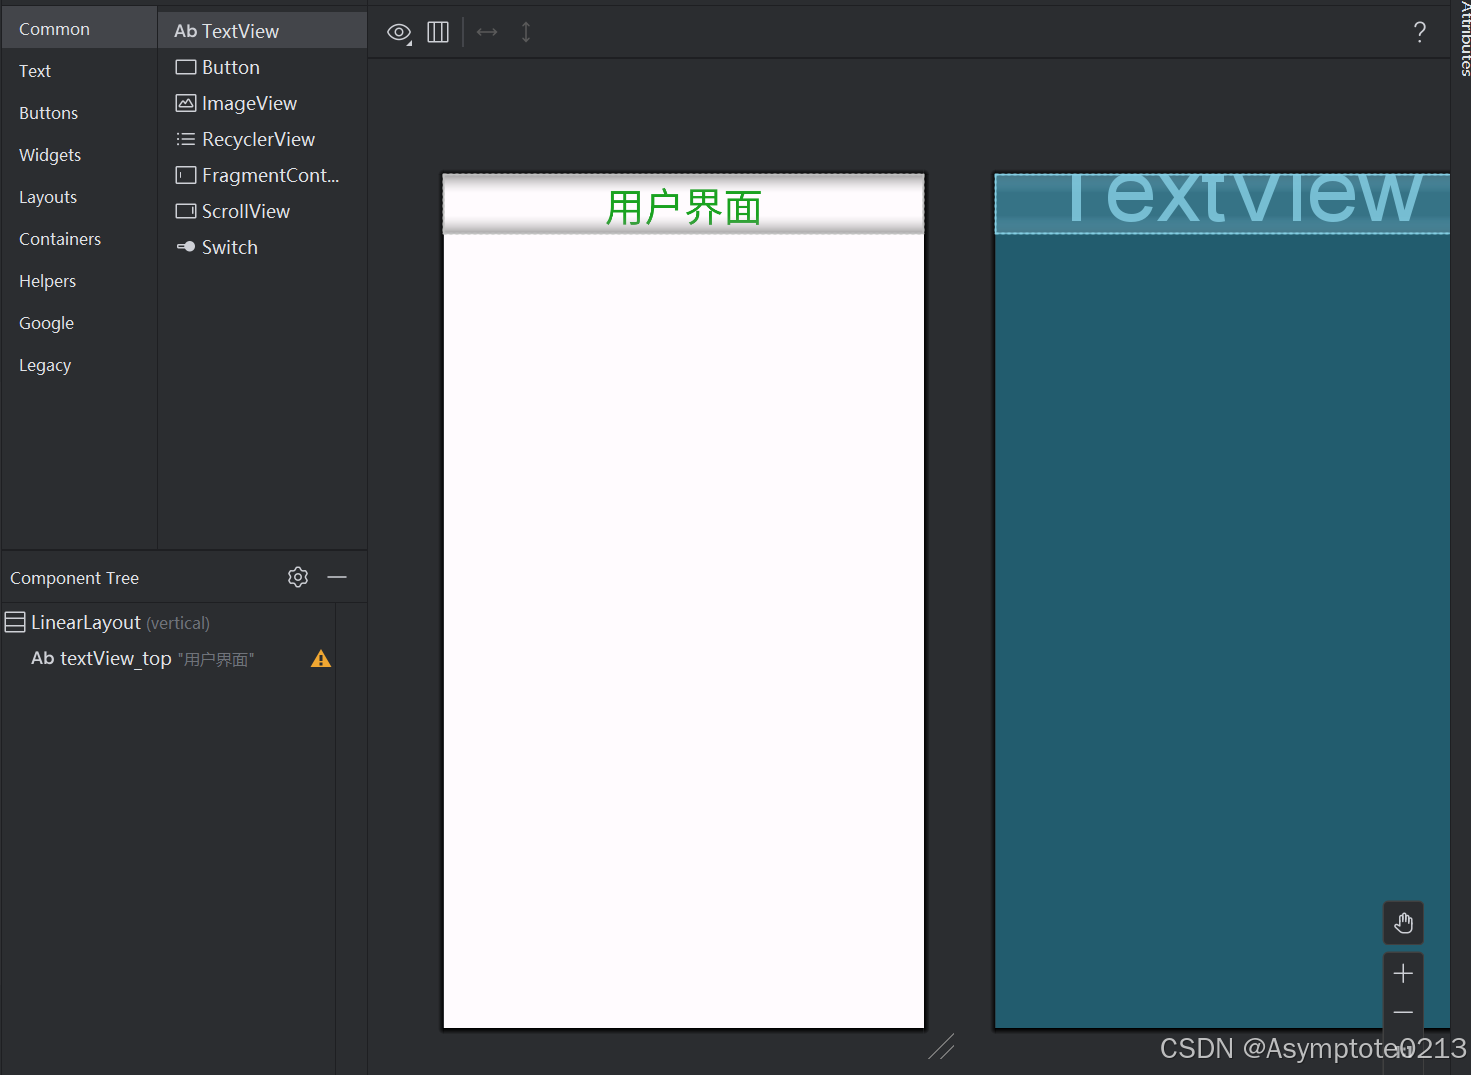
【fragment_top.xml】——顶部导航文件
<?xml version="1.0" encoding="utf-8"?>
<LinearLayout xmlns:android="http://schemas.android.com/apk/res/android"
    android:layout_width="match_parent"
    android:layout_height="wrap_content"
    android:orientation="vertical">

    <TextView
        android:id="@+id/textView_top"
        android:layout_width="match_parent"
        android:layout_height="wrap_content"
        android:gravity="center"
        android:text="用户界面"
        android:textColor="#1AA220"
        android:textSize="34sp" />
</LinearLayout>
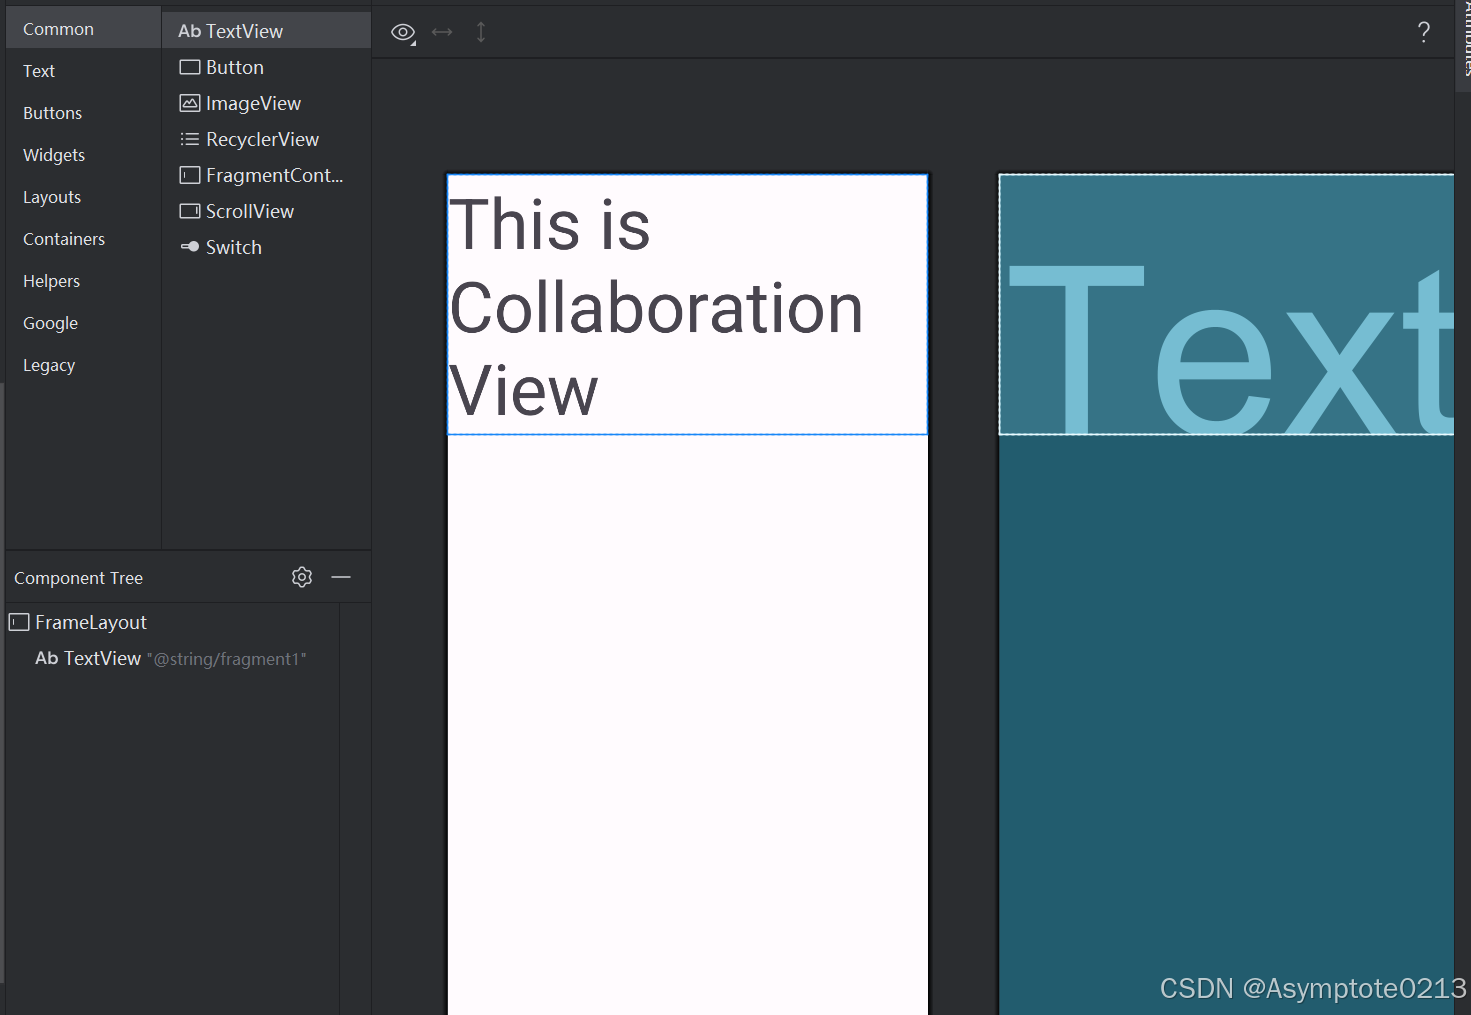
【fragment_layout】——布局文件
四个布局文件大差不差,布局类似,不一一展示。如下图所示:
<?xml version="1.0" encoding="utf-8"?>
<FrameLayout xmlns:android="http://schemas.android.com/apk/res/android"
    xmlns:tools="http://schemas.android.com/tools"
    android:layout_width="match_parent"
    android:layout_height="wrap_content"
    tools:context=".Fragment1">

    <!-- TODO: Update blank fragment layout -->
    <TextView
        android:layout_width="match_parent"
        android:layout_height="match_parent"
        android:text="@string/fragment1"
        android:textSize="60sp" />

</FrameLayout>
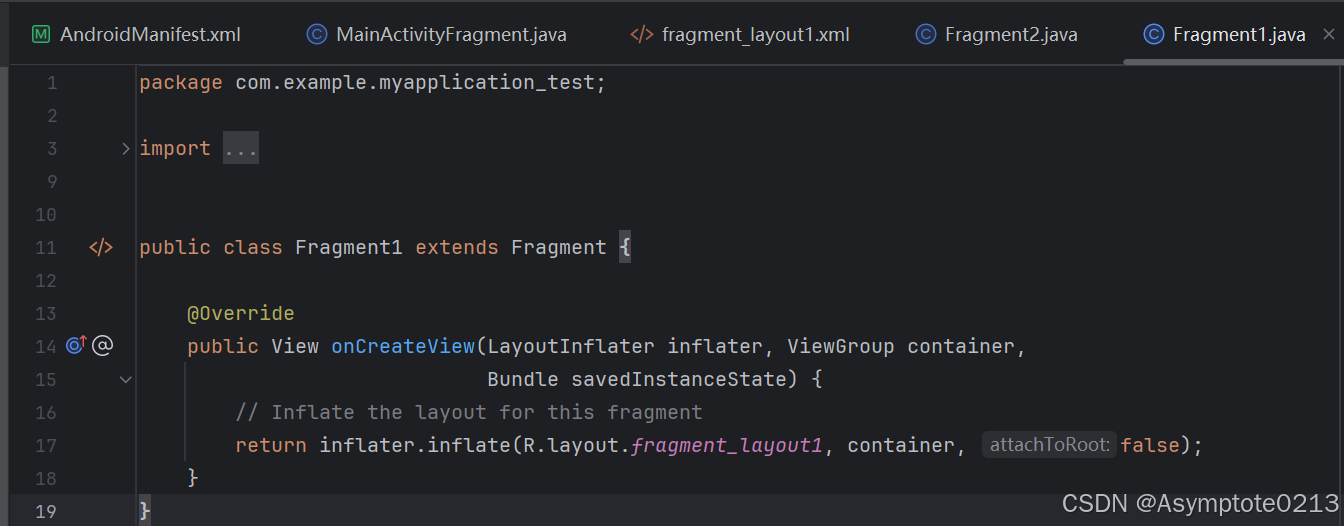
Fragment准备:
准备四个不同的Fragment,每个Fragment对应底部导航栏的一个按钮。下图为Fragment1的Java文件。其余三个文件布局类似,不一一展示。
[!NOTE]
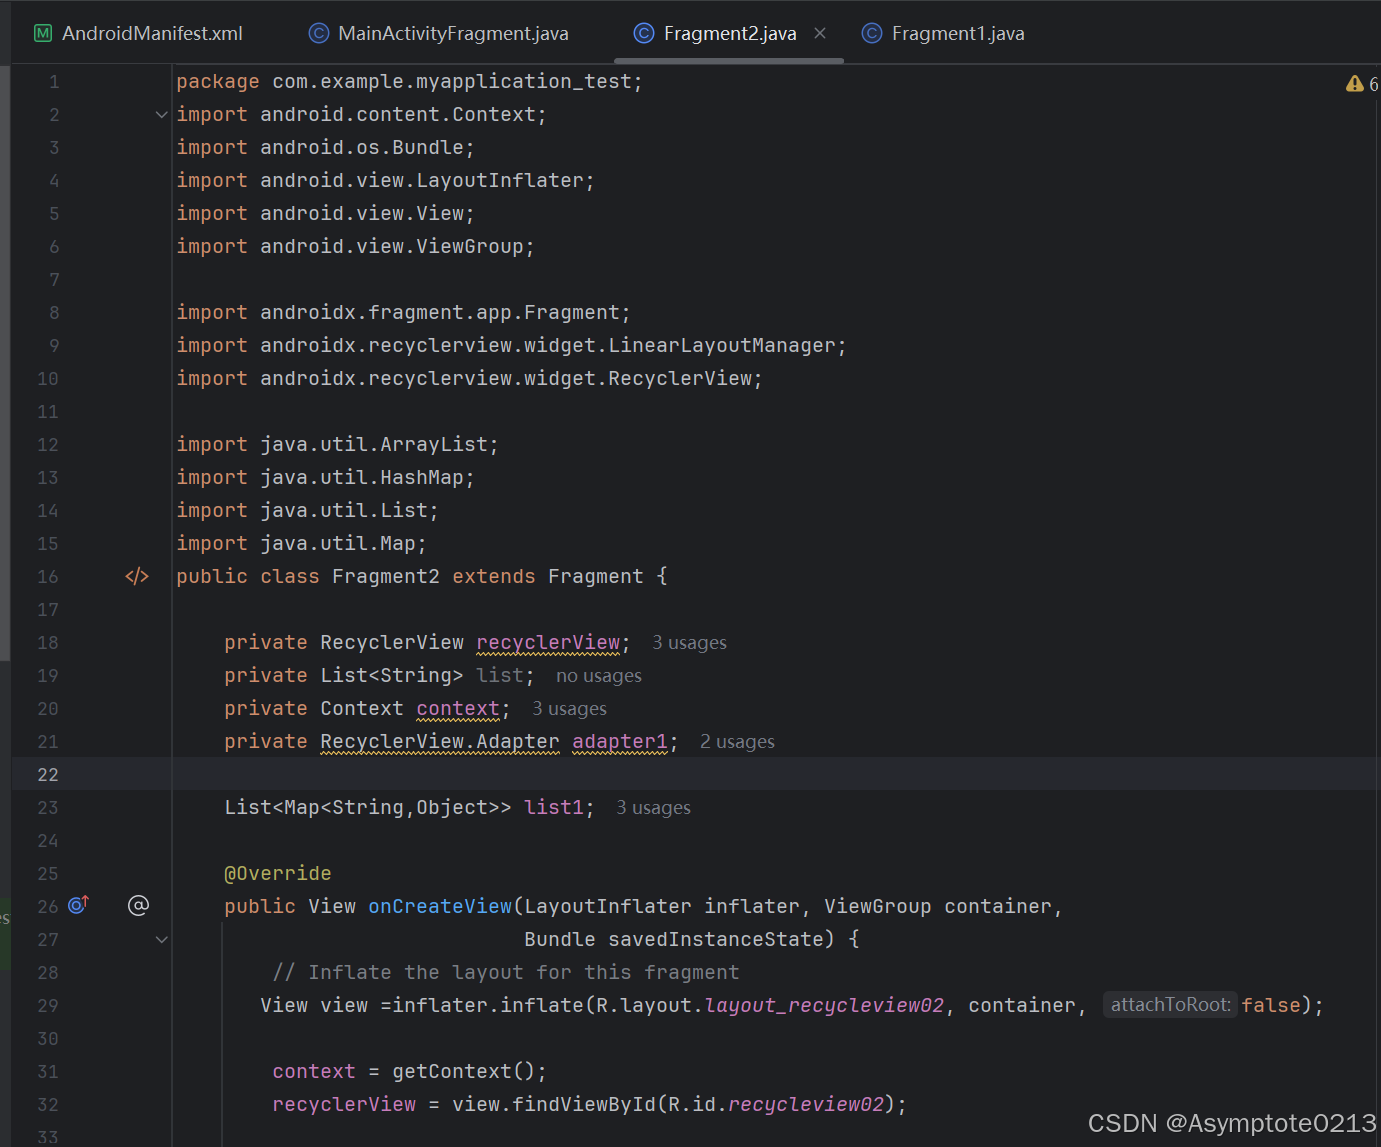
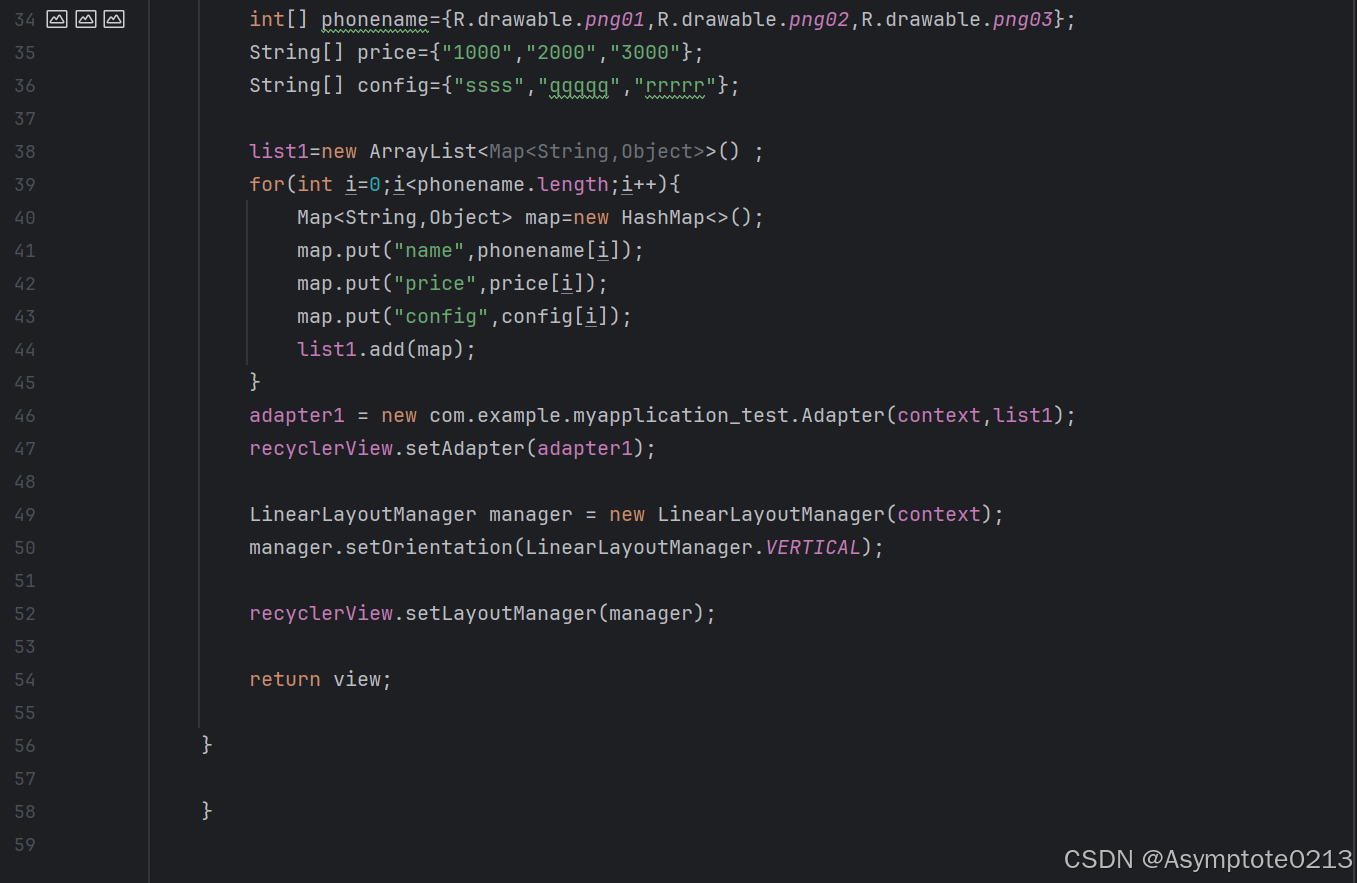
这个Fragment只能实现简单的textView展示,若要实现更为复杂的页面展示,如fragment2中的图片与文本的下拉则需要在Fragment中与recycleView和adapter联系起来。
Fragment2——Recycleview
下面是Fragment2的更为复杂的设置,里面的文本内容可根据需要自行更换。
【MainActivityFragment】布局文件
public class MainActivityFragment extends AppCompatActivity implements View.OnClickListener{

    Fragment fragment1,fragment2,fragment3,fragment4;
    LinearLayout layout1,layout2,layout3,layout4;

    FragmentManager manager;
    FragmentTransaction transaction;


    @Override
    protected void onCreate(Bundle savedInstanceState) {
        super.onCreate(savedInstanceState);
        EdgeToEdge.enable(this);
        setContentView(R.layout.activity_main_fragment);

        layout1=findViewById(R.id.bottomlinearLayout_1);
        layout1=findViewById(R.id.bottomlinearLayout_2);
        layout1=findViewById(R.id.bottomlinearLayout_3);
        layout1=findViewById(R.id.bottomlinearLayout_4);


        fragment1=new Fragment1();
        fragment2=new Fragment2();
        fragment3=new Fragment3();
        fragment4=new Fragment4();

        manager=getSupportFragmentManager();
        transaction= manager.beginTransaction();

        intial();

        fragmentHide();

        transaction.show(fragment1);
        transaction.commit();

        layout1.setOnClickListener(v ->{
            transaction =manager.beginTransaction();
            fragmentHide();
            transaction.show(fragment1);
            transaction.commit();

        });

        layout2.setOnClickListener(v -> {
            transaction = manager.beginTransaction();
            fragmentHide();
            transaction.show(fragment2);
            transaction.commit();

        });

        layout3.setOnClickListener(v -> {
            transaction = manager.beginTransaction();
            fragmentHide();
            transaction.show(fragment3);
            transaction.commit();

        });

        layout4.setOnClickListener(v -> {
            transaction = manager.beginTransaction();
            fragmentHide();
            transaction.show(fragment4);
            transaction.commit();

        });

        ViewCompat.setOnApplyWindowInsetsListener(findViewById(R.id.main), (v, insets) -> {
            Insets systemBars = insets.getInsets(WindowInsetsCompat.Type.systemBars());
            v.setPadding(systemBars.left, systemBars.top, systemBars.right, systemBars.bottom);
            return insets;
        });
    }

    private void intial() {
        transaction.add(R.id.FrameLayout,fragment1);
        transaction.add(R.id.FrameLayout,fragment2);
        transaction.add(R.id.FrameLayout,fragment3);
        transaction.add(R.id.FrameLayout,fragment4);
    }


    void fragmentHide(){
        transaction.hide(fragment1);
        transaction.hide(fragment2);
        transaction.hide(fragment3);
        transaction.hide(fragment4);

    }

  @Override
public void onClick(View view) {
    switch (view.getId()) {
        case R.id.bottomlinearLayout_1:
            fragmentHide();
            showfragment(fragment1);
            break;
        case R.id.bottomlinearLayout_2:
            fragmentHide();
            showfragment(fragment2);
            break;
        case R.id.bottomlinearLayout_3:
            fragmentHide();
            showfragment(fragment3);
            break;
        case R.id.bottomlinearLayout_4:
            fragmentHide();
            showfragment(fragment4);
            break;
    }
}

private void showfragment(Fragment fragment) {
    transaction = manager.beginTransaction();
    fragmentHide();
    transaction.show(fragment);
    transaction.commit();
}
代码解释:
Android应用程序中的Activity类,名为MainActivityFragment,它继承自AppCompatActivity并实现了View.OnClickListener接口。这个类的主要功能是通过底部的四个LinearLayout(作为按钮)来控制四个不同的Fragment的显示和隐藏,实现底部导航的效果。
- 定义了四个
Fragment变量和四个LinearLayout变量,分别用于存放不同的Fragment实例和底部导航按钮。 - 定义了
FragmentManager和FragmentTransaction变量,用于管理Fragment的事务。 onCreate方法:当Activity创建时调用,这里是设置界面布局、初始化Fragment和底部导航按钮的点击事件的地方。findViewById:通过ID找到布局文件中的LinearLayout控件,并赋值给对应的变量。- 创建四个
Fragment实例。 - 获取
FragmentManager实例,并开始一个FragmentTransaction。 - 调用
intial方法,将所有的Fragment添加到FrameLayout中,但默认都是隐藏的。 - 调用
fragmentHide方法,将所有的Fragment都隐藏。 - 显示第一个
Fragment(fragment1)。 - 为四个
LinearLayout设置点击事件监听器,当点击时,隐藏所有Fragment并显示对应的Fragment。 ViewCompat.setOnApplyWindowInsetsListener:这是一个用于处理Android版本兼容的窗口适配监听器,用于设置系统栏(如状态栏和导航栏)的边距。intial方法:将所有的Fragment添加到FrameLayout中,但默认都是隐藏的。fragmentHide方法:隐藏所有的Fragment。onClick方法:View.OnClickListener接口的实现方法,根据点击的View的ID,调用fragmentHide方法隐藏所有Fragment,然后显示对应的Fragment。showfragment方法:显示传入的Fragment,但这里有一个错误,应该是显示传入的fragment参数,而不是固定的fragment1。
六:写在最后
本节给大家讲解了如何使用一个LinarLayout + 四个TextView 实现一个底部导航栏以及 Fragment add,hide,show的逻辑。点个赞吧👍👍👍!
殚精竭虑之后的成功给人一种无法衡量的幸福感,生命中没有任何身体上或精神上的喜悦足以与此相比。——阿贝尔.加缪
