Spring-AI
langchain(python) langchain4j
官网:
https://spring.io/projects/spring-ai#learn
整合chatgpt
前置准备
- open-ai-key:
https://api.xty.app/register?aff=PuZD
https://xiaoai.plus/
https://eylink.cn/
或者淘宝搜: open ai key - 魔法软件, 由于国家相关法律规定,建议大家自行准备。(中转可暂不准备)
- jdk17
4 springboot3
示例代码:https://gitee.com/xscodeit/ai-openai-examples.git
实现
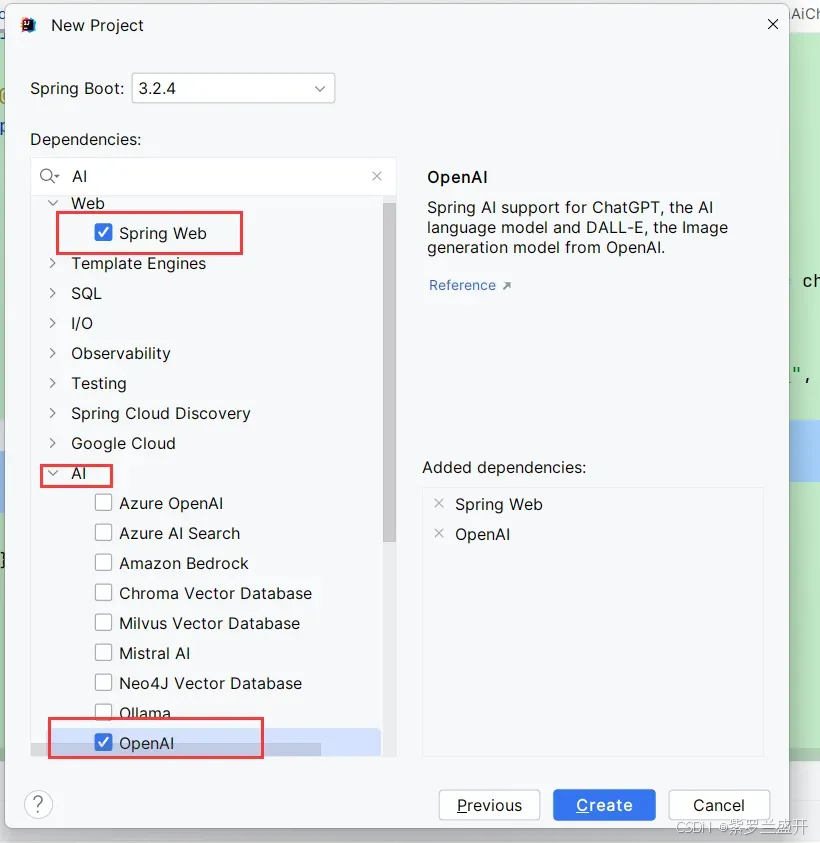
创建完后会发现加入了依赖:
<dependencyManagement>
  <dependencies>
    <dependency>
      <groupId>org.springframework.ai</groupId>
      <artifactId>spring-ai-bom</artifactId>
      <version>1.0.0-SNAPSHOT</version>
      <type>pom</type>
      <scope>import</scope>
    </dependency>
  </dependencies>
</dependencyManagement>

<dependencies>
  <dependency>
    <groupId>org.springframework.boot</groupId>
    <artifactId>spring-boot-starter-web</artifactId>
  </dependency>


  <dependency>
    <groupId>org.springframework.ai</groupId>
    <artifactId>spring-ai-openai-spring-boot-starter</artifactId>
  </dependency>

  <dependency>
    <groupId>org.springframework.boot</groupId>
    <artifactId>spring-boot-starter-test</artifactId>
    <scope>test</scope>
  </dependency>

  <dependency>
    <groupId>org.projectlombok</groupId>
    <artifactId>lombok</artifactId>
  </dependency>

</dependencies>
设置代理, 如果你请求的大模型的api接口不是国内的。需要将程序设置代理:
public static void main(String[] args) {
    // 设置代理
    String proxy = "127.0.0.1";  // 如果代理在你本机就127.0.0.1 ,  如果代理是其
    他服务器相应设置
    int port = 7890;   //设置科学上网代理的端口,
    System.setProperty("proxyType", "4");
    System.setProperty("proxyPort", Integer.toString(port));
    System.setProperty("proxyHost", proxy);
    System.setProperty("proxySet", "true");

    SpringApplication.run(Application.class, args);

}
设置key:
xushu:
  # 官方(自行配置)
  openai:
    key: ${OPENAI_KEY}
    url: ${OPENAI_URL}
  # 中转(自行配置)
  aicore:
    key: ${OPEN_AI_KEY}
    url: ${OPEN_AI_URL}

spring:
  ai:
    openai:
      api-key: ${xushu.aicore.key}
      base-url: ${xushu.aicore.url}
示例代码:
private final ChatClient chatClient;
private final OpenAiChatModel chatClient2;
private final OpenAiImageModel imageClient;
private final OpenAiAudioTranscriptionModel audioClient;
private final  OpenAiAudioApi openAiAudioApi;


@Value("${OPEN_AI_KEY}")
private String openAiKey;


@GetMapping("/ai/simple")
public Map<String, String> completion(@RequestParam(value = "message", defaultValue = "给我讲个笑话") String message) {
    System.out.println(openAiKey);
    var value=chatClient.prompt()
    .user(message).call().content();
    return Map.of("generation",value );
}

@GetMapping(value="/ai/stream",produces="text/sse;charset=UTF-8")
public Flux<String> stream(@RequestParam(value = "message", defaultValue = "给我讲个笑话") String message ) {
    System.out.println(openAiKey);
    return chatClient.prompt()
    .user(message)
    .stream()
    .content();
}


@GetMapping(value="/ai/img",produces="text/html")
public String image(@RequestParam(value = "message", defaultValue = "猫") String message ) {

    ImageResponse response = imageClient.call(
        new ImagePrompt(message,
                        OpenAiImageOptions.builder()
                        .withQuality("hd")
                        .withN(1)
                        .withModel(OpenAiImageApi.ImageModel.DALL_E_2.getValue())
                        // dall-e-2 256
                        .withHeight(256)
                        .withWidth(256).build()));

    String url = response.getResult().getOutput().getUrl();
    System.out.println(url);
    return "<img src='"+url+"'/>";

}


@GetMapping(value="/ai/audit2text")
public String audit2text() {

    var transcriptionOptions = OpenAiAudioTranscriptionOptions.builder()
    .withResponseFormat(OpenAiAudioApi.TranscriptResponseFormat.TEXT)
    .withTemperature(0f)
    .build();

    // flac、mp3、mp4、mpeg、mpga、m4a、ogg、wav 或 webm。
    var audioFile = new ClassPathResource("/hello.mp3");

    AudioTranscriptionPrompt transcriptionRequest = new AudioTranscriptionPrompt(audioFile, transcriptionOptions);
    AudioTranscriptionResponse response = audioClient.call(transcriptionRequest);

    //openAiAudioApi.createTranscription()
    return response.getResult().getOutput();
}


@GetMapping(value="/ai/text2audit")
public String text2audit() {


    ResponseEntity<byte[]> speech = openAiAudioApi.createSpeech(
        OpenAiAudioApi.SpeechRequest.builder().
        withVoice(OpenAiAudioApi.SpeechRequest.Voice.ONYX).
        withInput("你好,我是徐庶").build());
    byte[] body = speech.getBody();


    // 将byte[]存为 mp3文件
    try {
        writeByteArrayToMp3(body, System.getProperty("user.dir"));
    } catch (IOException e) {
        throw new RuntimeException(e);
    }

    return "ok";
}

public static void writeByteArrayToMp3(byte[] audioBytes, String outputFilePath) throws IOException {
    // 创建FileOutputStream实例
    FileOutputStream fos = new FileOutputStream(outputFilePath+"/xushu.mp3");

    // 将字节数组写入文件
    fos.write(audioBytes);

    // 关闭文件输出流
    fos.close();
}


@GetMapping(value="/ai/mutil")
public String mutilModel(String message,String imgUrl) throws IOException {

    byte[] imageData = new ClassPathResource("/test.png").getContentAsByteArray();

    var userMessage = new UserMessage(
          "这个图片你看出什么?", // content
          List.of(new Media(MimeTypeUtils.IMAGE_PNG, imageData))); // media

    ChatResponse response = chatClient.call(new Prompt(userMessage,
          OpenAiChatOptions.builder()
                .withModel(OpenAiApi.ChatModel.GPT_4_TURBO_PREVIEW.getValue())
                .build()));

    return  response.getResult().getOutput().getContent();
}
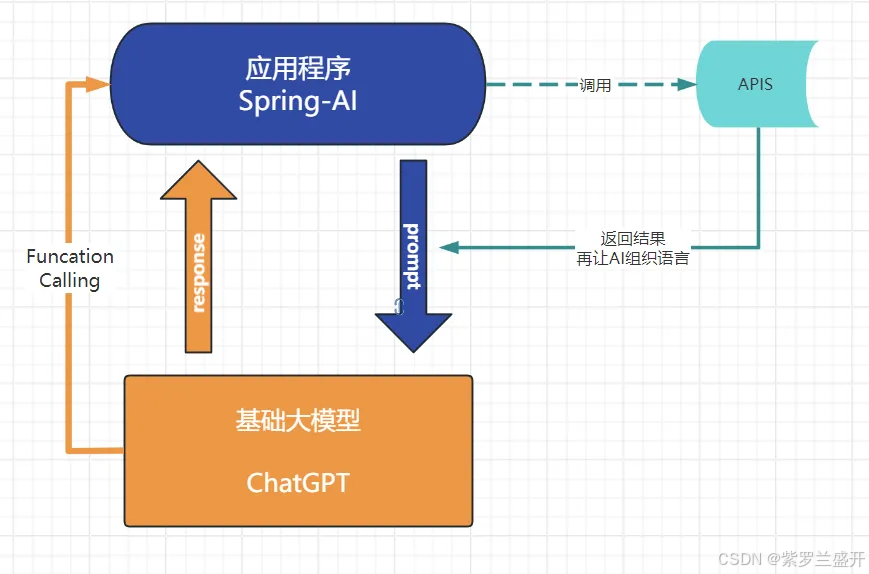
function-call
AI本身是不具备实时消息能力的, 比如问“现在北京的天气是什么”, AI是不知道的, 这个时候我们需要通过接口来帮助AI完成,大致流程:
function-call实现的代码:
- 在发送文本时, 同时设置Funcation ; 关键代码:.withFunction(“getWaitTime”)
ChatResponse response = chatClient.call(new Prompt(
        List.of(userMessage),
        OpenAiChatOptions.builder()
                .withFunction("getWaitTime")
                .build()));
- 当代码执行完call时(AI响应之后), 会再调用getWaitTime对应的bean的apply方法。
@Bean
public Function<WaitTimeService.Request, WaitTimeService.Response> getWaitTime() {
    return new WaitTimeService();
}
- 并且会把 getWaitTime该bean的Request作为funcation-call的返回参数, 即可在apply方法中获取Request对应的参数
@Override
public Response apply(Request request) {
    String name =  request.name();
    String location =  request.location();
     // todo...
    return new Response(location+"有10个!");
}
// jdk17新特性 密封类
public record Request(String name,String location) {}
public record Response(String weather) {}
随后Response会再次丢给AI组织语言, 进行响应,最终
源码:
看源码之前, 了解下该接口需要哪些参数:https://platform.openai.com/docs/api-reference/chat/create
请求: userMessage=“长沙有多少叫徐庶的”
调用call方法, 执行openai的远程api请求
@Override
public ChatResponse call(Prompt prompt) {

    ChatCompletionRequest request = createRequest(prompt, false);

    return this.retryTemplate.execute(ctx -> {

       ResponseEntity<ChatCompletion> completionEntity = this.callWithFunctionSupport(request);

       var chatCompletion = completionEntity.getBody();
       if (chatCompletion == null) {
          logger.warn("No chat completion returned for prompt: {}", prompt);
          return new ChatResponse(List.of());
       }

       RateLimit rateLimits = OpenAiResponseHeaderExtractor.extractAiResponseHeaders(completionEntity);

       List<Generation> generations = chatCompletion.choices().stream().map(choice -> {
          return new Generation(choice.message().content(), toMap(chatCompletion.id(), choice))
             .withGenerationMetadata(ChatGenerationMetadata.from(choice.finishReason().name(), null));
       }).toList();

       return new ChatResponse(generations,
             OpenAiChatResponseMetadata.from(completionEntity.getBody()).withRateLimit(rateLimits));
    });
- 通过createRequest将withFunction参数解析到request.tools
ChatCompletionRequest request = createRequest(prompt, false);
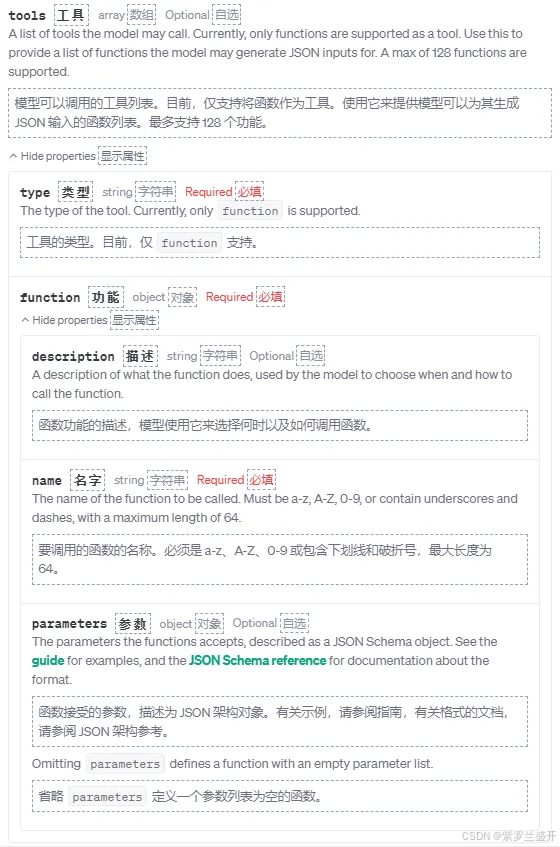
tools属性:包含了

关于open-ai对tools参数的说明:https://platform.openai.com/docs/api-reference/chat/create#chat-create-tools
-
来到callWithFunctionSupport 真正调用远程api接口
protected Resp callWithFunctionSupport(Req request) { Resp response = this.doChatCompletion(request); return this.handleFunctionCallOrReturn(request, response); }
这里2句关键代码: -
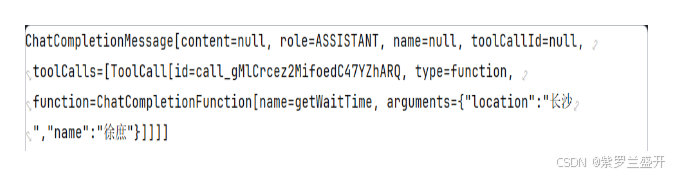
this.doChatCompletion(request); 方法会正常请求chat completion 接口并且会带上funcation-call参数并携带tools属性 , 并且返回对话中的funcation-call所需参数(即WaitTimeService.Request的参数)
-
handleFunctionCallOrReturn 执行Function-callback方法, 此时会调用WaitTimeService.apply方法
a. 拿到之前解析的functionCallback即
b. 将arguments从Json转换为对象调用WaitTimeService.apply
c. 将返回的数据再次请求大模型
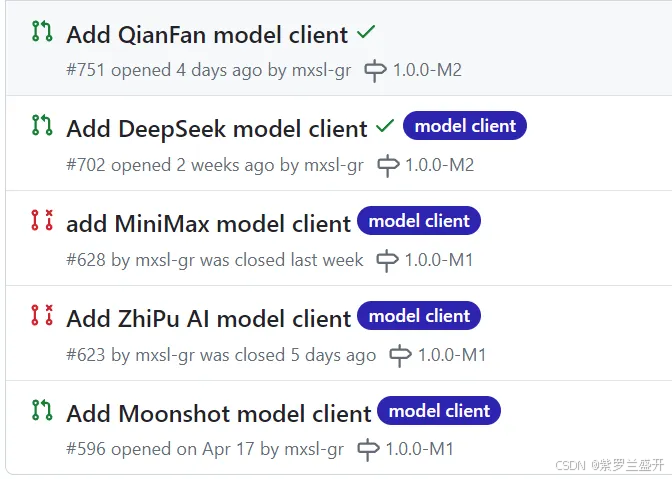
发展
SpringAI社区非常活跃
在后续的版本都会更新国内常用的大模型
https://github.com/spring-projects/spring-ai/issues?q=Moonshot
阿里也率先为自己得通义大模型封装了基于SpringAI的spring-cloud-starter-alibaba-ai
https://sca.aliyun.com/?spm=0.29160081.0.0.77ff60c5NGK3QD