安安静静写个代码也挺好
目录
一,概念
在进行配置多渠道打包之前,需要先了解target和product的概念:
target:工程内的每一个Entry/Feature模块,对应的构建产物为HAP,HAP是应用/服务可以独立运行在设备中的形态。由于在不同的业务场景中,同一个模块可能需要定制不同的功能或资源,因此引入target的概念。一个模块可以定义多个target,每个target对应一个定制的HAP,通过配置可以实现一个模块构建出不同的HAP。
product:一个HarmonyOS工程的构建产物为APP包,APP包用于应用/服务发布上架应用市场。由于不同的业务场景,需要定制不同的应用包,因此引入product概念。一个工程可以定义多个product,每个product对应一个定制化应用包,通过配置可以实现一个工程构建出多个不同的应用包。
目前我在实际应用中只应用到了多HAP的多渠道打包,所以本文暂时只讲多HAP的打包
二,版本
API10和API12有着较大的差异,API12新增许多配置,可以更加灵活的配置多渠道信息。
但是好多小伙伴目前实际应用可能还都是在API10,所以就根据这两个版本分别讲解下怎么配置。
三,API10配置多HAP
3.1配置target
首先我们需要在模块的build-profile.json5中的target下面配置我们需要构建的HAP的target
例如,在entry/build-profile.json5中:
"targets": [
    {
      "name": "bedhead"
    },
    {
      "name": "bedside"
    }
  ]
然后在项目的build-profile.json5中的modules下面添加刚才的两个targets:
"modules": [
    {
      "name": "entry",
      "srcPath": "./entry",
      "targets": [
        {
          "name": "bedhead",
          "applyToProducts": [
            "default"
          ]
        },
        {
          "name": "bedside",
          "applyToProducts": [
            "default"
          ]
        }
      ]
    }

  ]
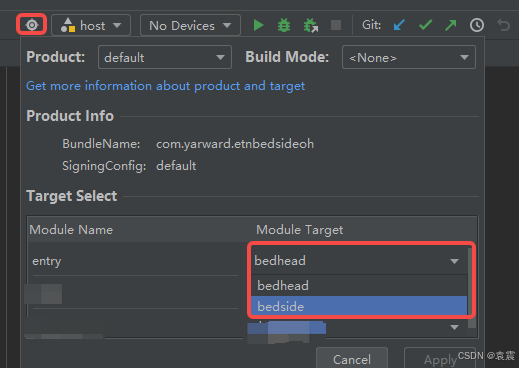
编译之后,点开Product就会看到我们新增加的两个targets:
选择哪个就会编译哪个,打包就会打包哪个。
3.2 定义target运行的系统
在配置模块的build-profile.json5中的target时,可以配置target支持的操作系统:
"targets": [
    {
      "name": "bedhead",
      "runtimeOS": "OpenHarmony"

    },
    {
      "name": "bedside",
      "runtimeOS": "OpenHarmony"

    }
  ]
3.3 定义targets的source源码集-pages
在pages目录下的页面可以选择性的进行配置使用。
例如:bedhead只使用一个页面,bedside使用了两个页面,可以进行如下配置:
 "targets": [
    {
      "name": "bedhead",
      "runtimeOS": "OpenHarmony",
      "source": {
        "pages": [
          "pages/alarmClock/components/ClockPushDialog",
        ]
      }
    },
    {
      "name": "bedside",
      "runtimeOS": "OpenHarmony",
       "source": {
        "pages": [
          "pages/alarmClock/components/ClockPushDialog",
          "pages/alarmClock/components/test",
        ]
      }
    }
  ]
注意:如果没有配置此项,默认包含全部页面
3.4 定义产物的资源
对于API10来说,这项配置是最好用最实用的配置。
每个target使用的资源文件可能存在差异,在开发过程中,开发者可以将每个target所使用的资源存放在不同的资源目录下。ArkTS工程支持对main目录下的资源文件目录(resource)进行定制。
比如现在有这样一个需求,同一个entry项目中,需要根据不同的包进行一些不同的逻辑处理,那对于api10来说,就没有现成的配置可以让我们使用了。
所以呢我就想了一个比较取巧的方法,可以利用加载不同的资源文件来区分不同的包。
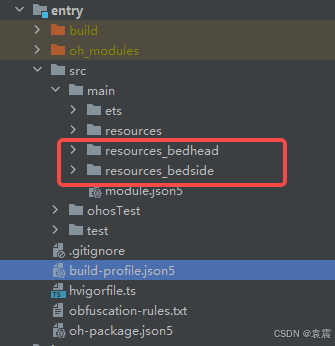
首先我们在main目录下新建两个资源文件夹:resources_bedhead和resources_bedside
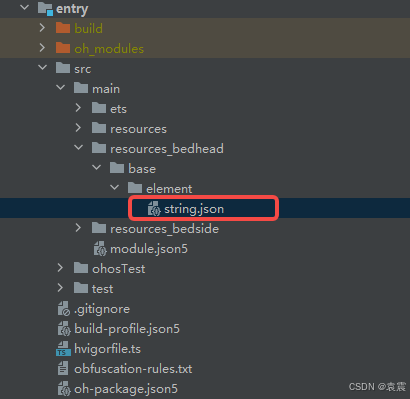
然后在文件夹中创建string.json文件:
在两个string.json文件中创建name相同value不同的对象(根据具体业务逻辑自己定义):
bedhead:
{
  "string": [
    {
      "name": "DevicesType",
      "value": "wnBed"
    }
  ]
}
bedside:
{
  "string": [
    {
      "name": "DevicesType",
      "value": "wnBedside"
    }
  ]
}
然后在targets下添加resource:
"targets": [
    {
      "name": "bedhead",
      "runtimeOS": "OpenHarmony",
      "resource": {
        "directories":[
          "./src/main/resources_bedhead",
          "./src/main/resources"
        ]
      }
    },
    {
      "name": "bedside",
      "runtimeOS": "OpenHarmony",
      "resource": {
        "directories":[
          "./src/main/resources_bedside",
          "./src/main/resources"
        ]
      }
    }
  ]
注意:需要添加默认的resources,否则找不到资源
再使用的时候,就可以根据相同的name不同的value来进行业务处理了:
this.app.abilityContext.resourceManager.getStringValue($r('app.string.DevicesType').id).then(value=>{
      console.info("yh------测试:"+value)
    })
四,API12配置多HAP
API12进行配置就简单的多了,它增加了需要新的配置。
4.1 定义产物的命名
"targets": [
    {
      "name": "bedhead",
      "runtimeOS": "OpenHarmony",
      "resource": {
        "directories":[
          "./src/main/resources_bedhead",
          "./src/main/resources"
        ]
      },
      "output": {
        "artifactName": "yuanzhen-1.0.0"
      }
    },
    {
      "name": "bedside",
      "runtimeOS": "OpenHarmony",
      "resource": {
        "directories":[
          "./src/main/resources_bedside",
          "./src/main/resources"
        ]
      },
      "output": {
        "artifactName": "yz-2.0.0"
      }
    }
  ]
4.2 定义产物的distributionFilter
在未定义target的分发规则distributionFilter时,以module配置distroFilter/distributionFilter分发规则为准。
针对多target存在相同设备类型deviceType的场景,相同设备类型的target需要指定分发规则distributionFilter。
"targets": [
    {
      "name": "bedhead",
      "runtimeOS": "OpenHarmony",
      "resource": {
        "directories":[
          "./src/main/resources_bedhead",
          "./src/main/resources"
        ]
      },
      "output": {
        "artifactName": "yuanzhen-1.0.0"
      },
      "config": {
        "distributionFilter": {
          "screenShape": { // 屏幕形状枚举
            "policy": "include",
            "value": ["circle"]
          }
        }
      }
     },
    {
      "name": "bedside",
      "runtimeOS": "OpenHarmony",
      "resource": {
        "directories":[
          "./src/main/resources_bedside",
          "./src/main/resources"
        ]
      },
      "output": {
        "artifactName": "yz-2.0.0"
      }
    }
  ]
4.3 定义产物的icon、label、launchType
针对每一个的target的ability,均可以定制不同的icon、label和launchType。如果不定义,则该target采用module.json5中module.abilities配置的icon、label,launchType默认为"singleton"。
"targets": [
    {
      "name": "bedhead",
      "runtimeOS": "OpenHarmony",
      "source": {
        "abilities": [
          {
            "name": "EntryAbility",
            "icon":"$media:layered_image",
            "label":"$string:EntryAbility_label",
            "launchType": "singleton"
          }
        ]
      }
      "output": {
        "artifactName": "yuanzhen-1.0.0"
      },

     },
    {
      "name": "bedside",
      "runtimeOS": "OpenHarmony",
      "output": {
        "artifactName": "yz-2.0.0"
      },
      "source": {
        "abilities": [
          {
            "name": "EntryAbility",
            "icon":"$media:layered_image",
            "label":"$string:EntryAbility_label",
            "launchType": "singleton"
          }
        ]
      }
    }
  ]
4.4 定义产物的source源码集-sourceRoots
最关键的来了,这是api12新增加的配置,通过这个配置,我们不用再像api10那样通过资源文件来区分不同的渠道包。
在模块的主代码空间(src/main)下,承载着开发者编写的公共代码。如果开发者需要实现不同target之间的差异化逻辑,可以使用差异化代码空间(sourceRoots)。配合差异化代码空间的能力,可以在主代码空间中代码不变的情况下,针对不同的target,编译对应的代码到最终产物中。
例如以下工程目录:
entry
|--src
|----main
|------ets
|--------code
|----------test.ets
|----target
|------util
|--------util.ets
|--index.ets- packageName为entry。
- sourceRoot为src/main、src/target。
- sourcePath为ets/code、util。
- sourceFileName为test.ets、util.ets。
规格限制
1. import xxx from '<packageName>/sourcePath/sourceFileName' :通过packageName的方式,省略sourceRoot,可以实现不同target下的差异化构建。
2. 支持hap、hsp、har(请注意:开启文件/文件夹名称混淆的har模块需要使用-keep-file-name指定sourceRoot,sourcePath,sourceFileName对应的文件/文件夹名称不被混淆)。
3. 不支持跨模块引用。
4. 不支持动态import。
编译时模块target的选择优先级说明
在模块编译的过程中,该模块使用的sourceRoots由当前模块编译时的target来决定。当前模块编译时选择target的优先级则为:命令行显式指定 > 直接引用方target > default。
如以下示例:
hap -> hsp -> har(->表示依赖)
其中hap和hsp存在三个target:default、custom、static,而har存在两个target:default、static。
- 执行编译命令:hvigorw -p module=hap@custom assembleHap,hap指定target为custom进行编译,那么三个模块编译时的target分别为:
hap: custom,命令行显式指定;
hsp: custom,命令行没有显式指定,则基于直接引用方查找,hsp的直接引用方为hap,hap的target为custom,hsp存在该target,则hsp的target为custom;
har: default,命令行没有显式指定,则基于直接引用方查找,har的直接引用方为hsp,hsp的target为custom,har不存在该target,则har的target为default;
- 执行编译命令:hvigorw -p module=hap@custom,hsp@static assembleHap assembleHsp,hap指定target为custom,hsp则指定target为static进行编译,那么三个模块编译时的target分别为:
hap: custom,命令行显式指定;
hsp: static,命令行显式指定;
har: static,命令行没有显式指定,则基于直接引用方查找,har的直接引用方为hsp,hsp的target为static,har存在该target,则har的target为static。
- 在当前依赖关系的基础上,添加依赖:hap -> har。执行编译命令:hvigorw -p module=hap@custom,hsp@static assembleHap assembleHsp。由于har没有显示指定target,且存在两个target不同的直接引用方(hap和hsp,对应的target分别为custom和static),所以编译过程中har的target只能二选一。基于这种场景,建议开发者显示指定模块的target进行编译:hvigorw -p module=hap@custom,hsp@static,har@static assembleHap assembleHsp assembleHar。
示例
1. 在entry模块的build-profile.json5中添加sourceRoots:
{
  "apiType": "stageMode",
  "buildOption": {},
  "targets": [
    {
      "name": "default",
      "source": {
        "sourceRoots": ["./src/default"] // 配置target为default的差异化代码空间
      }
    },
    {
      "name": "custom",
      "source": {
        "sourceRoots": ["./src/custom"] // 配置target为custom的差异化代码空间
      }
    }
  ]
}
2. 在src目录下新增default/Test.ets和custom/Test.ets,新增后的模块目录结构:
entry
  |--src
    |--main
      |--ets
        |--pages
          |--Index.ets
    |--default
      |--Test.ets  // 新增
    |--custom
      |--Test.est  // 新增
3. 在default/Test.ets中写入代码:
export const getName = () => "default"4. 在custom/Test.ets中写入代码:
export const getName = () => "custom"5. 修改src/main/ets/pages/Index.ets的代码:
import { getName } from 'entry/Test'; // 其中entry为模块级的oh-package.json5中的name字段的值
@Entry
@Component
struct Index {
  @State message: string = getName();
  build() {
    RelativeContainer() {
      Text(this.message)
    }
    .height('100%')
    .width('100%')
  }
}
6. 在工程级的build-profile.json5中配置targets:
{
  "app": {
    "signingConfigs": [],
    "products": [
      {
        "name": "default",
        "signingConfig": "default",
        "compatibleSdkVersion": "5.0.0(12)",
        "runtimeOS": "HarmonyOS",
      },
      {
        "name": "custom",
        "signingConfig": "default",
        "compatibleSdkVersion": "5.0.0(12)",
        "runtimeOS": "HarmonyOS",
      }
    ],
    "buildModeSet": [
      {
        "name": "debug",
      },
      {
        "name": "release"
      }
    ]
  },
  "modules": [
    {
      "name": "entry",
      "srcPath": "./entry",
      "targets": [
        {
          "name": "default",
          "applyToProducts": [
            "default"
          ]
        },
        {
          "name": "custom",
          "applyToProducts": [
            "default"
          ]
        }
      ]
    }
  ]
}
7. Sync完成后,选择entry的target为default,点击Run,界面展示default;选择entry的target为custom,点击Run,则界面展示custom。


