一、目的
这一节我们来学习如何使用合宙ESP32 C3连接控制诺基亚Nokia 5110 LCD 屏幕,实现文字显示。下面我们一起来学习一下吧!
二、环境
ESP32 C3开发板(MicroPython v1.19.1 on 2022-06-18)+ 诺基亚Nokia 5110 LCD 屏幕+ 几根杜邦线 + Win10商业版
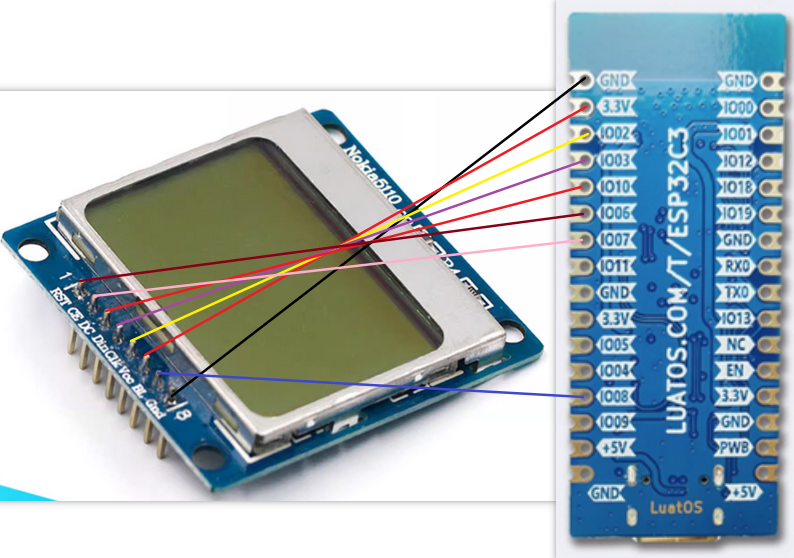
ESP32 C3和各模块接线方法:
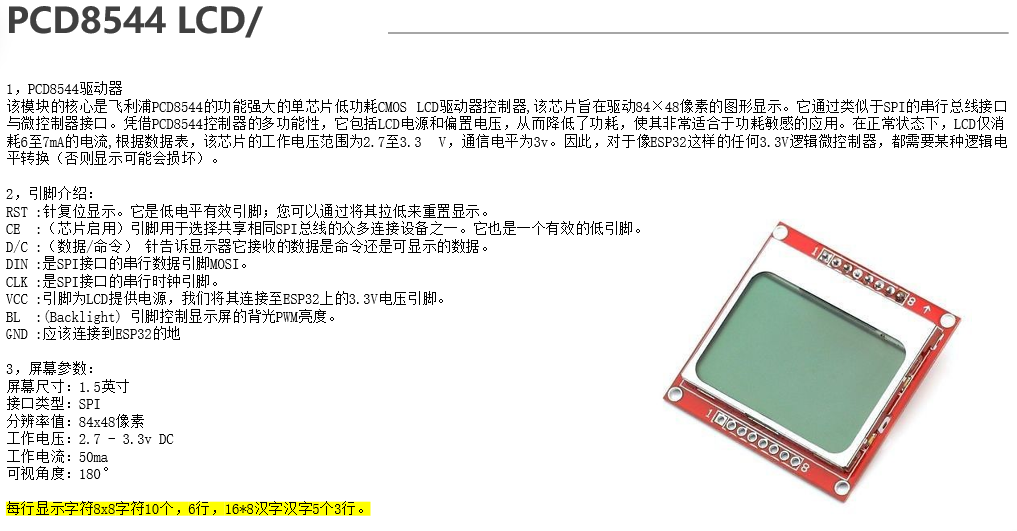
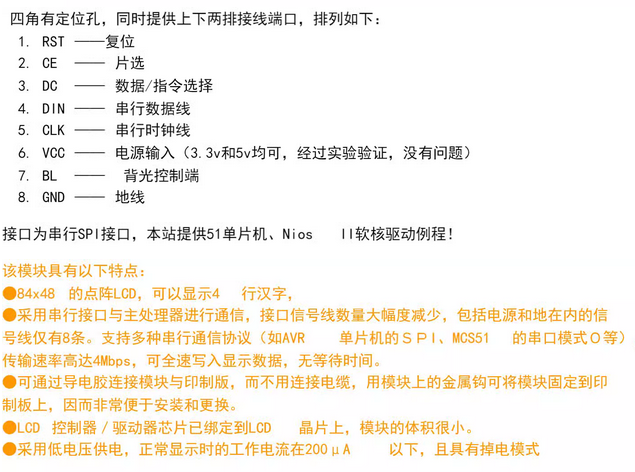
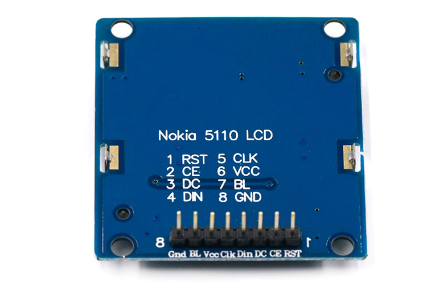
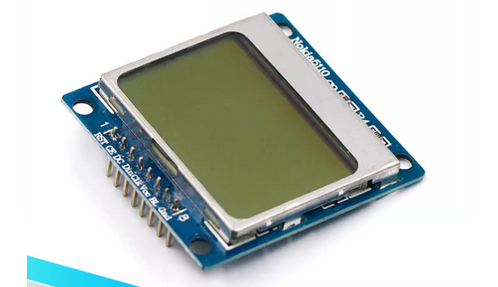
三、模块介绍
四、屏幕驱动
pcd8544.py
"""
MicroPython Nokia 5110 PCD8544 84x48 LCD driver

"""

from micropython import const
from ustruct import pack
from utime import sleep_us
from machine import Pin,PWM
import framebuf

# Function set 0010 0xxx
FUNCTION_SET     = const(0x20)
POWER_DOWN       = const(0x04)
ADDRESSING_VERT  = const(0x02)
EXTENDED_INSTR   = const(0x01)

# Display control 0000 1x0x
DISPLAY_BLANK    = const(0x08)
DISPLAY_ALL      = const(0x09)
DISPLAY_NORMAL   = const(0x0c)
DISPLAY_INVERSE  = const(0x0d)

# Temperature control 0000 01xx
TEMP_COEFF_0     = const(0x04)
TEMP_COEFF_1     = const(0x05)
TEMP_COEFF_2     = const(0x06) # default
TEMP_COEFF_3     = const(0x07)

# Bias system 0001 0xxx
BIAS_1_100       = const(0x10)
BIAS_1_80        = const(0x11)
BIAS_1_65        = const(0x12)
BIAS_1_48        = const(0x13)
BIAS_1_40        = const(0x14) # default
BIAS_1_24        = const(0x15)
BIAS_1_18        = const(0x16)
BIAS_1_10        = const(0x17)

# Set operation voltage
SET_VOP          = const(0x80)

# DDRAM addresses
COL_ADDR         = const(0x80) # x pos (0~83)
BANK_ADDR        = const(0x40) # y pos, in banks of 8 rows (0~5)

# Display dimensions
WIDTH            = const(0x54) # 84
HEIGHT           = const(0x30) # 48

class PCD8544(framebuf.FrameBuffer):
	def __init__(self, spi, cs, dc, rst, blk):
		self.spi = spi
		self.cs  = cs   # chip enable, active LOW
		self.dc  = dc   # data HIGH, command LOW
		self.rst = rst  # reset, active LOW
		self.blk = PWM(Pin(blk),freq = 1000,duty = 0)#bei guang she zhi

		self.height = HEIGHT  # For Writer class
		self.width = WIDTH

		self.cs.init(self.cs.OUT, value=1)
		self.dc.init(self.dc.OUT, value=0)

		if self.rst:
			self.rst.init(self.rst.OUT, value=1)

		self.buf = bytearray((HEIGHT // 8) * WIDTH)
		super().__init__(self.buf, WIDTH, HEIGHT, framebuf.MONO_VLSB)

		self.reset()
		self.init()

	def init(self, horizontal=True, contrast=0x3f, bias=BIAS_1_40, temp=TEMP_COEFF_2):
		# power up, horizontal addressing, basic instruction set
		self.fn = FUNCTION_SET
		self.addressing(horizontal)
		self.contrast(contrast, bias, temp)
		self.cmd(DISPLAY_NORMAL)
		self.clear()

	def reset(self):
		# issue reset impulse to reset the display
		# you need to call power_on() or init() to resume
		self.rst(1)
		sleep_us(100)
		self.rst(0)
		sleep_us(100) # reset impulse has to be >100 ns and <100 ms
		self.rst(1)
		sleep_us(100)

	def power_on(self):
		self.cs(1)
		self.fn &= ~POWER_DOWN
		self.cmd(self.fn)

	def power_off(self):
		self.fn |= POWER_DOWN
		self.cmd(self.fn)

	def contrast(self, contrast=0x3f, bias=BIAS_1_40, temp=TEMP_COEFF_2):
		for cmd in (
			# extended instruction set is required to set temp, bias and vop
			self.fn | EXTENDED_INSTR,
			# set temperature coefficient
			temp,
			# set bias system (n=3 recommended mux rate 1:40/1:34)
			bias,
			# set contrast with operating voltage (0x00~0x7f)
			# 0x00 = 3.00V, 0x3f = 6.84V, 0x7f = 10.68V
			# starting at 3.06V, each bit increments voltage by 0.06V at room temperature
			SET_VOP | contrast,
			# revert to basic instruction set
			self.fn & ~EXTENDED_INSTR):
			self.cmd(cmd)

	def invert(self, invert):
		self.cmd(DISPLAY_INVERSE if invert else DISPLAY_NORMAL)

	def clear(self):
		# clear DDRAM, reset x,y position to 0,0
		self.data([0] * (HEIGHT * WIDTH // 8))
		self.position(0, 0)

	def addressing(self, horizontal=True):
		# vertical or horizontal addressing
		if horizontal:
			self.fn &= ~ADDRESSING_VERT
		else:
			self.fn |= ADDRESSING_VERT
		self.cmd(self.fn)

	def position(self, x, y):
		# set cursor to column x (0~83), bank y (0~5)
		self.cmd(COL_ADDR | x)  # set x pos (0~83)
		self.cmd(BANK_ADDR | y) # set y pos (0~5)

	def cmd(self, command):
		self.dc(0)
		self.cs(0)
		self.spi.write(bytearray([command]))
		self.cs(1)

	def data(self, data):
		self.dc(1)
		self.cs(0)
		self.spi.write(pack('B'*len(data), *data))
		self.cs(1)

	def show(self):
		self.data(self.buf)

	def Blk(self,BLK):
		self.blk.duty(int((BLK/1000)*1023))
五、字库文件
1,字体文件unifont-14.0.04.bmf从这篇文章的第五节,某度网盘下载:
物联网开发125 - Micropython ESP32 C3 NecIR VS1838B红外遥控解码+ST7735S屏显示-CSDN博客
2,字库ufont.py
__version__ = 3

import time
import struct

import framebuf

DEBUG = False

def timeit(f, *args, **kwargs):
    try:
        myname = str(f).split(' ')[1]
    except:
        myname = "UNKONW"

    def new_func(*args, **kwargs):
        if DEBUG:
            try:
                t = time.ticks_us()
                result = f(*args, **kwargs)
                delta = time.ticks_diff(time.ticks_us(), t)
                print('Function {} Time = {:6.3f}ms'.format(myname, delta / 1000))
            except AttributeError:
                t = time.perf_counter_ns()
                result = f(*args, **kwargs)
                delta = time.perf_counter_ns() - t
                print('Function {} Time = {:6.3f}ms'.format(myname, delta / 1000000))
            return result
        else:
            return f(*args, **kwargs)

    return new_func

class BMFont:
    @staticmethod
    def _list_to_byte(arr):
        b = 0
        for a in arr:
            b = (b << 1) + a
        return bytes([b])

    @timeit
    def _bit_list_to_byte_data(self, bit_list):
        """将点阵转换为字节数据

        Args:
            bit_list:

        Returns:

        """
        byte_data = b''
        for _col in bit_list:
            for i in range(0, len(_col), 8):
                byte_data += self._list_to_byte(_col[i:i + 8])
        return byte_data

    @timeit
    def __init__(self, font_file):
        self.font_file = font_file

        self.font = open(font_file, "rb", buffering=0xff)

        self.bmf_info = self.font.read(16)

        if self.bmf_info[0:2] != b"BM":
            raise TypeError("字体文件格式不正确: " + font_file)

        self.version = self.bmf_info[2]
        if self.version != 3:
            raise TypeError("字体文件版本不正确: " + str(self.version))

        self.map_mode = self.bmf_info[3]  # 映射方式
        self.start_bitmap = struct.unpack(">I", b'\x00' + self.bmf_info[4:7])[0]  # 位图开始字节
        self.font_size = self.bmf_info[7]  # 字体大小
        self.bitmap_size = self.bmf_info[8]  # 点阵所占字节

    @timeit
    def _to_bit_list(self, byte_data, font_size, *, _height=None, _width=None):
        """将字节数据转换为点阵数据

        Args:
            byte_data: 字节数据
            font_size: 字号大小
            _height: 字体原高度
            _width: 字体原宽度

        Returns:

        """
        _height = _height or self.font_size
        _width = _width or self.bitmap_size // self.font_size * 8
        new_bitarray = [[0 for j in range(font_size)] for i in range(font_size)]
        for _col in range(len(new_bitarray)):
            for _row in range(len(new_bitarray[_col])):
                _index = int(_col / (font_size / _height)) * _width + int(_row / (font_size / _width))
                new_bitarray[_col][_row] = byte_data[_index // 8] >> (7 - _index % 8) & 1
        return new_bitarray

    @timeit
    def _color_render(self, bit_list, color):
        """将二值点阵图像转换为 RGB565 彩色字节图像

        Args:
            bit_list:
            color:
        Returns:

        """
        color_array = b""
        for _col in range(len(bit_list)):
            for _row in range(len(bit_list)):
                color_array += struct.pack("<H", color) if bit_list[_col][_row] else b'\x00\x00'
        return color_array

    @timeit
    def _get_index(self, word):
        """获取索引

        Args:
            word: 字符

        Returns:

        """
        word_code = ord(word)
        start = 0x10
        end = self.start_bitmap

        while start <= end:
            mid = ((start + end) // 4) * 2
            self.font.seek(mid, 0)
            target_code = struct.unpack(">H", self.font.read(2))[0]
            if word_code == target_code:
                return (mid - 16) >> 1
            elif word_code < target_code:
                end = mid - 2
            else:
                start = mid + 2
        return -1

    @timeit
    def get_bitmap(self, word):
        """获取点阵图

        Args:
            word: 字符

        Returns:
            bytes 字符点阵
        """
        index = self._get_index(word)
        if index == -1:
            return b'\xff\xff\xff\xff\xff\xff\xff\xff\xf0\x0f\xcf\xf3\xcf\xf3\xff\xf3\xff\xcf\xff?\xff?\xff\xff\xff' \
                   b'?\xff?\xff\xff\xff\xff'

        self.font.seek(self.start_bitmap + index * self.bitmap_size, 0)
        return self.font.read(self.bitmap_size)

    @timeit
    def text(self, display, string, x, y, color=1, *, font_size=None, reverse=False, clear=False, show=False,
             half_char=True, auto_wrap=False, **kwargs):
        """通过显示屏显示文字

        使用此函数显示文字,必须先确认显示对象是否继承与 framebuf.FrameBuffer。
        如果显示对象没有 clear 方法,需要自行调用 fill 清屏

        Args:
            display: 显示实例
            string: 字符串
            x: 字体左上角 x 轴
            y: 字体左上角 y 轴
            color: 颜色
            font_size: 字号
            reverse: 是否反转背景
            clear: 是否清除之前显示的内容
            show: 是否立刻显示
            half_char: 是否半字节显示 ASCII 字符
            auto_wrap: 自动换行
            **kwargs:
            Returns:
            None
        """
        font_size = font_size or self.font_size
        initial_x = x

        # 清屏
        try:
            display.clear() if clear else 0
        except AttributeError:
            print("请自行调用 display.fill(*) 清屏")

        for char in range(len(string)):
            # 是否自动换行
            if auto_wrap:
                if auto_wrap and ((x + font_size // 2 >= 128 and ord(string[char]) < 128 and half_char) or
                                  (x + font_size >= 128 and (not half_char or ord(string[char]) > 128))):
                    y += font_size
                    x = initial_x

            # 回车
            if string[char] == '\n':
                y += font_size
                x = initial_x
                continue
            # Tab
            elif string[char] == '\t':
                x = ((x // font_size) + 1) * font_size + initial_x % font_size
                continue

            # 其它的控制字符不显示
            elif ord(string[char]) < 16:
                continue

            # 超过范围的字符不会显示*
            if x > 160 or y > 80:
                continue

            byte_data = list(self.get_bitmap(string[char]))

            # 反转
            if reverse:
                for _pixel in range(len(byte_data)):
                    byte_data[_pixel] = ~byte_data[_pixel] & 0xff

            # 缩放和色彩*
            if color > 1 or font_size != self.font_size:
                bit_data = self._to_bit_list(byte_data, font_size)
                if color > 1:
                    display.blit(
                        framebuf.FrameBuffer(bytearray(self._color_render(bit_data, color)), font_size, font_size,
                                             framebuf.RGB565), x, y)
                else:
                    display.blit(
                        framebuf.FrameBuffer(bytearray(self._bit_list_to_byte_data(bit_data)), font_size, font_size,
                                             framebuf.MONO_HLSB), x, y)
            else:
                display.blit(framebuf.FrameBuffer(bytearray(byte_data), font_size, font_size, framebuf.MONO_HLSB), x, y)

            # 英文字符半格显示
            if ord(string[char]) < 128 and half_char:
                x += font_size // 2
            else:
                x += font_size

        display.show() if show else 0

    def char(self, char, color=1, font_size=None, reverse=False):
        """ 获取字体字节数据

        在没有继承 framebuf.FrameBuffer 的显示驱动,或者内存不足以将一整个屏幕载入缓存帧时
        可以直接获取单字的字节数据,局部更新
        Args:
            char: 单个字符
            color: 颜色
            font_size: 字体大小
            reverse: 反转
            Returns:
            bytearray
        """
        font_size = font_size or self.font_size
        byte_data = list(self.get_bitmap(char))

        # 反转
        if reverse:
            for _pixel in range(len(byte_data)):
                byte_data[_pixel] = ~byte_data[_pixel] & 0xff
        if color > 1 or font_size != self.font_size:
            bit_data = self._to_bit_list(byte_data, font_size)
            if color > 1:
                return self._color_render(bit_data, color)
            else:
                return self._bit_list_to_byte_data(bit_data)
        else:
            return bytearray(byte_data)
六、示例程序
demo.py
from machine import Pin,SPI
import time

from pcd8544 import PCD8544
from ufont import BMFont

font = BMFont("unifont-14.0.04.bmf")

spi = SPI(1,baudrate = 1_000_000,polarity = 0,sck = Pin(2),mosi = Pin(3),miso = None)
lcd = PCD8544(spi, cs = Pin(7), dc = Pin(10), rst = Pin(6), blk = 8)

def main():

    lcd.Blk(100)

    lcd.text("Nokia",0,0,1)
    lcd.show()

    lcd.hline(0,10,84,1)
    lcd.show()

    font.text(lcd,"计数",0,20,color=1,font_size=16,reverse=False,clear=False,show=True,half_char=True,auto_wrap=False)

    while True:

        for i in range(0,100,1):
            font.text(lcd,"Num:%.2d"%(i),35,20,color=1,font_size=16,reverse=False,clear=False,show=True,half_char=True,auto_wrap=False)
            time.sleep(0.1)

if __name__ == "__main__":
    main()
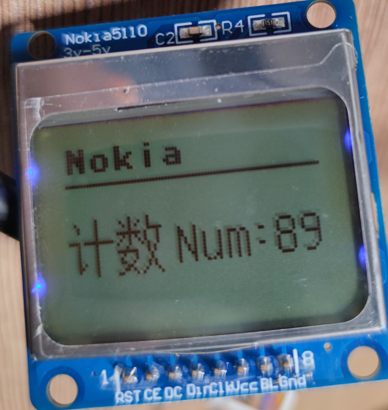
显示效果:
七、模块购买
某宝上有很多,我使用的是这款:
蓝色单片机开发板用 5110液晶屏模块 兼容3310 蓝色背光LCD屏
商品详情
