目录
4.2 max virtual memory areas vm.max_map_count [65530] is too low, increase to at least [262144]
3.8 或者通过 _update API的方式单独更新你想要更新的
一.注意
1.JDK需要安装1.8及以上的
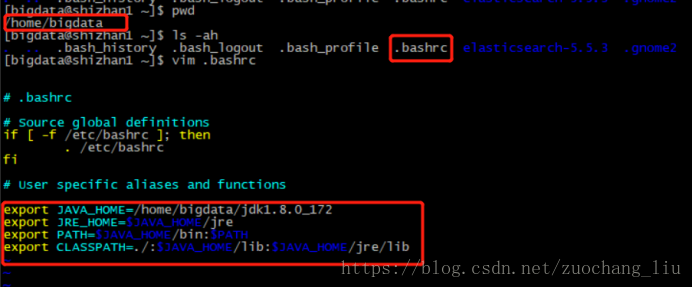
export JAVA_HOME=/home/bigdata/jdk1.8.0_172
export JRE_HOME=$JAVA_HOME/jre
export PATH=$JAVA_HOME/bin:$PATH
export CLASSPATH=./:$JAVA_HOME/lib:$JAVA_HOME/jre/lib
2.必须使用非root用户运行
Caused by: java.lang.RuntimeException: can not run elasticsearch as root
3.Centos7最佳,centos6需要增加额外配置
二.安装步骤
-
下载安装包
-
解压安装包
-
在解压目录中运行bin/elasticsearch命令
-
可能遇到的问题
4.1 max file descriptors [4096] for elasticsearch process is too low, increase to at least [65536] max number of threads [1024] for user [hdfs] is too low, increase to at least [2048]
(max_user_processes和open_file修改)
使用root用户修改配置文件:/etc/security/limits.conf增加如下内容
* soft nproc 10240
* hard nproc 10240
* soft nofile 10240
* hard nofile 10240
其中nofile对应open_files
nproc对应max_user_processes
但是在Linux 6.4之后,如果只修改了该文件中的nproc,那么其他非root用户对应的max_user_processes并不会改变,仍然是1024,这个是因为受到了下面这个文件的影响
/etc/security/limits.d/90-nproc.conf
查看一下:
[root@rhf ~]# cat /etc/security/limits.d/90-nproc.conf
# Default limit for number of user's processes to prevent
# accidental fork bombs.
# See rhbz #432903 for reasoning.
* soft nproc 1024
root soft nproc unlimited
此时有两种方法解决该问题:
1、修改/etc/security/limits.d/90-nproc.conf将
* soft nproc 1024
修改为:
* soft nproc 10240
2、修改/etc/security/limits.conf,将
* soft nofile 10240
修改为
oracle soft nofile 10240
4.2 max virtual memory areas vm.max_map_count [65530] is too low, increase to at least [262144]
vim /etc/sysctl.conf
添加下面配置:
vm.max_map_count=655360
[root@node01 config]# sysctl -p #刷新修改参数使其生效
4.3 OpenJDK 64-Bit Server VM warning: INFO: os::commit_memory(0x000000008a660000, 1973026816, 0) failed; error=‘Cannot allocate memory‘ (errno=12)
# There is insufficient memory for the Java Runtime Environment to continue.
# Native memory allocation (mmap) failed to map 1973026816 bytes for committing reserved memory.
# An error report file with more information is saved as:
# /usr/local/elasticsearch-5.1.2/hs_err_pid11986.log
修改jvm空间分配,因为elasticsearch5.x默认分配jvm空间大小为2g
[root@node01 elasticsearch-5.1.2]# vim config/jvm.options
-Xms2g
-Xmx2g
修改为
-Xms512m
-Xmx512m
4.4 system call filters failed to install; check the logs and fix your configuration or disable system call filters at your own risk和以下异常是统一原因 java.lang.UnsupportedOperationException: seccomp unavailable: CONFIG_SECCOMP not compiled into kernel, CONFIG_SECCOMP and CONFIG_SECCOMP_FILTER are needed ....
问题原因:因为Centos6不支持SecComp,而ES5.5.2默认bootstrap.system_call_filter为true进行检测
所以导致检测失败,失败后直接导致ES不能启动。解决方法:
修改配置vi ./config/elasticsearch.yml
bootstrap.system_call_filter为false,注意要在Memory下面:
bootstrap.memory_lock: false
bootstrap.system_call_filter: false
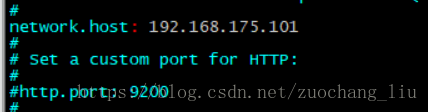
5 修改配置文件

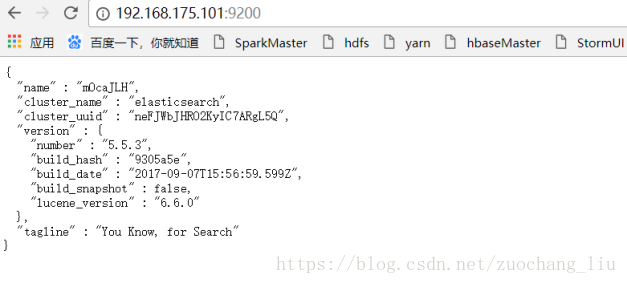
6.启动

访问
http://192.168.175.101:9200/
如出现以下内容,则启动正常
三 简单使用
1.杀掉es进程的两种方式
kill `ps -ef | grep Elasticsearch | grep -v grep | awk '{print $2}'`
kill `jps | grep Elasticsearch | awk '{print $1}'`
# get|post|put|delete
# HTTP 现有请求后有响应,请求和响应是成对出现的
2.查看集群状态
curl -XGET 'http://192.168.175.101:9200/_cluster/health?pretty'
http://192.168.175.101:9200/_cluster/health?pretty
------------------------------------------------------------------------------------------------------------------
3.RESTful接口URL的格式:
http://192.168.175.101:9200/<index>/<type>/[<id>]
其中index、type是必须提供的。
id是可选的,不提供es会自动生成。
index、type将信息进行分层,利于管理。
index可以理解为数据库;type理解为数据表;id相当于数据库表中记录的主键,是唯一的。
curl -XGET 'http://192.168.175.101:9200/_cat/indices?v'
3.1 向store索引中添加一些书籍
curl -XPUT 'http://192.168.175.101:9200/store/books/1' -d '{
"title": "Elasticsearch: The Definitive Guide",
"name" : {
"first" : "Zachary",
"last" : "Tong"
},
"publish_date":"2015-02-06",
"price":"49.99"
}'
3.2 在linux中通过curl的方式查询
curl -XGET 'http://192.168.175.101:9200/store/books/1'
#通过浏览器查询
http://192.168.175.101:9200/store/books/1
3.3 再添加一个书的信息
curl -XPUT 'http://192.168.175.101:9200/store/books/2' -d '{
"title": "Elasticsearch Blueprints",
"name" : {
"first" : "Vineeth",
"last" : "Mohan"
},
"publish_date":"2015-06-06",
"price":"35.99"
}'
3.4 通过ID获得文档信息
curl -XGET 'http://192.168.175.101:9200/store/books/1'
3.5 在浏览器中查看
http://192.168.175.101:9200/store/books/2
3.6 通过_source获取指定的字段
curl -XGET 'http://192.168.175.101:9200/store/books/1?_source=title'
curl -XGET 'http://192.168.175.101:9200/store/books/1?_source=title,price'
curl -XGET 'http://192.168.175.101:9200/store/books/1?_source'
3.7 可以通过覆盖的方式更新
curl -XPUT 'http://192.168.175.101:9200/store/books/1' -d '{
"title": "Elasticsearch: The Definitive Guide",
"name" : {
"first" : "Zachary",
"last" : "Tong"
},
"publish_date":"2016-02-06",
"price":"99.99"
}'
3.8 或者通过 _update API的方式单独更新你想要更新的
curl -XPOST 'http://192.168.175.101:9200/store/books/1/_update' -d '{
"doc": {
"price" : 88.88
}
}'
curl -XGET 'http://192.168.175.101:9200/store/books/1'
3.9 删除一个文档
curl -XDELETE 'http://192.168.175.101:9200/store/books/1'
curl -XPUT 'http://192.168.175.101:9200/store/books/4' -d '{
"title": "Elasticsearch: The Definitive Guide",
"author": "Guide",
"publish_date":"2016-02-06",
"price":"35.99"
}'
#https://www.elastic.co/guide/en/elasticsearch/reference/current/query-dsl.html
3.10 最简单filter查询
# SELECT * FROM books WHERE price = 35.99
# filtered 查询价格是35.99的
# 返回的的分是1.0
curl -XGET 'http://192.168.175.101:9200/store/books/_search' -d '{
"query": {
"bool": {
"must": {
"match_all": {}
},
"filter": {
"term": {
"price": 35.99
}
}
}
}
}'
# 返回的的分是1.0
curl -XGET 'http://192.168.175.101:9200/store/books/_search' -d '{
"query": {
"constant_score": {
"filter": {
"term": {
"price": 35.99
}
}
}
}
}'
# 返回的的分是0.0
curl -XGET 'http://192.168.175.101:9200/store/books/_search' -d '{
"query": {
"bool": {
"filter" : {
"term" : {
"price" : 35.99
}
}
}
}
}'
#指定多个值
curl -XGET 'http://192.168.175.101:9200/store/books/_search' -d '{
"query" : {
"bool" : {
"filter" : {
"terms" : {
"price" : [35.99, 99.99]
}
}
}
}
}'
curl -XGET 'http://192.168.175.101:9200/store/books/_search' -d '{
"query" : {
"bool" : {
"must": {
"match_all": {}
},
"filter" : {
"terms" : {
"price" : [35.99, 99.99]
}
}
}
}
}'
# SELECT * FROM books WHERE publish_date = "2015-02-06"
curl -XGET 'http://192.168.175.101:9200/store/books/_search' -d '{
"query" : {
"bool" : {
"filter" : {
"term" : {
"publish_date" : "2016-02-06"
}
}
}
}
}'
3.11 bool过滤查询,可以做组合过滤查询
# SELECT * FROM books WHERE (price = 35.99 OR price = 99.99) AND publish_date != "2016-02-06"
# 类似的,Elasticsearch也有 and, or, not这样的组合条件的查询方式
# 格式如下:
# {
# "bool" : {
# "must" : [],
# "should" : [],
# "must_not" : [],
# }
# }
#
# must: 条件必须满足,相当于 and
# should: 条件可以满足也可以不满足,相当于 or
# must_not: 条件不需要满足,相当于 not
curl -XGET 'http://192.168.175.101:9200/store/books/_search' -d '{
"query" : {
"bool" : {
"should" : [
{ "term" : {"price" : 35.99}},
{ "term" : {"price" : 99.99}}
],
"must_not" : {
"term" : {"publish_date" : "2016-02-06"}
}
}
}
}'
3.12 嵌套查询
# SELECT * FROM books WHERE price = 35.99 OR ( publish_date = "2016-02-06" AND price = 99.99 )
curl -XGET 'http://192.168.175.101:9200/store/books/_search' -d '{
"query": {
"bool": {
"should": [
{
"term": {
"price": 35.99
}
},
{
"bool": {
"must": [
{
"term": {
"publish_date": "2016-02-06"
}
},
{
"term": {
"price": 99.99
}
}
]
}
}
]
}
}
}'
3.13 range范围过滤
# SELECT * FROM books WHERE price >= 10 AND price < 99
# gt : > 大于
# lt : < 小于
# gte : >= 大于等于
# lte : <= 小于等于
curl -XGET 'http://192.168.175.101:9200/store/books/_search' -d '{
"query": {
"range" : {
"price" : {
"gte" : 10,
"lt" : 99
}
}
}
}
#name和author都必须包含Guide,并且价钱等于33.99或者188.99
curl -XGET 'http://192.168.175.101:9200/store/books/_search' -d '{
"query": {
"bool": {
"must": {
"multi_match": {
"operator": "and",
"fields": [
"name",
"author"
],
"query": "Guide"
}
},
"filter": {
"terms": {
"price": [
35.99,
188.99
]
}
}
}
}
}'
- 集群安装
修改配置
vi /bigdata/elasticsearch-2.3.1/config/elasticsearch.yml
#集群名称,通过组播的方式通信,通过名称判断属于哪个集群
cluster.name: bigdata
#节点名称,要唯一
node.name: es-1
#数据存放位置
path.data: /data/es/data
#日志存放位置
path.logs: /data/es/logs
#es绑定的ip地址
network.host: 172.16.0.14
#初始化时可进行选举的节点
discovery.zen.ping.unicast.hosts: ["node-4", "node-5", "node-6"]使用scp拷贝到其他节点
scp -r elasticsearch-2.3.1/ node-5:$PWD
scp -r elasticsearch-2.3.1/ node-6:$PWD在其他节点上修改es配置,需要修改的有node.name和network.host
启动es(/bigdata/elasticsearch-2.3.1/bin/elasticsearch -h查看帮助文档)
/bigdata/elasticsearch-2.3.1/bin/elasticsearch -d用浏览器访问es所在机器的9200端口
http://172.16.0.14:9200/
elasticsearch.yml配置参考
# ======================== Elasticsearch Configuration =========================
#
# NOTE: Elasticsearch comes with reasonable defaults for most settings.
#       Before you set out to tweak and tune the configuration, make sure you
#       understand what are you trying to accomplish and the consequences.
#
# The primary way of configuring a node is via this file. This template lists
# the most important settings you may want to configure for a production cluster.
#
# Please see the documentation for further information on configuration options:
# <http://www.elastic.co/guide/en/elasticsearch/reference/current/setup-configuration.html>
#
# ---------------------------------- Cluster -----------------------------------
#
# Use a descriptive name for your cluster:
#
cluster.name: bigdata
#
# ------------------------------------ Node ------------------------------------
#
# Use a descriptive name for the node:
#
node.name: node-4
#
# Add custom attributes to the node:
#
# node.rack: r1
#
# ----------------------------------- Paths ------------------------------------
#
# Path to directory where to store the data (separate multiple locations by comma):
#
path.data: /bigdata/elasticsearch-2.2.1/data
#
# Path to log files:
#
path.logs: /bigdata/elasticsearch-2.2.1/logs
#
# ----------------------------------- Memory -----------------------------------
#
# Lock the memory on startup:
#
# bootstrap.mlockall: true
#
# Make sure that the `ES_HEAP_SIZE` environment variable is set to about half the memory
# available on the system and that the owner of the process is allowed to use this limit.
#
# Elasticsearch performs poorly when the system is swapping the memory.
#
# ---------------------------------- Network -----------------------------------
#
# Set the bind address to a specific IP (IPv4 or IPv6):
#
network.host: 172.16.0.14
#
# Set a custom port for HTTP:
#
# http.port: 9200
#
# For more information, see the documentation at:
# <http://www.elastic.co/guide/en/elasticsearch/reference/current/modules-network.html>
#
# --------------------------------- Discovery ----------------------------------
#
# Pass an initial list of hosts to perform discovery when new node is started:
# The default list of hosts is ["127.0.0.1", "[::1]"]
#
discovery.zen.ping.unicast.hosts: ["node-4", "node-5", "node-6"]
#
# Prevent the "split brain" by configuring the majority of nodes (total number of nodes / 2 + 1):
#
# discovery.zen.minimum_master_nodes: 3
#
# For more information, see the documentation at:
# <http://www.elastic.co/guide/en/elasticsearch/reference/current/modules-discovery.html>
#
# ---------------------------------- Gateway -----------------------------------
#
# Block initial recovery after a full cluster restart until N nodes are started:
#
# gateway.recover_after_nodes: 3
#
# For more information, see the documentation at:
# <http://www.elastic.co/guide/en/elasticsearch/reference/current/modules-gateway.html>
#
# ---------------------------------- Various -----------------------------------
#
# Disable starting multiple nodes on a single system:
#
# node.max_local_storage_nodes: 1
#
# Require explicit names when deleting indices:
#
# action.destructive_requires_name: true