linux架构高可用
a.概述
- 高可用:HA HighAvailablity —>Keepalived
- 生成VIP,DNS解析到这个IP地址即可
b.原理
- keepalived 是基于VRRP协议实现高可用
- VRRP虚拟路由器冗余协议,最开始是给网络设备实现高可用,目前keepalive实现vrrp协议,通过vrrp实现高可用
- 分为主,备一般是2个节点,主备之间是通过vrrp协议发送数据包沟通
- 主给备定期发送数据包,备份收到数据包表示主还活着,备无法收到数据包,表示主挂了,备胎转正了,接管用户请求流量
- vrrp协议使用组播的ip 224.224.xx.xx
c.部署环境
部署服务
[root ~]#yum install -y keepalived
[root ~]#yum install -y keepalived
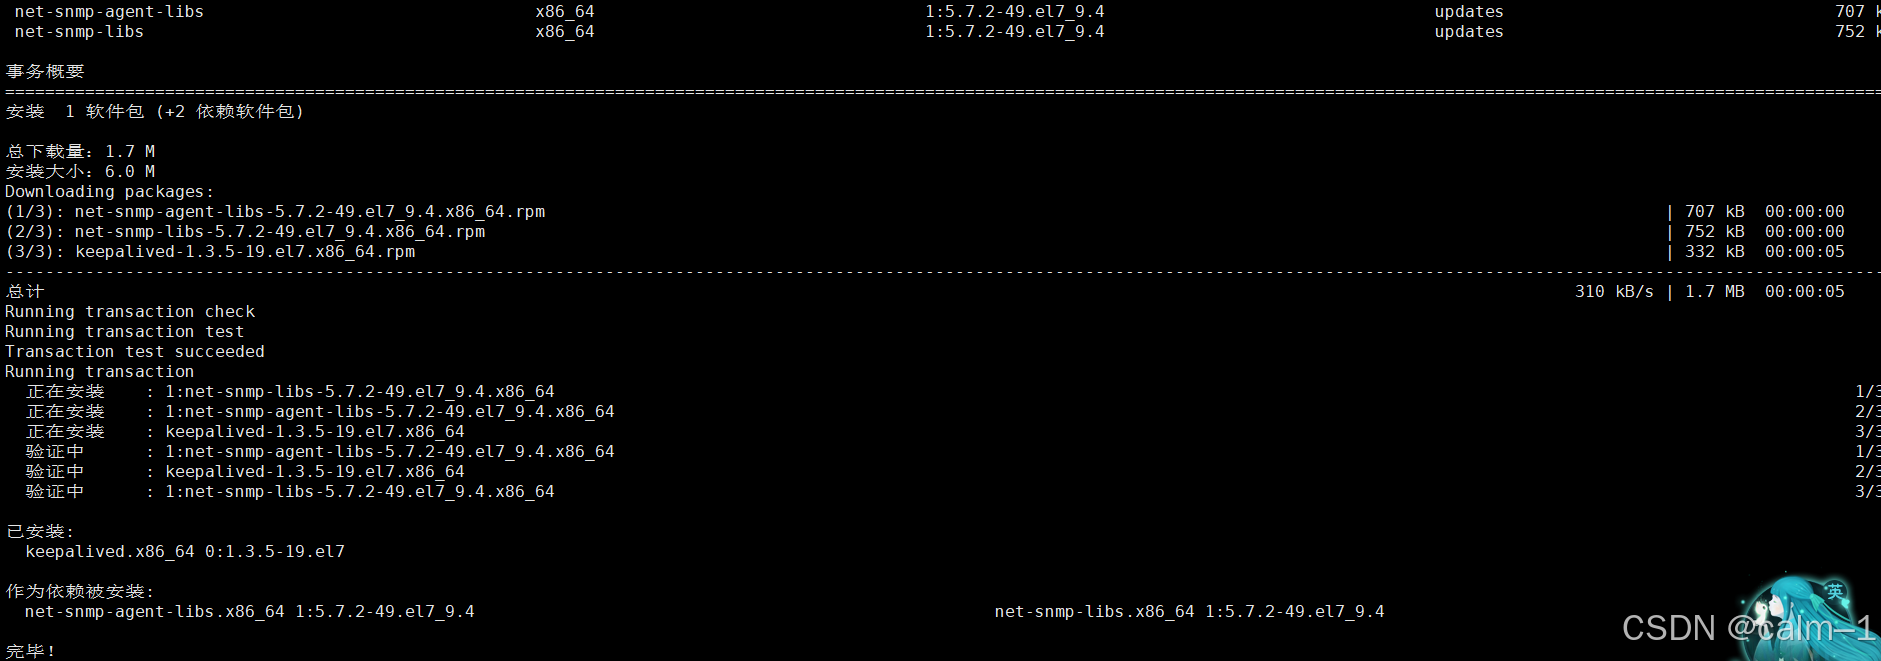
- 安装成功界面:
keepalived配置文件分类(分为3部分)
[root ~]#cp /etc/keepalived/keepaliv #备份
#配置文件36行到结尾为lvs相关配置,可以删掉
#删的时候注意花括号:问题
#技巧:把光标放在花括号上面,按% :光标会在同一对引号中进行来回切换,如果没有切换说明花括号没有成对!!!
[root]# cat /etc /keepalived/keepalived.conf
! Configuration File for keepalived
#全局定义部分
global_defs {
router_id lb01 #每一个keepalived的名字,当前网络中唯一
}
#vrrp实例配置部分 用于配置VIP virtual_ipaddress
vrrp_instance vip_3 { #vrrp实例名字
#设备1对主备之间使用的名字 注意在同一对主备之间这个名字需要一致
state MASTER #主/备 MASTER主 BACKUP备 SLAVE----(大写)
interface eth0 #指定网卡
virtual_router_id 51 #在一对主备之间设置的1个 id号 1对主备之间id同一号即可
priority 100 #优先级 数字越大优先级越高,设置建议:主》备 100 50 相差50
advert_int 1 #心跳间隔,多久发送一次vrrp数据包
authentication { #授权与认证,保持默认即可,对数据包加密
auth_type PASS
auth_pass 1111
}
virtual_ipaddress { #设置vip*****
10.0.0.3 dev eth0 label eth0:0 #label 设置了别名
}
}
lb01配置
[root@lb01 ~]# cat /etc/keepalived/keepalived.conf
!Configuration File for keepalived

global_defs {
       router_id lb01
}

vrrp_instance vip_3 {
      state MASTER
      interface eth0
      virtual_router_id 51
      priority 100
      advert_int 1
      authentication {
	         auth_type PASS
	         auth_pass 1111
      }
      virtual_ipaddress {
          10.0.0.3 dev eth0 label eth0:0
      }
}
lb02配置
!Configuration File for keepalived

global_defs {
       router_id lb02
}

vrrp_instance vip_3 {
      state BACKUP
      interface eth33
      virtual_router_id 51
      priority 50
      advert_int 1
      authentication {
                 auth_type PASS
                 auth_pass 1111
      }
      virtual_ipaddress {
          10.0.0.3 dev eth0 label eth0:0
      }
}
1. lb01与lb02对比
2.关闭lb01的keepalived,现象:
3.启动lb01的keepalive的,现象:
上述两个现象概括为:IP漂移
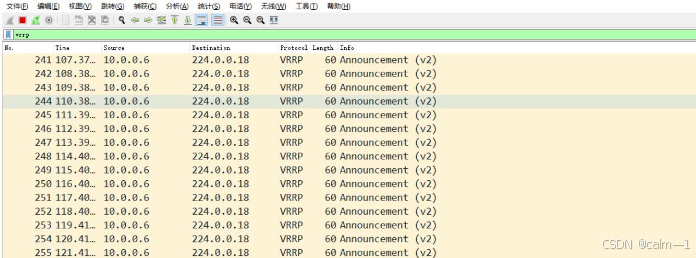
抓包查看
4. 脑裂故障
脑裂、裂脑:
           1. 现象:主备都有vip
           2. 原因:
-  备认为主挂了,接管资源生成VIP,实际上主并没有挂,仍有VIP
- 有很多原因可以导致脑裂,开启防火墙,selinux。配置,物理线路

3. 解决
   - 监控(备节点监控),只要备节点有VIP就告警了
   - 更狠一点监控备节点只要有VIP,远程控制主节点,只要备节点认为主挂了,那么他就真挂了
脑裂模拟:
以后可以在备节点写一个脚本,判断备节点是否有VIP,如果有发送告诫短信,告诫邮件等等
案例:keepalived基于主机高可用软件
- keepalived只会在主机挂了,网络断开后,才会进行主备切换.
- 默认情况下keepalived不会监控某个服务.
- 项目目标:某个服务关闭了,keepalived就进行主备切换.
- 项目步骤:
- 书写脚本,过滤服务进程数,端口数量,检查是否运行.
- 然后进行判断如果服务没有运行,则关闭keepalived.
- 修改keepalived配置文件,通过keepalived调用这个脚本.
- 书写脚本:(小脚本)
[root@lb01 ~]#vim /server/scripts/check_ngx.sh
[root@lb01 ~]#sh /server/scripts/check_ngx.sh
调试:ngx 端口数量1
[root@lb01 ~]# ip a |grep 0.3
     inet 10.0.0.3/32 scope global eth0:0
[root@lb01 ~]#pkill nginx
[root@lb01 ~]#sh /server/scripts/check_ngx.sh
调试:ngx 端口数量 0
[root@lb01 ~]#ip a |grep 0.3
[root@lb01 ~]#sh -x  这里没有进行显示进程号

[root@lb01 ~]#sh -x /server/scripts/check_ngx.sh
++ grep nginx
++ wc  -l
++ ss -lntup
+ count=0
+ echo '调试:ngx 端口数量 0'
调试: ngx 端口数量 0
+ '[' 0 - eq 0 ']'
+ systemctl stop keepalived
#!/bin/bash
#author:wulin
#version: v1.0
#desc : keepalived  检查nginx 端口数量,检查是否运行

#1.取出ngx端口数量
Port_cnt=`ss -lntup |grep nginx |wc -l`
ech0 "调试:ngx 端口数量 ${count}"

#2.进行判断,数量等于0
if [ $count -eq 0 ];then
    systemctl stop keepalived
fi
- 注意给脚本加执行权限
- 脚本名字中不要包含服务名字
书写keepalived配置文件
[root@lb01 ~]#chmod + x /server/scripts/check_ngx,sh
[root@lb01 ~]# ll /server/scripts/check_ngx.sh
-rwxr-xr-x 1 root root 360 jun  /ser/scripts/check_ngx.sh

配置文件编写
[root@lb01 ~]# vim /etc/keepalived/keepalived.conf
!Configuration File for keepalived

global_defs {
       router_id lb01
}

#变量 check_ngx
vrrp_script check_ngx {
      script /server/scripts/check_ngx.sh  #调用这个文件脚本
      interval 2           #调用时间
      weight 1             #权重(未来要监控多个服务,脚本涉及到权重)
      user root            #脚本root运行
}

vrrp_instance vip_3 {
      state MASTER
      interface eth0
      virtual_router_id 51
      priority 100
      advert_int 1
      authentication {
	         auth_type PASS
	         auth_pass 1111
      }
      virtual_ipaddress {
          10.0.0.3 dev eth0 label eth0:0
      }

      #接收上面的变量
      #这里设置前一定/server/scripts/check_ngx.sh脚本有执行权限
      track_script {
           check_ngx
      }
}


[root@lb01 ~]#systemctl restart nginx
[root@lb01 ~]#systemctl restart keepalived.service
[root@lb01 ~]#systemctl status keepalived.service
[root@lb01 ~]#ip a |grep 0.3
     inet 10.0.0.3/32 scope global eth0:0
[root@lb01 ~]#pkill nginx
[root@lb01 ~]#ip a |grep 0.3
[root@lb01 ~]#这里没了,没了的原因是背后进行调用脚本了

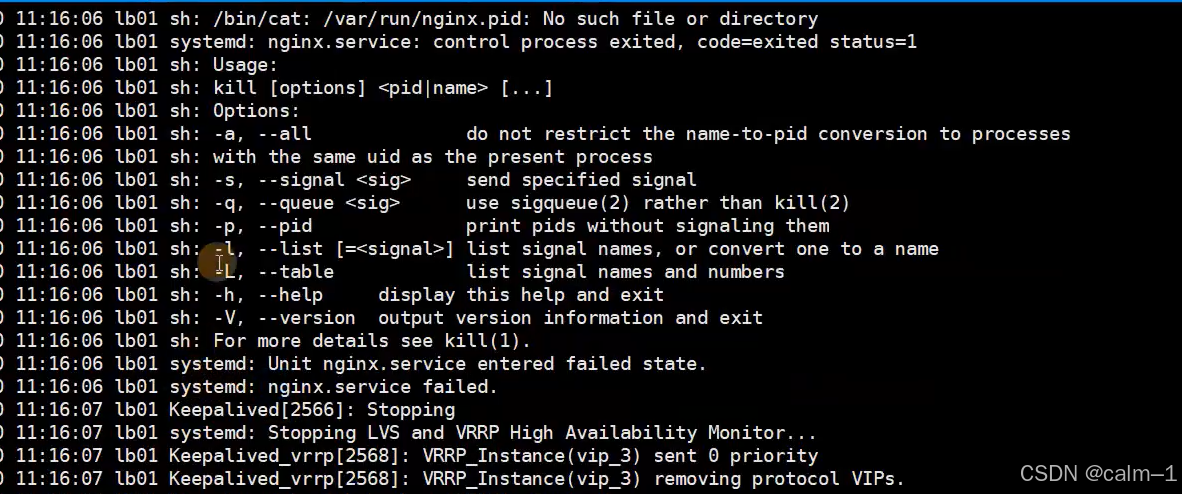
#可以查看日志记录,keepalived自己没有自己的日志名
[root@lb01 ~]#tail -f /var/log/messages
如下图所示:有个lb01 keepalived[2556]:stopping

如果把nginx关掉,还是关闭状态吗?keepalived日志记录会显示stopping(一开就关)
#会发现ip漂移到lb02上

[root@lb02]# ip a|grep 0.3
    inet 10.0.0.3/32 scope global eth0:0
#未来要避免一个情况:脚本配置lb01,lb02都有,两台nginx不能都挂了;否则keepalived就挂了,VIP也就没有了;
keepalived进阶用法
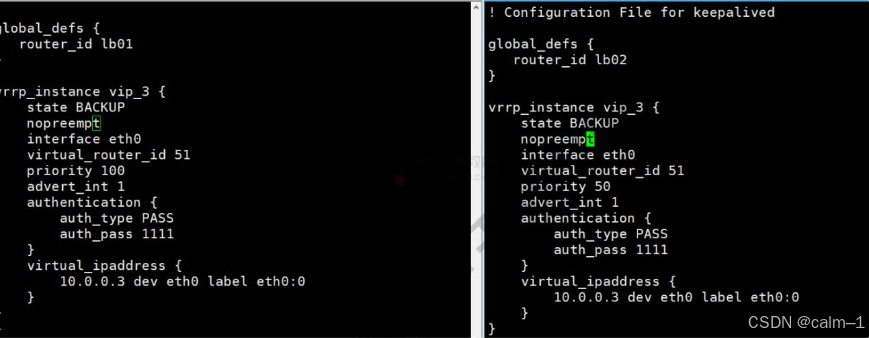
非抢占模式
-
keepalived主配默认是抢占模式,主挂了,备解管,主恢复,不希望主重新抢回资源
-
配置非抢占模式即可
-
使用流程:
- 2个节点状态是备
- 配置nopreempt选项
[root@lb01 ~]#vim /etc/keepalived/keepalived.conf
! Configuration File for keepalived

global_defs {
    router_id lb01
}

vrrp_instance vip_3 {
    state BACKUP
    noreempt
    interface eth0
    virtual_router_id 51
    priority 100
    advert_int 1
    authentication {
           auth_type PASS
           auth_pass 1111
    }
    virtual_ipaddress {
          10.0.0.3 dev eth0 label eth0:0
    }
}
[root@lb01 ~]#两个进行重启
systemctl restart keepalived.service
#检查ip
ip a |grep 0.3
    inet 10.0.0.3/32 scope global eth0:0
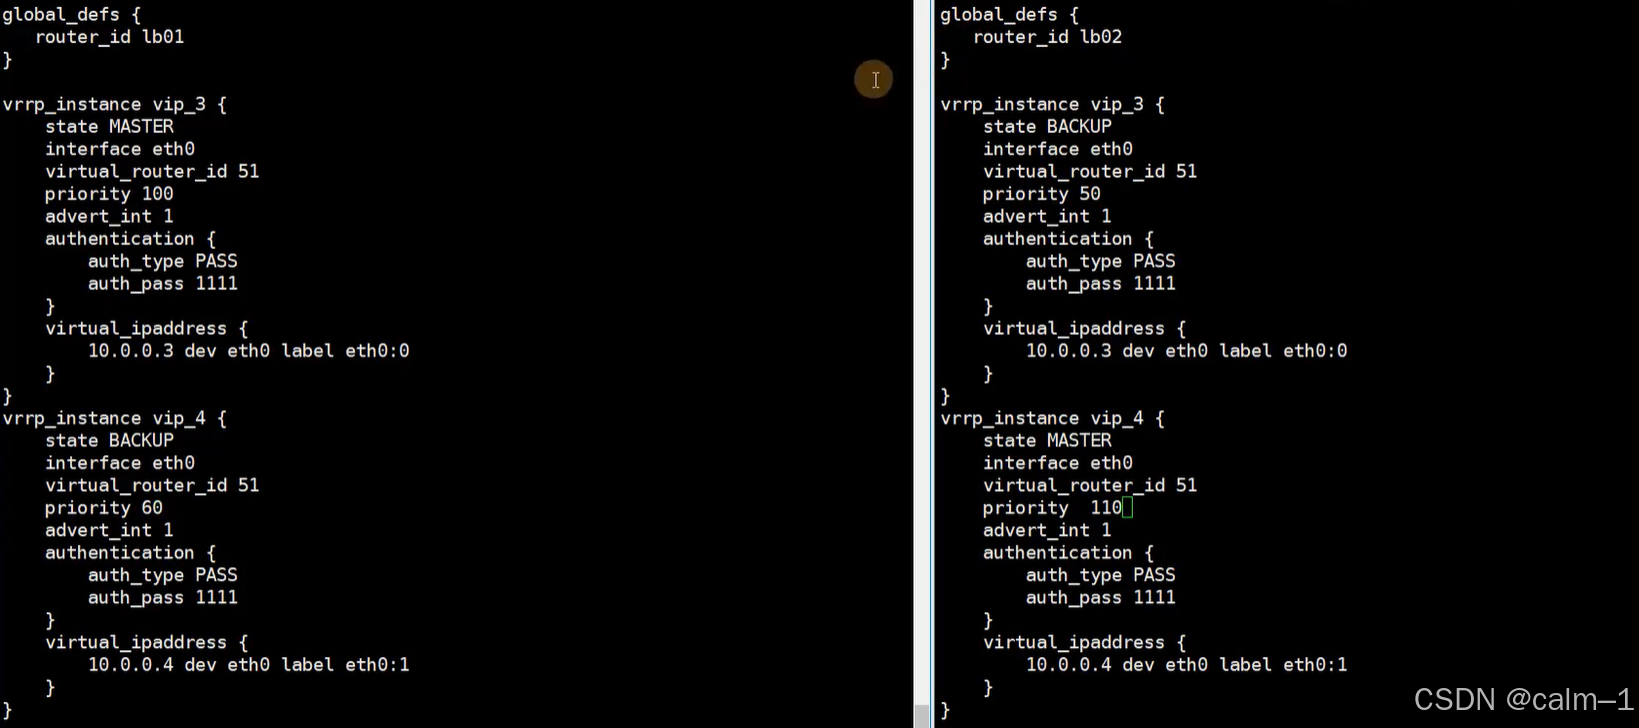
keepalived-多实例与双主模式(逻辑图)
lb01 与 lb02编辑文件配置:
但是这样配置会出现问题:.3与.4都在主与前面案例配置没有区别,所以不使用这一种方法
- 多实例配置方法:
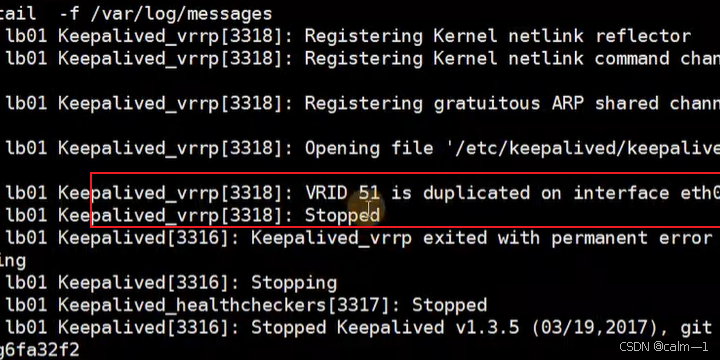
systemctl restart keepalived.service
- 发现keepalived服务起不来,查看日志:故障是id 51,多实例一致冲突;修改即可
keepalived总结
- 高可用HA:常用软件
- keepalived原理
- 脑裂故障
- keepalived监控服务
- 进阶用法
Https证书
https概述
-
基于http协议,传输的时候进行加密.
-
如果不使用https,数据传输都是明文的.
-
应用场景:
目前大部分的业务都是使用https加密.
企业想使用http 3.0基于https.
部署https加密的流程(单台)
- 域名*.jd.comwww.jd.com
- 根据域名申请https证书(私钥与公钥(ca证书)),自己创建.
- 进行配置web/lb.
网站不安全图片:
https加密流程(单台)
- 部署
申请的https证书的域名与网站域名一致,才能正常使用.
否则用户访问会有警告与提示
- 配置思路
- 全部进行加密 用户-(锁)–> lb–> (锁)web
- 部分加密 用户-(锁)–> lb --> web
[root@web01 ~]#mkdir -p /etc/nginx/ssl_keys/
[root@web01 ~]# unzip 6958320_ssl.wulinlinux.cn_nginx.zip -d/etc/nginx/ssl_keys
[root@web01 ~]#unzip 6958320_ssl.wulinlinux.cn_nginx.zip -d /etc/nginx/ssl_keys/
[root@web01 ~]#cd /etc/nginx/ssl_keys/
[root@web01 /etc/nginx/ssl_keys]#ll
total 8
-rw-r--r-- 1 root root 1679 jun 22 15:01 8548094_ssl.wulinlinux.cn.key
-rw-r--r-- 1 root root 1679 jun 22 15:01 8548094_ssl.wulinlinux.cn.pem
#8548094证书过期续上数字会变
#批量重命名
[root@web01 /etc/nginx/ssl_keys]#rename 6958320_   ''  *
[root@web01 /etc/nginx/ssl_keys]#vim /etc/nginx/conf.d/ssl.wulinlinux.cn.conf
server {
     listen 443 ssl;
     server_name ssl.wulinlinux.cn;

     #ssl key
     ssl_certificate /etc/nginx/ssl_keys/ssl.wulinlinux.cn.pem;
     ssl_certificate_key /etc/nginx/ssl_keys/ssl.wulinlinux.cn.key;

     root /app/code/ssl;
     location / {
          index index.html;
     }
}
[root@web01 /etc/nginx/ssl_keys]# systemctl reload nginx


[root@web01 /etc/nginx/ssl_keys]# cat
/etc/nginx/conf.d/ssl.oldboylinux.cn.conf
server {
         listen 443 ssl;
         #ssl on ; 1.15.0以后被废弃了.
         server_name ssl.wulinlinux.cn;
         root /app/code/ssl;
         error_log /var/log/nginx/ssl-error.log notice;
         access_log /var/log/nginx/ssl-access.log main;

         #ssl key
         ssl_certificate /etc/nginx/ssl_keys/ssl.oldboylinux.cn.pem;
         ssl_certificate_key
/etc/nginx/ssl_keys/ssl.oldboylinux.cn.key;

location / {
       index index.html;
      }
}
[root@web01 /etc/nginx/ssl_keys]# mkdir -p /app/code/ssl
[root@web01 /etc/nginx/ssl_keys]# echo
ssl.wulinlinux.cn web01 >/app/code/ssl/index.html
- 配置DNS解析
访问浏览器:https://ssl.wulinlinux.cn(访问成功)
最新架构–集群与https逻辑图
[root@web01 /etc/nginx/conf.d]# cd /etc/nginx
[root@web01 /etc/nginx]# scp -r ssl_keys/  lb01:`pwd`
root@lb01's password:
ssl.wulinlinux.cn.key              100% 1679  1.7MB/S    00:00
ssl.wulinlinux.cn.pem              100% 3809  413.4KB/s  00:00
[root@web01 /etc/nginx]#

[root@lb01 ~]# cd /etc/nginx/ssl_keys/
[root@lb01 /etc/nginx/ssl_keys]#ll
total 8
-rw-r--r-- 1 root root 1679 jun 20 18:05 ssl.wulinlinux.cn.key
-rw-r--r-- 1 root root 3809 feb 20 18:05 ssl.wulinlinux.cn.pem
[root@lb01 /etc/nginx/ssl_keys]#cd ..
[root@lb01 /etc/nginx]# ll
这里信息就省略不写了

[root@lb01 /etc/nginx]# vim conf.d/ssl.wulinlinux.cn.conf

upstream ssl_pools {
    server 10.0.0.7:443;
    server_name ssl.wulinlinux.cn;
    return 302  https://wulinlinux.cn$request_uri;
}

server {
    listen 80;
    server_name ssl.wulinlinux.cn;

    #ssl key
    ssl_certificate  /etc/nginx/ssl_keys/ssl.wulinlinux.cn.pem;
    ssl_certificate_key  /etc/nginx/ssl_keys/ssl.wulinlinux.cn.key;

    location / {
        proxy_pass   https://ssl_pools;
        proxy_set_header  Host $http_host;
        proxy_set_header  X-Forwarded-For  $proxy_add_x_forwarded_for
;
     }
}

server {
     listen 443 ssl;
}
[root@lb01 /etc/nginx] # nginx -t
[root@lb01 /etc/nginx] #systemctl reload nginx
job for nginx.service invalid.
[root@lb01 /etc/nginx] #systemctl reload restart
[root@lb01 /etc/nginx] #ss -lntup |grep nginx
-
配置负载lb的dns解析(未来也可以解析到VIP上)
-
浏览器访问:ssl.wulinlinx.cn或者https://ssl.wulinlinux.cn
-
抓包工具查看上面负载过程:
-
配置http2.0
upstream ssl_pools {
     server  10.0.0.7:443 ;
}
server {
  listen 80;
  server_name ssl.wulinlinux.cn;
  return 301
https://ssl.wulinlinux.cn$request_uri;
}
server {
  listen 443 ssl http2; #此处加上标记即可.
  server_name ssl.wulinlinux.cn;

  ssl keys
  ssl_certificate    /etc/nginx/ssl_keys/ssl.wulinlinux.cn.pem;
  ssl_certificate_key /etc/nginx/ssl_keys/ssl.wulinlinux.cn.key;
  location / {
    proxy_pass https://ssl_pools;
    proxy_set_header Host $http_host;
    proxy_set_header X-Forwarded-For  $proxy_add_x_forwarded_for;
    oxy_set_header X-Real-Ip $remote_addr;
  }
}
- 网站集群部分进行https
#web配置
server {
     listen 80;
     server_name ssl.wulinlinux.cn;
     root /app/code/ssl;

     location/{
     index index.html;
   }
}
#lb配置
upstream ssl_pools {
     server  10.0.0.7:80 ;
}

server {
     listen 80;
     server_name ssl.wulinlinux.cn;
     return 301
https://ssl.wulinlinux.cn$request_uri;
}

server {
     listen 443 ssl http2;
     server_name ssl.wulinlinux.cn;

     #ssl keys
     ssl_certificate    /etc/nginx/ssl_keys/ssl.wulinlinux.cn.pem;
     ssl_certificate_key /etc/nginx/ssl_keys/ssl.wulinlinux.cn.key;
  location / {
    proxy_pass http://ssl_pools;
    proxy_set_header Host $http_host;
    proxy_set_header X-Forwarded-For  $proxy_add_x_forwarded_for;
    proxy_set_header X-Real-Ip $remote_addr;
  }
}
温馨提示:用户–》负载加密(https)负载到web未加密(http)配置php网站的时候有问题
对php动态部分进行配置
fastcgi_param HTTPS on; #前面 部分的请求是https
server {
    listen 80;
    server_name blog.wulinlinux.cn;
    root /app/code/blog;
    error_log  /var/log/nginx/blog-error.log notice;
    access_log /var/log/nginx/blog-access.log main;
location / {
    index index.php;
    }
}

location ~* \.(html|js|css|jpg|png|jpeg)$ {
      expires max;
      }

location ~ \.php$ {
      fastcgi_pass  127.0.0.1:9000;
      fastcgi_index index.php;
      fastcgi_param HTTPS on;
      fastcgi_param SCRIPT_FILENAME  $document_root$fastcgi_script_name;
      include   fastcgi_params;
      }
}
keepalived总结
- 脑裂:是什么意思?原因?检查?
- 通过keepalived监控某一个服务(服务挂了,keepalived也挂了,VIP漂移,主备切换)
- https
拿到https证书后配置web服务器和负载均衡服务器
命令行创建https证书
#创建私钥
openssl genrsa -idea -out server.key 2048
#根据私钥创建 证书
openssl req -days 36500 -x509 -sha256 -nodes -newkey rsa:2048  -keyout  server.key  -out server.crt
监控
优化
- https == http over tls
server {
         listen              443 ssl;
         keepalive_timeout   70;
         ssl_protocols       TLSv1 TLSv1.1 TLSv1.2; #指定ssl加密协议的版本

         ssl_ciphers         AES128-SHA:AES256-SHA:RC4-SHA:DES-CBC3-SHA:RC4-
MD5:!aNULL:!eNULL:!EXPORT:!DES:!RC4:!
MD5; #加密算法.需要排除算法
       #排除null空算法,md5算法
        ssl_certificate    /usr/local/nginx/conf/cert.pem;
        ssl_certificate_key /usr/local/nginx/conf/cert.key;

       #设置https会话缓存
        ssl_session_cache   shared:SSL:10m;

       #超时时间10分钟
       ssl_session_timeout 10m;

       ......
}
监控
- 过期时间.
- 流程:
- 通过命令获取证书的过期日期
- 与当前日期对比(30天之前)
- 获得剩余的时间
curl -vL   https://www.baidu.com | grep 'expire date'
#有一些命令的输出,并非标准输出,而是作为标准错误输出.
curl -vL   https:��www.baidu.com |& grep 'expire date'
|&表示把管道前面标准输出(正确)和标准错误输出都传递给后面的命令.
如果不加,默认传递标准输出(正确)
[root@web01 /etc/nginx]# cat /server/scripts/check_ssl.sh
#! /bin/bash
url=https://www.baidu.com

expire_date_ori=`curl -vL   $url |& grep 'expire
date' |awk -F 'date:|GMT'  '{print $2}'`
expire_date_opt=`date -d "$expire_date_ori" +%F`

echo 原始格式的过期时间 $expire_date_ori
echo 处理后的过期时间   $expire_date_opt
[root@web01 /etc/nginx]# sh /server/scripts/check_ssl.sh
原始格式的过期时间 JUN 06 05:16:01 2024
处理后的过期时间 2024-07-23


[root@web01 /etc/nginx]# cat /server/scripts/check_ssl.sh
#!/bin/bash
#author: wulin
#version: v1.0 beta
#desc:检查指定 url 地址https证书过期时间
url=https://www.jd.com

expire_date_ori=`curl -vL   $url |& grep 'expire date' |awk -F 'date:| GMT'   '{print $2}'`

expire_date_opt=`date -d "$expire_date_ori" +%s`
#当前的日期与过期时间进行相减  秒数
date_now_second=`date +%s`
expire_days=`echo "($expire_date_opt -$date_now_second)/(60*60*24)"|bc `

echo "网站$url证书过期倒计时:还有$expire_days天"
echo "网站过期日期是:`date -d "$expire_date_ori" +%F`"


