本次分享我在kaggle中参与竞赛的历程,这个版本是我的第一版,使用的是vgg。欢迎大家进行建议和交流。
概述
-
判断自动驾驶场景是真是假,训练神经网络或使用任何算法来分类驾驶场景的图像是真实的还是虚假的。
-
图像采用 RGB 格式并以 JPEG 格式压缩。
-
标签显示 (1) 真实和 (0) 虚假
-
二元分类
数据集描述
文件
train.csv - 训练集标签
Sample_submission.csv - 正确格式的示例提交文件
Train/- 训练图像
Test/ - 测试图像
模型思路
由于是要进行图像的二分类任务,因此考虑使用迁移学习,将vgg16中的卷积层和卷积层的参数完全迁移过来,不包括顶部的全连接层,自己设计适合该任务的头部结构,然后加以训练,绘制图像查看训练结果。
vgg16简介
VGG16 是由牛津大学视觉几何组(VGG)在2014年提出的卷积神经网络(CNN)。它由16个层组成,其中包含13个卷积层和3个全连接层。其特点是使用3x3的小卷积核和2x2的最大池化层,网络深度较深,有效提取图像特征。VGG16在图像分类任务中表现优异,尤其是在ImageNet挑战中取得了良好成绩。尽管计算量大、参数众多,但它因其简单而高效的结构,仍广泛应用于迁移学习和其他计算机视觉任务中。
源码+解析
- 第一步,导入所需的库。
import os
import cv2
import numpy as np
import pandas as pd
from tensorflow.keras.preprocessing.image import ImageDataGenerator, load_img, img_to_array
from tensorflow.keras.applications import VGG16
from tensorflow.keras.models import Sequential
from tensorflow.keras.layers import Dense, Flatten, Dropout, GlobalAveragePooling2D
from tensorflow.keras.optimizers import Adam
from sklearn.model_selection import train_test_split
from tensorflow.keras.utils import to_categorical
from tensorflow.keras.callbacks import ModelCheckpoint, EarlyStopping
from tensorflow.keras.applications.vgg16 import preprocess_input
- 加载文件
# 路径和文件
data_file = '/kaggle/input/cidaut-ai-fake-scene-classification-2024/train.csv'
image_test = '/kaggle/input/cidaut-ai-fake-scene-classification-2024/Test/'
image_train = '/kaggle/input/cidaut-ai-fake-scene-classification-2024/Train/'

# 加载标签数据
df = pd.read_csv(data_file)
df['image_path'] = df['image'].apply(lambda x: os.path.join(image_train, x))

n_classes = df['label'].nunique()

df.head()  # 显示数据的前几行,检查路径和标签
输出
	image	label	image_path
0	1.jpg	editada	/kaggle/input/cidaut-ai-fake-scene-classificat...
1	2.jpg	real	/kaggle/input/cidaut-ai-fake-scene-classificat...
2	3.jpg	real	/kaggle/input/cidaut-ai-fake-scene-classificat...
3	6.jpg	editada	/kaggle/input/cidaut-ai-fake-scene-classificat...
4	8.jpg	real	/kaggle/input/cidaut-ai-fake-scene-classificat...
原始train.csv文件只有前两列,image 和label 列,为了方便读取图像文件,新添加了一列image_path用来记录图像文件的具体路径。
# 初始化空列表 x 用于存储图像
x = []

# 遍历每一行读取图像
for index, row in df.iterrows():
    image_path = row['image_path']  # 获取图像路径
    img = cv2.imread(image_path)  # 使用 cv2 读取图像

    if img is not None:
        img_resized = cv2.resize(img, (256, 256))  # 调整图像尺寸为 (256, 256)
        x.append(img_resized)  # 将读取的图像添加到列表 x 中
    else:
        print(f"图像 {row['image_path']} 读取失败")  # 打印失败的路径

# x 列表现在包含了所有读取的图像
print(f"总共有 {len(x)} 张图像被读取")
输出
总共有 720 张图像被读取
通过输出结果,可以看到图像被正确的读取了。并且将图像的大小调整为vgg所能用的256*256的尺寸,存放在变量x中。
- 第三步,进行数据处理
# 将图像转换为 NumPy 数组
x = np.array(x)

# 标签映射并进行 one-hot 编码
y = df['label'].map({'real': 1, 'editada': 0})
y = np.array(y)
y = to_categorical(y, num_classes=2)  # 二分类

# 分割训练集和测试集
x_train, x_test, y_train, y_test = train_test_split(x, y, test_size=0.2, random_state=42)

# 检查转换后的结果
print(f"x_train.shape: {x_train.shape}")
print(f"y_train.shape: {y_train.shape}")
print(f"x_test.shape: {x_test.shape}")
print(f"y_test.shape: {y_test.shape}")
输出
x_train.shape: (576, 256, 256, 3)
y_train.shape: (576, 2)
x_test.shape: (144, 256, 256, 3)
y_test.shape: (144, 2)
这里是为了将原始的图像转换为numpy数组,并且将标签进行独热编码,(对分类的标签一定要进行独热编码,转换为矩阵形式),并且切分数据集。
- 第四步,设计模型结构
from tensorflow.keras.regularizers import l2
# 加载预训练的VGG16卷积基(不包括顶部的全连接层)
vgg16_model = VGG16(include_top=False, weights='imagenet', input_shape=(256, 256, 3))

# 冻结VGG16的卷积层
for layer in vgg16_model.layers:
    layer.trainable = False

# 创建一个新的模型
model_fine_tuning = Sequential()

# 将VGG16的卷积基添加到新模型中
model_fine_tuning.add(vgg16_model)  # 添加VGG16卷积基
model_fine_tuning.add(Flatten())  # 将卷积特征图展平

# 添加新的全连接层并进行正则化
model_fine_tuning.add(Dense(512, activation='relu', kernel_regularizer=l2(0.01)))  # L2正则化
model_fine_tuning.add(Dropout(0.3))  # Dropout层,减少过拟合
model_fine_tuning.add(Dense(256, activation='relu', kernel_regularizer=l2(0.01)))  # 较小的全连接层
model_fine_tuning.add(Dropout(0.3) ) # 再次使用Dropout层

# 输出层
model_fine_tuning.add(Dense(2, activation='softmax'))  # 对于二分类问题,使用softmax

# 查看模型架构
model_fine_tuning.summary()
输出:
| Layer (type) | Output Shape | Param # |
|---|---|---|
| vgg16 (Functional) | (None, 8, 8, 512) | 14,714,688 |
| flatten (Flatten) | (None, 32768) | 0 |
| dense (Dense) | (None, 512) | 16,777,728 |
| dropout (Dropout) | (None, 512) | 0 |
| dense_1 (Dense) | (None, 256) | 131,328 |
| dropout_1 (Dropout) | (None, 256) | 0 |
| dense_2 (Dense) | (None, 2) | 514 |
这里实现了一个基于预训练VGG16模型的迁移学习框架,用于图像分类任务。首先,加载了预训练的VGG16卷积基(不包括全连接层),并通过设置include_top=False来只使用卷积部分,从而利用其在ImageNet数据集上学到的特征。接着,冻结VGG16的卷积层,即通过将trainable属性设为False,使得这些层在训练过程中不进行更新。接下来,创建了一个新的Sequential模型,并将VGG16的卷积基添加进去,随后使用Flatten层将卷积特征图展平,为全连接层准备输入。为了增加模型的表达能力,添加了两个全连接层,每个层都应用了ReLU激活函数,并使用L2正则化来防止过拟合。为了进一步减少过拟合,模型还在每个全连接层后添加了Dropout层,丢弃30%的神经元。最后,输出层是一个具有两个神经元的全连接层,采用softmax激活函数,用于处理二分类问题。model_fine_tuning.summary()方法输出模型架构,帮助查看各层的结构和参数。通过这种方式,模型能够利用VGG16的预训练卷积基进行特征提取,并通过新添加的全连接层进行分类。
- 第五步,编译并训练模型
# 编译模型
model_fine_tuning.compile(loss='binary_crossentropy',
                          optimizer=Adam(),
                          metrics=['accuracy'])

datagen = ImageDataGenerator(
    rotation_range=40,
    width_shift_range=0.2,
    height_shift_range=0.2,
    shear_range=0.2,
    zoom_range=0.2,
    horizontal_flip=True,
    fill_mode='nearest',
    preprocessing_function=preprocess_input)  # 使用VGG16的预处理函数

# 对原始图像进行增强,并进行训练
history = model_fine_tuning.fit(datagen.flow(x_train, y_train, batch_size=32),
                                epochs=20,
                                validation_data=(x_test, y_test),
                                callbacks=[ModelCheckpoint('best_model.keras', save_best_only=True),
                                           EarlyStopping(patience=5)])
这里主要完成了对已经构建的模型(model_fine_tuning)的编译与训练过程。
- 首先,使用
compile()方法对模型进行编译,指定损失函数为binary_crossentropy,适用于二分类问题,同时选择Adam优化器,这是一种自适应学习率的优化算法,能够有效提升训练性能。在编译时,还通过metrics=['accuracy']设置了准确率作为评估指标。 - 接着,创建了一个
ImageDataGenerator对象用于数据增强,它包含多种图像变换方式,如旋转、平移、剪切、缩放、水平翻转等,这些操作可以增加数据多样性,减少过拟合,提升模型的泛化能力。 - 此外,
preprocessing_function=preprocess_input使用了VGG16预训练模型的标准预处理函数,确保输入图像的像素范围符合VGG16的训练要求。 - 随后,通过
fit()方法开始训练模型,训练数据通过datagen.flow()进行增强和批量生成,训练将在20个周期(epochs)内进行。在训练过程中,还设置了两个回调函数:ModelCheckpoint,用于保存最好的模型权重文件(best_model.keras),并且只保存验证集上表现最好的模型; EarlyStopping,用于在验证集准确率不再提升时提前停止训练,patience=5表示如果5个周期内没有改进,则停止训练。这样,通过数据增强和回调函数的配合,能够有效提高训练的效果和模型的稳定性。
到这里,整个部分就基本完成了。
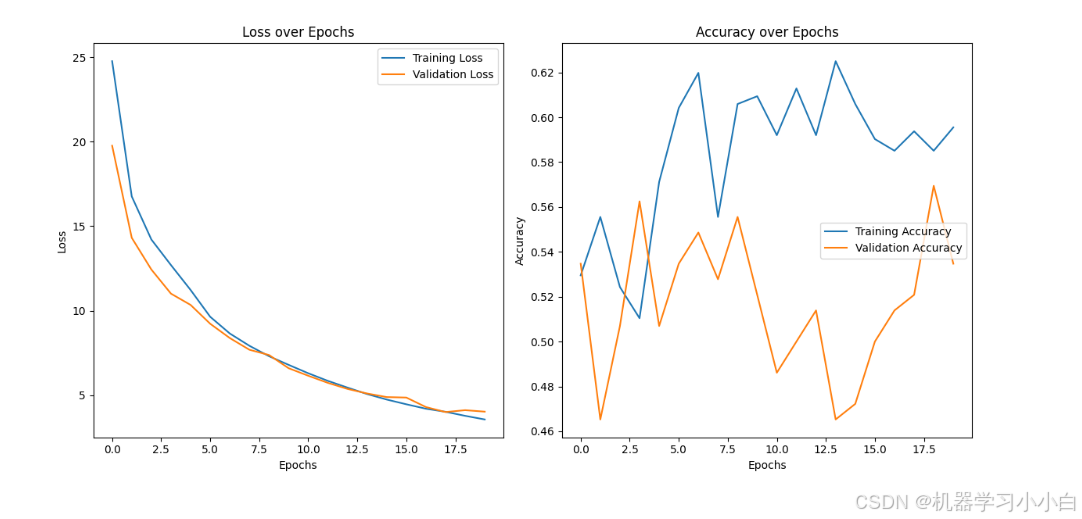
- 绘制损失和准确率图像
import matplotlib.pyplot as plt

# 获取训练过程中的损失和准确率数据
history_dict = history.history
loss = history_dict['loss']
accuracy = history_dict['accuracy']
val_loss = history_dict['val_loss']
val_accuracy = history_dict['val_accuracy']

# 绘制损失图
plt.figure(figsize=(12, 6))

# 损失图
plt.subplot(1, 2, 1)
plt.plot(loss, label='Training Loss')
plt.plot(val_loss, label='Validation Loss')
plt.title('Loss over Epochs')
plt.xlabel('Epochs')
plt.ylabel('Loss')
plt.legend()

# 准确率图
plt.subplot(1, 2, 2)
plt.plot(accuracy, label='Training Accuracy')
plt.plot(val_accuracy, label='Validation Accuracy')
plt.title('Accuracy over Epochs')
plt.xlabel('Epochs')
plt.ylabel('Accuracy')
plt.legend()

# 展示图像
plt.tight_layout()
plt.show()
数据文件已经上传,感兴趣的小伙伴可以下载后自己尝试。
