单片机学习!
目录
前言
本文介绍了I2C硬件配置常用的一些库函数。
一、I2C_DeInit函数
I2C_DeInit函数将外设 I2Cx 寄存器重设为缺省值。
二、I2C_Init函数
I2C_Init函数用于I2C的初始化。函数第二个参数是初始化的结构体。
I2C_Mode 用以设置 I2C 的模式。下表给出了该参数可取的值:
I2C_DutyCycle 用以设置 I2C 的占空比。下表给出了该参数可取的值:
注意:该参数只有在 I2C 工作在快速模式(时钟工作频率高于 100KHz)下才有意义。
I2C_OwnAddress1 该参数用来设置第一个设备自身地址,它可以是一个 7 位地址或者一个 10 位地址。
I2C_Ack 使能或者失能应答(ACK),下表给出了该参数可取的值:
I2C_AcknowledgedAddress 定义了应答 7 位地址还是 10 位地址。下表给出了该参数可取的值:
I2C_ClockSpeed 该参数用来设置时钟频率,这个值不能高于 400KHz。
三、I2C_StructInit函数
下表给出了 I2C_InitStruct 各个成员的缺省值:
四、I2C_Cmd函数
使能或失能I2C外设用I2C_Cmd函数来完成。
五、I2C_GenerateSTART函数
调用I2C_GenerateSTART函数,就可以生成起始条件。
程序源码:
/**
  * @brief  Generates I2Cx communication START condition.
  * @param  I2Cx: where x can be 1 or 2 to select the I2C peripheral.
  * @param  NewState: new state of the I2C START condition generation.
  *   This parameter can be: ENABLE or DISABLE.
  * @retval None.
  */
void I2C_GenerateSTART(I2C_TypeDef* I2Cx, FunctionalState NewState)
{
  /* Check the parameters */
  assert_param(IS_I2C_ALL_PERIPH(I2Cx));
  assert_param(IS_FUNCTIONAL_STATE(NewState));
  if (NewState != DISABLE)
  {
    /* Generate a START condition */
    I2Cx->CR1 |= CR1_START_Set;
  }
  else
  {
    /* Disable the START condition generation */
    I2Cx->CR1 &= CR1_START_Reset;
  }
}
如果 NewState 不等于 DISABLE,就把CR1寄存器的 START 位置1;否则,把 START 位清0.
START 位意义可以从手册里的寄存器描述中来了解:
START 置1
- 在从模式下是产生起始条件。
- 在主模式下是产生重复起始条件。
就是 START 这一位置1,产生起始条件。
六、I2C_GenerateSTOP函数
调用I2C_GenerateSTOP函数,生成终止条件。
程序源码:
/**
  * @brief  Generates I2Cx communication STOP condition.
  * @param  I2Cx: where x can be 1 or 2 to select the I2C peripheral.
  * @param  NewState: new state of the I2C STOP condition generation.
  *   This parameter can be: ENABLE or DISABLE.
  * @retval None.
  */
void I2C_GenerateSTOP(I2C_TypeDef* I2Cx, FunctionalState NewState)
{
  /* Check the parameters */
  assert_param(IS_I2C_ALL_PERIPH(I2Cx));
  assert_param(IS_FUNCTIONAL_STATE(NewState));
  if (NewState != DISABLE)
  {
    /* Generate a STOP condition */
    I2Cx->CR1 |= CR1_STOP_Set;
  }
  else
  {
    /* Disable the STOP condition generation */
    I2Cx->CR1 &= CR1_STOP_Reset;
  }
}
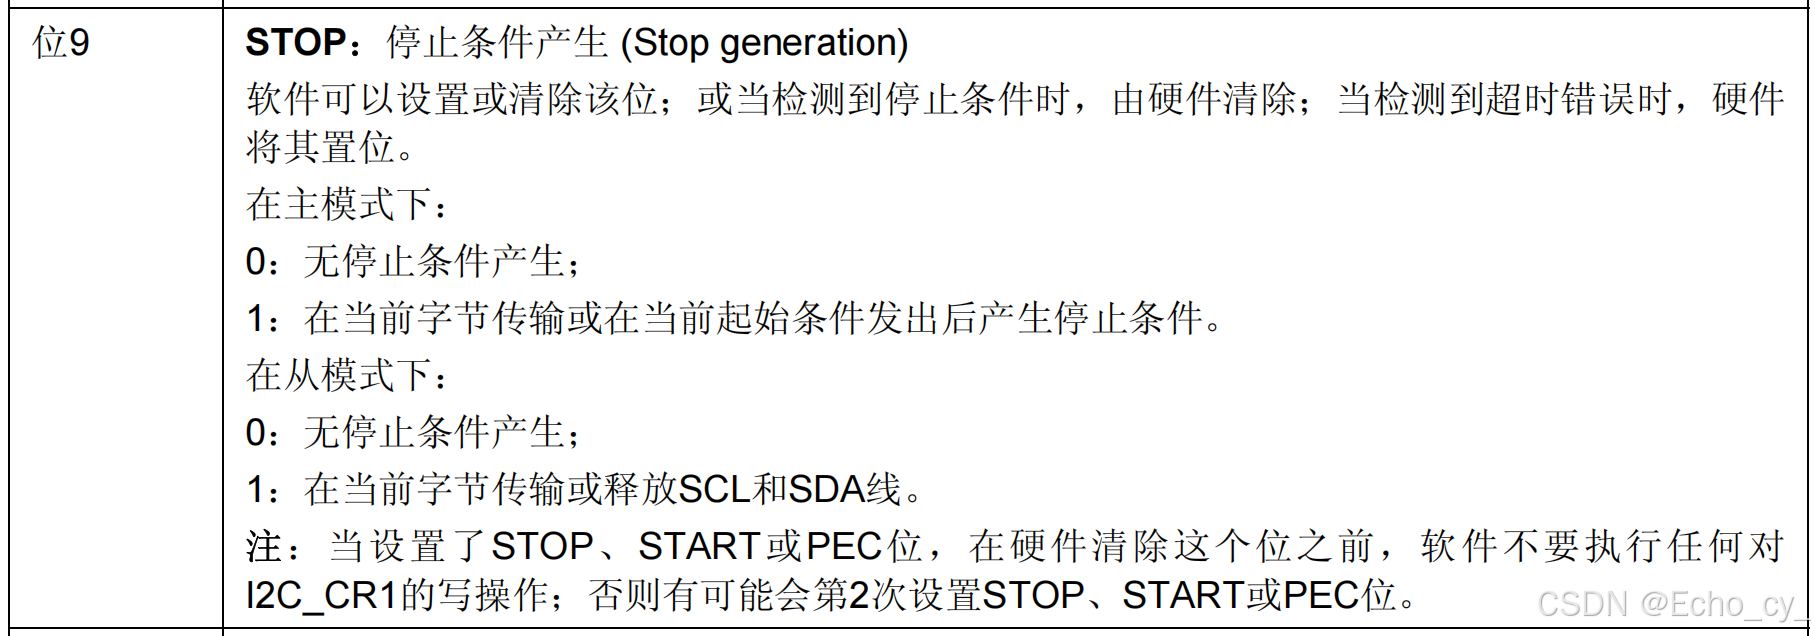
I2C_GenerateSTOP函数其实就是操作 CR1 的 STOP 位,查询手册中I2C寄存器的内容:
STOP 是产生停止条件的。STOP位置1,产生停止条件。
七、I2C_AcknowledgeConfig函数
I2C_AcknowledgeConfig函数是用来配置 CR1 的 ACK 这一位。就是配置,在收到一个字节后是否给从机应答。
程序源码:
/**
  * @brief  Enables or disables the specified I2C acknowledge feature.
  * @param  I2Cx: where x can be 1 or 2 to select the I2C peripheral.
  * @param  NewState: new state of the I2C Acknowledgement.
  *   This parameter can be: ENABLE or DISABLE.
  * @retval None.
  */
void I2C_AcknowledgeConfig(I2C_TypeDef* I2Cx, FunctionalState NewState)
{
  /* Check the parameters */
  assert_param(IS_I2C_ALL_PERIPH(I2Cx));
  assert_param(IS_FUNCTIONAL_STATE(NewState));
  if (NewState != DISABLE)
  {
    /* Enable the acknowledgement */
    I2Cx->CR1 |= CR1_ACK_Set;
  }
  else
  {
    /* Disable the acknowledgement */
    I2Cx->CR1 &= CR1_ACK_Reset;
  }
}
手册ACK寄存器描述:
ACK就是应答使能。STM32作为主机,在接收到一个字节后,是给从机应答还是非应答,就取决于ACK这一位。
在应答的时候:
- 如果ACK是1,就给从机应答。
- 如果ACK是0,就不给从机应答。
八、I2C_SendData函数
I2C_SendData函数用于写数据到数据寄存器DR。
程序源码:
/**
  * @brief  Sends a data byte through the I2Cx peripheral.
  * @param  I2Cx: where x can be 1 or 2 to select the I2C peripheral.
  * @param  Data: Byte to be transmitted..
  * @retval None
  */
void I2C_SendData(I2C_TypeDef* I2Cx, uint8_t Data)
{
  /* Check the parameters */
  assert_param(IS_I2C_ALL_PERIPH(I2Cx));
  /* Write in the DR register the data to be sent */
  I2Cx->DR = Data;
}
分析源码,I2C_SendData函数实际就是把Data这个数据直接写入到DR寄存器。
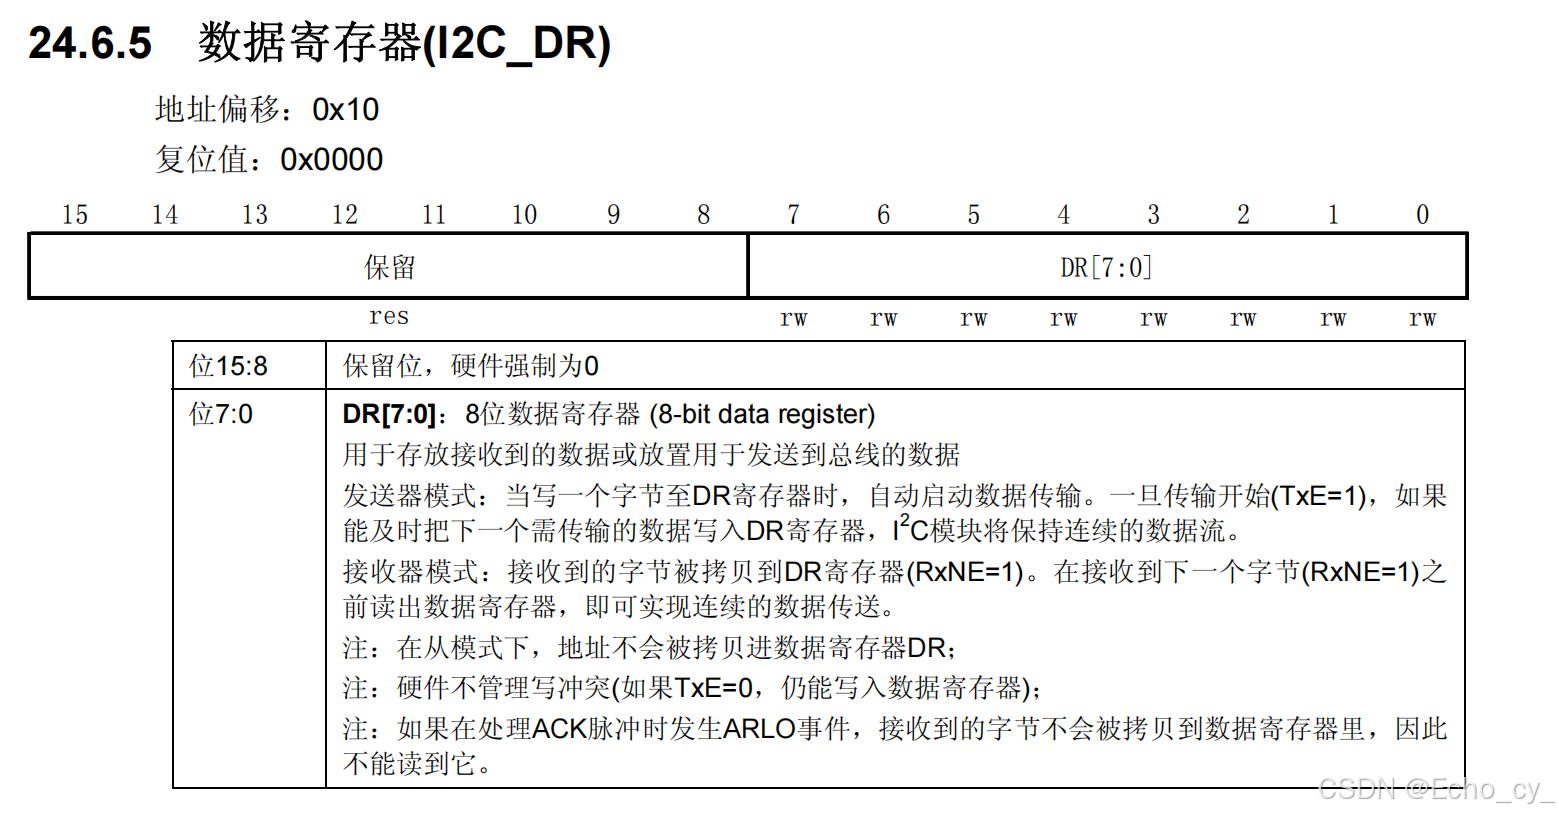
手册DR寄存器描述:
DR数据寄存器用于存放接收到的数据或放置用于发送到总线的数据。在发送器模式下,当写一个字节至DR寄存器时,自动启动数据传输。一旦传输开始,也就是TxE=1,发送寄存器空,如果能及时把下一个需传输的数据写入DR寄存器,I2C模块将保持连续的数据流。
从上面可以看出两个信息:
- 一个是,写入DR,自动启动数据传输。也就是产生发送一个字节的波形。
- 另一个是,在上一个数据移位传输过程中,如果及时把下一个数据放在DR里等着,这样就能保持连续的数据流。
九、I2C_ReceiveData函数
I2C_ReceiveData函数用于读取DR数据,作为返回值。
程序源码:
/**
  * @brief  Returns the most recent received data by the I2Cx peripheral.
  * @param  I2Cx: where x can be 1 or 2 to select the I2C peripheral.
  * @retval The value of the received data.
  */
uint8_t I2C_ReceiveData(I2C_TypeDef* I2Cx)
{
  /* Check the parameters */
  assert_param(IS_I2C_ALL_PERIPH(I2Cx));
  /* Return the data in the DR register */
  return (uint8_t)I2Cx->DR;
}
手册DR寄存器描述:
在接收器模式下,接收到的字节被拷贝到DR寄存器,这时就是RxNE=1,接收寄存器非空。在接收到下一个字节(RxNE=1)之前读出数据寄存器,即可实现连续的数据传送。
这里也可以看出两个信息:
- 一个是,接收移位完成时,收到的一个字节由移位寄存器转到数据寄存器。读取数据寄存器就能接收一个字节了。
- 另一个是,要在下一个字节收到之前,及时把上一个字节取走,防止数据覆盖。这样才能实现连续的数据流。
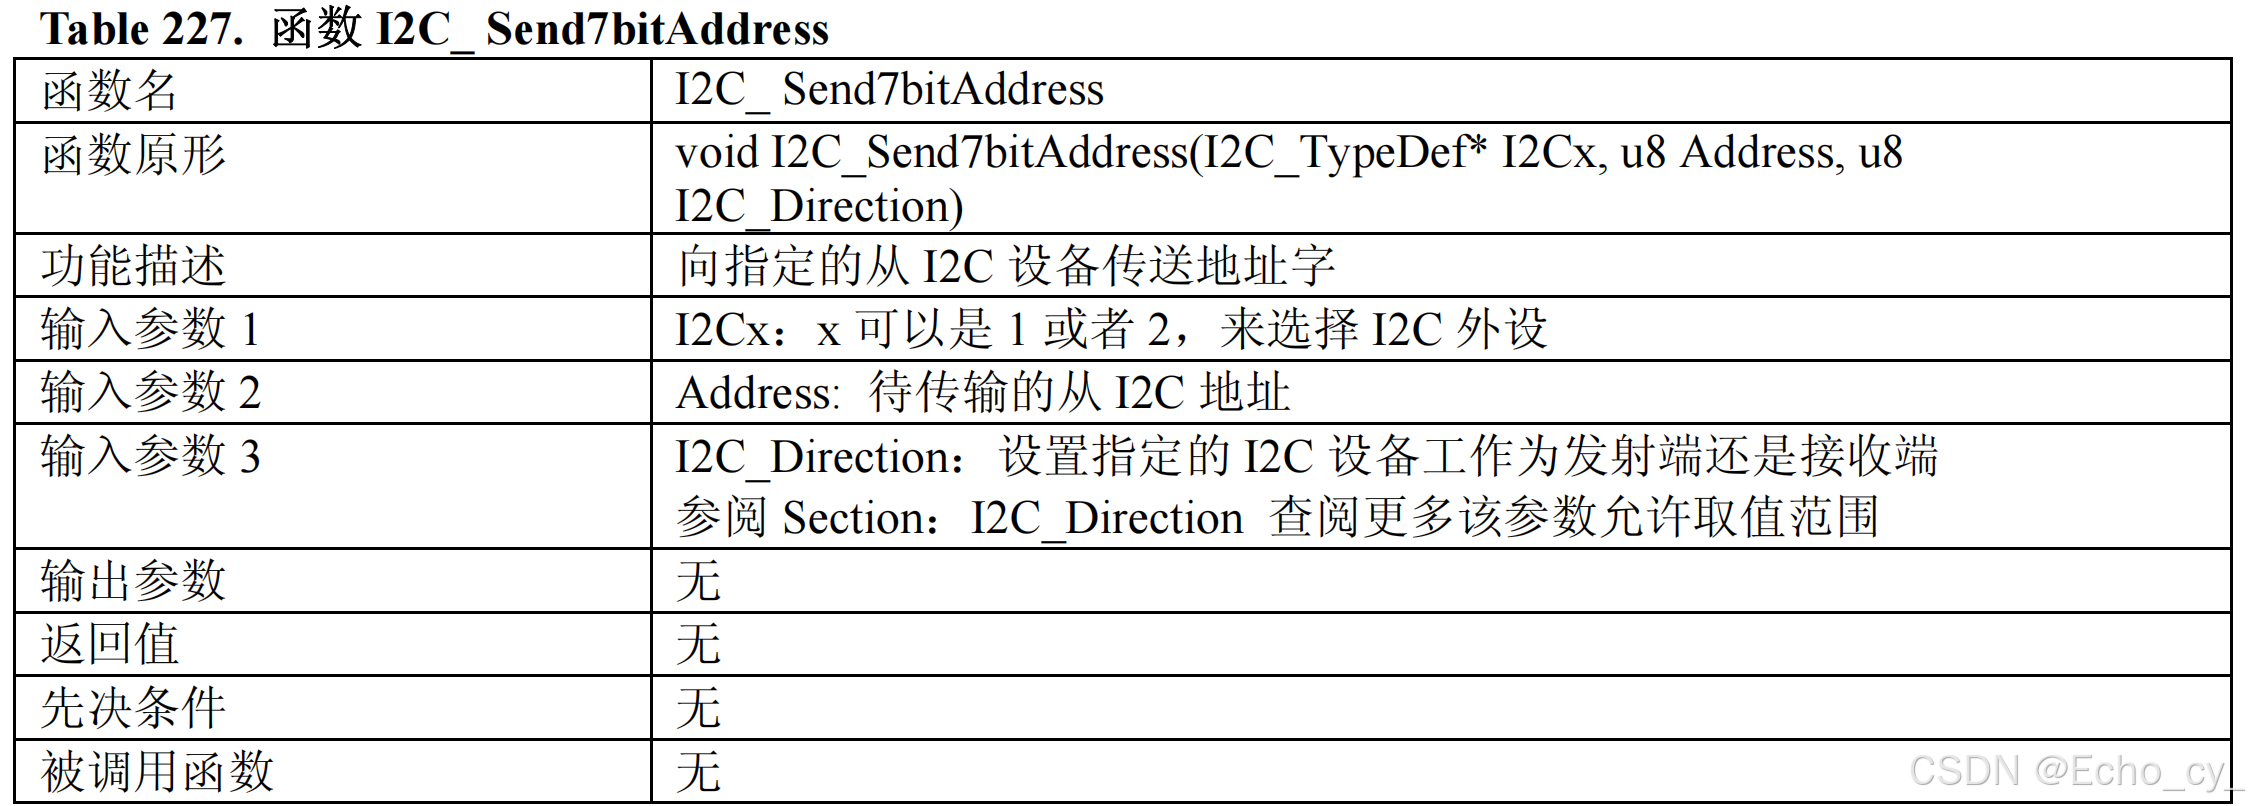
十、I2C_Send7bitAddress函数
I2C_Send7bitAddress函数是发送7位地址的专用函数。
程序源码:
/**
  * @brief  Transmits the address byte to select the slave device.
  * @param  I2Cx: where x can be 1 or 2 to select the I2C peripheral.
  * @param  Address: specifies the slave address which will be transmitted
  * @param  I2C_Direction: specifies whether the I2C device will be a
  *   Transmitter or a Receiver. This parameter can be one of the following values
  *     @arg I2C_Direction_Transmitter: Transmitter mode
  *     @arg I2C_Direction_Receiver: Receiver mode
  * @retval None.
  */
void I2C_Send7bitAddress(I2C_TypeDef* I2Cx, uint8_t Address, uint8_t I2C_Direction)
{
  /* Check the parameters */
  assert_param(IS_I2C_ALL_PERIPH(I2Cx));
  assert_param(IS_I2C_DIRECTION(I2C_Direction));
  /* Test on the direction to set/reset the read/write bit */
  if (I2C_Direction != I2C_Direction_Transmitter)
  {
    /* Set the address bit0 for read */
    Address |= OAR1_ADD0_Set;
  }
  else
  {
    /* Reset the address bit0 for write */
    Address &= OAR1_ADD0_Reset;
  }
  /* Send the address */
  I2Cx->DR = Address;
}
从源码可以看出,Address这个参数实际上也是通过DR发送的。只不过是Address参数在发送之前设置了Address最低位的读写位。
代码意思是:如果I2C_Direction不是发送,就把Address的最低位置1,也就是读;否则就把Address的最低位清0,也就是写。
在发送地址的时候,可以用一下这个函数。当然也可以手动设置最低位,调用I2C_SendData函数来发送地址。
十一、I2C状态监控功能
源码说明:
/**
 * @brief
 ****************************************************************************************
 *
 *                         I2C State Monitoring Functions
 *
 ****************************************************************************************
 * This I2C driver provides three different ways for I2C state monitoring
 *  depending on the application requirements and constraints:
 *
 *
 * 1) Basic state monitoring:
 *    Using I2C_CheckEvent() function:
 *    It compares the status registers (SR1 and SR2) content to a given event
 *    (can be the combination of one or more flags).
 *    It returns SUCCESS if the current status includes the given flags
 *    and returns ERROR if one or more flags are missing in the current status.
 *    - When to use:
 *      - This function is suitable for most applications as well as for startup
 *      activity since the events are fully described in the product reference manual
 *      (RM0008).
 *      - It is also suitable for users who need to define their own events.
 *    - Limitations:
 *      - If an error occurs (ie. error flags are set besides to the monitored flags),
 *        the I2C_CheckEvent() function may return SUCCESS despite the communication
 *        hold or corrupted real state.
 *        In this case, it is advised to use error interrupts to monitor the error
 *        events and handle them in the interrupt IRQ handler.
 *
 *        @note
 *        For error management, it is advised to use the following functions:
 *          - I2C_ITConfig() to configure and enable the error interrupts (I2C_IT_ERR).
 *          - I2Cx_ER_IRQHandler() which is called when the error interrupt occurs.
 *            Where x is the peripheral instance (I2C1, I2C2 ...)
 *          - I2C_GetFlagStatus() or I2C_GetITStatus() to be called into I2Cx_ER_IRQHandler()
 *            in order to determine which error occurred.
 *          - I2C_ClearFlag() or I2C_ClearITPendingBit() and/or I2C_SoftwareResetCmd()
 *            and/or I2C_GenerateStop() in order to clear the error flag and source,
 *            and return to correct communication status.
 *
 *
 *  2) Advanced state monitoring:
 *     Using the function I2C_GetLastEvent() which returns the image of both status
 *     registers in a single word (uint32_t) (Status Register 2 value is shifted left
 *     by 16 bits and concatenated to Status Register 1).
 *     - When to use:
 *       - This function is suitable for the same applications above but it allows to
 *         overcome the limitations of I2C_GetFlagStatus() function (see below).
 *         The returned value could be compared to events already defined in the
 *         library (stm32f10x_i2c.h) or to custom values defined by user.
 *       - This function is suitable when multiple flags are monitored at the same time.
 *       - At the opposite of I2C_CheckEvent() function, this function allows user to
 *         choose when an event is accepted (when all events flags are set and no
 *         other flags are set or just when the needed flags are set like
 *         I2C_CheckEvent() function).
 *     - Limitations:
 *       - User may need to define his own events.
 *       - Same remark concerning the error management is applicable for this
 *         function if user decides to check only regular communication flags (and
 *         ignores error flags).
 *
 *
 *  3) Flag-based state monitoring:
 *     Using the function I2C_GetFlagStatus() which simply returns the status of
 *     one single flag (ie. I2C_FLAG_RXNE ...).
 *     - When to use:
 *        - This function could be used for specific applications or in debug phase.
 *        - It is suitable when only one flag checking is needed (most I2C events
 *          are monitored through multiple flags).
 *     - Limitations:
 *        - When calling this function, the Status register is accessed. Some flags are
 *          cleared when the status register is accessed. So checking the status
 *          of one Flag, may clear other ones.
 *        - Function may need to be called twice or more in order to monitor one
 *          single event.
 *
 */
以上描述的是I2C的状态监控函数。
STM32有的状态可能会同时置多个标志位,
- 如果只检查某一个标志位就认为这个状态已经发生了,就不太严谨。
- 如果用I2C_GetFlagStatus函数读多次,再进行判断,又可能比较麻烦。
所以这里库函数就给了多种监控标志位的方案:
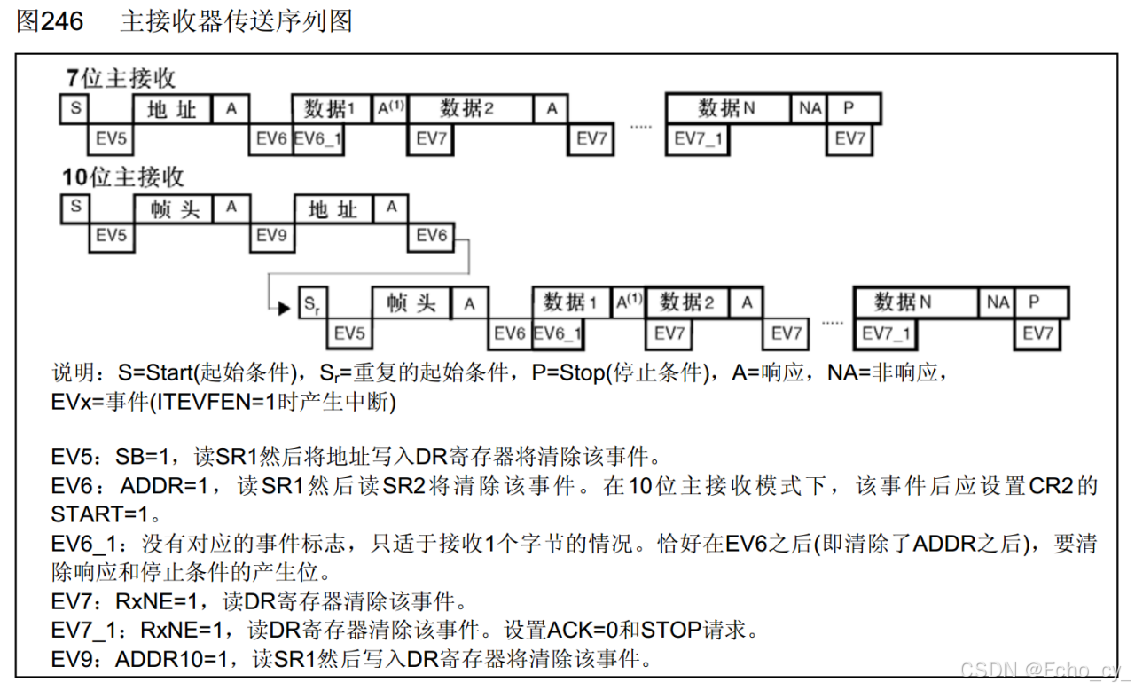
第一种,基本状态监控,使用I2C_CheckEvent函数。这种方式就是同时判断一个或多个标志位,来确定几个EVx,从而判断某个状态是否发生。和下图的流程是对应的。
第二种,高级状态监控,使用I2C_GetLastEvent函数,是直接把SR1和SR2这两个状态寄存器拼接成16位的数据。
第三种,基于标志位的状态监控,使用I2C_GetFlagStatus函数判断某一个标志位是否置1了。
十二、标志位函数
12.1 I2C_GetFlagStatus函数
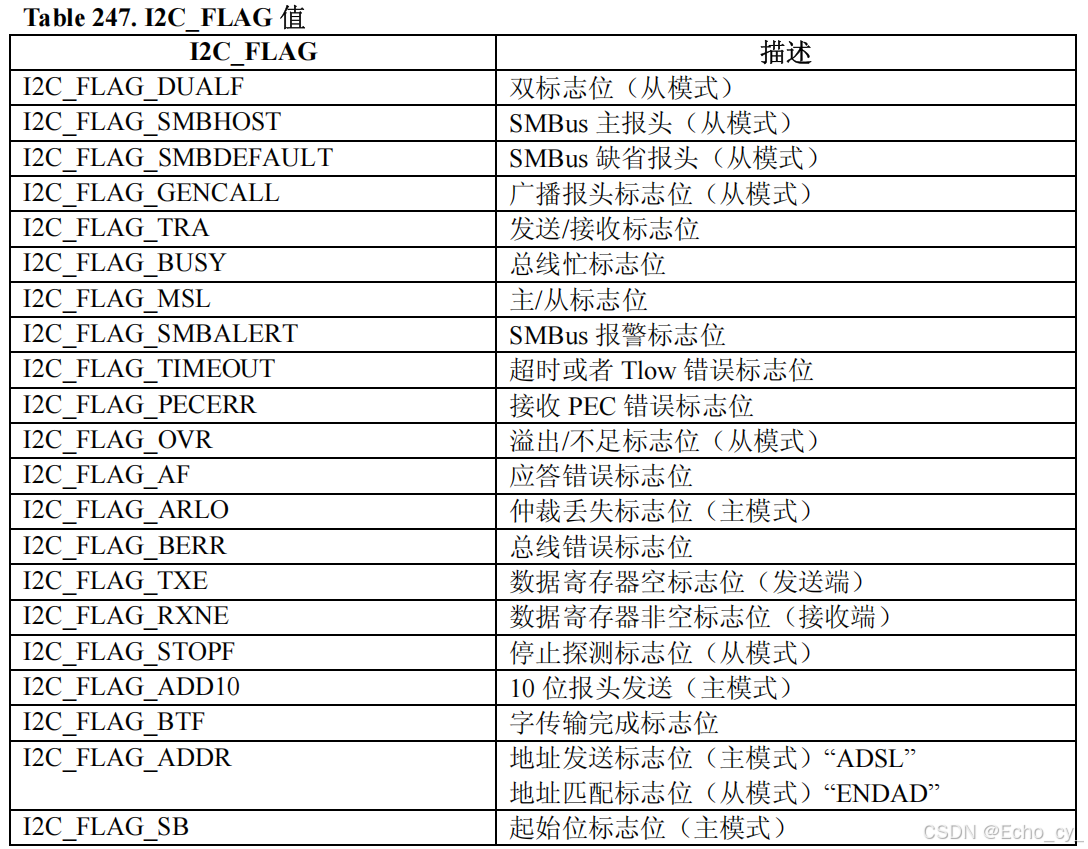
I2C_GetFlagStatus函数用于读取标志位。
下表给出了所有可以被函数 I2C_ GetFlagStatus 检查的标志位列表:
12.2 I2C_ClearFlag函数
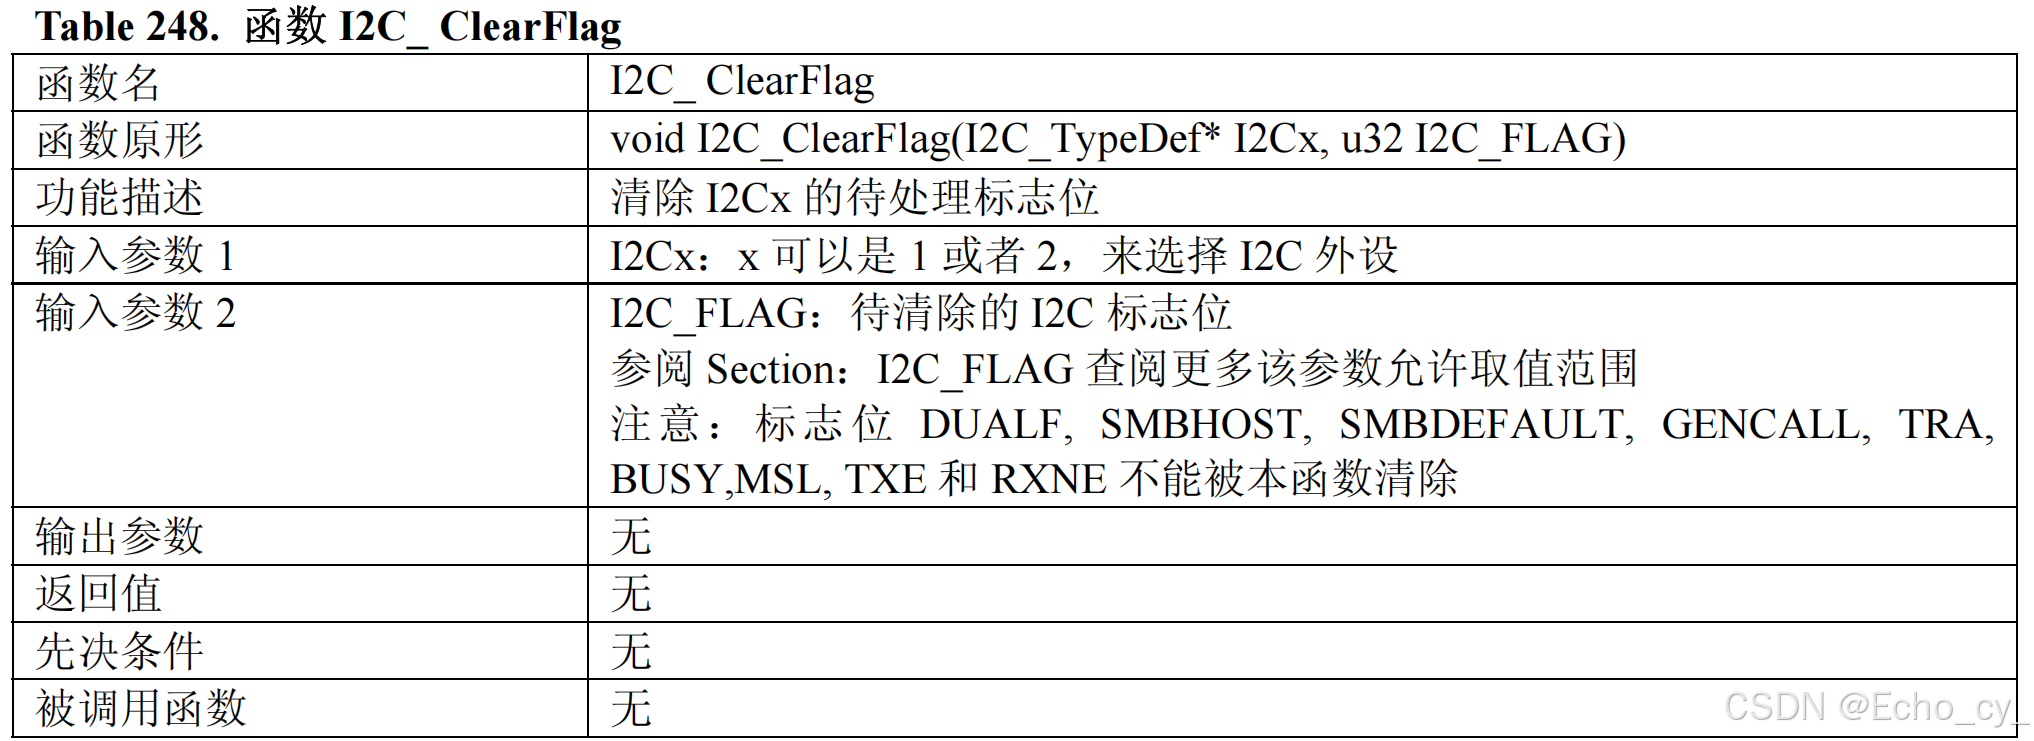
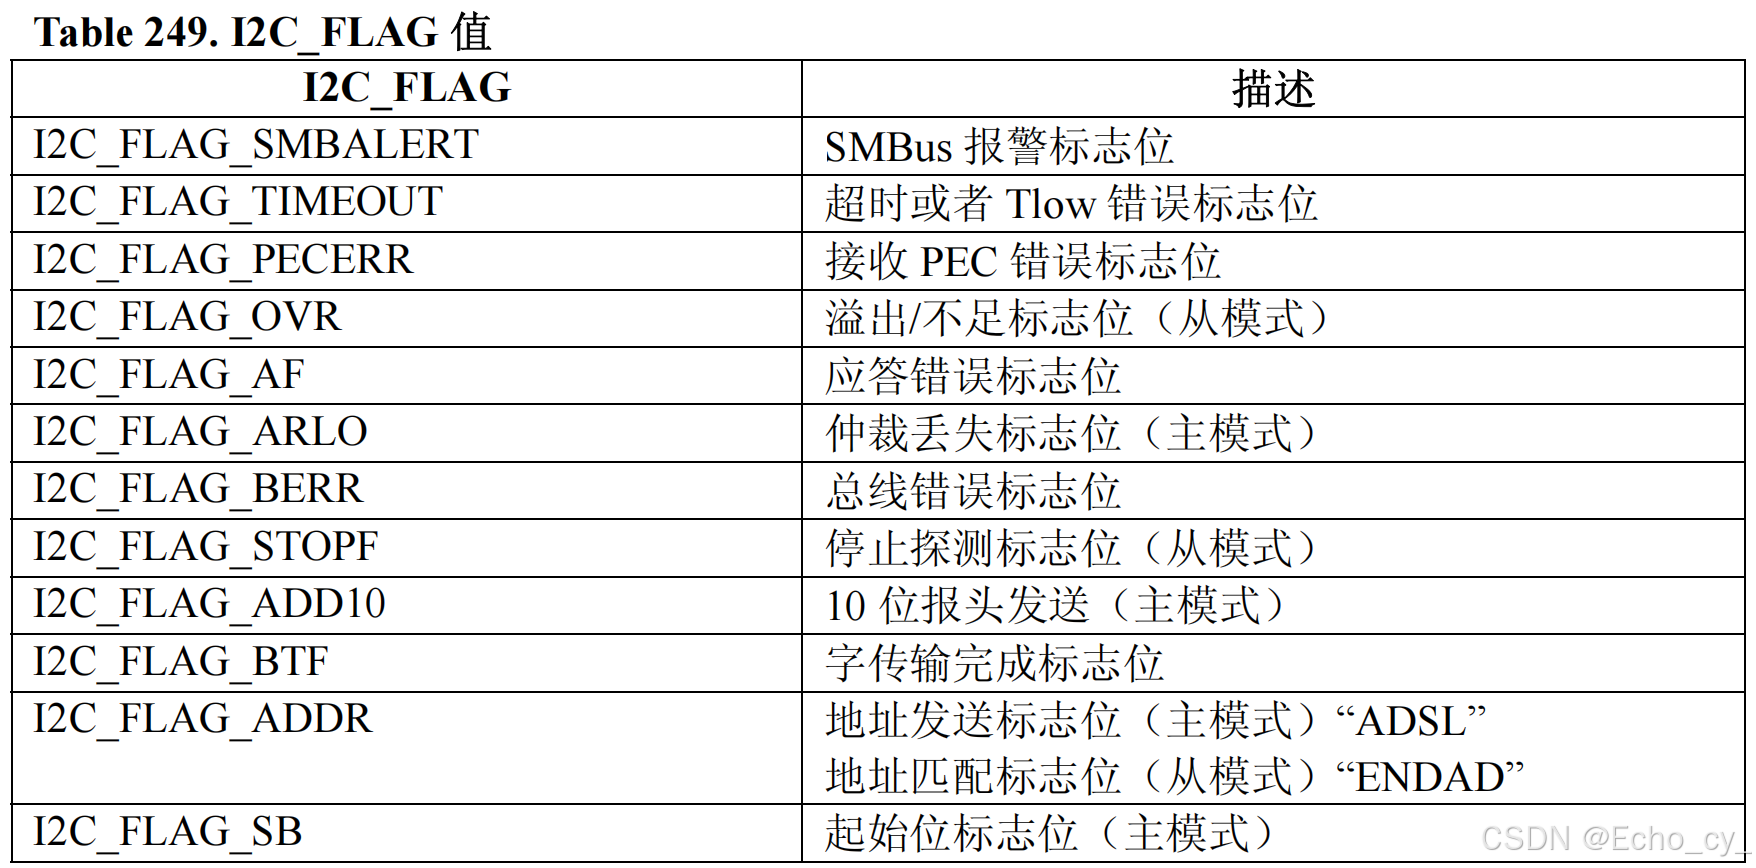
I2C_ClearFlag函数用于清除标志位。
下表给出了所有可以被函数 I2C_ ClearFlag 清除的标志位列表:
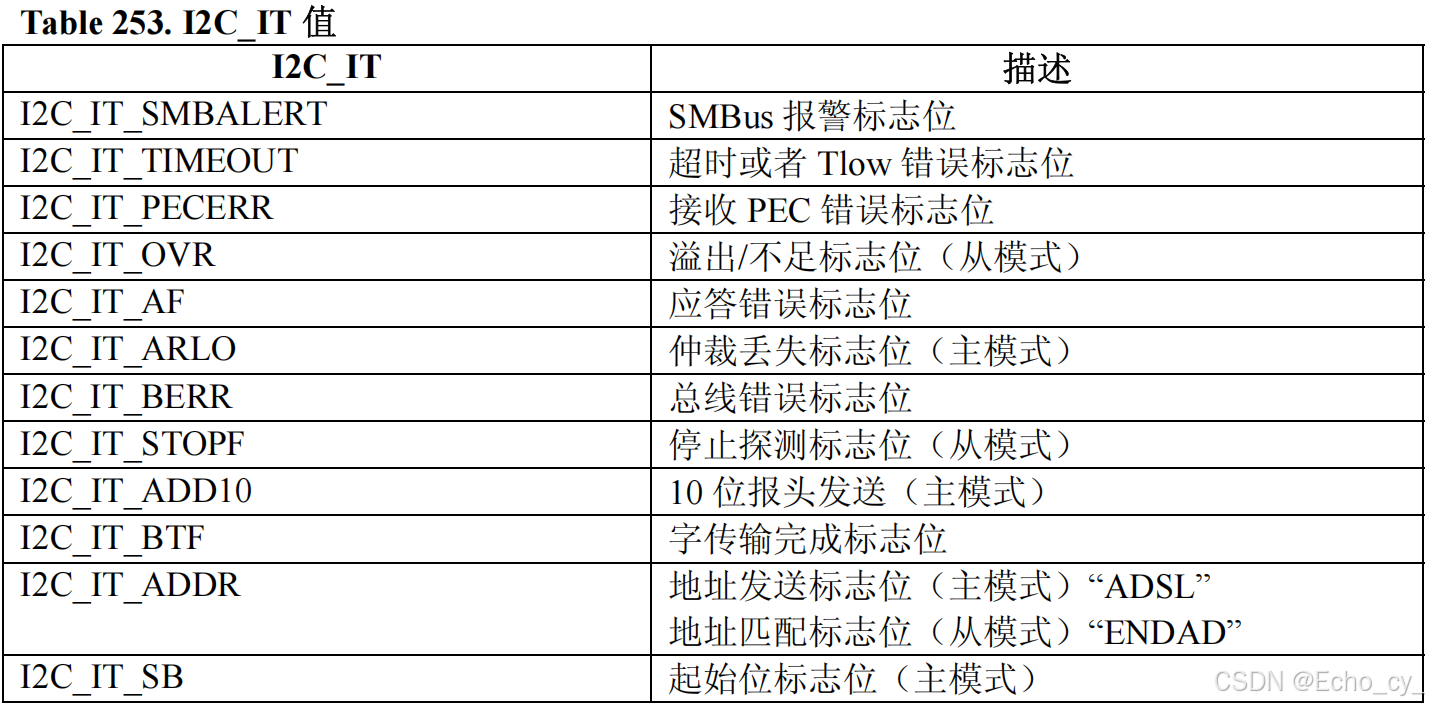
12.3 I2C_GetITStatus函数
I2C_GetITStatus函数用于读取中断标志位。
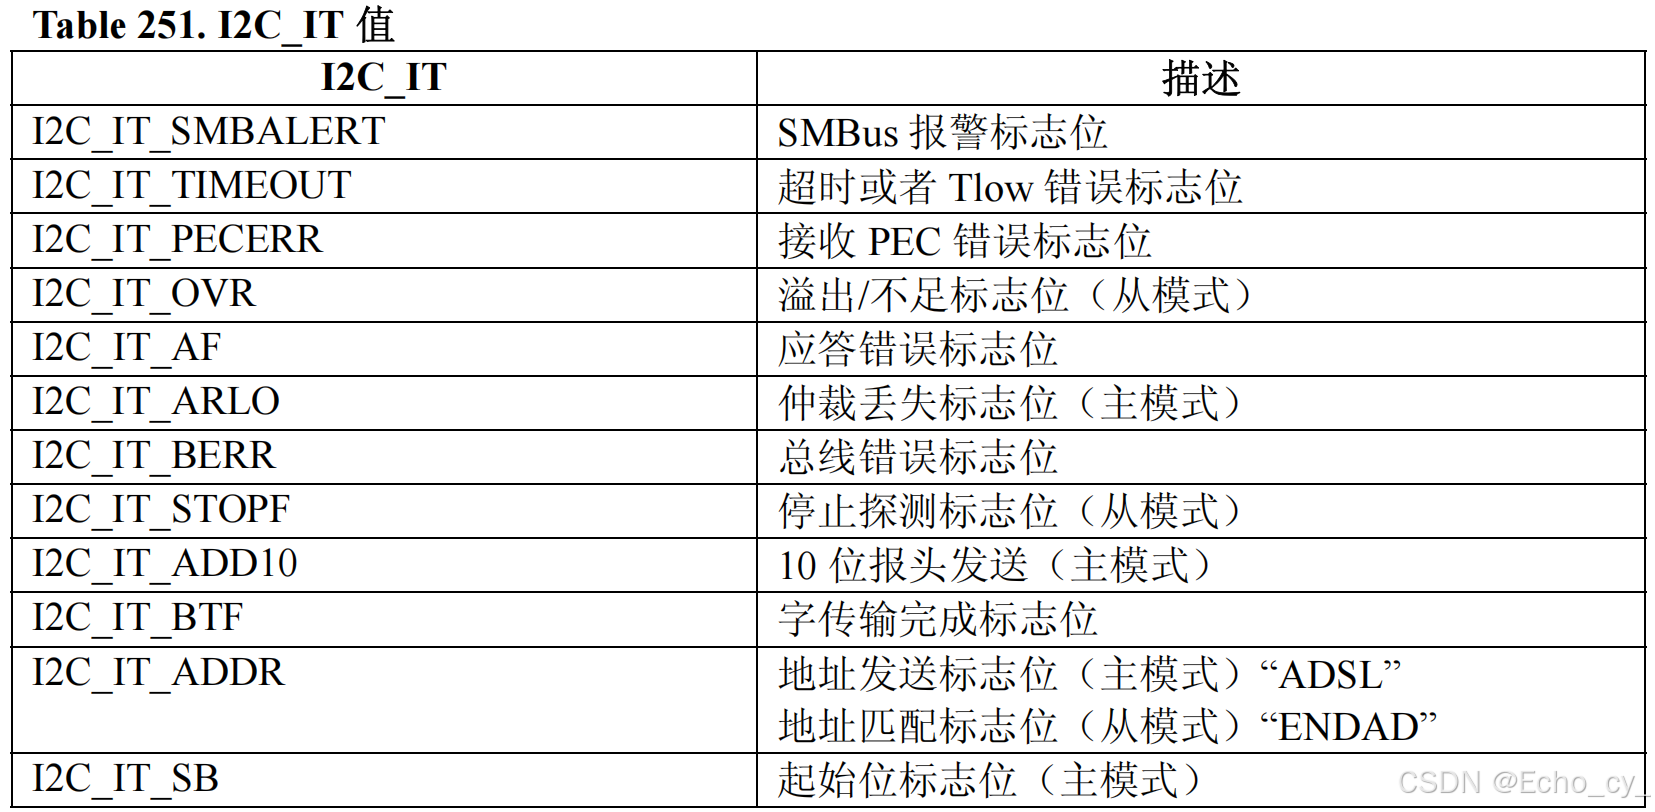
下表给出了所有可以被函数 I2C_ GetITStatus 检查的中断标志位列表:
12.4 I2C_ClearITPendingBit函数
I2C_ClearITPendingBit函数用于清除中断标志位。
下表给出了所有可以被函数 I2C_ ClearITPendingBit 清除的中断待处理位列表:


