文章目录
前言
笔者从人工智能小白的角度,力求能够从原文中解析出最高效率的知识。
之前看了很多博客去学习AI,但发现虽然有时候会感觉很省时间,但到了复现的时候就会傻眼,因为太多实现的细节没有提及。而且博客具有很强的主观性,因此我建议还是搭配原文来看。
请下载原文《Going deeper with convolutions》搭配阅读本文,会更高效哦!
一、GoogleNet论文精读
首先,看完标题,摘要和结论,我了解到了以下信息:
(1)摘要中提及赫布学习理论:用进废退,多尺度信息处理:不同尺度的卷积核进行多尺度的并行处理Inception,再进行交融和汇总。参数较少,比AlexNet少十二倍,但更准确。
(2)受脑类科学影响:每一个神经元都观测不同特征,可以将观测的模式,例如猫的胡子,眼睛等特征汇总。
(3)用1*1的卷积核进行降维和升维(减少参数量和运算量,增加模型非线性表达能力,既增加深度也增加宽度),用Global Average Pooling层取代全连接层。
1.Introduction:
(1)提及了比赛表现,赫布学习理论,多尺度信息处理。
2.Related Work:
(1)之前CNN的网络框架:CNN,Max-Pooling,Fully -connected layers。Max-pooling会导致空间信息的缺失,但这样的卷积网络层对人类姿态检测,目标检测,定位有效。
(2)提及了目标检测中的RCNN为代表的两步骤:一是找出候选区域,二是对候选区域运用CNN。
3.Motivation and High level Considerations:(Inception模块思想的来源)
(1)传统提高模型性能的方法:
① 增加深度(层数)
② 增加宽度(卷积核的个数)
(2)增加深度和宽度的缺点:
① 参数越多,容易过拟合
② 对小数据集和获取标注成本大的数据集不可用
③ 计算效率问题,两个相连卷积层,两层同步增加,卷积核个数计算量将平方增加,如果很多权重训练后接近,那么这部分计算就被浪费了,不能不考虑计算效率不计成本追求精度。
(3)为了解决这个问题:应当采用稀疏连接结构代替全连接。
(4)赫布学习法则:例如识别一只猫,猫有猫耳朵,猫眼,那么当识别一只猫时,这些识别的神经元会同时被激活。
4.Architectural Details
(1)浅层感受野小,深层感受野大,所以前面的层用11,后面的层增加33和55卷积核的比例。局部信息由11卷积提取,越靠前面的层越提取局部信息,大范围空间信息由大卷积核提取,越靠后面的层越提取大范围空间信息。
(2)为了使得四个层一样大,使用了patch对齐的方法。
(3)底层先用普通卷积层,后面用Inception模块堆叠,
(4)所以这样的结构允许模型提高深度和宽度,同时计算量不会爆炸。如果精心调试,可以发现比相同的精度网络快两到三倍。
(5)视觉信息多尺度并行分开处理.再融合汇总。
5.GoogLeNet
(1)Global Average Poling全局平均池化:一个channel用一个平均值代表取代全连接层,减少参数量。用GAP代替全连接层:
① 便于fine-tune迁移学习
② 提升了0.6%.的Top-1的准确率
(2)所有激活层用ReLu,11卷积核后面也是用ReLu激活函数
(3)预处理:输入图像224224尺寸,RGB通道,减去了均值
(4)在计算资源、内存读写受限的设备上便于部署.22层有权重的层,算上Inception内部共100层。
(5)4a和4d后加辅助分类器。
6.Training Methodology
(1)数据并行,数据并行一个batch 均分k份让不同节点前向和反向传播再由中央Param server 优化更新权重。
(2)裁剪策略:裁剪为原图的8%到100%之间宽高比3/4和4/3之间,训练效果最好。
论文的关键要点:
- 作者提出需要将全连接的结构转化成稀疏连接的结构。稀疏连接有两种方法,一种是空间(spatial)上的稀疏连接,也就是传统的CNN卷积结构:只对输入图像的某一部分patch进行卷积,而不是对整个图像进行卷积,共享参数降低了总参数的数目减少了计算量;另一种方法是在特征(feature)维度进行稀疏连接,就是前一节提到的在多个尺寸上进行卷积再聚合,把相关性强的特征聚集到一起,每一种尺寸的卷积只输出256个特征中的一部分,这也是种稀疏连接。作者提到这种方法的理论基础来自于Arora et al的论文Provable bounds for learning some deep representations。
- 作者提到如今的计算机对稀疏数据进行计算的效率是很低的,即使使用稀疏矩阵算法也得不偿失。使用稀疏矩阵算法来进行计算虽然计算量会大大减少,但会增加中间缓存。前面提到ConvNets这样利用稀疏性的方法现在已经很少用了,那还有什么方法能在特征维度上利用稀疏性么?这就引申出了这篇论文的重点:将相关性强的特征汇聚到一起,也就是上一章提到的在多个尺度上卷积再聚合。
- Global Average Pooling(GAP)层来代替全连接层的方法,具体方法就是对每一个feature上的所有点做平均,有n个feature就输出n个平均值作为最后的softmax的输入。
优点:
① 对数据在整个feature上作正则化,防止了过拟合。
② 不再需要全连接层,减少了整个结构参数的数目(一般全连接层是整个结构中参数最多的层),过拟合的可能性降低。
③ 不用再关注输入图像的尺寸,因为不管是怎样的输入都是一样的平均方法,传统的全连接层要根据尺寸来选择参数数目,不具有通用性。
二、GoogleNet源码实现及修改
改为CIFAR10数据集
import numpy as np
import torch
from torch.autograd import Variable
from torch import nn
from torchvision.datasets import CIFAR10
#定义一个卷积加一个relu激活函数和一个batchnorm作为一个基本的层结构
def conv_relu(in_channels, out_channels, kernel, stride=1, padding=0):
     layer = nn.Sequential(
          nn.Conv2d(in_channels, out_channels, kernel, stride, padding),
          nn.BatchNorm2d(out_channels, eps=1e-3),
          nn.ReLU(True)
     )
     return layer


class inception(nn.Module):
     def __init__(self, in_channel, out1_1, out2_1, out2_3, out3_1, out3_5, out4_1):
          super(inception, self).__init__()
          #第一条线路
          self.branch1x1 = conv_relu(in_channel, out1_1, 1)

          #第二条线路
          self.branch3x3 = nn.Sequential(
               conv_relu(in_channel, out2_1, 1),
               conv_relu(out2_1, out2_3, 3, padding=1)
          )

          #第三条线路
          self.branch5x5 = nn.Sequential(
               conv_relu(in_channel, out3_1, 1),
               conv_relu(out3_1, out3_5, 5, padding=2)
          )

          #第四条线路
          self.branch_pool = nn.Sequential(
               nn.MaxPool2d(3, stride=1, padding=1),
               conv_relu(in_channel, out4_1, 1)
          )
     def forward(self, x):
          f1 = self.branch1x1(x)
          f2 = self.branch3x3(x)
          f3 = self.branch5x5(x)
          f4 = self.branch_pool(x)
          output = torch.cat((f1, f2, f3, f4), dim=1)
          return output

test_net = inception(3, 64, 48, 64, 64, 96, 32)
test_x = Variable(torch.zeros(1, 3, 96, 96))
print('input shape: {} x {} x {}'.format(test_x.shape[1], test_x.shape[2], test_x.shape[3]))
test_y = test_net(test_x)
print('output shape: {} x {} x {}'.format(test_y.shape[1], test_y.shape[2], test_y.shape[3]))


class googlenet(nn.Module):
     def __init__(self, in_channel, num_classes, verbose=False):
          super(googlenet, self).__init__()
          self.verbose = verbose

          self.block1 = nn.Sequential(
               conv_relu(in_channel, out_channels=64, kernel=7, stride=2, padding=3),
               nn.MaxPool2d(3, 2)
          )
          self.block2 = nn.Sequential(
               conv_relu(64, 64, kernel=1),
               conv_relu(64, 192, kernel=3, padding=1),
               nn.MaxPool2d(3, 2)
          )
          self.block3 = nn.Sequential(
               inception(192, 64, 96, 128, 16, 32, 32),
               inception(256, 128, 128, 192, 32, 96, 64),
               nn.MaxPool2d(3, 2)
          )
          self.block4 = nn.Sequential(
               inception(480, 192, 96, 208, 16, 48, 64),
               inception(512, 160, 112, 224, 24, 64, 64),
               inception(512, 128, 128, 256, 24, 64, 64),
               inception(512, 112, 144, 288, 32, 64, 64),
               inception(528, 256, 160, 320, 32, 128, 128),
               nn.MaxPool2d(3, 2)
          )
          self.block5 = nn.Sequential(
               inception(832, 256, 160, 320, 32, 128, 128),
               inception(832, 384, 182, 384, 48, 128, 128),
               nn.AvgPool2d(2)
          )

          self.classifier = nn.Linear(1024, num_classes)

     def forward(self, x):
          x = self.block1(x)
          if self.verbose:
               print('block 1 output: {}'.format(x.shape))
          x = self.block2(x)
          if self.verbose:
               print('block 2 output: {}'.format(x.shape))
          x = self.block3(x)
          if self.verbose:
               print('block 3 output: {}'.format(x.shape))
          x = self.block4(x)
          if self.verbose:
               print('block 4 output: {}'.format(x.shape))
          x = self.block5(x)
          if self.verbose:
               print('block 5 output: {}'.format(x.shape))

          x = x.view(x.shape[0], -1)
          x = self.classifier(x)
          return x

test_net = googlenet(3, 10, True)
test_x = Variable(torch.zeros(1, 3, 96, 96))
test_y = test_net(test_x)
print('output: {}'.format(test_y.shape))
#可以看到输入的尺寸不断减小,通道的维度不断增加

#然后我们可以训练我们的模型看看在 cifar10 上的效果
def data_tf(x):
     x = x.resize((96,96), 2) #将图片放大到96*96
     x = np.array(x, dtype='float32') / 255
     x = (x - 0.5) / 0.5
     x = x.transpose((2,0,1)) ## 将 channel 放到第一维,这是 pytorch 要求的输入方式
     x = torch.from_numpy(x)
     return x


train_set = CIFAR10('./dataset', train=True, transform=data_tf, download=False)
train_data = torch.utils.data.DataLoader(train_set, batch_size=64, shuffle=True)
test_set = CIFAR10('./dataset', train=False, transform=data_tf, download=False)
test_data = torch.utils.data.DataLoader(test_set, batch_size=128, shuffle=False)

net = googlenet(3, 10)
optimizer = torch.optim.SGD(net.parameters(), lr=0.01)
criterion = nn.CrossEntropyLoss()

from datetime import datetime
def get_acc(output, label):
     total = output.shape[0]
     _, pred_label = output.max(1)
     num_correct = (pred_label == label).sum().data.item()
     return num_correct / total

def train(net, train_data, valid_data, num_epochs, optimizer, criterion):
     if torch.cuda.is_available():
          net = net.cuda()
     prev_time = datetime.now()
     for epoch in range(num_epochs):
          train_loss = 0
          train_acc = 0
          net = net.train()
          for im, label in train_data:
               if torch.cuda.is_available():
                    im = Variable(im.cuda())
                    label = Variable(label.cuda())
               else:
                    im = Variable(im)
                    label = Variable(label)
               #forward
               output = net(im)
               loss = criterion(output, label)
               #forward
               optimizer.zero_grad()
               loss.backward()
               optimizer.step()

               train_loss += loss
               train_acc += get_acc(output, label)
          cur_time = datetime.now()
          h, remainder = divmod((cur_time-prev_time).seconds, 3600)
          m, s = divmod(remainder, 60)
          time_str = "Time %02d:%02d:%02d" % (h, m, s)
          if valid_data is not None:
               valid_loss = 0
               valid_acc = 0
               net = net.eval()
               for im, label in valid_data:
                    if torch.cuda.is_available():
                         im = Variable(im.cuda(), volatile=True)
                         label = Variable(label.cuda(), volatile=True)
                    else:
                         im = Variable(im, volatile=True)
                         label = Variable(label, volatile=True)
                    output = net(im)

                    loss = criterion(output, label)
                    valid_loss += loss.item()
                    valid_acc += get_acc(output, label)
               epoch_str = (
                "Epoch %d. Train Loss: %f, Train Acc: %f, Valid Loss: %f, Valid Acc: %f, "
                % (epoch, train_loss / len(train_data),
                   train_acc / len(train_data), valid_loss / len(valid_data),
                   valid_acc / len(valid_data)))
          else:
               epoch_str = ("Epoch %d. Train Loss: %f, Train Acc: %f, " %
                         (epoch, train_loss / len(train_data),
                          train_acc / len(train_data)))

          prev_time = cur_time
          print(epoch_str + time_str)

train(net, train_data, test_data, 20, optimizer, criterion)
代码分析
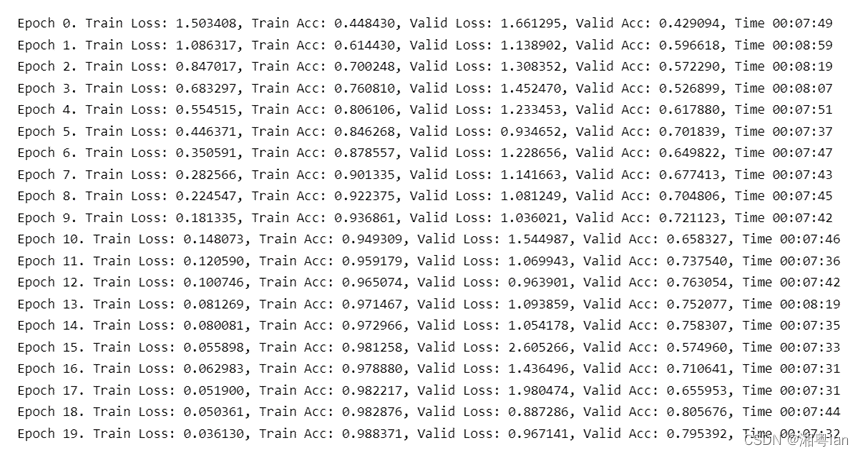
将其源代码改为训练较小的CIFAR10数据集,利用老师的卡跑了20个epoches却用了两个小时,究其原因是因为CIFAR10数据大小本来是3232,但是为了改成GoogleNet能接受的数据大小形式,改成了9696,且是在训练过程中放大的,这一步骤使得速度变慢了许多。训练代码在8卡的/home/zxy/classic_paper_code/GoogleNet_cifar10。
训练结果如下:

